Fostex PD-6 Owner's manual
Model PD-6 operation manual
(supplement forV2.20)
The PD-6 software is upgraded to V2.20 and
some functions are expanded, added or
changed.
Please read this supplement together with the
PD-6 operation manual and other supplemen-
tary manual(s).
8289614000
(416436)
© PRINTED IN JAPAN APR. 20078289614000 FX
(416436)
FOSTEX CO.
3-2-35, Musashino, Akishima-shi, Tokyo, Japan 196-0021

Model PD-6 operation manual (Supplement for V2.20) Model PD-6 operation manual (Supplement for V2.20)
Summary of enhanced/changed/added functions .....................................................................3
Change of drive names displayed on the "Select drive" screen ..................................................4
Ubit information display capability on the Normal screen .........................................................5
Change of the Setup menu item order ............................................................................................6
Enhancement of the "Default file name" menu item in the Setup menu ..................................7
"False Start" menu item newly added to the Setup menu ...........................................................8
"Chain Play" menu item newly added to the Setup menu ...........................................................9
Changes in the "Set Gen.TC" menu item of the TC SETUP menu ..............................................10
"Set Gen Ubit" menu item newly added to the TC SETUP menu ..............................................11
Enhancement of the "Format" menu item in the UTILITY menu .............................................12
Change in the "Pull Up/Down" function ......................................................................................13
Enhanced USB keyboard operation ..............................................................................................14
Table of contents
2
Model PD-6 operation manual (Supplement for V2.20) Model PD-6 operation manual (Supplement for V2.20)
Summary of enhanced/changed/added functions
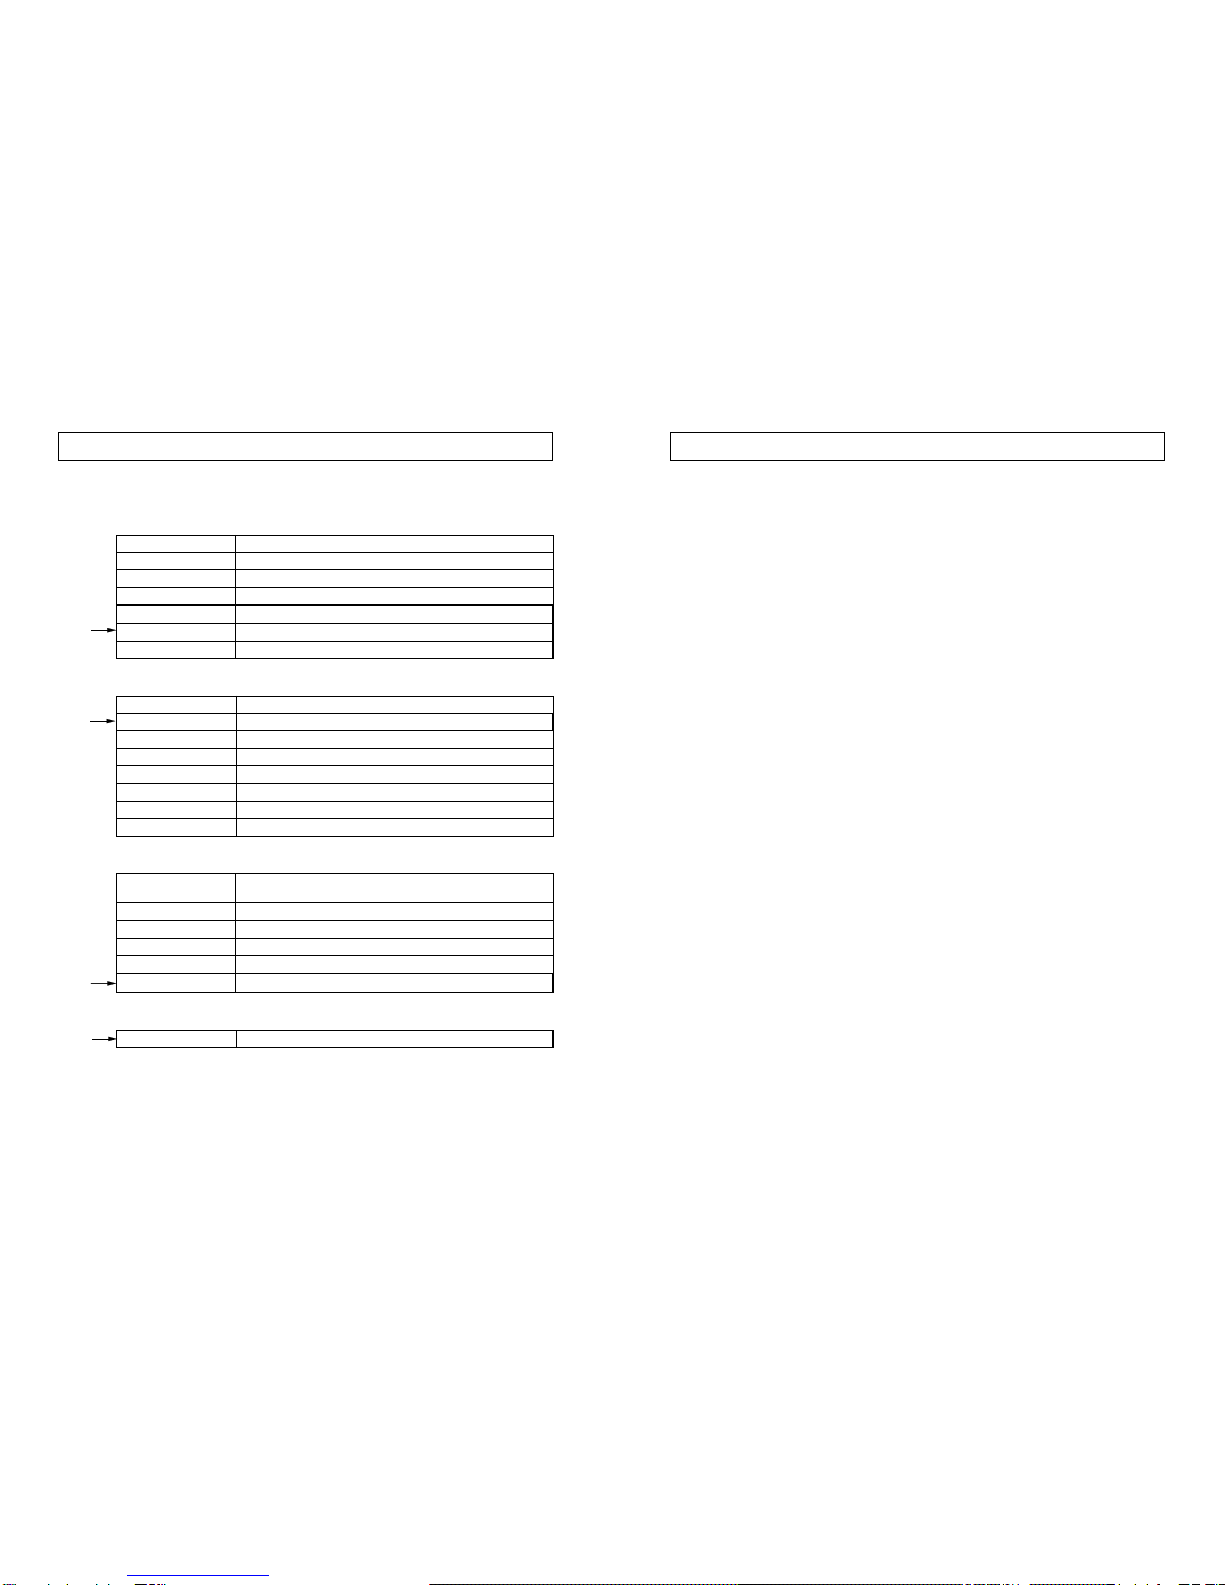
1) Drive names displayed on the "Select drive" screen are changed.
Drive names displayed on the "Select drive" screen which is used when you select the drive are
changed. See page 4 for details.
2) The new "Repro Ubit" option is added to the time display modes on the Normal screen.
The new "Repro Ubit" option is added to the time display modes on the Normal screen, so you
can see the reproduced user bit easily. See page 5 for details.
3) The order of the Setup menu items is changed.
The order of the menu items in the Setup menu is changed so that you can easily access to
items you frequently use. See page 6 for details.
4) The "Default file name" menu item in the Setup menu is enhanced.
The "Default file name" menu item in the Setup menu is enhanced by adding the "Reel mode"
option to the default file name mode. See page 7 for details.
5) The new "False Start" menu item is added to the Setup menu.
The new "False Start" menu item added to the Setup menu allows you to select whether
deleting or keeping the file after executing False start. See page 8 for details.
6) The new "Chain play" menu item is added to the Setup menu.
The new "Chain play" menu item added to the Setup menu allows you to set the transport
mode after an audio file is played back to the end. By setting this menu item appropriately,
you can automatically play back audio files on a disk (or a partition) continuously. See page 9
for details.
7) The "Set Gen.TC" menu item in theTC Setup menu is enhanced.
When the TC GEN mode is set to "Free Run", the "Set Gen.TC" menu item now allows you to
jam the internal realtime clock time data, in addition to the TC value editing capability.
Also, the user bit setting capability when the TC GEN mode is set to "Free Run" has been
deleted from the "Set Gen.TC" menu item (the user bit setting now can be done via the newly
added "Set Gen Ubit" menu item in the TC Setup menu). See page 10 for details.
8) The "Set Gen Ubit" menu item is added to theTC Setup menu.
The "Gen Ubit" menu item has been deleted from the TC Setup menu. Instead, the "Set Gen
Ubit" menu item is newly added to the TC Setup menu. This menu item allows you to set the
user bit mode and user bit value in the same screen (in the earlier version, the user bit value
setting can be made via the "Set Gen.TC" menu item). See page 11 for details.
9) The "Format" menu item in the DISK UTILITY menu is enhanced.
The "Format" menu item is used for formatting a DVD-RAM disk (or a partition of the optional
internal hard disk). There are some changes in this menu item regarding the physical format
on/off selection, default format mode, etc. See page 12 for details.
10) The pull-up/pull-down function now works differently from the earlier version.
With the earlier version, when the unit is running with the internal clock reference and the
pull-down or pull-up function is active, the TC frame rate always changes in sync with the
speed change. With the new version, the TC frame rate does not always change. See page 13
for details.
11) The USB keyboard capability for controlling the unit is enhanced.
Now you can control the unit from a USB keyboard connected to the [USB (KYBD ONLY)] port
on the PD-6 more flexibly. See page 14 for details.
By upgrading the PD-6 software to version 2.20, the following changes are made.
The capability for controlling the PD-6 from a USB keyboard connected to the [USB (KYBD
ONLY)] port is enhanced.
The functions indicated by the arrow in the table below are newly added.
Enhanced USB keyboard operation
F1 key
F2 key
F3 key
Selects the "Edit file name" menu item in the Utility menu.
F4 key
F5 key
Acts the same as the [CIRCLE TAKE] key on the panel.
Selects the "Default file name" menu item in the Setup menu.
Selects the "Default track name" menu item in the Setup menu.
Selects the "Set Gen. TC" menu item in the TC Setup menu.
ALT key + F key
ALT key + D key
ALT key + C key
Acts the same as the [FILE SEL] key on the panel.
ALT key + S key
ALT key + U key
Selects the "Select drive" menu item in the Setup menu.
Acts the same as the [CUE] key on the panel.
Enters the Setup mode.
Enters the Utility mode.
Right/Left/Down/Up key
ESC key
ENTER key
These keys can be used to enter characters or move the cursor position when
editing the name for a label or file name.
BS key
DEL key
Acts the same as the [EXIT] key on the panel.
Acts the same as the [ENTER] key on the panel.
Executes the back space function for character entry.
Executes the delete function for character entry.
ALT key + L key
ALT key + E key Enters the EDL SEL mode.
ALT key+T key Enters the TC Setup mode.
HOME key Returns to the Home screen directly.
Other keys
Function keys
SHIFT key + F6 key
SHIFT key + F7 key
Brings up the False start execution screen.
Selects the "Format" menu item in the Setup menu.
Ctrl key + L key Acts the same as the [LOCATE] key on the panel.
Control key
Shortcuts
314

Model PD-6 operation manual (Supplement for V2.20) Model PD-6 operation manual (Supplement for V2.20)
Drive names displayed on the "Select drive" screen which is used when you select the drive
are partly changed.
To bring up the "Select drive" screen, carry out either of the following operations.
1. When the shift mode is active (the [SHIFT] indicator is lit), press the [LIGHT] key.
2. When the shift mode is inactive, press the [SETUP] key to enter the Setup menu and select the
"Select drive" menu item, then press the [ENTER] key.
Change of drive names displayed on the "Select drive" screen
BeforeV2.20 FromV2.20
The "Select drive" screen when no drive option is installed
A "Select drive" screen example when the Model 9056 (Internal hard disk) is installed and the PD-6 DVD-RAM is selected
A "Select drive" screen example when the EX-12 is connected and the EX-12 DVD-RAM is selected
You can select from among the PD-6 DVD-RAM drive
(iDVD) and HDD partitions (iP01 through iP27).
You can select from among the PD-6 DVD-RAM drive
(iDVD), EX-12 DVD-RAM drive (eDVD) and EX-12
hard disk partitions (iP01 through iP08).
When the Model 9056 optional hard disk drive in installed and the EX-12 is connected to
the PD-6, you can select from among the PD-6 DVD-RAM drive (iDVD), internal hard disk
partitions (iP01 through iP27), the EX-12 DVD-RAM drive (eDVD) and EX-12 hard disk
partitions (eP01 through eP08).
The "Select drive" screen when no drive option is in-
stalled.
The "drive select" function has been added from V2.00. See the "Version 2.00 supplemen-
tary manual" for details about this function.
With the earlier version, the TC frame rate always changes in sync with +/- 0.1% speed
change. With the new version, the TC frame rate does not always change, as shown in the
table below.
Change in the "Pull Up/Down" function
0% +0.1% -0.1%
23.97 FPS 24 FPS 23.97 FPS
24 FPS 24 FPS 23.97 FPS
25 FPS 25.025FPS 24.97 FPS
29.97 FPS 30 FPS 29.97 FPS
30 FPS 30 FPS 29.976
The TC frame changes only when the clock is
pulled up.
The TC frame changes only when the clock is
pulled down.
The TC frame changes when the clock is pulled
up or down.
The TC frame changes only when the clock is
pulled down.
The TC frame changes only when the clock is
pulled up.
23.976
24
25
29.97DF / ND
30DF / ND
[FRAME] SW
setting
4213
Model PD-6 operation manual (Supplement for V2.20) Model PD-6 operation manual (Supplement for V2.20)
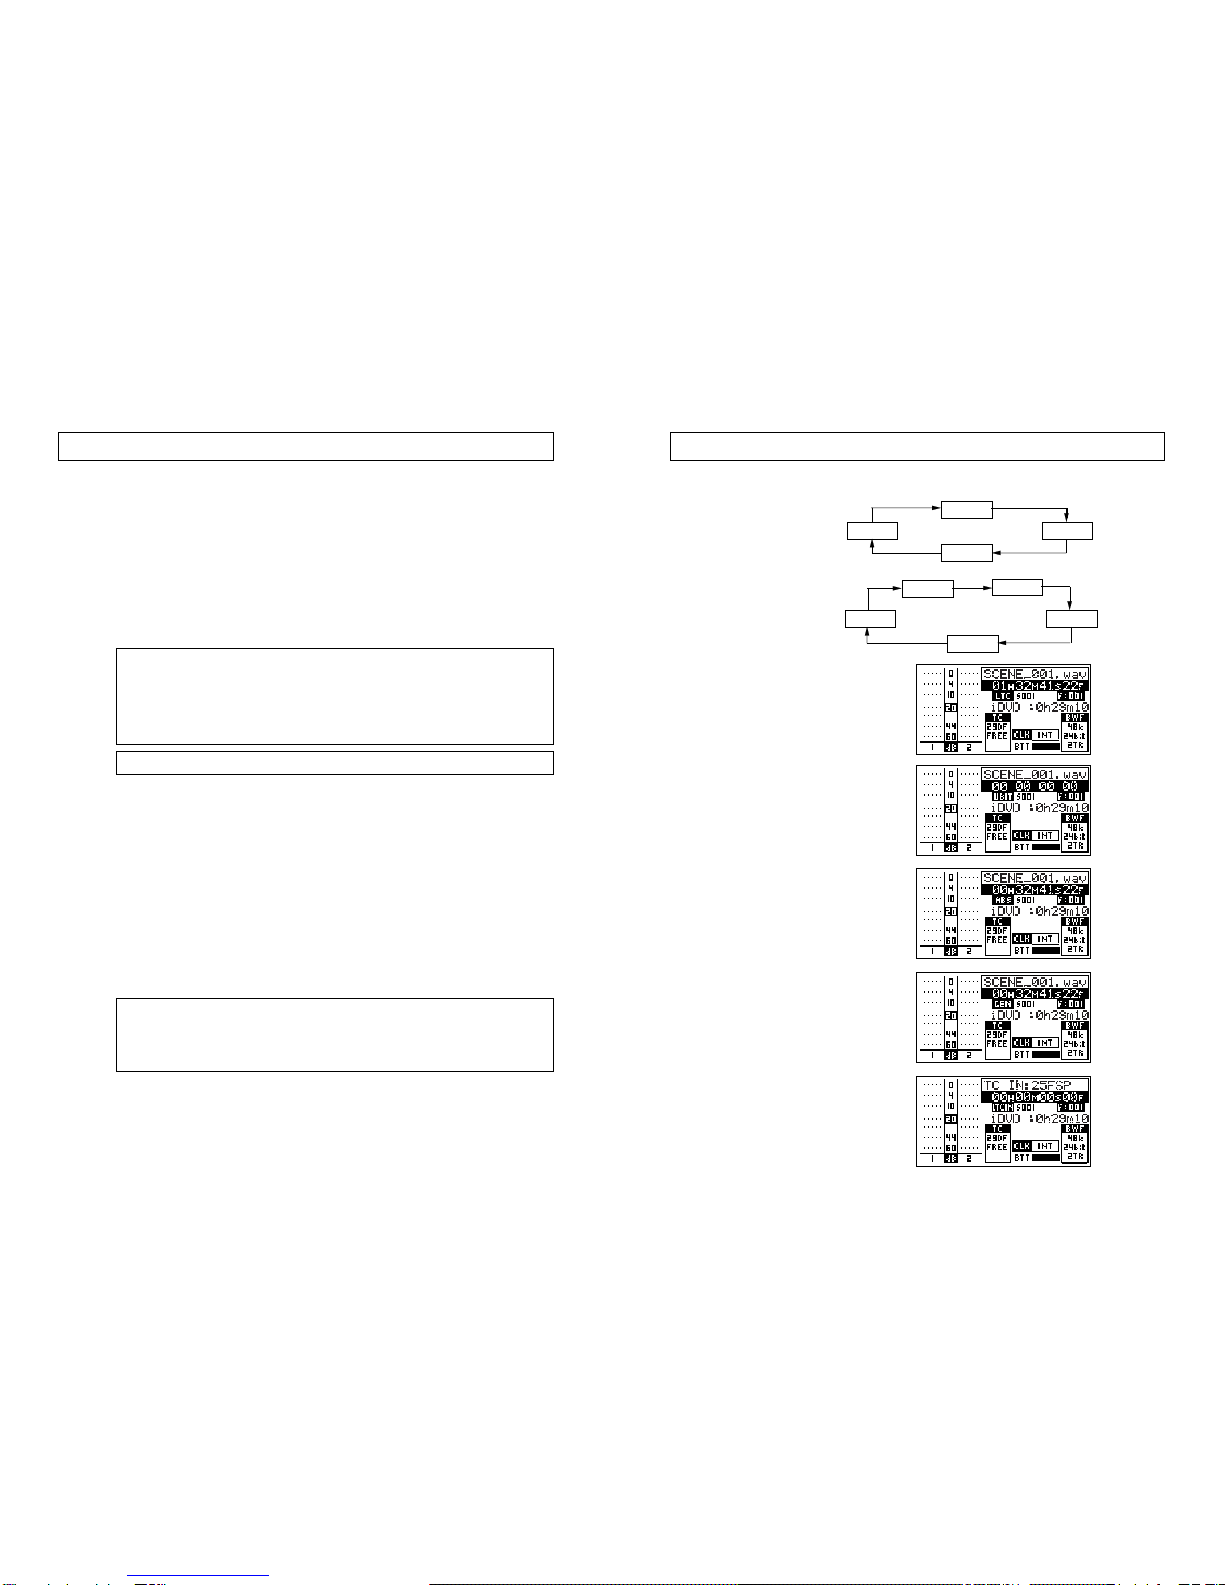
The new "Repro Ubit" option is added to the time display modes on the Normal screen.
You can switch the time display mode among the following using the [TIME/DISP MODE]
key.
Ubit information display capability on the Normal screen
LTC
ABS
GEN
LTC IN
<FromV2.20>
LTC
ABS
GEN
LTC IN
Ubit
"LTC" mode example
When the unit is turned on, the
LTC mode is active.
"Repro Ubit" mode example
The reproduced user bit is
shown in the time display field.
"ABS" mode example
The current ABS time is shown.
"GEN" mode example
The internal generator time is
shown only when the generator
mode is set to "FREE RUN" or
"24H". When the generator
mode is set to any other mode,
"--------" is shown.
"LTC IN" mode example
The external time code value is
shown. When the unit does not
receive external time code,
"------" is shown.
<BeforeV2.20>
The "Format" menu item is used for formatting a DVD-RAM disk set to the PD-6 or the
optional EX-12, or a partition of the optional internal hard disk or the optional EX-12.
In this menu item, the following three changes has been made.
Enhancement of the "Format" menu item in the UTILITY menu
<Note>:
If you format a DVD-RAM disk while a hard disk partition is selected as the current
drive, the DVD-RAM is not selected as the current partition after formatting completes.
In other words, only when you format a partition of the optional hard disk while the DVD-
RAM drive is selected as the current drive, the current drive changes after formatting com-
pletes.
See also the operation manual and the V2.0 supplement for details about formatting.
• After formatting completes,the formatted drive is selected as the current drive.
With the earlier software version, if you format a partition of the optional hard disk while the
DVD-RAM drive is selected as the current drive, the DVD-RAM drive is still selected as the
current drive after formatting completes. With the new version, the formatted partition is
selected as the current drive after formatting completes.
• The default "Format Mode" in the Format menu item has been changed.
With the earlier version, when reformatting a DVD-RAM disk (or a partition of the optional
hard disk), "Format Mode" in the Format menu item always shows "Normal" by default.
With the new version, the current format mode of the disk (or partition) is shown.
For example, if you are going to format a partition of the optional hard disk which was
formatted by the "Mirror" mode last time, "Mirror" is shown. You can change the setting when
executing formatting.
You can, of course, select the desired format mode before formatting a disk (or partition).
<Note>:
It takes a long time to execute the physical format. We recommend executing the
physical format when disk access time becomes longer or sound interruption occurs in
normal use. You do not need to physical-format a brand-new or relatively new disk.
However, regardless of whether the format mode is "Normal" or "Mirror", there may be a
case that "Physical Format" on the Format screen is automatically set to "On" and you
cannot select "Off". In this case, the unit decides that the disk to be formatted needs the
physical format and you must execute the physical format.
<Note>:
Do not turn off the power of the unit while executing the physical format.
• You can now select on or off of the physical format when "Mirror" is selected as
the Format mode.
With the earlier software version, you can select on or off of the physical format only when
"Normal" is selected as the Format mode. With the new version, you can select on or off of the
physical format even when “Mirror” is selected as the Format mode.
Note that you can select the “Mirror” mode when formatting a partition of the optional hard
disk, a DVD-RAM disk on the optional EX-12 or a partition of the EX-12 (you cannot format a
DVD-RAM disk on the PD-6 in the “Mirror” mode).
512

Model PD-6 operation manual (Supplement for V2.20) Model PD-6 operation manual (Supplement for V2.20)
The menu items in the Setup menu screen are now arranged in the order of frequency of
use, so that you can access to the desired item more easily.
The following show the initial Setup menu screens and the menu item orders before and
after V2.20.
Note that the description of the Setup menu operation in the PD-6 operation manual is
based on the earlier version, therefore, there are some differences between the actual
operations with V2.20 and the manual description.
Change of the Setup menu item order
<Primary Setup screen beforeV2.20> <Primary Setup screen afterV2.20>
<Menu item order beforeV2.20> <Menu item order afterV*2.20>
The "Set Gen Ubit" menu item is newly added to the TC SETUP menu.
This menu item allows you to set the TC user bit mode and TC user bit value.
While the [SHIFT] indicator is lit, press the [CONTRAST/TC SETUP] key to enter the TC
SETUP menu. Then use the [SEL] dial to highlight "Set Gen Ubit" and press the [ENTER] key.
The display now shows the "Set Gen Ubit" screen on which you can set the user bit mode
and the user bit value.
"Set Gen Ubit" menu item newly added to theTC SETUP menu
<User>
MMDDYYuu
The default is "00 00 00 00".
BG_76: MM (month) / BG_54: DD (day) / BG_32: YY (year) /BG_10: uu (for USA)
DDMMYYuu BG_76: DD (day) / BG_54: MM (month) / BG_32: YY(year) /BG_10: uu (for EUR)
Sets the user bit mode. See the
table below for details about the
available options. The default is
"<User>", which is set to "00 00 00
00" by default.
Showsthe user bit being output ac-
cording to the current user bit
mode.
Selecting the user bit mode
By pressing the [ENTER] key while "Ubit MD: <User>" is highlighted, the current user bit mode starts
flashing and you can now select the mode (by default, "<User>" flashes).
Use the [SEL] dial to select the user bit mode and press the [ENTER] key to confirm your selection.
You can select from among the following.
Showsthe current userbit.Youcan
set the desired user bit.
The rightmost two figures of the
user bit are always used regard-
less of the "Ubit MD" setting.
When selecting "MMDDYYuu" or "DDMMYYuu", you can set the desired user bit to "uu" of
"BG_10: uu". The other fields are automatically set to the date of the realtime clock.
Editing the user bit
By using the [SEL] dial to highlight "User: 00 00 00 00" and pressing the [ENTER] key, the rightmost
field of the current user bit (by default, "0") starts flashing and you can now make editing.
You can enter the desired value to the flashing field using the numeric keys or the [SEL] dial (or a
USB keyboard). You can move the flashing field using the [SKIP/CURSOR] keys.
Flashing
Flashing
611
Model PD-6 operation manual (Supplement for V2.20) Model PD-6 operation manual (Supplement for V2.20)
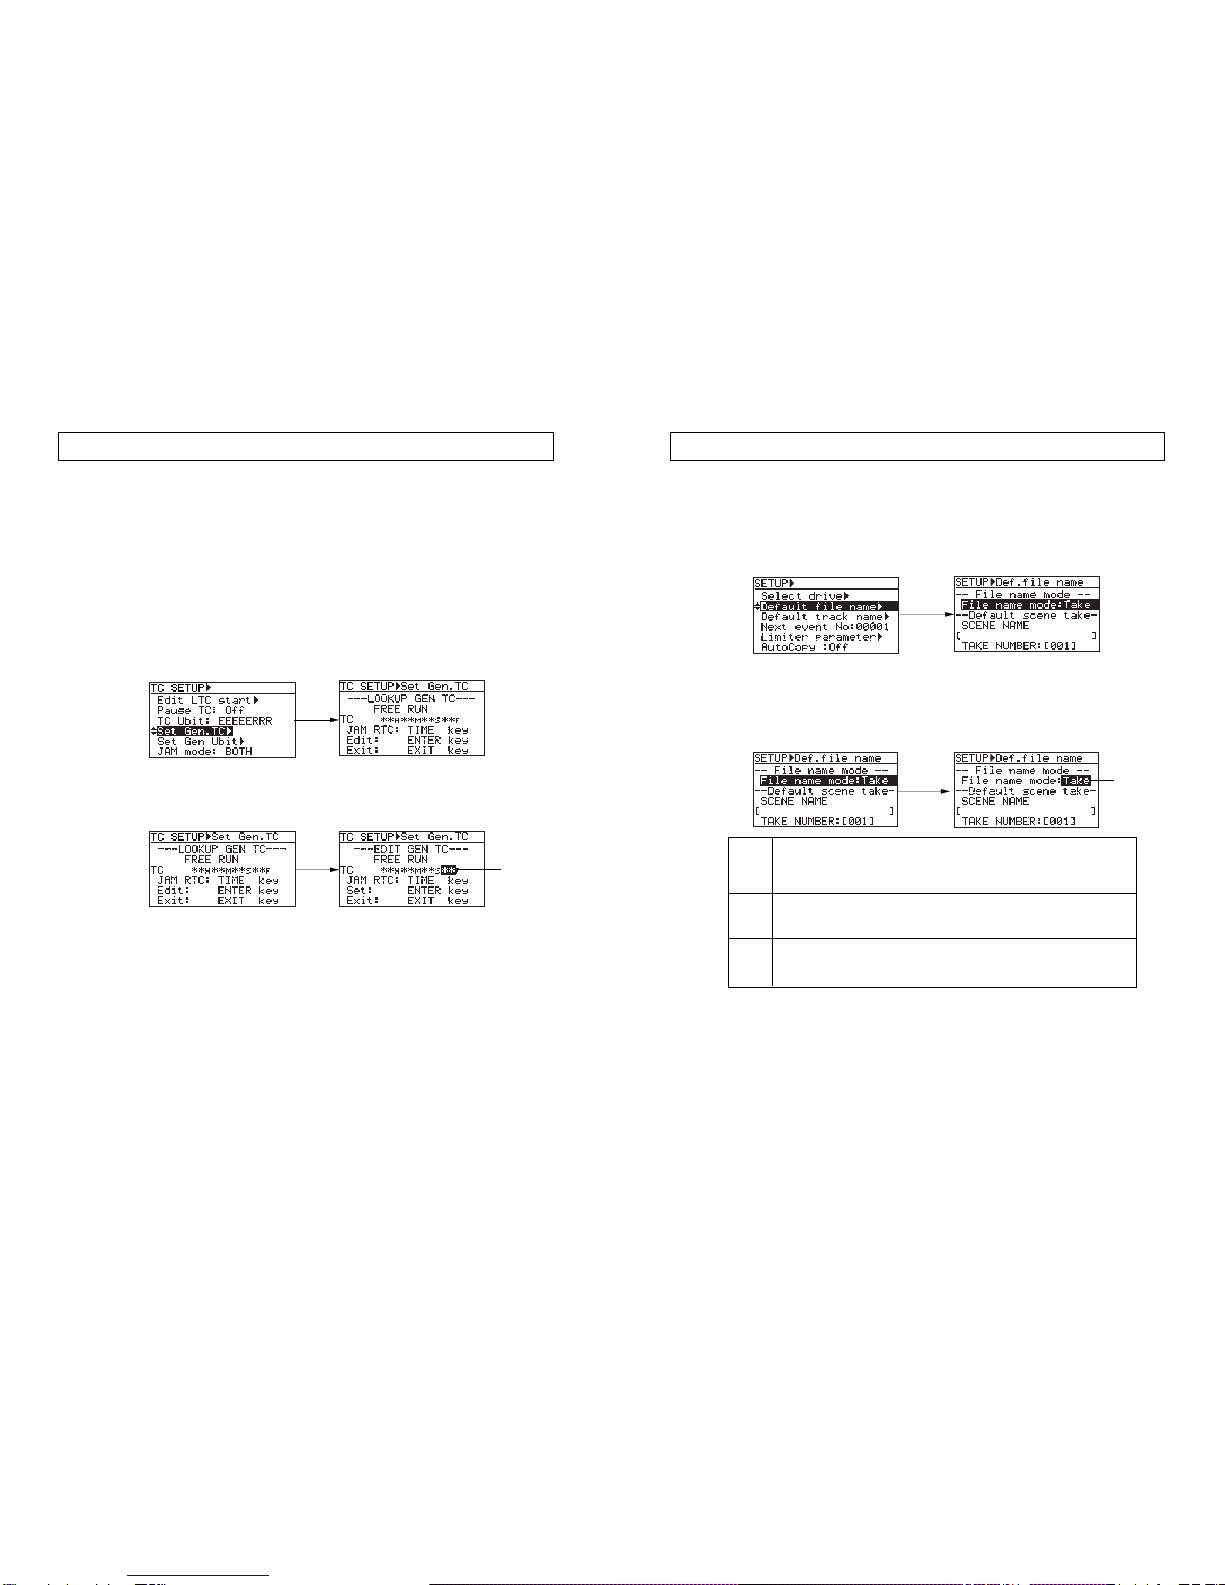
The "Default file name" menu item in the Setup menu is enhanced by adding the "Reel
mode" option to the default file name mode. Therefore, there are now three options for file
name mode selection: "Date", "Scene name + Take No." and "Reel No. + File No.".
See also "Default file name setting (Default file name)" on page 99 in the PD-6 operation
manual.
Press the [SETUP] key to enter the Setup menu, and use the [SEL] dial to select the "Default
file name", then press the [ENTER] key.
Enhancement of the "Default file name" menu item in the Setup menu
Take
(Default)
Date
Reel
"<SCENE NAME>_<TAKE NUMBER>.wav" is the default file name. The SCENE NAME
is specified on the same screen above. The TAKE NUMBER is incremented automati-
cally each time recording is made.
Example: Last_Scene -001.wav, Last_Scene -002.wav, etc.
The internal realtime clock data (with ".wav", the file extension) is the default file name.
That is, a file name shows the recording date/time information.
Example: B05h 05m 06s 10may 2004.wav, etc.
The reel number of a drive (or a partition of the optional hard disk drive) currently selected
for recording with the file number is the default file name.
Example: S001_005.wav, S002_008.wav, etc.
• Setting the file name mode
By pressing the [ENTER] key when the screen above right is shown, the currently selected mode
starts flashing and you can now select the desired mode (the default mode is "Take").
Use the [SEL] dial to select the desired mode and press the [ENTER] key to confirm your selection.
* After recording is made, the default file name can be edited using the "Edit file name" menu item
in the UTILITY menu.
When setting the file name mode to "Take", the SCENE NAME and TAKE NUMBER specified on the
same screen are used for each file name. Even if you set the file name to "Date" or "Reel", the SCENE
NAME and TAKE NUMBER currently set are used as the SCENE data in the meta data.
Flashing
When the time code "Gen mode" is set to "Free Run", the "Set Gen.TC" menu item now
allows you to jam the internal realtime clock time data, as well as edit the TC value.
Also, the user bit setting item which was available in the "Set Gen.TC" menu item with the
earlier version has been now deleted from this menu item and moved to the newly added
"Set Gen Ubit" menu item in the TC SETUP menu. For details about user bit setting, see the
explanation of the "Set Gen Ubit" menu item on the next page.
The following explains "Set Gen.TC" menu item setting when the "Gen mode" menu item in
the TC SETUP menu is set to "Free Run".
See also the V2.00 supplementary manual for "Set Gen.TC" menu item setting when the
"Gen mode" is set to any option other than "Free Run".
While the [SHIFT] indicator is lit, press the [CONTRAST/TC SETUP] key to enter the TC
SETUP menu. Then use the [SEL] dial to highlight "Set Gen. TC" and press the [ENTER] key.
The display now shows the "Set Gen. TC" screen on which you can see the generator time
code value in realtime.
Changes in the "Set Gen.TC" menu item of theTC SETUP menu
• Editing the generator time code value,:
While this screen is shown, press the [ENTER] key.
The frame field starts flashing and you can now edit the displayed time code.
Editing to the desired time value:
Use the numeric keys (or the [SEL] dial) to enter the desired value in the flashing field.
Use the [SKIP/CURSOR] keys to move the flashing field.
After completing entry of the desired time code value, press the [ENTER] key to confirm your entry.
Jamming to the realtime clock:
If you press the [TIME] key, the internal realtime clock time value is set to the generator time code
value.
Immediately after editing to the desired time code and confirming the setting, or jamming to the
realtime clock, the display changes to the "LOOK UP GEN TC" screen.
Flashing
710
Model PD-6 operation manual (Supplement for V2.20) Model PD-6 operation manual (Supplement for V2.20)
The new "False Start" menu item added to the Setup menu.
With the earlier version, if you have made recording unsuccessfully, you can cancel the
recording and clear (delete) the audio file by executing "False start" (see page 68 in the PD-
6 operation manual).
With V2.20, you have a choice of keeping or completely deleting the audio file when ex-
ecuting "False start" by setting the "False Start" menu item newly added to the Setup
menu appropriately.
The following shows how to set the False start mode.
"False Start" menu item newly added to the Setup menu
1) While the unit is stopped, press the [SETUP] key to enter the Setup menu.
The display now shows the Setup menu screen.
2) Use the [SEL] dial to highlight "False start" and press the [ENTER] key.
The currently selected mode starts flashing (by default, "Rename" is selected).
You can now select the desired mode.
3) Use the [SEL] dial to select the desired mode and press the [ENTER] key.
You can select between "Rename" (default) and "Delete".
Rename
(Default)
Delete
When the False start function is executed, the take number decreases by one (i.e. returns to the
previous take number) and the canceled audio file is stored as a file with the file name starting by
"~nn" followed by the original name ("nn" shows the number). Up to 100 canceled files (starting by
~, ~1 through ~99) can be stored. The following examples show how the file names are given.
<Examples>
After the first False start: Scene1_001.wav -> ~Scene1_001.wav
After the second False start: Scene1_001.wav -> ~1Scene1_001.wav
After the 100th False start: Scene1_001.wav -> ~99Scene1_001.wav
You can check stored files from the file selection screen (which can be shown by pressing the
[FILE SEL] key).
As with the earlier version, after executing the False start function, the unsuccessful file is com-
pletely deleted and the disk remaining time returns to the value before the last recording is made.
The take number decreases by one (returns to the previous take number).
4) After making selection, press the [EXIT] key to exit the Setup menu.
<Note>:
To execute False start, while the unit is stopped, press the [STANDBY] key while
holding down the [CLEAR] key. See page 68 in the PD-6 operation manual.
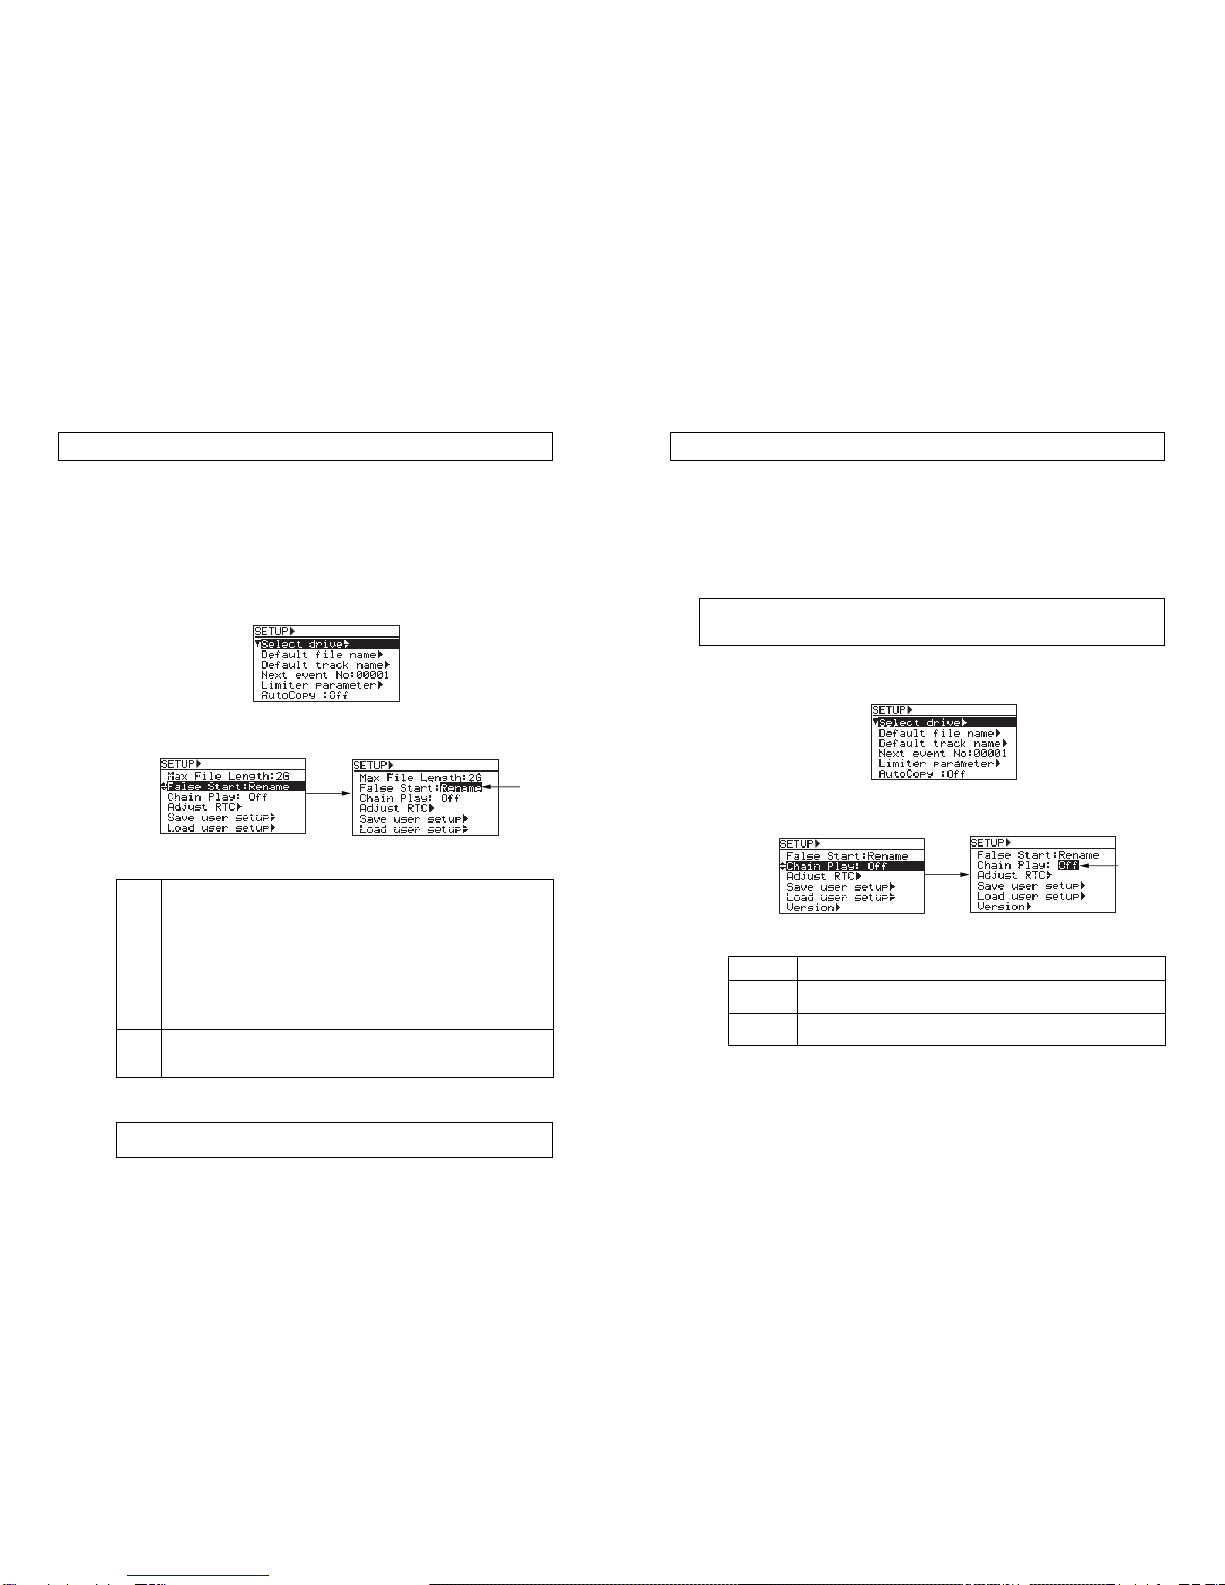
The new "Chain play" menu item added to the Setup menu allows you to set the transport
mode after an audio file is played back to the end.
With the older version, the PD-6 stops when an audio file is played back to the end.
With V2.20, the PD-6 can also pause at the beginning of the next audio file when an audio
file is played back to the end, or play back all audio files on the current disk (or partition
when the optional hard disk drive is installed) continuously in the numeric order of file
numbers.
The following shows how to select the desired chain play option.
"Chain Play" menu item newly added to the Setup menu
1) While the unit is stopped, press the [SETUP] key to enter the Setup menu.
The display now shows the Setup menu screen.
2) Use the [SEL] dial to highlight "Chain Play" and press the [ENTER] key.
The currently selected mode starts flashing (by default, "Off" is selected).
You can now select the desired mode.
3) Use the [SEL] dial to select the desired mode and press the [ENTER] key.
The following three modes are available.
4) After making selection, press the [EXIT] key to exit the Setup menu.
Off (Default)
Pause
AutoPly
The unit stops when an audio file is played back to the end.
The unit pauses at the beginning of the next audio file when an audio file is played back to
the end.
The unit continuously plays back all audio files following the current file on the current disk
(or partition) in the numerical order. When the unit plays back the last file to the end, it stops.
<Note>:
All audio files on the current drive (a DVD-RAM disk or partition when the optional hard
disk drive is installed), regardless of the recording mode, Fs, etc., are the targets of the chain play
function.
Flashing
Flashing
8 9
Other manuals for PD-6
4
Table of contents
Other Fostex DVD Recorder manuals


