Fostex DV-40 User manual
DV40 Owner's Manual
<VersionV1.3 Supplement >
This owner's manual supplement describes
new functionality added by updating the
DV40 with software version 1.3.
Please refer to the original owner's manual
and V1.2 owner's manual supplement to-
gether along with this supplement to fully
utilize the functions of a DV40 running V1.3
software.
8288 694 000
< Important Notice! >
When data recorded on a DV40 is exported
to a PC for editing, etc. and is then copied
back to the DVD-RAM disk again,
DO NOT COPYTHE HISTORY FILE INTHE HSTF
(HISTORY FOLDER).
Suppose a DVD-RAM disk has a history file
copied back to it and is loaded into a DV40,
if MULTIPLE UNDO, OPTIMIZE or DELETE
functions are executed there is a high dan-
ger that the disk may be destroyed.

Model DV40 Owner’s Manual <Version V1.3 Supplement>
Contents
<1>MultiplePunchIn/OutfunctioninLISTPLAYmode......................................................................3
Using the Multiple Punch In/Out function in LIST PLAY mode .....................................3
<2> Single File Maximum Recording Capacity Select Function .......................................................5
Selecting the Single Maximum Recording Capacity ........................................................5
<3>FileDivideFunction...........................................................................................................................6
Dividing a File .......................................................................................................................6
Deleting a Divided File .........................................................................................................7
<4>UpdatingSoftware via a DVD-RAM’s INFO Folder........................................................................8
Executing the Software Update ..........................................................................................8
<5>FileRenumberingFunction...........................................................................................................10
Renumbering Files .............................................................................................................10
<6>AdditionalFunction Expansion (Recognition of "BWF" extension).......................................10
<7>Permissiontouse“/”asafile name character............................................................................11
2
Model DV40 Owner’s Manual <Version V1.3 Supplement>
<1> Multiple Punch In/Out function in LIST PLAY mode
It is now possible to implement multiple punch in/out function for ADR (Automatic Dialog
Replacement) purpose. This is the mode to create a new BWF file every time punch in/out
function is executed in the LIST PLAY mode. If the “ALE File Link” LIST PLAY mode is selected,
the punch in/out information is automatically recorded in the ALE file.
<NOTE>
Only the following BWF file types recorded in NORMAL mode can be used with the Multiple Punch In
/ Out feature in the LIST PLAY mode. Neither SDII files or files recorded in TAPE mode can be used
with this feature. When recording, only the "NEW FILE" AUDIO READY SW can be selected. It is not
possible to record by selecting either the "INSERT" or "TC RDY" SWs.
<Track Mode & FS/Bit combination for Multiple Punch In / Out>
1. Press the AUDIO READY [NEW FILE] SW. (The NEW FILE LED flashes.)
Remember in the LIST PLAY mode, only the "NEW FILE" AUDIO READY SW can be turned on and off.
2. Press the [PLAY] key to start the “LIST PLAY”mode.
3. Press the [RECORD] key at the point where you would like to Punch In.
The DV40 changes mode from PLAY to RECORD.
4. Press the [PLAY] key at a point where you would like to Punch Out.
The DV40 changes the mode from RECORD to PLAY.
The above punch in/out procedures can be recorded up to 199 times.
Executing Multiple Punch In / Out in LIST PLAY mode
The following examples assume that the LIST PLAY mode is activated beforehand. For the LIST
PLAY mode, refer to the original owner's manual and the V1.2 owner's manual supplement.
<Executing Multiple Punch In / Out in "ALE FILE Link" LIST PLAY mode>
Executing Multiple Punch In / Out's by selecting the "ALE FILE Link" in the LIST PLAY mode allows
every recorded TAKE to be added to the existing ALE file.
Punching in redundantly while playing back an existing file updates the ALE file information. How-
ever, since a file previously recorded has a priority, the punch-in file will not be reproduced in the
LIST PLAY mode.
Track Mode
44.1kHz/16bit, 44.1kHz/24bit, 48kHz/16bit, 48kHz/24bit, 88.2kHz/24bit, 96kHz/24bit
FS/Bit
4 Track
Stereo Track
Mono Track
44.1kHz/16bit, 44.1kHz/24bit, 48kHz/16bit, 48kHz/24bit
44.1kHz/16bit, 44.1kHz/24bit, 48kHz/16bit, 48kHz/24bit, 88.2kHz/24bit, 96kHz/24bit
<NOTE>
Registering the CUE point is not possible in the LIST PLAY mode.
5. Press the [STOP] key after you have finished punching in / out.
The DV40 will then start creating the files made by the Multiple Punch In / Out function after the
[STOP] key is pressed.
The length of time it takes depends the number of punch in / out’s made. It takes about 1 second per
punch in / out made (take) to create 1 file.
<NOTE>
Never turn the power off before the message "
PlsWait!
" is extinguished.
If you do so, all the TAKEs you made will become invalid.
3

Model DV40 Owner’s Manual <Version V1.3 Supplement>
<Created files after the Multiple Punch In / Out function is executed>
Every TAKE recorded by the Multiple Punch In / Out function is stored as an independently re-
corded file. When the "TAKE" mode is selected in the "F.Name MD?" SETUP menu and the optional
file name and TAKE No are correctly registered in the "Default File Name?" SETUP menu, the corre-
sponding name and TAKE No are attached to the automatically generated file name. The following
is an example of the Multiple Punch In / Out function executed twice with "PunchIn" and "017" as the
default file name and the TAKE No respectively.
1
-INT-
BWF
FORMAT
CLOCK
kHz 4824
FS
BIT
HMSF
PGM
LTC
HMSF
PGM
LTC
If the "DATE" mode is selected in “F.Name MD?” SETUP menu or no optional name and TAKE No are
registered, "#" will be used as the temporary file name and the TAKE No will start from "001".
These are attached to the newly created file.
HMSF
PGM
LTC
HMSF
PGM
LTC
File created by the 1st Punch In / Out
File created by the 2nd Punch In / Out
File created by the 1st Punch In / Out
File created by the 2nd Punch In / Out
While in the file creation process, the message "PlsWait!" flashes. As shown in the diagram below, the
progress of the file creation process is shown by the “level” indication on the FL display which reduces
from right to left.
4

Model DV40 Owner’s Manual <Version V1.3 Supplement>
<2> Single File Maximum Recording Capacity Select Function
The maximum recording capacity of a single audio file (either BWF or SDII) was limited to 2GB
on DV40 until now. Updating the software to V1.3 allows selecting either a 2GB or 4GB maxi-
mum file recording capacity. Selection can be made by the new "Max File Length?" SETUP
menu.
<NOTE>
• There is a case that an audio file larger than 2GB cannot be correctly recognized by a PC.
In such a case, use the new "
Divide File?
" function in the AUDIO EDIT menu to divide the audio
file. Refer to the next section for details.
• When a DVD-RAM disk with a 4GB SDII audio file recorded on it is inserted into a DVD-RAM drive
connected to a Macintosh computer, there may be a case that all the files in the SDII folder cannot
be seen.
• If the 4GB maximum recording capacity is selected and a DVD-RAM disk is formatted in TAPE
mode, only one audio file will be created.
1. While the DV40 is in STOP mode, press the [SETUP] key.
The SETUP menu is displayed. In the recalled SETUP menu, the default setting is "Adjust RTC?".
2. Select the "Max File Length?" SETUP menu by rotating the JOG dial (or press the [SKIP/CURSOR
|<</>>|] key) and press the [ENTER/YES] key.
The default maximum file capacity "2100.0" flashes.
Setting Maximum recording capacity
MB
SETUP
3. Select "4200.0" by rotating the JOG dial (or press the [SKIP/CURSOR |<</>>|] key) and press the
[ENTER/YES] key.
The maximum file capacity is set to 4GB (4200.0) and "?" flashes.
MB
SETUP
4. Press the [EXIT/NO] key (or [STOP] key) to exit from the SETUP menu.
5. If you prefer to record in theTAPE mode, select "Tape" / "New" format in the "Format?" Utility menu
and format the DVD-RAM disk again.
MB
SETUP
MB
SETUP
Flashing Flashing
Flashing Flashing
5
Model DV40 Owner’s Manual <Version V1.3 Supplement>
<3> File Divide Function
There is a case that an audio file larger than 2GB cannot be correctly recognized by a PC.
In such a case, creating a smaller file by the “Divide File” menu which is newly added to the
AUDIO EDIT mode allows as PC to recognize the file.
<NOTE>
• In order to divide a file, time data has to be registered to the "
SOURCE IN
" and "
SOURCE
OUT
" points beforehand. Refer to the original owner's manual for registering time data to
the "SOURCE IN" and "SOURCE OUT" points.
• Even when a file is divided, the original file will be left intact and no additional disk capacity
is consumed. However, write operations on the original file as well as the divided file are
now prohibited. In other words, these files will become READ ONLY after the division.
There is no History File attached to the divided files and UNDO functions on the original file
will not be possible.
• Due to the nature of SDII files, which are divided into "
6,144 byte
" units, an SDII file will be
divided at slightly different points than those which the user designated by the SOURCE IN
and OUT points to accommodate this anomaly.
1. While the unit is in STOP mode, press the [AUDIO EDIT] key to enter AUDIO EDIT mode.
The AUDIO EDIT menu appears on the display. The default setting is "Copy Clip?".
2. Select the "DivideFile?" menu by rotating the JOG dial (or pressing the [SKIP/CURSOR |<</>>|] key)
and press the [ENTER/YES] key.
The display changes to the following and "Sure?" starts flashing.
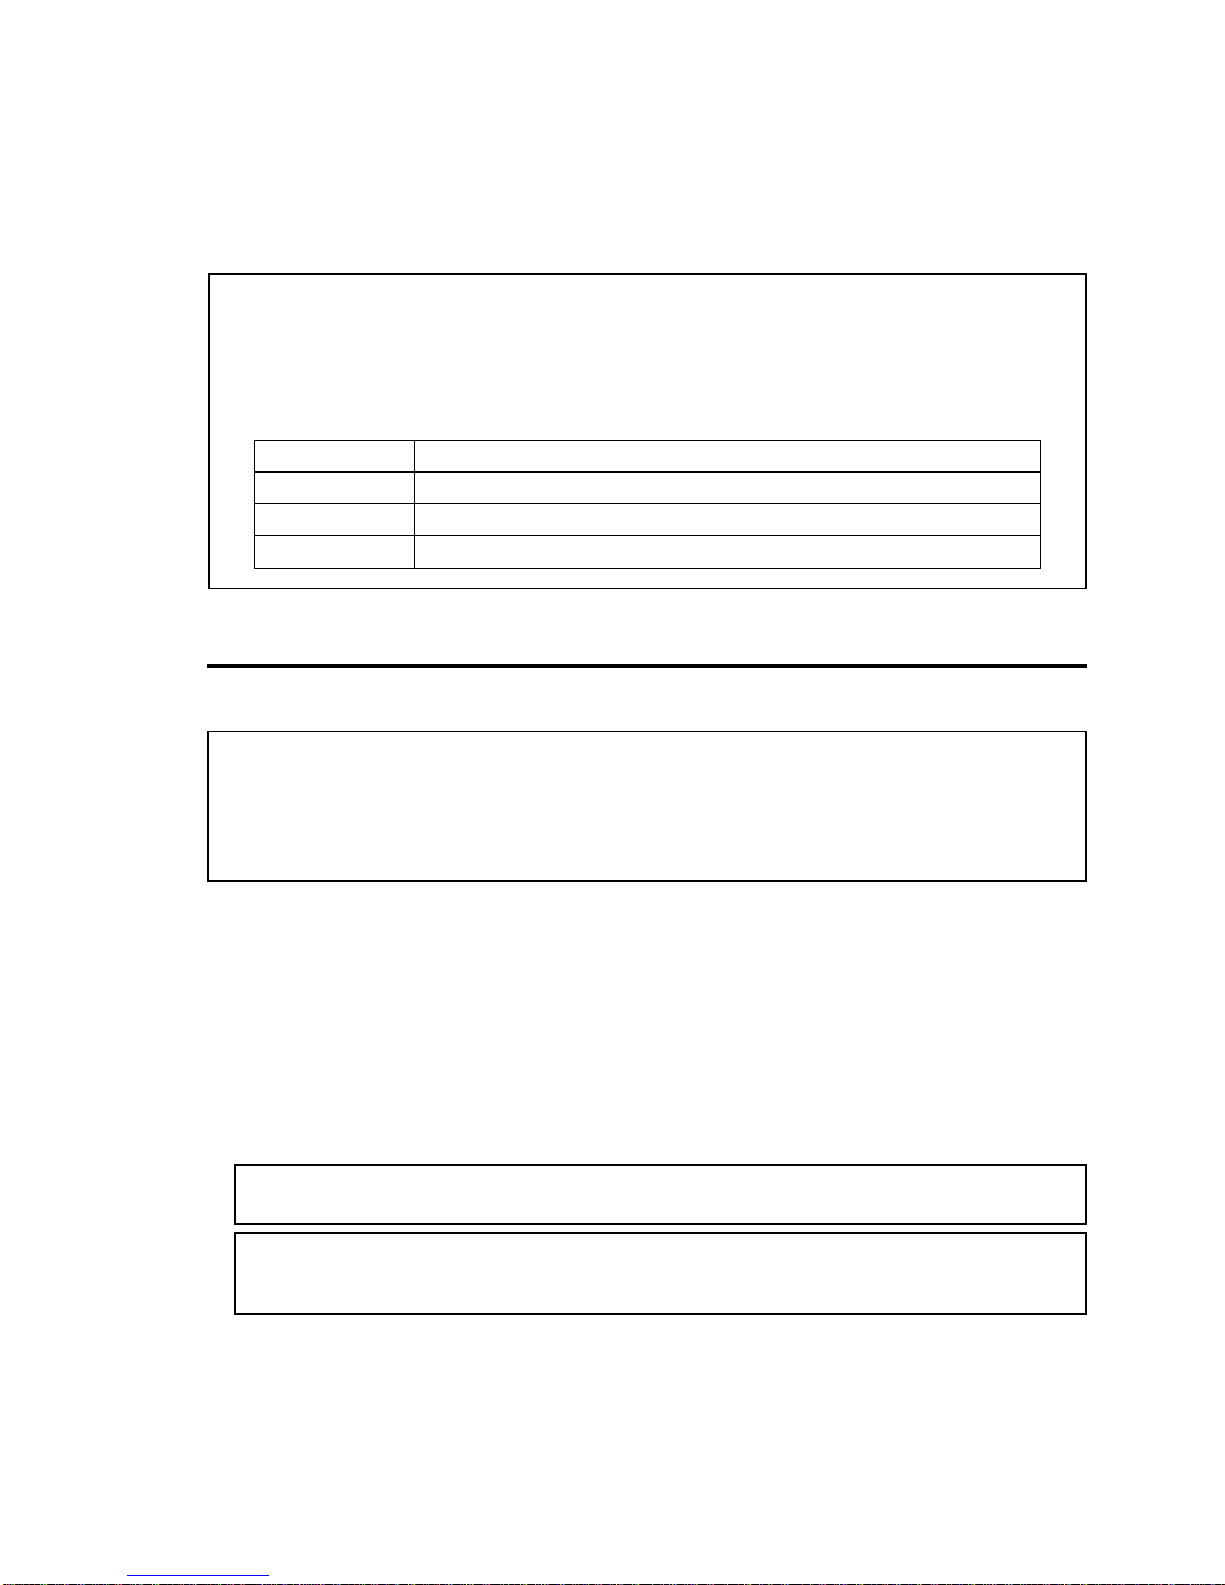
Dividing a file
The following operation assumes that the SOURCE IN and OUT points for dividing a file are
already registered beforehand.
MB
<File dividing example>
The following is an example of dividing 1 (one) file into 2 (two).
First, register the SOURCE IN and OUT points for divided area No. 1 and execute the File Divide
function. Then, register the SOURCE IN and OUT points for divided area No. 2 and execute the
File Divide function again. In order to maintain the continuity of the divided files, the SOURCE
OUT point for divided area No. 1 and the SOURCE IN point for the divided area No. 2 must be
set to the same value.
<NOTE>
If the SOURCE IN / OUT points are empty or
wrongly registered and you press the
[ENTER/YES]
key, the following error message will be displayed.
Flashing Flashing
SOURCE IN point SOURCE OUT point
SOURCE IN point SOURCE OUT point
Divided area-1
Divided area-2
6
Model DV40 Owner’s Manual <Version V1.3 Supplement>
3. While "Sure?" flashes, press the [ENTER/YES] key.
If the file is successfully divided, "Completed!" will be displayed.
4. Register the next SOURCE IN and OUT points and repeat the procedures 1. ~ 3.
The divided files will be named in numerical serial sequence. "V01", "V02", etc. will be attached at the
head of the file name. If you would like to change the file name, rename it by using "Edit File Name?"
in the UTILITY menu.
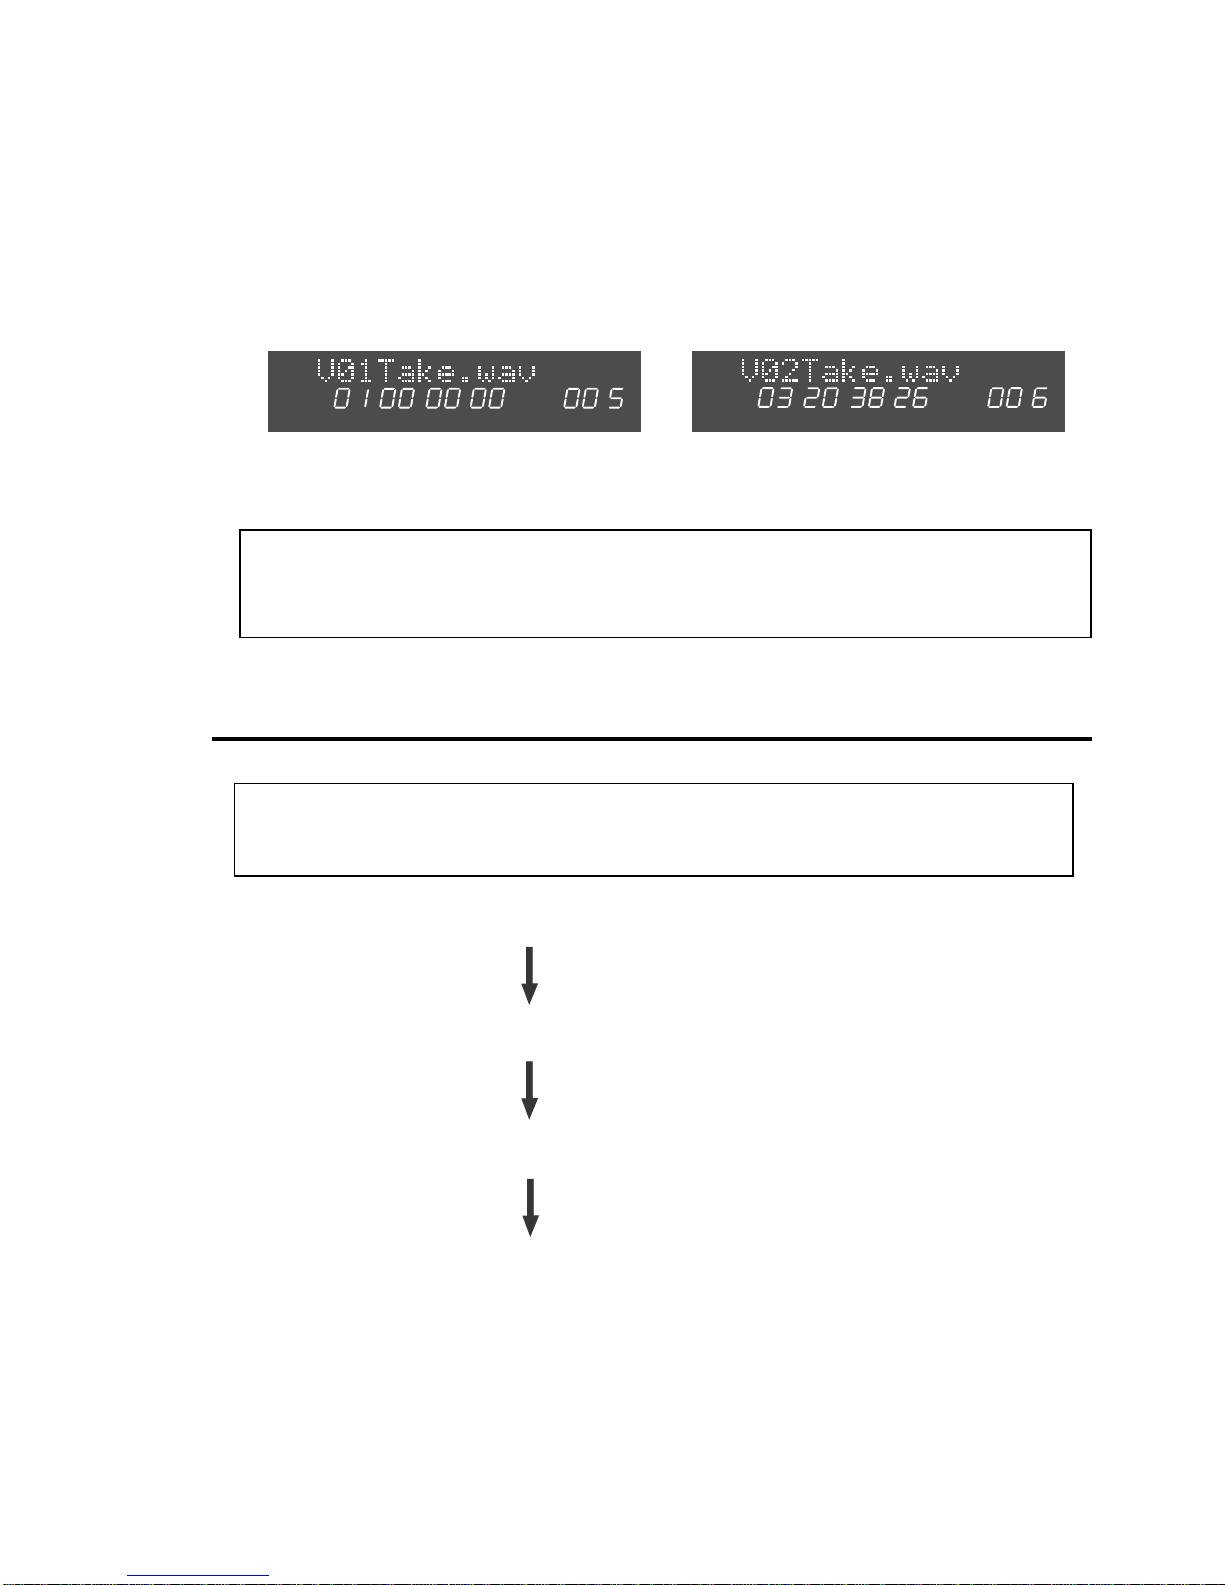
The following example shows that the file "Take" has been divided into 2 (two) separate files.
Deleting Divided Files
Please follow the procedures below to delete divided files.
<NOTE>
READ ONLY operation is all that is possible on divided files that have been exported to a PC.
Do not try to cancel the RECORD PROTECT flag in the file and delete it on a PC.
<NOTE>
The divided files are set to the RECORD PROTECT: ON condition. You cannot record to these files.
Even if you manually cancel the RECORD PROTECT: ON condition and try to record to these files,
the DV40 will display a "
Common File!
" message and the RECORD operation will be invalid.
2. Change the "Rec Protect?" UTILITY menu setting from "On" to "Off".
Refer to the original owner's manual for operation of the "Rec Protect?" UTILITY menu feature.
4. Optimize the disk by the "Optimize Disk?" UTILITY menu.
Refer to the original owner's manual for operation of the "Optimize Disk?" UTILITY menu feature.
3. Delete the divided file by the "Delete File?" UTILITY menu.
Refer to the original owner's manual for operation of the "Delete File?" UTILITY menu feature.
HMSF
PGM
INLTC
HMSF
PGM
INLTC
The above display indicates that the 1st file is
divided by the section from 01H 00M 00S 00F to
03H 20M 38S 26F and its file number is 005.
The above display indicates that the 2nd file is
divided by the section from 03H 20M 38S 26F to
REC END point and its file number is 006.
1. Recall the divided file you would like to delete.
7

Model DV40 Owner’s Manual <Version V1.3 Supplement>
<4> Updating Software via DVD-RAM INFO Folder
"Version up?" SETUP menu which enables updates to the MAIN and ETHERNET CARD software
by copying update files with a ".mot" extension to the BWF file INFO folder has now been
added in V1.3. If the DV40 is connected to a PC via LAN cable, using an FTP application the
software update files can be directly transferred from a PC to the INFO folder of the current
DVD-RAM instead of having to use an extra DVD-RAM or CD-ROM disk / drive for future
software updates.
1. While the unit is in STOP mode, press the [SETUP] key to enter the SETUP mode.
The SETUP menu is displayed. In the recalled SETUP menu, the default setting is "Adjust RTC?".
2. Select "Version up?" SETUP menu by rotating the JOG dial (or press the [SKIP/CURSOR |<</>>|]
key) and press the [ENTER/YES] key.
The display changes to allow you to select a software update file with a ".mot" extension.
Rotating the JOG dial (or press the [SKIP/CURSOR |<</>>|] key) allows you to select a software update
file for either the MAIN or the ETHERNET CARD. (MAIN = "DV40m***.mot", ETHERNET = "DV40e***.mot")
Executing Software Update
The following operation assumes that the DV40’s current software version is V1.30 and the
DVD-RAM disk has software updates that are newer than V1.30 in the BWF INFO folder of the
DV40’s DVD-RAM disk.
SETUP
SETUP
3. Select the software file with a ".mot" extension by rotating the JOG dial (or press the [SKIP/CURSOR
|<</>>|] key) and press the [ENTER/YES] key.
The example below shows the software file for MAIN as being selected. To confirm the software
update procedure, "Sure?" starts flashing.
SETUP
SETUP
4. Press the [ENTER/YES] key.
The DV40 starts updating the software with the selected software update file.
<NOTE> Do not power off while updating software.
After the software update is complete, "Completed!" is displayed.
5. Press the [EXIT/NO] key (or [STOP] key).
The display returns to the state allowing you to select a software file with a ".mot" extension.
Select the software update file for the ETHERNET CARD and update the software accordingly.
<NOTE>
Updating the software for both the MAIN and ETHERNET CARD at the same time is strongly
recommended.
Flashing Flashing
Flashing Flashing
8
Model DV40 Owner’s Manual <Version V1.3 Supplement>
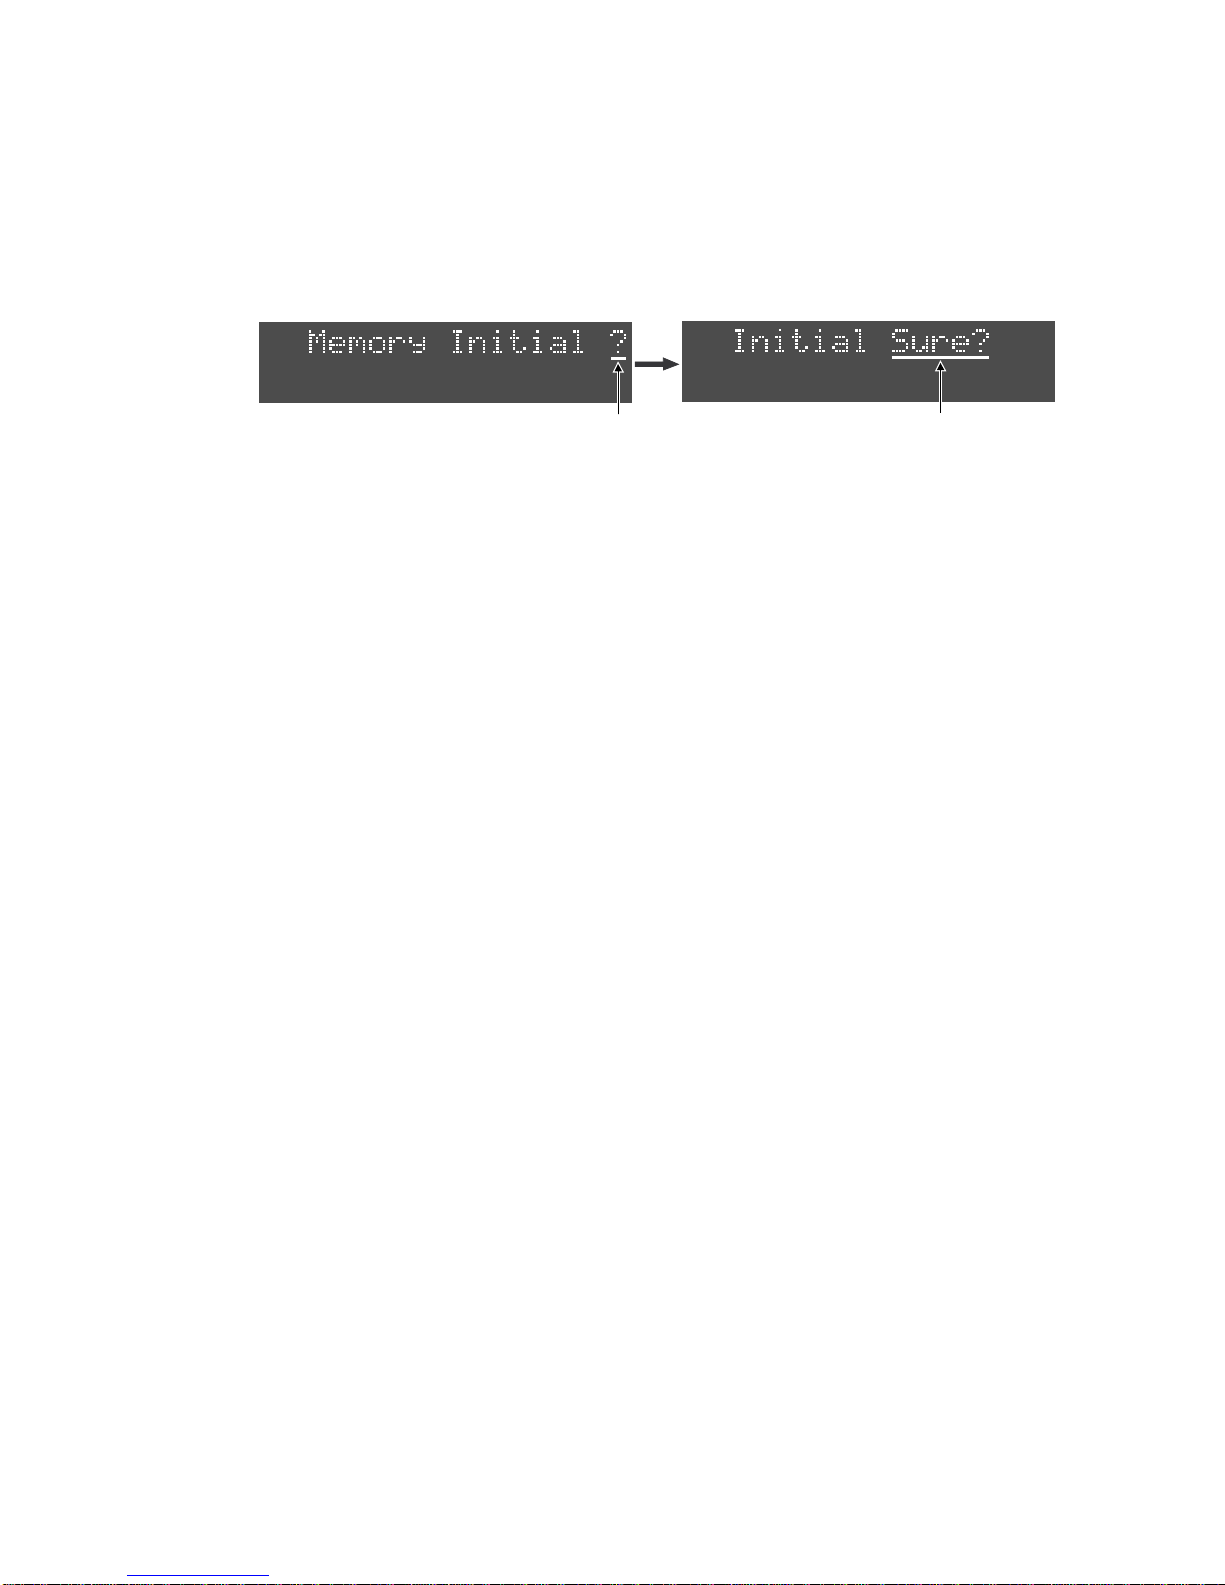
7. Press the [SETUP] key while pressing down the [STOP] key to enter the additional menu SETUP
mode.
Select the "Memory Initial?" menu and press the [ENTER/YES] key. "Initial Sure?" appears on the
display.
6. After updating the software for both the MAIN and ETHERNET CARD, press the [EXIT/NO] key (or
[STOP] key) and then power cycle the DV40.
8. Press the [ENTER/YES] key.
After "Completed!" is displayed, the display returns to the "Memory Initial?". ("?" flashes.)
This indicates that initialization the memory is complete.
9. Press the [EXIT/NO] key (or [STOP] key) to go back to the normal display mode.
SETUP
SETUP
Flashing Flashing
9
Model DV40 Owner’s Manual <Version V1.3 Supplement>
<6> Additional Function Expansion (Recognition of "BWF" extension )
A DV40 with V1.21 or before only allowed files with ".wav" extensions to be recognized.
By updating the software to V1.30, files with the ".BWF" extension can now also be recognized.
<NOTE>
When copying files with
".wav"
and
".BWF"
extensions to a BWF folder in the DVD-RAM disk, files
with
".BWF"
extension are placed behind files with
".wav"
extension.
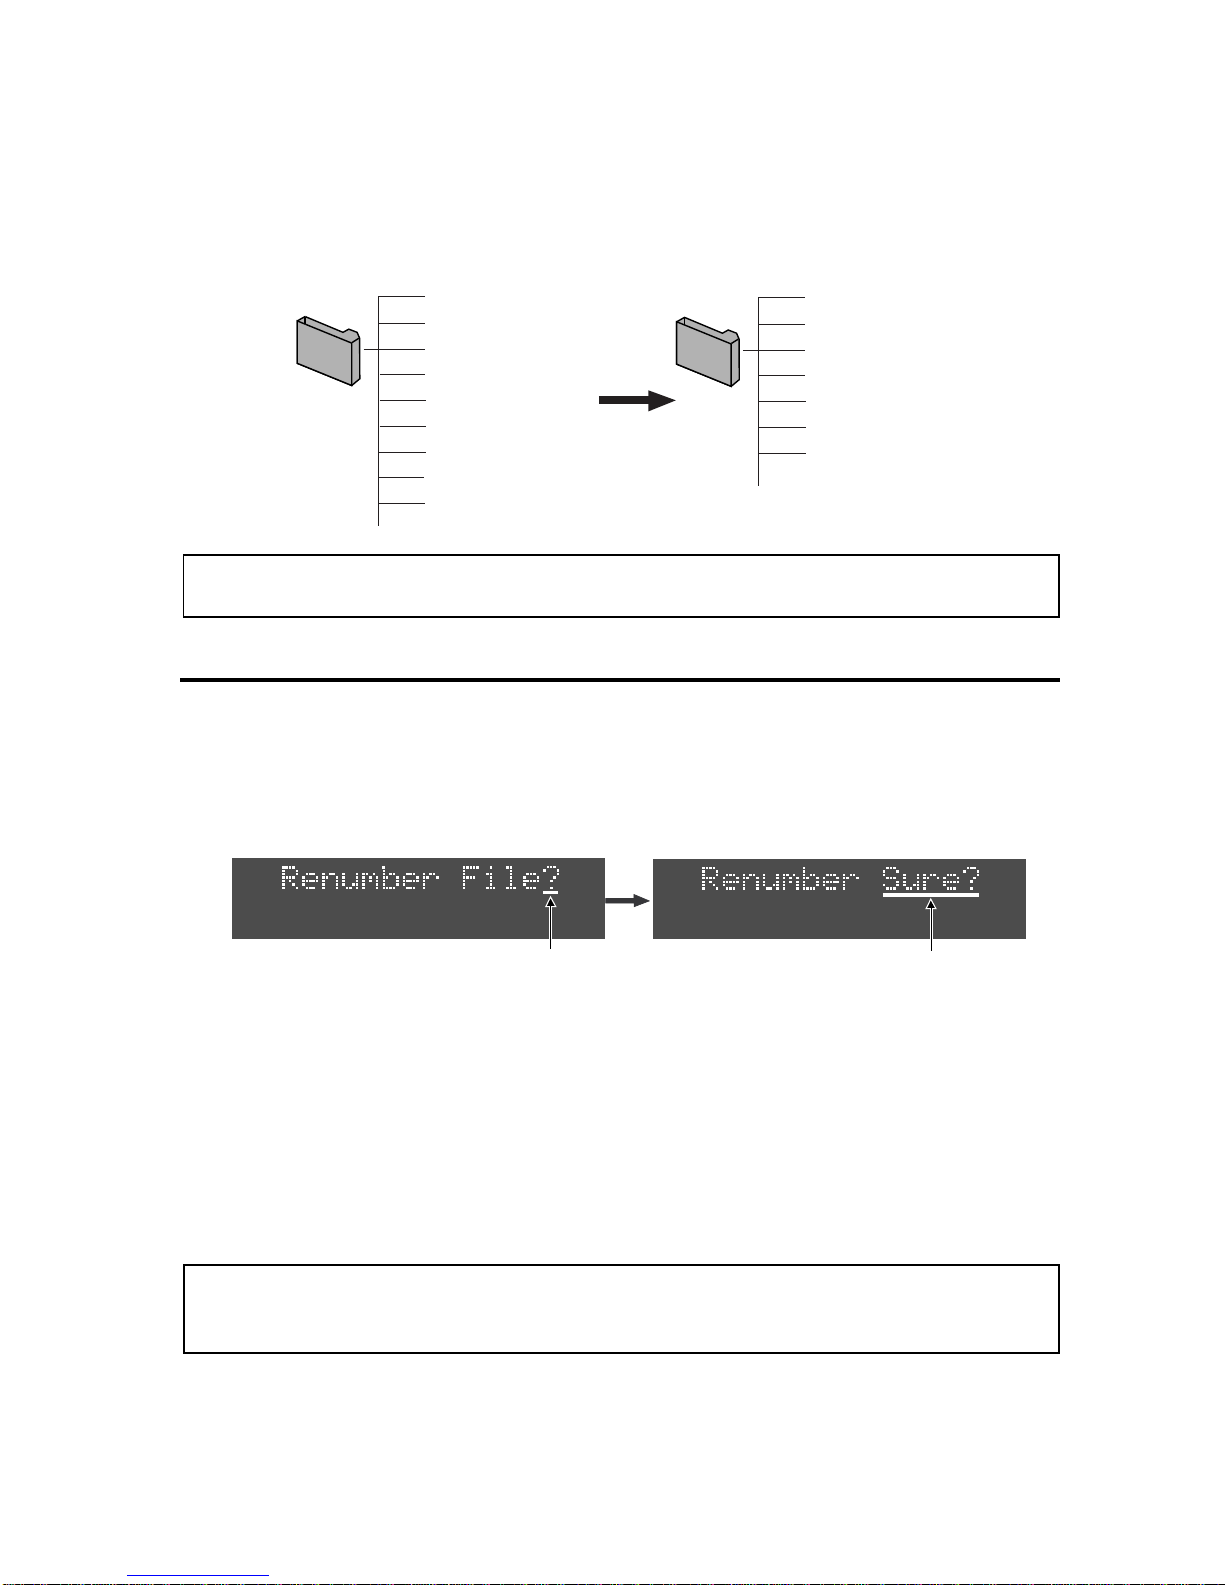
<5> File Renumbering Function
A "Renumber File?" UTILITY menu which allows reorganization of the file numbers has been
added. If there are deleted files and the disk was optimized in previous software versions, the
file numbers of the missing files still exist. This menu allows you to delete the missing files
numbers and renumber the remaining ones.
<NOTE>
A file left as “
<<Hidden File>>
" will be renumbered in the same manner as existing files.
1. While the unit is in STOP mode,enter the UTILITY mode by pressing the [SHIFT] key and then [SETUP]
key.
2. Select the "Renumber File?" UTILITY menu by rotating the JOG dial (or press the [SKIP/CURSOR
|<</>>|] key) and press the [ENTER/YES] key.
To start the file numbering procedure, "Sure?" starts flashing.
Renumbering Files
Flashing
3. Press the [ENTER/YES] key.
After "Completed!" is displayed, the display returns to normal mode.
bwff
************.wav (001)
************.wav (002)
<<Deleted File>> (003)
************.wav (004)
************.wav (005)
************.wav (006)
<<Deleted File>> (007)
************.wav (008)
************.wav (009)
bwff
************.wav (001)
************.wav (002)
************.wav (003)
************.wav (004)
************.wav (005)
************.wav (006)
************.wav (007)
Flashing
10

Model DV40 Owner’s Manual <Version V1.3 Supplement>
<7> Permission to use“/”as a file name character
A character “/” which is prohibited to use as a file name in Windows OS can be used on DV40
with software update to V1.3.
<NOTE>
Even though “/” character is used in the file name, there will be no problem accessing the file itself
at all. However, if you use a file with “/” character on Windows OS, the file name characters “/” and
after will turn into garbage. Also when sending a file with “/” character via Ethernet, transferring
the file is okay but the file name will not be transferred as it originally is.
11

FOSTEX CORPORATION
3-2-35 Musashino, Akishima-shi, Tokyo, Japan 196-0021
FOSTEX AMERICA
15431, Blackburn Ave., Norwalk, CA 90650, U.S. A.
© PRINTED IN JAPAN JULY 2002 8288 694 000 FX
Other manuals for DV-40
10
Table of contents
Other Fostex DVD Recorder manuals


Popular DVD Recorder manuals by other brands


 operating instructions")


Panasonic
Panasonic Diga DMR-EZ27 operating instructions

Pioneer
Pioneer PRV-LX1DW Service manual

Sony
Sony RDR-GX355 - Tunerless DVD Recorder Specifications

Philips
Philips DVDR3355/37 Quick use guide

CyberHome
CyberHome CH-DVR 1600MU operating guide

MicroBoards Technology
MicroBoards Technology CopyWriter Premium Series user manual