Barton Musical Circuits Auto-Seq Operator's manual

Auto-Seq Documentation
Written April 6th, 2014
I. Using The Module
A. What is Auto-Seq?
B. Controls/In uts/Out uts
C. Sam le Patches
II. Schematics
A.Chi Pinout
B.In uts
1.Analog In uts
2.Digital In uts
C.Out uts
1.Analog Out ut
2.Digital Out ut
D.Power Su ly
III. Construction
A.Parts List
B.Wiring/PCB Information
C.Calibration

I.Using The Module
A. What is Auto-Seq?
"Auto-Seq" is shorthand for "Automated Sequencer." It is a unique step sequencer hich
programs it's o n sequences. There is a small selection of controls to help refine it's sequences to
the taste of the composer. There is no ay of storing and recalling the sequences hich it rites,
Auto-Seq is an improviser. If you're interested in random composition, or if you're just tired of the
hand cramps that come ith programming traditional step sequencers, then this is a module that
you might find useful.
B. Controls/In uts/Out uts
Controls
1. Mode - The Auto-Seq has a built in quantizer, this knob selects hat musical mode it ill
quantize to. From least clock ise knob position to most clock ise, the modes are Major, Minor,
Major Pentatonic, Minor Pentatonic, Fifths and Chromatic.
2.Length - This knob controls the length of the sequence. This is measured by the number of input
clock pulses before the sequence resets itself. The range of pulses before reset is 1 to 256.
3.Rhythm Subdivision - The input clock pulses are run into a 4x clock multiplier and then through
a divider. This control selects hat division of output is used by the sequencer for functions other
than Length. The range is from 4x input to 1/8 input. This knob is only read at the start of a ne
sequence.
4.Range - This selects the range of pitches that Auto-Seq can output. It selects by octave, ranging
from one to five octaves. When the sequencer is choosing notes, it ill check to see if a note is in
range, and if not it transposes the note do n an octave. So hen increasing range, you ill hear
the same notes, just in different octaves.
5.The "One" Switch - When activated this s itch ill make sure that a note is played on the first
note of the sequence (the "one" of the sequence) and that the note ill be the root note of the scale
being played (the "one" of the scale).
6.Portamento - This s itch ill turn on portamento or glide bet een notes. Not all notes ill be
played ith portamento. The effect becomes more noticable as the range of pitches is increased.
7.Keychange - This s itch sets hether or not the next sequence to be ritten ill be in a ne key.
When this s itch is disengaged, all sequences ill be in the key of 0V as their root note.
8.Straight Rhythm - This s itch, hen engaged, sets the sequencer to play a note on every beat.
There ill be a minor variation on the note length from the gate output. This s itch is only read at
the start of a ne sequence.
9.New Sequence - This pushbutton tells the sequencer to rite a ne sequence. The ne sequence
ill be played hen the current sequence finishes.
In uts
1.Clock - A series of timing pulses should be input here.
2.Reset - This tells the sequencer to play the first note of the sequence on the next incoming clock
pulse. It's used to help syncronize ith other timing devices.
3.New - This input has the same effect as the Ne Sequence button, but can be activated by a gate
or trigger.
Out uts

1.Control Voltage - This is a 0 to 6V CV output to
be used ith 1v/oct calibrated oscillators and
VCFs.
2.Trigger - This is a short timing pulse that is sent
out at the start of every ne note. It's range is 0 to
5V
3.Gate - This is a timing pulse that is sent out for
the duration of a note's length.
4.End of Sequence - This is a timing pulse sent
out on the last note of a sequence.
C.Sam le Patches
For the first t o sound samples, the
diagram on the right sho s the patch used. A
clock is being input to the Auto-Seq. The Auto
Seq's trigger and gate outs are being sent to
Envelope Generators, hich are then being sent to
control the cutoff frequence of a VCF and the
amplitude of a VCA. The Voltage output is being
sent to a VCO and VCF. The VCO's output is
being sent to the VCF, hose output is being sent
to the VCA. For the third sound sample, this same
patch is used, but the clock is also controlling a
pair of drum sounds.
Listen to example 1 here. This mp3 just demonstrates a fe different sequences being created by
hitting the "Ne Sequence" button. No other controls are manipulated.
Listen to example 2 here. This mp3 demonstartes all of the knobs being manipulated. First is the
musical mode knob, then length, then rhythm subdivision and finally pitch range.
Listen to example 3 here. In this mp3 the Auto seq is paired ith a pair of drum sounds to help give
context to it's rhythmic changes. The straight rhythm s itch, rhythm knob, range knob and the ne
button are all manipulated in this mp3.

II. Schematics
A. The Microchi
On the right, e see the pinouts for the
microcontroller. This chip is at the center of the
design and all other schematics presented refer to
the chip. Pins 19 - 16 are the analog inputs, these
are all connected to knobs and read a variable voltage. Pins 15-12, 10, 3 and 2 are all digital
inputs hich look for changes bet een 0 and 5V. Pins 5-7 are digital outputs, hich output a
change be teen 0 and 5 volts. Pins 8, 9, and 11 are serial data outputs hich connect to the digital
to analog converter chip.
B.In uts
1.Analog In uts.
On the right e see the four analog
inputs. Each of these consists of a 100K
linear pot ired as a potential divider bet een
+5V and Ground. The iper of the pot is
connected to a capacitor to ground to filter
out high frequency noise and then sent to an
input pin on the microcontroller.

2. Digital In uts.
Belo , e see the digital inputs. On the left of the diagram is a bussed 100K resistor array
attached to ground and various other points. On the right e see some op-amps ired as
comparators. These ensure that an input signal for the Ne , Reset or Clock input ill be large
enough to get a response from the microcontroller. The inverting inputs on each of these is tied to .
05V, so any signal above .05V ill turn the input on. The positive inputs of each is tied to ground
through a 100K resistor and then attached to the input jack, except for the Ne input, hich first
goes through a diode (to protect the output of the driving circuitry from the Ne s itch).
The outputs of these op amps each go through a diode for polarity protection, then a 100K
resistor in series ith a schottky diode for overvoltage protection, and then a 100k to ground and
finally the input pin.
The digital inputs hich are attached to s itches, are simply connected to the bussed
resistor array and then connected to the pins of the microcontroller.

C. Out uts
1.Analog Out ut
The analog output is pictured above. The 4921 is a digital-to-analog conversioni IC that is
controlled by the serial data output of the microcontroller. We see soem pins on the 4921 are
connected to the mmicrocontroller, and then it's output is fed into a pair of inverting amplifiers, one
of hich has a trimpot in it's feedback path. This provides for a non-inverting adjustable amount of
amplification.
2.Digital Out uts
The digital outputs are pictured above. Each circuit is composed of the same pieces. An op
amp is ired as a unity gain buffer ith it's input tied to a digital output pin of the microcontroller.
The buffer's output is then sent to an LED and an output iring pad ith a 1K resistor in series ith
each.

D.Power Su ly
Belo , e see the po er supply for the module. At the top are pads for t o different kinds of
connecters for modular synthesizer systems. The positive and negative rails are filtered by a 10
ohm resitor and 10uf capacitor, and then again at the pins of the TL074 ith .1uf bypass capacitors.
The +5V supply for the controls and the microcontroller is obtained ith a 7805 voltage regulator.
Sho n are iring pads for +5V and GND to connect to the jacks and buttons.

III. Construction
A.Parts List
Semiconductors
Value Qty Notes
16F689 1 Pre programmed, should have come ith your PCB
TL074 2 14pin DIP, any quad op amp should ork
7805 1 TO220 package
1n4148 4
MCP4921 1 DAC in 8 pin DIP format
SD101C 3 Or other small schottky
LED 3 3mm size
Resistors
Value Qty Notes
10 ohm 2 7.5mm lead spacing. 1/4 Metal Film unless other ise noted on all
resistors
1K ohm 7
100K ohm 6
33K ohm 1
100K bussed array 1 11 Pin, or stand 10 resistors on their end and make your o n.
B100k Pot 4 16mm PC mounted Alpha brand.
100K trimpot 1 Multi turn cermet
Capacitors
Value Qty Notes
.1uf 9 2.5mm lead spacing, use cheap ceramics
10uf 3 2.5mm lead spacing Electrolytic
Other
Value Qty Notes
8 pin Dip socket 1
14 pin DIP socket 2
20 pin DIP socket 1
Po er Connecter 1 either Eurorack or MOTM style
Pushbutton 1 momentary on
SPDT 4 or SPST
Jack 7

B.Wiring/PCB Information
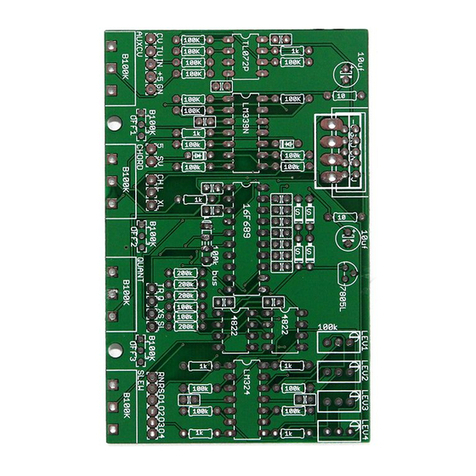
Above is the PCB. It is 86mm x 45mm. The mounting holes are spaced 82mm x 37mm and the pots
are spaced 23mm apart.
The iring pads should be connected as follo s (starting from the corner of the PCB nearest the
panel):
GN - Ground, connect the ground tab of one of the jacks
+5 - +5V connect to the center tab of all the s itches.
1 - Input for the "One" control, ire to the bottom tab of a toggles itch.
K - Input for the "Key" control, ire to the bottom tab of a toggles itch.
C - Input for the Clock input, ire to the Clock input jack
R - Input for the Reset input, ire to the Reset input jack
N - Input for the Ne input, rire to the Ne pushbutton
V - Output for the CV voltage, ire to the CV output jack
T - Output for the trigger out, ire to the Trigger out jack
G - Output for the gate out, ire to the Gate out jack
E - End of Sequence output,
S - Straight Rhythm input, ire to the bottom tab of a toggles itch
P - Portamento input, ire to the bottom tab of a toggle s itch
XN - External new, wire to the New in ut jack

To wire the LEDs onto the board, just follow this sequence:
C. Calibration
1.Before po ering up, turn all the knobs completely clock ise, then turn the po er supply on. The
module ill no be in calibration mode.
2.Use a voltage meter to read the CV output.
3.Adjust the trimpot until the CV output is exactly 6V.
4.You're done! Moving the knobs to any other position should take you out of calibration mode.
This manual suits for next models
1
Table of contents
Other Barton Musical Circuits Recording Equipment manuals
