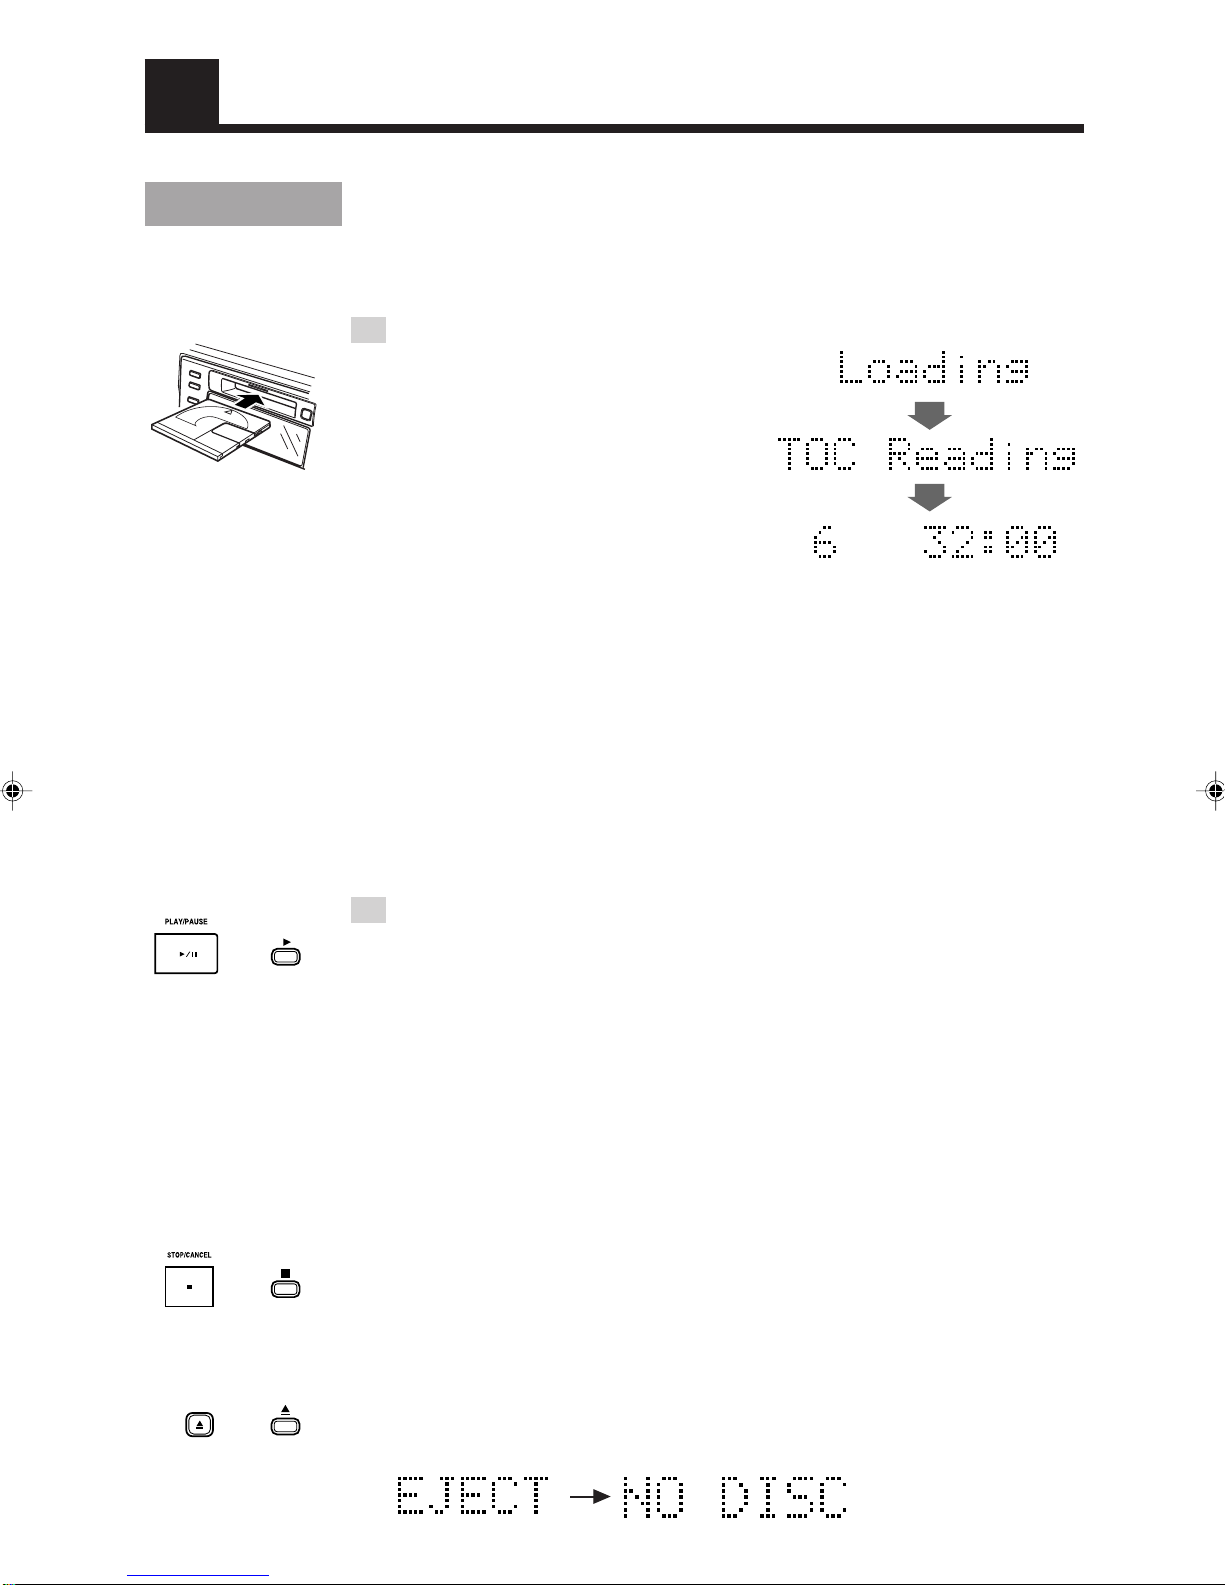
JVC XM-228BK User manual

MD RECORDER
For Customer Use:
Enter below the Model No. and Serial
No. which are located either on the rear,
bottom or side of the cabinet. Retain this
information for future reference.
Model No.
Serial No.
LVT0111-003B
[B]
INSTRUCTIONS
XM-228BK
RM-SM228EU
REMOTE CONTROL
1234
5678
9 10 +10
CANCEL
REPEAT
TRACK
MARKING TITLE
/EDIT DISPLAY
/CHARA SCROLL
REC PAUSE
RANDOM PROGRAM
SET
ENTER
XM-228BK(B)-Eng. Cover 98.9.25, 4:13 PM1

Warnings, Cautions and Others
IMPORTANT for the U.K.
DO NOT cut off the mains plug from this equipment. If the
plug fitted is not suitable for the power points in your home
or the cable is too short to reach a power point, then obtain
an appropriate safety approved extension lead or consult
your dealer.
BESUREtoreplacethefuseonlywithanidenticalapproved
type, as originally fitted.
If nontheless the mains plug is cut off ensure to remove the
fuseanddisposeoftheplugimmediately,toavoidapossible
shock hazard by inadvertent connection to the mains sup-
ply.
If this product is not supplied fitted with a mains plug then
follow the instructions given below:
IMPORTANT:
DO NOT make any connection to the terminal which is
marked with the letter E or by the safety earth symbol or
coloured green or green-and-yellow.
The wires in the mains lead on this product are coloured in
accordance with the following code:
Blue : Neutral
Brown : Live
As these colours may not correspond with the coloured
markings identifying the terminals in your plug proceed as
follows:
The wire which is coloured blue must be connected to the
terminalwhichismarkedwiththeletterNorcolouredblack.
The wire which is coloured brown must be connected to the
terminal which is marked with the letter L or coloured red.
IFINDOUBT-CONSULTACOMPETENTELECTRICIAN.
IMPORTANT FOR LASER PRODUCTS
REPRODUCTION OF LABELS
2WARNING LABEL, PLACED INSIDE THE UNIT
1CLASSIFICATION LABEL, PLACED ON REAR
ENCLOSURE
CLASS 1
LASER PRODUCT
DANGER: Invisible laser
radiation when open and
interlock failed or defeated.
AVOID DIRECT EXPOSURE
TO BEAM. (e)
ADVARSEL: Usynlig laser-
stråling ved åbning, når
sikkerhedsafbrydere er ude
af funktion. Undgå udsæt-
telse for stråling (d)
VARNING: Osynlig laser-
strålning när denna del är
öppnad och spärren är
urkopplad. Betrakta ej
strålen. (s)
VARO: Avattaessa ja suo-
jalukitus ohitettaessa olet
alttiina näkymättömälle
lasersäteilylle. Älä katso
säteeseen. (f)
1. CLASS 1 LASER PRODUCT
2. DANGER: Invisible laser radiation when open and
interlock failed or defeated. Avoid direct exposure to
beam.
3. CAUTION: Do not open the top cover. There are no
user serviceable parts inside the Unit; leave all servic-
ing to qualified service personnel.
CAUTION
To reduce the risk of electrical shocks, fire, etc.:
1. Do not remove screws, covers or cabinet.
2. Do not expose this appliance to rain or moisture.
Caution –– switch!
Disconnect the mains plug to shut the power off completely.
The switch in any position does not disconnect the mains
line. The power can be remote controlled.
G-1
XM-228BK(B)-Eng. Safety 98.9.25, 4:18 PM1

1
Welcome !
We would like to thank you for purchasing one of our JVC products. Before connecting
this unit to the wall outlet, please read the instructions carefully to ensure that you obtain
the best possible performance. If you have any questions, please consult your JVC dealer.
Important cautions
Installation of the Unit
• Select a place which is level, dry and neither too hot nor too cold (Between 5°C and
35°C or 41°F and 95°F).
• Leave sufficient distance between the Unit and a TV.
• Be sure to place the Unit in a location with good ventilation.
• Do not use the Unit in a place subject to vibrations.
• Do not place the Unit on a carpet.
• Do not place the Unit on top of another heat-generating piece of equipment.
Power cord
• Do not handle the power cord with wet hands!
• When unplugging the Unit from the wall outlet, always pull the plug, not the power
cord.
Malfunctions, etc.
• There are no user serviceable parts inside. If anything goes wrong, turn off the power
immediately. If the same problem reoccurs when the power is turned on once more, turn
off the power again, unplug the power cord and consult your dealer.
• Do not insert any metallic object into the Unit.
For safe use, observe the
following
Avoid moisture, water and dust
Do not set your machine in moist or dusty places.
Avoid high temperatures
Do not expose your machine to direct sunlight or set near a heating device.
Do not block the vents
Poor-ventilation may damage your machine. So do not block the vents or put the unit
in a poorly ventilated place.
When you’re away
When away on travel or otherwise for an extended period of time, turn off the power
and pull the plug from the electrical socket.
Do not insert foreign matter into the machine
Do not insert wires, hairpins, coins, etc. into your machine.
Care of the cabinet
When cleaning your machine, use a soft cloth and follow the relevant instructions on
the use of chemically-coated cloths. Avoid applying benzene, thinner or other organic
solvents and disinfectants. This may cause deformation or discoloring.
If water gets inside the machine
Turn off the power and pull the plug from the electrical socket, then call the store where
you made your purchase. Using the machine in this state may cause a fire or electrical
shock.
US and foreign patents licensed from Dolby Laboratories Licensing Corporation.
XM-228BK(B)-Eng. p.1-16 98.9.25, 4:19 PM1

2
Table of Contents
Welcome !.................................................... 1
Important cautions ....................................... 1
For safe use, observe the following ............. 1
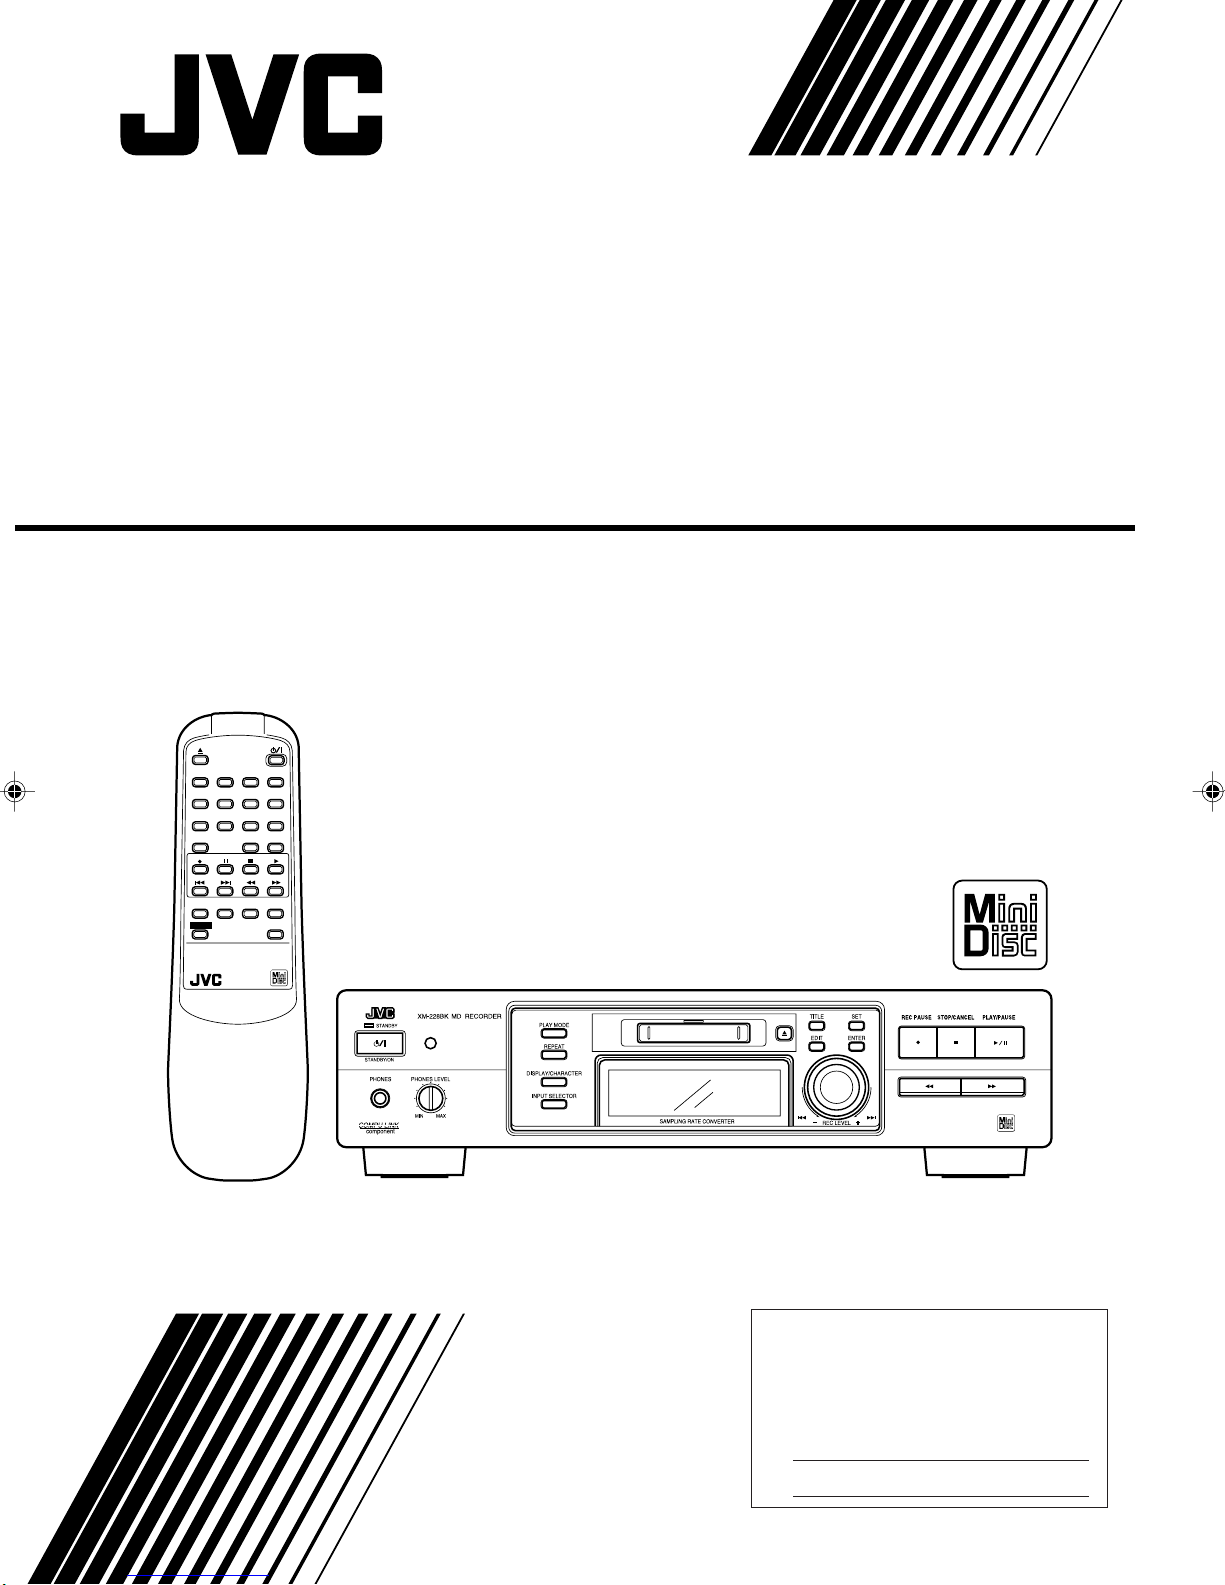
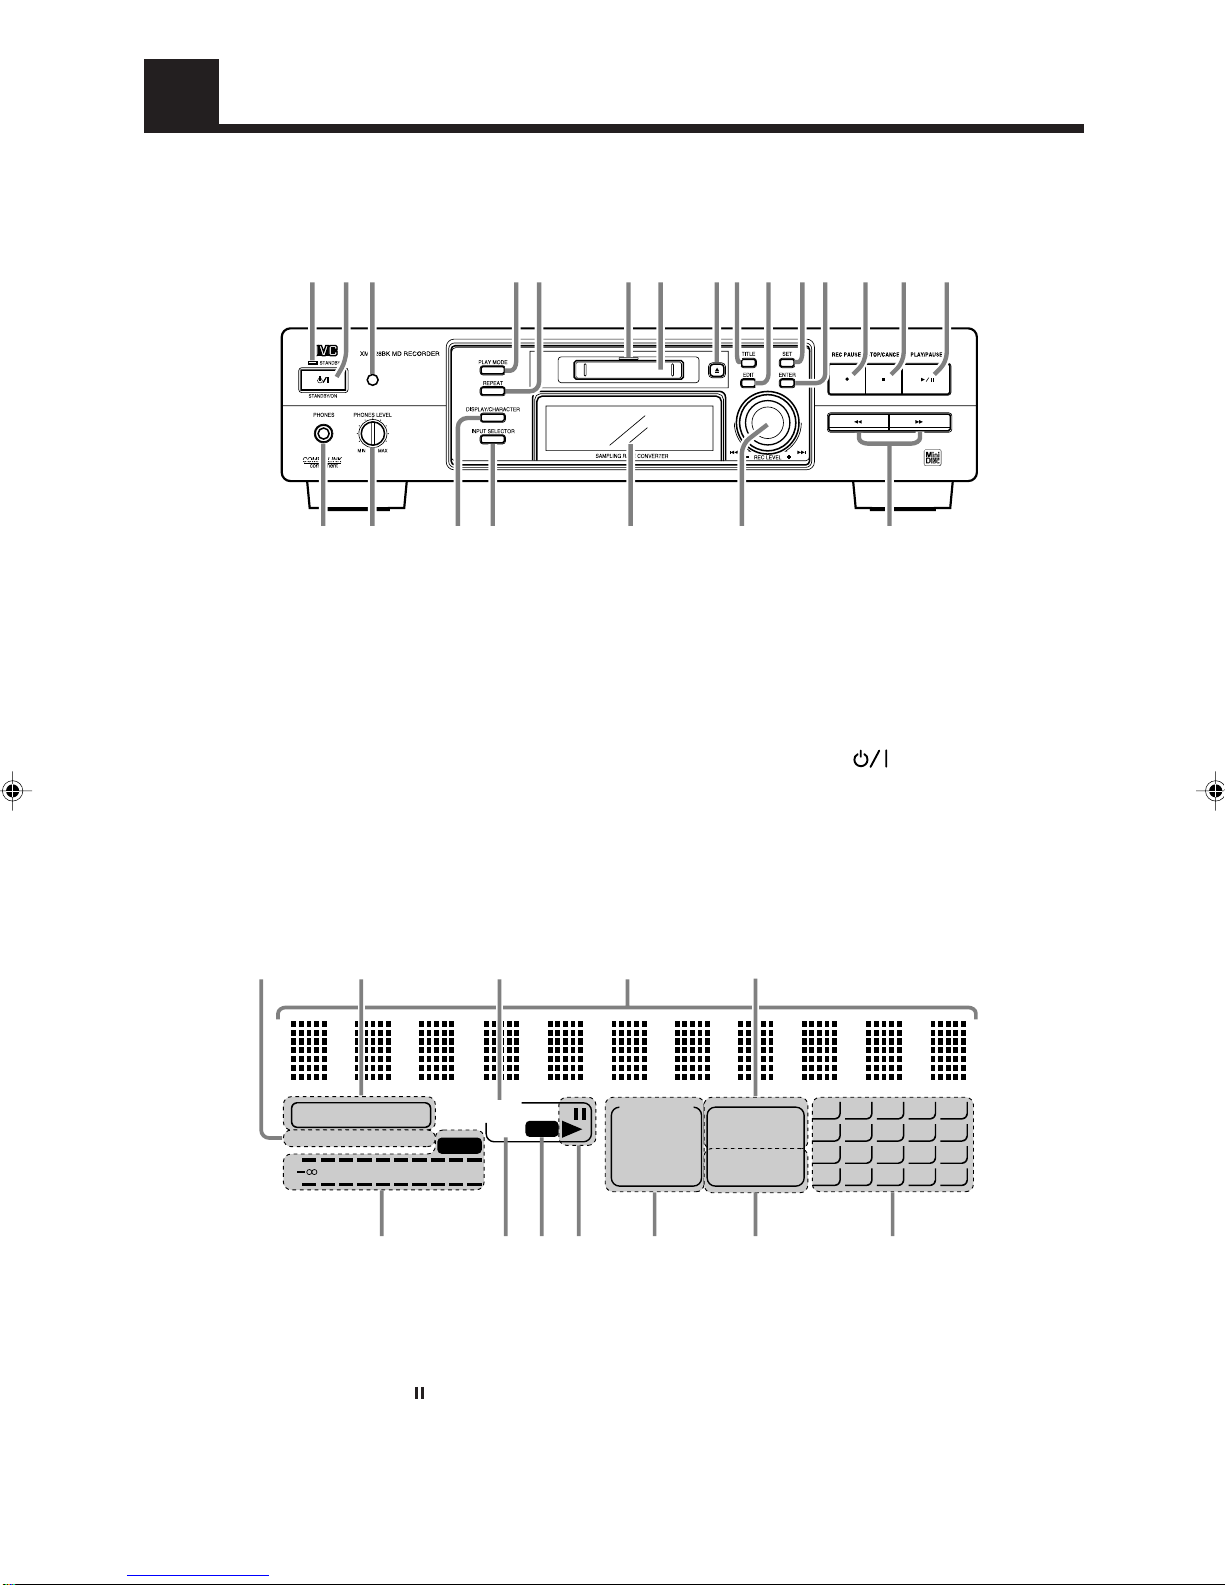
Parts Index ........................................... 3
Front panel.............................................. 3
Display.................................................... 3
Remote control unit ................................ 4
Setting up the System ........................ 5
Supplied Accessories ................................... 5
Remote control batteries.............................. 5
Operating the Remote Control..................... 5
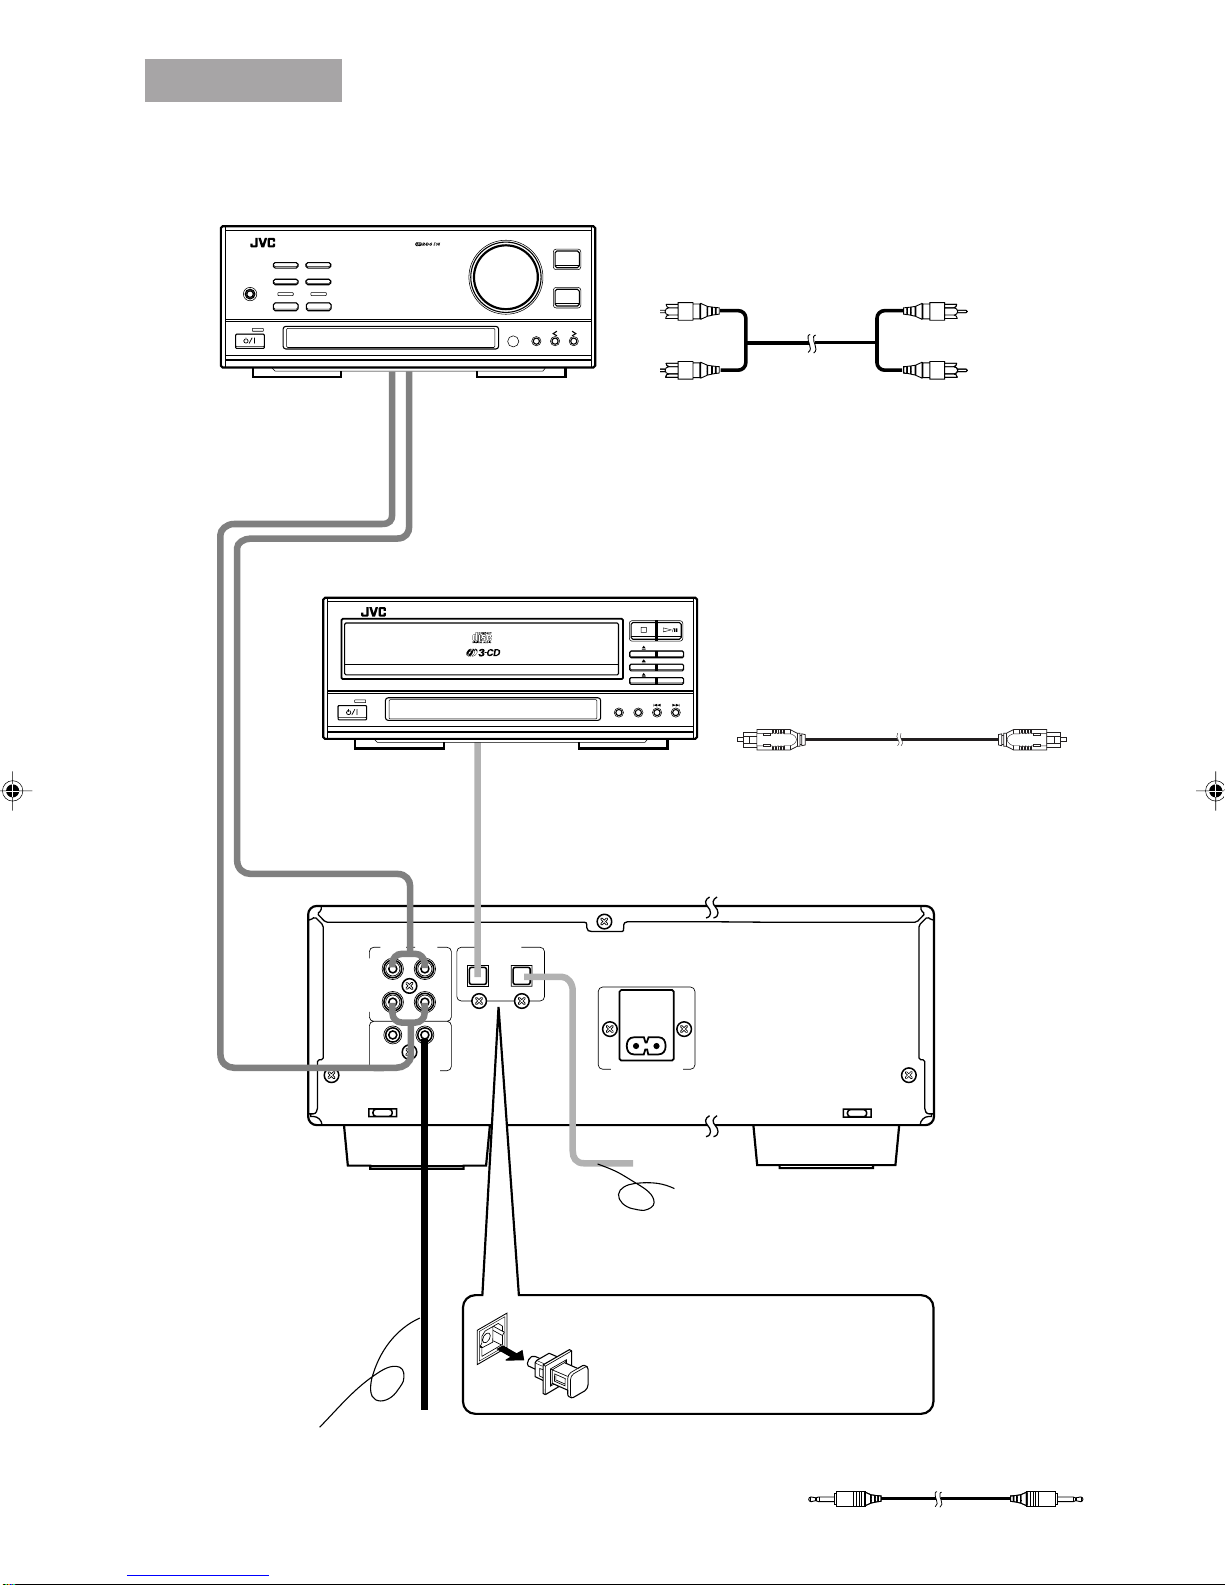
Connection................................................... 6
Turning the Power On and Off............ 7
Power On ..................................................... 7
Power Off..................................................... 7
Playback............................................... 8
Normal playback ......................................... 8
Switching the displayed information......... 10
Program playback ...................................... 10
Random playback ...................................... 12
Repeat playback......................................... 13
Recording .......................................... 14
Recording operation .................................. 14
Editing Functions.............................. 17
MD editing functions................................. 17
Dividing a track (DIVIDE)........................ 19
Joining tracks (JOIN) ................................ 20
Moving a track (MOVE) ........................... 22
Erasing a track (ERASE)........................... 23
Erasing all tracks in an MD
(ALL ERASE) ...................................... 24
Assigning the disc title and track titles...... 26
Assigning a track title during playback or
recording............................................... 29
COMPU LINK ..................................... 30
Linked Operation of the Other Optional
Components (Compu Link).................. 30
Rule on Digital Copying.................... 31
SCMS (Serial Copy Management System) 31
About MD (Mini Disc) ........................ 32
Role of the cartridge .................................. 32
Two disc types ........................................... 32
ATRAC (Adaptive TRansform
Acoustic Coding).................................. 33
Sound skip guard memory......................... 33
UTOC (User Table Of Contents) ............... 33
MD Messages .................................... 34
MD Restrictions................................. 35
Handling MDs .................................... 36
MD handling precautions ..................... 36
To protect important recording............. 36
Troubleshooting ................................ 37
Specifications.................................... 38
XM-228BK(B)-Eng. p.1-16 98.9.25, 4:19 PM2

3
Parts Index
Front panel ————————————————————————————
1PHONES jack
2PHONES LEVEL control
3DISPLAY/CHARACTER button
4INPUT SELECTOR button
5Display
6Jog dial (4, ¢/REC LEVEL)
71, ¡buttons
86PLAY/PAUSE button
97STOP/CANCEL button
p¶REC PAUSE button
qENTER button
wSET button
eEDIT button
rTITLE button
t0(Eject) button
yMD insertion slot
Display ——————————————————————————————
1Level indicators and OVER indicator
2TOC indicator
3REC indicator
4Play indicators (3(Play), (Pause))
5MD editing mode indicators
(DIVIDE, JOIN, MOVE, ERASE, ALL ERASE)
6Repeat mode indicators
(REPEAT ALL, REPEAT 1)
uDisc indicator
iREPEAT button
oPLAY MODE button
;Remote sensor
aSTANDBY/ON button
sSTANDBY indicator
7Music calender
8Play mode indicators (PROGRAM, RANDOM)
9Character display (11 digits)
pMD indicator
qInput mode indicators (DIGITAL 1, DIGITAL 2)
wSampling frequency indicators
(32kHz, 44.1kHz, 48kHz)
DIGITAL 12
MD
32kHz 44.1kHz 48kHz
TOC
MD EDIT
DIVIDE
JOIN
MOVE
ALL ERASE
PROGRAM
RANDOM
REPEAT
ALL 1
1
6
11
16
2
7
12
17
3
8
13
18
4
9
14
19
5
10
15
20
L
40 30 20 15 10 6 3 0 dB
R
REC
OVER
1
wq p 9 8
24356 7
s
1
a; oi u y tre wq p 9 8
243567
XM-228BK(B)-Eng. p.1-16 98.9.25, 4:19 PM3

4
Remote control unit————————————————————————
1(STANDBY/ON) button
2Numeric keys
3CANCEL button
4PROGRAM button
5RANDOM button
6MD control buttons
¶REC PAUSE
8(Pause)
7(Stop)
3(Play)
4, ¢
1, ¡
7SCROLL button
8SET button
9DISPLAY/CHARA button
pTITLE/EDIT button
qENTER button
wTRACK MARKING button
eREPEAT button
r0(Eject) button
RM-SM228EU
REMOTE CONTROL
1234
5678
9 10 +10
CANCEL
REPEAT
TRACK
MARKING TITLE
/EDIT DISPLAY
/CHARA SCROLL
REC PAUSE
RANDOM PROGRAM
SET
ENTER
1r
e
w
q
p9
8
2
4
3
5
6
7
XM-228BK(B)-Eng. p.1-16 98.9.25, 4:19 PM4

5
Setting up the System
Supplied Accessories
Before setting up your system make sure you received all of the following supplied
accessories.
AC power cord (1)
Audio pin cord (2)
Compu Link cable (1)
Optical digital cable (1)
Batteries R6P (SUM-3)/AA (15F) (2)
Remote Control (1)
Remote control batteries
Match the polarity (+ and –) on the batteries with the + and – markings in the battery
compartment.
CAUTION: Handle batteries properly.
To avoid battery leakage or explosion:
• Remove batteries when the Remote Control will not be used for a long time.
• When you need to replace the batteries, replace both batteries at the same time with
new ones.
• Do not use an old battery with a new one.
• Do not use different types of batteries together.
Operating the Remote Control
The remote control makes it easy to use many of the functions of the system from a
distance of up to 7 m (23 feet) away.
You need to point the remote control unit at the remote sensor on the front panel.
R6P (SUM-3)/AA (15F)
Remote sensor
XM-228BK(B)-Eng. p.1-16 98.9.25, 4:19 PM5

6
AC POWER CORD
DIGITAL IN
VICTOR COMPANY OF JAPAN, LIMITED MADE IN JAPAN
LEFTRIGHT
COMPU LINK- 3
(SYNCHRO)
IN
(REC)
OUT
(PLAY)
ANALOG
1- OPTICAL- 2
BAND
VOLUME
UP
KEY
MODE
DOWN
INPUT
PHONES
INTEGRATED AMPLIFIER / TUNER
STANDBY
DIRECTS. A. BASS
TA/NEWS
/INFO
DISPLAY
MODE
PTY
SEARCH
EON
ON/OFF
PLAY MODEREPEAT
STANDBY
COMPACT DISC PLAYER
CD 3
CD 2
CD 1
/CANCEL
PLAY &EXCHANGE
Connection
Signal cable connections ——————————————
Optical digital cable
Connect to the DIGITAL OUT
jack of your DBS tuner, etc.
Audio pin cords
Connect to the MD jacks, TAPE jacks, etc. of an external unit.
Always connect the jacks with the plugs of the same colors so as not to
mistake the L (Left) and R (Right) connections.
Connect the OUT (PLAY) jacks to the IN (PLAY) jacks of the external unit,
and the IN (REC) jacks to its OUT (REC) jacks.
Example: Amplifier/Tuner
Optical digital cable
Connect to the DIGITAL OUT jack of the CD player, for
example.
Compu Link cable
Connect to the COMPU LINK-3 (SYNCHRO) jack of another
component equipped with the Compu Link remote control system.
Example: CD player
Be sure to remove the protective cap
before using the DIGITAL IN jack.
Keep the cap in a safe place so you can
replace it when not using the DIGITAL
IN jack.
Audio pin cord (supplied)
Optical digital cable (supplied)
Compu link cable (supplied)
XM-228BK(B)-Eng. p.1-16 98.9.25, 4:19 PM6

7
AC power cord connection —————————————
First, firmly insert the supplied AC power cord into the AC inlet on the back of the unit.
Next, plug the AC power cord plug into the wall outlet.
Cautions
• Use only the JVC AC power cord provided with this system
to avoid malfunction or damage to the system.
• Be sure to unplug the power cord from the outlet when
going out or when the system is not in use for an extended
period of time.
Turning the Power On and Off
Power On
1 Press STANDBY/ON on the main unit or the remote
control unit.
The STANDBY indicator goes out, the disc indicator lights in green, and the display
comes on. The MD indicator lights up on the display.
When no MD is loaded:
“NO DISC” is shown on the display.
When an MD is already loaded:
The following messages are shown on the display in succession.
• “TOC Reading”
• The disc title, if the MD has.
• Number of tracks and the total playing time of the MD
You can play the MD by pressing 6on the main unit or 3on the remote control unit.
For detailed description, see “Playback” on the next page.
Power Off
1 Press STANDBY/ON again.
The STANDBY indicator lights up, the disc indicator goes out, and the display becomes
blank.
• Some power (7W) is always consumed even though power is turned off (called
Standby mode).
• To switch off the system completely, unplug the AC power cord from the AC outlet.
AC power cord
AC POWER CORD
XM-228BK(B)-Eng. p.1-16 98.9.25, 4:19 PM7

8
Playback
Normal playback
The basic operation for playing an MD is described below. When no MD is loaded yet,
“NO DISC” is shown on the display.
1 Load an MD.
Hold an MD with the side on which an
arrow is marked facing up, and insert it into
the slot in the direction of the arrow.
The MD will be pulled in automatically
from the middle.
• If the MD has a disc title, the display
shows the disc title then the number of
tracks and total playing time of the MD.
• The tracks in the MD appears on the
music calender.
Note: To allow easy insertion, insert the MD along the upper part of the MD insertion
slot.
Caution
• Do not mistake the MD insertion direction, otherwise
malfunction will result.
Shortcut:
You can insert an MD in Standby mode. Then, the power is turned on and the MD is
pulled in automatically.
2 Press 6on the main unit or 3on the remote control unit.
Playback starts.
The 3indicator blinks for a while and then stays lit.
The playback level for the L and R channels are shown on the level indicators.
• If the track has a title, the track title will be displayed before playing the track.
• The track number that has been played disappears from the music calender.
• The MD automatically stops when the last track of the MD has finished playing.
Shortcut:
When you press 6on the main unit or 3on the remote control unit in Standby mode,
power is turned on and the MD is automatically played. However, if no MD is loaded,
“NO DISC” is shown on the display.
To stop the MD:
Press 7on the main unit or the remote control unit.
• If the MD has a disc title, the display shows the disc title then the number of tracks and
total playing time of the MD.
To eject the MD:
Press 0on the main unit or the remote control unit.
The MD is ejected and the display changes as follows:
or
or
or
Number of tracks Total playing time
XM-228BK(B)-Eng. p.1-16 98.9.25, 4:19 PM8

9
To pause the MD:
Press 6on the main unit or press on the remote control unit.
The indicator lights up.
To cancel pause, press 6on the main unit or press 3on the remote control unit. The MD
starts from the position where it has paused.
To select a track ——————————————————
You can select a desired track during playback or in Stop mode. When you use the numeric
keys on the remote control unit in Stop mode, the selected track automatically starts
playing.
Main unit:
During playback, turn the jog dial to the right or left to select the track you want. Then, the
selected track starts playing.
• Turn the jog dial to the right by one click to skip to the beginning of the next track.
• Turn the jog dial to the left by one click to skip to the beginning of the current track
being played. While “--:--” is shown on the display, you can play the previous track by
turning the jog dial to the left.
In Stop mode, you can select a track in the same way. To start playback, press 6.
Remote control unit:
Using 4or ¢:
During playback, press 4or ¢to select the track you want. Then, the selected
track starts playing.
• Press ¢once to skip to the beginning of the next track.
• Press 4once to skip to the beginning of the current track being played. While
“--:--” is shown on the display, you can play the previous track by pressing 4.
In Stop mode, you can select a track in the same way. To start playback, press 3.
Using the numeric keys:
During playback or in Stop mode, select a track with the numeric keys. Then, the
selected track starts playing.
Selecting a track with the numeric keys:
To select track No. 5 : Press 5.
To select track No. 15: Press +10 then 5.
To select track No. 20: Press +10 then 10.
To select track No. 52: Press +10 five times then press 2.
• When you try to select a track number greater than the recorded tracks in the MD,
the last track is automatically selected.
Search play —————————————————————
During playback, you can fast forward/backwards the MD to quickly find a particular
passage in the track you are listening to.
To perform this, press and hold 1or ¡on the main unit or the remote control unit.
Using headphones —————————————————
Connect a pair of headphones (not supplied) to the PHONES jack to listen to the playback
sound of the MD or rec-monitor sound.
• The output from the unit is not cut off even if the headphones are used.
Caution
• Be sure to turn down the PHONES LEVEL control before
connecting or putting on headphones.
1234
5678
9 10 +10
or
or
XM-228BK(B)-Eng. p.1-16 98.9.25, 4:20 PM9

10
Switching the displayed information
The display can show the disc title, track title and remaining time (recording time available
when a recordable MD is loaded) information.
When no track is selected (In Stop mode):
Press DISPLAY/CHARACTER on the main unit or the remote control unit.
Each press of the button switches the displayed information as follows.
• A disc title composed of more than 11 characters is scrolled, and the
first 11 characters are displayed after scrolling.
• The display shows “NO TITLE” if the disc has no title assigned to it.
When a track has already been selected (During
playback or in Stop mode):
Press DISPLAY/CHARACTER on the main unit or the remote control unit.
Each press of the button switches the displayed information as follows.
• A track title composed of more than 11 characters is scrolled, and the
first 11 characters are displayed after scrolling.
• The display shows “NO TITLE” if the track has no title assigned to it.
Program playback
You can program up to 32 tracks in any desired order including the same tracks.
• You can only make a program in Stop mode.
1 Load an MD.
See “Normal playback ” on page 8.
2 Select Program mode.
Main unit:
Press PLAY MODE until “PROGRAM” is shown. Then, the PROGRAM indicator
lights up.
Each time PLAY MODE is pressed, the play mode indicators switches as follows:
Remote control unit:
Press PROGRAM. The “PROGRAM” is shown and the PROGRAM indicator lights
up.
To exit Program mode, press PROGRAM once again. Then, the PROGRAM indicator
goes out.
The display shows the following for programming.
Disc title
Number of tracks and
remaining recording time
Number of tracks and
total playing time
Track No. and its playing time
Track title
PROGRAM RANDOM Off (Continuous play)
DISPLAY
/CHARA
or
Number of tracks and total
playing time
Number of tracks and remaining
recording time
Disc title
PROGRAM
The first track
XM-228BK(B)-Eng. p.1-16 98.9.25, 4:20 PM10

11
3 Select desired track numbers to be programmed.
Main unit:
1 Turn the jog dial to the right or left to select the desired track number to be
programmed. (Turning it to the right increases the track number and vice versa.)
The selected track number will blink.
2 Press SET.
The track number stays lit and the program number increases by 1.Also, the
programmed track is indicated on the music calender.
Then, the total playing time is displayed instead of the program number.
Example)
3 Repeat steps 1 and 2 to select the other tracks for the program.
Remote control unit:
1 Select the desired track number with the numeric keys.
The selected track number is programmed and the program number is displayed.
Then, the total playing time is displayed instead of the program number.
To select a track, see “Selecting a track with the numeric keys” on page 9.
2 Repeat step 1 to select the other tracks for the program.
4 Press 6on the main unit or 3on the remote control
unit.
Program playback starts in the programmed order.
• Program playback stops after having played all programmed tracks.
• To stop playing, press 7on the main unit or the remote control unit.
• To skip the programmed track, turn the jog dial on the main unit to the right or left
or press 4or ¢on the remote control unit.
To check the programmed tracks and their order (In Stop
mode):
Press 4or ¢on the remote control unit in Stop mode. The programmed tracks will be
successively displayed in the programmed order. (The track title will be displayed before
the track number, if it is written.)
If you make a mistake in programming (In Stop mode):
Press 7STOP/CANCEL on the main unit or CANCEL on the remote control unit in Stop
mode to clear the last track. Each press of the button clears the last track in the program.
Press the button repeatedly until the track you programmed by mistake is cleared and then
re-program tracks from that point.
To exit Program Play mode (In Stop mode):
Main unit:
Press PLAY MODE in Stop mode to select any mode other than Program Play mode.
Remote control unit:
Press PROGRAM in Stop mode to light off the PROGRAM indicator.
The program contents remain in memory even after the unit has exited Program Play mode.
Note: The program contents are cleared from memory when the power cord is unplugged
or in case of power failure.
or
or
CANCEL
or
PROGRAM
Total playing time
The last programmed track
Number of programmed tracks
The last programmed track
XM-228BK(B)-Eng. p.1-16 98.9.25, 4:20 PM11

12
To clear the program:
Press 0 on the main unit or the remote control unit.
The programmed tracks are cleared then the MD is ejected.
To play programmed tracks repeatedly:
Combine the program playback and repeat playback to play the programmed tracks
repeatedly.
For the repeat playback, see page 13.
Random playback
Tracks in the MD can be played in a randomly selected order. The random playback may
bring you a surprising effect by playing tracks in a different order every time.
• You can only select the random play in Stop mode.
1 Load an MD.
See “Normal playback” on page 8.
2 Press PLAY MODE to select RANDOM.
Main unit:
Press PLAY MODE until “RANDOM” is shown. Then, the RANDOM indicator lights
up.
Each time PLAY MODE is pressed, the play mode indicators switches as follows:
Remote control unit:
Press RANDOM. The “RANDOM” is shown and the RANDOM indicator lights up.
To exit Random mode, press RANDOM once again. Then, the RANDOM indicator
goes out.
3 Press 6on the main unit or 3on the remote control unit.
Random playback starts.
• Random playback stops after having played every track once.
• To stop playing, press 7on the main unit or the remote control unit.
To exit Random Play mode (In Stop mode):
Main unit:
Press PLAY MODE in Stop mode to select any mode other than Random Play mode.
Remote control unit:
Press RANDOM in Stop mode to light off the RANDOM indicator.
To repeat random playback:
Combine the random playback and repeat playback to play tracks repeatedly in random
orders. The order tracks are played differs every time random playback is repeated.
For the repeat playback, see page 13.
PROGRAM RANDOM Off (Continuous play)
or
or
RANDOM
or
Number of tracks
RANDOM
XM-228BK(B)-Eng. p.1-16 98.9.25, 4:20 PM12

13
REPEAT ALL REPEAT 1
Off (Repeat playback canceled)
REPEAT
or
REPEAT
or
or
Repeat playback
You can repeat all the tracks or single track in each playback mode.
1 Press REPEAT on the main unit or the remote control unit
to select Repeat Play mode.
Each time REPEAT is pressed, the repeat mode indicators switches as follows.
REPEAT ALL :In Normal Play mode, repeats all the tracks.
In Program Play mode, repeats all the tracks in the program.
In Random Play mode, repeats all the tracks in random order.
REPEAT 1 :Repeats one track.
2 Press 6on the main unit or 3on the remote control
unit.
Repeat playback starts.
• To stop playing, press 7on the main unit or the remote control unit.
To cancel repeat playback:
Press REPEAT on the main unit or the remote control unit until the repeat mode
indicator goes out.
XM-228BK(B)-Eng. p.1-16 98.9.25, 4:20 PM13

14
Accidental erasure protect tab
For recording
or editing For protecting
erasure
Recording
REC PAUSE
or
The first track to
be recorded REC
An audio signal from a variety of sources can be recorded by using either digital or analog
input as required.
Things to know before recording ——————————
• It may be unlawful to record or play back copyrighted material without the consent of
the copyright owner.
• Carefully read the “Rule on Digital Copying” on page 31.
• The MD recorder supports the following sampling frequencies for digital sources
DIGITAL 1 and DIGITAL 2 and lights the sampling frequency being received on the
display.32 kHz, 44.1 kHz and 48 kHz
• Recording level adjustment:
When recording a digital input, the recording level is automatically set correctly.
When recording an analog input, it is necessary to adjust the recording level properly.
• The accidental erasure protect tab is provided on the back of an MD cartridge to prevent
accidental erasure or recording. It must be set to the close position before recording.
Otherwise, “DISC PROTECTED” will appear when you try to record a signal to the
MD.
• When you stick an adhesive label onto the MD cartridge, adhere it securely. If it peels
off, ejection trouble, etc. will occur.
• Be sure that the MD is not the Playback-only type one. (See “Two disc types” on page
32.)
• Be sure that the MD has enough space for recording. If not, carry out ERASE ALL or
ERASE function to erase all the tracks or desired tracks in the MD.You can check the
recordable remaining time of the MD. (See “To display the remaining recording time”
on page 16.)
Recording operation
1 Load a recordable MD.
2 Press ¶REC PAUSE on the main unit or the remote
control unit.
The MD recorder enters Rec/Pause mode. The REC and (Pause) indicators light up
and the first track to be recorded is displayed.Also, the disc indicator lights in red.
Example) When 14 tracks are already recorded
Close Open
XM-228BK(B)-Eng. p.1-16 98.9.25, 4:20 PM14

15
3 Select the input by pressing INPUT SELECTOR on the
main unit.
Each press of INPUT SELECTOR switches the inputs as follows.
DIGITAL 1 IN: Select this to record the digital input from the digital source
component connected to the DIGITAL IN 1 optical jack.
The DIGITAL 1 indicator lights up.
DIGITAL 2 IN: Select this to record the digital input from the digital source
component connected to the DIGITAL IN 2 optical jack.
The DIGITAL 2 indicator lights up.
ANALOG IN : Select this to record the analog input from the analog source
component (cassette deck, tuner, etc.) connected to the ANALOG IN
(REC jacks).
4 Play the source to be recorded.
The level indicators show the input levels.
• The input level should be adjusted when the analog input is recorded (see “To adjust
the analog input level” below).
• The input level for the digital inputs does not need adjustment.
• When DIGITAL 1 or DIGITAL 2 is selected, one of the sampling frequency
indicators lights up. For example, 44.1kHz indicator is displayed for a CD player
input.
However, if no source component is connected
to the digital input or the sampling frequency
input is other than 32 kHz, 44.1 kHz, or 48 kHz,
“DIGITAL IN UNLOCK” scrolls on the display
showing that the recording is impossible.
5 Press 6on the main unit or 3on the remote control unit.
Recording starts.
The 3indicator lights up.
• When the MD becomes full, “UTOCwriting” is displayed indicating that the
recording is successfully completed. Then, the MD stops. The disc indicator lights
in green.
To stop recording:
Press 7on the main unit or the remote control unit.
“UTOCwriting” is displayed and the MD stops. The disc indicator lights in green.
To pause the MD:
Press ¶REC PAUSE on the main unit or the remote control unit.
To resume recording, press 6on the main unit or 3on the remote control unit.
To adjust the analog input level ——————————
The input level should be adjusted before recording the analog input.
1 In Rec/Pause mode, start playing the source for level adjustment.
The level indicators show the input levels.
2 Turn the jog dial on the main unit to the right or left or press 4or ¢ on the remote
control unit to increase or decrease the recording level.
As you adjust the recording level, “VOL. –10” will appear, for example.You can adjust
the recording level between VOL.–50 and VOL.0 (–50 dB and 0 dB), or to VOL. – – –
(below –50 dB).
DIGITAL 1 IN DIGITAL 2 IN ANALOG IN
DIGITAL 1
44.1kHz
or
or
REC PAUSE
or
or
L
40 30 20 15 10 6 3 0 dB
R
XM-228BK(B)-Eng. p.1-16 98.9.25, 4:20 PM15

16
• Normally the input level should be adjusted so that the segments for 0 dB blink at the
peak level.
• When the input level is too high, the OVER indicator will light up, resulting in distorted
recording.
To display the remaining recording time ——————
In Rec/Pause or during recording, press DISPLAY/CHARACTER on the main unit or the
remote control unit.
Each press of the button switches the elapsed recording time display and remaining
recording time display alternately.
Track marking ———————————————————
The track numbers on the MD are marked at the beginning of each track. The track numbers
are identified by these “track markings” and each section between two track markings are
considered as a track.
For analog input:
You can create the track marking automatically or manually.
Automatic track marking:
Press TRACK MARKING on the remote control unit to select
“AUTO”.
• A track marking is automatically recorded every time a blank of more than 3
seconds is detected.
Manual track marking:
1 Press TRACK MARKING on the remote control unit to
select “MANUAL”.
2 When the point you want to record a track marking comes during recording, press
SET on the remote control unit.
This operation records a track marking at the point where the button is pressed.
For digital input:
When tracks are recorded from a CD player by digital input, track markings are recorded
automatically at the points where the CD tracks change.
remaining recording time
DISPLAY
/CHARA
or
TRACK
MARKING
TRACK
MARKING
SET
XM-228BK(B)-Eng. p.1-16 98.9.25, 4:20 PM16

17
C D E
AB
After
All Erase
Track No.
1st 2nd 3rd 4th 5th
C D E
AB
C D E
A
After track B
erasure
Track No.
1st 2nd 3rd 4th 5th
1st 2nd 3rd 4th
C D E
AB
CDE
AB
After track B
movement
Track No.
1st 2nd 3rd 4th 5th
1st 2nd 3rd 4th 5th
CDE
C D E
BA
AB
After track B
joining
Track No.
1st 2nd 3rd 4th 5th
1st 2nd 3rd 4th
C D
A
1st
B
2nd 3rd 4th
E
5th
1st 2nd 3rd 4th
B C DA E
After track B
division
Track No.
Editing Functions
MD editing functions
A recorded MD can be edited in many ways. The editing functions include the dividing,
joining, moving, erasing a single track, erasing the entire disc and assigning titles to the
disc and tracks, and more than one of them can be combined as required.
Dividing a track (DIVIDE) Page 19
This function divides a track by adding track marking(s) in
desired point(s) in the middle or where you want to search later.
Joining tracks (JOIN) Page 20
This function joins two adjacent tracks into a single track by
deleting a track marking.
Moving a track (MOVE) Page 22
This function moves a track by reordering the track numbers.
Erasing a track (ERASE) Page 23
This function erases a specified track.After the erasure, the
subsequent tracks are justified and their track numbers are
decremented automatically.
Erasing all tracks (ALL ERASE) Page 24
This function erases data in a disc entirely.
XM-228BK(B)-Eng. p.17-29 98.9.25, 4:22 PM17

18
B C
A
AB
AAC
abc
ABC
A
a c
ABC
A
a c
b
a c
Dividing track A
into 3 tracks
Part to be erased
Erasing track
Joining
tracks and
Track No.
Track No.
Track No.
1st
1st
1st
1st
2nd
2nd
2nd
3rd
2nd 3rd
3rd
3rd
4th
4th
5th
Combining editing functions
By combining “DIVIDE”, “ERASE” and “JOIN”, for
example, it is possible to erase only a part of existing track.
Assigning titles
A title can be assigned to a track or disc. Once a title is
assigned, it is displayed in later playback for confirmation.
Each title can be composed of up to 64 characters, and can
be input using any of character types, alphabets (uppercase
and lowercase), symbols and numerals.
XM-228BK(B)-Eng. p.17-29 98.9.25, 4:22 PM18
This manual suits for next models
1
Table of contents
Other JVC Recording Equipment manuals

JVC
JVC KSSRA100 - Vehicle Sirius Satellite Radio... Guide

JVC
JVC XL-R5000BKB User manual

JVC
JVC XL-R5000BK User manual

JVC
JVC HR-A37U User manual

JVC
JVC SA-F911E User manual

JVC
JVC VU-LD20U User manual

JVC
JVC HR-S5900EG User manual

JVC
JVC HM -DR10000EU User manual

JVC
JVC HM-HDS1U User manual

JVC
JVC KA-MR100G User manual