Fostex UR-2 Instructions and recipes

Model UR-2 Supplementary manual
<for version 1.10>
8289657000
(494752)
With the software upgrade of the UR-2 to version 1.10,
the following changes are made. See also the UR-2 owner's
manual together with this supplement.
You can now record and play back an MP3 file.
Two recording modes -- Relay mode and Loop mode -- are
newly added.
You can now perform seamless continuous recording be-
tween SD cards.
The procedure of file copy is changed.
You can now create a folder for storing audio files on a stor-
age device using the unit.
You can now save and load a chain play list.
The name editing function using the keys on the panel of
the unit is enhanced.
The RS232C commands are enhanced.
The digital scrub function while setting the chain play list is
improved.

2
Recording/playbackofMP3files......................................................................................................3
Expandedrecordingmodes.............................................................................................................4
Creatingafolderforrecordedaudiofiles........................................................................................5
Creating a new folder ..................................................................................................................5
Selecting a folder ..........................................................................................................................5
Editing a folder name ..................................................................................................................6
Newprocedureforfilecopy..............................................................................................................7
Saving/loadingachainplaylist........................................................................................................8
Saving a chain play list ................................................................................................................8
Loading a chain play list .............................................................................................................9
Otherenhancedfunctions ..............................................................................................................10
Enhanced digital scrub function while setting a chain play list .........................................10
Backspace and insert in name entry .......................................................................................10
New RS232C commands are added ........................................................................................11
Contents
3
With the new version, you can record and play back MP3 (compressed) files.
You can choose from following four types of MP3 modes using the "Record FS/bit" item in the SYSTEM SETUP
menu of the MENU mode.
Recording/playback of MP3 files
About MP3 (MPEG Layer-3)
Supply of this product does not convey a license nor imply any right to distribute content created
with this product in revenue-generating broadcast systems (terrestrial, satellite, cable and/or other
distribution channels), streaming applications (via Internet, intranets and/or other networks), other
content distribution systems (pay-audio or audio-on-demand applications and the like) or on physi-
cal media (compact discs, digital versatile discs, semiconductor chips, hard drives, memory cards and
the like). An independent license for such use is required. For details, please visit “http://
mp3licensing.com”.
MPEG Layer-3 audio coding technology licensed from Fraunhofer IIS and Thomson.
<Previous version>
44K16 (44.1kHz/16bit): Default
48K16 (48kHz/16bit)
44K24 (44.1kHz/24bit)
48K24 (48kHz/24bit)
88K24 (88.2kHz/24bit)
96K24 (96kHz/24bit)
<New version>
44K16 (44.1kHz/16bit): Default
48K16 (48kHz/16bit)
44K24 (44.1kHz/24bit)
48K24 (48kHz/24bit)
88K24 (88.2kHz/24bit)
96K24 (96kHz/24bit)
MP3-LP (44.1kHz/64kbps): Newly added
MP3-SQ (44.1kHz/128kbps): Newly added
MP3-MQ (44.1kHz/192kbps): Newly added
* For details about the "Record FS/bit" menu item in the "SYSTEM SETUP" menu of the MENU mode, see
page 74 of the owner's manual.
<Memo>: A name of an mp3 file has the "mp3" file extension.
MP3-HQ (44.1kHz/256kbps): Newly added
<Note>:
You cannot add an mp3 file to the play list for memory play. In other words, you cannot play back an
mp3 file in memory play mode. For details about playback in memory play mode, see page 45 of the owner's
manual.
4
Two new recording modes -- Relay mode and Loop mode -- are now available in addition to the Normal mode.
Expanded recording modes
Normal mode
(default)
Relay mode
(newly added)
Loop mode
(newly added)
Recording stops when no available recording space is left on the current storage device.
When no available recording space is left on the current storage device, the unit continues recording to the next
storage device.This mode is available only when there is available recording space on the next storage device.If no
recording space is available on every storage device, recording stops.
<Note>:This mode is available only when two SD cards are set to the SD-1 and SD-2 slots.It is not applicable
to a USB memory. On the second SD card, only the BWFF folder is created.
As with the Relay mode above, when no available recording space is left on the current storage device, the unit
continues recording to the next storage device.The difference from the Relay mode is that the unit performs overwrite
recording while erasing old data in the Loop mode.Therefore, when two storage devices are set, recording semi-
permanently continues until you manually stop recording.
<Note>:This mode is available only when two SD cards are set to the SD-1 and SD-2 slots. It is not applicable
to a USB memory. On the second SD card, only the BWFF folder is created.
<Note>:
With version 1.10, when the current file size reaches the maximum file size (2G or 4G) during recording,
the unit automatically creates a new file and performs recording to the new file continuously. (With the previous
version, the unit stops when the current file size reaches the maximum file size.) This function is available only
when you use a storage device that has the recordable space more than the maximum file size. When you use a
storage device that has the recordable space less than the maximum file size, the unit stops when no available
recording space is left (except in Relay and Loop modes).
When recording in MP3 mode, the unit automatically creates a new file when the time indication reaches 100
hours.
<Note>:
When recording "high FS and high bit rate" audio in either Relay or Loop mode, the beginning of the
audio of the next storage device may be slightly muted. In other words, you may hear a small gap when playing
back audio files on two SD cards continuously.
(1) While the unit is stopped, press the [ENTER] key to
enter the MENU mode.
When you first enter the MENU mode, the
following screen is shown.
(2) While "SYSTEM SETUP" is highlighted, press the
[ENTER] key.
The display now shows the menu items of the
SYSTEM SETUP menu.
(3) Use the [MENU] dial to highlight "Record mode" and
press the [ENTER] key.
The currently selected “Recording mode” flashes.
By default, "Normal" is flashing.
(4) Use the [MENU] dial to highlight the desired recording
mode and press the [ENTER] key.
You can select from "Normal" (default), "Relay" and
"Loop".
(5) Press the [EXIT] key repeatedly or press the [STOP] key
to exit the MENU mode.
<Memo>: The following screens show how the record
icon is shown on the display during recording in Relay
mode and Loop mode.
Flashing
<During recording in Normal mode>
<During recording in Relay mode>
<During recording in Loop mode>
5
When you first perform recording to a blank storage device, the unit automatically create the "BWFF" folder
and recorded audio files are stored to this folder. With version 1.10, you can also additionally create a folder
for storing audio files using the UR-2. You can give a desired name to the folder you created, which also can be
edited later.
To create a folder or edit a folder name, use the "Make folder" or "Edit folder name" menu item in the
"STORAGE UTILITY" menu of the MENU mode (see the following description).
Creating a folder for recorded audio files
Creating a new folder
In the following description, it is assumed that the
"BWFF" folder is created on the current storage device
(SD-1) and an audio file in this folder is loaded.
(1) While the unit is stopped, press the [ENTER] key to
enter the MENU mode.
When you first enter the MENU mode, the
following screen is shown.
(2) Use the [MENU] dial to highlight "STORAGE UTILITY"
and press the [ENTER] key.
The display now shows the menu items of the
STORAGE UTILITY menu.
(3) Use the [MENU] dial to highlight "Make folder" (newly
added) and press the [ENTER] key.
The display shows the screen for editing the name
of the newly created folder.
(4) Enter the desired folder name according to the following
manners.
You can give a folder name with up to 14 characters.
(5) After editing the folder name, press the [ENTER] key to
confirm the name.
The display returns to the Home screen that was
shown before the unit entered the MENU mode.
<Memo>: The unit gives a default folder name,
which you can edit later, therefore, you do not
have to edit it in this step. . See "Editing a folder
name" on the next page.
Selecting a folder
When more than one folder (including a folder cre-
ated from a personal computer) is available on the
current storage device, you can select a folder for
recording/playback.
In the following description, it is assumed that there
are the "UR2_1" and "UR2_2" folders in addition to
the "BWFF" folder on the current storage device.
STORAGE
BWFF
UR2_1
UR2_2
To move the cursor position left or right
Press the [ ] or [ ] key.
To select a desired alphanumeric character
at the cursor position
Rotate the [MENU] dial.
To erase a character on the left of the cursor position
Press the [ ] key while holding down the [
SHIFT
] key.
To insert a space at the cursor position
Press the [ ] key while holding down the [
SHIFT
] key.
Flashing
6
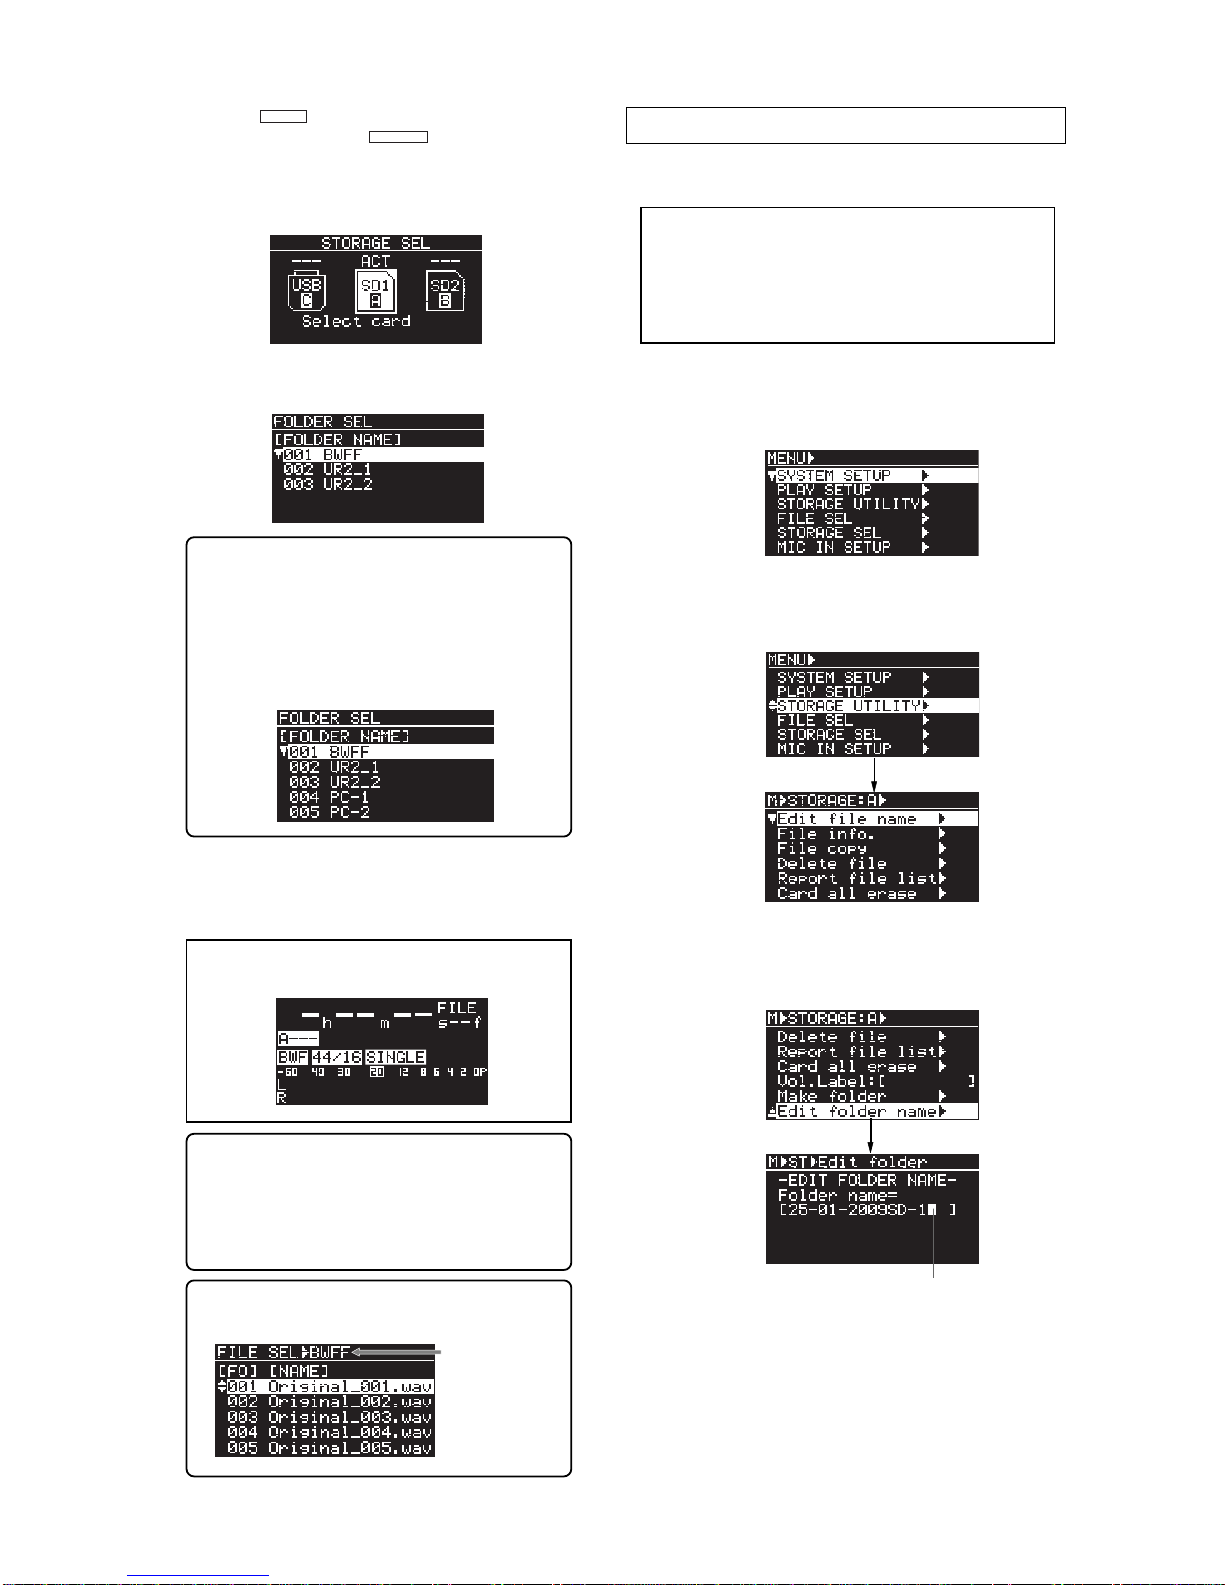
(1) Press the [
SHIFT
] key to turn on the SHIFT mode
followed by the [FILE SEL/
STRG SEL
] key.
The display shows the screen for selecting a
storage device.
In the screen example below, only an SD card is set
to the "SD-1" slot.
(2) Press the [ENTER] key again.
The display now shows the screen for selecting a
folder.
(3) Use the [MENU] dial to select a desired folder and press
the [ENTER] key.
The display shows the Home screen for the first
created audio file in the selected folder.
<Memo>: In the screen example above, "001
BWFF" is the BWFF folder created automatically
when you perform recording with the storage
device, while "002 UR2_1" and "003 UR2_2" are
folders manually created.
Folders created from a personal computer are
also shown ("004 PC-1" and "005 PC-2" in the
example below).
<Note>:
If no audio file exists in the selected
folder, the display shows as below.
<Memo>: When more than one storage device is
set to the unit and you want to select a desired
folder that is not on the current storage device,
execute the similar procedure as above.
You also need to select a folder when you edit a
file name or delete an audio file.
Editing a folder name
You can edit a name of a folder in the current storage
device.
<Note>:
To edit a name of a folder, the folder must
be in the current storage device.
Select a storage device and then select a folder be-
fore executing the following procedure.
Note that you can also edit a folder name from your
personal computer.
(1) While the unit is stopped, press the [ENTER] key to
enter the MENU mode.
When you first enter the MENU mode, the
following screen is shown.
(2) Use the [MENU] dial to highlight "STORAGE UTILITY"
and press the [ENTER] key.
The display now shows the menu items of the
STORAGE UTILITY menu.
(3) Use the [MENU] dial to highlight "Edit folder name" (newly
added) and press the [ENTER] key.
The display shows the screen for editing the folder
name of the current folder.
(4) Edit the folder name.
See page 4 for details about how to edit a folder
name.
(5) After editing the folder name, press the [ENTER] key to
confirm the name.
The display returns to the Home screen that was
shown before the unit entered the MENU mode.
<Memo>: To check the current folder, press the
[FILE SEL] key while the Home screen is shown.
The current folder
is shown here.
Flashing
7
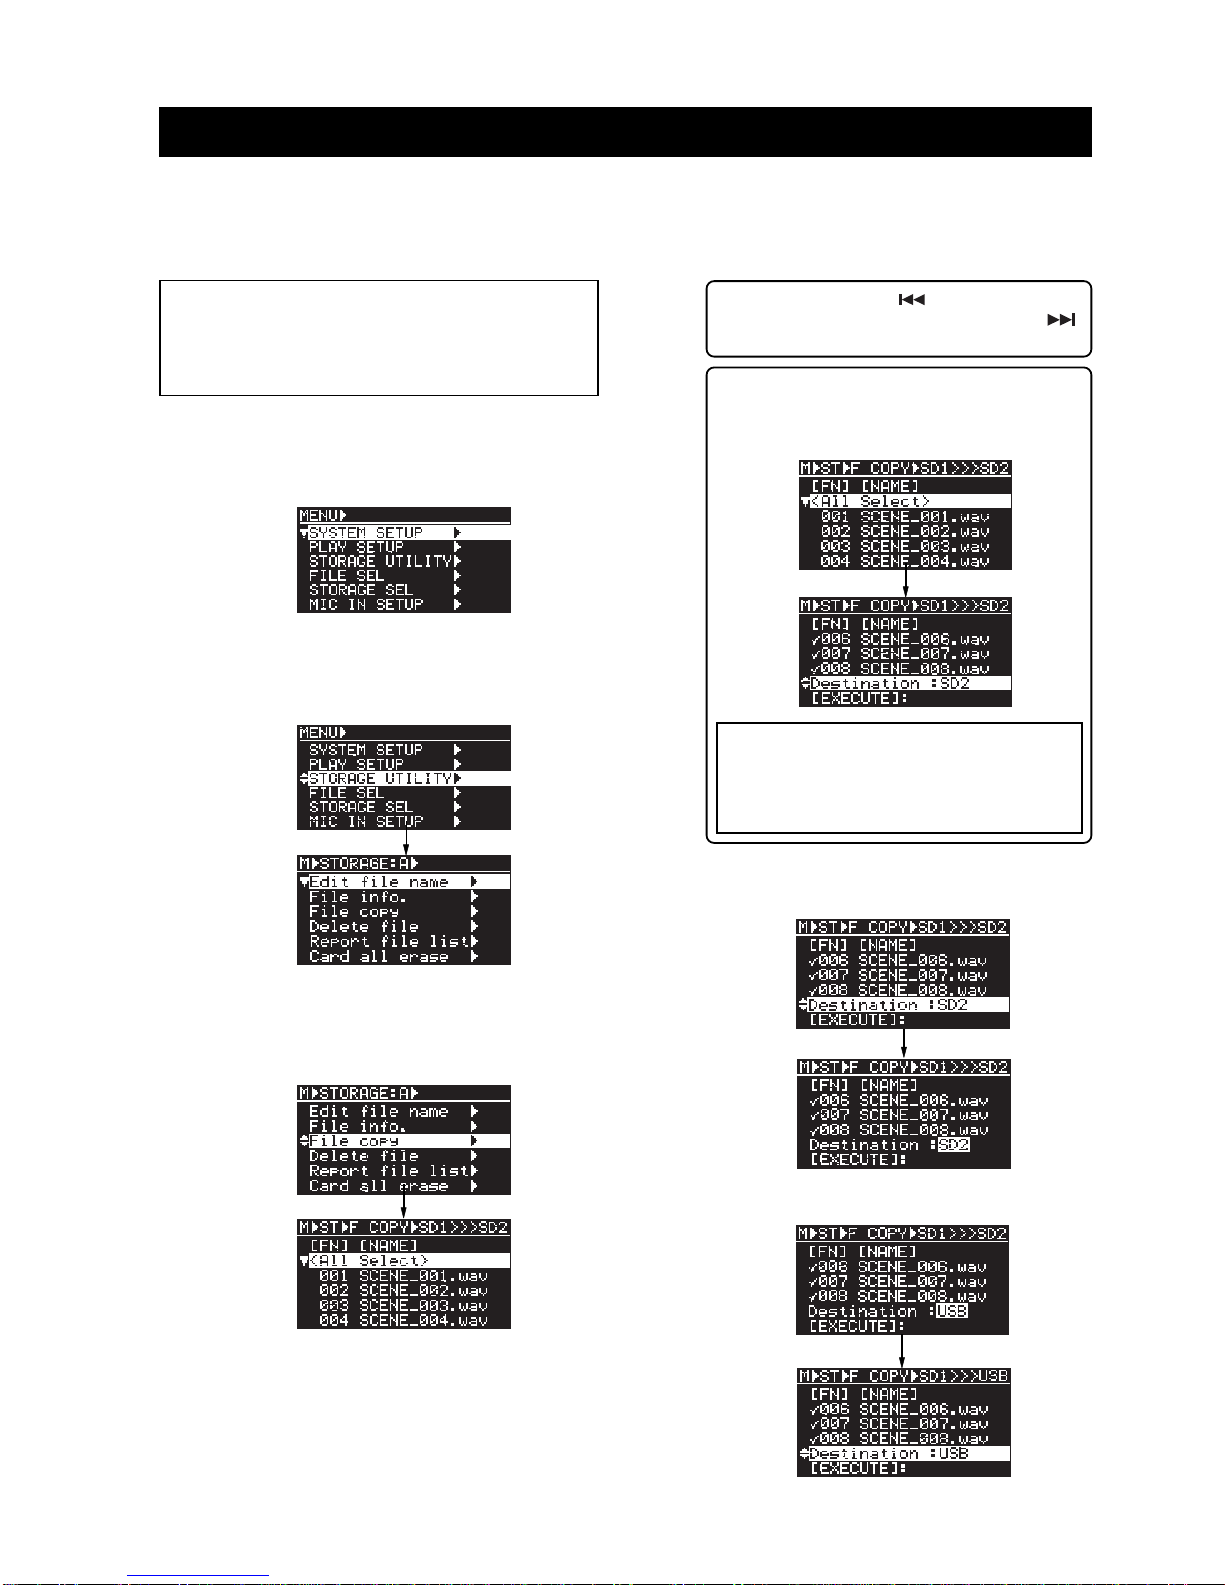
With the newly added folder creation capability described earlier, the procedure for file copy is partly changed.
Follow the procedure described below for file copy with the new version. (The procedure for file copy with the
previous version is described on page 84 of the owner's manual.)
The following shows the procedure for copying files from an SD card in the SD-1 slot to a USB memory.
New procedure for file copy
1) While the unit is stopped, press the [ENTER] key to
enter the MENU mode.
When you first enter the MENU mode, the
following screen is shown.
(2) Use the [MENU] dial to highlight "STORAGE UTILITY"
and press the [ENTER] key.
The display now shows the menu items of the
STORAGE UTILITY menu.
(3) Use the [MENU] dial to highlight "File copy" and press
the [ENTER] key.
The display shows the file list in the selected folder
on the current storage device.
(4) Use the [MENU] dial to highlight a copy source file and
press the [ENTER] key.
A checkmark is added to the left of the selected
file. By repeating this step, you can add checkmarks
to multiple files.
<Note>:
If more than one folder exists on the current
storage device, select an appropriate folder that stores
a file you want to copy before performing the follow-
ing procedure. See "Selecting a folder" for details about
how to select a folder.
<Memo>: By highlighting "<All Select>" at the top
of the file list and pressing the [ENTER] key, you
can add checkmarks to all the files. The screen
changes as below.
<Note>:
If you want to copy all files in the chain
play list (CHAINLIST.CSV) or in the timer play
list (TIMERLIST.CSV) created on the copy
source storage device, it is recommended to
select "<All Select>".
(5) Use the [MENU] dial to highlight "Destination" and press
the [ENTER] key.
You can now select the copy destination.
(6) Use the [MENU] dial to select "USB" and press the
[ENTER] key.
<Memo>: Pressing the [ ] key highlights the
first entry in the list, while pressing the [ ]
key highlights the last entry in the list.

8
<Note>:
If you attempt to select a copy destina-
tion which does not have enough space to ac-
cept the copy source files, the popup window as
below appears and you cannot select the desti-
nation.
(7) Use the [MENU] dial to highlight "[EXECUTE]" and press
the [ENTER] key.
The display shows the folder list in the destination
storage device. (This folder list screen is newly
added with version 1.10 software.)
(8) Use the [MENU] dial to select the destination folder and
press the [ENTER] key.
The unit starts file copy from the SD card in the
SD1 slot to the USB memory.
After finishing file copy, the popup window as
below appears and the unit stops access.
<Note>:
Even though only one folder exists on
the destination storage device, the folder list
screen as above is shown.
(9) Press any key to exit the MENU mode.
With the new version, you can save and load a chain play list that is created using the "CHAIN PLAY SET" menu
of the MENU mode. In result, you can have more than one chain play list in a folder.
Saving/loading a chain play list
The following shows how to save a chain play list.
It is assumed that a chain play list (named
"CHAINLIST.CSV") has been created using the "CHAIN
PLAY SET" menu.
For details about how to create a chain play list, see
page 46 of the owner's manual.
Saving a chain play list
(1) While the unit is stopped, press the [ENTER] key to
enter the MENU mode.
When you first enter the MENU mode, the
following screen is shown.
(2) Use the [MENU] dial to highlight "CHAIN LIST SAVE" and
press the [ENTER] key.
The display now shows the screen for editing a name
of the current chain play list.
<Note>:
Without saving a chain play list created us-
ing the "CHAIN PLAY SET" menu, it is overwritten
when you create a new chain play list. Therefore, if
you want to keep the current chain play list and
create a new one, save the current chain play list
using the "CHAIN LIST SAVE" menu before creating
another one.
(3) Enter the desired chain play list name.
Use the [ ] and [ ] keys to move the editing
(flashing) point and use the [MENU] dial to enter
the desired alphanumeric character.
To erase a character on the left of the cursor
position, press the [ ] key while holding down
the [
SHIFT
] key.
To insert a space at the cursor position, press the
[] key while holding down the [
SHIFT
] key.
In the following screen example, "Chime1" is entered.
Flashing
Flashing

9
(4) After entering the name, press the [ENTER] key.
The display now shows the confirmation screen for
saving the chain play list.
<Note>:
If you want to change the name, press
the [ENTER] key while "EXIT" is highlighted.
The display returns to the previous screen for
name entry.
(5) Use the [MENU] dial or [ ] key to highlight "EXECUTE"
and press the [ENTER] key.
"COMPLETED!" is briefly shown and saving is
completed. The display returns to the Home screen
that was shown before the unit entered the MENU
mode.
<Note>:
If a chain play list with the same name
exists in the same folder, the following screen
appears after you press the [ENTER] key.
To overwrite the existing chain play list, high-
light "EXECUTE" and press the [ENTER] key.
If you do not want to overwrite the existing chain
play list, press the [ENTER] key while "EXIT" is
highlighted and rename the list name and save
the list.
<Memo>: You can check the chain play lists you
saved by executing steps (1) and (2) of the "Load-
ing a chain play list" described below.
You can load a chain play list you have saved.
Loading a chain play list
<Note>:
You can load any chain play list in the cur-
rent folder.
(1) While the unit is stopped, press the [ENTER] key to
enter the MENU mode.
When you first enter the MENU mode, the
following screen is shown.
(2) Use the [MENU] dial to highlight "CHAIN LIST LOAD"
and press the [ENTER] key.
The display now shows the screen for selecting a
chain play list. On the example screen below, only
one chain play list is available.
<Memo>: On the example screen below, three
chain play lists are saved in the current folder.
(3) Use the [MENU] dial to select a desired chain play list to
be loaded and press the [ENTER] key.
The display shows the warning message as below.
To cancel loading, press the [ENTER] key while
"EXIT" is highlighted.
(4) Use the [MENU] dial or [ ] key to highlight "EXECUTE"
and press the [ENTER] key.
"COMPLETED!" is briefly shown and loading is
completed.
The display returns to the Home screen that was
shown before the unit entered the MENU mode.

10
In addition to the changed/enhanced functions described earlier, the following functions are enhanced with
the new version.
Other enhanced functions
When you fine-adjust the start or end time of a file in the chain play list (see page 49 of the owner's manual
for details), the digital scrub function is now enhanced with the new version, as described below.
(1) By pressing the [PLAY] key while the display shows the scrub screen,you can preview audio of first 1.5 seconds from
the start point (or last 1.5 seconds to the end point).
(2) Each time you press the [ ] key while the display shows the scrub screen, the waveform is zoomed in to x2,x4, x8 and
x16. Each time you press the [ ] key while the display shows the scrub screen,the waveform is zoomed out.
Enhanced digital scrub function while setting a chain play list
<Note>:
With the function enhancement (2) above, you now cannot use the [ ] and [ ] keys for digital
scrubbing forward or backward. Use the [MENU] dial to scrub forward or backward.
When you enter a name (file name, etc.) in the MENU mode, you can now delete or insert a character from the
unit (with the previous version, you can delete or insert a character only from a USB keyboard).
Though the operation methods for deleting and inserting a character are described on page 4 in this supple-
ment, see also below.
The following operation examples show how to edit a file name on the file name editing screen of the "Edit file
name" menu item in the "SYSTEM SETUP" menu of the MENU mode.
Backspace and insert in name entry
Cursor position (flashing)
(Example 1)
Press the [ ] key while holding down the [
SHIFT
] key.
The character on the left of the cursor position is deleted.
(Example 2)
Press the [ ] key while holding down the [
SHIFT
] key.
A space is inserted at the cursor position.
To move the cursor position left or right
Press the [ ] or [ ] key.
To select a desired alphanumeric character
at the cursor position
Rotate the [MENU] dial.
To erase a character on the left of the cursor position
Press the [ ] key while holding down the [
SHIFT
] key.
To insert a space at the cursor position
Press the [ ] key while holding down the [
SHIFT
] key.
Cursor position (flashing)
Cursor position (flashing)
11
Several RS232C commands are newly added. With the new version, the UR-2 complies with the follow-
ing RS232C commands. See page 63 of the owner's manual for details about controlling the unit from a
personal computer via RS232C control commands.
New RS232C commands are added
REC
c
STOP
c
PLAY
c
REW
c
c
c
c
c
c
FFWD
SKIP<<
SKIP>>
ABS 0
REC END
STX 12345678910 11 12 CHK CHK ETX STX 12345678910 11 12 CHK CHK ETX
HEX
02 63 52 45 43 20 20 20 20 20 20 20 20 33 44 03
02 63 53 54 50 20 20 20 20 20 20 20 20 35 41 03
02 63 50 4C 59 20 20 20 20 20 20 20 20 35 38 03
02 63 52 45 57 20 20 20 20 20 20 20 20 35 31 03
02 63 46 57 44 20 20 20 20 20 20 20 20 35 34 03
02 63 53 4B 2B 20 20 20 20 20 20 20 20 34 43 03
02 63 53 4B 2D 20 20 20 20 20 20 20 20 32 45 03
02 63 41 42 30 20 20 20 20 20 20 20 20 31 36 03
02 63 52 45 44 20 20 20 20 20 20 20 20 33 45 03
D
A
8
1
4
C
E
6
E
3
5
5
5
4
2
2
1
3
R
S
P
R
F
S
S
A
R
E
T
L
E
W
K
K
B
E
C
P
Y
W
D
+
-
O
D
ASCII (a space is just a blank space)
c
LOAD FILE 02 63 4C 44 46 xxx20 20 20 20 20
xx
03
XX
LDF
c
LOCATE 02 63 4C 4F 43
hhmmssffxx
03
XX
LOC
X
H
X
H
X
MMS SFF
0c
1c
2c
3c
c
c
c
c
c
4
5
6
7
8
STX 12345678910 11 12 CHK CHK ETX STX 12345678910 11 12 CHK CHK ETX
HEX
02 63 4B 59 30 20 20 20 20 20 20 20 20 33 37 03
02 63 4B 59 31 20 20 20 20 20 20 20 20 33 38 03
02 63 4B 59 32 20 20 20 20 20 20 20 20 33 39 03
02 63 4B 59 33 20 20 20 20 20 20 20 20 33 41 03
02 63 4B 59 34 20 20 20 20 20 20 20 20 33 42 03
02 63 4B 59 35 20 20 20 20 20 20 20 20 33 43 03
02 63 4B 59 36 20 20 20 20 20 20 20 20 33 44 03
02 63 4B 59 37 20 20 20 20 20 20 20 20 33 45 03
02 63 4B 59 38 20 20 20 20 20 20 20 20 33 46 03
7
8
9
A
B
C
D
E
F
3
3
3
3
3
3
3
3
3
K
K
K
K
K
K
K
K
K
Y
Y
Y
Y
Y
Y
Y
Y
Y
0
1
2
3
4
5
6
7
8
ASCII (a space is just a blank space)
c
9KY9
c
10+ K0+ 0490 02 63 4B 59 39 20 20
02 63 4B 30 2B 20 20 20 20 20 20 20 20
20 20 20 20 20 20 34 30 03
30 39 03
Correct receipt
r
Not remotable
s
Error r
Error (BUSY)
r
STX 12345678910 11 12 CHK CHK ETX STX 12345678910 11 12 CHK CHK ETX
HEX
02 72 53 54 50 20 20 20 20 20 20 20 20 35 39 03
02 73 52 4E 47 20 20 20 20 20 20 20 20 35 41 03
02 72 45 52 52 20 20 20 20 20 20 20 20 35 42 03
02 72 42 47 59 20 20 20 20 20 20 20 20 35 34 03
9
A
B
4
6
5
5
5
S
R
E
B
T
N
R
G
P
G
R
Y
ASCII (a space is just a blank space)
REC RDY ON
c
REC RDY OFF
c
STX 12345678910 11 12 CHK CHK ETX STX 12345678910 11 12 CHK CHK ETX
HEX
02 63 52 44 59 4F 4E 20 20 20 20 20 20 41 46 03
02 63 52 44 59 4F 46 46 20 20 20 20 20 39 43 44
F
D
A
C
R
RD
DY
Y
ASCII (a space is just a blank space)
OFF
ON
FILE STATUS
s
Response
r
FILE TIME
s
Response
r
s
r
DISK REMAIN
TIME
Response
STX 12345678910 11 12 CHK CHK ETX STX 12345678910 11 12 CHK CHK ETX
HEX
02 73 46 49 4C 20 20 20 20 20 20 20 20 34 45 03
02 72
nnnxx
02 73 46 54 4D 20 20 20 20 20 20 20 20 35 41 03
02 72 46 54 4D
hhmmssffxx
03
02 73 44 52 4D 20 20 20 20 20 20 20 20 35 36 03
02 72 44 52 4D
hhhhmmssxx
03
E
X
A
X
4
X
4
X
5
X
4
X
F
N
F
F
D
D
I
N
T
T
R
R
L
N
M
M
M
M
ASCII (a space is just a blank space)
HHMMSSFF
HHHHMMSS
( FILE NAME MAX 8CHAR ) ( file name max 8char.)
<Status request and response>
<Mode setting>
<Receipt response>
<Numeric keys>
<Transport controls>

© PRINTED IN JAPAN FEB 2009 8289 657 000 FX
(494752)
FOSTEX CO.
3-2-35 Musashino, Akishima-shi, Tokyo Japan 196-0021
Other manuals for UR-2
3
Table of contents
Other Fostex Recording Equipment manuals

Fostex
Fostex 8333 User manual

Fostex
Fostex XR-3 User manual

Fostex
Fostex D-90 User manual

Fostex
Fostex 4030 User manual

Fostex
Fostex VF-16 User manual

Fostex
Fostex DE-10 User manual

Fostex
Fostex Foundation 2000RE User manual

Fostex
Fostex VF-16 User manual

Fostex
Fostex E-16 User manual

Fostex
Fostex X-55 User manual


