Fostex VF-16 User manual
VF-16 Owner’s Manual
< V3.1 Supplement >
This owner’s manual supplement explains
about “added function” and “expanded
function” by updating the software to V3.1.
Read this supplementary manual together
with the main owner’s manual to fully utilize
VF-16 with V3.1 software.
8288 688 000

2
VF-16 Owner's Manual V3.1 Supplement
• Addition of Collective Track Select function (Refer to page 3 - 4.)
When selecting IN (INPUT) - TRK (TRACK), BUSS REC SOURCE and DIRECT REC TRK or SAFE/READY
status of input monitoring function, all of the objective tracks can be collectively selected at once now.
• Addition of Channel SOLO Function (Refer to page 5.)
With a simple key operation, turning ON/OFF of SOLO function on a desired channel is now possible.
• Expanded Locate function (Refer to page 5)
1. Designating the event number allows to locate directly.
2. Locating to a last REC START POINT is now possible instantly.
3. A faster locating using [F FWD/NEXT] / [REWIND/PREV] key is now possible.
• Expanded Zoom function on Digital Scrub (Refer to page 6)
Enlarging the waveform by the zoom function in 5 scales allows to improve locate accuracy.
• Addition of Track Exchange pattern (Refer to page 6)
In addition to the “8 track” unit and “mono (1) track” unit, exchanging “2 track (stereo pair)” unit is
now possible.
• Expanded function that the tempo map setting is incorporated into BPM value of BPM DELAY (Refer
to page 7)
Incorporating the tempo map setting into the BPM parameter setting (Effect Type: L31 / L32) in the
internal DSP Multi Effect is now possible. With this function, there is no need to use a scene to change
the BPM value. Thus, varying the BPM value in accordance with previously set tempo map when in
PLAY mode.
• Expanded Scene Event Map function (Refer to page 7)
1. Even in the Event Map window, VF-16 current location can be now recognized.
2. The cursor position when displaying the Event Map window is changed.
3. In order to prevent from operation mistake, an "ALERT" is now displayed when deleting an event.
• Change on Display contents when in Scene Recall/Store/Clear (Refer to page 8)
1. When Scenes are displayed by the list, the scene currently recalled is easily recognized now.
2. Even when in PLAY mode, entering into Scene Store mode is now possible.
3. In or der to prevent from operation mistake, an "ALERT" is now displayed when a scene is cleared.
• Change on turning ON/OFF of Fader Recall mode (Refer to page 8)
1. When a scene is recalled with "Fader Recall mode" setting in the SETUP mode to ON, FADER ADJUST
LED will not flash anymore.
2. In the condition that "Fader Recall mode" is set to OFF, Level Adjust function can be activated now.
• Addition of "Pair Fader Setting" SETUP mode (Refer to page 9)
Manipulating an odd channel fader allows to control the adjacent channel fader level now.
• Addition of WAV file Export/Import function using a SCSI external CD-RW/CD-R drive (Refer to page
10 - 14)
In addition to the operation-confirmed drives up to now (e.g. MO, zip), exporting/importing a WAV file
to/from a SCSI external CD-RW/CD-R drive/disk is now possible.
• Expanded function on creating an Audio CD (Refer to page 15)
Creating a multiple audio CDs with same contents consecutively is now possible.

3
VF-16 Owner's Manual V3.1 Supplement
Addition of Collective Track Select function
When selecting INPUT - TRACK (9 ~ 16), BUSS REC
SOURCE (1 ~ 16), DIRECT REC TRK (1 ~ 16) and
SAFE/READY status of input monitoring function,
all the objective tracks can be collectively selected
at once now.
• Collective Select of BUSS REC SOURCE
When selecting a source channel after pressing the
[BUSS SOURCE] key, pressing either one of the [CH
STATUS/CH SEL] 1 ~ 8 key with holding down the
[SHIFT] key allows to change all the channel 1 ~ 8
SOURCE and SAFE status alternatively. In the same
manner, pressing either one of the [CH STATUS/CH
SEL] 9 ~ 16 key with holding down the [SHIFT] key
allows to change all the channel 9 ~ 16 SOURCE and
SAFE status alternatively.
<Example>
Pressing either one of the 1 ~ 8 [CH STATUS/CH SEL] keys
with holding down the [SHIFT] key changes the SOURCE -
SAFE status alternatively.
< CAUTION >
If Collective Select is executed in the condition that there
are “
IN
(INPUT)” channels, all the channels are switched
to “TRACK”. In the same manner, if Collective Select is
executed in the condition that one or some of the record
tracks (BUSS or DIRECT REC track) are in the READY
status, all the READY tracks are canceled.
<Example>
Pressing either one of the 9 ~ 16 [CH STATUS/CH SEL] keys
with holding down the [SHIFT] key changes the SOURCE -
SAFE status alternatively.
< CAUTION >
If some of the channels are selected as REC tracks,
Collective Select is not possible. If some of the channels
are selected as SOURCE tracks, all the channels (1 ~ 8,
9 ~ 16) will be in the SAFE status.
• Collective Select of INPUT - TRACK
When selecting IN (INPUT) - TRK (TRACK) after
pressing the [INPUT SEL] key, pressing either one of
the [CH STATUS/CH SEL] 9 ~ 16 keys with holding
down the [SHIFT] key allows to select “IN (INPUT)” or
“TRK (TRACK)” all at once. Every time the key is
pressed, “IN” and “TRK” are alternatively selected.

4
VF-16 Owner's Manual V3.1 Supplement
• Collective Select of INPUT MONITORING
In the condition that the normal display is displayed
or in the DIRECT REC TRK selection on the screen,
pressing the [INPUT SEL] key with holding down the
[SHIFT] key allows to change all the track 1 ~ 16
input monitoring SAFE and READY status
alternatively.
In the READY status, all the 1 ~ 16 track [CH STATUS/
CH SEL] keys are flashing in red. In the SAFE status,
they stop flashing and go back to the previous
condition.
• Collective Select of DIRECT REC TRK
When selecting a DIRECT REC TRACK after pressing
the [DIRECT REC TRK] key, pressing either one of the
[CH STATUS/CH SEL] 1 ~ 8 key with holding down the
[SHIFT] key allows to change all the channel 1 ~ 8
SAFE and READY status alternatively. In the same
manner, pressing either one of the [CH STATUS/CH
SEL] 9 ~ 16 key with holding down the [SHIFT] key
allows to change all the channel 9 ~ 16 SAFE and
READY status alternatively.
<Example>
Pressing either one of the 1 ~ 8 [CH STATUS/CH SEL] keys
with holding down the [SHIFT] key changes the SAFE -
READY status alternatively.
< CAUTION >
The status of the channels which are selected as IN
(INPUT) cannot be changed. If Collective Select is
executed in the condition that one or some of the record
tracks (BUSS or DIRECT REC track) are in the READY
status, all the READY tracks are canceled.
<Example>
Pressing either one of the 9 ~ 16 [CH STATUS/CH SEL] keys
with holding down the [SHIFT] key changes the SAFE -
READY status alternatively.
< CAUTION >
The status of the channels which are selected as IN
(INPUT) cannot be changed.
If Collective Select is executed in the BUSS REC mode,
the alert “
Rec Mode Change! Sure?
” will be displayed on
the LCD. If you press the
[ENTER/YES]
key, recording
mode will be switched to “
DIRECT
” and all the tracks
are put into input monitoring mode. If you press the
[EXIT/NO]
key, the alert message will disappear and the
display goes back to the previous status.
CH STATUS/CH SEL
12345678
TRACK
9 10111213141516
TRACK
ABCDEFGH
INPUT
ORANGE
CH STATUS
INPUT RED REC GREEN PLAY MUTE
EQ/COMP
EFF1/EFF2 HI-G/F/Q
AUX1/AUX2 MID-G/F/Q
PAN LO-G
FADER CHVIEW
PRE/POST
PRE/POST
COMP
MUTE MUTE
EFF1 EFF2
CH PARAM EDIT
EFF EDIT
OFF
CH STATUS/CH SEL
+6
-10
-20
-40
-
∞
-30
0
+6
-10
-20
-40
-
∞
-30
0
+6
-10
-20
-40
-
∞
-30
0
+6
-10
-20
-40
-
∞
-30
0
+6
-10
-20
-40
-
∞
-30
0
+6
-10
-20
-40
-
∞
-30
0
+6
-10
-20
-40
-
∞
-30
0
+6
-10
-20
-40
-
∞
-30
0
+6
-10
-20
-40
-
∞
-30
0
MASTER
+6
-10
-20
-40
-
∞
-30
0
+6
-10
-20
-40
-
∞
-30
0
+6
-10
-20
-40
-
∞
-30
0
+6
-10
-20
-40
-
∞
-30
0
+6
-10
-20
-40
-
∞
-30
0
+6
-10
-20
-40
-
∞
-30
0
+6
-10
-20
-40
-
∞
-30
0
+6
-10
-20
-40
-
∞
-30
0
RECALL STORE
DIRECTRCL M AP
SCENE
CLEAR
If all the 1 ~ 16 tracks are put in the input
monitor mode, the channel 1 ~ 16 [CH STATUS/
CH SEL] keys as well as the [RECORD] key will
flash in red.

5
VF-16 Owner's Manual V3.1 Supplement
Expanded LOCATE Function
• Expanded on ABS LOCATE Function
Pressing the [RECORD] key with holding down the
[STOP] key allows to locate to the start time of the
last recording promptly.
• Expanded on SEEK LOCATE Function
The SEEK LOCATE function can be executed by
pressing either the [F FWD/NEXT] or [REWIND/PREV]
key with holding down the [SHIFT] key and locates
to the next or previous Event Memory point. On the
V3.1 software, the SEEK LOCATE function has been
expanded. The number of times that the [F FWD/
NEXT] or [REWIND/PREV] key is pressed is memorized
and locate to the further corresponding Event
Memory point.
< CAUTION >
If no recording is executed after powering on, the above
key manipulation will locate to "
ABS 0
".
• DIRECT LOCATE on Event Map Display
While in the condition that the Event Map is
displayed (pressing the [SCENE-STORE/MAP] key with
holding down the [SHIFT] key), designating a desired
event memory and locating is possible.
< Example >
In order to locate to the event memory point EVT05
which is the 2nd event memory point ahead from the
current position, press the [F FWD/NEXT] key twice with
holding down the [SHIFT] key.
< Example >
In the below Event Map Display, selecting the Event
Memory 02 (00h 00m 00s 00sf) by rotating the [JOG]
dial and then pressing the [LOCATE] key will allow to
locate to 00h 05m 00s 00sf and automatically go back
to the Normal Display condition.
The following LOCATE functions have been expanded
on the V3.1 software.
Addition of Channel SOLO function
In the VF-16 with the previous software version, if
you would like to monitor only a certain channel,
all the other channels faders must be turned down.
With the V3.1 software, one key manipulation allows
to turn on and off of the SOLO on a desired channel.
• Turning on and off of channel SOLO function
Pressing a desired [CH STATUS/CH SEL] key with
holding down the [SHIFT] key will SOLO the
corresponding channel and the [CH STATUS/CH SEL]
key will start flashing.
If you do the same key manipulation as above again,
the SOLO function will be canceled.
Tips:
• Turning ON the SOLO function on a muted
channel allows to listen to the signal routed to
the corresponding channel. If the SOLO function
is canceled, the signal is muted again.
• In the Normal Display condition, when the SOLO
function on one of the channels is ON, pressing
the [CH STATUS/CH SEL] key on a channel on
which the SOLO function is set to OFF will cancel
SOLO function on all the channels.
• In the Normal Display condition, the channel on
which the SOLO function is turned ON will
automatically become a CH PARAM EDIT objective
channel. For example, when entering the EQ Edit
mode after the Channel 2 SOLO function is turned
ON, Channel 2 will be automatically in a condition
that the EQ parameters can be edited.
• When in BUSS REC mode, turning ON/OFF of the
SOLO function on the SOURCE channel will
automatically turn ON/OFF of READY channel.
(Turning ON/OFF of READY channel cannot be
manually controlled.)
Current position
10M00S
EVT 03
07M30S
EVT 02
05M00S
EVT 01
02M30S
ABS0
EVT 06
17M30S
EVT 05
15M00S
EVT 04
12M30S
[SHIFT] key + [F FWD/NEXT] key
6
VF-16 Owner's Manual V3.1 Supplement
Zoom Function on Digital Scrub
Current location Magnification
< Tips >
In the condition that the magnification is set to other
than X01, holding down the [SHIFT] key changes the
magnification to X01 temporarily. Note that the
magnification is reset to X01 when powering off and
back on.
Addition of Track Exchange pattern
If the [JOG] dial is rotated in the condition that
“01&02” is displayed, “01&02” ~ “23&24” can be
selected. In the same manner, the 2-track unit at
right side can be selected by rotating the [JOG] dial.
For example, if the Track Exchange pattern
“07&08<=>01&02” (“01&02<=>07&08”) is selected, track
1/2 and track 7/8 will be exchanged upon executing
the Track Exchange.
Flashing
An "Adjacent odd and even 2 tracks (stereo pair)" unit
Track Exchange pattern has been newly added. It is
now possible to select the Track Exchange pattern
among 1-track unit, 8-track unit and 2-track unit.
The zoom function on Digital Scrub has been
expanded on the V3.1 software and it is now possible
to zoom by the magnification X2, X4, X8 and X16.
In the X16 magnification, the resolution will become
0.7ms. On VF-16 with the previous software, the
resolution was fixed at about 10ms.
• Changing Zoom Magnification
Changing the Zoom magnification can be executed
by pressing the [F FWD] or [REWIND] key in the below
display condition. Pressing the [F FWD] key every
time will change the magnification by X01 -> X02 ->
X04 -> X08 -> X16. In the same manner, pressing the
[REWIND] key will decrease the magnification.
Changing the magnification is global on all the tracks
and the magnification is displayed at the bottom
section of the screen.
For your information, if the Zoom magnification is
changed, based on the current location at the center,
redrawing the display is executed. • Exchanging the 2-track unit
Press the [EDIT] key and display “Track Exchange?”.
Then, after the press of [ENTER/YES] key, rotating
the [JOG] dial will change the Track Exchange pattern
to 8-track unit, 1-track unit, and 2-track unit.
Flashing
Flashing
One track unit exchange
8 track unit exchange
2 track unit exchange
TRACK 17
TRACK 18
TRACK 19
TRACK 20
TRACK 21
TRACK 22
TRACK 23
TRACK 24
TRACK 9
TRACK 10
TRACK 11
TRACK 12
TRACK 13
TRACK 14
TRACK 15
TRACK 16
TRACK 1
TRACK 2
TRACK 3
TRACK 4
TRACK 5
TRACK 6
TRACK 7
TRACK 8
7
VF-16 Owner's Manual V3.1 Supplement
Tempo Map setting incorporating into BPM value
The operation below is explained on the assumption
that the "tempo map" has been programmed.
1.After pressing the [EFF 2] key, rotate the [JOG] dial,
select either [L31:Mono BpmDL] or [L32:Pan BpmDL]
and press the [ENTER/YES] key.
The display below is an example that [L31:Mono BpmDL]
is selected.
2.Select "BPM" as a parameter to be edited and rotate
the [JOG] dial fully C.W.
As shown in the drawing below, the BPM value with "M"
attached at the end will be displayed. “M” stands for
map and “**” the tempo map currently set on the unit.
3.Press the [EXIT/NO] key to exit the Effect Edit mode.
By the procedures above, the tempo map currently set
on the unit will be incorporated into the BPM parameter.
< CAUTION >
If incorporating the tempo map value into the BPM
parameter is not required, select the value without “
M
”
attached at the end.
On the V3.1 software, the programmed “tempo map”
setting in the SETUP menu can be incorporated into
the BPM parameter value set in the effect type “L31”
and “L32” of the EFF2 library. Refer to the following
operation procedures for specific settings.
Change on Event Map
• Change on Event Map display
When switching to the Event Map display, the cursor
is displayed to the nearest Event Map to the current
position and the corresponding event number will
start flashing. With this change, recognizing the
recorder current location will be possible even on
the Event Map Display.
Cursor
EVENT No.
In the above condition, putting the unit in PLAY, F
FWD or REWIND mode will flash the Event Number
closest to the current location. For example, if the
unit is put in PLAY mode in the above display
condition, the Event Number 02, 03 and 04 will flash
in order.
< CAUTION >
Even if the recorder location changes, the cursor
position will not. The Event Map currently displayed
on the screen will not scroll either. Thus, even if the
Event Number exists after 04, the flashing event will be
up to Event Number 04. In order to check the current
location after Event Number 04, changing the cursor
position is required.
Tips:
As explained in the "Expanded LOCATE Function" before,
in the above Event Map display, selecting a desired Event
Number and pressing the [LOCATE] key will locate to a
designated point promptly.
• Addition of ALERT when deleting Event Memory in Event
Map
When deleting an Event Memory in the Event Map,
in order not to mistakenly delete it, the following
ALERT will be displayed and “Sure?” will flash.
In order to delete the Event Memory, press the
[ENTER/YES] key. To cancel, press the [EXIT/NO] key.
Note that deleting the Event Map cannot UNDO.
As shown in the example below, the cursor is displayed
on the Event Number 2 where the recorder current
location is the closest and the corresponding event
number “02” flashes.
Event Map display (pressing the [SCENE-STORE/MAP]
key with holding down the [SHIFT] key) and the
display when deleting the Event Map has been
changed.
Flashing
8
VF-16 Owner's Manual V3.1 Supplement
Change on Display contents when in Scene Recall/Store/Clear
• Changing on display contents when in scene recall
In the condition that there are SCENES stored,
switching to the Scene Recall Display by the press of
[SCENE-STORE/MAP] key will allow to display the
scene currently recalled.
In the above display condition, when executing the
DIRECT RECALL or playback by the SCENE
SEQUENCE, every time the scene changes, the
corresponding scene number will flash.
For example, if the SCENE SEQUENCE playback is
executed in the order of S02, S03 and S04, the
corresponding scene number (02, 03 and 04) will
flash accordingly.
< CAUTION >
Even if the scene changes, the cursor position will not.
The Scene Recall display currently displayed on the LCD
will not scroll either. Thus, even if the Event Numbers
exist after 04 (Event Number 05, 06 ...), the flashing
event will be up to Event Number 04. In order to check
the Event Number 05 and onwards, changing the cursor
position is required.
Cursor
SCENE No.
• Addition of ALERT when clearing SCENE MEMORY
When clearing a Scene Memory in the Event Map, in
order not to mistakenly clear it, the following ALERT
will be displayed and “Sure?” will flash.
In order to clear the Scene Memory, press the [ENTER/
YES] key. To cancel, press the [EXIT/NO] key. Note
that clearing the Scene Memory cannot UNDO.
• Storing Scene Even when in PLAY mode
Even when in PLAY mode, the display which allows
to execute the Scene Store function appears on the
screen now. Storing the modified scene while playing
back a song is possible.
As shown in the example below, The cursor is displayed
on the Scene Number 02 (Title: B*****) which is
currently recalled and the Scene Number 02 will flash.
With this change, recognizing the scene currently
recalled is now possible.
Change on turning ON/OFF of Fader Recall mode
• Change 1
Recalling the scene when the “Fader Recall mode
Setting” in the SETUP menu is set to ON (“CH”, “MST”
or “CH&MST”) used to flash the FADER ADJUST LED
until the actual fader position and the fader level
set in the scene matched. From the V3.1 software, in
the Normal Display, the FADER ADJUST LED will not
flash any longer.
Now the FADER ADJUST LED flashes only when the
actual fader position and the fader level set in the
scene do not match in the FADER ADJUST, LEVEL
ADJUST or FADER VIEW display. It is naturally lit
solid when the actual fader position and the fader
level set in the scene match. (The FADER ADJUST
LED is unlit when in the FADER VIEW display.)
< CAUTION >
When the “
Fader Recall mode Setting
” in the SETUP menu
is set to OFF, the FADER ADJUST LED will not flash
regardless of the actual fader position and the fader
level set in the scene.
• Change 2
In the condition that the fader level set in the scene
currently recalled and the actual fader position do
not match, if you try to change the “Fader Recall mode
Setting” in the SETUP menu from ON (“CH”, “MST”
or “CH&MST”) to OFF, the ALERT asking to execute
the Level Adjust function will appear on the LCD as
shown below. This ALERT is for drastic level change
that might occur when the Level Adjust function will
be executed.
For your information, the Level Adjust function will
force the fader level set in the scene to match the
actual fader position.
In order to execute the Level Adjust function, press
the [ENTER/YES] key. To cancel, press the [EXIT/NO]
key.
Flashing
Flashing

9
VF-16 Owner's Manual V3.1 Supplement
A newly added “Pair Fader Set” menu sets whether or not you simultaneously control the adjacent odd and
even channels.
Normally, each channel fader on VF-16 is designed to act independently. By turning ON the “Pair Fader Set”,
you can pair faders of two adjacent channels, allowing the odd channel fader to control the partner (even)
channel's level. This function is useful for controlling the level of stereo source, etc.
Remember that controlling the “Pair Fader Channels” simultaneously during channel parameter editing is
possible. See "Hints!" below in detail.
Initial setting: “Off” for all pair channels
Options: “On”, “Off” for each pair channels
* Pair Fader can be set on each individual program.
* Pair Fader setting can be saved and loaded as part of
song data
* Pair Fader setting is maintained even after powering
off.
1.Select “Pair Fader Set” in the SETUP menu and press
the [ENTER/YES] key.
The pair fader set status (On or Off) list appears and
channel 1 & 2 line is highlighted. In the initial condition,
all paired channels are set to “Off”.
2.Select a desired channel pair by rotating the [JOG] dial
and press the [ENTER/YES] key.
The setting field ("On" or "Off") for the selected channels
flashes.
3.Select “On” or “Off” by the [JOG] dial and press the
[ENTER/YES] key.
The setting is completed and the display returns to
highlight a single line, as shown in the step 1 above.
4.To set another channel pair, repeat the step 2 and 3.
5.After completing all the setting, press the [EXIT/NO] key
(or the [STOP] key) to exit the SETUP mode.
< Hints! >
On paired channels, besides fader control, the following
functions can be controlled simultaneously.
• Effect send level adjustment
By pressing either of the [CH STATUS/CH SEL] key on
paired channels, the icons for both the paired
channels start flashing. Rotating the [JOG] dial controls
the effect send levels on both paired channels
simultaneously.
• Effect send pre/post setting
By pressing either of the [CH STATUS/CH SEL] key on
paired channels, the icons for both the paired channels
starts flashing. Rotating the [JOG] dial sets pre or post
for the effect sends on both paired channels
simultaneously.
• Aux send level adjustment
By pressing either of the [CH STATUS/CH SEL] key on
paired channels, the icons for both the paired channels
starts flashing. Rotating the [JOG] dial controls the aux
send levels on both paired channels simultaneously.
• Aux send pre/post setting
By pressing either of the [CH STATUS/CH SEL] key on
paired channels, the icons for both the paired channels
starts flashing. Rotating the [JOG] dial sets pre or post
for the aux sends on both paired channels
simultaneously.
• EQ (HI/MID/LO) adjustment
By pressing either of the [CH STATUS/CH SEL] key on
paired channels, the icons for both the paired channels
starts flashing. Rotating the [JOG] dial adjusts the EQ
on both paired channels simultaneously.
• On/Off of SOLO
By pressing either of the [CH STATUS/CH SEL] key on
paired channels, you can select on or off of solo monitor
on both paired channels simultaneously.
• On/Off of channel mute
By pressing either of the [CH STATUS/CH SEL] key on
paired channels, you can select on or off of mute on
both paired channels simultaneously.
• Setting of INPUT (TRACK/INPUT) SEL (channel 9 ~
16 only)
By pressing either of the [CH STATUS/CH SEL] key on
paired channels, you can select source (either INPUT
or TRACK) on both paired channels simultaneously.
• Setting of REC source for BUSS recording
By pressing either of the [CH STATUS/CH SEL] key on
paired channels, you can select both paired channels
as REC source simultaneously.
• Setting of built-in compressor
By pressing either of the [CH STATUS/CH SEL] key on
paired channels (channel 13-14 or 15-16), you can set
the compressor parameter on both paired channels
simultaneously.
< CAUTION >
If you control the even channel fader which is
paired, the following ALERT will appear. Controlling
the paired even channel fader does not affect the
signal level.
Addition of Pair Fader Setting in SETUP menu
Flashing

10
VF-16 Owner's Manual V3.1 Supplement
By connecting an external SCSI CD-R/RW drive to the VF-16 SCSI terminal, save/load of WAV files to and from
a CD-R/RW disk is now possible.
Unlike the save/load using another type of SCSI devices such as zip, MO and DVD-RAM drives, preformatting
a CD-R/RW disc by the DOS format (FAT-16) is not required.
For external SCSI CD-R/RW drives that can be used with VF-16, access the Fostex Home Page (http://
www.fostex.co.jp/int/) or contact your local distributor.
< Important notes for using WAV file >
About directory of backup disc:
• A saved WAV file is recorded in the root directory (in the first layer) on a backup disc.
• A WAV file to be loaded must be allocated in the root directory on a CD-R/RW disc.
A WAV file moved from the root directory to another area such as folder cannot be recognized by VF-
16, which may cause malfunction.
About file name of WAV file:
• A WAV file saved by VF-16 is named as “******##.WAV”.
• A WAV file to be loaded into VF-16 must be named as “******##.WAV”.
The first 6 characters “******” are the title that is shown in the “Title Edit” screen in the SETUP menu.
These characters can be changed when saving a WAV file on VF-16 or edited by a computer.
The following 2 characters “##” indicate the track number (01 to 24) of saved/loaded WAV file.
The last characters “.WAV” is the file extension indicating that the file format is WAV. VF-16 does not
recognize other file names than above. See the following description in detail.
Using the above specifications, loading desired tracks of WAV files or loading track-swapped WAV
files is possible.
< Notes for saving a WAV file >
Regardless of recorded data capacity, saving only one desired program on a single CD-R/RW disc is possible.
Even if a disc has enough recording space left, you cannot record more than one program on it. If one
program data size exceeds a single disc capacity, it can be saved using more than one disc.
Save/Load of WAV files using an external SCSI CD-R/RW drive
11
VF-16 Owner's Manual V3.1 Supplement
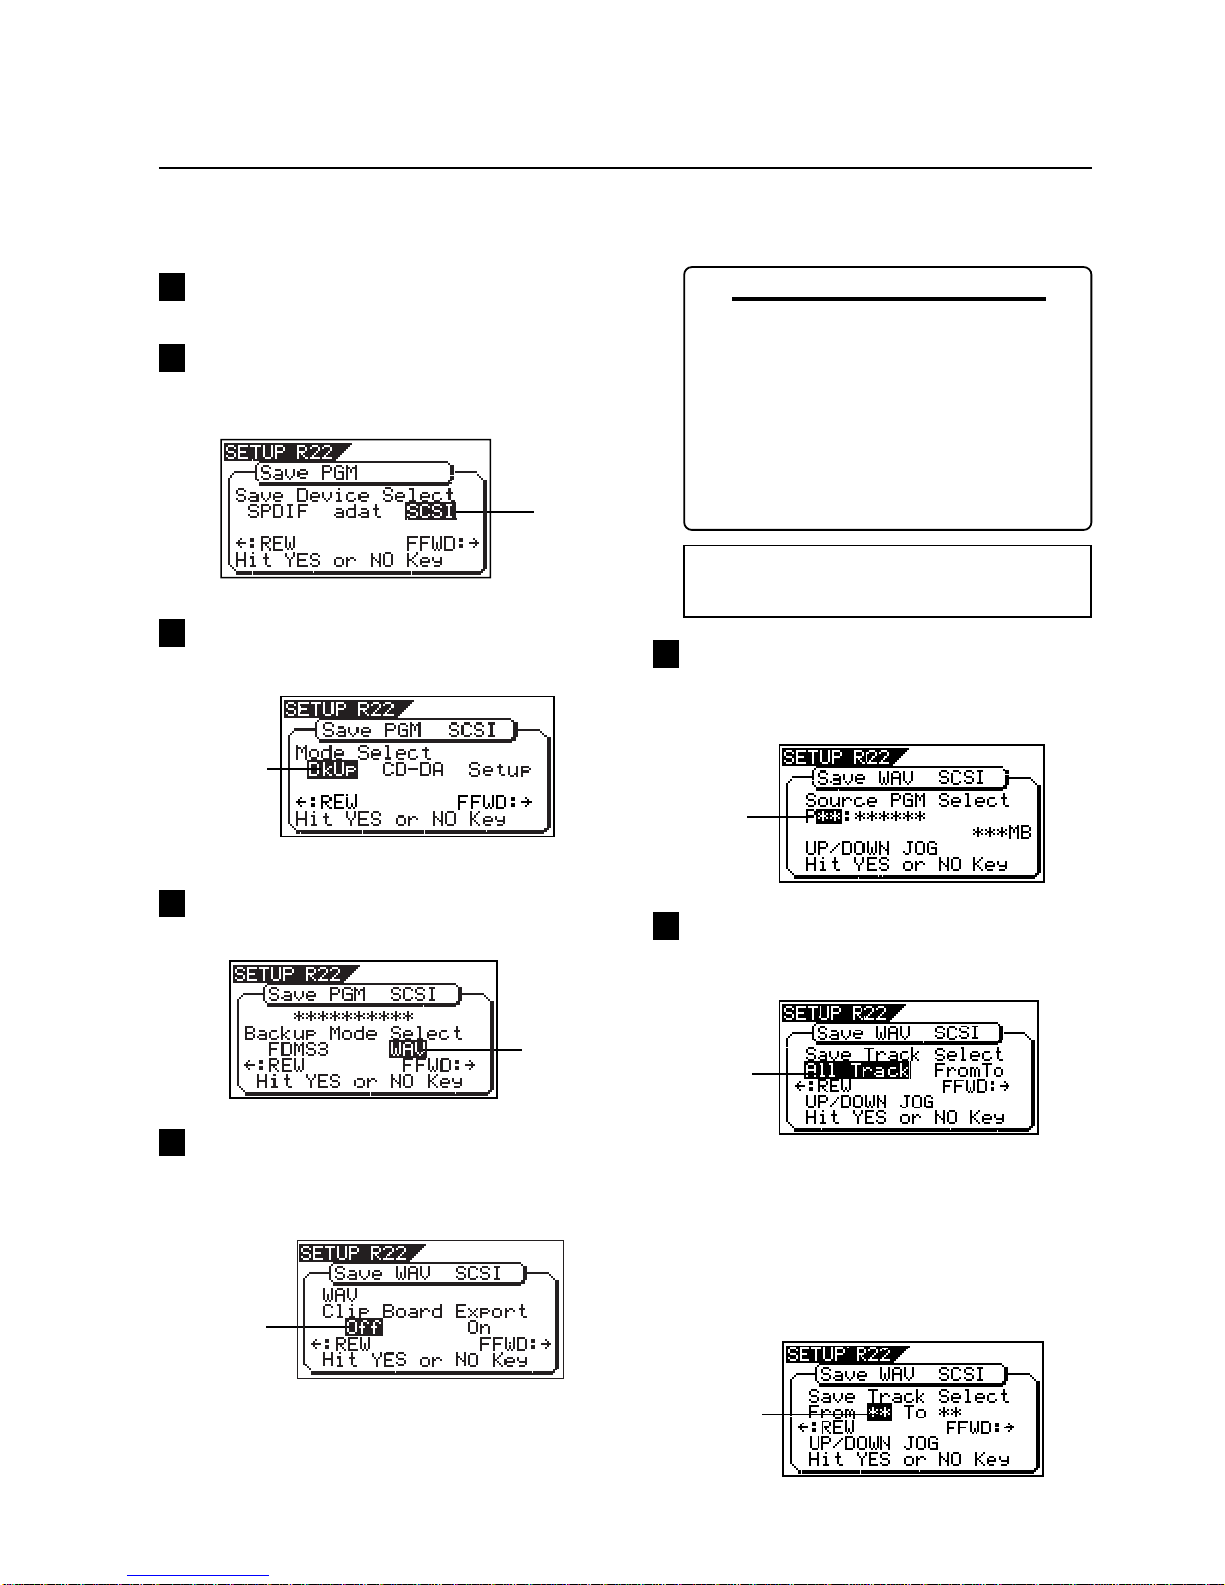
While "WAV" is flashing, press the [ENTER/YES] key.
The display shows the screen for selecting On or Off
of the Clipboard Export function, where “Off” flashes.
You can turn On and Off the function by pressing the
[REWIND] or [F FWD] key.
Press the [SETUP] key.
The display shows the screen for selecting the SETUP
menu.
While "BkUp" is flashing, press the [ENTER/YES] key.
The display shows the screen for selecting a backup
mode, where "WAV" flashes.
Select "Save PGM" SETUP menu by rotating the [JOG]
dial and press the [ENTER/YES] key.
The display shows the screen for selecting a device to
save data, where “SCSI” flashes.
If you would like to save all data from ABS0 to REC
END, leave the Clipboard Export function setting to
"Off" and go on to the next step.
1
2
4
5
While "SCSI" is flashing, press the [ENTER/YES] key.
The display shows the screen for selecting a save mode,
where “BkUp (backup)” flashes.
3
Saving a WAV file
In the following description, we assume that an operation-confirmed external SCSI CD-R/RW drive is connected
to the VF-16 SCSI terminal and a blank CD-R/RW disc is set.
While "Off" is flashing, press the [ENTER/YES] key.
The display shows the screen for selecting a program
to be saved. The program number currently selected
flashes, while the data size of the program is shown in
"MB" unit.
Select a program to be saved by the [JOG] dial and
press the [ENTER/YES] key.
The display shows the screen for selecting a track to
be saved, where “All Track” flashes.
In the above display condition, by rotating the [JOG]
dial (or press the [F FWD] key), you can select “From **
To **” (where the left field initially flashes) instead of
“All Track”.
If you would like to save all track data (1 through 24),
select “All Track”.
If you would like to save specific track (s), select "From
** To **". In this case the display changes to the following
screen.
< CAUTION >
If you save all data from “
ABS 0
” to “
REC END
”, set
the “
Clipboard Export function
” to “
Off
”.
7
6
< About Clipboard Export function >
The "Clipboard Export function" allows to save a
selected area of data between the Clipboard In and
Out points which are normally set when executing
the Copy-Paste or Move-Paste editing function.
Therefore, if you want to save only a specific area
of data, you need to register the Clipboard In and
Out points prior to the save operation.
For registering the Clipboard In and Out points,
see “Locating a mark point using a Memory Key” in
“Chapter 2 Basic Recording and Playback”.
Flashing
Flashing
Flashing
Flashing
Flashing
Flashing
Flashing

12
VF-16 Owner's Manual V3.1 Supplement
Press the [EXIT/NO] key (or the [STOP] key) repeatedly
until exiting the SETUP mode.
< Note >
When using a CD-RW disc on which any data is
recorded, pressing the
[ENTER/YES]
key while “
BkUp
”
is flashing brings up the warning message “
Not Empty!
”,
followed by the screen for erasing the existing data on
a disc as shown below. In the case a CD-R disc on which
any data is recorded, pressing the
[ENTER/YES]
key
while “
BkUp
” is flashing brings up the warning message
“
Not Writable!
” and the CD-R disc is automatically
ejected.
To erase the existing data on a CD-RW disc, select
“
ERASE
” and press the
[ENTER/YES]
key. If you do not
want to erase the data, select “
Eject
” and press the
[ENTER/YES]
key. After the disc is ejected, place a blank
disc. Rotating the
[JOG]
dial (or pressing the
[F FWD]
/
[REWIND]
key) allows to select either “
ERASE
” or “
Eject
”.
11
After inputting the file name, press the [ENTER/YES]
key.
The save operation is executed. The display shows the
following screen. As the save operation goes on, the
remaining data capacity in “MB” unit counts down.
< Note >
You can input up to 6 characters for a file name. Note
that characters used to name a file by the "
Title Edit
"
SETUP menu on VF-16 are automatically converted when
the file is recognized on a computer.
By rotating the [JOG] dial, you can input a desired
alphanumeric or symbolic character on a flashing
point. To move the flashing point, press the [F FWD]
(to the right) or [REWIND] (to the left) key. See the
following table for the characters available on VF-16.
While "WAV" is flahing, press the [ENTER/YES] key.
The display shows the screen for editing a file name
to be saved on a CD-R/RW disc.
Upper-case alphabetical characters (A to Z)
Numerals (0 to 9)
Symbols (! # $ % & ë ( ) @ ^ _ -)
In the case data to be saved cannot be accommodated
in a single disc, after the data saving to the 1st disc is
completed, it is automatically ejected and “Insert Disk”
flashes on the screen, prompting you to remove the
1st disc and to insert the 2nd disc. Inserting the 2nd
disc resumes the save operation.
After the save operation is completed, “Save
Completed!” appears on the screen.
9
10
After selecting the track (s), press the [ENTER/YES]
key.
The display shows the screen, where “WAV” flashes. In
this condition, by rotating the [JOG] dial, “Eject”
appears on the screen. To remove the disc, press the
[ENTER/YES] key while “Eject” is flashing. To continue
save operation, select "WAV".
8
<To Specify desired tracks by selecting "From ** To **">
By rotating the [JOG] dial while the left ("From") field is
flashing, you can select the track number from 01
through 24. The number in the right (“To”) field
automatically follows the number in the left field. (i.e.
The numbers in the left and right fields are always the
same.) This is convenient when saving a single track.
For example, specifying “From 02 To 02” will save only
track 2.
In order to specify multiple tracks such as “From 05 To
12”, enter “05” in the left field while the left field is
flashing. Then, press the [F Fwd] key to make the right
field flashing. Next, select “12” in the right field. Note
that the number of the right field must be equal or
greater than the left field. Now the display shows “From
05 To 12” which allows to save data from track 5 to track
12.
Flashing
<File name coversion example>
Characters input on VF-16 Characters recognized on a computer
Upper-case alphabetical
characters (A to Z) No change
Lower-case alphabetical
characters (a to z) Converted to upper.
Numerals (0 to 9) No change
Symbols (! # $ % & ë ( ) @ ^ _ -)
Converted to "_" (under bar)
On VF-16 On a computer
Vf-16 VF-16_##.wav
D2424LV D2424L##.wav
No name is input ------##.wav
No change
Other Symbols
* “##” indicates the track number (01 ~ 24).

13
VF-16 Owner's Manual V3.1 Supplement
After selecting the track (s) to be loaded, press the
[ENTER/YES] key.
The display shows the screen for selecting the load
destination program to which WAV files are loaded.
You can select the program by rotating the [JOG] dial.
After selecting a desired WAV file, press the [ENTER/
YES] key.
The display shows the screen for selecting a track to
be loaded, where “All” initially flashes.
5
6
Loading a WAV file
In the following description, we assume that an operation-confirmed external SCSI CD-R/RW drive is connected
to the VF-16 SCSI terminal and a blank CD-R/RW disc is set.
< Note >
VF-16 cannot recognize any file names other than
“
******##.WAV
” and cannot load WAV files. WAV files
with different first 6 characters are recognized as
separate backup WAV files and can be
independently selected.
Select the WAV file by rotating the [JOG] dial.
If more than one WAV file with different names (the
first 6 characters) are saved, you can see each file name
by the first 6 characters with corresponding file
capacity in "MB" unit in order. You can also select
"Eject" to remove the CD-R/RW disc.
1Press the [SETUP] menu to enter the SETUP mode.
The display shows the screen for selecting the SETUP
menu.
Select “Load PGM” in the SETUP menu by rotating
the [JOG] dial and press the [ENTER/YES] key.
The display shows the screen for selecting a device
from which device is loaded into VF-16, where "SCSI"
flashes.
2
3
4
< About saved WAV files >
• WAV file structure.
24 WAV files (one file per track) are created in the root directory of the CD-R/RW disc.
The WAV file names are “******01.WAV” through “******24.WAV” where “******” indicates the file name input in step
8 and 2-digit numbers (01 ~ 24) indicates the corresponding track number.
• WAV file structure saved on more than one disc.
WAV files are saved in the order of track number (starting from track 1).
During the save operation over more than one CD-R/RW disc, VF-16 always calculates the remaining disk capacity. If
VF-16 judges that the remaining disk capacity is not enough to save the next track WAV file, the disc is ejected upon
the completion of saving the current WAV file. After the next disc is inserted, save operation is resumed.
• WAV file capacity
There is a case that the saved WAV file capacity is larger than the original data capacity on the current drive (VF-16
HD), depending on the recorded data condition such as start and end time, amount of recorded and non-recorded
section on each track. For example, if signal is recorded from ABS 0 (00h00m00s) to ABS 00h01m00s and from ABS
00h10m00s to ABS 00h11m00s on a track, it consumes the amount of 2 minutes on the current drive, while the WAV
file consumes disk capacity which is equal to 11 minutes.
###### 01.WAV ###### 02.WAV ###### 24.WAV
Press the [ENTER/YES] key while “SCSI” is flashing.
The display shows the screen for selecting the WAV
file to be loaded. Besides “All”, you can select any one of the tracks (01
through 24) by rotating the [JOG] dial.
Flashing
Flashing
Flashing
Flashing

14
VF-16 Owner's Manual V3.1 Supplement
Press the [EXIT/NO] key (or the [STOP] key) repeatedly
until exiting the SETUP mode.
To go back to the previous step or abort the operation,
you can also use the [EXIT/NO] key or the [STOP] key.
< Note >
The title of the program to which the WAV files are
loaded is replaced with the loaded WAV file name
(the first 6 characters).
After selecting the load destination program, press
the [ENTER/YES] key.
When selecting a new program as the load destination,
the load operation immediately starts.
When selecting an existing program as the load
destination, “Overwrite?” and “Sure?” appear.
Pressing the [ENTER/YES] key one more time will start
the load operation.
During the operation, the screen shows the following.
As data loading goes on, the remaining data capacity
counts down.
When the load operation is completed, "Load
Completed!" appears on the screen.
7
8
< Note >
If there is not enough space left to load the WAV
files on the current drive (VF-16 HD), the capacity
indication on the screen shows a negative value
“-***MB”. In such a case, select a program that can
be replaced or delete unnecessary program by the
“delete PGM” SETUP menu.
When the screen shows “Title” and “Capacity (MB)”, it
indicates that the WAV files to be loaded will overwrite
the selected existing program on the VF-16 HD.
When the screen shows “Title” and “New PGM”, it
indicates that the WAV files will be loaded into a newly
created program on the VF-16 HD.
Flashing

15
VF-16 Owner's Manual V3.1 Supplement
Expanded functions on making an audio CD
On “Making an audio CD”, the message to complete the SAVE operation (“Save Completed!”) has been changed as
shown below. It is now possible to select either “Continue” or “Exit” when the save operation is completed. If
“Continue” is selected, you can create another audio CD with same data.
< The new "Save Completed!" screen >
When using a blank CD-R/CD-RW disc When using a prerecorded CD-RW disc
• To continue the save operation (to create another audio
CD):
Press the [ENTER/YES] key.
The screen shows flashing message “Insert Disk”.
1.Insert a blank disc.
After reading the disc, VF-16 starts
the save operation.
When the save operation is completed,
“Save Completed!” is shown and the disc
is ejected.
• To exit the save operation:
Press the [EXIT/NO] key.
VF-16 exit the SETUP mode and the display returns to show
the Normal screen.
1.Insert a prerecorded disc.
After showing “Not Empty!”, the
display shows the screen for
selecting whether to erase disc data
or eject the disc.
2.Press the [ENTER/YES] key while
“ERASE” is highlighted.
VF-16 starts erasing data. While
the erase operation is in progress,
“Erasing CDRW Now!” is shown on
the display, while asterisks (*) fill
up from left to right.
To continue the save operation, depending on the disc condition (blank or used), carry out either procedures
below.
To eject the disc, rotate the [JOG] dial
to highlight “Eject” and then press
the [ENTER/YES] key.
To continue the save operation for
making an audio CD, repeat the same
procedures as above.
After the erase operation is
completed, the save operation
immediately starts. When the save
operation is completed, "Save
Completed!" is shown and the disc
is ejected.
To continue the save operation for
making an audio CD, repeat the
same procedures as above.

© PRINTED IN JAPAN MAR. 2002 8288 688 000 FX.
FOSTEX CORPORATION
3-2-35, Musashino, Akishima-shi, Tokyo, Japan 196-0021
FOSTEX AMERICA
15431, Blackburn Avenue, Norwalk, CA 90650, U.S.A.
Other manuals for VF-16
7
Table of contents
Other Fostex Recording Equipment manuals


Fostex
Fostex ATC-4 User manual

Fostex
Fostex X-15 Multitracker User manual

Fostex
Fostex X-28 User manual

Fostex
Fostex MR-8MKII User manual

Fostex
Fostex MR-16HD User manual

Fostex
Fostex XR-3 User manual

Fostex
Fostex VF80EX User manual

Fostex
Fostex DC-R302 User manual

Fostex
Fostex CR300 User manual

Fostex
Fostex D-10 User manual


