manuals.online logo
Brands
  1. Home
  2. •
  3. Brands
  4. •
  5. Fosworks
  6. •
  7. Transmitter
  8. •
  9. Fosworks OMNI Tx-3 User manual

Fosworks OMNI Tx-3 User manual

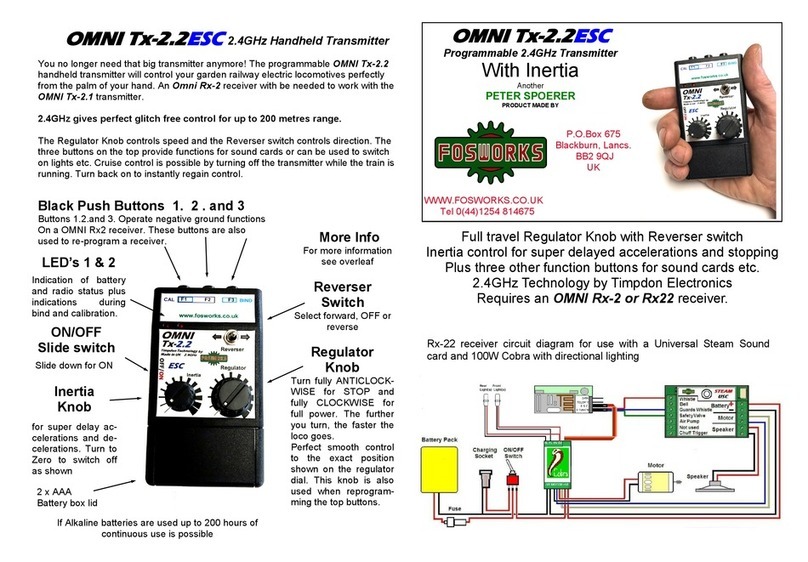
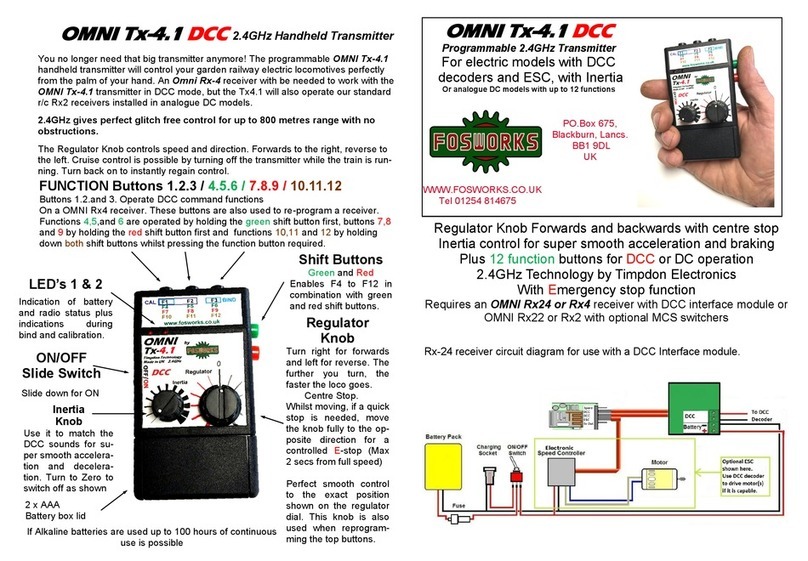
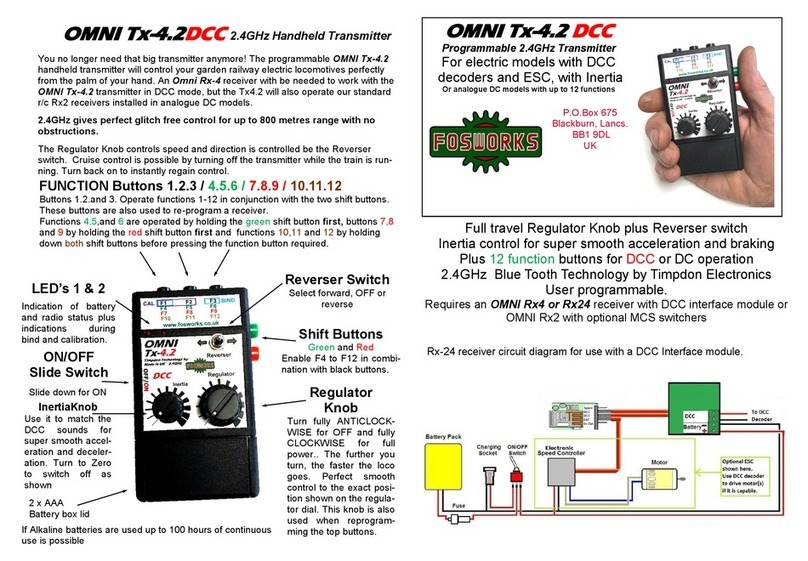
You no longer need that big transmitter anymore! The programmable OMNI Tx-3 Servo
handheld transmitter will control your garden railway live steam locomotives perfectly
from the palm of your hand. An Omni Rx-3 or Rx23 receiver with be needed to work
with the OMNI Tx-3 transmitter.
2.4GHz gives perfect glitch free control for up to 800 metres range.
Four servos can be controlled from an OMNI Tx-3 Servo Transmitter. One infinitely var-
iable and two with stop positions. Cruise control is possible by turning off the transmitter
while the train is running. Turn back on to instantly regain control.
Black Push Buttons 1. 2 . and 3
Buttons 1 and 2 control Servo 3. Button 3 controls Servo 4 and BIND
Press button 3 and Servo 4 swings from left to
right. Release and the arm swings back. Excel-
lent for operating whistles and couplings etc.
Buttons 1,2 and 3 are also employed in re-
programming the transmitter
Press 1 and the servo moves to the left.
Press again and it returns to centre.
Press button 2 for Right movement
and again for centre. Very good for
Operating Forwards and reverse
Rx-23 receiver circuit diagram for use with four Servos.
Programmable Three Servo Operation
S1 infinitely variable. S3 three position,S4 two position
2.4GHz Technology by Timpdon
Requires an OMNI Rx-3 or Rx23 receiver.
Up to 800 metres range
Telemetry feedback to the handset on LED 2,
ideal for monitoring boiler water level in conjunction
With STM-118 Locosaver
OMNI Tx-3 Servo
2.4GHz Handheld Transmitter
2 x AAA
Battery box
ON/OFF
Slide switch
Slide down for ON
More Info
For more information
see overleaf
With Alkaline batteries
approx 100 hours of
continuous use is
possible.
S1
Servo 1
Infinitely variable
servo movement
(Regulator)
Rx-23
OMNI Tx-3 Servo
Programmable 2.4GHz Transmitter
For Live Steam Locos
Another
PETER SPOERER
PRODUCT MADE BY
P.O.Box 675,
Blackburn, Lancs.
BB2 9QJ
UK
WWW.FOSWORKS.CO.UK
Tel 0(44)1254 814675
LED indicators
LED 1 -power
LED 2 -telemetry (see below)
Both LED’s flash when
battery low and are both
used during calibration and
binding
Telemetry - by default, telemetry (i.e. feedback from the receiver to the handset) is not acti-
vated to give a longer battery life. If it is required, then it must be activated with the following
procedure: Turn Transmitter OFF, Hold down buttons 1,2, and 3. Turn on transmitter and keep
holding down all three buttons until LED2 goes on. Release all buttons. It is now active and
LED2 will illuminate whenever the telemetry input on the FRx23 is grounded.
To de-activate, use the same procedure.
Calibrating Servo start, mid and end positions.
Each servo can have it’s start and end settings adjusted independently.
The S1 servo knob is used to adjust all four servo settings.
The transmitter and receiver must be already bound together and tested.
It’s on video, if you prefer , see our website for the link.
The Calibration procedure must be carried out within 20 seconds of turning on the re-
ceiver, so start by ensuring everything is off, then power up the receiver.
1 Press and hold buttons 2 and 3, then turn Transmitter ON
2 Wait until both LEDS go solid, then release the buttons, you are now in calibration
mode and the only exit is to power off the transmitter.
3 LED 1 will be flashing the selected SERVO, use Button 1 to move to the next one.
4LED 2 will be indicating which servo position you wish to set, use button 2 to move to
the next one:
One flash = Start position of servo swing (When knob is fully anticlockwise)
Two flash = Mid position of servo swing (Not available on servos 1,2 and 4)
Three flash = End position of servo swing (when knob is fully clockwise)
5 Having selected the servo and the position you wish to set, use the S1 knob to set
the actual position of the servo arm and then save the position by pressing button 3.
6You can now go on to set more positions or leave the process by turning off the trans-
mitter, then back on again to check the results of your efforts.
Re-Programming Servo 3 and 4 to momentary or latching mode
Servo 3, when set to latching, toggles between mid and end positions on buttons 1 and
2, when set to momentary, will move from mid to start on button 1 and mid to end on
button 2, then back to the middle again.
Servo 4, when set to latching, toggles position from one end to the other on each press
of button 3 and when set to momentary moves from start to end position and back
again.
The Calibration procedure must be carried out within 20 seconds of turning on the re-
ceiver, so start by ensuring everything is off, then power up the receiver.
1 Press and hold buttons 1 and 2, then turn Transmitter ON
2Wait until both LEDS go solid, then release the buttons, you are now in calibration
mode and the only exit is to power off the transmitter.
3LED2 now indicates which servo is being set, one flash for SERVO 3 and 2 flashes
for SERVO 4. Use button 2 to move to the next one.
4Set the S1 (Regulator) knob to fully Anticlockwise for Momentary or fully Clockwise
for latching mode.
5Press button 3 to save this setting.
6Proceed with further settings OR power off the transmitter to leave the procedure.
For further advice, contact us by email at: [email protected] or call us
on 01254 814675
Re-programming the OMNI system to suit your needs.
Your OMNI transmitter and receiver comes to you all pre-set and ready to run
Live Steam Locomotives. Each servo is set for a full 90 degree swing. Normally
there should be no need to change these settings, However should the swing of
a servo need to be modified, it can be done by reprogramming the receiver.
The OMNI R/C system is unique, in that when you wish to re-program it to suit
the special needs for a particular loco, it is not the transmitter you are re-
programming, but the receiver in the loco. The Transmitter tells the receiver what
is expected of it via calibration and it is the receiver that remembers it. In this
way, one OMNI Tx-3 transmitter can control many different Live Steam locos,
each with its own different requirements.
It is possible to change all or just one of the servo movements. The start and stop
position of each servo swing is adjustable. You can even reverse the servo
swings by setting the 1st position as the end and the 2nd position as the start.
Binding Procedure.
Now simpler than ever!
1. Turn on the Receiver (or the model, if it’s al-
ready fitted inside) then….
2. Hold down black buttons 1 and 3, then turn on
the transmitter
3. Successful binding is indicated by LED 2 going
ON.
4. Release the two buttons and the job is done.
LED 1 goes solid to indicate that the transmit-
ter and receiver are linked.
13
LED 1
On
LED 2
Low battery warning
When the batteries in the handset get too low for reliable operation, both LED 1
and 2 start flashing together. Replace them with quality alkaline AAA cells for the
best results,

Other Fosworks Transmitter manuals

Fosworks OMNI Tx-4.10R User manual

Fosworks

Fosworks OMNI Tx-4.10R User manual

Fosworks OMNI Tx-4.2 User manual

Fosworks

Fosworks OMNI Tx-4.2 User manual

Fosworks OMNI Tx-4.1 DCC User manual

Fosworks

Fosworks OMNI Tx-4.1 DCC User manual

Fosworks OMNI Tx-2.2ESC User manual

Fosworks

Fosworks OMNI Tx-2.2ESC User manual

Popular Transmitter manuals by other brands

M-system W2XM instruction manual

M-system

M-system W2XM instruction manual

CYP IP-7000TX Operation manuals

CYP

CYP IP-7000TX Operation manuals

signia CROS Pure user guide

signia

signia CROS Pure user guide

CYP CH-507TX Operation manual

CYP

CYP CH-507TX Operation manual

Anker A8327 user manual

Anker

Anker A8327 user manual

Thies CLIMA 5.4041 1.00 Series Instructions for use

Thies CLIMA

Thies CLIMA 5.4041 1.00 Series Instructions for use

Emerson Rosemount 5408 quick start guide

Emerson

Emerson Rosemount 5408 quick start guide

Lectrosonics UM400E instruction manual

Lectrosonics

Lectrosonics UM400E instruction manual

Honeywell XNX Technical manual

Honeywell

Honeywell XNX Technical manual

Denon Envoi HL user guide

Denon

Denon Envoi HL user guide

Vivax Metrotech VM-550FF Quick start quide

Vivax Metrotech

Vivax Metrotech VM-550FF Quick start quide

Cardio Theater LCS-TX instruction manual

Cardio Theater

Cardio Theater LCS-TX instruction manual

Becker Centronic EasyControl EC545 Assembly and operating instructions

Becker

Becker Centronic EasyControl EC545 Assembly and operating instructions

Sennheiser E W 300 IEM G2 Instructions for use

Sennheiser

Sennheiser E W 300 IEM G2 Instructions for use

GE HO97686 instruction manual

GE

GE HO97686 instruction manual

DLO TransDock Deluxe manual

DLO

DLO TransDock Deluxe manual

Pet Stop OT-300 Programming guide

Pet Stop

Pet Stop OT-300 Programming guide

Honeywell oneWireless XYR 6000 user manual

Honeywell

Honeywell oneWireless XYR 6000 user manual

manuals.online logo
manuals.online logoBrands
  • About & Mission
  • Contact us
  • Privacy Policy
  • Terms and Conditions

Copyright 2025 Manuals.Online. All Rights Reserved.