Fox F50-841 User manual

MANUALE DI ISTRUZIONI / INSTRUCTION MANUAL/ / MANUEL D’INSTRUCTIONS /
GEBRAUCHS ANWEISUNG / MANUAL DE INSTRUCCIONES / MANUAL DE INSTRUÇÕES
ASPIRATORE A CICLONE
CYCLONE DUST COLLECTORS
ASPIRATTEURES CYCLONE
ZYKLONABSAUGANLAGEN
ASPIRADORES DE CICLÓN
ASPIRADOR CICLONE
Modello / Model / Modell /
Modèle / Modelo / Modelo
F50-841
F50-841_ISTRUZIONI.indd 1F50-841_ISTRUZIONI.indd 1 19/05/2016 10.50.1719/05/2016 10.50.17

IT
EN
DE
FR
ES
PT
DICHIARAZIONE DI CONFORMITÁ
secondo la Direttiva Europea 2006/42/CE Allegato II.A
FEMI S.p.A.
Via Del Lavoro, 4 - 40023 Castel Guelfo - (BO) ITALY
dichiara che la macchina:
ASPIRATORE A CICLONE F50-841
prodotta nel (vedi etichetta riportata):
- è conforme alle disposizioni della Direttiva 2006/42/CE e alle
disposizioni di attuazione;
- inoltre è conforme alle seguenti disposizioni e relative
attuazioni: 2
011/65/UE, 2012/19/UE, 2014/30/UE, 2014/35/
UE.
COMPLIANCE DECLARATION CE
in compliance with European Directive 2006/42/EC Appendix II.A
FEMI S.p.A.
Via Del Lavoro, 4 - 40023 Castel Guelfo - (BO) ITALY
declares that the machine
CYCLONE DUST COLLECTORS F50-841
manufactured in (see affi xed label):
- conforms to the regulations indicated in 2006/42/EC and
relative regulations of implementation:
- furthermore it conforms to the following regulations and relative
implementation: 2011/65/EU, 2012/19/EU 2014/30/EU, 2014/35/
EU.
KONFORMITÄTSERKLÄRUNG
Gemäß der europäischen Richtlinie 2006/42/EWG Anhang II.A
FEMI S.p.A.
Via Del Lavoro, 4 - 40023 Castel Guelfo - (BO) ITALY
erklärt, dass die Maschine:
ZYKLONABSAUGANLAGEN F50-841
gebaut in (siehe beigefügtes Etikett):
- den Bestimmungen der Richtlinie 2006/42/EG sowie den
Anwendungsvorschriften entspricht
- darüber hinaus die folgenden Bestimmungen und jeweiligen
Anwendungsvorschriften erfüllt: 2011/65/UE, 2012/19/UE,
2014/30/UE, 2014/35/UE.
Persona autorizzata a costituire il fascicolo tecnico
Person authorized to create the technical fi le:
Zur Ausarbeitung der technischen Dokumentation
bevollmächtigte Person:
Personne autorisée à étabilir le dossier technique:
Persona autorizada a crear el documento técnico:
Pessoa autorizada a constituir o fasciculo técnico:
MAURIZIO CASANOVA Castel Guelfo (BO),
Presso-C/o-Bei-De-Junto da: FEMI S.p.A.
Via Del Lavoro, 4
Riferimento norme armonizzate/Reference to harmonised
standards/Verweis auf harmonisierte Normen/Référence aux
normes harmonisées/Referencia a normas armonizadas/
Referência às normas harmonizzadas
EN ISO 12100
EN 60335-1
EN60335-2-69
EN62233
EN 55014-1, EN 55014-2
EN 61000-3-2
EN 61000-3-3
20/04/2016
40023 Castel Guelfo - (BO) ITALY.
Ingombro per etichetta
DECLARATION DE CONFORMITE
selon la Directive Européenne 2006/42/CE Annexe II.A
FEMI S.p.A.
Via Del Lavoro, 4 - 40023 Castel Guelfo - (BO) ITALY
déclare que la machine:
ASPIRATTEURES CYCLONE F50-841
produite en (voir étiquette reportée) :
- est conforme aux dispositions de la 2006/42/CE et aux
dispositions de réalisation;
- en outre elle est conforme aux dispositions suivantes et relatives
réalisations: 2
011/65/UE, 2012/19/UE, 2014/30/UE, 2014/35/UE.
DECLARATION DE CONFORMIDAD
según la Directiva Europea 2006/42/CE Anexo II.A
FEMI S.p.A.
Via Del Lavoro, 4 - 40023 Castel Guelfo - (BO) ITALY
declara que la máquina:
ASPIRADORES DE CICLÓN F50-841
fabricada en (ver la etiqueta ilustrada):
- Cumple los requisitos de la norma 2006/42/CE y las
disposiciones de aplicación;
- Asimismo, cumple las normas siguientes y sus correspondientes
aplicaciones: 2011/65/UE y 2012/19/UE, 2014/30/UE,
2014/35/UE.
DECLARAÇÃO DE CONFORMIDADE
segundo a Directiva Europeia 2006/42/CE Anexo II.A
FEMI S.p.A.
Via Del Lavoro, 4 - 40023 Castel Guelfo - (BO) ITALY
declara que a máquina:
ASPIRADOR CICLONE F50-841
produzida em (ver etiqueta indicada):
- está em conformidade com as disposições da directiva 2006/42/
CE e com as disposições de actuação;
- está também em conformidade com as seguintes disposições e
respectivas actuações: 2011/65/UE, 2012/19/UE, 2014/30/UE,
2014/35/UE.
F50-841_ISTRUZIONI.indd 2F50-841_ISTRUZIONI.indd 2 19/05/2016 10.50.3219/05/2016 10.50.32

1
IT
1 INTRODUZIONE ALL’USO
Prima di iniziare le lavorazioni con il Vostro aspiratore,
leggete attentamente questo manuale di istruzioni, allo
scopo di conoscere la macchina ed i suoi impieghi, e le
eventuali controindicazioni.
Conservate con cura questo manuale: esso fa parte
integrante della macchina, e ad esso dovrete sempre
riferirvi per eseguire al meglio e nelle massime condizioni
di sicurezza le operazioni che in esso sono descritte.
Utilizzate la macchina solo ed esclusivamente per
gli impieghi di seguito specificati, usandola come
raccomandato in questo manuale, e non cercando in
alcun modo di manometterla o forzarla, o di usarla per
scopi non adatti.
1.1 SIMBOLOGIA
Non sottovalutare i richiami “ATTENZIONE - CAUTELA”
riportati in questo manuale.
Al fi ne di attirare l’attenzione e dare messaggi di sicurezza
le operazioni pericolose sono precedute da simboli e
note che ne evidenziano la pericolosità e spiegano come
comportarsi per evitare il pericolo.
Questi simboli e note sono di tre categorie identifi cate
dalle parole:
ATTENZIONE: comportamenti rischiosi che
potrebbero provocare gravi lesioni.
CAUTELA: comportamenti che potrebbero causare
lesioni non gravi o danni alle cose.
NOTE: le note precedute da questo simbolo sono
di carattere tecnico e facilitano le operazioni.
1.2 SICUREZZA E NORMATIVA
La macchina è progettata e costruita secondo le prescrizioni
imposte dalle vigenti Direttive Comunitarie: 2006/42/CE,
2011/65/UE, 2012/19/UE, 2014/30/UE, 2014/35/UE.
La dichiarazione di conformità CE, unita al marchio CE
posto sul prodotto, costituisce elemento fondamentale e
parte integrante della macchina: garantiscono la conformità
del prodotto alle Direttive di sicurezza sopra citate.
1.3 NORME DI SICUREZZA GENERALI
- Non usate la macchina in luoghi molto umidi o con
presenza di liquidi infi ammabili o di gas.
- Non usatela all’aperto, quando le condizioni generali
meteo ed ambiente non lo consentono (es. atmosfere
esplosive, durante un temporale o precipitazioni).
- Vestitevi adeguatamente: evitate di indossare abiti con
maniche larghe od oggetti, come sciarpe, catene e
bracciali, che potrebbero essere agganciati dalle parti
in movimento.
- Usate sempre i dispositivi personali di protezione:
occhiali antinfortunistici conformi alle norme, guanti di
dimensioni adatte a quelle della mano, cuffi e o inserti
auricolari e cuffi e per il contenimento dei capelli, se
necessario.
- Fate attenzione al cavo di alimentazione : non
utilizzatelo per scollegare la spina dalla presa di
corrente, salvaguardatelo da spigoli taglienti e non
esponetelo ad elevate temperature.
- Eventuali prolungamenti del cavo di alimentazione
devono essere di tipo omologato e rispondente alle
normative di sicurezza.
- Evitate di utilizzare la macchina se siete in condizioni
psicofi siche precarie o alterate o sotto l’effetto di alcool
o sedativi.
INDICE
1 INTRODUZIONE ALL’USO ....................................... 1
2 INSTALLAZIONE .......................................................3
3 UTILIZZAZIONE ........................................................ 6
4 MANUTENZIONE ......................................................6
F50-841_ISTRUZIONI.indd Sez1:1F50-841_ISTRUZIONI.indd Sez1:1 19/05/2016 10.50.3219/05/2016 10.50.32

2
IT
1.4 REGOLE DI SICUREZZA SUPPLEMENTARI
PER GLI ASPIRATORI DA OFFICINA
ATTENZIONE:
Osservare sempre le misure di precauzione di
base quando si utilizza l’aspiratore da offi cina.
Per ridurre i rischi di infortunio, di scariche
elettriche o d’incendio, rispettare le regole di
sicurezza elencate di seguito.
1. Leggere e comprendere le informazioni prima di
utilizzare l’aspiratore.
2. Non lasciare l’aspiratore attaccato alla presa. Staccare
l’aspiratore quando: non viene utilizzato, prima di fare
delle riparazioni, cambiare i sacchi, pulirlo.
3. AVVERTENZA:
per ridurre il rischio di scariche elettriche, non
esporlo alla pioggia ne utilizzarlo in luoghi umidi.
Utilizzarlo solo per la raccolta di rifi uti secchi.
4. OSSERVARE tutte le norme europee riguardanti la
sicurezza e le installazioni elettriche.
Tutti gli allacciamenti elettrici così come il cablaggio
devono essere fatti solo da persone competenti.
5. NON utilizzare l’aspiratore per rimuovere liquidi
infi ammabili o combustibili. Non utilizzare mai l’aspiratore
vicino a liquidi infi ammabili o combustibili.
6. Utilizzare l’aspiratore solo per raccogliere trucioli
di legno o segatura. Non utilizzare l’aspiratore per
raccogliere pezzi, polveri, o pezzi metallici.
7. Non utilizzare l’aspiratore per dissipare vapori o fumi.
Non raccogliere mai ciò che è caldo o che brucia, come
sigarette, cenere calda. ……
8. Utilizzare l’aspiratore solo secondo le indicazioni fornite
nel manuale. Utilizzare solo gli accessori raccomandati
da FEMI SpA.
9. Non manipolare la presa o l’ aspiratore con le mani
umide.
10. Sostituire immediatamente il cavo danneggiato.
Non utilizzare una presa o un cavo danneggiato.
Se l’aspiratore non funziona perfettamente, o se è
danneggiato, se è entrato in contatto con dell’acqua,
inviarlo subito ad un centro di assistenza per
ripararlo.
11. Non utilizzare l’aspiratore come un gioco. Non utilizzarlo
vicino a bambini.
12. Non mettere le dita o qualsiasi oggetto nei buchi di
ammissione della polvere. Custodire i capelli, i vestiti
larghi, le dita e le altre parti del corpo lontano dalle
aperture e dai pezzi mobili dell’aspiratore.
13. Non utilizzare l’aspiratore senza il sacco fi ltrante e senza
il sacco per la polvere collocato e ben fi ssato.
14. VERIFICARE REGOLARMENTE il sacco fi ltrante e
il sacco della polvere per accertarsi che non siano
stracciati o tagliati. NON utilizzare mai l’aspiratore con
un sacco o un tubo danneggiati.
15. L’aspiratore è concepito per un uso domestico.
NOTA:
CONSERVARE LE ISTRUZIONI. Rileggerle
frequentemente e utilizzarle per informare le
altre persone.
1.5 REGOLE DI SICUREZZA
Lavorare il legno può essere pericoloso se non si rispettano
delle tecniche sicure e appropriate.
Come per ogni macchina, il suo utilizzo può provocare
seri
pericoli.
Se si utilizza la macchina con precauzione e si rispettano
le regole, la possibilità di ferirsi sarà considerevolmente
minima.
Tuttavia, se le normali precauzioni di sicurezza non sono
rispettate o ignorate l’operatore può seriamente ferirsi.
L’equipaggiamento di sicurezza come le protezioni, i
pulsanti, i dispositivi di ritenuta, gli occhiali di sicurezza,
le maschere anti polvere e le protezioni uditive possono
ridurre le possibilità di infortunio.
Ma anche la migliore protezione non può proteggere contro
una mancanza di buon senso, di premura o di attenzione.
Usare sempre il buon senso e prendere le precauzioni
necessarie nell’offi cina. Se una tecnica sembra pericolosa,
non tentarla. Concepire un metodo più sicuro. NON
DIMENTICARE: la sicurezza è responsabilità di ognuno.
Questo aspiratore è stato concepito per usi ben precisi.
Femi SpA raccomanda di non modifi carlo e/o utilizzarlo per
un altro scopo se non quello per cui è stato concepito. Se si
pongono dei presupposti per un‘applicazione particolare,
non utilizzare l’aspiratore prima di aver preso contatto
con Femi SpA per determinare se può essere impiegata
in tal maniera.
ATTENZIONE:
L’inosservanza di queste regole puó provocare
gravi infortuni.
1.6 DESCRIZIONE DELLA MACCHINA (Fig. 1)
A Base rettangolare
B Motore
C Collettore d’aspirazione con turbina
D Tamburo di fi ssaggio sacchi
E Due sacchi d’aspirazione
F Rotelle direzionali
G Rotelle fi sse
H Maniglia
I Supporti
L Gancio sostegno sacco
F50-841_ISTRUZIONI.indd Sez1:2F50-841_ISTRUZIONI.indd Sez1:2 19/05/2016 10.50.3319/05/2016 10.50.33

3
IT
2 INSTALLAZIONE
2.1 SPECIFICHE TECNICHE
Tensione: ............................................................ 230 volt
Potenza ............................................................ 750 watt.
Numero di giri ................................................ 2950 g/min
Portata d’aria: ..............................................16,6 m3/min.
Diametro ventola: ...............................................300 mrn
Dimensione della base di aspirazione: ........... Ø 100 mm
Dimensioni del sacco: .................. Ø 370 mm x h640 mm
Volume del sacco: .............................................0.057 m3
Livello sonoro medio: .............................Lpm = 76 db (A)
Peso: .......................................................................30Kg
Fig. 1
L
B
C
I
A
G
F
E
D
H
E
2.2 RIMOZIONE DELL’IMBALLO
Rimuovere la scatola che protegge la macchina durante il
trasporto, avendo cura per quanto possibile di mantenere
l’imballo intatto, nel caso dobbiate spostare l’aspiratore per
lunghi tragitti oppure immagazzinarlo per lunghi periodi.
AVVERTENZA:
Non attivare l’aspiratore fi no a quanto non é
stato completamente assemblato e fi nché non
sono state lette e comprese tutte le
istruzioni d’uso.
2.3 ASSEMBLAGGIO
Il vostro aspiratore deve essere completamente assemblato
prima del suo utilizzo.
E’ importante leggere precedentemente il manuale
d’istruzione per famigliarizzare con la vostra macchina
prima di cominciare a lavorare.
Preparare i differenti pezzi d’assemblare
1. Collocare le rotelle nei quattro angoli sotto la base
rettangolare utilizzando le viti e i dadi con le relative
rondelle. Per ciascun angolo di supporto di ogni rotella
inserire sopra una vite attraverso la rondella nella
base poi nel supporto di ogni rotella. Chiudere il dado
con una chiave appropriata e un cacciavite. Ripetere
l’operazione anche per le altre rotelle. Le due rotelle
direzionali vanno collocate sul lato dei sacchi opposto
al motore (Fig. 2).
Fig. 2
F50-841_ISTRUZIONI.indd Sez1:3F50-841_ISTRUZIONI.indd Sez1:3 19/05/2016 10.50.3319/05/2016 10.50.33

4
IT
2. Allineare l‘insieme motore con il tamburo per la collocazione dei sacchi. Piazzare la guarnizione e la rete di protezione
tra i due pezzi da assemblare, utilizzare le viti, le rondelle e i dadi corrispondenti (Fig. 3).
3. Fissare i due supporti del collettore con sostegni su
l‘insieme motore utilizzando le viti, le rondelle e i dadi
corrispondenti (Fig. 4).
Montare i rimanenti supporti con I sostegni non
dimenticando di fissare, contemporaneamente, la
maniglia sul tamburo di fi ssaggio dei sacchi. (Fig. 5).
4. Posizionare la base sulle rotelle e posizionare l’insieme motore e tamburo sulla base allineando i supporti con i fori
sulla base. Inserire le viti e le rondelle e fi ssare i supporti sulla base.
Chiudere le viti con la chiave appropriata. Attenzione a rispettare il posizionamento delle rotelle direzionali che dovranno
trovarsi dal lato dei sacchi opposto al motore. (Fig. 6).
5. Fissare il gancio sostegno sacco sull’insieme motore tamburo. Allineare i due buchi del supporto e quelli del tamburo
poi utilizzare le viti e le rondelle per fi ssare il supporto al tamburo. Stringere forte (Fig. 7).
Fig. 3
Fig. 4 Fig. 5
F50-841_ISTRUZIONI.indd Sez1:4F50-841_ISTRUZIONI.indd Sez1:4 19/05/2016 10.50.3319/05/2016 10.50.33

5
IT
6. Passare la fascetta di chiusura nell‘ orlo del sacco superiore per la polvere munito di un dispositivo che permette di
fi ssarlo al gancio. Sospendere il sacco al gancio. Piazzare l’ estremità aperta del sacco fi ltrante sull’orlo del tamburo.
Una volta piazzato il fi ltro, aggiustare la fascetta di chiusura in maniera tale che il tenditore sia posizionato nei denti
del sistema di chiusura. Premere sulla maniglia del tenditore per bloccare il sacco in posizione. Assicurarsi che la
fascetta di chiusura si trovi nella gola del collettore prima di bloccare il tenditore.
Posizionare il sacco inferiore nello stesso modo utilizzato per il sacco superiore ma dalla parte inferiore del collettore
senza sospenderlo (Fig. 8).
Fig. 6 Fig. 7
Fig. 8
7. Fissare il tubo flessibile al connettore da montare
all’uscita dell’aspiratore (Fig. 9). Oppure disconnettere
questo tubo fl essibile e connettere quello della macchina
da legno utilizzando il tubo fl essibile appropriato e le
fascette di chiusura corrispondente.
Fig. 9
F50-841_ISTRUZIONI.indd Sez1:5F50-841_ISTRUZIONI.indd Sez1:5 19/05/2016 10.50.3319/05/2016 10.50.33

6
IT
2.4 COLLEGAMENTO ELETTRICO
Controllare che l’impianto rete sul quale inserite la macchina
sia collegato a terra come previsto dalle norme di sicurezza
vigenti, e che la presa di corrente sia in buono stato.
Si ricorda all’utilizzatore che a monte dell’impianto rete
deve essere presente una protezione magnetotermica
atta a salvaguardare tutti i conduttori dai corto circuiti e dai
sovraccarichi.Tale protezione dovrà essere scelta in base
alle caratteristiche elettriche della macchina riportate sul
motore. Per i tecnici ricordiamo che i fi li di collegamento di
questo aspiratore sono i seguenti:
Giallo/verde = terra
Blu = neutro
Marrone = Fase
AVVERTENZA:
Non esporre l’aspiratore alla pioggia ne’
utilizzarlo in luoghi umidi.
Il motore dell’aspiratore è cablato per un funzionamento su
un’alimentazione di 230 volt.
ATTENZIONE:
Istruzioni per la messa a terra avvertenze: questa
macchina deve essere messa a terra al momento
dell’utilizzo per proteggere l’utilizzatore da ogni
eventuale scarica elettrica.
ATTENZIONE:
Consultare un elettricista competente o il
personale di servizio post-vendita se si hanno
dei dubbi circa la messa a terra della macchina.
Non modifi care la presa fornita con l’aspiratore.
Se la presa di corrente non si adatta, bisogna
far installare una presa di corrente adatta da un
elettricista autorizzato.
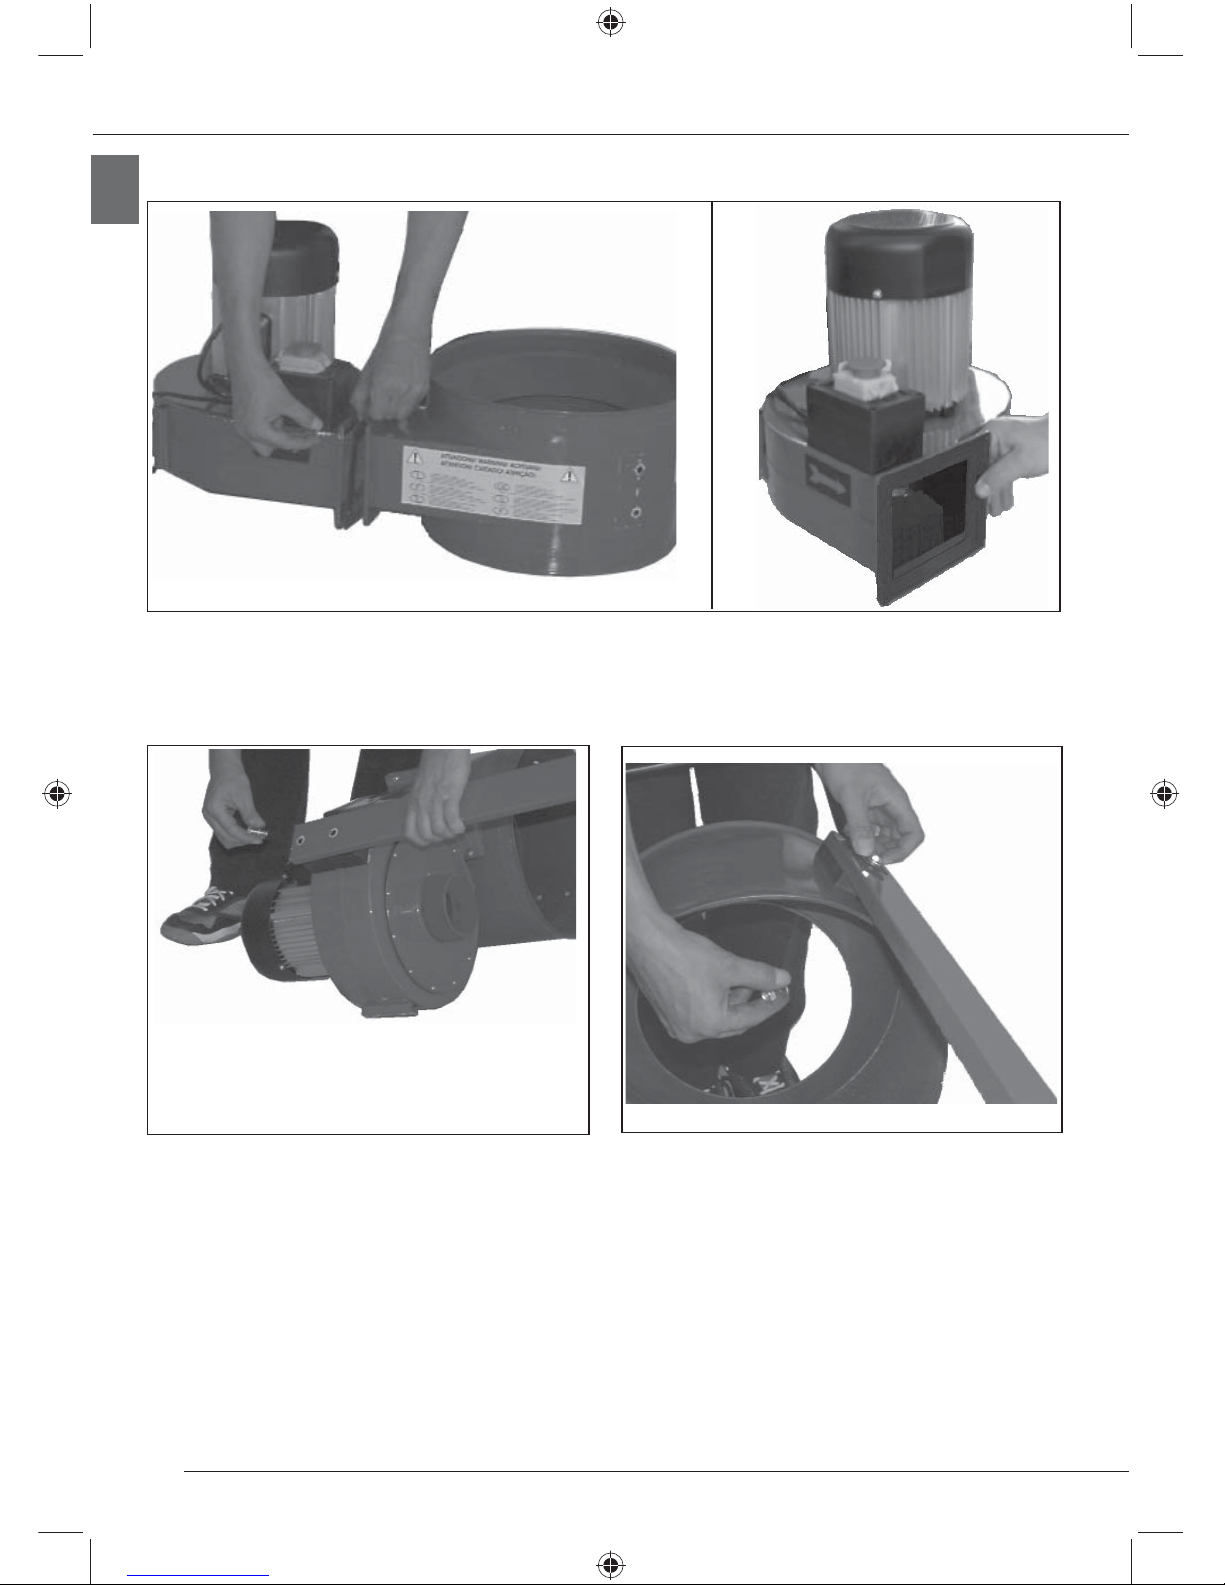
2.5 COMANDI INTERRUTTORE ON/OFF
L’interruttore on/off è posizionato sul Iato del motore. Questo
aspiratore è equipaggiato di un interruttore a mancanza
di tensione. Per avviarlo premere sul bottone ON e per
fermarlo premere sul bottone OFF.
3 UTILIZZAZIONE
3.1 MODO D’USO
Questo aspiratore è stato progettato per essere collegato a
un tubo fl essibile per aspirazione di trucioli e di polveri.
Se l’uscita d’aspirazione della macchina è differente
vi invitiamo a utilizzare delle riduzioni appropriate per
connettere la macchina all’aspiratore.
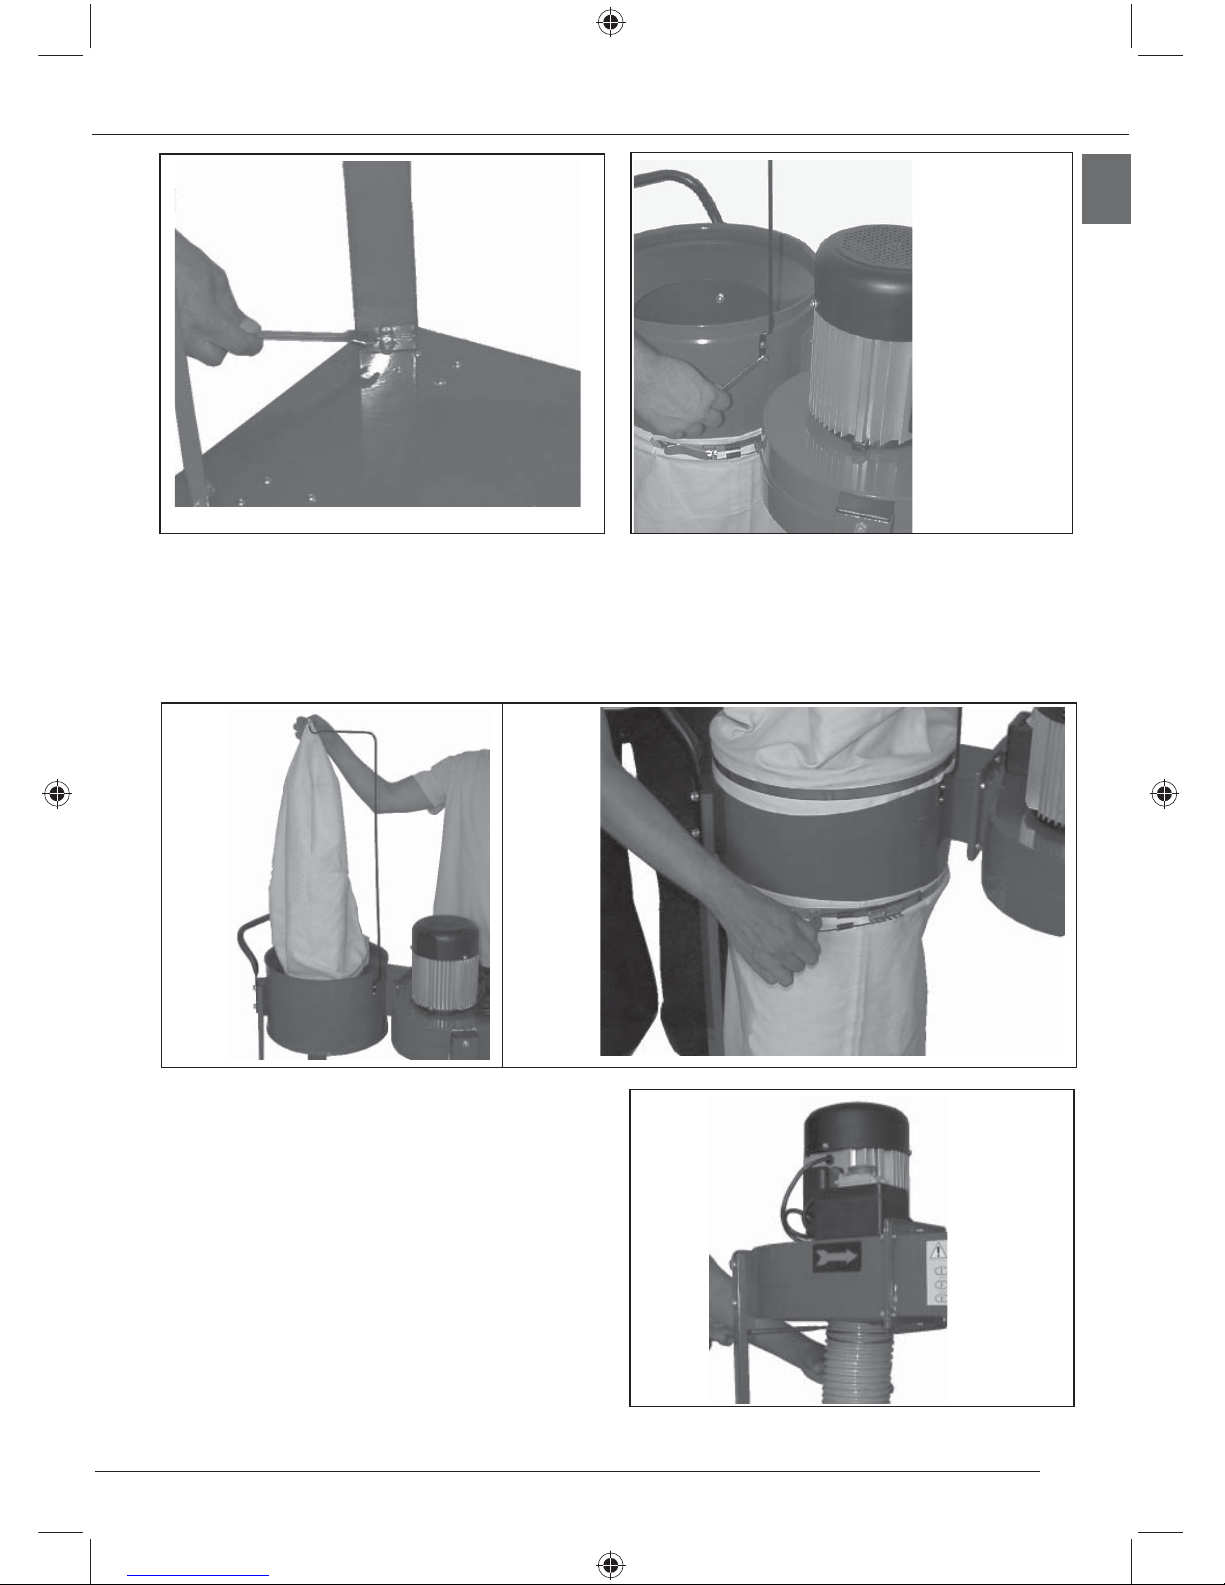
Assicurarsi sempre che il sacco d’ aspirazione sia
perfettamente fi ssato al collettore tramite fascetta.
Quando il sacco d’aspirazione raggiunge i ¾ della sua
capienza massima, svuotarlo per evitare che blocchi il
sistema d’ aspirazione.
Prima di svuotare il sacco, staccare l’aspiratore dalla presa
di corrente mettere una mascherina e dei
guanti.
Liberare la fascetta di chiusura del sacco inferiore e
svuotare il sacco in un luogo appropriato.
Rimettere il sacco a posto e richiudere il collare.
4 MANUTENZIONE
4.1 OSSERVAZIONI
Prima di qualsiasi manutenzione assicurarsi che
l’apparecchio sia staccato dall’alimentazione per evitare
eventuali incidenti. La manutenzione dell’articolo qui
menzionato deve essere affi data a un centro di servizio
assistenza autorizzato.
Prima di mettere a deposito l’aspiratore staccare la presa.
Arrotolare bene il cavo d’alimentazione e posizionarlo sulla
base dell’aspiratore per evitare che si danneggi.
4.2 MANUTENZIONE DEL MOTORE
Pulizia della polvere e dello sporco. Soffiare dell’aria
compressa a bassa pressione sul motore per allontanare lo
sporco e la polvere. La persona che effettua la pulizia deve
sempre utilizzare occhiali di protezione. L’accumulo della
polvere può provocare un surriscaldamento del motore.
4.3 SMALTIMENTO MACCHINA, IMBALLAGGIO
INFORMAZIONE AGLI UTENTI
Attuazione delle Direttive
2011/65/UE, 012/19/
UE
, relative alla riduzione dell’uso di sostanze
pericolose nelle apparecchiature elettriche
ed elettroniche, nonché allo smaltimento dei
rifi uti”, si precisa quanto segue:
• Il simbolo del cassonetto barrato riportato
sull’apparecchiatura o sulla confezione indica che il
prodotto alla fi ne della propria vita utile deve essere
raccolto separatamente dagli altri rifiuti. L’utente
dovrà, pertanto conferire l’apparecchiatura giunta a
fi ne vita agli idonei centri di raccolta differenziata dei
rifi uti elettronici ed elettrotecnici, oppure riconsegnarla
al rivenditore al momento dell’acquisto di una nuova
apparecchiatura di tipo equivalente, in ragione di uno
a uno.
• L’adeguata raccolta differenziata per l’avvio successivo
dell’apparecchiatura dismessa al riciclaggio, al
trattamento e allo smaltimento ambientalmente
compatibile contribuisce ad evitare possibili effetti
negativi sull’ambiente e sulla salute e favorisce il
reimpiego e/o riciclo dei materiali di cui è composta
l’apparecchiatura.
ATTENZIONE: Lo smaltimento abusivo del
prodotto da parte dell’utente comporta
l’applicazione delle sanzioni amministrative
previste dalla normativa vigente.
F50-841_ISTRUZIONI.indd Sez1:6F50-841_ISTRUZIONI.indd Sez1:6 19/05/2016 10.50.3319/05/2016 10.50.33

7
EN
1.1 CONVENTIONAL SYMBOLS
Before starting work with your sawing machine, carefully
read this instructions manual so that you are familiar with
the machine and its uses and where it should not be used.
Keep this manual in a safe place.
Do not underestimate the symbols “HAZARD” and
“CAUTION” in this manual.
Symbols and notes precede all hazardous operations both
to give safety messages and to draw the users’ attention
to danger and also to outline the appropriate behaviour to
adopt to avoid such events.
The three symbols used and relative wording are the
following:
WARNING: high risk behaviour which could be
severely harmful.
WARNING: behaviour which could be moderately
harmful or damage objects.
NOTE: the notes preceded by this symbol are of a
technical nature and simplify use.
1.2 SAFETY AND RULES
The machine was designed and built according to the
Community Directives in force: 2006/42/EC, 2011/65/EU,
2012/19/EU, 2014/30/EU, 2014/35/EU. The enclosed CE
Declaration of conformity, togheter with the CE mark on
product, essentially comprise and are an integral part of
the machine: both guarantee product conformity with the
aforesaid safety Directives.
1.3 STANDARD SAFETY PROCEDURS
- Do not use the machine in very damp places or in the
presence of infl ammable liquids or gases.
- Do not use the machine outdoors in adverse weather
or environmental conditions (explosive atmospheres,
storms or rain).
- Wear appropriate clothing: do not wear loose-sleeved
garments or objects such as scarves, chains or
bracelets which may get caught in machine’s moving
parts.
- Always use personal protective gear: standard accident-
prevention goggles, well-fi tting gloves, earphones or
earplugs and headgear to cover hair if necessary.
- Handle the power supply cable with care: do not use it
to lift the machine or to pull the plug out of the socket.
Keep it away from cutting edges, oily patches and high
temperatures.
- When in need, only use approved power supply cable
extensions.
Any power cable extensions must be type approved
abd comply with safety standards.
- Avoid using the machine if your psycho-physical
condition are precarious or upset or under the effects
of alcohol or sedatives.
1 INTRODUCTION TO USE
Before using your suction fan, please read this instruction
manual very carefully in order to become familiar with the
machine and its recommended use.
Do not lose this manual as it is an essential part of the
machine itself. We recommend you always refer to it in
order to operate the machine in the best and safest way
possible.
Keep the manual with the machine and handy at all times
to be consulted whenever necessary.
Use the machine exclusively for the uses specifi ed below,
follow manual instructions carefully and never try to force
or to tamper with it, or to use it inappropriately.
INDEX
1 INTRODUCTION TO USE......................................... 7
2 INSTALLATION ........................................................9
3 USE ......................................................................... 12
4 MAINTENANCE ...................................................... 12
F50-841_ISTRUZIONI.indd Sez1:7F50-841_ISTRUZIONI.indd Sez1:7 19/05/2016 10.50.3419/05/2016 10.50.34

8
EN
1.4 SUPPLEMENTARY SAFETY RULES FOR
WORK SHOP SUCTION FANS
WARNING: always comply with the standard
precautionary measures when using work shop
suction fans. In order to cut down risks of injury,
electric discharge or fi re outbreaks, closely
adhere to the safety rules outlined below.
1. Read and fully understand all supplied information
before operating the suction fan.
2. Do not leave the suction fan’s cable plugged in.
Disconnect the suction fan when it is not being used,
before repairing it, when changing the bags or when
cleaning it.
3. WARNING:
In order to cut down the risk of electric discharge
do not expose the suction fan to rain and do
not use it inside humid places. Use it only for
collecting dry waste.
4. COMPLY WITH all the European standards concerning
safety and electrical installations.
All the electrical hook-ups and the wiring must be made
by skilled technicians.
5. DO NOT use the suction fan to suck up infl ammable
liquids or combustible materials. Never use the
suction fan near infl ammable liquids or combustible
materials.
6. Use the suction fan only for sucking up wood shavings
or sawdust. Do not use the suction fan to suck up
metallic pieces or dust.
7. Do not use the suction fan to dissipate vapors or
fumes. Never suck up anything hot or burning such as
cigarettes, hot ashes, etc.
8. Use the suction fan only complying with the instructions
supplied in the manual. Use only the accessories
recommended by FEMI SpA.
9. Do not handle the socket or the suction fan if your hands
are wet.
10. Replace any damaged cables immediately. Do not use
a damaged socket or cable. If the suction fan does not
work effi ciently, or if it is damaged, or if it came into
touch with water, send it immediately to a servicing
centre to have it repaired.
11. Do not use the suction fan as a toy. Keep children away
from it when in use.
12. Do not stick your fingers or any other type of
object into the inlet holes. Tie your hair and keep
it away, along with loose clothing, fi ngers
and other body parts, from the openings and
movable parts of the suction fan.
13. Do not use the suction fan unless the fi lter bag and
the dust bag are in place and fi rmly secured.
14. CHECK the fi lter bag and the dust bag ON A REGULAR
BASIS to make sure they are not torn or cut. NEVER
USE the suction fan if a bag or a tube is damaged.
15. The suction fan is designed for domestic use.
NOTE:
KEEP THESE INSTRUCTIONS WITHIN REACH.
Reread them often and use them for instructing
other personnel.
1.5 SAFETY RULES
Washing wood could be a dangerous operation if safe and
appropriate techniques are not complied with.
As occurs with any machine, using it could give rise to
serious danger.
If you use the machine carefully and adhere to the rules,
the risk of getting hurt is considerably cut down to a
minimum.
Nonetheless, if the usual safety precautions are not
complied with or if they are ignored, the operator could be
seriously injured. Safety equipment such as guards, specifi c
pushbuttons, self-latching devices, safety goggles, facial
dust-proof masks and earmuffs do contribute in cutting
down the risk of being injured.
But even the best protection cannot protect you against
lack of common sense, concern or attention. Always use
common sense and proceed with precaution in the work
shop. If a job seems risky or dangerous, do not attempt to
carry it out. Try to fi nd a safer way to handle it. DO NOT
FORGET: safety is everyone’s responsibility.
This suction fan was designed for specifi c usage. FEMI
SpA recommends not modifying and/or using it for other
scopes except for the one for which it has been designed.
If situations arise that require special applications, do not
use the suction fan until you have contacted FEMI SpA
to determine whether or not the fan may be used as you
require.
WARNING:
Failure to comply with the foregoing rules could
cause serious injury
1.6 MACHINE DESCRIPTION
A Rectangular base
B Motor
C Suction manifold with turbine
D Drum for securing the bags
E Two suction bags
F Directional wheels
G Fixed wheels
H Handle
I Supports
L Bag hook
F50-841_ISTRUZIONI.indd Sez1:8F50-841_ISTRUZIONI.indd Sez1:8 19/05/2016 10.50.3419/05/2016 10.50.34

9
EN
2 INSTALLATION
2.1 TECHNICAL SPECIFICATIONS
Voltage: ..............................................................230 volts
Power: … .…………………………………………750 watts
Number of revs: ………………………………….2950 rpm
Airfl ow: .........................................................16.6 m3/min.
Fan diameter: .....................................................300 mm
Dimension of the sucking base: ...................... Ø 100 mm
Dimensions of the bag: .................. Ø 370mm x h640mm
Bag volume: .......................................................0.057 m3
Average sound level: ..............................Lpm = 76 db (A)
Weight: ....................................................................30Kg
Fig. 1
L
B
C
I
A
G
F
E
D
H
E
2.2 REMOVING THE PACKING
Remove the box used for protecting the machine during
transport. Exercise the greatest caution not to damage the
packing as you might need it again to move the suction fan
or store it for long periods of time.
WARNING:
Do not start the suction fan until it has
been completely assembled and until all the
operating instructions have been fully read and
understood
Fig. 2
2.3 ASSEMBLY
Your suction fan must be fully assembled before using it.
The instruction manual must be read before using the
machine to get to know it well before beginning the job.
Prepare the various parts to be assembled
1. Fit the four wheels in the four corners underneath the
rectangular base using the screws and nuts with the
relevant washers. For each wheel-supporting corner you
should insert over a screw through the washer in the
base and then in the support of each wheel. Tighten the
nut using a specifi c wrench and a screwdriver. Repeat
the operation for the other wheels. The two directional
wheels are to be located on the side of the bags opposite
the motor (Fig. 2).
F50-841_ISTRUZIONI.indd Sez1:9F50-841_ISTRUZIONI.indd Sez1:9 19/05/2016 10.50.3419/05/2016 10.50.34

10
EN
2. Align the motor-with-drum assembly for placing the bags. Place the gasket and the protection net in between the two
parts to be assembled, using the screws, the washers and the corresponding nuts (Fig. 3).
3. Secure the two supports of the manifold with supports
onto the motor assembly using the screws, the washers
and the corresponding nuts (Fig. 4).
Mount the remaining supports with the supports and do
not forget to simultaneously secure the handle to the
drum that secures the bags. (Fig. 5).
4. Position the base onto the wheels and position the motor and drum assembly onto the base aligning the supports
with the holes on the base. Insert the screws and the washers and fi x the supports to the base. Tighten the screws
using the appropriate wrench. Pay attention when positioning the directional wheels that must be on the side of the
bags opposite the motor. (Fig. 6).
5 Fix the bag hook to the motor-drum assembly. Align the two holes of the support to those of the drum and then use
the screws and washers to secure the support to the drum. Tighten all the way (Fig. 7).
Fig. 3
Fig. 4 Fig. 5
F50-841_ISTRUZIONI.indd Sez1:10F50-841_ISTRUZIONI.indd Sez1:10 19/05/2016 10.50.3419/05/2016 10.50.34

11
EN
6. Pass the closing strap through the dust upper bag’s mouth that has a device for fi xing it to the hook. Hang the bag
on the hook. Place the open end of the fi lter bag on the drum’s edge. Once done, adjust the closing strap so that
the tensioner is in the closing system’s teeth. Press the tensioner’s handle to lock the bag in place. Make sure the
closing strap is in the manifold’s throat before locking the tensioner.
Position the lower bag like the upper bag but from the manifold’s lower part without suspending it (Fig. 8).
7. Secure the fl exible tube to the connector to mount to
the escape at the outfeed of the suction fan (Fig. 9).
Or disconnect this fl exible tube and connect the wood
machine’s one using the appropriate fl exible tube and
the corresponding closing strap.
Fig. 6 Fig. 7
Fig. 8
Fig. 9
F50-841_ISTRUZIONI.indd Sez1:11F50-841_ISTRUZIONI.indd Sez1:11 19/05/2016 10.50.3419/05/2016 10.50.34

12
EN
2.4 ELECTRICAL CONNECTION
Check that the mains system in which the machine is
inserted is connected to ground as set forth in the prevailing
safety standards and that the current socket is in good
condition.
The user should not forget that a magnetothermal circuit
breaker must be installed upstream of the mains system
to safeguard all the conductors from short circuits and
overloads.
This protection must be chosen according to the machine’s
electrical specifi cations shown on the motor.
The connecting wires of the suction fan are as follows:
Yellow/green = ground
Blue = neutral
Brown = Phase
WARNING:
Do not leave the suction fan in the rain and do
not use it in humid places.
The suction fan’s motor is rated to operate at 230 volts.
WARNING:
Grounding information: this machine must be
grounded when used for protecting the user
against possible electric discharge.
WARNING:
Consult a skilled electrician or after-sales service
personnel if you have any doubts about how to
ground the machine. Do not change the plug
supplied with the suction fan. If the power point
does not adapt to it, an authorized electrician
must install a suitable one.
2.5 ON/OFF SWITCH
The on/off switch is located on the side of the motor. This
suction fan is equipped with a power failure switch. In order
to start it, press the ON button. To stop it, press OFF.
3 USE
3.1 INTENDED CONDITIONS OF USE
This suction fan was designed for being connected to a
fl exible tube for sucking up wood shavings or sawdust.
If the machine’s suction outlet size is different, it is advisable
to use appropriate adapters to connect the machine to the
suction fan.
Always check and make sure that the suction bag is perfectly
secured to the manifold with the closing strap.
When the suction bag is ¾ full, empty it to avoid blocking
the suction system.
Before emptying the bag disconnect the suction fan’s plug
from the socket and don a facial mask and work gloves.
Release the strap that closes the lower bag and empty it
in a suitable place.
Refi t the bag and close the strap again.
4 MAINTENANCE
4.1 OBSERVATIONS
Before performing any type of maintenance make sure
that the equipment is disconnected from the power
supply to avoid accidents of any kind. Maintenance to
the foregoing article must be performed by an authorized
service centre.
Always unplug the suction fan when it is stored. Wind the
power cable properly and set it on the suction fan’s base
so that it will not be damaged in any way.
4.2 MOTOR MAINTENANCE
Remove dust and dirt. Blow low-pressure compressed air
onto the motor to remove dirt and dust. The person who
cleans the motor must always wear safety goggles. Dust
build-up might cause the motor to overheat.
4.3 DISPOSAL OF THE MACHINE AND
PACKAGING
INFORMATION FOR USERS
Implementation of Directives 2011/65/EU,
2012/19/EU, relative to reducing the use
of hazardous substances in electrical and
electronic appliances and the disposal of
waste”, please take note of the following:
• The crossed out wheelie bin symbol found on the
appliance or on the packaging, indicates that the
product must be disposed of separately from ordinary
household waste when it reaches the end of its working
life.
• The user must consign the unwanted appliance to
an authorized differentiated waste disposal centre for
electrical and electronic goods, or alternatively, hand
it over to the relative dealer on purchasing a new
appliance of the same type on the basis of a one to
one ratio.
• Differentiated disposal, to enable possible recycling
or environmentally compatible elimination of the
appliance, helps to limit undesirable effects on health
and the environment and promotes the reuse and/or
recycling of the materials which went into making up
the appliance.
ATTENTION: Sanctions, in accordance with the
relative legislation in force in the country of use,
will be imposed on the user if the appliance is
disposed of illegally.
F50-841_ISTRUZIONI.indd Sez1:12F50-841_ISTRUZIONI.indd Sez1:12 19/05/2016 10.50.3419/05/2016 10.50.34

13
DE
1.1 PIKTOGRAMME
DEN ANWENDUNGSPUNKTEN
Unterschätzen Sie die Anweisungen „ACHTUNG !“ und
„VORSICHT!“ in diesem Handbuch nie. Spezielle Symbole
und Hinweise sollen Ihre Aufmerksamkeit auf sich ziehen
und Sicherheitsanweisungen über gefährliche Operationen
geben. Daraus ersehen sie, wie gefährlich gewisse
Situationen sind und erfahren, wie Sie sich verhalten
müssen, damit jede Gefahr ausgeschlossen wird. Diese
Symbole und Hinweise sind wie folgt in drei Kategorien
aufgeteilt:
ACHTUNG: gefährliche Verhaltensweisen können
zu schweren Verletzungen führen.
VORSICHT: falsche Verhaltensweisen können zu
mittelschweren Verletzungen oder Sachschäden
führen.
MERKE: erscheint dieses Symbol vor einer
Erklärung, bedeutet dies, daß sie technischer Art ist
und die Operation erleichtern hilft.
1.2 SICHERHEIT UND NORMEN
Die Maschine wurde so konzipiert und gebaut, daß sie
den Anforderungen der gültigen EG Richtlinien entspricht:
2006/42/EG, 2011/65/EU, 2012/19/EU, 2014/30/EU,
2014/35/EU.
Die beiliegende EG Konformitätserklärung ist, zusammen
mit dem auf dem Produkt angebrachten “CE” Kennzeichen,
ein grundlegendes Element und ein wesentlicher Teil der
Maschine: sie ist eine Garantie, daß das Produkt den o. g.
Sicherheitsrichtlinien entspricht.
1.3 ALLGEMEINE SICHERHEITSVORSCHRIFTEN
- Gebrauchen Sie nicht die Maschine in feuchten
Räumen, in Nähe von explosiven Substanzen oder
Gas.
- Nie im Freien verwenden, wenn die allgemeinen Wetter-
und Umweltbedingungen dies nicht zulassen (z.B.:
explosive Atmosphären, während eines Gewitters oder
bei Regen).
- Verwenden Sie stets Ihre persönlichen
Sicherheitsvorrichtungen: vorschriftsgemäße
Schutzbrille, Handschuhe in der richtigen Größe,
äußeren oder inneren Ohrenschutz, falls notwendig
eine Haube, die die Haare bedeckt.
- Achten Sie auf das Stromkabel: es darf nie zum
Anheben der Maschine oder zum Entfernen des
Steckers gezogen werden, schützen Sie es vor scharfen
Kanten, Öl und Überhitzung.
- Erlauben Sie nicht, daß Kinder sich der Maschine
nähern oder diese sogar anfassen.
- Eventuelle Verlängerungen für das Stromkabel
müssen eine Zulassung haben und den gültigen
Sicherheitsnormen entsprechen.
- Vermeiden Sie die Benutzung der Maschine, wenn Sie
sich schlecht fühlen oder unter dem Einfl uß von Alkohol
oder Beruhigungsmitteln stehen.
1 EINFÜHRUNG IN DIE BEDIENUNG
Bevor Sie mit Ihrer Staubsauger zu arbeiten beginnen,
lesen Sie bitte dieses Handbuch aufmerksam durch, bis Sie
die Maschine und ihre Verwendungsmöglichkeiten kennen
und wissen, für welche Anwendungsbereiche sie eventuell
nicht geeignet ist.
Bewahren Sie dieses Handbuch sorgfältig auf, es gehört zur
Maschine und soll regelmäßig konsultiert werden, damit die
Operationen, die darin beschrieben werden, bestmöglich
und unter Einhaltung der Sicherheitsbedingungen
ausgeführt werden können. Das Handbuch muß immer
in der Nähe der Maschine sein, damit es im Bedarfsfalle
gleich zum Nachschlagen bereit ist. Benützen Sie die
Maschine immer nur für die Verwendungszwecke, die
nachfolgend aufgeführt werden, und zwar so, wie im
Handbuch angegeben; versuchen Sie keinesfalls, sie
zu verändern, aufzubrechen oder für nicht vorgesehene
Verwendungszwecke zu benützen.
INHALT
1 EINFÜHRUNG IN DIE BEDIENUNG ...................... 13
2 INSTALLATION .....................................................15
3 EINSATZ .................................................................18
4 INSTANDHALTUNG ............................................... 18
F50-841_ISTRUZIONI.indd Sez1:13F50-841_ISTRUZIONI.indd Sez1:13 19/05/2016 10.50.3419/05/2016 10.50.34

14
DE
12. Die Finger oder Gegenstände sollten nicht in die
Staubeinsauglöcher gesteckt werden. Lange Haare
sind zusammenzubinden. Vorsicht auch bei weiten
Kleidern. Die Finger und andere Körperteile sollten
nicht in die Nähe der Öffnungen oder der beweglichen
Teile des Staubsaugers gebracht werden.
13. Der Staubsauger sollte nicht ohne Filterbeutel und
ohne ordentlich angebrachten und gut befestigten
Staubbeutel betrieben werden.
14.Der Filterbeutel und der Staubbeutel sollten
REGELMÄSSIG ÜBERPRÜFT werden, um
sicherzustellen, dass diese nicht gerissen oder
eingeschnitten sind. Der Staubsauger sollte
KEINESFALLS mit beschädigtem Beutel oder Schlauch
benutzt werden.
15. Der Staubsauger ist für den Hausgebrauch entwickelt
worden.
MERKE:
DIESE HINWEISE SOLLTEN AUFBEWAHRT
WERDEN. Sie sollten wiederholt gelesen und für
die Information anderen Personen zugänglich
gemacht werden.
1.5 SICHERHEITSVORSCHRIFTEN
Die Bearbeitung von Holz kann gefährlich sein, wenn die
geeigneten Techniken und die Sicherheitsanforderungen
nicht beachtet werden. Wie bei jeder Maschine kann
auch der Betrieb dieses Geräts ernste Gefahren bergen.
Wird die Maschine mit der gebotenen Vorsicht und unter
Beachtung der Sicherheitsvorschriften betrieben, so besteht
lediglich ein äußert geringes Verletzungsrisiko.
Werden die normalen Sicherheitsvorschriften jedoch
nicht beachtet oder sind diese nicht bekannt, so können
dadurch ernsthafte Verletzungen beim Bedienungspersonal
verursacht werden. Die Sicherheitsausrüstungen wie die
Schutzvorrichtungen, die Tasten, die Haltevorrichtungen,
die Schutzbrillen, die Staubschutzmasken und der
Gehörschutz können das Unfallrisiko reduzieren.
Jedoch schützt auch die beste Schutzausrüstung nicht gegen
das Fehlen von gesundem Menschenverstand, Vorsicht und
Aufmerksamkeit. Beim Einsatz in der Werkstatt sollten
daher stets der gesunde Menschenverstand benutzt und
die erforderlichen Vorsichtsmaßnahmen getroffen werden.
Sollte ein Vorgang gefährlich erscheinen, sollte davon
abgesehen werden. Vorzugsweise sollte eine sicherere
Methode ausgeführt werden. NICHT VERGESSEN: Für
die Sicherheit ist jeder Einzelne verantwortlich.
Der Staubsauger wurde für genau umrissene Zwecke
entwickelt. Das Unternehmen FEMI SpA empfi ehlt, das
Gerät nicht zu verändern und/oder für andere Zwecke
einzusetzen, für die es nicht entwickelt wurde. Soll das
Gerät in einer besonderen Anwendung eingesetzt werden,
so sollte es erst nach Rücksprache mit dem Unternehmen
FEMI SpA und der Abklärung, ob es für diesen Gebrauch
geeignet ist, für den jeweiligen Zweck verwendet werden.
ACHTUNG:
Die Nichtbeachtung dieser Vorschriften kann zu
schweren Unfällen führen.
1.4 ZUSÄTZLICHE
SICHERHEITSVORSCHRIFTEN FÜR DEN
WERKSTATT-STAUBSAUGER
ACHTUNG:
Beim Betrieb des Staubsaugers in der
Werkstatt sollten stets die grundlegenden
Vorsichtsmaßnahmen beachtet werden. Um die
Gefahren durch Unfälle, elektrische Entladungen
oder Brände zu verringern, sind die nachfolgend
aufgeführten Sicherheitsvorschriften zu
beachten.
1. Vor dem Betrieb des Staubsaugers sind die Informationen
zu lesen. Diese sollten auch verstanden werden.
2. Der Staubsauger sollte nicht an der Steckdose
eingesteckt bleiben. Der Stecker des Staubsaugers
ist abzunehmen: wenn er nicht benutzt wird, bevor
Reparaturen ausgeführt werden, bevor die Beutel
gewechselt werden, vor der Reinigung.
3. VORSICHT:
um die Gefahr von elektrischen Entladungen
zu reduzieren, sollte er weder dem Regen
ausgesetzt noch in feuchten Räumen eingesetzt
werden. Der Staubsauger sollte ausschließlich
für die Aufnahme von trockenem Abfall
eingesetzt werden.
4. Es sind alle europäischen Vorschriften hinsichtlich
der Sicherheit und der elektrischen Installationen zu
beachten.
Alle elektrischen Anschlüsse sind ebenso wie die
Verkabelung ausschließlich durch qualifiziertes
Fachpersonal auszuführen.
5. Der Staubsauger sollte NICHT für die Entfernung von
entflammbaren oder verbrennbaren Flüssigkeiten
eingesetzt werden. Der Staubsauger sollte keinesfalls
in der Nähe von entfl ammbaren oder verbrennbaren
Flüssigkeiten benutzt werden.
6. Der Staubsauger sollte ausschließlich für die Aufnahme
von Holz- oder Sägespänen eingesetzt werden.
Der Staubsauger sollte nicht für die Aufnahme von
Werkstücken, Staub oder Metallstücken verwendet
werden.
7. Der Staubsauger sollte nicht für die Abführung von
Dämpfen oder Rauch eingesetzt werden. Keine heißen
oder brennenden Teile, wie Zigaretten oder heiße Asche
einsaugen.
8. Der Staubsauger sollte ausschließlich gemäß der
Hinweise im Handbuch eingesetzt werden. Es
sollten ausschließlich die von FEMI SpA empfohlenen
Zubehörteile verwendet werden.
9. Die Steckdose oder der Staubsauger sollten keinesfalls
mit feuchten Händen angefasst werden.
10. Ein beschädigtes Kabel ist unverzüglich auszutauschen.
Beschädigte Kabel oder Steckdosen dürfen nicht
benutzt werden. Kann der Staubsauger nicht
störungsfrei betrieben werden, ist er beschädigt
oder ist er mit Wasser in Berührung gekommen,
so ist er unverzüglich für die Reparatur an das
Kundendienstzentrum einzusenden.
11. Der Staubsauger sollte nicht als Spielzeug benutzt
werden. Er sollte nicht in der Nähe von Kindern
eingesetzt werden.
F50-841_ISTRUZIONI.indd Sez1:14F50-841_ISTRUZIONI.indd Sez1:14 19/05/2016 10.50.3519/05/2016 10.50.35

15
DE
2.2 ENTFERNUNG DER
TRANSPORTVERPACKUNG
Die Schachtel, mit der die Maschine während des
Transports geschützt wird, entfernen. Dabei sollte so
vorgegangen werden, dass die Transportverpackung
möglichst intakt bleibt, damit sie für weitere Transporte
des Staubsaugers oder die langfristige Einlagerung erneut
benutzt werden kann.
VORSICHT:
Der Staubsauger sollte nicht eingeschaltet
werden, bevor er vollständig zusammengebaut
wurde und bevor die Betriebsanleitungen
vollständig gelesen und verstanden wurden.
2 INSTALLATION
2.1 TECHNISCHE DATEN
Spannung: ..........................................................230 Volt
Leistung: .............................................................750 Watt
Drehzahl: ......................................................2950 U/Min.
Luftdurchsatz: ..............................................16,6 m3/Min.
Durchmesser Lüfter: ...........................................300 mm
Abmessung der Saugbasis: ............................ Ø 100 mm
Abmessungen des Beutels: .......Ø 370 mm x H 640 mm
Fassungsvermögen des Beutels: ......................0.057 m3
Mittlerer Schallpegel ............................... Lpm = 76 db(A)
Gewicht: ...................................................................30Kg
1.6 BESCHREIBUNG DER MASCHINE
A Rechteckiges Untergestell
B Motor
C Saugsammlerleitung mit Turbine
D Befestigungstrommel Beutel
E Zwei Saugbeutel
F Richtungsrollen
G Feste Rollen
H Handgriff
I Halterungen
L Haltehaken Beutel
Abb. 1
L
B
C
I
A
G
F
E
D
H
E
Abb. 2
2.3 MONTAGE
Ihr Staubsauger muss vor der Inbetriebnahme vollständig
zusammengebaut werden.
Aus diesem Grunde ist es von Bedeutung, dass vorher das
Bedienungshandbuch gelesen wird, um vor der Aufnahme
der Arbeit die Maschine etwas kennen zu lernen.
Vorbereitung der verschiedenen Teile für die Montage
1. Die Rollen an den vier Ecken des rechteckigen
Untergestells unter Verwendung der Schrauben und
Muttern sowie der entsprechenden Unterlegscheiben
anbringen. Für jeden Stützwinkel der einzelnen
Rollen ist oben eine Schraube mit Unterlegscheibe in
das Untergestell und dann in den Halter einer jeden
Rolle einzusetzen. Die Mutter mit einem geeigneten
Schlüssel und einem Schraubenzieher anziehen. Den
gleichen Arbeitsvorgang auch auf den anderen Rollen
ausführen. Die Richtungsrollen werden auf der Seite
der Beutel gegenüber dem Motor angebracht (Abb.
2).
F50-841_ISTRUZIONI.indd Sez1:15F50-841_ISTRUZIONI.indd Sez1:15 19/05/2016 10.50.3519/05/2016 10.50.35

16
DE
2. Den Motorkomplex mit der Trommel für die Aufnahme der Beutel ausrichten. Dichtung und das Schutznetz zwischen
den beiden zu montierenden Teilen einlegen. Dabei sind die entsprechenden Schrauben, Unterlegscheiben und
Muttern zu verwenden (Abb. 3).
Die verbleibenden Halterungen mit den Stützen
montieren. Gleichzeitig ist der Handgriff auf der
Trommel für die Befestigung der Beutel zu befestigen.
(Abb. 5).
4. Das Untergestell auf die Rollen stellen und den Motorkomplex und die Trommel auf dem Untergestell positionieren. Dabei
werden die Halterungen auf die Öffnungen des Untergestells ausgerichtet. Die Schrauben und die Unterlegscheiben
einsetzen und die Halterungen auf dem Untergestell befestigen. Die Schrauben mit einem geeigneten Schlüssel
anziehen. Die Richtungsrollen sollten korrekt positioniert werden. Sie werden auf der Seite der Beutel gegenüber
dem Motor angebracht (Abb. 6).
5. Den Haltehaken des Beutels auf dem Komplex Motor-Trommel befestigen. Die beiden Öffnungen der Halterung
und diejenigen der Trommel ausrichten. Nachfolgend ist der Halter mit den entsprechenden Schrauben und
Unterlegscheiben an der Trommel zu befestigen. Die Schrauben sollten fest angezogen werden (Abb. 7).
3. Die beiden Halter der Sammlerleitung mit der Stütze
auf dem Motorkomplex befestigen. Dabei sind die
entsprechenden Schrauben, Unterlegscheiben und
Muttern zu verwenden (Abb. 4).
Abb. 3
Abb. 4 Abb. 5
F50-841_ISTRUZIONI.indd Sez1:16F50-841_ISTRUZIONI.indd Sez1:16 19/05/2016 10.50.3519/05/2016 10.50.35

17
DE
6. Die Schließschelle durch die Einfassung des oberen Staubbeutels ziehen, der mit einer Vorrichtung für die Befestigung
am Haken ausgestattet ist. Den Beutel in den Haken einhängen. Das offene Endstück des Filterbeutels über die
Einfassung der Trommel ziehen. Nach Anbringung des Filters ist die Schließschelle so zu positionieren, dass
der Spanner in den Zähnen des Schließsystems sitzt. Um den Beutel in seiner Position zu sperren, wird auf den
Handgriff des Spanners gedrückt. Sicherstellen, dass die Schließschelle sich in der Einkerbung der Sammlerleitung
befi ndet, bevor der Spanner gesperrt wird.
Den unteren Beutel mit der gleichen Vorgehensweise wie für den oberen Beutel anbringen. Er wird jedoch auf dem
unteren Bereich der Sammlerleitung positioniert und nicht eingehängt (Abb. 8).
7. Den Schlauch an den Stecker der Absauganlage
befestigen (Fig. 9). Alternativ kann dieser Schlauch
abgenommen und ein geeigneter Schlauch mit der
entsprechenden Schließschelle an der Holzmaschine
angeschlossen werden.
Abb. 6 Abb. 7
Abb. 8
Fig. 9
F50-841_ISTRUZIONI.indd Sez1:17F50-841_ISTRUZIONI.indd Sez1:17 19/05/2016 10.50.3519/05/2016 10.50.35

18
DE
2.4 ELEKTRISCHER ANSCHLUSS
Überprüfen, ob die Netzanlage, auf der die Maschine
eingesteckt wird, über einen Erdungsanschluss gemäß
der geltenden Sicherheitsvorschriften verfügt, und ob die
Steckdose sich in einem guten Zustand befi ndet.
Es wird darauf hingewiesen, dass vor der Netzanlage eine
Wärmeschutzvorrichtung zwischengeschaltet werden
muss, um alle Leiter vor Kurzschlüssen und Überlasten zu
schützen. Diese Schutzvorrichtung muss entsprechend
der elektrischen Eigenschaften der Maschine, die auf dem
Motor aufgeführt werden, ausgelegt sein. Für die Techniker
weisen wir darauf hin, dass die folgenden Leiter dieses
Staubsaugers für den Anschluss verwendet werden:
Gelb/Grün = Erde
Blau = Nulleiter
Braun = Phase
VORSICHT:
Der Staubsauger sollte nicht dem Regen
ausgesetzt oder in feuchten Räumen benutzt
werden.
Der Motor des Staubsaugers ist für einen Betrieb bei einer
Versorgung auf 230 Volt verkabelt.
ACHTUNG:
Hinweise für den Erdungsanschluss: diese
Maschine muss für den Betrieb an die Erdung
angeschlossen werden, um den Benutzer
vor eventuellen elektrischen Endladungen zu
schützen.
ACHTUNG:
Sollten hinsichtlich des Erdungsanschlusses
der Maschine Zweifel bestehen, sollte ein
kompetenter Elektriker oder das Personal des
Kundendienstes zu Rate gezogen werden. Die
mit dem Staubsauger gelieferte Buchse sollte
nicht verändert werden. Sollte die Steckdose
nicht passend sein, so muss eine geeignete
Steckdose durch einen zugelassenen Elektriker
installiert werden.
2.5 STEUERUNGEN SCHALTER ON/OFF
Der Ein-/Ausschalter befi ndet sich auf der Seite des Motors.
Dieser Staubsauger ist mit einem Spannungsabschalter
ausgestattet. Um das Gerät einzuschalten, ist die Taste ON,
für die Ausschaltung die Taste OFF zu drücken.
3 EINSATZ
3.1 BEDIENUNG
Dieser Staubsauger wurde für den Anschluss an einen
Schlauch für die Absaugung von Spänen und Staub
entwickelt.
Sollte der Saugausgang der Maschine anders gestaltet
sein, so bitten wir Sie, die entsprechenden Reduzierstücke
für den Anschluss der Maschine an den Staubsauger zu
verwenden. Es sollte stets sichergestellt werden, dass der
Staubbeutel mit der Schelle korrekt an die Sammlerleitung
angeschlossen wurde.
Ist der Staubbeutel auf ¾ seines maximalen
Fassungsvermögens gefüllt, so sollte er geleert werden,
um eine Blockierung des Ansaugsystems zu vermeiden.
Vor der Entleerung des Beutels ist der Staubsauger von
der Steckdose abzunehmen. Dabei sind eine Maske
und Handschuhe zu tragen. Die Befestigungsschelle
des unteren Beutels abnehmen und den Beutel in einen
geeigneten Behälter entleeren.
Den Beutel wieder in seiner Aufnahme anbringen und die
Schelle schließen.
4 INSTANDHALTUNG
4.1 HINWEISE
Vor der Ausführung jeglichen Eingriffs zu Instandhaltung
sollte sichergestellt werden, dass das Gerät von der
Versorgung abgenommen wurde, um eventuelle Unfälle
zu vermeiden. Die hier genannte Instandhaltung des
Artikels muss in einem autorisierten Kundendienstzentrum
vorgenommen werden.
Vor der Abstellung und Einlagerung des Staubsaugers
muss dieser von der Buchse abgenommen werden.
Das Versorgungskabel ist ordentlich aufzurollen und auf
dem Untergestell des Staubsaugers abzulegen, um zu
vermeiden, dass es beschädigt wird.
4.2 INSTANDHALTUNG DES MOTORS
Der Motor sollte von Schmutz und Staub gereinigt
werden. Staub und Schmutz werden mit Druckluft auf
Niederdruck vom Motor entfernt. Die Person, die die
Reinigung vornimmt, sollte stets eine Schutzbrille tragen.
Staubablagerungen können zu einer Überhitzung des
Motors führen.
4.3 MASCHINENENTSORGUNG, VERPACKUNG
BENUTZERINFORMATION
Umsetzung der Richtlinien 2011/65/EU,
2012/19/EU zur Beschränkung der Verwendung
bestimmter gefährlicher Stoffe in Elektro- und
Elektronikgeräten sowie zur Abfallentsorgung”
wird Folgendes festgelegt:
• Das Symbol der durchgestrichenen Mülltonne an dem
Produkt oder der Verpackung bedeutet, dass das
Altgerät von anderen Abfällen getrennt entsorgt werden
muss.
• Der Benutzer muss das Altgerät daher autorisierten
Sammelstellen für Elektro- und Elektronikabfälle
zuführen bzw. dem Händler beim Kauf eines
gleichwertigen Neugeräts im Verhältnis eins zu eins
zurückgeben.
• Das getrennte Sammeln und anschließende Zuführen
des Altgeräts für Recycling, Behandlung und ökogerechte
Entsorgung trägt dazu bei, die negativen Auswirkungen
auf Umwelt und Gesundheit zu vermeiden, außerdem
die Wiederverwertung oder das neue Inverkehrbringen
der Geräteteile zu fördern.
ACHTUNG: Die widerrechtliche Entsorgung
des Geräts durch den Benutzer wird gesetzlich
geahndet.
F50-841_ISTRUZIONI.indd Sez1:18F50-841_ISTRUZIONI.indd Sez1:18 19/05/2016 10.50.3519/05/2016 10.50.35
Other manuals for F50-841
1
Table of contents
Languages:
Popular Dust Collector manuals by other brands

Baileigh
Baileigh DC-600C Operator's manual

JessEm
JessEm 05151 quick start guide

Jet
Jet JDC-510 Operating instructions and parts manual

Donaldson
Donaldson Downflo Evolution DFE 2-8 Installation, operation and maintenance manual

Woodtec
Woodtec XW117 instruction manual

Steel City
Steel City 65110 user manual

Jet
Jet JDC-501 Operating instructions and parts manual

Texas Equipment
Texas Equipment COLLECTOR BOX Assembly instruction

General
General 10-110 Operation manual

Rikon Power Tools
Rikon Power Tools POWER TOOLS 60-1750 Operator's manual

Clarke
Clarke Cav 12 Operator's manual

WAM
WAM SILOTOP R03 Installation operation & maintenance