Foxconn RAID User manual

RAID Manual
Edition
V1.0 P/N: 91-187-CK8-A5-0E
Trademarks
All brand or product names mentioned are trademarks or registered trade-
marks of their respective holders.

NVIDIA RAID ............................................................................................ 1
RAID Arrays ............................................................................................................ 1
Install Hard Disks ................................................................................................. 3
Basic Configuration Instructions.......................................................................... 4
Setting Up the BIOS .............................................................................................. 5
Entering the RAID BIOS Setup ............................................................................. 6
NVIDIA RAID Utility Installation ........................................................................... 10
Initializing and Using the Disk Array ................................................................... 13
Using The NVRAIDMAN Utility ............................................................................ 14
Win2K Limitation with Bootable RAID ................................................................ 20
Contents

1
Summary of RAID Configurations
RAID Arrays
This section describes the following types of RAID arrays that NVIDIA RAID
supports:
• RAID 0
RAID 0 defines a disk striping scheme that improves the disk read and write
times for many applications.
• RAID 1
RAID 1 defines techniques for mirroring data.
• RAID 0+1
RAID 0+1 combines the techniques used in RAID 0 and RAID 1 arrays.
• Spanning (JBOD)
JBOD provides a method for combining drives of different sizes into one large
disk.
Array
RAID 0
RAID 1
RAID
0+1
JBOD
Advantages
High data throughput.
100% data
redundancy.
Optimized for both
100% data redun-
dancy and
performance. Allows
spare disks.
Combines and uses
the capacity of odd
size drives.
Drawbacks
No fault tolerance.
Requires two drives
for the storage space
of one drive.
Requires two drives
for the storage space
of one drive—the
same as RAID level 1.
Decreases perfor-
mance because of the
difficulty in using drives
concurrently or to op-
timize drives for differ-
ent uses.
# Hard Disks
multiple
2
4+
multiple
Fault Tolerance
None
Yes
Yes
No
NVIDIA RAID

2
NVIDIA RAID offers the following additional features:
• Free Disk and Dedicated Spare Disk
A Free Disk or Dedicated Disk can be automatically used in case one drive of a fault-
tolerant array fails. NVIDIA RAID defines a fault-tolerant array as either RAID 1 or
RAID 0+1. A free disk can be used by any available fault-tolerant array, while a
dedicated disk can be used only by the array to which it is assigned.
• RAID Across PATA and SATA
NVIDIA RAID can span across both Parallel ATA as well as Serial ATA controllers.
RAID operations can be performed on Parallel ATA hard drives, Serial ATA hard
drives, or both Parallel and Serial ATA hard drives.
• Bootable RAID
NVIDIA RAID can be configured in a way to make it bootable. For example, two hard
drives can be configured as a bootable mirrored RAID array.
• RAID on Multiple Disk Controllers
Unlike other RAID solutions that limits the user to a dedicated RAID controller,
NVIDIA RAID software can use a drive on one RAID controller and another drive on
a second RAID controller.
• Morphing
Morphing is the ability to convert from one RAID mode to another RAID mode. This
allows the user to upgrade their current disk or array for better performance, higher
security, and increased capacity. More importantly, this is accomplished without
having to go through multiple steps. The morphing feature gives the user an
upgradeable option to manage storage easily.
• Hot Plug Array
Hot plug, with respect to RAID, is the ability to add a disk to a system safely and
without causing problems for the RAID software. For example, when a drive in a
mirrored array fails, a user can launch the Hot Plug Array Wizard which instructs the
user as to when a drive can be added safely to the system. As soon as the drive is
added, the user can then finish running the RAID wizard and the drive becomes
useable by the system.

3
Install Hard Disks
Install SATA hard disks:
STEP 1: Install one SATA hard disk into one drive bay.
STEP 2: Connect one end of the SATA data cable to the motherboard’s one of
SATA connectors.
STEP 3: Connect the other end of the SATA data cable to the SATA hard disk.
STEP 4: Connect the power cable to the SATA hard disk.
STEP 5: Following step 1/2/3/4 to install the other SATA hard disks.
Install Parallel hard disks:
STEP 1: Setting one IDE hard disks as Master/Slave mode.
STEP 2: Install the hard disks into one drive bay.
STEP 3: Connect one end of the IDE cable to the motherboard’s one of IDE
connectors.
STEP 4: Connect the other end of the IDE cable to the IDE hard disk.
STEP 5: Connect the power cable to the IDE hard disk.
STEP 6: Following step 1/2/3/4 to install the other IDE hard disks.

4
Basic Configuration Instructions
The following are the basic steps for configuring NVIDIA RAID:
Non-Bootable RAID Array
1. Choose the hard disks that are to be RAID enabled in the system BIOS.
2. Specify the RAID level, either Mirroring (RAID 1), Striping (RAID 0), Stripe Mirroring
(RAID 0+1), or Spanning (JBOD) and create the desired RAID array.
3. Install the operating system on one hard disk, then reboot the computer.
4. Run the Windows nForce Setup application and install the RAID driver.
5. Initialize the NVRAID Array.
Bootable RAID Array
1. Choose the hard disks that are to be RAID enabled in the system BIOS.
2. Specify the RAID level, either Mirroring (RAID 1), Striping (RAID 0), Mirrored Strip-
ing (RAID 0+1), or Spanning (JBOD) and create the desired RAID array.
3. Boot from the Windows CD, then press F6 when the Windows Setup appears.
4. Insert the RAID driver floppy to Install the nForce RAID driver.
5. Initialize the NVRAID Array.
5
Setting Up the BIOS
1. Start up the computer, then press Delete to enter the BIOS setup. Use the arrow
keys to select Integrated Peripherals, then press Enter.
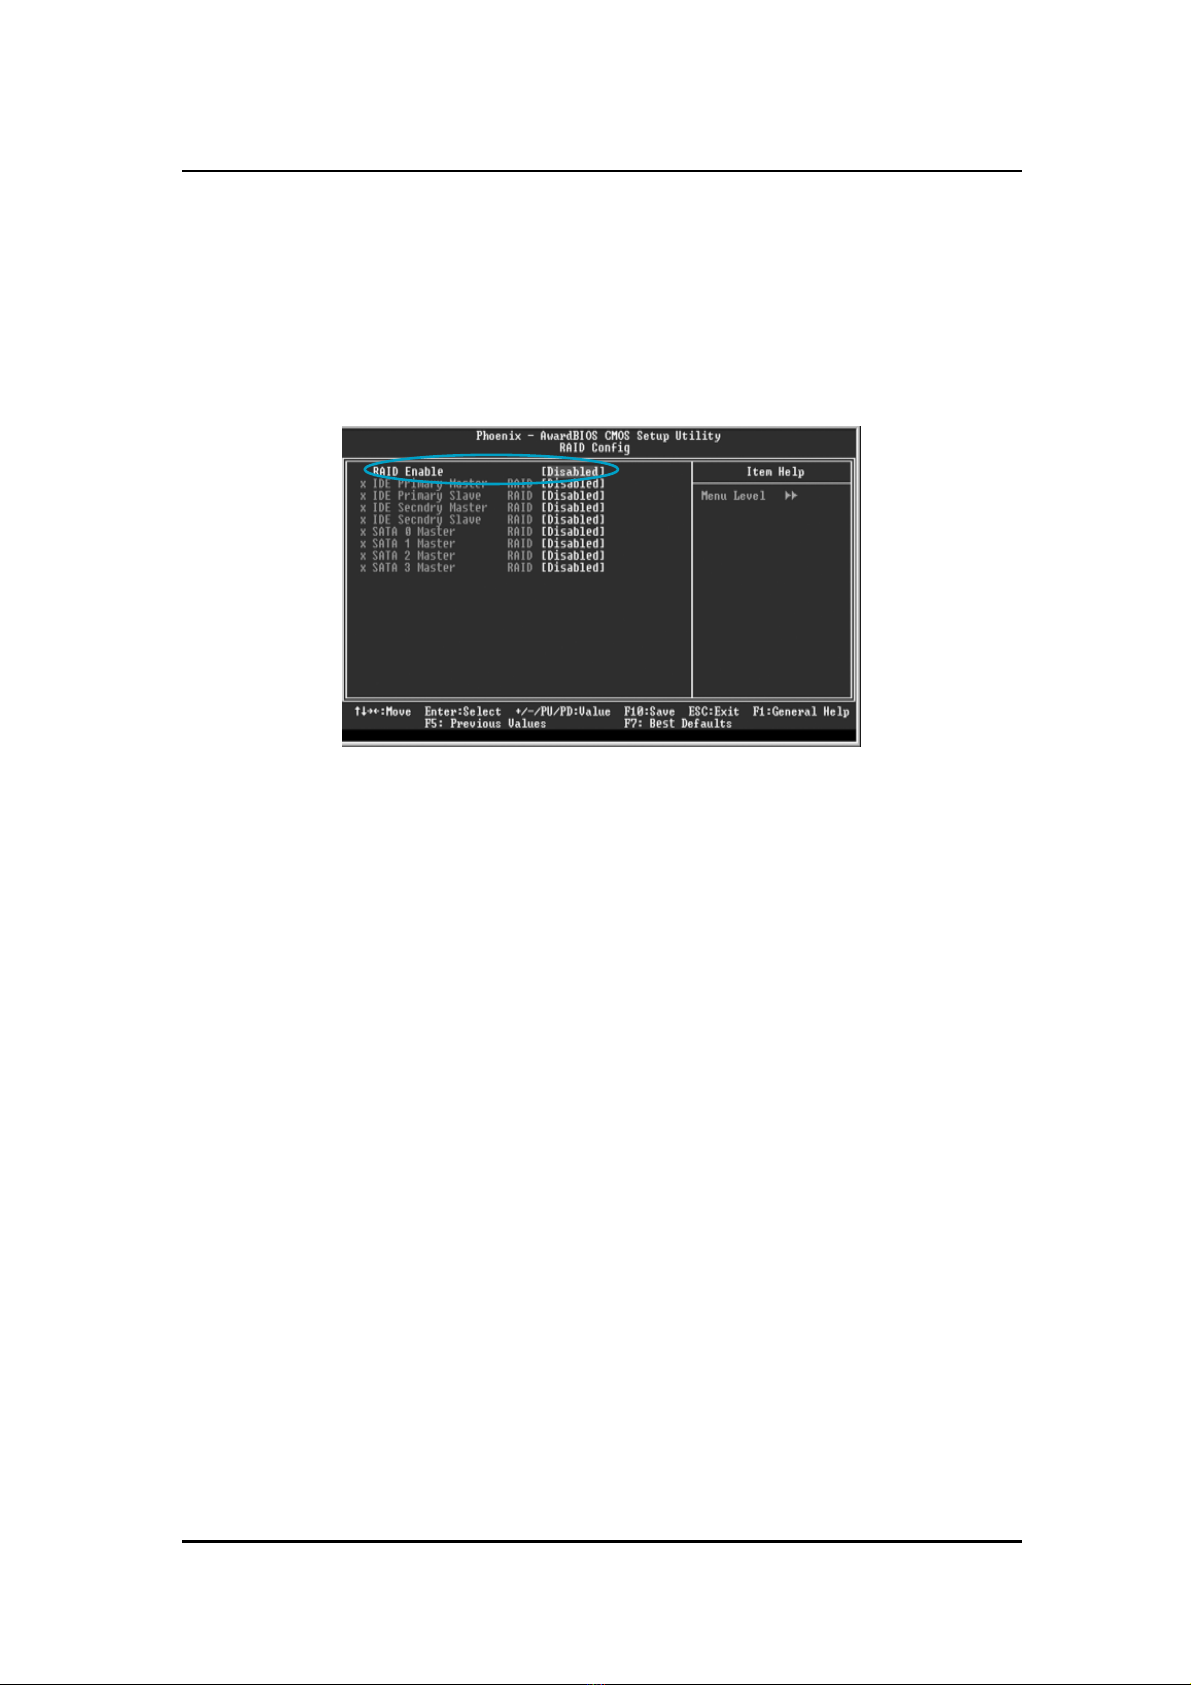
2. Use the arrow keys to select the RAID Config, then press Enter.
3. From the RAID Config window, “enabled” the RAID Enable, the other items would
be light, then you can enable the disk that you want to use as RAID disks.
4. Press F10 to save the configuration and exit.
6
Entering the RAID BIOS Setup
1. After rebooting your PC, wait until you see the RAID software prompting you to
press F10. The RAID prompt appears as part of the system POST and boot process
prior to loading OS.
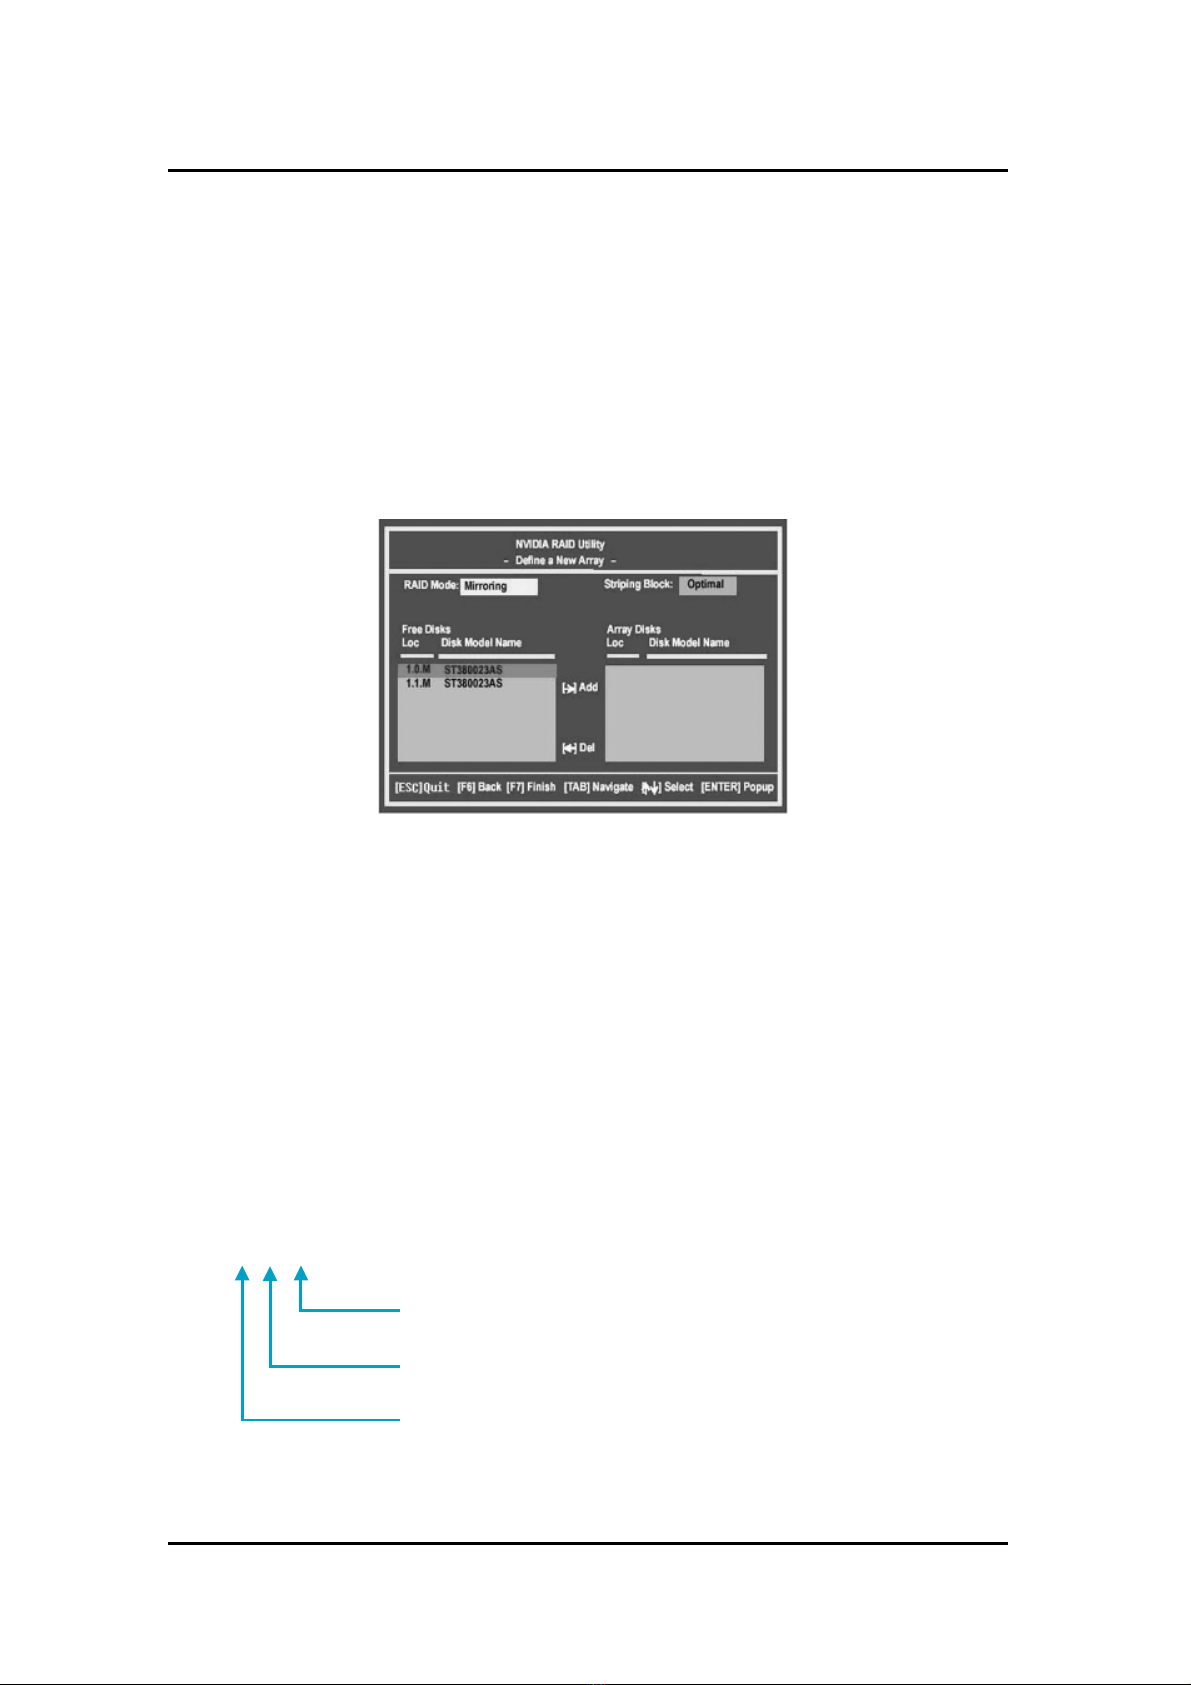
2. Press <N>, and the NVIDIA RAID Utility --- Define a New Array window will appear.
The default RAID Mode is set to Mirroring and the default Striping Block is set to
Optimal.
Understanding the “Define a New Array” Window
Use the Define a New Array window to
• Select the RAID Mode
• Set up the Striping Block
• Specify which disks to use for the RAID Array
Depending on the platform used, the system have one or more channels. In a
typical system there are usually one controller and multiple channels, and each
channel have a slave and a master.
The channel/controller/master/slave status of each hard disk is given in the Loc
(location) columns of the Free Disks and Array Disks lists.
1. 0. M
M: Master
S: Slave
0: Channel
Adapter - adapter 0 is used for PATA drives
1 and above is used for SATA drives.

7
In the example above, 1.0.M means the hard drive is attached to Adapter 1,
Channel 0, and the drive is set to Master. The following is a list of all possible
combinations:
Parallel ATA
0.0.M Adapter 0, Channel 0, Master
0.0.S Adapter 0, Channel 0, Slave
0.1.M Adapter 0, Channel 1, Master
0.1.S Adapter 0, Channel 1, Slave
Serial ATA
1.0.M Adapter 1, Channel 0, Master
1.1.M Adapter 1, Channel 1, Master
2.0.M Adapter 2, Channel 0, Master
2.1.M Adapter 2, Channel 1, Master
Note: There is no such thing as Slave drive in Serial ATA. All drives are consid-
ered to be Master since there is a one to one connection between the drive and
the controller.
Using the Define a New Array Window
If necessary, press the tab key to move from field to field until the appropriate field is
highlighted.
• Selecting the RAID Mode
By default, this is set to [Mirroring]. Change to a different RAID mode, press the
down arrow keys until the mode that you want appears in the RAID Mode box—
either [Mirroring], [Striping], [Spanning], or [Stripe Mirroring].
• Selecting the Striping Block Size
Striping Block size is given in kilobytes, and affects how data is arranged on the
disk. It is recommended to leave this value at the default [Optimal], which is 32KB,
but the values can be between [4 KB] and [128 KB].

8
• Assigning the Disks
The disks that you enabled from the RAID Config BIOS setup page appear in the
Free Disks block. These are the drives that are available for use as RAID array.
To designate a free disk to be used as a RAID array:
1. Tab to the Free Disks section. The first disk in the list is selected.
2. Move it from the Free Disks block to the Array Disks block by pressing the right
arrow key ( ). The first disk in the list is moved, and the next disk in the list is
selected and ready to be moved.
3. Continue pressing the right-arrow key ( ) until all the disks that you want to use
as RAID array appear in the Array Disks block.
Completing the RAID BIOS Setup
1. After assigning your RAID array mode, press F7. The Clear disk data windows
prompt appears.
It shows that two disks have been assigned as RAID1 array disks in the figure
above.
Other manuals for RAID
3
Table of contents
Other Foxconn Computer Accessories manuals


