FP PRO PAK'R User manual

PRO PAK’R User Manual Version 1.0 Page -1-
FP International
www.fpintl.eu
PRO PAK’R
USER MANUAL
Never stop
PROgressing

PRO PAK’R User Manual Version 1.0 Page -2-FP International
PRO PAK’R
Air Cushion Machine
FP International BV
HEERLEN
The Netherlands

PRO PAK’R User Manual Version 1.0 Page -3-
FP InternationalFP International
About this mAnuAl
mAchine identificAtion
the mAnufActurer
service centres
Edition : Version 1.0
ORIGINAL INSTRUCTION
Edition date : 04-03-2013
© Copyright : FP International BV, HEERLEN, THE NETHERLANDS 2013.
No part of this documentation may be reproduced in any form whatsoever without the prior
permission of FP International BV. Excepted are parts intended for reproduction for the purpose
of using the documentation, such as summary instructions and instructions (to be) afxed to the
machine.
This user manual forms part of the following machine:
Designation : PRO PAK’R
Model : MPRPK02MAC
Precise identication: see the data on the machine identication plate and/or the “EC Declaration of
Conformity” on page 30.
The machine is produced by:
FP International B.V.
Nijverheidsweg 4
6422 PD Heerlen
The Netherlands
FP International B.V.
Nijverheidsweg 4
6422 PD Heerlen
The Netherlands
Tel.+31(0)45 566 7400
Fax. +31(0)45 566 7401
E-mail info@fpintl.eu
www.fpintl.eu

PRO PAK’R User Manual Version 1.0 Page -4-FP International
contents
ABOUT THIS MANUAL 3
MACHINE IDENTIFICATION 3
THE MANUFACTURER 3
SERVICE CENTRES 3
FOREWORD 5
USING THE MANUAL 5
TYPOGRAPHIC CONVENTIONS 6
SERVICE AND INFORMATION 6
WARRANTY AND LIABILITY 7
1 INTRODUCTION 8
1.1 Intention of Use 8
1.2 Glossary of Machine Terms and Jargon 8
1.3 Models and Accessories 8
1.3.1 Standard Machine and accessories 8
1.3.2 Not included with the machine 9
2 SAFETY 10
2.1 Introduction 10
2.2 Safety Features 10
2.3 Safety Rules 10
2.4 Unauthorized Use 10
2.5 Machine Users 11
2.5.1 Operators (level 1) 11
2.5.2 Maintenance Personnel (level 2) 11
2.6 Workplace 11
2.7 Personal Protective Equipment 11
2.8 Emergency switch 12
2.9 Cautions on the machine 12
2.10 Fire and other emergencies 12
3 OPERATING INSTRUCTIONS 13
3.1 Construction and operating controls 13
3.1.1 Conguration 13
3.1.2 Control panel keypad instructions 16
3.1.3 Control panel display symbols 16
3.2 Starting up the machine 17
3.3 Loading Film 18
3.3.1 General instructions to operate the machine 19
3.3.2 Changing Menu Setting 20
3.3.3 Display Errors 21
3.3.4 Moving 21
3.3.5 Setting up 21
3.4 Cleaning 22
3.5 Transport/storage 22
3.5.1 General 22
3.5.2 Storage 22
3.6 Commissioning 23
3.7 Repair and maintenance 23
3.7.1 Replacing blades / cone tip 23
3.7.1.1 Change cone tip 23
3.7.1.2 Replace blade / new cutting edge 23
3.7.2 Replacing wear strips 24
3.7.3 Cleaning backing wheel 24
3.7.4 Replacing backing wheel 24
3.7.5 Extention wide lm 24
3.8 Troubleshooting 25
4 SPECIFICATION 26
4.1 Machine specication 26
4.1.1 General 27
4.1.2 Product to be processed 26
4.2 Electrical specication 26
4.3 Machine environment 27
4.4 Directives and Standards applied 27
5 INDICATIONS ON THE MACHINE 28
5.1 Machine Identication Plate 28
5.2 Warnings 29
EC DECLARATION OF CONFORMITY 30

PRO PAK’R User Manual Version 1.0 Page -5-
FP InternationalFP International
foreword
using the mAnuAl
This user manual details the daily use and maintenance of the PRO PAK’R, an installation that is part
mechanical, part electrical.
Details of maintenance work to be carried out by the manufacturer’s personnel only are expressly
excluded.
This manual is an integral part of the machine and should be carefully looked after! It
contains information that may be useful or required at a later date, for example when
carrying out repairs and maintenance. It is recommended that you keep one copy
near the machine and that you le the other one, for example with the records of your
technical department. The manufacturer may be able to supply you with an additional
copy.
The manual is to accompany the machine, should its ownership be transferred to a third
party.
This PRO PAK’R is provided with a USB key (only FAT formatted USB Stick works)
This manual, also in different languages, is also available on the USB key in the machine.
The instructions in this manual are listed according to the various classes of user of the machine. The
requirements for these different classes of user are given in chapter 2.
In this manual, the terms in the left hand column below are used as dened on the right.
User: The collective designation for everyone working on or with the machine.
Operator: Any person using the machine on a daily basis.
Relevant chapters: Introduction, Safety and Operating Instructions.
Maintenance personnel: Persons with qualications and experience in carrying out the work
described, and disposing of the means required to do so.
Relevant chapters: All
Any work not described in this manual must be carried out by or in consultation with FP International
BV.
The term “product” is used in this manual to refer to the items to be processed by the machine and
therefore does not refer to the machine itself.
The gures included in the text of this manual serve the exclusive purpose of illustration. They are
intended only as text aids, for example to illustrate the location and function of controls or parts.
The actual layout and dimensions may vary. Technical drawings, if required, may be appended or
supplied separately.

PRO PAK’R User Manual Version 1.0 Page -6-FP International
typogrAphic convention
service And informAtion
Sections of text relating to personal health and safety are printed in bold, with the exception of the
Safety chapter itself. The following cautionary symbols may have been used:
For further details about the machine, please contact the manufacturer/your supplier
(see “About this Manual” on page 3).
By scanning this QR code, you will
access videos that show most of
the operations described in this
manual.
Warning!
This pictogram draws attention to the risk of personal injury.
Caution!
This pictogram draws attention to the possibility of damage to
the product or the machine.

PRO PAK’R User Manual Version 1.0 Page -7-
FP InternationalFP International
wArrAnty And liAbility
The warranty comprises the following terms and provisions, unless agreed otherwise in
writing:
• The manufacturer enters into this warranty with the original user for 12 months from the date of
delivery of the product.
• Defects must be reported to the manufacturer prior to expiry of the term of warranty.
- The warranty covers defects which:
- occur during normal operation of the machine/assembly;
- arise from defective construction or materials;
- arise from any lack of expertise on the part of the manufacturer;
• The warranty does not cover defects arising from:
- normal wear and tear;
- inexpert or inappropriate use;
- the use of consumables other than prescribed.
• Should any defects occur, the manufacturer will:
- replace the parts. Ownership of the parts replaced reverts to the manufacturer;
- correct the defects;
- opt to replace the equipment should repair, within reason, be ruled out. The customer must
provide the manufacturer with the opportunity to correct any defects;
• Integrated third party components are subject to the warranty of the manufacturer in question. The
applicable term of warranty may vary from the above.
• The manufacturer reserves the right to modify machines/assemblies without prior notice.
Please note that the following limitations apply to the manufacturer’s liability under the
terms of the warranty:
The manufacturer is not liable for potentially dangerous situations, not for incidents or damage
resulting from warnings or instructions supplied either on the machine/assembly or in this manual
having been ignored. No liability applies to, for example:
• inexpert or incorrect use or maintenance;
• use for purposes or under circumstances other than are indicated in this manual;
• the use of parts other than prescribed;
• repairs carried out without the manufacturer’s prior permission;
• modications to the machine/assembly, such as:
- modication of the control system;
- welding, mechanical alterations;
- additions to the machine/assembly or its control system.
Furthermore, the manufacturer is not liable:
• should the customer have failed to full any of his obligations (nancial or otherwise) in respect to
the manufacturer;
• for consequential damage resulting from any failure of or defects to the machine/assembly (such as
damage to products (to be processed), shut-down of operations, delayed production etc.).

PRO PAK’R User Manual Version 1.0 Page -8-FP International
1 introduction
1.1 intention of use
The machine is intended for the production of air lled cushions. The inated air cushions can be cut
at a desired quantity, then serves as void-ll for packaging purposes.
See “Product to be processed” on page 22 for precise details of suitable kinds of lm to be processed.
1.2 glossAry of mAchine terms And JArgon
Pedal: A control mechanism (transport and sealing of lm, starting up of presets) by
means of a foot switch.
Display: Image shown on the screen.
Control panel: Screen operated by buttons, to access control functions.
RFID: We equip every PRO PAK’R roll with an RFID tag that holds information about
the optimal sealing temperature and ination levels.
The controls are explained under “Operating Instructions ” on page 13.
1.3 models And Accessories
1.3.1 stAndArd mAchine And Accessories
The standard version consists of the assembled unit complete with:
• Machine (Inator), including power cord.
• >500mm wide lm (Optional)
• Stand (Optional)
• Pedal (Optional)
• Sensor (Optional)
Warning!
In case processing > 500mm wide lm, use the wide lm
kit.
If needed, read the instruction carefully.
Use the >500mm wide lm kit for rolls;
• larger then 500mm (width).
• and heavier than 15 kg (weight).
PRO PAK’R User Manual Version 1.0 Page -9-
FP InternationalFP International
1.3.2 not included with the mAchine
Not included with the machine are:
• Work station for packing: conveyor belt, table etc.
Caution!
Any details in this manual about these parts are supplied for
information only. The current instructions or information given
by the supplier of whichever equipment may vary and
take precedence over ours.
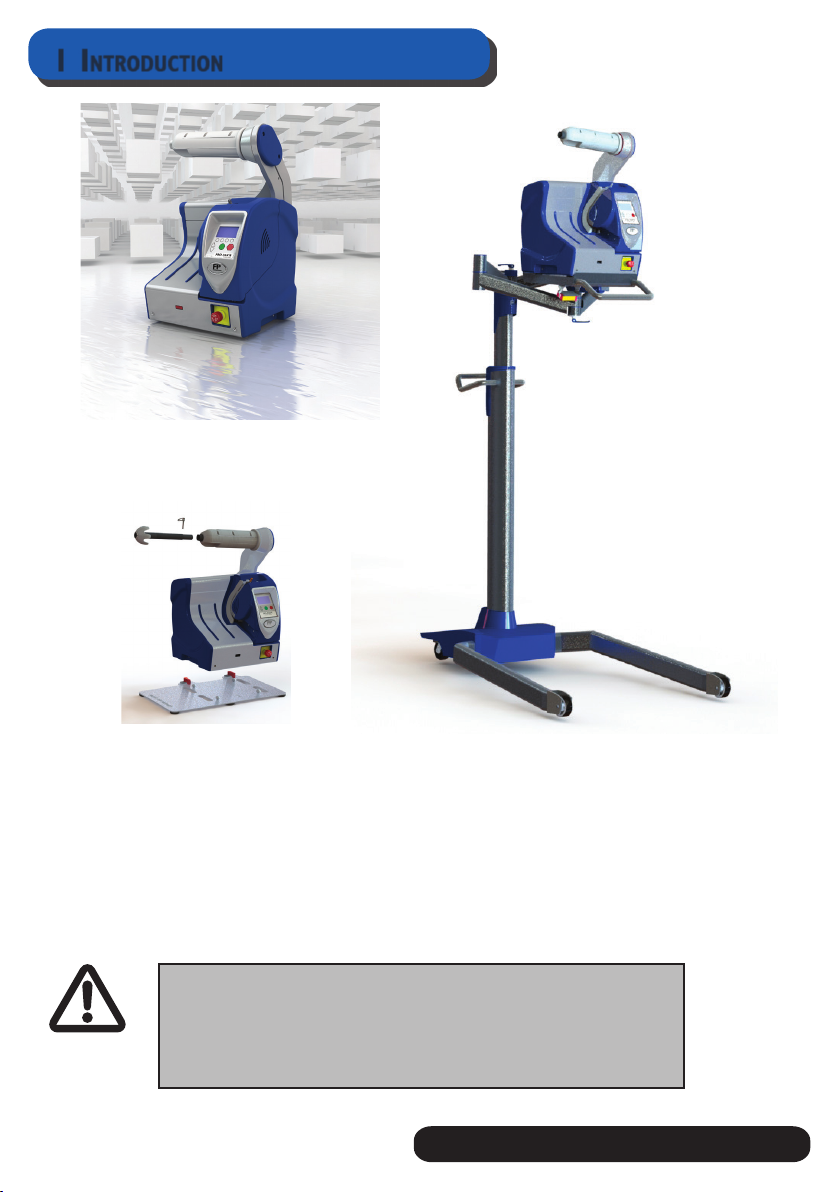
1 introduction
Wide lm kit (Optional)
Use the >500mm wide
lm kit for rolls
PRO PAK’R on a stand
(optional)
PRO PAK’R
machine

PRO PAK’R User Manual Version 1.0 Page -10-FP International
2 sAfety
2.1 introduction
This machine has been designed and built with safety of use and maintenance in mind. The safety
applies provided the machine is used as set out in this manual, under the circumstances described
and in compliance with the instructions given. It is therefore crucially important that this manual is
read and the instructions are complied with, by everyone using or maintaining the machine. Used in
any business environment, the employer shall be responsible for ensuring that users are familiar and
comply with the instructions.
Additional safety regulations may apply within the organization or country in which the machine is put
to use. Most likely, these will concern the health and safety of the operators. This manual does not
describe how to comply with any such additional measures but does provide the information about
the machine that is necessary for this purpose. In cases of doubt, please consult your government or
Health and Safety Ofcer.
In this manual, a distinction is made between normal use (see “Operating Instructions” on page 15)
and other work to the machine. The reason is that maintenance work imposes different requirements
on personnel than machine operation, particularly in terms of safety.
The basic maintenance tasks described alongside the operating instructions, can be carried out by
qualied personnel of FP International. Any work not listed under “operating instructions” may
only be carried out by suitably qualied personnel. The items provided to restrict access to certain
machine parts or functions must not be kept with or near the machine. Only persons possessing the
know-how required may have access to such items.
2.2 sAfety feAtures
The machine is tted with the following safety features:
• Cover switch on the housing: the machine is disabled when the cover is open;
• Film feed button: the feed rollers only rotate when the button is pressed;
• Emergency stop (see “Emergency switch” on page 12);
2.3 sAfety rules
• Children and animals must be kept away from the machine!
• Do not reach into the machine while it is operating or has been switched on.
• Even when the machine is not operating, it may be “on”, meaning it may start to operate
automatically. Only in combination with sensor or pedal.
• Safety features may not be removed or disabled.
• Keep the workplace clean and free from obstacles.
• Ensure adequate lighting.
• The safety of the machine may deteriorate with prolonged use. Ensure frequent maintenance.
• Do not use the machine if the safety features are in any way damaged or malfunctioning. Make
sure the machine is repaired.
2.4 unAuthorized use
Please note that the machine is unsuitable for the following purposes:
• The processing of materials other than prescribed in this user manual.

PRO PAK’R User Manual Version 1.0 Page -11-
FP InternationalFP International
2.5 mAchine users
2.5.1 operAtors (level 1)
In the operating software, this class of user will handle the tasks in the menus “operator”
The machine may only be operated by adults who have familiarized themselves with the chapters
“Safety” and “Operating Instructions” of this manual and will comply with their content.
No special training is required.
Some previous experience in handling this type of equipment is required.
The operator’s duties will generally consist of:
• Fitting new rolls of lm
• Producing strips of lm
• Dening and applying the preset parameters (supervisor only)
• Cleaning the machine (exterior).
2.5.2 mAintenAnce personnel (level 2)
In the operating software, this class of user will handle the tasks in the menu “service”.
Maintenance staff should be aware of the added risk involved in the type of work they are to carry
out. In addition to the requirements listed under “Operators “ above, maintenance personnel
should therefore have:
• an HND in a relevant subject or know-how equivalent to that qualication;
• experience in maintaining machines;
• the necessary resources at their disposal (e.g. tools and measuring equipment).
2.6 workplAce
The denition of and requirements for the workplace are an area of 1 meter at both the front and
the rear of the machine. This provides sufcient room for all operating tasks to be carried out
and allows the machine to be placed over a roller conveyor belt, for example.
2.7 personAl protective equipment
No PPE is required to operate the machine.
2 sAfety

PRO PAK’R User Manual Version 1.0 Page -12-FP International
2.8 emergency switch
To allow the machine to be stopped as
quickly as possible in case of an emergency,
it has been tted with a clearly recognizable,
bright red emergency switch.
If the emergency switch is pressed in,
the machine will stop instantly.
The switch will remain mechanically disabled,
preventing the machine from restarting.
In case of personal injury, rst aid can then be provided without delay. Other emergency steps
should also be taken immediately.
Once the crisis has been resolved, the emergency switch can be re-enabled. The machine will not
restart automatically and should be started up in the normal manner.
The emergency switch may also be used in suddenly arising cases, for example when the machine
malfunctions or jams materials.
Recommendations:
• Allow novice operators to practise using the emergency switch;
• Regularly test the due functioning of the machine;
• Never re-enable the emergency switch until you are fully convinced that it is safe to do so. Find
out who used the emergency switch and why.
2.9 cAutions on the mAchine
The cautionary notices afxed onto the machine must remain clearly legible. Replace if worn.
The texts are included under “Warnings” on page 28
The risks in question are described more closely in the sections on operating and maintenance
instructions.
2.10 fire And other emergencies
No special instructions apply in case of re or other emergencies. Normally applicable
extinguishing media can be used.
2 sAfety

PRO PAK’R User Manual Version 1.0 Page -13-
FP InternationalFP International
Before the machine is taken into use, operators must have familiarized themselves with the contents
of the chapter on safety.
This chapter is intended for operators, as dened in the section “Operators “ on page 11.
Any work not described in this chapter may only be carried out by maintenance personnel (as dened
in the section “Maintenance Personnel” on page 11).
Warning!
Before the machine can be taken into use, it must be
commissioned by maintenance personnel.
3.1 construction And operAting controls
3.1.1 configurAtion
The machine is congured as follows:
PRO PAK’R on a stand
(optional)
3 operAting instructions
Wide lm kit
See page 8
PRO PAK’R
machine
Switches /
Connectors
PRO PAK’R User Manual Version 1.0 Page -14-FP International
3 operAting instructions
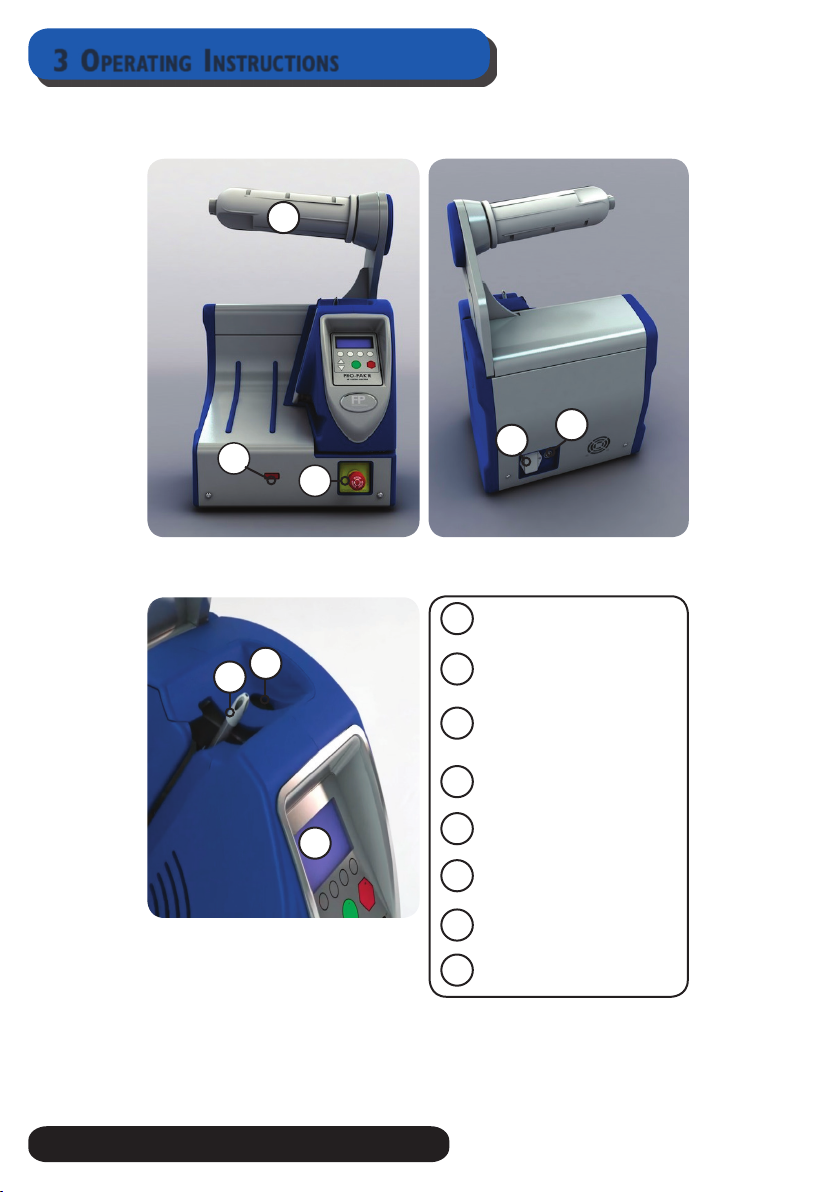
front view reAr view
Roll Holder
Emergency stop
AC power inlet, on/off main
switch and fuse.
Accessoires Port
Control Panel
Fill Tube (Cone Tip)
Auto index sensor
Access screw display cover
1
5
4
3
2
6
1
2
34
5
6
7
7
8
8

PRO PAK’R User Manual Version 1.0 Page -15-
FP InternationalFP International
3 operAting instructions
1
2
5
3
4
7
6
8
Blade holder
Black knob
Circlip Backingwheel
Backingwheel
Lock / Lever
Drive roller
Sealwheel / heater
Film guides
USB connector
1
2
3
4
5
6
7
8
9
9

PRO PAK’R User Manual Version 1.0 Page -16-FP International
3 operAting instructions
3.1.2 control pAnel keypAd instructions
3.1.3 control pAnel displAy symbols
stAtus icon whAt it meAns
Shows the icon for decrease
Shows the icon for increase
Shows the way of sliding true the menu
Shows the cancel icon
Shows the conrm icon
Shows the temperature control of the seal wheel that fuses the front and back lm sheets
together. Press the menu button below the icon to access seal temperature.
Shows the ll level rate of the cushions. Press the menu button below the icon to access
ll level.
Shows the length of strings of the air cushions. Press the menu button below the icon to
adjust the cushion length
Shows the menu. Press the menu button below the icon to access the menu.
Shows the machine is heating up or cooling down.
Shows the machine is in standby mode. If the PRO PAK’R is not used by “..” time it will go
in a “Standby” mode. To resume press “any” key.
3
4
1
2
5 6
Display Screen
4 Menu buttons
Forward feed button
Backward feed button
Start Button
Stop Button
1
5
4
3
2
6

PRO PAK’R User Manual Version 1.0 Page -17-
FP InternationalFP International
3 operAting instructions
Shows the machine is ready to use
Shows the machine is running.
Shows the menu for switching to a operate mode
Shows that the machine is on manual mode
Shows that the machine is in foot pedal mode.
Shows that the machine is on bin / sensor mode
Shows that the machine is in Auto-Index mode .
Shows that the machine is in ADS mode.
Shows the restore. Press the restore button below the icon to access
NO TAG Press Start. This may clear the error. If not, turn the roll.
3.2 stArting up the mAchine
• Make sure the machine has been set up correctly.
• The machine can be xed on a stand (optional) or can be placed on a stable table.
• Insert provided power cord into the rear of the machine.
• Plug the power cord into a dedicated, grounded outlet.
• Switch on the machine with the main switch. The start-up screen will appear on the
display.
GB: Always remove the roll of lm before
changing the
position of the stand.
DE : Entfernen Sie immer zuerst die Folie
bevor Sie die Position des Standes änderen.
FR: Retirer impérativement la bobine de lm
avant de changer la position du stand.
NL: Verwijder altijd eerst de folie alvorens de
positie van de stand te veranderen.

PRO PAK’R User Manual Version 1.0 Page -18-FP International
3.3 loAding film
3 operAting instructions
Press the Start button as soon as the
machine is ready.
5
12
Slide the lm roll on the roll holder. The lm unwind direction to be as
shown on the picture.
Pull the lm towards the ll-tube tip.
Use the feed down button on the
control panel to feed the lm all the
way through the machine.
3 4
Open the air channel of the lm-roll
and pull it over the ll-tube until you
feel resistance.

PRO PAK’R User Manual Version 1.0 Page -19-
FP InternationalFP International
3 operAting instructions
3.3.1 generAl instructions to operAte the mAchine
• Make sure the E-stop is not activated. To deactivate twist the head of the E-stop to release.
• Power the machine on by turning the POWER TOGGLE SWITCH (AC power plug) on the
rear of the machine to ON.
• Press the button on the display panel to activate the machine when prompted on the screen
• Load the film onto the roll holder (Loading film figure 1)
• Open the air channel in the film and pull it over the air fill tube cone (Loading film figure 3)
• Pull the film down into the air tube (Loading film figure 4)
• Press the Forward Button and feed the film down the air tube until the feed rollers grab the
film. (Loading film figure 3)
The Machine is now ready to produce air cushions.
• The RFID technology will read the film installed and set the Pro Pak’r for optimal
performance.
o The fill level, sealing temperature and sealing pressure can be adjusted for specific
applications through the key pad display. (See 3.3.2.)
• The length of string of the air cushions can be set through the key pad display (see 3.3.2.)
o Holding the foot pedal down (if installed) will override the length control setting on the
equipment.
o Tapping the foot pedal will cause the machine to deliver a length of air cushions.
o The machine can be operated with the Start button.
PRO PAK’R User Manual Version 1.0 Page -20-FP International
3 operAting instructions
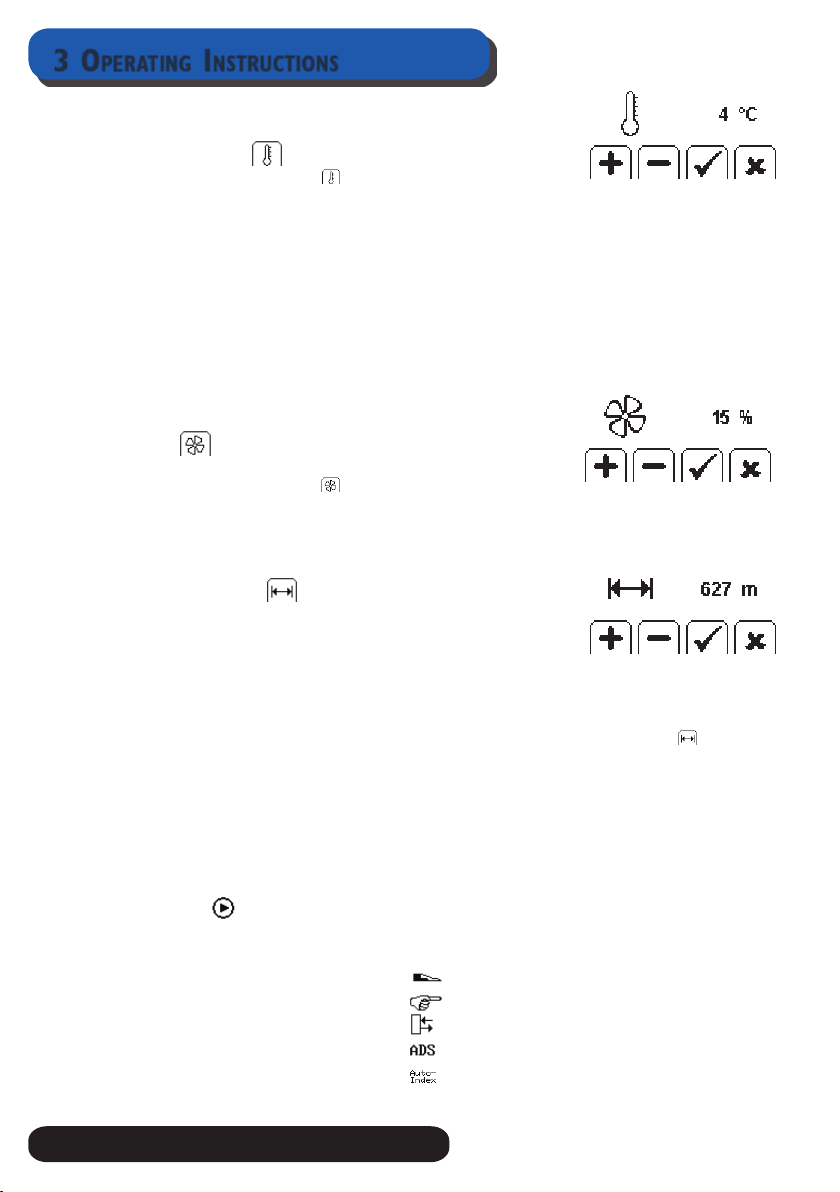
3.3.2 chAnging mAchine settings
temperAture control
Press the button below the ( ) to adjust.
• If the air cushions become at, and upon inspection the heat seals are leaking air,
increase the Temperature Control by pressing the button below the “+” icon
• If the air cushions become at because the seals are burned through at the seal line as
evidenced by holes in the air cushions, decrease the temperature control by pressing
the button below the “-” icon
Press the button below Pto accept
After changing the temperature control setting, the PRO PAK’R may take a few moments to
establish the new seal temperature.
During heat-up or cool down, RED LED will ash until the correct temperature has been
achieved.
If air cushions continue to show poor seals and produce at cushions, contact FPI for assis-
tance.
Air control
Air Control regulates the amount of air in the Air Cushions.
Press the button below the ( ) to adjust
If you want to increase the ll level, press the button below the “+”icon
If you want to decrease the ll level, press the button below the “-” icon
Press the button below Pto accept
AdJust length control
Length control sets the length of a string of air cushions to be pro-
duced each time you press the start button. You have 2 options:
continuous mode:
Length control at the factory is preset at continuous production. Press start button and the
machine will run the lm until the lm roll is empty or the stop button is pressed.
fixed length
If you want to produce a xed length of a string of air cushions, press below , press the +
Button until desired length is displayed. The machine will count down the length of air cush-
ions produced.
Press Pto accept
To change from Fixed to Continuous mode, press - button in the length control menu until
the display shows “0:”
Access menu
mode options
In this option you can select the operation mode, there are 5 option to select
Option 1 Foot Pedal
Option 2: Manually
Option 3: Sensor
Option 4: ADS
Option 5 Auto-Index
Select the desired Mode option. Accept press P.
Table of contents
Languages:


