Get Packed EXP-108W User manual

PALLET STRETCH WRAPPING MACHINE
MODEL: EXP-108W
OPERATION MANUAL
980326
www.getpacked.com.au

TABLE OF CONTENT
1. GENERAL INFORMATION.................................................................................. 1
1.1 NOTE OF INSTALLATION........................................................................................1
1.2 NOTICE OF OPERATION ........................................................................................2
2. SPECIFICATION ................................................................................................. 3
2.1 SPEC. TABLE...........................................................................................................3
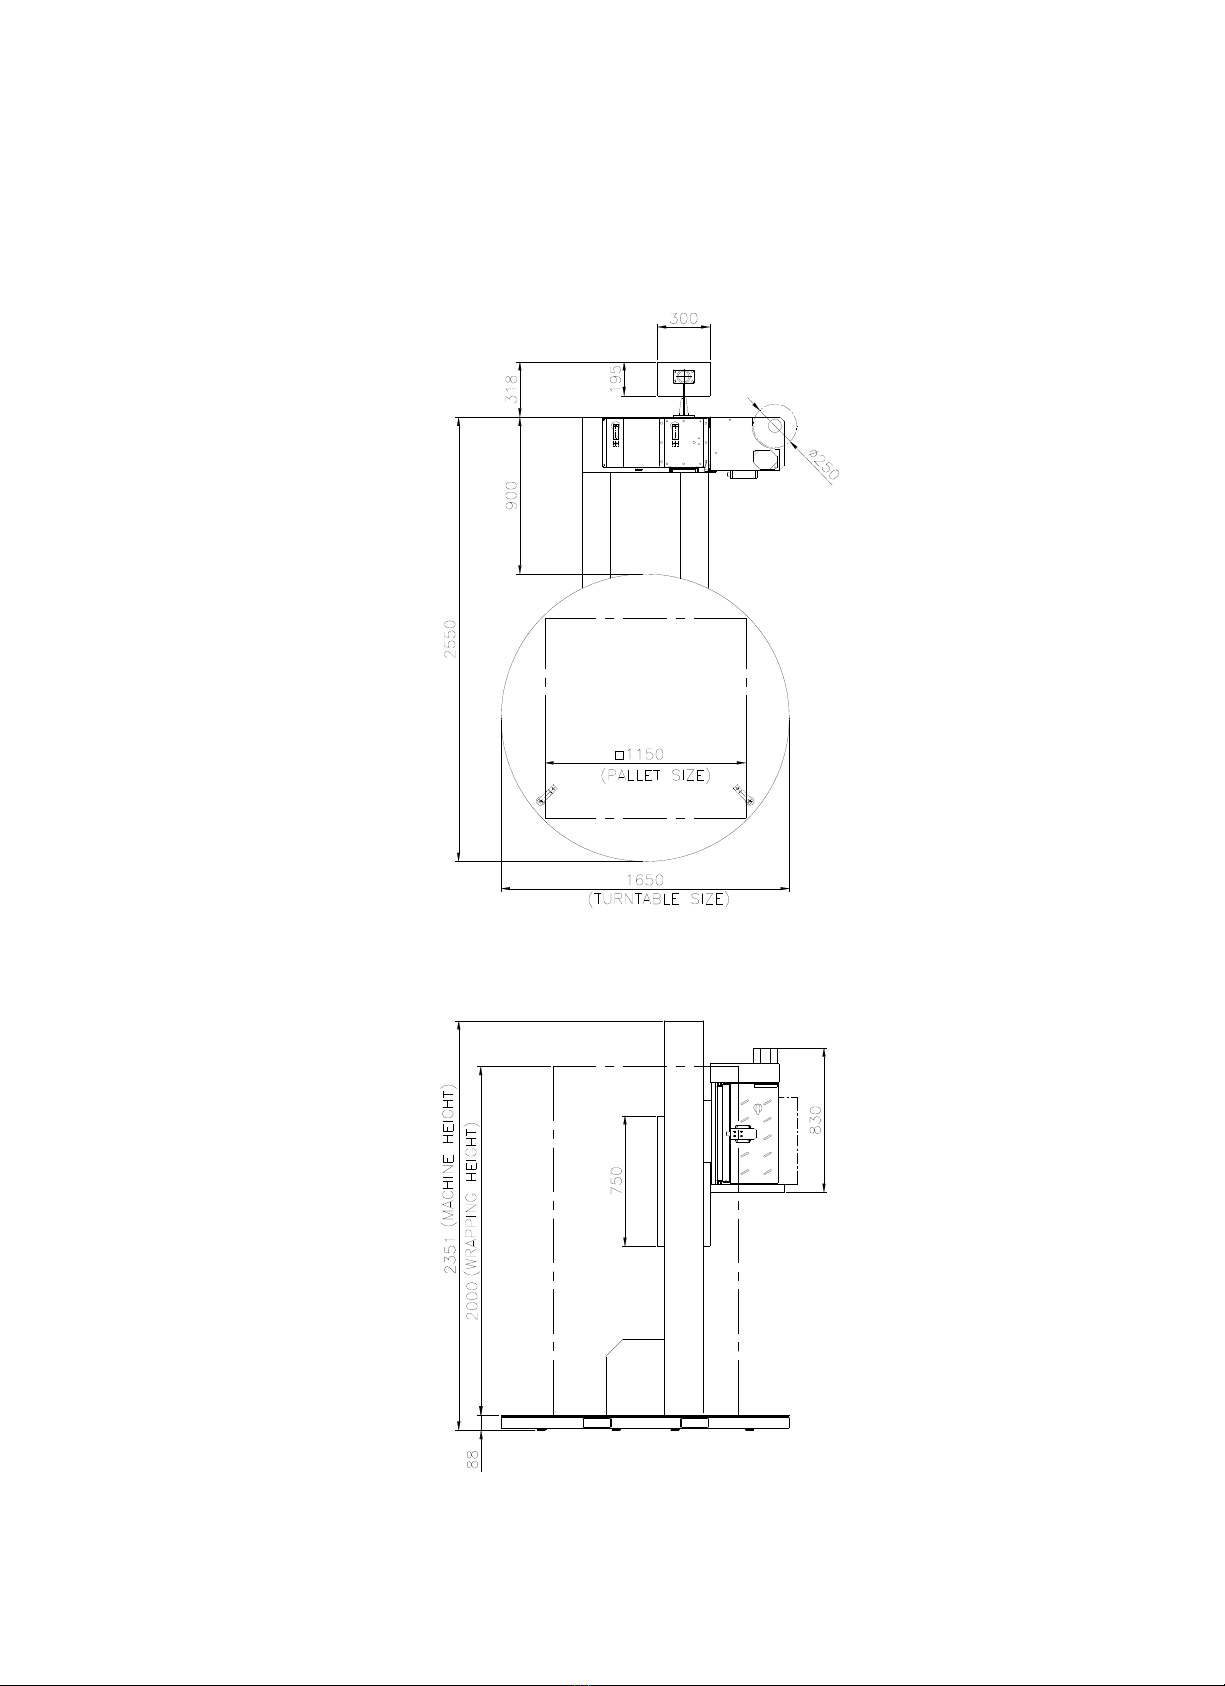
2.2 MACHINE DIMENSION............................................................................................4
2.3 MACHINE DESCRIPTION........................................................................................5
3. OPERATION DESCRIPTION .............................................................................. 6
3.1 INSTALLMENT .........................................................................................................6
3.2 REMINDER OF INSTALLATION ..............................................................................7
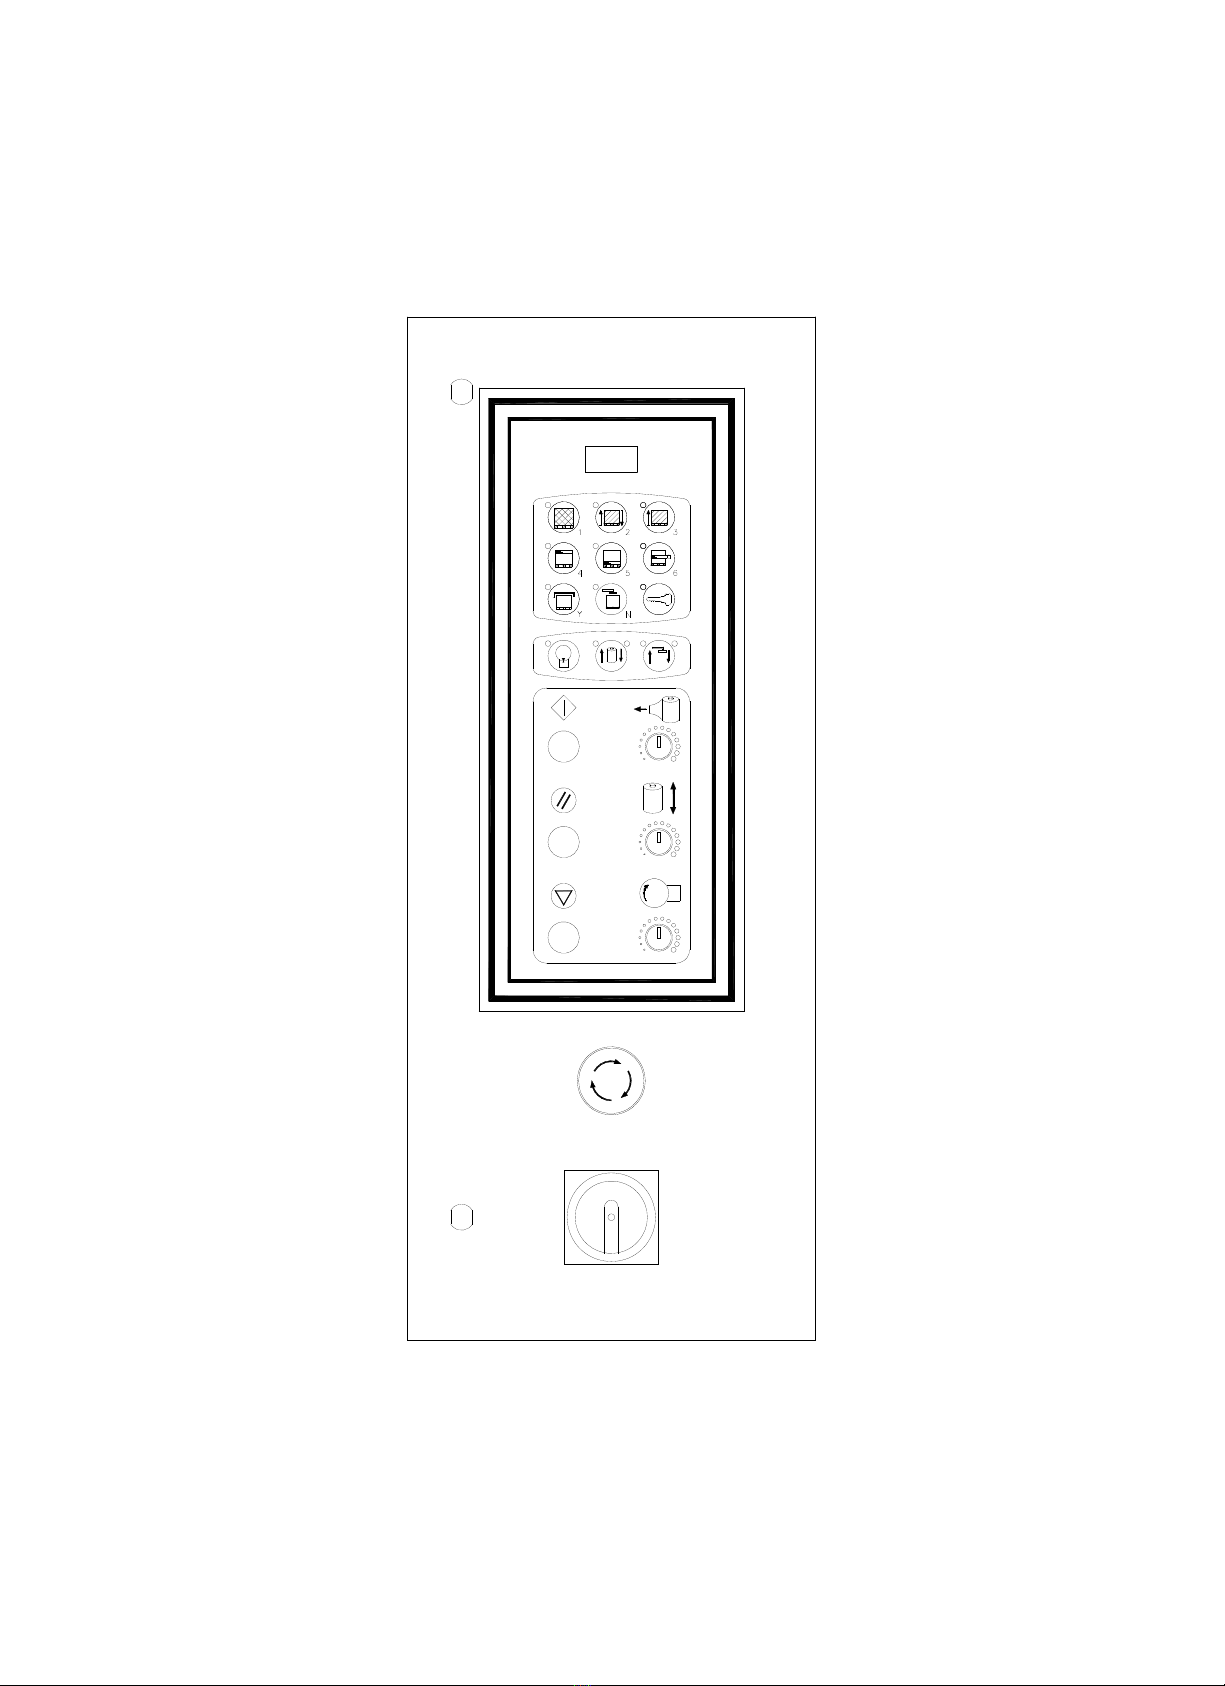
3.3 OPERATION OF CONTROL PANEL........................................................................8
3.4 OPERATION DESCRIPTION ...................................................................................9
3.5 ELEVATOR UNIT....................................................................................................14
3.6 CALIBRATION SETUP DESCRIPITION ..................................................................16
4. ELECTRICAL .................................................................................................... 22
4.1 ELECTRICAL CAPACITY.......................................................................................22
4.2 ELECTRICAL DIAGRAM........................................................................................23
5. TROUBLE SHOOTING ..................................................................................... 35
5.1 GENERAL ADJUSTMENT......................................................................................35
5.2 RUNNING AND SELF TEST ..................................................................................36
5.3 SUGGESTION FOR SOLVING “ER0” ....................................................................37
5.4 TROUBLE SHOOTING WITH EXP-108W MACHINE ............................................38
6. PART LIST......................................................................................................... 47
6.1 SEAT.......................................................................................................................47
6.2 TOWER ..................................................................................................................50
6.3 ELEVATO ...............................................................................................................53
6.4 CONTROL BOX......................................................................................................58
www.getpacked.com.au

1. GENERAL INFORMATION
1.1 NOTE OF INSTALLATION
To m a k e sure a saf e a n d c o r r e ct o p e r ation, please check below conditions before
install the machine:
1) Power source capacity must be equal of the machine need.
2) Machine standard power is 110v/220v (+- 10%)
3) Machine standard power Hertz is 50/60 Hz. (+- 2%)
4) Machine is workable under the temperature between O ℃- 45℃
5) Make sure the wire is tidy on the ground.
6) There should not have vibration beside the machine during the installment, and
make sure the ground is flat.
7) Read and follow the instruction of the installment.
www.getpacked.com.au

1.2 NOTICE OF OPERATION
To h a ve g ood p rote c t i o n f o r t h e o p erat o r, p l ease make sure the following conditions:
1) Before operating, please read the machine operational manual carefully.
2) Make sure there is no object put on the power cable.
3) Make sure there is no object put on the upper elevator unit.
4) Avoid any damp object or water around the electric parts.
5) Avoid film winded into the turntable.
6) Do not stand on or across the machine during operation.
7) When problem occurs, please check the section of 5 Trouble shooting
www.getpacked.com.au

2. SPECIFICATION
2.1 SPEC. TABLE
Model EXP-108W
Turntable Speed 0 –12 RPM
Turntable dia. 1650mm
Max wrapping height 2000mm
Max wrapping size 1150x1150mm
Max loading weight 1650kgs
Film stretch (%)
300% & 230% two step change by handle
(250% and 200% option)
Film tension Adjustable
Elevator Unit speed Adjustable
Max. film spec. 250x500mm∮
Turntable height 82mm
Ramp (slope) spec. 1165x1000mm
Machine size 2550x1650x2345mm
Machine net weight 516kg
Standardoption:
2.5 & 3.0 meters wrapping height
Top pressure plate driven by motor
Ramp
www.getpacked.com.au

2.2 MACHINE DIMENSION
www.getpacked.com.au

2.3 MACHINE DESCRIPTION
www.getpacked.com.au

3. OPERATION DESCRIPTION
3.1 INSTALLMENT
1) Apart all the wooden package. Avoid damaging the machine.
2) Move the machine to an installment position by fork lift.
3) Lift up the tower.
4) Fix and tighten the tower by M10 screws.
5) Connect the sensor wires.
Proximity Switch: +,-,4.
Motor for Elevator: U3,V3,W3.
6) Install the motor’s cover.
7) Install the motor’s cover.
8) Use forklift to lift up the machine, and fix the M12 adjusted leg screws into
the loadcells.
9) Place the machine on the ground and adjust the height of 4 * M12
adjusted leg screws to make the turntable to be level. At the same time to
keep at least 20mm between the bottom line of the bottom unit and the
ground.
10) Once finished the adjustment of the level, please check again if 4 * M12
adjusted leg screws is contacted with floor surface, then tight the M12 nut
to fix.
11) Connect the power cable with the socket by a 110V/220V power.
www.getpacked.com.au

3.2 REMINDER OF INSTALLATION
There are some issues operators need to pay attention on:
Tower Installation
Engineers must ensure all six screws are properly installed underneath the tower,
and evenly lay out.
Control Panel Installation
Engineers must make sure the bottom-supporting arm is installed properly to the
tower with four screws and carefully fitted the tower on to the bottom-supporting arm
then installed the top-supporting arm, on top of the Control Panel. After the
installation is done, make sure, the Control Panel is 180 degree turnable.
Control Wires and Connections
On the bottom side of the Control Panel, there is one black tube, with wires inside;
carefully clipped the tube to clips on the tower and follow all the way down to the
machine base.
Motor Cover
After all the connections are complete, please carefully install the motor cover to
cover up all the wire connections and the motor on the base of the machines.
www.getpacked.com.au

3.3 OPERATION OF CONTROL PANEL
www.getpacked.com.au

3.4 OPERATION DESCRIPTION
Screen Reader
Screen shows “S” : means “ Manual Operation”
Screen shows “ ErO” means “ Emerge Stop”
Screen shows “ Er1” means “ Film Breaking”
Screen shows “A” means “ Program A”
Screen shows “B” means “ Program B”
Screen shows “C” means “ Program C”
PROGRAM BUTTONS A, B & C
These buttons are for programs setting and selections:
Program A. This button is already pre-program to run the machine with
spiral up and spiral down wrapping cycle.
Program B This buttons are pre-program for spiral up and spiral down.
The first stage is for Spiral up, then the machine will pin punch the film
and stopped.
The second stage is for spiral down and the machine will pin punch the
film and stopped. But, before the machine start to run, the operator must
press the green button to start.
Program C This button is for spiral up, after the machine pin punch the
film, the elevator will return back to the starting position.
WRAP CNT. ( TOP & BOTTOM) BUTTON, REINFORCEMENT
Press this button to select the number of top wrapping count from 0 to 9
first, then set up the bottom wrapping count from 0 to 9 as well.
www.getpacked.com.au

WRAP CNT. ( TOP & BOTTOM) BUTTON, REINFORCEMENT
Press this button to select the number of bottom count from 0 to 9 first,
WRAP CNT. (MIDDLE), REINFORCEMENT
This button is for reinforcing specific area during wrapping process
under manual program. Please follow the instruction:
1. Press ELEVATOR BUTTON and move the elevator to the lowest
position.
2. Press Elevator Button again to move the Elevator up to the
reinforced position.
3. Hold the Reinforced button till the wrapping counters are satisfied.
P. S . T h e w r a p p i n g c o u n t e r a r e v a r i o u s a c c o r d i n g t o o p e r a t o r ’ s
requirements.
TOP SHEET BUTTON
Selecting “Top Sheet” function means after elevator reach the top
section; it will come down 200mm first and stop. Operators put the top
sheet then press “ START” to let the wrapping goes up again and
continue the unfinished wrapping cycles.
NOTE: When the program sets on the wrapping from top to bottom &
one way only, operator should place the top sheet before hand.
PRESSURE BUTTON
This is an OPTIONAL function only operate when machine install the
pressure plate. There are 2 pressuring options available with this option.
Option A – After completing the wrapping cycle, the pressure plate goes
up to the top position.
www.getpacked.com.au

Option B – After completing the wrapping cycle, the pressure plate rises
up and remains 500mm from the package.
KEY BUTTON
After all of function setting, press this button to memory.
TURNTABLE BUTTON
It is the manual button for the turntable.
First, Pressing this button first. Light is on.
Second, Pressing the “START” button to operate the turntable.
Finally, Pressing the button again to stop the turntable. Light is off.
During the operation of elevator, operator also can press this button to
control the turntable.
ELEVATOR BUTTON
It is the manual button for Elevator. After pressing this button, either left
or right lamp is on
When upper left lamp is on, the elevator will go up after pressing the
“START”.
In contrast, when its upper right lamp is on, the elevator will come down
after pressing the START.
To st o p i n any p o s i tion s i m p l y pre s s t h is b u t t o n . Both l i g h ts will b e o ff.
During the operation of turntable, operator can press this button to
control the elevator.
www.getpacked.com.au

PRESSUR UP/DOWN BUTTON
It is the manual button for pressure plate UP/DOWN
After pressing this button, either its left or right lamp is on. If its upper left
lamp is on, after pressing the START the pressure plate will come up.
In contrast, when its upper right lamp is on means after pressing the
START the pressure plate will come down.
START BUTTON
Press this button to start operation.
Note: After all of function been setting press this button to re start the
program
ELEVATOR SPEED ADJUSTMENT
Turn the knob clockwise to increase the speed of elevator.
Turn the knob anticlockwise to decrease the speed of elevator.
The speed adjust knob is available for both “AUTO” and “MANU”
program.
If there is no particular requirement, please set the knob on standard position.
TURNTABLE SPEED ADJUSTMENT
Turn the knob clockwise to increase the speed of turntable.
Turn the knob anticlockwise to decrease the speed of turntable.
The speed adjust knob is available for both “AUTO” and “MANU”
program.
If there is no particular requirement, please set the knob on standard
position. The turntable speed is 12 RPM.
FILM TENSION ADJUSTMENT
www.getpacked.com.au

It is the control knob for wrapping tension.
Turn the knob clockwise to increase the tension.
Turn the knob anticlockwise to decrease the tension.
NOTE: 1 ) Turntable speed and wrap tension can be adjusted individually.
2) Wrapping tension on the package edge and side are the same
3) After setting the wrapping tension, it is suitable for any package and
no need to make adjustment.
RESET BUTTON
Pressing the button, all operation is released and the machine returns to
natural status.
PAUSE BUTTON
Press the button; the machine will be stop whether it is under automatic
or manual mode. Press the START button to complete the rest program.
EMG. STOP
Pressing this button to make emergency stop.
MAIN POWER
This is the main power cut switch.
www.getpacked.com.au

3.5 ELEVATOR UNIT
Pre- Stretch Percentage Change
1) Switch the power off and apart the handle cover
2) Push the safety lock inner, and then use the handle to adjust the pre-stretch
percentage. Take up the handle to get the high pre – stretch percentage or
put down to get the low pre – stretch.
SAFETY LOCK LOW-RATIO
HIGH-RATIO
3) To make sure a safe and correct operation, please check the below items:
1. The mark line is back to its home position.
SAFETY LINE
SAFETY LOCK
www.getpacked.com.au

2. The lamp indicated the correct pre-stretch percentage
LOW RATIO
HIGH RATIO
NOTE:) There are two sets of pre- stretch percentage, one is 300% & 230%, the other
is 250% & 200%.
Illustration for film threading
1. OPEN THE SECURITY DOOR FIRST.
2. Make sure the film go through C roller.
3. CLOSE THE SECURITY DOOR
SECURITY DOOR
FILM
A
FILM
B
C
www.getpacked.com.au

3.6 CALIBRATION SETUP DESCRIPITION
CALIBRATION SETUP MANUAL
www.getpacked.com.au

A. Thereare3sectionsthatneedto be reset F8, F16, and F17.
Reset units F8: 1) Pound 2) Kilogram
Recommend to use Pound as a unit during reset procedure. When F21 reset the
machine back to factory setting, then there is no need to rest F8.
F16 Set the machine to Zero (To set the machine back to zero, the machine surface
must be clear without any pallet or packages and film roll need to be removed from
carriage.)
Span Calibration F17 (Utilize the weight to correct)
F16 Rest to Zero
1. Reset switch, adjust the switch to left to enter (setup)
2. Press “Print” button to select F16.
3. Press “Zero” button to enter F16 mode for setting, this procedure require to turn
the power off and on.
www.getpacked.com.au

4. Press “Zero” again to set the machine back to zero.
5. Press “Set” button complete the process.
6. F16 Reset to zero complete.
--
Span Calibration F17 (Utilize the weight to correct)
This calibration weight is 1339 lbs.(F8 needs to establish as 1 lb)
1. Reset switch, adjust the switch to left to enter (setup)
--
www.getpacked.com.au
Table of contents
Other Get Packed Packaging Equipment manuals