Fröbergs TM-600 Series Instruction manual

Version 2.6:190307-Eng
1
QUICK START MANUAL
Fröbergs RFID / Fingerprint
(TM-600 Series)

Version 2.6:190307-Eng
2
1. INTRODUCTION
This manual will help you to setup the time attendance devices Fröbergs RFID and Fröbergs
Fingerprint, including the TimeMoto software.
It will guide you through the basic functions of the system.
The system has many advanced functions which will not be guided in this quick start manual.
More detailed instructions for these functions can be found in the full manual, which can be
downloaded at www.frobergs.se/tm
If you are going to use the software as personnel attendance tracking system
(personalliggare) to fulfill the Swedish Tax Agency's (Skatteverket) requirements for certain
business, it's of most importance to follow the instructions, found in the separate manual.
2. INSTALLATION OF THE TERMINAL
The terminal can be connected to the network by Wi-Fi or LAN-cable. If no network is
available, the attendance logs can be transferred with a USB-memory. Follow the steps
below according to the connection type you want to use.
Connection by Wi-Fi
1. Connect the power cable of the terminal to a wall outlet.
2. The welcome screen on the terminal shows ”SSID: Timemoto-” and a device unique six
digit number.
3. The terminal has created a Wi-Fi hotspot to ease the installation process. Use a
computer to connect to the Wi-Fi hotspot stated on your terminal welcome screen. If
your computer doesn't have a wireless network card, you can use your smartphone to
connect to the hotspot. This hotspot is only used for basic setup of the terminal. After
this setup, the hotspot will disappear.
4. Open a web browser window on your connected computer or device and go to the
following address: http://192.168.8.1.
5. Follow the instructions in the browser to install the terminal.
…

Version 2.6:190307-Eng
3
• Choose language
• Choose software. Normally this will be the TimeMoto PC-Software (the second listed
option). Only if you bought the optional Cloud-software, should you choose the first
option.
• Choose setup with Wi-Fi.

Version 2.6:190307-Eng
4
• Select Wi-Fi name and enter credentials. “Use DHCP” should normally be selected.
If your network SSID is hidden, select “Other” and enter it’s name.
• Confirm your settings.

Version 2.6:190307-Eng
5
• At the following screen, close your browser. Your device is pre-registered.
Connection by LAN-cable
1. Connect the power cable of the terminal to a wall outlet.
2. Connect a RJ-45 LAN-cable to the terminal and to your network (router/switch/firewall).
3. Press the “MENU” button on the terminal.
- Scroll down to “System settings” using the arrows and press the “OK” button.
- Select “Communication”, and press the “OK” button.
4. Select “Network and press “OK”.
5. Make a note of the IP-address of the terminal (ex. 192.168.1.130)
6. Open a browser on a computer connected to the same network as the terminal.
Type the address http:// followed by the IP-address of the terminal.
(ex. http://192.168.1.130)
7. Follow the instructions in the browser to install the terminal.

Version 2.6:190307-Eng
6
• Choose language
• Choose software. Normally this will be the TimeMoto PC-software (the second listed
option.) Only if you bought the optional Cloud-software, should you choose the first
option.
• Select connection with LAN (Local Area Network).
*Guide says “Local Access Network”, which is incorrect.

Version 2.6:190307-Eng
7
• “Use DHCP” should normally be selected.
• Confirm your settings.
• At the following screen, close your browser. Your device is pre-registered.

Version 2.6:190307-Eng
8
3. INSTALLING THE PC-SOFTWARE
The PC-software is supposed to be installed on one client computer on the same network as
the terminal. Note that the software is a one PC-software and is not for server installation.
1. Download the PC-software setup file from www.frobergs.se/tm
2. Extract and run the setup file (TMsetup.exe) and follow the instructions on your screen.
3. The PC-software is now installed and you’ll find an icon for TM (TA) on your desktop.
4. Start the TM (TA) software. Choose “Start TM+ Trial”, see image below. Within 30-days
from your purchase you will receive your license key, by e-mail. The software will work
just as normal in trial mode, until you receive your license key.
5. If you want to change the language of the software, go to “File” in the main menu to the
top left, and choose “Preferences”. Select your preferred language.
Click “Save” after selecting, then press “OK” in the popup window and your software will
close. Next time the software is opened, the language will be changed to your setting.

Version 2.6:190307-Eng
9
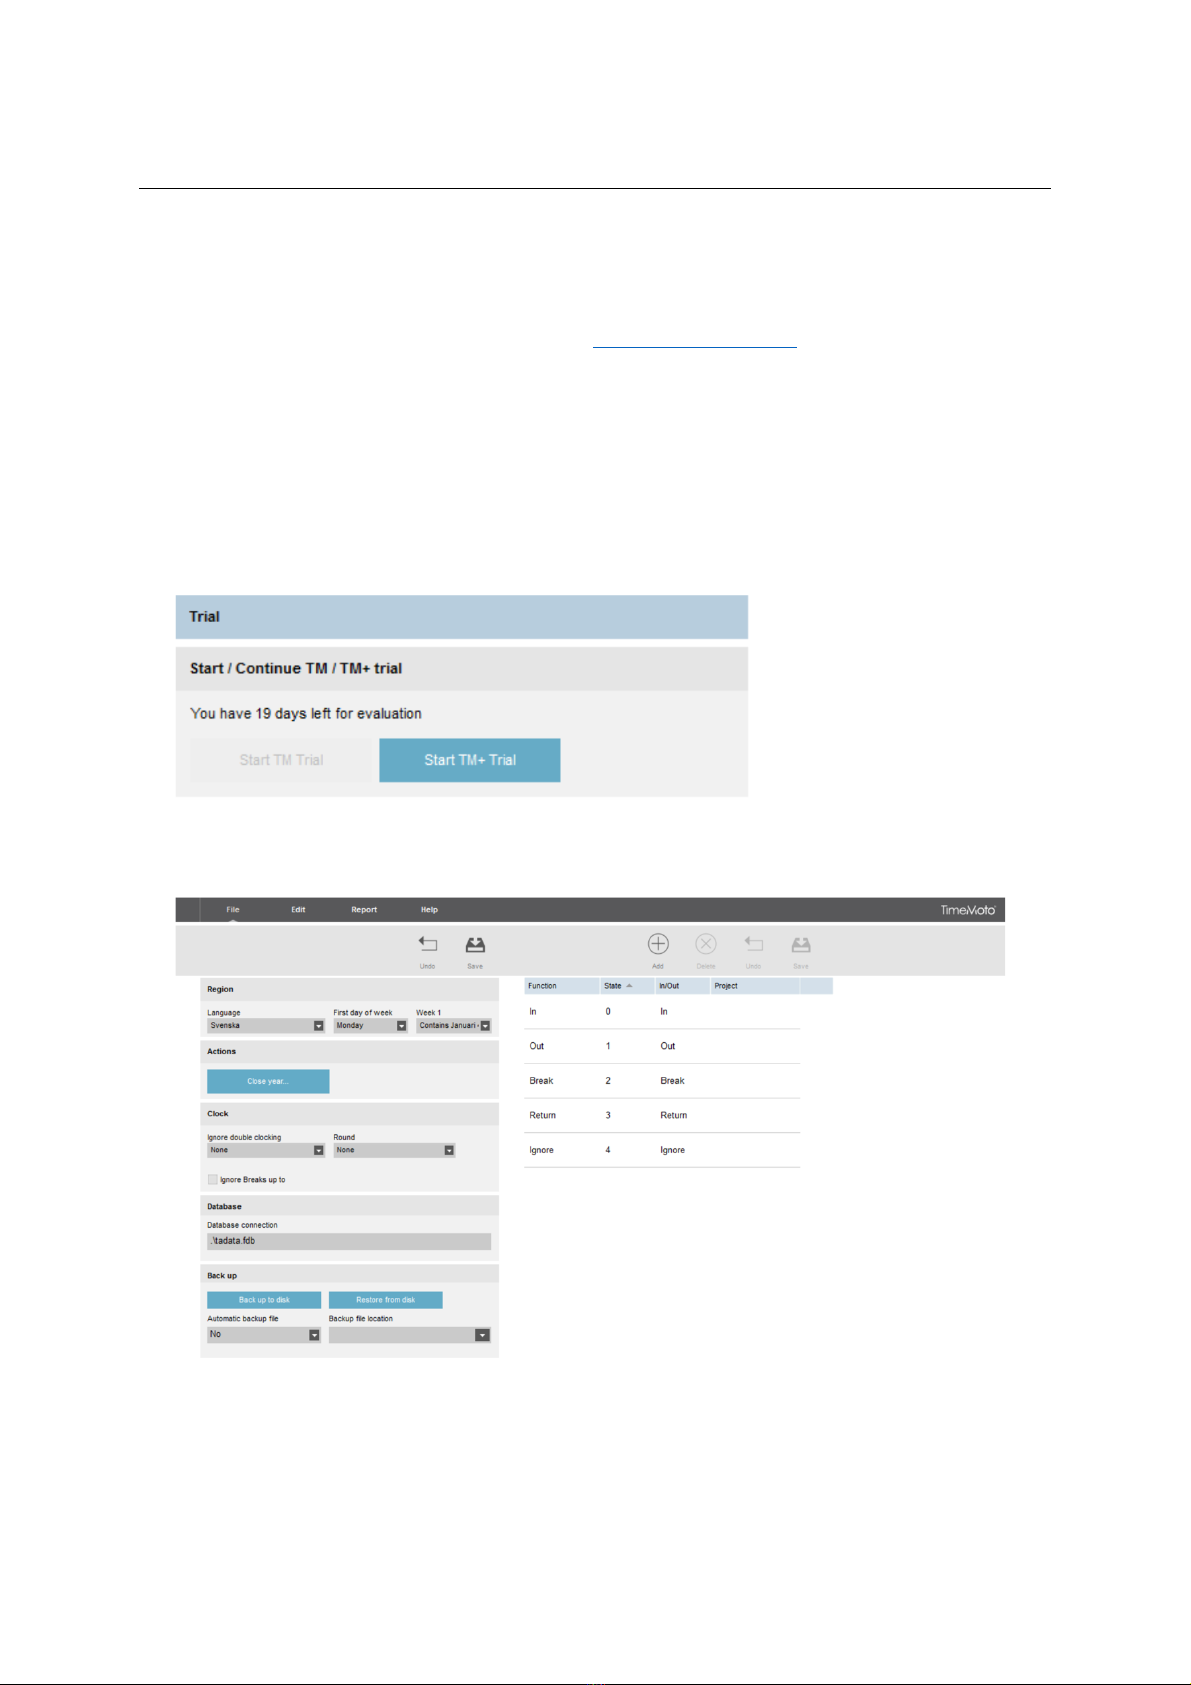
Licensing the software
Within 30-days of your purchase, you will receive your license key by e-mail.
You enter your license, by choosing File/License in the main menu of the software. In the
grey box “Enter License Code”, you enter the provided e-mail and license key. Click “Accept
License”, to activate your key.
Notice! Save your licensing information! This might be needed in the future to reinstall the
software. The license details can also be used as login credentials to the software, if the
Supervisor has lost their login credentials.
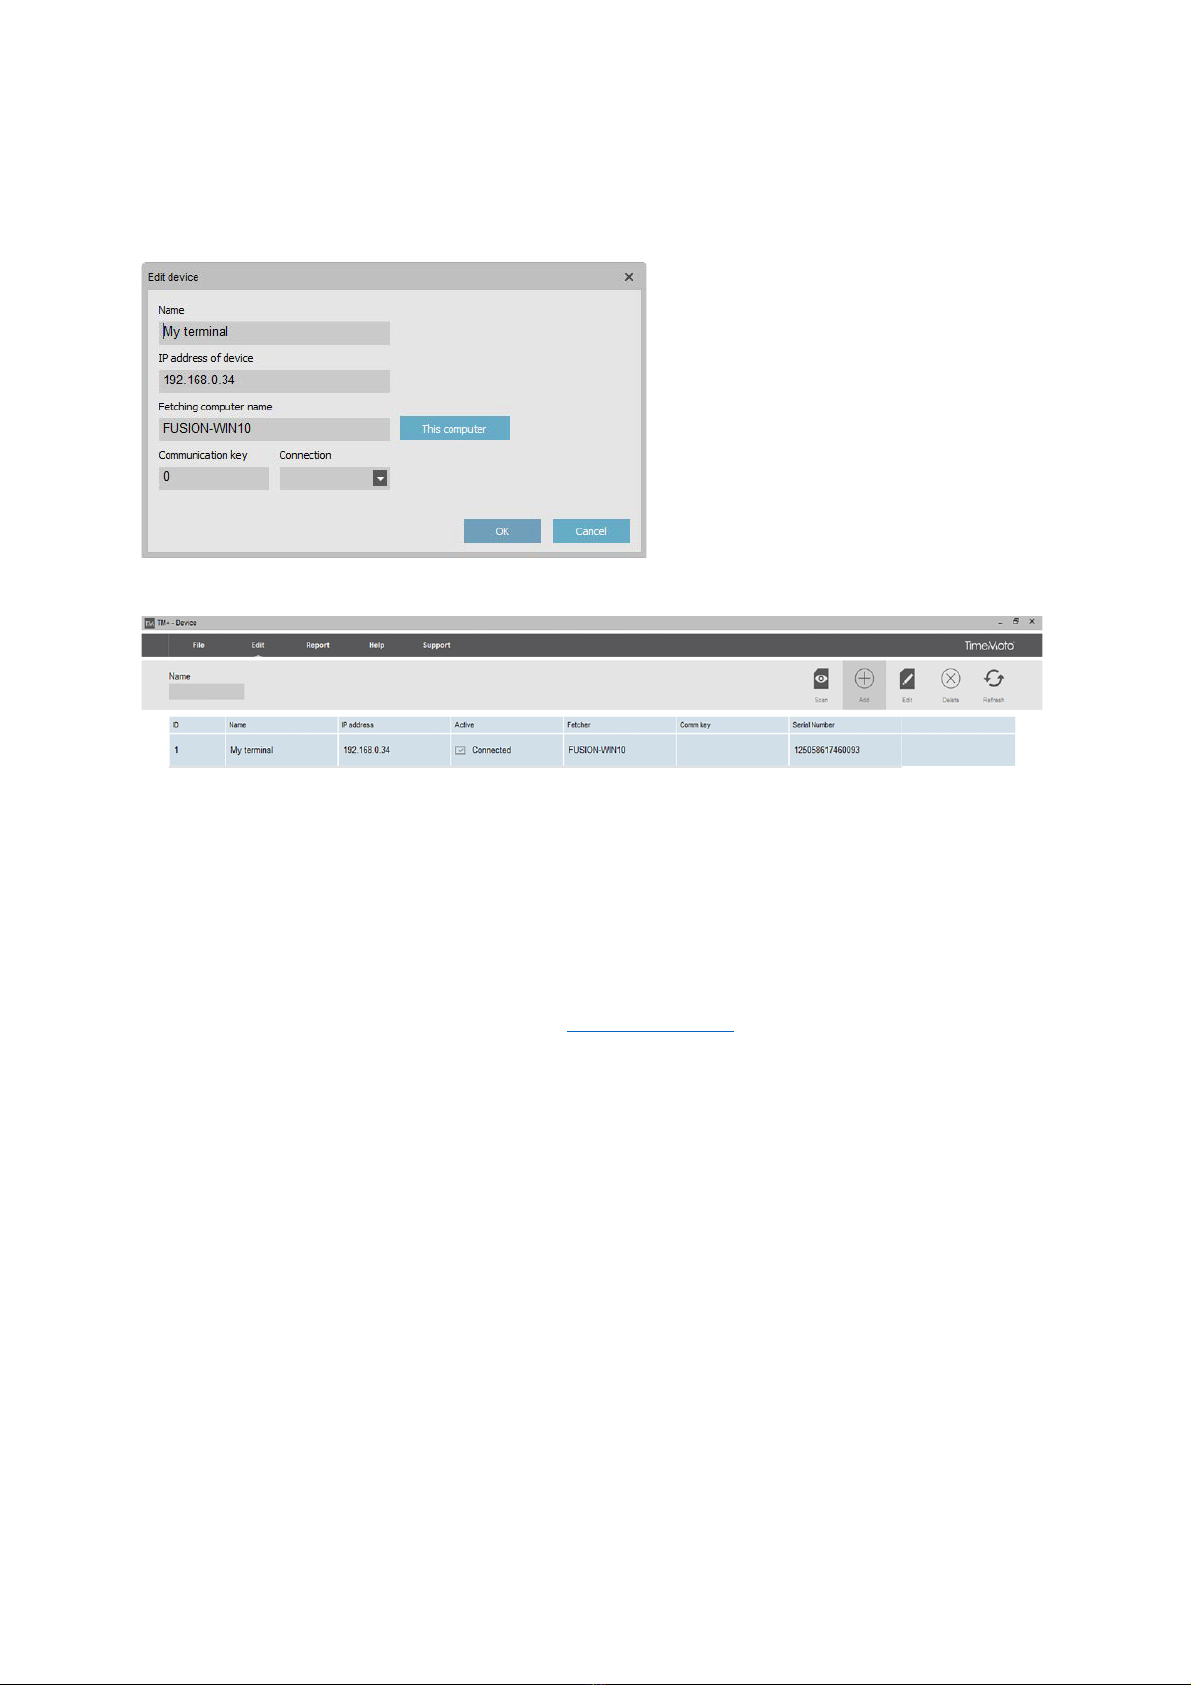
4. CONNECT THE SOFTWARE TO THE TERMINAL
1. Open the software TM (TA).
2. Click “Edit” in the main menu and choose “Device”.
3. Click the button “Scan” in the top right corner. In most cases, the software locates your
device and connects it. In some cases, the software doesn’t the terminal and you have to
connect to it manually. This is done by adding the device using it’s IP-address. If scan the
scan fails, follow the steps below.
Manual connection of the terminal, in the software
1. Press the “MENU” button on the terminal.
2. Select “System Settings” and press “OK” (Use the up and down arrows to select).
3. Select “Communication” and press “OK”.
4. Select “Network” and press “OK”.
5. Take note of the IP-address shown.
6. Back at the computer, go to “Edit” in the main menu and select “Device”. Click “Add”.
• Name your device, so it’s easy to identify, what device it is, if you have multiple devices
now or in the future.

Version 2.6:190307-Eng
10
• Enter the IP-address of the terminal, from previous step.
• Click the button “This computer” and the software will automaticly enter your PC’s
name.
• Click “OK”.
The device should now be added and shown as connected, in the column “Active”.
If the connection still doesn’t work, you might need to check that your computer is
connected to the same network and that they are on the same subnet. For this you might
need help from your IT-technician or IT-department. If you need to set a static IP of the
device, there is a specific manual for this at www.frobergs.se

Version 2.6:190307-Eng
11
5. BASIC SETTINGS OF THE SOFTWARE
Backup
Set the software to take automatic backups. Go to File/Preferences. Change “Automatic
backup file” to “Yes” and choose “Backup file location”.
Remember to press “Save” in the top of the window to save your setting.
Import country specific holidays *only available in TM+
To import country specific holidays, go to the menu “Edit” and choose “Planning”. Press the
button “Load Holidays”, in the top right corner of the window. Select country and press
“OK”.

Version 2.6:190307-Eng
12
6. ADD USERS
This is how you add a user.
1. In the software go to the menu “Edit” and choose “User”.
2. Click “Add” (+) in the top right corner. (See image above).
An editable window appear in the bottom of the screen. (Notice that a “User ID” is
automatically created. This ID, should not be changed and is also locked.)
• The first tab is named “System data” (see image below).
3. In the system data tab, you enter the following:
• Username – this is the name shown in the device when the user identifies and is also the
name the user can use to login in the PC-software. This field takes a max of 8 characters.
(Full name is not entered here. That is entered in a later step.)
• Privilege – select a permission level for the user. Choose “User” or “Supervisor”.
Users with the level of “Supervisor”, has full access in the PC-software and to the
terminal menu. Users with the level “user”, can only check in/out in the terminal and can
login to the PC-software, with limited access. A user can only see their own attendance-

Version 2.6:190307-Eng
13
logs but can see the attendance panel. They have no access to make any changes.
• Password – press the button “Change password”. A popup window opens and you can
enter a password, which can be used to check in/out in the terminal, but is also the
password that is used to login into the PC-software.
Notice! Use only passwords with numbers, since you won’t be able to use letters to
identify with password in the terminal.
• Work Schedule – this is changed later. (Steps for this will be found, later in this manual.)
4. Change tab to the “Personal data” tab.
In the “Personal data” tab, you enter the “First name” and “Last name” of the user. In the
field “Joined company”, you choose the date when you plan to start using the system. If you
use an earlier date in this field, problems related to summaries for previous attended time
might occur.
You can add as much details as you prefer.
NOTICE! If the system is to be used as employee attendance tracking (“personalliggare”), for
the Swedish tax agency (“Skatteverket”), you are required to input certain data. See the
specific manual for this.

Version 2.6:190307-Eng
14
5. Change tab to “Identification”, if you plan to use RFID-cards/tags. In the field “RFID”, you
enter the 7-digit number of the RFID-card/tag this user is going to use.
If no RFID number is found on the RFID-card/tag, you can enroll RFID, by scanning them
in the terminal. (See how to do this, later in this manual.)
If your user is going to use fingerprint, you can skip this step, since fingerprints are
enrolled in the terminal.
IMPORTANT! When all required user data is entered, remember to press save! When the
user is saved, the user will appear in the list above in your software.
6. Repeat the above steps for all users you need to add.

Version 2.6:190307-Eng
15
7. SYNCHRONIZE USERS FROM THE PC-SOFTWARE TO THE
TERMINAL
To transfer users or changes to users, between the PC-software and the terminal,
synchronization must be performed.
Notice! When you add a fingerprint/RFID/password to a user on the terminal,
synchronization also must performed.
When the terminal and the PC-software is synchronized correctly, attendance logs from the
terminal will transfer automatically to the pc software.
It's very important to synchronize users. If this is not done on changes, it can easily end up
in communication and database problems. REMEMBER to synchronize your changes to
users.
The DIRECTION of the synchronization is important. Note the following:
TM > PC: copies users from the terminal (TM) to your computer (PC).
PC > TM: copies users from your comuter (PC) to the terminal (TM).
When you added/edited or removed a user in the pc-software, you synchronize in the
direction "PC>TM".
When you add a RFID/Fingerprint in the terminal, you synchronize in the other direction
("TM>PC").
Performing synchronization
When you need to perform a synchronization, follow these steps:
1. Go to the menu Edit/Device in the PC-software. Select the terminal you wish to
synchronize with. The selected terminal will be marked with a blue color (1.)
2. When you have select your terminal, some icons in the bottom of the window will be
unlocked. Press the button “Synchronize” (2 in the above image).

Version 2.6:190307-Eng
16
3. A popup window will appear. “Synchronize users” is open.
In this example picture above, some users were created in the PC-software and need to be
transferred to the terminal. In the window “PC>TM” (1) is clicked to choose the direction
and then “Commit” (2) is clicked to perform the action. User data is copied from the
computer to the terminal.
IMPORTANT! Remember were you perform changes, to users. If you synchronize in the
wrong direction, you might erase or overwrite user information. The most regular place for
making changes to users are in the PC-software. For that reason “PC>TM” is most often
used.
NOTICE! Attendance logs from the terminal, can never be synchronized manually over the
network. Over the network, attendance logs are only automatically performed.
8. ENROLLING FINGERPRINTS AND RFID IN THE TERMINAL
If your users are going to use fingerprint, their fingerprints must be enrolled directly in the
terminal after the user is synchronized from the PC-software. Follow the steps below for
“Enrolling fingerprints”.
If your users are going to use RFID and the RFID-number is printed on the cards/tags (RFID
cards/tags bought from Fröbergs, normally has this printed), it’s easier to enroll the RFID
number directly when you add the user. See step 5, in chapter 6. ADD USERS.
If your RFID-cards/tags doesn’t have the RFID number printed on them, follow the steps
below for “Enrolling RFID”.
If your users are going to use PIN-code, it’s easier to assign their passwords directly when
you create the user. See chapter 6. ADD USERS.

Version 2.6:190307-Eng
17
Enrolling Fingerprints
1. On the terminal, press the “MENU” button.
If you have created a user with the privilege of “Supervisor” and synchronized this user
to the terminal, you will have to “Identify”, to gain access to the menu. If no “Supervisor”
exists in the terminal, you will gain access to the menu directly.
If you are required to “Identify”, press the user ID number of the supervisor user, then
press the “OK” button. Select “Password” and press “OK”, then enter the password set
for the supervisor user followed by “OK”.
2. In the menu of the terminal, select “User management” (first option) and press “OK”.
3. Use the arrows up and down to scroll through the user list and select the user you wish
to enroll, then press “OK”. (Instead of scrolling through the list, you can also enter the ID
number for the user you wish to enroll and press “OK”.)
4. Select “Edit” and press “OK”.
5. Use the arrows and select “Fingerprint”, then press “OK”.
6. Select the finger you wish to enroll by pressing the number for that certain finger,
displayed in the terminal display, then press “OK”. Follow the instructions given in the
display.
We recommend that you enroll at least 1 finger on each hand, for every user. This is solely
for backup identification if the first finger would become injured. Recommended fingers are
the index- and the middle-fingers. Avoid thumbs, since these are quite tricky to use.
Notice! A correct finger positioning on the sensor is crucial. Try to cover as much of the
sensor as possible with your finger. Avoid pressing to hard, since the sensor will see the
fingerprints as “smudged”, but do not press to loosely either. See images below for correct
positioning.
To enroll another finger for the same user, simply press “OK” on the option “Fingerprint” in
the menu again, when the first finger has been enrolled. Select another finger by choosing a
finger displayed with a different number from last one.
7. Repeat the process for all users you wish to enroll. Select another user by pressing the
“ESC” button, twice, to return to the user list and select another user.

Version 2.6:190307-Eng
18
8. When the desired fingerprints have been enrolled, you must synchronize the user data
with the PC-software again.
Because the fingerprints were added to the user on the terminal, you must synchronize
in the direction “TM>PC”.
It’s very important to choose the correct direction. See instructions for synchronization
in chapter 7.
Enrolling RFID-cards/tags
1. On the terminal, press the “MENU” button.
If you have created a user with the privilege of “Supervisor” and synchronized this user
to the terminal, you will have to “Identify”, to gain access to the menu. If no “Supervisor”
exists in the terminal, you will gain access to the menu directly.
If you are required to “Identify”, press the user ID number of the supervisor user, then
press the “OK” button. Select “Password” and press “OK”, then enter the password set
for the supervisor user followed by “OK”.
2. In the menu of the terminal, select “User management” (first option) and press “OK”.
3. Use the arrows up and down to scroll through the user list and select the user you wish
to enroll, then press “OK”. (Instead of scrolling through the list, you can also enter the ID
number for the user you wish to enroll and press “OK”.)
4. Select “Edit” and press “OK”.
5. Use the arrows and select “Badge Number”, then press “OK”.
6. Present the card/tag to the RFID reader and the RFID number will be scanned and
registered by the terminal. Remember what card/tag the user was assigned.
7. Repeat the process for all users you wish to enroll, by pressing the “ESC” button twice, to
return to the users list and select another user.
8. When the desired RFID-cards/tags has been enrolled, you must synchronize the user
data with the PC-software again.
Because the RFID number were added to the user on the terminal, you must synchronize
in the direction “TM>PC”.
It’s very important to choose the correct direction. See instructions for synchronization
in chapter 7.

Version 2.6:190307-Eng
19
9. WORK SCHEDULES
You can create work schedules and assign them to a user or a department. The software will
then compare the actual attendance data with the user’s specified schedule.
The software can also be used without a schedule, if only the user’s attended time is of
interest.
Usage of work schedules gives the following functions:
• If a user doesn’t check in a scheduled day, the software marks their abscense.
• If a user’s attendance is longer then scheduled, a positive time balance is recorded in the
reports.
• If a user’s attendance is less than scheduled, a negative time balance is recorded in the
reports.
• If a user check’s in a scheduled day but forgets to check out when their work shift end,
the report automatically ends the day with the shift’s end in the work schedule.
• Marking absence during sick leave is possible.
Work schedules are suitable for users with fixed workdays and times. It’s possible to have
different times for different weekdays, but with reoccurrence of the same schedule each
week. If users have different schedules each week, it’s more suitable to use planned
workschedules.
Creating a work schedule
Work schedules can be based on a shift start and a shift end. It can also be based on a goal
of hours per day, week or month. The example below shows a schedule based on shift start
and shift end with an automatically subtracted lunch break.
1. Go to the “Edit” menu in the software and select “Work schedule”.
2. Click “Add” (+) in the top right corner and assign a name and add a description of the
schedule. Press “OK”.

Version 2.6:190307-Eng
20
3. The work schedule is now created and now we need to define start, break and end
times. Click the blue button “Add” and select “Time In/Out”.
4. Select the days that have the same start and end time. Input the start, end and if there is
a rounding to be applied.
In the example below, the work schedule is Monday-Thursday 07:00-16:30 and Friday.
The personnel in this schedule should not receive worktime if they check in up to 30
minutes before the work schedule and they should not receive any work time the first 30
minutes past the work schedule.
Table of contents