Franklin Electric HES Series User manual

6"/8" HES
GB D
Quick Installation Guide
franklinwater.eu
S F IT RU

Summary
Page
English 5 - 19
Deutsch 25 - 39
Svenska 44 - 60
French 63 - 81
Italian 84 - 101
Russian 104 - 121

GB
franklinwater.eu
6"/8" HES
Quick Installation Guide

7HFKQLFDOFKDQJHVZLWKRXWQRWLFH7HFKQbQGHUXQJHQYRUEHKDOWHQ0RGL¿FDWLRQVWHFKQLTXHVUpVHUYpHVVDQVSUpDYLV
4
Summary*
Page
Control modes and necessary sensor technologies 5
Battery Installation Procedure IP66 / IP21 5
Connection Description 6"/ 8" HES Sytem Standard 6
System and Connection Description 6" HES solar 7
Connections Motor and Option cards 8
6"/8" System Performance Data 400V-50Hz 9
Keypad button Overview 10
Start-Up-Wizard 10
%DVLF&RQ¿JXUDWLRQ 11 / 12
&RQ¿JXUDWLRQ4 13 / 14
&RQ¿JXUDWLRQh15
&RQ¿JXUDWLRQP16
Direct Mode (DM) 17
Manual Mode (MM) 17
Display Messages 18
&RQ¿JXUDWLRQS (Solar) 19
DANGER
Additional safety instructions
System can automatically restart (Solar) - the appropiate safety pre-
cautions should be taken. See page 19
* This manual always refers to the latest Franklin Electric operating software version for the HES Vacon frequency inverters.

7HFKQLFDOFKDQJHVZLWKRXWQRWLFH7HFKQbQGHUXQJHQYRUEHKDOWHQ0RGL¿FDWLRQVWHFKQLTXHVUpVHUYpHVVDQVSUpDYLV
5
Battery Installation Procedure IP66
1
2
1
2
Battery Installation Procedure IP21
Process
reference
Control
reference Flow meter Pressure
sensor
Level
sensor
PT100 sensor &
Drive slot card
Flow switch
(digital)
4)ORZ No (Optional) mandatory Optional
P mandatory mandatory
H mandatory mandatory
P - pressure No (Optional) Yes* mandatory mandatory*
Q mandatory mandatory
H - level No (Optional) Yes* mandatory mandatory*
Q mandatory mandatory
Direct Mode No Yes** No No mandatory* No
Manual Mode No Yes*
Solar No Yes* mandatory
*please consult Franklin Electric
** need to be evaluated to PLC
Control modes and necessary sensor technologies

7HFKQLFDOFKDQJHVZLWKRXWQRWLFH7HFKQbQGHUXQJHQYRUEHKDOWHQ0RGL¿FDWLRQVWHFKQLTXHVUpVHUYpHVVDQVSUpDYLV
6
Common - Common(Terminal 7)
Fig. 2: Relais Output Connection
Fig. 1: Input/Output Terminals
Connections 6" / 8" HES Standard System
Standard I/O
Terminal Signal
1 +10 Vref Reference output
2AI1+ Analogue input,
voltage or current Control Reference: AI1, Terminals 2(+), 3(GND)
Default setting [V]
3AI1- Analogue input
common
4AI2+ Analogue input,
voltage or current Process Reference: AI2, Terminals 4(+), 5(GND)
Default setting [mA]
5AI2- Analogue input
common
6 24V out 24V aux. voltage
7GND I/O ground
8DI1 Digital input 1 Start/Stop: DI1, Terminals 6(+24V), 8(DI1)
9DI2 Digital input 2 External Fault: DI2, Terminals 6(+24V), 9(DI2)
10 DI3 Digital input 3 Manual Operation: DI3, Terminals 6(+24V), 10(DI3)
11 CM Common for DI1 - DI6*
12 24V out 24V aux. voltage
13 GND I/O ground
14 DI4 Digital input 4 Set Point - : DI4, Terminals 6(+24V), 14(DI4)
15 DI5 Digital input 5 Set Point + : DI5, Terminals 6(+24V), 15(DI5)
16 DI6 Digital input 6 Reset: DI6, Terminals 6(+24V), 16(DI6)
17 CM Common for DI1 - DI6*
18 AO1+ Analogue output,
voltage or current
19 AO-/GND Analogue output
common
30 +24V in 24V aux. input voltage
A RS485 Serial bus, negative
B RS485 Serial bus, positive
* Can be isolated from ground, see chapter 5.1.6.
(Connection depending
on settings)
Relays
Terminal Signal
21 RO1/1
Operation: RO1, Terminals 22(+24V), 23
Switching capacity 24VDC/8A
250VAC/8A
125VAC/0,4A
5V/10mA
22 RO1/2
23 RO1/3
24 RO2/1
Warning/Fault: RO2, Terminals 25(+24V), 24
Min. switching load
25 RO2/2
26 RO2/3
Relay output 1
Relay output 2
Fig. 3: Analog Input/Output Signal Selection
Fig. 4: Digital Input Selection
Fig. 1.1 : Sensor connection
* depending on Reference
2- wire Sensor
3- wire Sensor
4- wire Sensor
Supply + 24V (Terminal 6)
Common - AI+ (Terminal 2/4*)
AI - (Terminal 3/5*)
Common(Terminal 7)
Supply + 24V (Terminal 6)
0/4- 20mA AI+ (Terminal 2/4*)
AI- (Terminal 3/5*)
0/4- 20mA+ AI + (Terminal 2/4*)
Supply + 24V (Terminal 6)
Common Common(Terminal 7)
0/4- 20mA - AI- (Terminal 3/5*)
AI1 AI2 A0
&
2
9
AI1 AI2 A0
IP21 IP66
IP21 IP66

7HFKQLFDOFKDQJHVZLWKRXWQRWLFH7HFKQbQGHUXQJHQYRUEHKDOWHQ0RGL¿FDWLRQVWHFKQLTXHVUpVHUYpHVVDQVSUpDYLV
7
Connections 6" HES Solar System
Standard I/O
Terminal Signal
1 +10 Vref Reference output
2AI1+ Analogue input,
voltage or current
3AI1- Analogue input
common
4AI2+ Analogue input,
voltage or current
5AI2- Analogue input
common
6 24V out 24V aux. voltage
7GND I/O ground
8DI1 Digital input 1 Start/Stop: DI1, Terminals 6(+24V), 8(DI1)
9DI2 Digital input 2 Flow Switch: DI2, Terminals 6(+24V), 9(DI2)
10 DI3 Digital input 3 Manual Operation: DI3, Terminals 6(+24V), 10(DI3)
11 CM Common for DI1 - DI6*
12 24V out 24V aux. voltage
13 GND I/O ground
14 DI4 Digital input 4 Control Switch „Empty“ DI4, Terminals 6(+24V), 14(DI4)
15 DI5 Digital input 5 Control Switch „Full“ DI5, Terminals 6(+24V), 15(DI5)
16 DI6 Digital input 6 Reset: DI6, Terminals 6(+24V), 16(DI6)
17 CM Common for DI1 - DI6*
18 AO1+ Analogue output,
voltage or current
19 AO-/GND Analogue output
common
30 +24V in 24V aux. input voltage
ARS485 Serial bus, negative
BRS485 Serial bus, positive
* Can be isolated from ground, see chapter 5.1.6.
6" HES Solar System
Fig. 5: Input/Output Terminals
2 Level Control Switch Operation
optional parts: 308 170 209
Flow Switch
(required for operation): 226 019 101
Control
Switch
“Full”
Control
Switch
“Empty”
Alternate AC
Power (Optional)
IP 66 HES
Drive Solar
Filter
Pump/Motor
A
D
B
E
H
DC Disconnect
optional part:
308 170 210
F
C
DC Power
Solar PV Array
G
IP66 Derating
40°C - 100%
50°C - 75%
60°C - 50%
IP 21 HES
Drive Solar
B
IP21 Derating
40°C - 100%
>40°C -1,5%/°C
max. 50°C
Heat Sink
B
B

7HFKQLFDOFKDQJHVZLWKRXWQRWLFH7HFKQbQGHUXQJHQYRUEHKDOWHQ0RGL¿FDWLRQVWHFKQLTXHVUpVHUYpHVVDQVSUpDYLV
8
Connections Motor and Option cards
Fig. 7: PT100 card (left slot)
Fig. 9: OPTB1, 6 DI/DO card
dUdt
U1
V1
W1
U2
V2
W2
PE PE
L1
L2
L3
U/T1
V/T2
W/T3
~ _
~ _
PE PE PE
V
U
W3~
M
Fig. 6: Supply and motor connection
Fig. 8: PT100 connection
12
3
1 - black
2 - blue
3 - brown
)LJ237(3UR¿EXVFDUGULJKWVORW
Jumper X2
Jumper X4
X6
X1
9876
Bus Connector
Red
Yellow
Green
Interface Board - Connector
Jumper
Bus Connector Interface Board - Connector
Red
Yellow
Green
Fig. 10: OPT-B4, 1AI/2AO card
word 1: motor current
word 2: process value
word 3: control value
word 4: PT100 temperature
word 5: motor speed (RPM)
word 6: process reference
word 7: relay output
word 8: output frequency
U - brown
V - grey
W - black
Color code FE Motor Short Lead:
Color code FE PT100 Lead:

7HFKQLFDOFKDQJHVZLWKRXWQRWLFH7HFKQbQGHUXQJHQYRUEHKDOWHQ0RGL¿FDWLRQVWHFKQLTXHVUpVHUYpHVVDQVSUpDYLV
9
6" HES System Performance Data 400V-50Hz
400V/50Hz PN
[kW]
Thrust
F [kN]
nN
[min-1]
IN
[A]
IA / IN*
[A]
Ș
[%] PF TN
[Nm]
TA / TN*
[Nm]
308 010 X16
4 15,5 3000 8 1 88 0,95 12,9 1
5,5 15,5 3000 10 1 89 0,95 17,5 1
7,5 15,5 3000 13 1 89,5 0,95 23,8 1
308 014 X23 9,3 15,5 3000 18 1 91,5 0,95 29,6 1
11 15,5 3000 20 1 92 0,95 35 1
308 014 X38
13 15,5 3000 23 1 92,5 0,95 41,5 1
15 15,5 3000 26 1 92,5 0,95 46,1 1
18,5 15,5 3000 32 1 92 0,95 59 1
308 016 X61
22 27,5 3000 39 1 93 0,95 70 1
26 27,5 3000 46 1 92,5 0,95 82,6 1
30 27,5 3000 54 1 91,5 0,95 95,5 1
308 016 X87 37 27,5 3000 72 1 90 0,95 117,8 1
8" HES System Performance Data 400V-50Hz
400V/50Hz P
[kW]
Thrust
F [kN]
nN
[min-1]
IN
[A]
IA / IN*
[A]
Ș
[%] PF TN
[Nm]
TA / TN*
[Nm]
308 014 X01
45 45 3000 74 1 93,3 0,96 143 1
55 45 3000 91 1 93,3 0,96 175 1
67 45 3000 112 1 93 0,96 213 1
75 45 3000 128 1 92,5 0,96 239 1
308 016 X01
75 45 3000 129 1 93,5 0,95 239 1
83 45 3000 143 1 93,3 0,95 264 1
93 45 3000 162 1 93 0,95 296 1
100 45 3000 178 1 92,7 0,95 319 1
308 017 X01
100 45 3000 176 1 94,2 0,94 319 1
110 45 3000 193 1 94,2 0,94 350 1
130 45 3000 229 1 94 0,94 413 1
150 45 3000 270 1 93,4 0,94 477 1
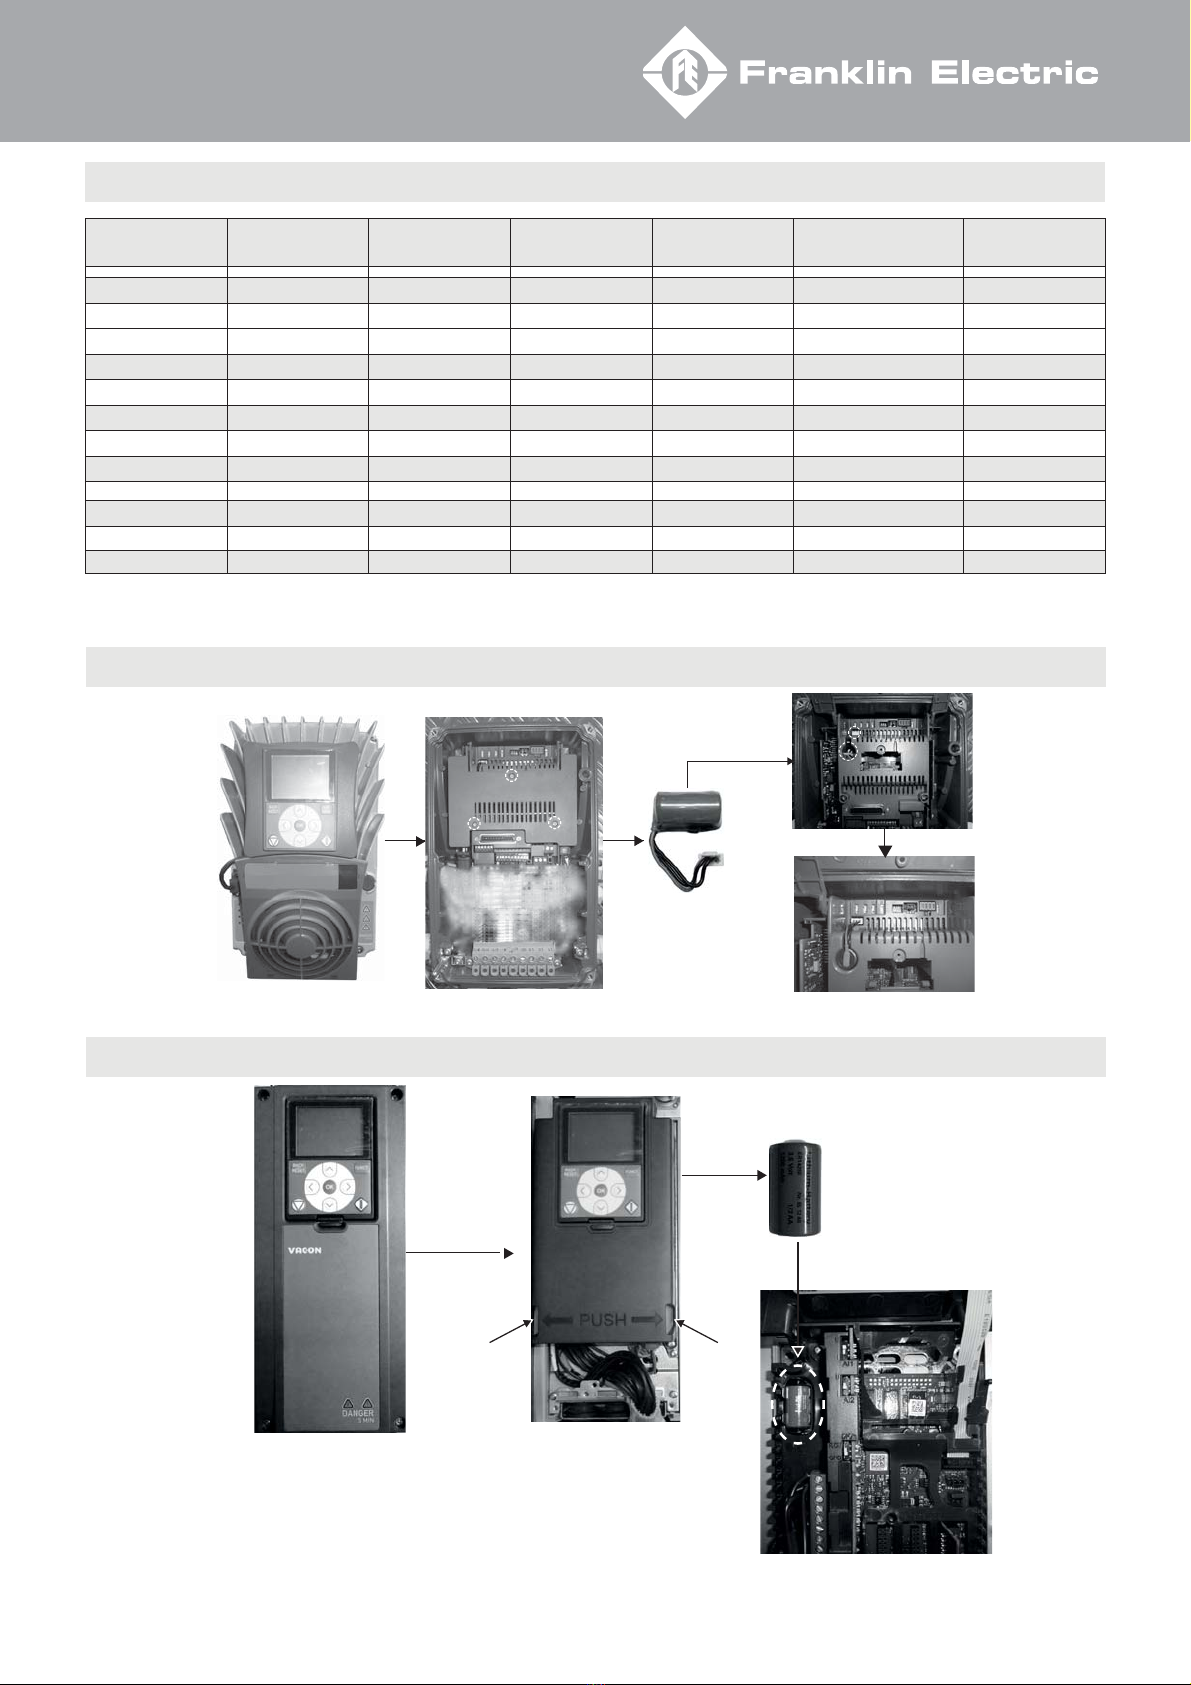
Performance data are based on measurements with Franklin Electric original equipment!
6LQFHWKLVLVDQLQWHJUDWHGV\VWHPPRWRUSOXVHOHFWURQLFVWKHVH¿JXUHVUHODWHWR9)'LQSXW

7HFKQLFDOFKDQJHVZLWKRXWQRWLFH7HFKQbQGHUXQJHQYRUEHKDOWHQ0RGL¿FDWLRQVWHFKQLTXHVUpVHUYpHVVDQVSUpDYLV
10
Keypad buttons Overview
Start-Up-Wizard
RUN READY I / O
Multimonitor
ID: 113 Nominal Amps
Nominal Amps Amps Motor Speed
Setpoint Feedback PT100
CtrlSetPnt Ctrl. Act. Ctrl. Max.
23.0A 20.0A 2300rpm
50.0m3h 49.5m3h 23.7°C
0.0[-] 0.0[-] 0.0[-]
STOP READY I / O
Monitor
ID: M 2.1
Basic
Multimonitor
(12)
Trend Curve
(12)
STOP READY I / O
Monitor
ID: M 2.1
Basic
(1)
Trend Curve
(4)
Fieldbus Data
(20)
STOP READY I / O
WIZARD
ID:1171 M 2.10.1
Startup wizard
STOP READY I / O
Startup wizard
ID: M 2.10.1
Add to Favorites
Activate
Help
Move cursor left Move cursor right
Start button
Stop button
Scroll menu up
Increase value
Move backward in menu
Exit edit mode
Reset faults with long press
Scroll menu down
Decrease value
Enter active level/item
&RQ¿UPVHOHFWLRQ
2x

7HFKQLFDOFKDQJHVZLWKRXWQRWLFH7HFKQbQGHUXQJHQYRUEHKDOWHQ0RGL¿FDWLRQVWHFKQLTXHVUpVHUYpHVVDQVSUpDYLV
11
%DVLF&RQ¿JXUDWLRQ
* for other languages please contact Franklin Electric Europa GmbH
STOP READY I / O
Language Selection
ID: 802
English
STOP READY I / O
Daylight saving
ID: 2204
EU
Russia
US
OFF
STOP READY I / O
Time
ID: 2201
09:14:11
Min:
Max:
STOP READY I / O
Year
ID: 2203
2017
Min:
Max:
STOP READY I / O
ID:
During the next steps please
enter System Data.
STOP READY I / O
Date
ID: 2202
7.2.
Min:
Max:
STOP READY I / O
Output Filter
ID: 1810
du/dt Filter
6LQH¿OWHU
STOP READY I / O
PT100 installed
ID: 1834
Yes
No
STOP Not RDY I / O
ID:
Please note, a PT100 sensor has
to be used to measure Motor-
Temperature, connected to OPT-
BH, terminals 1, 2 and 3.
Refere to Quick Installation Guide.
STOP READY I / O
ID:
6\VWHP'DWD¿QLVKHG'XULQJWKH
next steps please enter Motor
Nameplate Data.
STOP READY I / O
Motor Nom. Voltage
ID: 1812
500 V
400 V
230 V
220 V
STOP READY I / O
Nominal Amps
ID: 113
1.90 A
Min: 0.26A
Max: 5.20A
STOP READY I / O
Motor Nom. Frequency
ID: 1813
100 Hz
120 Hz
* *
** is only shown and selectable if PT100 Option card is installed
STOP READY I / O
ID:
0RWRU1DPHSODWH'DWD¿QLVKHG
During the next steps please enter
Duty Point Data.
STOP READY I / O
Duty Point Flow
ID: 1828
75.0 m³/h
Min: 1.0m³/h
Max: 500.0m³/h

7HFKQLFDOFKDQJHVZLWKRXWQRWLFH7HFKQbQGHUXQJHQYRUEHKDOWHQ0RGL¿FDWLRQVWHFKQLTXHVUpVHUYpHVVDQVSUpDYLV
12
h
P
Page 14
Page 16
4Page 13
STOP READY I / O
Process Reference
ID: 1819
Q [m³/h]
h [m]
P [bar]
Manual Mode MM Page 17
SPage 19
Solar
STOP READY I / O
Min. Water Colum
ID: 1818
STOP READY I / O
Pump Install. Depth
ID: 1815
%DVLF&RQ¿JXUDWLRQ
Ø D
Q, H
Fig. 12
See
Fig.12
See
Fig.12
STOP READY I / O
Duty Point Head
ID: 1829
90.0 m
Min: 1.0m
Max: 1000m
50.0 m
Min: 1.0m
Max: 1000.0m
STOP READY I / O
Casing Diameter
ID: 1816
300.0 mm
Min: 100.0mm
Max: 1000.0mm
10.0 m
Min: 0.5m
Max: 200.0m
STOP READY I / O
ID:
'XW\3RLQW'DWDLQSXW¿QLVKHG
During the next steps please enter
Process Data.
STOP READY I / O
ID:
Process Reference has to be
connected to AI2, terminals 4(+) and 5(-).
Control reference 1 has to be connected
to AI1, terminals 2(+) and 3(-).
Flow Inducer SLEEVE
:KHQ&RROLQJ)ORZQRW6XႈFLHQW
PUMP INSTALL. DEPTH
Min. Water Column
Level Probe Installation Depth
Direct Mode DM Page 17

7HFKQLFDOFKDQJHVZLWKRXWQRWLFH7HFKQbQGHUXQJHQYRUEHKDOWHQ0RGL¿FDWLRQVWHFKQLTXHVUpVHUYpHVVDQVSUpDYLV
13
Voltage
&RQ¿JXUDWLRQ4[m3/h]
See Fig. 1, 1.1
STOP READY I / O
Process Reference
ID: 1830
4...20mA
0...20mA
Voltage
STOP READY I / O
Proc. Ref. End Scale
ID: 1034
150.0 m3h
Min: 0.00m3h
Max: 600.0m3h
STOP READY I / O
Proc. Ref. Set Point
ID: 167
73.0 m3h
Min: 31.12m3h
Max: 1000.0m3h
STOP READY I / O
ID:
Please note, if AI2 is used as
Voltage input, you have to set DIP-
Switch AI2 to U. Refere to Quick
Installation Guide.
STOP READY I / O
Control Reference
ID: 1831
0...10V
2...10V
STOP READY I / O
Control Reference
ID: 1820
On
2ႇ
STOP READY I / O
Control Reference
ID: 1820
On
2ႇ
STOP READY I / O
ID:
Please note, an analog level meter
or analog pressure sensor has to
be used as Control Reference 1,
connected to AI1, terminals 2(+)
and 3(-).
STOP READY I / O
ID:
$IWHUSUHVVLQJÄ2.³,GHQWL¿FDWLRQ
without rotation will start. You can
VWRS,GHQWL¿FDWLRQE\SUHVVLQJUHG
Stop-Button at any time. Having
,GHQWL¿FDWLRQ¿QLVKHGGULYHLV
ready to start.
RUN READY I / O
Multimonitor
ID: 113 Nominal Amps
Nominal Amps Amps Motor Speed
Setpoint Feedback PT100
CtrlSetPnt Ctrl. Act. Ctrl. Max.
23.0A 20.0A 2300rpm
50.0m3h 49.5m3h 23.7°C
0.0[-] 0.0[-] 0.0 [-]
STOP READY I / O
ProcRefSetPntSource
ID: 332
Fieldbus
Standard
STOP READY I / O
ProcRefSetPntSource
ID: 332
Fieldbus
Standard

7HFKQLFDOFKDQJHVZLWKRXWQRWLFH7HFKQbQGHUXQJHQYRUEHKDOWHQ0RGL¿FDWLRQVWHFKQLTXHVUpVHUYpHVVDQVSUpDYLV
14
STOP READY I / O
Multimonitor
ID: 113 Nominal Amps
Nominal Amps Amps Motor Speed
Setpoint Feedback PT100
CtrlSetPnt Ctrl. Act. Ctrl. Max.
23.0A 20.0A 2300rpm
50.0m3h 49.5m3h 23.7°C
6.0bar 4.5bar 25.0bar
STOP READY I / O
ID:
$IWHUSUHVVLQJ2N,GHQWL¿FDWLRQ
without rotating will start. You can
VWRS,GHQWL¿FDWLRQE\SUHVVLQJUHG
Stop-Button at any time. Having
,GHQWL¿FDWLRQ¿QLVKHGGULYHLV
ready to start.
STOP READY I / O
Ctrl. Ref. Set Point
ID: 1823
Min: 0.5bar
Max: 100.0bar
6.0 bar
STOP READY I / O
Control Reference
ID: 1833
4...20mA
Voltage
0...20mA
STOP READY I / O
ID:
If Control Reference Signal
is mA, you have to set. DIP-
Switch AI1 to I. Refer to Quick
Installation Guide.
STOP READY I / O
Ctrl. Ref. End Scale
ID: 1836
Min: 1.0bar
Max: 1000.0bar
25.0 bar
STOP READY I / O
Control Reference
ID: 1832
0...10V
Current
2...10V
STOP READY I / O
Ctrl. Ref. Signal
ID: 1822
h [m]
P [bar]
STOP READY I / O
Multimonitor
ID: 113 Nominal Amps
Nominal Amps Amps Motor Speed
Setpoint Feedback PT100
CtrlSetPnt Ctrl. Act. Ctrl. Max.
23.0A 20.0A 2300rpm
50.0m3h 49.5m3h 23.7°C
10.0m 10.5m 25.0 m
STOP READY I / O
LPP Max. Range
ID: 1887
Min: 0.1 m
Max: 1000.0 m
10.0m
STOP READY I / O
Ctrl. Ref. Signal
ID: 1822
h[m]
P[bar]
Current
Current
&RQ¿JXUDWLRQ4[m3/h]
See Fig. 3
See Fig. 3
h [m]
P [bar]
STOP READY I / O
Control Reference
ID: 1832
0...10V
Current
2...10V
STOP READY I / O
LPP Install. Depht
ID: 1888
Min: 0.1 m
Max: 1000.0 m
20.0m
STOP READY I / O
ID:
If Control Reference Signal
is mA, you have to set. DIP-
Switch AI1 to I. Refer to Quick
Installation Guide.
STOP READY I / O
Control Reference
ID: 1833
4...20mA
Voltage
0...20mA
STOP READY I / O
ID:
$IWHUSUHVVLQJ2N,GHQWL¿FDWLRQ
without rotating will start. You can
VWRS,GHQWL¿FDWLRQE\SUHVVLQJUHG
Stop-Button at any time. Having
,GHQWL¿FDWLRQ¿QLVKHGGULYHLV
ready to start.
STOP READY I / O
Ctrl. Ref. Set Point
ID: 1823
Min: 0.0 m
Max: 1000.0 m
0.0 m

7HFKQLFDOFKDQJHVZLWKRXWQRWLFH7HFKQbQGHUXQJHQYRUEHKDOWHQ0RGL¿FDWLRQVWHFKQLTXHVUpVHUYpHVVDQVSUpDYLV
15
STOP READY I / O
Ctrl. Ref. Set Point
ID: 1823
50.0m3h
Min: 31.1m3h
Max: 150.0m3h
STOP READY I / O
ID:
$IWHUSUHVVLQJ2N,GHQWL¿FDWLRQ
without rotating will start. You can
VWRS,GHQWL¿FDWLRQE\SUHVVLQJUHG
Stop-Button at any time. Having
,GHQWL¿FDWLRQ¿QLVKHGGULYHLV
ready to start.
RUN READY I / O
Multimonitor
ID: 113 Nominal Amps
Nominal Amps Amps Motor Speed
Setpoint Feedback PT100
CtrlSetPnt Ctrl. Act. Ctrl. Max.
23.0A 20.0A 2100rpm
15.0m 9.0m 23.5°C
31.1m3h 45.0m3h 150.0m3h
&RQ¿JXUDWLRQh [m]
STOP READY I / O
Control Reference
ID: 1833
4...20mA
0...20mA
STOP READY I / O
ID:
,IÀRZPHWHU6LJQDO5HIHUHQFH
is mA, you have to set. DIP-
Switch AI1 to I. Refer to Quick
Installation Guide.
STOP READY I / O
Ctrl. Ref. End Scale
ID: 1836
150.0 m3h
Min: 1.0 m3h
Max: 1000.0 m3h
Current
STOP READY I / O
ID:
3OHDVHQRWHDÀRZPHWHUKDVWR
be used as Control Reference,
connected to AI1, terminals 2(+)
and 3(-).
See Fig. 3
STOP READY I / O
Control Reference
ID: 1832
2...10V
0...10V
Current
STOP READY I / O
Proc.Ref.Set Point
ID: 167
10.00 m
Min: 0.00m
Max: 40.00m
See Fig. 1, 1.1
STOP READY I / O
LPP Install. Depth
ID: 1888
STOP READY I / O
Process Ref. Signal
ID: 1830
2...10V
0...10V
STOP READY I / O
ID:
Please note, if AI2 is used as
Voltage input, you have to set DIP-
Switch AI2 to U.
Refere to Quick Installation Guide.
20.0m
Min: 0.1 m
Max: 1000.0m
STOP READY I / O
Process Ref. Signal
ID: 1830
4...20mA
0...20mA
Voltage
Voltage
See Fig. 3
STOP READY I / O
LPP Max. Range
ID: 1887
Min: 0.1 m
Max: 1000.0 m
10.0m
STOP READY I / O
ProcRefSetPntSource
ID: 332
Fieldbus
Standard
STOP READY I / O
ProcRefSetPntSource
ID: 332
Fieldbus
Standard
STOP READY I / O
Ctrl. Ref. Set Point
ID: 1823
50.0 m3h
Min: 31.1m3h
Max: 150.0m3h
STOP READY I / O
ID:
$IWHUSUHVVLQJ2N,GHQWL¿FDWLRQ
without rotating will start. You can
VWRS,GHQWL¿FDWLRQE\SUHVVLQJUHG
Stop-Button at any time. Having
,GHQWL¿FDWLRQ¿QLVKHGGULYHLV
ready to start.
RUN READY I / O
Multimonitor
ID: 113 Nominal Amps
Nominal Amps Amps Motor Speed
Setpoint Feedback PT100
CtrlSetPnt Ctrl. Act. Ctrl. Max.
23.0A 20.0A 2100rpm
15.0m 9.0m 23.5°C
31.1m3h 45.0m3h 150.0m3h
STOP READY I / O
Control Reference
ID: 1833
4...20mA
0...20mA
STOP READY I / O
ID:
,IÀRZPHWHU6LJQDO5HIHUHQFH
is mA, you have to set. DIP-
Switch AI1 to I. Refer to Quick
Installation Guide.
STOP READY I / O
Ctrl. Ref. End Scale
ID: 1836
150.0 m3h
Min: 1.0 m3h
Max: 1000.0 m3h
Current
STOP READY I / O
ID:
3OHDVHQRWHDÀRZPHWHUKDVWR
be used as Control Reference,
connected to AI1, terminals 2(+)
and 3(-).
See Fig. 3
STOP READY I / O
Control Reference
ID: 1832
2...10V
0...10V
Current

7HFKQLFDOFKDQJHVZLWKRXWQRWLFH7HFKQbQGHUXQJHQYRUEHKDOWHQ0RGL¿FDWLRQVWHFKQLTXHVUpVHUYpHVVDQVSUpDYLV
16
&RQ¿JXUDWLRQ3[bar]
Voltage
Current
See Fig. 3
STOP READY I / O
Process Ref. Signal
ID: 1831
2...10V
0...10V
STOP READY I / O
ID:
Please note, if AI2 is used as
Voltage input, you have to set DIP-
Switch AI2 to U.
Refere to Quick Installation Guide.
STOP READY I / O
Proc. Ref. End Scale
ID: 1034
16.0 bar
Min: 0.0 bar
Max: 600.0 bar
STOP READY I / O
Process Ref. Signal
ID: 1830
4...20mA
0...20mA
Voltage
STOP READY I / O
Control Reference
ID: 1832
2...10V
0...10V
Current
STOP READY I / O
ID:
3OHDVHQRWHDÀRZPHWHUKDVWR
be used as Control Reference 1,
connected to AI1, terminals 2(+)
and 3(-).
STOP READY I / O
Ctrl. Ref. End Scale
ID: 1836
150.0 m3h
Min: 1.0 m3h
Max: 1000.0 m3h
See Fig. 3
STOP READY I / O
Cotrol Reference
ID: 1833
4...20mA
0...20mA
STOP READY I / O
ID:
,IÀRZPHWHU6LJQDO5HIHUHQFH
is mA, you have to set. DIP-
Switch AI1 to C. Refer to Quick
Installation Guide.
STOP READY I / O
Ctrl. Ref. Set Point
ID: 1823
50.0 m3h
Min: 31.1 m3h
Max: 100.0 m3h
STOP READY I / O
ID:
$IWHUSUHVVLQJ2N,GHQWL¿FDWLRQ
without rotating will start. You can
VWRS,GHQWL¿FDWLRQE\SUHVVLQJUHG
Stop-Button at any time. Having
,GHQWL¿FDWLRQ¿QLVKHGGULYHLV
ready to start.
RUN READY I / O
Multimonitor
ID: 113 Nominal Amps
Nominal Amps Amps Motor Speed
Setpoint Feedback PT100
CtrlSetPnt Ctrl. Act. Ctrl. Max.
23.0A 20.0A 2300rpm
8.0bar 6.5bar 23.7°C
31.1m3h 45.0m3h 100.0m3h
STOP READY I / O
ProcRefSetPntSource
ID: 332
Fieldbus
Standard
STOP READY I / O
ProcRefSetPntSource
ID: 332
Fieldbus
Standard
STOP READY I / O
Proc.Ref.Set Point
ID: 167
6.0 bar
Min: 0.0 bar
Max: 16.0 bar
STOP READY I / O
Wake up Level
ID: 1899
0.0 bar
Min: 0.0 bar
Max: 6.0 bar
See Fig. 1, 1.1
STOP READY I / O
Ctrl. Ref. Set Point
ID: 1823
50.0 m3h
Min: 31.1 m3h
Max: 150.0 m3h
STOP READY I / O
ID:
$IWHUSUHVVLQJ2N,GHQWL¿FDWLRQ
without rotating will start. You can
VWRS,GHQWL¿FDWLRQE\SUHVVLQJUHG
Stop-Button at any time. Having
,GHQWL¿FDWLRQ¿QLVKHGGULYHLV
ready to start.
RUN READY I / O
Multimonitor
ID: 113 Nominal Amps
Nominal Amps Amps Motor Speed
Setpoint Feedback PT100
CtrlSetPnt Ctrl. Act. Ctrl. Max.
23.0A 20.0A 2300rpm
8.0bar 6.5bar 23.7°C
31.1m3h 45.0m3h 100.0m3h
Current
STOP READY I / O
Control Reference
ID: 1832
2...10V
0...10V
Current
STOP READY I / O
ID:
3OHDVHQRWHDÀRZPHWHUKDVWR
be used as Control Reference 1,
connected to AI1, terminals 2(+)
and 3(-).
STOP READY I / O
Ctrl. Ref. End Scale
ID: 1836
150.0 m3h
Min: 1.0 m3h
Max: 1000.0 m3h
See Fig. 3
STOP READY I / O
Cotrol Reference
ID: 1833
4...20mA
0...20mA
STOP READY I / O
ID:
,IÀRZPHWHU6LJQDO5HIHUHQFH
is mA, you have to set. DIP-
Switch AI1 to C. Refer to Quick
Installation Guide.
STOP READY I / O
Wake up Level
ID: 1899
6.0 bar
Min: 0.0 bar
Max: 6.0 bar
See Fig. 1, 1.1

7HFKQLFDOFKDQJHVZLWKRXWQRWLFH7HFKQbQGHUXQJHQYRUEHKDOWHQ0RGL¿FDWLRQVWHFKQLTXHVUpVHUYpHVVDQVSUpDYLV
17
&RQ¿JXUDWLRQ0DQXDO0RGH00
STOP READY Keypad
ID:
$IWHUSUHVVLQJ2N,GHQWL¿FDWLRQ
without rotating will start. You can
VWRS,GHQWL¿FDWLRQE\SUHVVLQJUHG
Stop-Button at any time. Having
,GHQWL¿FDWLRQ¿QLVKHGGULYHLV
ready to start.
STOP READY Keypad
Frequency
ID: 105
Nominal Amps Amps
23.0A 20.0A
80.00 Hz
Output frequency PT100
89.80Hz 23.7°C
STOP READY Keypad
ID:
Start/Stop has to be connected to
terminal 6 (24V+) and DI1, terminal 8 or
can be used by keypad (green/red push
buttom).
2XWSXWIUHTXHQF\FDQEHPRGL¿HG
during operation by using DI4 (frequency
DOWN) and DI5 (frequency UP)
&RQ¿JXUDWLRQ'LUHFW0RGH'0
STOP READY I / O
ProcRefSetPntSource
ID: 332
Fieldbus
Standard
STOP READY I / O
ProcRefSetPntSource
ID: 332
Fieldbus
Standard
STOP READY I / O
ID:
$IWHUSUHVVLQJ2N,GHQWL¿FDWLRQ
without rotating will start. You can
VWRS,GHQWL¿FDWLRQE\SUHVVLQJUHG
Stop-Button at any time. Having
,GHQWL¿FDWLRQ¿QLVKHGGULYHLV
ready to start.
RUN READY I / O
Multimonitor
ID: 113 Nominal Amps
Nominal Amps Amps Motor Speed
Setpoint Feedback PT100
CtrlSetPnt Ctrl. Act. Ctrl. Max.
23.0A 20.0A 2300rpm
89.0 % 88.9 % 23.7°C
0.0 [-] 0.0 [-] 0.0 [-]
STOP READY I / O
ID:
If Process Reference has to be
connected to AI2, terminals 4
(+) and 5(-).
Voltage
See Fig. 3
STOP READY I / O
Process Ref. Signal
ID: 1831
2...10V
0...10V
STOP READY I / O
ID:
Please note, if AI2 is used as
Voltage input, you have to set DIP-
Switch AI2 to U.
Refere to Quick Installation Guide.
STOP READY I / O
Process Ref. Signal
ID: 1830
4...20mA
0...20mA
Voltage

7HFKQLFDOFKDQJHVZLWKRXWQRWLFH7HFKQbQGHUXQJHQYRUEHKDOWHQ0RGL¿FDWLRQVWHFKQLTXHVUpVHUYpHVVDQVSUpDYLV
18
Failure Messages
Warning Faults
Display Messages
RUN READY ALARM I / O
Sleep
Alarm Active Code: 81
Control Reference Signal out of range.
Device is sleeping.
STOP READY ALARM I / O
,GHQWL¿FDWLRQ
Alarm Hold Code: 57
&DXVH,GHQWL¿FDWLRQUXQKDVIDLOHG
Remedy: Check that motor is connected
to frequency converter and Run command
will not be removed befor completion of
LGHQWL¿FDWLRQUXQ
RUN READY ALARM I / O
PT100 Temperature
Alarm Active Code: 70
Motor temperature critical. Device sleep
imminent.
RUN READY ALARM I / O
PT100 Temperature
Alarm Active Code: 70
Motor temperature critical. Device is
sleeping.
STOP READY ALARM I / O
Sleep
Alarm Active Code: 81
Process Reference Signal too low.
Device is sleeping.
READY ALARM I / O
Sleep
Alarm Active Code: 81
Process Reference Set Point not
reached for a period of time. Device is
sleeping.
READY I / O
ID:
Next Start-Delay active.
Please wait, drive will
start automatically.
STOP Fault I / O
Current Limit
Fault: Hold Code: 82
Motorcurrent reached
Current-Limit. Check Setting and
Pump.
STOP READY ALARM I / O
Sleep
Alarm Active Code: 81
Process Reference Signal not reached
during a period of time.
READY ALARM I / O
Sleep
Alarm Active Code: 81
Control Reference Signal out of range.
Device is sleeping.
STOP READY ALARM I / O
Sleep
Alarm Active Code: 81
Control Reference Signal out of range
for several times.
READY ALARM I / O
Sleep
Alarm Active Code: 81
Level switch Empty and Full have not
plausible switch settings.
READY I / O
ID: 1081
Too high Process Refence at low
speed for a period of time.
STOP Fault Keypad
Current Limit
Fault: Hold Code: 83
Output frequency lower than
minimum frequency.

7HFKQLFDOFKDQJHVZLWKRXWQRWLFH7HFKQbQGHUXQJHQYRUEHKDOWHQ0RGL¿FDWLRQVWHFKQLTXHVUpVHUYpHVVDQVSUpDYLV
19
STOP READY Keypad
ID:
The Level Switch (Full) has to be
connected to terminal 6 (24V+)
and DI 5, terminal 15.
STOP READY Keypad
Level Switch
ID: 1892
STOP READY Keypad
ProcRefSetPntSource
ID: 332
&RQ¿JXUDWLRQ+(66RODU6
(Attention:7KH¿QDOVWDUWXSKDVWREHGRQHXQGHUVXႈFLHQWLUUDGLDWLRQFRQGLWLRQ:P
STOP READY Keypad
ID:
During the next steps please enter
Solar Panel Data.
STOP READY Keypad
Panel Voc
ID: 1870
37.0V
Min: 10.0V
Max: 100.0V
STOP READY Keypad
Panels per Row
ID: 1871
21
Min: 1
Max: 50
STOP READY Keypad
ID:
6RODU$UUD\GDWD¿QLVKHG
During the next steps please enter
control data.
See Fig. 5, page 7
STOP READY Keypad
ID:
&RQWURO'DWD¿QLVKHG
STOP READY Keypad
On Time
ID: 1464
09:00
Min: 00:00
Max: 20:00
STOP READY Keypad
2ႇ7LPH
ID: 1465
20:00
Min: 09:00
Max: 23:59
STOP READY Keypad
ID:
A Flow Switch has to be connected
to DI 2, terminal 6(24V+) and
terminal 9. Refer to Quick
Installation Guide.
See Fig. 5, page 7
STOP READY I / O
ID:
$IWHUSUHVVLQJ2N,GHQWL¿FDWLRQ
without rotating will start. You can
VWRS,GHQWL¿FDWLRQE\SUHVVLQJUHG
Stop-Button at any time. Having
,GHQWL¿FDWLRQ¿QLVKHGGULYHLV
ready to start.
STOP READY Keypad
Frequency
ID: 105
Nominal Amps Amps
23.0A 21.9A
100.00 Hz
Motor speed DC- link Voltage
2856 rpm 679 V
Fieldbus
Standard
One Level Switch
Two Level Switches
No Level Switch
STOP READY Keypad
Level Switch
ID: 1893
Normal Open (NO)
Normal Closed (NC)
STOP READY Keypad
Level Switch
ID: 1892
One Level Switch
Two Level Switches
No Level Switch
STOP READY Keypad
ID:
Warning: Without Level
Switch there is risk to
over flood the tank!
STOP READY Keypad
Level Switch
ID: 1893
Normal Open (NO)
Normal Closed (NC)
STOP READY Keypad
Level Switch
ID: 1892
One Level Switch
Two Level Switches
No Level Switch
STOP READY Keypad
ID:
The Level Switch (Full) has
to be connected to terminal 6
(24V+) and DI 5, terminal 15. The
Level Switch (Empty) has to be
connected to terminal 6 (24V+)
and DI 4, terminal 14.
STOP READY Keypad
DI 3 Bypass Solar
ID: 1894
STOP READY Keypad
DI 3 Bypass Solar
ID: 1894
Yes
No
Yes
No
STOP READY Keypad
Automatic Restart
ID: 1896
STOP READY Keypad
Automatic Restart
ID: 1896
Yes
No
Yes
No
STOP READY Keypad
ID:
Warning: By setting Automatic
Restart to “yes” the motor will start
automatically after sun is coming
back. Please refer QIG for safety
information.
See Fig. 5, page 7
*
* According to software revision

7HFKQLFDOFKDQJHVZLWKRXWQRWLFH7HFKQbQGHUXQJHQYRUEHKDOWHQ0RGL¿FDWLRQVWHFKQLTXHVUpVHUYpHVVDQVSUpDYLV
20
Notes
This manual suits for next models
8
Table of contents
Languages:
Other Franklin Electric Inverter manuals
Popular Inverter manuals by other brands

Eisvogel
Eisvogel Zhendre R410A installation manual

Sungrow
Sungrow SG110CX user manual

Generac Power Systems
Generac Power Systems SG020 Specifications

SolaX Power
SolaX Power X1 Series Quick installation guide

SDMO
SDMO KOHLER PERFORM 3000 TB UK C5 Instruction and maintenance manual

Echo
Echo EGi-4000 Operator's manual