FREDDO A033 User manual

ASTM-F963
Age: 6Years +
Maximum user
1. For famil and domestic use onl
2. Not to be used in traffic
3. Adult assembl required
Important Warning!
Important - Please read these instructions fully before assembly or use
These instructions contain important information which will help ou to get the
best from our product and ensure safe and correct assembl , use and
maintance.
Picture for reference
onl .
Please
refer
to real
object.
Special Note:
Battery packed in battery case could be taken out from the car
for
portable
charging
120kg
A033
4 Seater Dune Buggy

Table of Contents
1. About Your New Vehicle
2. Safety Information
3. Parts List
4. Parts Dia ram
5. Assembly Steps
6. How To Operate Your Vehicle
7. Char in The Vehicle
8.. Troubleshootin Guide
9. Maintainin Your Vehicle
10.Disposal Of Battery
About Your New Vehicle
Thank you for purchasin our products, we want your child to enjoy this product for years to come.
Keep these points in mind as you read this uide:
Suitable age: 6+years Batter : 24V14ah*1/24 V10ah *2 /
24V15.6ah *1 Lithium
Load Capacit : Motor: 24V150W X4
Speed: 5-11Km/h Charging time:6-8hours
Material: Optimum
Temperature:
Below 40°C
Avoid to use under burnin sun
Charger:
24V1.5A*1/24V2.0A*1/24V3.0A*1
Output: 24V
Current: 1500mA/2000mA/3000mA
120Kg

Safety Information
WARNING!
•General safety:
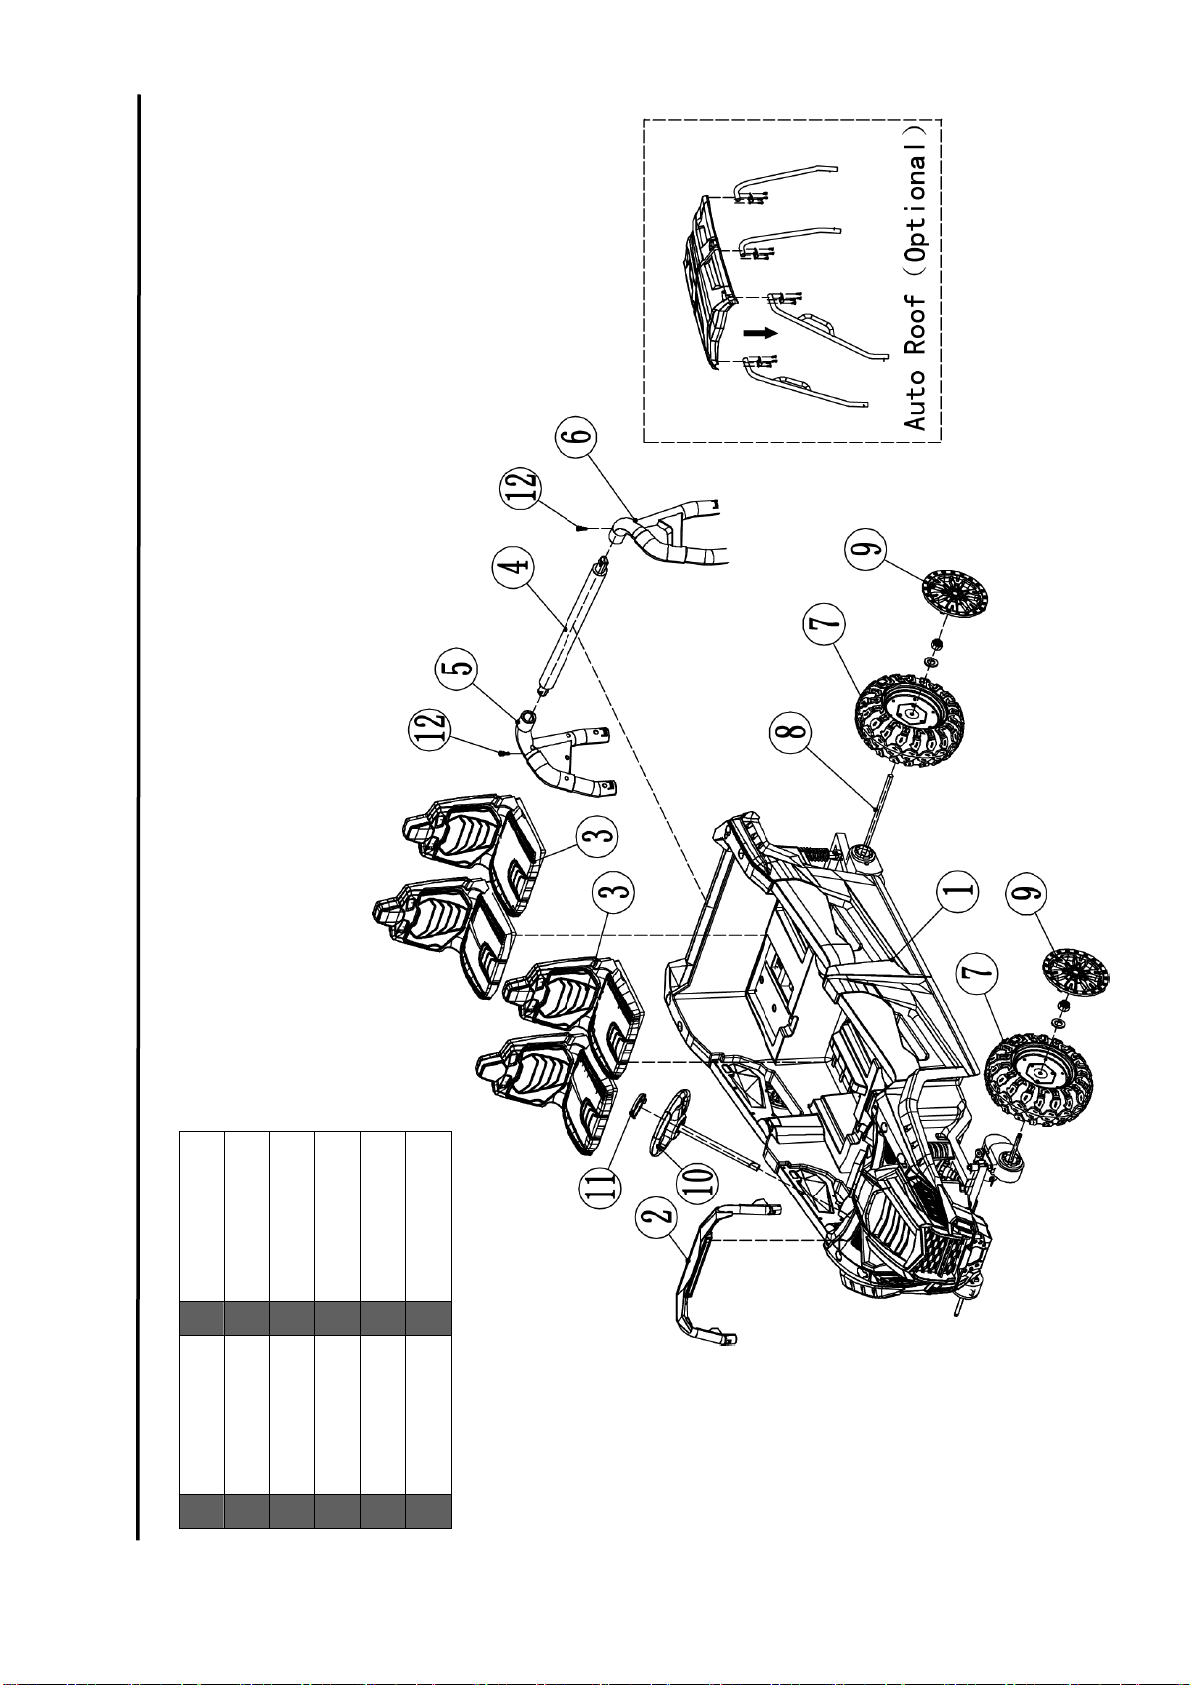
• Where products need assembly they must always be assembled by an adult.As a parent/carer, it is also your
responsibility to check the ti htness of screws, nuts and bolts before each use and if necessary, adjust and
re-ti hten.
• This product may contain small parts and it is your responsibility as a parent/carer to exclude children from
the area durin assembly due to small parts.
• Remove protective material and poly ba s and dispose of them responsibly before ivin the assembled
product to your child.
• Remember to retain these instructions for future reference.
• We have tried to make our toys as simple as possible to assemble but inevitably there will be one or two
sli htly more complex tasks.
Positioning :
•Do not allow your child to ride at ni ht or in poor li ht conditions.
•Do not let your child play near steps, swimmin pools / spas or other sources of water, on slopes,on streets
or around cars, even if parked on your own property.
•It is prohibited to drive/use this product on the public hi hway.
•This product is desi ned to be used on smooth surfaces and should not be used on soft round or in the
rain or snow.
Before use:
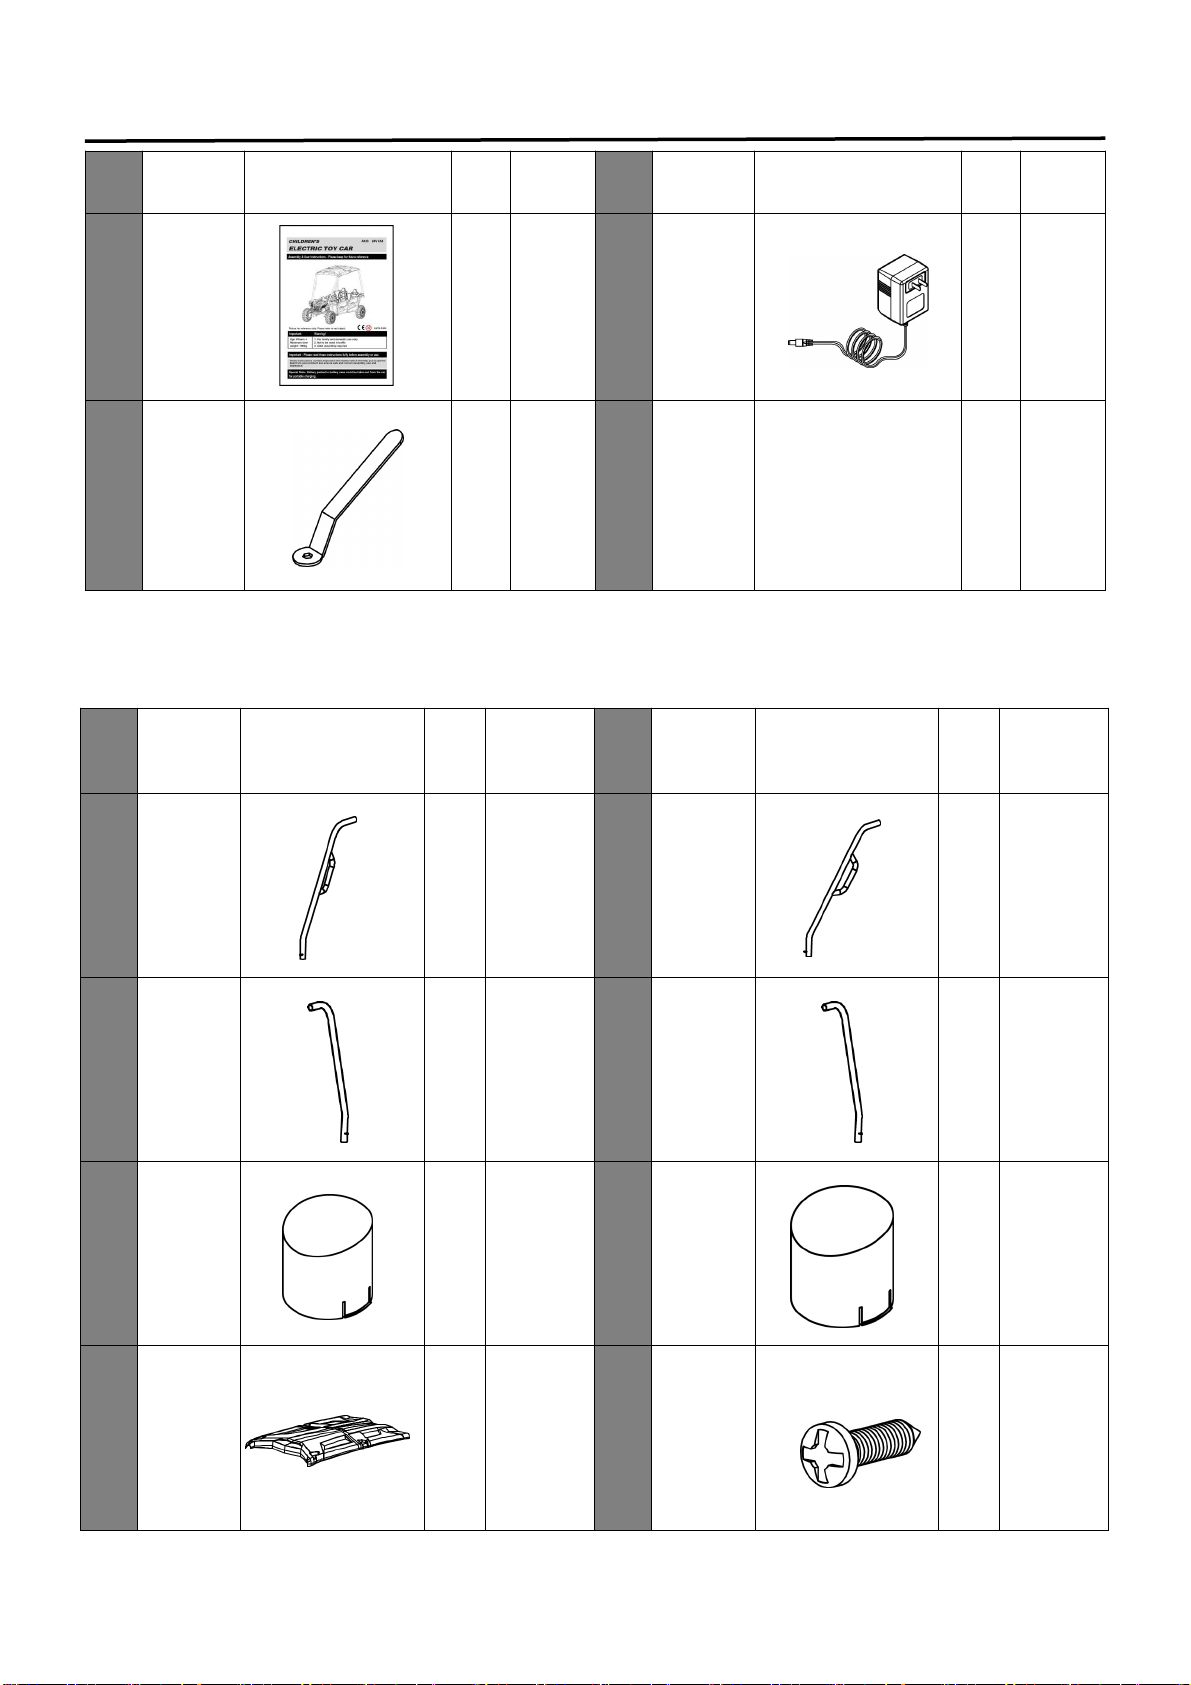
• Very Important. You Must Char e & Connect The Battery Before First Use.
• Dispose of all packa in material responsibly before ivin this product to your child.
• Check ti htness of all components before ivin this product to your child.
During use:
•This product is only suitable for children 6years and older.
•The toy should be used with caution since skill is required to avoid falls or collisions causin
injury to the user or third parties.
•Do not overload.
•Adult supervision is hi hly recommended when children play with wheeled toys. Your child’s
safety is your concern.
•Do not allow the child to ride with bare feet or without suitable footwear.
•Ensure the child keeps clothin , hands, hair,fin ers and feet away from movin parts.
•The use of protective ear includin approved helmets, loves and pad is recommended.
•Store this product at room temperature; do not leave it outside or uncared for.
•Never let any child play with the battery or char er at any time, or let them char e the product.
•Do not use if product is faulty or dama ed.
•Do not tamper with the battery or electrical parts inside the product.
120K .

Safety Information
WARNING!
•Charging the battery:
•All char in and re-char in must be carried out by an adult.
•Do not attempt to use the product while it is bein char ed.
•Char in should be carried out under cover and in a well-ventilated area.
•Always ensure the char er is switched off before connectin it to the product/battery.
•Always ensure the char er is plu ed into a wall outlet .Do not use an extension.
•Do not char e near sources of potential sparks, fires or flames or where flammable ases, liquids and
materials are stored.
•Durin char in the battery and the char er may et hot.
•Only char e the battery for a maximum time of 8 - 12 hours.
•Do not leave the char er plu ed into an outlet or connected to the product/battery once
char in is completed.
•Never attempt to rechar e a fully char ed or partially used battery for an extra boost.
•Do not over-char e; this action will si nificantly shorten battery life.
•Always ensure that once the battery becomes dischar ed/flat that you re-char e for the recommended
time. Failin to do so will si nificantly shorten battery life.
•Char in the product below 4°C (40°F) or above 40°C (104°F) will decrease the battery
life si nificantly.
•V.R.L.A. batteries are heavy and contain lead & acid. They are dan erous if improperly handled.
•Only use the char er supplied with the product.The use of other char ers may cause dama e to the battery
and/or cause explosion.
•Battery char ers used with the toy are to be re ularly examined for dama e to the cord, plu ,enclosure and
other parts, and in the event of such dama e, they must not be used until the dama e has been repaired.
•Only use the battery supplied with this product.The use of other batteries may cause dama e to the motor,
char er and subsequent wirin ,which could lead to fire and/or explosion.
•Exhausted batteries are to be removed from the toy.
•Always ensure that you connect the battery with the correct polarity.
•Never short-circuit the terminals of the battery,or any subsequent wirin .
•Never bypass or brid e a broken/blown fuse or circuit breaker and always replace with the same type/value
and model.

Parts List
PART
NO
PART
NAME PICTURE Q,ty
(pcs)
REMARKS
PART
NO
PART
NAME PICTURE Q,ty
(pcs)
REMARKS
1Vehicle
body 12Windshield
bar 1
3Seat 44
Guide
frame
A
1
5
Guide
frame
B1ri ht 6
Guide
frame
B1Left
7Wheel 48Rear axle 1
9Wheel
hub 410 Steerin
wheel 1
11 Cover 112 Screw 2
Placed
in the
assembly
packa e

Parts List
PART
NO
PART
NAME PICTURE Q,ty
(pcs)
REMARKS
PART
NO
PART
NAME PICTURE Q,ty
(pcs)
REMARKS
13 Instruction
manual 114 Char er 1
15 Spanner
B1
PART
NO PART
NAME PICTURE Q,ty
(pcs)
REMARKS
PART
NO PART
NAME PICTURE Q,ty
(pcs)
REMARKS
Support
column
1
1optional 14
Support
column
2
1optional
Support
column
3
1optional
Support
column
4
1optional
Front
plu 2optional Rear
plu 2optional
Auto
Roof 1optional Screw 20 optional

Parts Diagram
NOTE: Some Parts Shown are assembled
on both sides of vehicle
1Vehicle body *12Windshield bar *1
3Seat *44Guide frame A *1
5Guide frame B*16Guide frame B *1
7Wheel *48Rear axle *1
9Wheel hub *410 Steerin wheel *1
11 Cover *112
S
crew
*
2

Assembly Steps
1.Install the rear axle and gear box.
With car body up-side-down, cut plastic ties holdin drive motor in place, and remove the ear
box. One of the ear boxes rotates 180°, pay attention to the line when rotatin .
As shown in the picture,disconnect the rear axle parts ,put the rear axle throu h the car body
and ear box,then Install the other ear box.
As shown in the picture, ti hten all these bolts after rear axle and ear box fixed.
2.Install the back wheels .
Put the wheel throu h the rear axle
and fix it with washer and nut and
wheel hub in turn.
The other side is same as above.

Assembly Steps
3.Install the front axle .
As shown in the picture, install the front axle to the correspondin place,and fasten with the
bearin , washer and nut .
4. Install the front wheel .
Remove the nut and washer on the
front axle.
As showed in the picture, fix the
wheel, washer and nut onto the axle
in proper order.
Fasten the nut with spanner.
Fix the wheel hub.
Fix another wheel on the other side.

Assembly Steps
5. Install the guide frame .
As showed in the picture, install the uide frame B to the correspondin place.
As showed in the picture, press the uide frame downward to fix it.
6. Install the steering wheel.
As showed in the picture, press the steerin wheel,Adjust the hei ht well and fasten with the
nut.
Fasten the nut with spanner.
As showed in the picture, install the cove.

Assembly Steps
7. Install the seat.
As shown in the picture,press and hold the button, then install the seat to the correspondin
place .
8. Install the windshield bar.
As showed in the picture, press the
windshield bar downward to fix it.

Assembly Steps
9.Connect the power suppl .
As shown in the picture, press and hold the button,then open the hood .
As shown in the picture,the wire connector plu butt. Plu the power connector into the terminal
on battery.
Special note:The battery pack could be taken out for easy char in ,by the char er and the
char in cable in the accessary kit..
8. Install the auto roof (optional) .
As showed in the picture, install the support column to the auto roof,and fasten with screws.
The support column has front and rear, left and ri ht, pay attention to distin uish.
As showed in the picture, install the auto roof to the vehicle body,and fasten with screws.
As showed in the picture, install the front plu and rear plu to the vehicle body.

How To perate Your Vehicle
Use Operation(Ensure the power switch has been turned on)
IMPORTANT!
Always stop vehicle
when chan in the
speed or direction to
avoid dama e the
ear box and motor.
(1) Insert the key,turn on the power switch first, the sound can be played.
(2) Forward
Press the "Forward and Reverse switch" to the " " position.
Press the pedal.
The vehicle drives forward.
(3) Stop
Press the pedal-brake .
The vehicle stops .
(4) Reverse
Press the "Forward and Reverse switch" to the " " position.
Press the pedal.
The vehicle drives backward.
(5) Turn on the "FAST and SLOW Switch" , control the speed of the car.

How To perate Your Vehicle
(6)How to use the Sound System & Battery Indicator
1. Storage device slot.
2. Horn.
.AUX Port
4.Increase volume.
5.Decrease volume
6. Next Song: Switch songs.
7. Last Song: Switch songs.
8. SCAN Button: you can control the music play and pause.
9.Tell a story
10.Power Display: Shows battery power and charge level.
11.Music Button: Press to play music .
12.Smart connecting the car with your mobile,then you can play mobile files on the
car.

Charging Your Vehicle
ONLY AN ADULT CAN CHARGE AND RECHARGE THE BATTERY!
non-rechar eable batteries are not to be rechar ed;
different type of batteries or new and used batteries are not to be mixed;
batteries are to be inserted with the correct polarity;
exhausted batteries are to be removed from the toy;
the supply terminals are not to be short-circuited.
rechar eable batteries are only to be char ed under adult supervision;
rechar eable batteries are to be removed from the toy before bein char ed;
The transformers or battery char er used with the toy are to be re ularly examined for dama e to the cord,
plu , enclosure and other parts, and in the event of such dama e, they must not be used until that dama e
had been repaired.
WARNING!
•PREVEN FIRE AND ELEC RIC SHOCK:
-Use the only rechar eable battery and char er supplied with your vehicle. NEVER substitute the battery
or the char er with another brand. Usin another battery or char er may cause a fire or explosion.
- Do not use the battery or char er for any other product. Overheatin , fire or explosion could occur.
- NEVER modify the electric circuit system. Tamperin with the electric system may cause a shock, fire or
explosion or my permanently dama e the system.
- Do not allow direct contact between battery terminals. Fire or explosion can occur.
- Do not allow any type of liquid on the battery or its components.
- Explosive asses are created durin char in . Do not char e near heat or flammable materials. Char e
the battery in a well-ventilated area ONLY.
- NEVER pick up the battery by the wires or char er. Dama e can occur to the battery and may cause a
fire. Pick up the battery by the case ONLY.
- Char e the battery in a dry area ONLY.
• Battery posts, terminals and related accessories contain lead and lead compounds, chemicals
known to the State of California to cause cancer and reproductive harm. Wash hands after handling.
• Do not open the battery. Battery contains lead acid and other materials that are toxic and corrosive.
• Do not open the char er. Exposed wirin and circuitry inside case may cause electric shock.
Only adults may handle or char e the battery. NEVER allow child to handle or char e the battery.
Battery is heavy and contains lead acid (electrolyte).

Charging Your Vehicle
• The char in input socket is ON THE GAUGE BOARD.
• The POWER SWITCH must be turned in OFF position when char in .
• Before the first use, you should char e the battery for 8-12 hours. Do not rechar e the battery for
more than 20 hours to avoid overheatin the char er.
• When the vehicle be ins to run slowly, rechar e the battery.
• After each use or once a month minimum rechar e time as 8 to 12 hours, no more than 20 hours.
• Battery packed in battery case could be taken out from the car for portable char in .
1. Find the char in input socket on the au e board ;
2. Plu the char er port into the input socket;
3. Plu the char er plu into a wall outlet. The battery will be in char in .
WARNING!
•PREVEN FIRE AND ELEC RIC SHOCK:
• Do not drop the battery. Permanent dama e to the battery could occur or cause serious injury.
• Before char in the battery, check for wear or dama e to the battery, char er, its supply cord
and the connectors. DO NOT char e the battery if any dama e to parts has occurred.
• Do not allow the battery to drain completely. Rechar e the battery after each use or once a month
if not used re ularly.
• Do not char e battery upside down.
• Always secure the battery with the bracket. Battery can fall out and injure a child if vehicle tips over.
• A recommendation for adult supervision of youn children.
• The toy should be used with caution since skill is required to avoid falls or collisions causin injury to the
user or third parties.
WARNING!
his product with CHARGING
PRO EC ION:
When charging, all the
functions will be cut off!

Troubleshooting Guide
■PR BLEM: The vehicle does not run
PROBLEM CAUSE: The battery may low on power
After each use, or once a month minimum, char e the battery for 8-12 hours. Do not leave the
battery on the char er for more than 20 hours.
POSSIBLE CAUSE: Thermal fuse has tripped
The vehicle is equipped with a self-resettin fuse. When the vehicle is overloaded or operated
incorrectly; the self-resettin fuse will be cut off for 5-20seconds before becomin operational
a ain. The self-resettin fuse is under the seat (Refer to the picture.)
To avoid the fuse cut off the power,
follow these guidelines:
DO NOT overload the vehicle, Maximum wei ht
DO NOT tow anythin behind the vehicle.
DO NOT drive up steep slopes.
DO NOT drive into fixed objects, which may cause
the wheels to spin, causin the motor to overheat.
DO NOT drive in very hot weather, components
may overheat.
DO NOT tamper with the electric system. Doin
so may create a short circuit, causin the fuse to
trip.
POSSIBLE CAUSE: Wheel nuts are loose
If the nuts are not ti ht, the wheels will not en a e the forward ears. Ti hten the nut with the nut wrench.
POSSIBLE CAUSE: Battery connector or wires are loose
Make Sure the battery connectors are firmly plu ed into each other.
POSSIBLE CAUSE: Battery is dead
Have you properly maintained the battery accordin to the directions? Is the battery old? Your battery
may need to be replaced.
POSSIBLE CAUSE: Electric system is damaged
Water may have corroded the system, or loose dirt, ravel or sand mi ht have jammed the switch.
POSSIBLE CAUSE: Motor is damaged
The motor needs professional repair.
■PR BLEM: The battery will not recharge.
POSSIBLE CAUSE: Battery connector or adapter connector is loose
Make sure the battery connector and adapter connector are firmly plu ed to ether.
POSSIBLE CAUSE: Charger is not plugged in
Make sure the char er is plu ed into the wall outlet and the power flow to the outlet is on.
POSSIBLE CAUSE: Charger is not working
Is the char er warm while char in ? If not, the char er may be broken and may need to be replaced.
120k

Troubleshooting Guide
■PR BLEM: The vehicle does not run very long.
POSSIBLE CAUSE: Battery may be undercharged
You may not be char in the battery lon enou h. After each use, or once a month minimum, char e
the battery for 8 to 12 hours. Do not leave the battery on the char er for more than 20 hours.
POSSIBLE CAUSE: Battery is old
The battery will eventually lose the ability to hold a char e. Dependin on the amount of use, and
varyin conditions, the battery should operate for one to three years. Replace the battery with a new
one.
■PR BLEM: Battery buzzes or gurgles when charging.
This is normal and not a cause for concern. It may also be silent when char in , which is also normal.
■PR BLEM: Charger feels warm when recharging battery.
This is normal and not a cause for concern.
Maintaining Your Vehicle
• It is parents' responsibility to check main parts of the toy before usin , Must re ularly examine for potential
hazard, such as the battery, char e, cable or cord, plu , screws are fastenin enclosure of other parts and
that in the event of such dama e, the toy must not be until that dama e had been properly removed.
• Make sure the plastic parts of the vehicle are not cracked or broken.
• Occasionally use a li htwei ht oil to lubricate movin parts such as wheels.
• Park the vehicle indoors or cover it with a tarp to protect it from wet weather.
• Keep the vehicle away from sources of heat, such as stoves and heaters. Plastic parts may melt.
• Rechar e the battery after each use. Only an adult can handle the battery. Rechar e the battery at least
once a month when the vehicle Raider is not bein used.
• Do not wash the vehicle with a hose. Do not wash the vehicle with soap and water. Do not drive the
vehicle in rainy or snowy weather. Water will dama e the motor, electric system and battery.
• Clean the vehicle with a soft, dry cloth. To restore shine to plastic parts, use a non-wax furniture polish. Do
not use car wax. Do not use abrasive cleaners.
• Do not drive the vehicle in loose dirt, sand or fine ravel which could dama e movin parts, motors or the
electric system.
• When not usin , all the electrical source should be turned off. Turn off the power switch and disconnect the
battery connection.

Disposal f Battery
Disposal Of Battery
● Your sealed lead-acid battery must be recycled or disposed of in an environmentally
sound manner.
● Do not dispose of your lead-acid battery in a fire. The battery may explode or leak.
● Do not dispose of a lead-acid battery in your re ular, household trash. The incineration,
land fillin or mixin of sealed lead-acid batteries with household trash is prohibited by
law.
● Return an exhausted battery to your local approved lead-acid battery recycle, such as a
local seller of automotive batteries.
● Contact your local waste mana ement officials for other information re ardin the
environmentally sound recyclin and disposal of lead-acid batteries.
● The battery must be char ed only by adult .Please char e the product before usin !
● The toy should not be connected to excessive powers (more than the quantity specified
herein), and it should not be operated durin char in process.
● Any rechar eable battery must only be char ed under adult's supervision.
● Battery & char er should be re ularly checked, includin wires, plu s, casin , and other
parts. Stop usin and restored them if findin any dama e.
● Open the battery cover on the remote control, and put two pieces of batteries,payin
attention to batteries polarity. Replace the battery cover and lock with screws
(please replace the battery accordin to the above steps and should be done by adult) .
● All batteries should be inserted with the correct polarity.
● Non-rechar eable battery should not be char ed, please remove any runnin -off battery
from the toy.
● Do not use old and new batteries to ether, or mix different types of batteries.
● The battery char er used with the toy are to be re ularly examined for dama e to the cord,
plu , enclosure and other parts, and in the event of such dama e, they must not be used
until that dama e had been repaired.
MADE IN CHINA
Table of contents
Other FREDDO Motorized Toy Car manuals
Popular Motorized Toy Car manuals by other brands

Kyosho
Kyosho EVOLVA 2005 WC Team Edition instruction manual

Carrera RC
Carrera RC Mario Kart 8 Yoshi Safety instruction

Serpent
Serpent 950 instruction manual

Supertrax
Supertrax Thar Installation and operation instructions

Jamara
Jamara Cocoon EP RTR 2,4 GHz Instruction

Helion
Helion CONQUEST 10B XLR Owner's manual & technical information

Associated Electrics
Associated Electrics RC10B2 9000 manual

Jamara
Jamara Wheel Loader 440 instruction manual

Revell Control
Revell Control ALL TERRAIN VEHICLE DUST RACER user manual

Ofna Racing
Ofna Racing CD-3 SPORT RTR Assembly instructions

Jomurema
Jomurema JR128-R01-RTR instruction manual

VKAR
VKAR Bison instruction manual