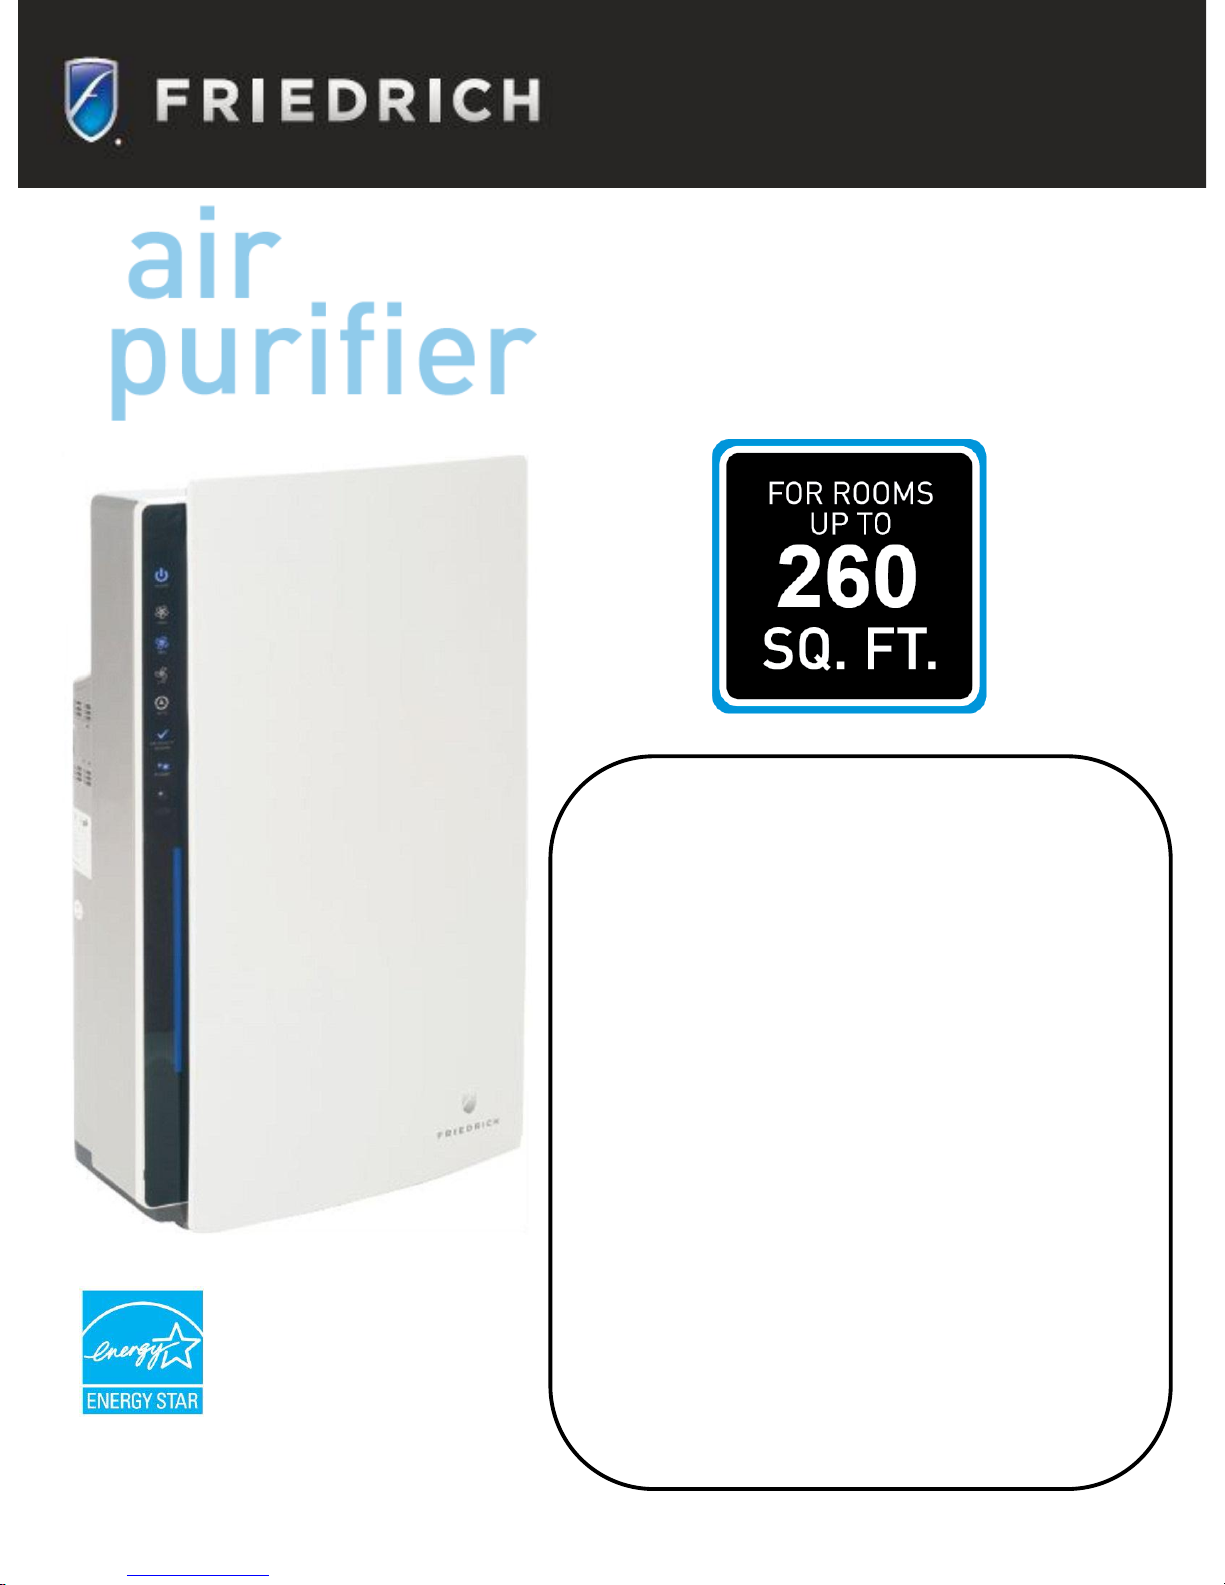
Friedrich AP260 User manual

Table of Contents
Get to Know your Air Purifier .....….……... 2
Introduction ..…..…………….…………………… 3
Unpack & Assemble Filters ………............. 4
Indicators Layout & Description .…….…… 5
Air Quality Sensors ………….…………..….….. 6
Operation …………………………...………………. 7
Maintenance & Cleaning ….…….…………... 9
Filter Replacement …..………………….……... 10
Troubleshooting …………………………….….… 12
Important Safety Guidelines ………..…..…. 13
AP260 Owner’s Manual
99991005_01
The energy efficiency of this ENERGY STAR
qualified model is measured based on a ratio
between the model’s CADR for Dust and the
electrical energy it consumes, or CADR/Watt.
To Buy: Visit www.sylvane.com or call (800) 934-9194
Product Support: Contact Friedrich at 1-800-541-6645

GET TO KNOW YOUR AIR PURIFIER
2
Air Quality
Sensor Outlet
Control Panel
Carbon Filter
HEPA Filter
Multi-filter
Pre-filter
Front Panel
Handle
Plasma Generator
Remote Control
Compartment
Air Outlet
Cord Storage
Compartment
Power Cord
1 2 3 4
Order of filter placement

INTRODUCTION
Congratulations on your purchase and welcome to Friedrich!
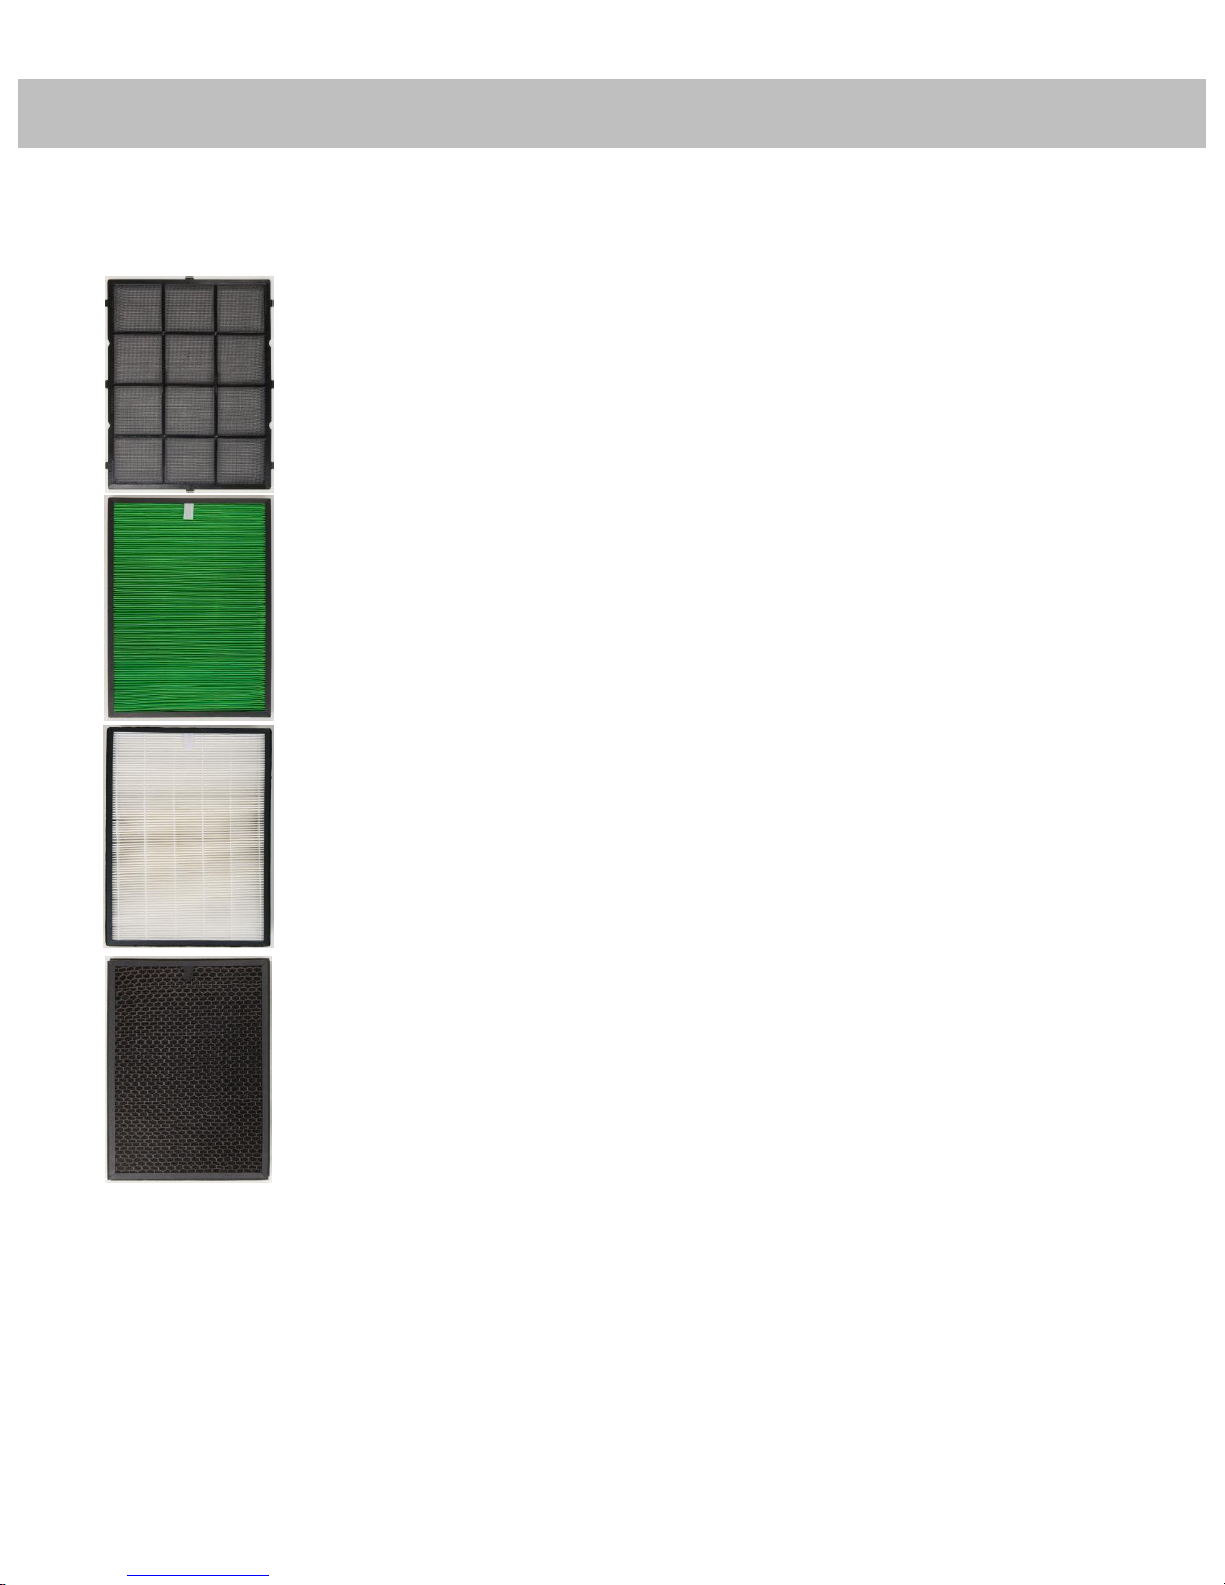
Your Air Purifier features 5 stages of air purification to remove pollutants ranging in size from large particles
(dust & pet dander) down to airborne bacteria and harmful gases and odors.
Stage 1: Antibacterial Pre-filter (4)*
• Removes large particles: human hair, pet hair, pet dander
Stage 2: Antibacterial/Antifungal Multi-filter (3)*
• Filters out smaller particles: dust, pollen, mold spores and allergens
• Prevents bacteria and fungi
Stage 3: High performance HEPA with Antibacterial coating (2)*
• HEPA Removes 99.97% of all particles greater than 0.03 microns from the air: fine dust, pollen,
mold spores, pet dander and tobacco smoke
• Antibacterial coating prevents the growth of germs and mold
Stage 4: Activated Carbon Filter - optional (1)*
• Absorbs gaseous pollutants including VOCs (volatile organic compounds)chemical vapors, and
odors (pet, tobacco, etc.)
Stage 5: Plasma Generator (inside unit)
• Ionized plasma field sterilizes and disinfects harmful airborne substances such as viruses and
bacteria
• Naturally filters out smoke and odors
3
1 2 3
4
*Order of filter placement

UNPACK AND ASSEMBLE FILTERS
IMPORTANT: Before you use your Air Purifier, you must remove all filters,
remove the plastic packaging from each and place them back into your unit.
Note: Make sure the side marked “FRONT” with the white tags are facing outward.
1. Remove front panel by gently pulling the top part of the front panel towards you. Then lift the hooks at the
bottom of the panel out of the bottom of the appliance.
2. Remove the Antibacterial Pre-filter by putting your fingers in the two flanges and pull the filter towards
you.
3. Remove all filters with plastic packaging from your Air Purifier.
4. Remove all plastic packaging from each filter.
5. Place optional Activated Carbon Filter (black with honeycomb markings) back into your Air Purifier.
6. Place High Performance HEPA Filter (thick white filter with black border) back into your Air Purifier.
7. Place Antibacterial/Antifungal Multi-filter (Green) back into your Air Purifier.
8. Place Antibacterial Pre-filter back into your Air Purifier.
9. Reattach the front panel. Insert the bottom hooks into the bottom of the appliance first, then push the
panel against the body of the appliance.
Once plastic has been removed from each filter and they are properly
placed back into your unit, you can begin operation.
Step 6 Step 9
Step 3
Step 8
Step 5Step 2 Step 4Step 1
Step 7
4

INDICATORS LAYOUT & DESCRIPTION
5
ON / OFF
HIGH-SPEED
MED-SPEED
LOW-SPEED
AUTO
AIR QUALITY
PLASMA
LIGHT SENSOR
Your remote control uses a CR2032 battery. See back of remote control for replacement
instructions
Press the “AUTO” button to switch the unit into
Intelligent Auto Operation
Press the “AIR QUALITY SENSOR” button to turn the
air quality sensor light on or off
Press the “PLASMA” button to turn the plasma generator on or off
When the “Intelligent Auto” operation is running , the light sensor will detect
the strength of the ambient light and adjust to day or night mode.
Control Panel Remote Control
Press the power button to turn on and off

6
AIR QUALITY SENSOR
Your Air Purifier contains an Air Quality Sensor which detects increased levels of air pollution and
changes color based on the current air quality level.
The air is sampled from the air inlet at the side of the unit, and then the sensor light will tell you what the
current air quality level is.
The Air Quality sensor will always be sampling the air to detect current air pollution levels, however, you
have the option of turning off the Air Quality Sensor light, by pressing the “AIR QUALITY SENSOR” button.
BLUE
Air Quality =
VERY GOOD
GREEN
Air Quality =
FAIR
RED
Air Quality =
POOR

7
OPERATION
Your Air Purifier operates in 2 separate modes:
Normal Operating Mode:
When you turn your Air Purifier on, it will enter into “Normal Operating mode” by default.
•Fan Speed: Medium is default setting, but you can adjust by pressing the desired speed level (HIGH,
MED or LOW).
•Air Quality Sensor: The Sensor Light is on by default, press AIR QUALITY SENSOR button to turn off.
•Plasma Generator: On by default, press PLASMA button to turn off.
Intelligent Auto Operation:
Intelligent Auto Operation senses air quality and day or night for intelligent fan speed control. Enter
Intelligent Auto Operation by pressing the “AUTO” button. To exit auto mode, press any of the fan speed
buttons (HIGH, MED, or LOW).
When entering into the auto mode, the machine will select the day or night mode automatically. Day
mode is the default.
If your Air Purifier is in the “Auto - Day” mode and detects darkness for 3 consecutive minutes, it will
enter into Night mode. If your Air Purifier is in the “Auto - Night” mode and detects light for 5 consecutive
minutes, it will enter into Day mode.

8
OPERATION
Intelligent Auto Operation Modes:
Day Mode:
In day mode, the air quality sensor is ON and the fan speed will alternate between low, medium and high,
based on the air quality level. See below:
NOTE: Plasma Generator is always ON by default, press PLASMA button to turn off.
BLUE
Air Quality = VERY
GOOD
Fan Speed: LOW
GREEN
Air Quality = FAIR
Fan Speed: MEDIUM
RED
Air Quality = POOR
Fan Speed: HIGH
Night Mode:
Night mode is designed to be used while you sleep. With dimmed lighting (Air Quality Sensor light off)
and the ULTRA QUIET fan speed (only available in Auto-Night mode), your air purifier will continue to
clean your air while never interrupting your peace and quiet. See below:
BLUE*
Air Quality = VERY GOOD
Fan Speed: ULTRA QUIET
GREEN*
Air Quality = FAIR
Fan Speed: LOW
RED*
Air Quality = POOR
Fan Speed: MEDIUM
*In Night mode, Air Quality Sensor light will be off. To turn it back on, press AIR QUALITY SENSOR. If you
do turn the Air Quality Sensor light back on, the fan speeds will continue to operate in Night mode setting.

9
MAINTENANCE AND CLEANING
Maintenance
Clean the body of the appliance, air inlet and outlet with dry soft cloth frequently.
Do not use water, bleach, Never immerse the appliance in water or any other liquid.
Never use aggressive or flammable cleaning agents such as bleach or alcohol to clean any part of
the appliance.
Cleaning Pre-Filter
Clean the Pre- Filter every 3 months for optimal functioning. Clean it more frequently if appliance is
used in a dusty environment.
Note: Only the pre-filter is washable. All other filters are NOT washable.
1. Always unplug the appliance before you clean it. Remove the pre-filter.
2. Rinse the pre-filter under a running faucet. If the pre-filter is very dirty, use vacuum or a soft
brush to remove dust.
3. Air-dry the pre-filter.
4. Make sure the pre-filter is completely dry before inserting back into the appliance.
5. Make sure all the hooks have been correctly attached to the appliance.
Air Quality Sensor
Clean the air quality sensor every 2 months for optimal functioning. Clean it more frequently if
appliance is used in a dusty environment.
Clean the air quality sensor inlet and outlet with a soft brush. Remove the air quality sensor cover.
Clean the air quality sensor, the dust inlet and outlet with a lightly moistened cotton swab. Dry
them with a dry cotton swab. Reattach the air quality sensor cover.

Replacement Filter Kits
For your convenience, our filter replacement kits are sold as annual supply packs:
1. AP260HFRK: Contains 2 antibacterial / antifungal Multi-filters (replace every 6-8 months*) and
1 High Performance HEPA filter (replace annually*).
2. AP260CFRK (Optional): Contains 2 Activated Carbon Filters; 1 year supply (replace every 6 -8months*).
10
FILTER REPLACEMENT
To ensure optimal air cleaning and efficiency, it is important to replace your air filters when needed.
The standard filter replacement schedule for your AP260 is shown below:
* or as needed
Antibacterial Pre-filter
Washable/no replacement necessary
Antibacterial/Antifungal Multi-filter
Replace 2 X a year, typically every 6 –8 months*
High Performance HEPA
Replace annually*
Activated Carbon Filter - optional
Replace 2 X a year, typically every 6 –8 months*

Reset the Filter Replacement Notification
Plug in the power cord and reset the filter notification by either of the two methods below:
1. Press the reset button “ ” on the remote control for 2 seconds
2. Press the reset button at the air quality sensor inlet for 2 seconds.
3. When the buzzer sounds one time, the filter reset
has been cleared and restarted.
11
FILTER REPLACEMENT
As a warning, the air quality sensor light starts to flash when one of the filters is almost full and has to
be replaced. When you do not replace and/or reset the filter replacement notification after your
second alert, the appliance will lock itself. See below:
First alert to change filter Second alert to change filter
The filter function will be relatively
weakened. The air quality light will
flash to remind users to change the
filter.
If filter is not replaced after the first
alert, the air quality light will flash
and buzzer will sound every 30
minutes to remind users to change
the filter.
Filter replacement lock
If you do not replace the filter after the first and second alert, appliance will
stop working. Power light and air quality light will flash with a continuous
beep.
If the appliance is locked:
1. Switch off the appliance (press and hold the on/off button) and unplug it.
2. Reset filter replacement notification and replace the filter. see section below

12
TROUBLESHOOTING
We’ve listed the most common problems you may experience with your air purifier. If the
information below does not address your concern, or you have any other questions, please contact
our Customer Service Department between 8AM and 5PM CT, Monday through Friday, at 1 (800)
541-6645.
Problem Possible Solution
Unit will not turn on.
•Make sure the power cord is plugged in and press the power
button on the unit, or the power button on the remote control.
•Make sure the front panel is securely attached and completed
closed. The bottom hooks on the front panel must be latched on
to the bottom of the unit.
The remote control
doesn’t work.
•Make sure you are pointing the remote control at the air purifier.
•The batteries may be dead. Replace with a new CR2032 battery
and try again.
The air flow is
significantly
weaker than when first
purchased.
•The pre-filter may be dirty. Clean the pre-filter. (see Maintenance
and Cleaning)
•Make sure that you have removed all packing material from the
filters.
The air quality does not
improve, even though
the air purifier has
been operating for a
long time.
•The filters may not be installed correctly. Make sure that all filters
are properly installed in the proper order. (see Unpack and
Assemble Filters)
•The pre-filter may be dirty. Clean the pre-filter. (see Maintenance
and Cleaning)
•The air quality sensor may be wet. Make sure the air quality
sensor is dry and clean (see Maintenance and Cleaning)
•The room where you are running the unit may exceed the
maximum size at which this air purifier can operate effectively.
The fan does not
change speeds in Auto
mode.
•The air quality sensor might be dirty or clogged. Make sure the air
quality sensor is dry and clean (see Maintenance and Cleaning)
•If your room is dark the unit may be in Night Mode and the fan
could be operating in ultra quiet setting. Select Low, medium, or
High speed to change the fan setting and take out of Auto mode.
My air purifier is very
loud.
•Make sure that you have removed all packing material from the
filters.
•Make sure the unit is secure and placed on a level surface.
•Make sure no foreign object has fallen into the unit.

IMPORTANT SAFETY GUIDELINES
Safety Guidelines
PLEASE READ THIS MANUAL CAREFULLY BEFORE USING THIS PRODUCT. Use only as directed by this
Manual.
Caution:
•Keep the Air Purifier away from water or any other liquid, and do not use in a bathroom, laundry area
or other damp location.
•Do not use the Air Purifier near heating devices, fireplaces or combustible products or gas appliances.
•Check if the voltage indicated on the rating label corresponds to local mains voltage
before you connect the appliance.
•Do not use the Air Purifier if the plug or cord appears damaged.
•Air Purifier should be used with extreme caution when operating and around children
•Do not block the air inlet and outlet.
•Always keep the Air Purifier on a dry, stable level and horizontal surface.
•Leave at least 8”free space around and above the Air Purifier.
•Do not place anything on top of the Air Purifier and do not sit on the appliance.
•Do not place the Air Purifier directly below an air conditioner to prevent condensation from
dripping onto the appliance.
•Make sure all filters are properly installed before you switch on the Air Purifier
•Always lift or move the Air Purifier by the handle at the back of the appliance.
•Do not insert your fingers or objects into the air outlet.
•Always unplug the Air Purifier after use and before cleaning.
•The Air Purifier does not remove carbon monoxide (CO) or radon (Rn).
•It cannot be used as a safety device in case of accidents with combustion processes and hazardous
chemicals.
Warning: When using electrical appliances, observe the following basic precautions to reduce
the risk of fire, electric shock and injury to persons.
13

Tabla de Contenidos
Conozca su purificador de aire ...….……... 2
Introducción ..…..…………….…………………… 3
Desempaque y Ensamble de filtros ........ 4
Indicadores de Diseño y Descripción …… 5
Sensores de Calidad del Aire ………..….….. 6
Operación …………………………...………………. 7
Mantenimiento y Limpieza .…….…………... 9
Remplazo de filtro …..………………….……... 10
Solución de problemas ………………….….… 12
Instrucciones Importantes de Seguridad 13
Manual del usuario AP260
99991005_01
La eficiencia energética de este modelo clasificado
como ENERGY STAR está basada en una relación
entre los modelos CADR para polvo y la energía
eléctrica que consume, o CADR/Watt.
purificador
de aire
PARA
HABITACIONES DE
HASTA
PIES
CUADRADOS
260

CONOZCA SU PURIFICADOR DE AIRE
2
Sensor de
Calidad de
Aire de Salida
Panel de Control
Filtro de Carbón
Filtro HEPA
Multi filtro
Pre filtro
Panel Frontal
Manivela
Generador de Plasma
Compartimento de
Control Remoto
Salida de Aire
Compartimento de
almacenaje de cable
Cable de Poder
1 2 3 4
Orden de colocación de filtro

INTRODUCCIÓN
Felicidades por su compra y bienvenido a Friedrich!
Su purificador de aire incluye 5 etapas de purificación de aire para remover contaminantes que varían en
tamaño desde grandes partículas (polvo y caspa de animales) hasta las bacterias del aire y gases y olores
nocivos.
Etapa 1: Pre filtro Antibacterial (4)*
•Elimina las partículas grandes: el pelo humano, pelo de animales, caspa de mascotas
Etapa 2: Multi filtro Antibacterial/Antihongos (3)*
•Filtra fuera las partículas más pequeñas: el polvo, polen, esporas de moho y los alérgenos
• Evita las bacterias y los hongos
Etapa 3: Alto desempeño HEPA con Revestimiento Antibacterial (2)*
•HEPA Elimina el 99.97% de todas las partículas de aire mayores a 0,03micras : polvo fino, polen,
esporas de moho, caspa de mascotas y el humo del tabaco
•El recubrimiento antibacteriano previene el crecimiento de gérmenes y hongos
Etapa 4: Filtro de Carbón Activado- opcional (1)*
• Absorbe los gases contaminantes como VOCs (compuestos orgánicos volátiles), vapores
químicos y olores (mascotas, tabaco, etc)
Etapa 5: Generador de Plasma (interior de la unidad)
•El campo de plasma ionizado esteriliza y desinfecta las sustancias nocivas en el aire, tales como
virus y bacterias
• Naturalmente filtra el humo y los olores
3
1 2 3
4
*Orden de colocación de filtros

DESEMPAQUE Y ENSAMBLE DE FILTROS
IMPORTANTE: Antes de usar el purificador de aire, debe remover todos los filtros,
eliminar los empaques de plástico de cada uno y colocar los filtros de nuevo en su unidad.
Nota: Asegúrese de que el lado con la marca "FRONT" con las etiquetas blancas son exteriores.
1. Retire el panel frontal tirando suavemente la parte superior del panel frontal hacia usted. A continuación,
levante los ganchos en la parte inferior del panel de la parte inferior del aparato.
2. Retire el Pre filtro Antibacterial poniendo sus dedos en las dos bridas y tire del filtro hacia usted.
3. Retire todos los filtros con envases de plástico de su purificador de aire.
4. Retire todos los empaques de plástico de cada filtro.
5. Coloque opcionalmente el Filtro de carbón activado (negro con marcas de nido de abeja) de nuevo en el
purificador de aire.
6. Coloque los filtros HEPA de alto rendimiento (filtro blanco y espeso con borde negro) de nuevo en el
purificador de aire.
7. Coloque el Multi-filtro Antibacteriano /Antihongos (verde) de nuevo en el purificador de aire.
8. Coloque el Pre filtro Antibacterial de nuevo en el purificador de aire.
9. Vuelva a colocar el panel frontal. Primero inserte los ganchos inferiores en la parte inferior del aparato, a
continuación, empuje el panel contra el cuerpo del aparato.
Una vez que el plástico ha sido removido de cada filtro y estén bien
colocados de nuevo en su unidad, se puede comenzar la operación.
Paso 6 Paso 9
Paso 3
Paso 8
Paso 5
Paso 2 Paso 4
Paso 1
Paso 7
4

INDICADORES DE DISEÑO Y DESCRIPCIÓN
5
ON / OFF
VELOCIDAD ALTA
VELOCIDAD MEDIA
VELOCIDAD BAJA
AUTO
CALIDAD DEL AIRE
PLASMA
SENSOR DE LUZ
Su control remoto usa una batería CR2032. Ver la parte trasera del control remoto para las
instrucciones de remplazo
Presione el botón “AUTO” para cambiar la unidad a
Operación Inteligente Automática
Presione el botón “AIR QUALITY SENSOR” para encender o apagar la luz de
sensor de calidad de aire
Presione el botón de “PLASMA” para encender o apagar el generador de plasma
Cuando la operación “Intelligent Auto” se esta usando, el sensor de luz
detectara la fuerza de la luz ambiental y lo ajustará a modo de día o noche.
Panel de Control Control Remoto
Botón de encendido y apagado o apagar

6
SENSOR DE CALIDAD DEL AIRE
Su purificador de aire contiene un sensor de la calidad del aire que detecta niveles elevados de
contaminación del aire y cambios de color basados en el nivel de calidad de aire actual.
El aire es muestra de la entrada de aire en el lado de la unidad, y luego la luz del sensor le dirá el nivel de
calidad del aire actual.
El sensor de calidad del aire estará siempre tomando muestras del aire para detectar los niveles actuales
de contaminación de aire, sin embargo, usted tiene la opción de apagar la luz del sensor de calidad del
aire, pulsando el botón “AIR QUALITY SENSOR".
AZUL
Calidad del
aire=
MUY BUENA
VERDE
Calidad del
aire=
RAZONABLE
ROJO
Calidad del
aire=
POBRE

7
OPERACIÓN
Su purificador de aire opera en 2 modos separados:
Modo Normal de operación:
Cuando encienda su purificador de aire, entrará en Modo de operación Normal automáticamente.
•Velocidad de abanico: Velocidad media es la configuración automática, pero usted puede ajustarla
presionando el nivel de velocidad deseado (ALTO, MEDIO, BAJO).
•Sensor de Calidad del Aire : La luz del sensor se enciende automáticamente, presione el botón AIR
QUALITY SENSOR para apagarlo.
•Generador de Plasma: Encendido automáticamente, presione el botón PLASMA para apagarlo.
Operación Inteligente Automática:
La Operación Automática Inteligente detecta la calidad del aire y el día o la noche para el control
inteligente de la velocidad del ventilador. Entre a Operación Automática Inteligente pulsando el botón
"AUTO". Para salir del modo automático, presione cualquiera de los botones de velocidad del abanico
(ALTO, MEDIO, BAJO).
Al entrar en el modo automático, la máquina seleccionará modo día o modo noche automáticamente. El
modo día es automático.
Si su purificador de aire se encuentra en el modo "Auto - Day" y detecta la oscuridad durante 3 minutos
consecutivos, entrará en el modo Noche. Si su purificador de aire se encuentra en el modo "Auto Night" y
detecta la luz durante 5 minutos consecutivos, entrará en el modo Day.
Table of contents
Languages:
Other Friedrich Air Cleaner manuals

Friedrich
Friedrich C-90B User manual

Friedrich
Friedrich C-90A User manual

Friedrich
Friedrich C-90A Operating and installation instructions

Friedrich
Friedrich C-90B User manual

Friedrich
Friedrich C-90A User manual

Friedrich
Friedrich C-90A User manual

Friedrich
Friedrich C-90B Building instructions

Friedrich
Friedrich C-90B User manual
Popular Air Cleaner manuals by other brands

Boneco
Boneco Therapure TP150 manual

EcoQuest
EcoQuest Fresh Air Spectrum UVX quick start guide

Panasonic
Panasonic ziaino F-JPU70A operating instructions

FUNGLAN
FUNGLAN KJG-178C Operation manual

Hunter
Hunter HEPAtech 30057 owner's manual

Ultravation
Ultravation SOLARIS E Series Installation and owner's manual