Frimax MAXON GPST Series User manual

www.frimax.mx
MANUAL DE USUARIO
Serie Deslizables
GPST

ÍNDICE
INFORMACIÓN GENERAL
RECOMENDACIONES
DESCRIPCIÓN Y OPERACIÓN DE LOS CONTROLES
DISPOSITIVOS DE SEGURIDAD
1
2
3
6
ATENCIÓN AL DESLIZAR
ASEGURAR LA CARGA
REPARACIÓN DE ELEMENTOS DE RODAMIENTO
CAPACIDAD
CARGA DEL CAMIÓN
TRANSFERENCIA DE CARGA DE UN VEHÍCULO
A OTRO
7
8
14
9
11
13

1
INFORMACIÓN GENERAL
General information
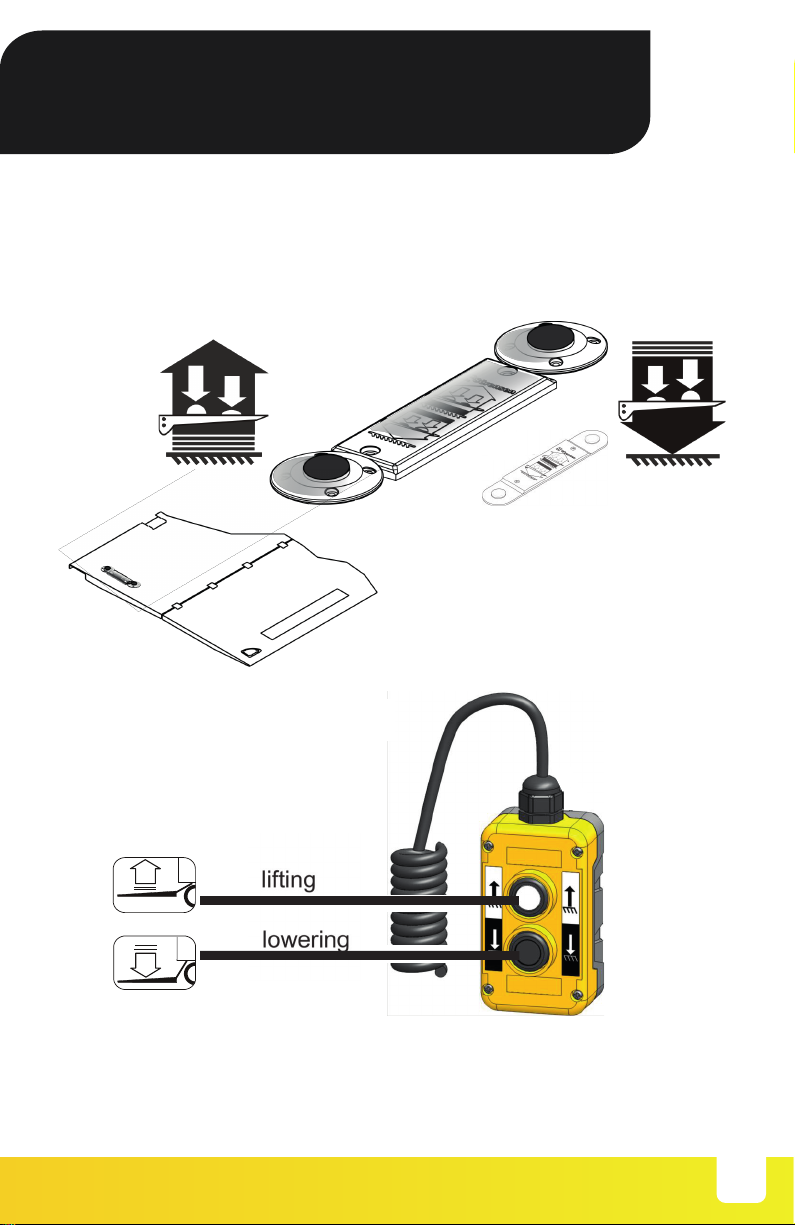
You have decided to purchase a top Slidelift. The Maxon Slidelift is very easy to use and to
maintain. It is equipped with maintenance and grease-free bearings, and does not require
greasing throughout its entire lifetime. The Maxon Slidelift is only to be used for lifting and lowering
of loads, which have to be placed on the platform in accordance with the loading diagram.
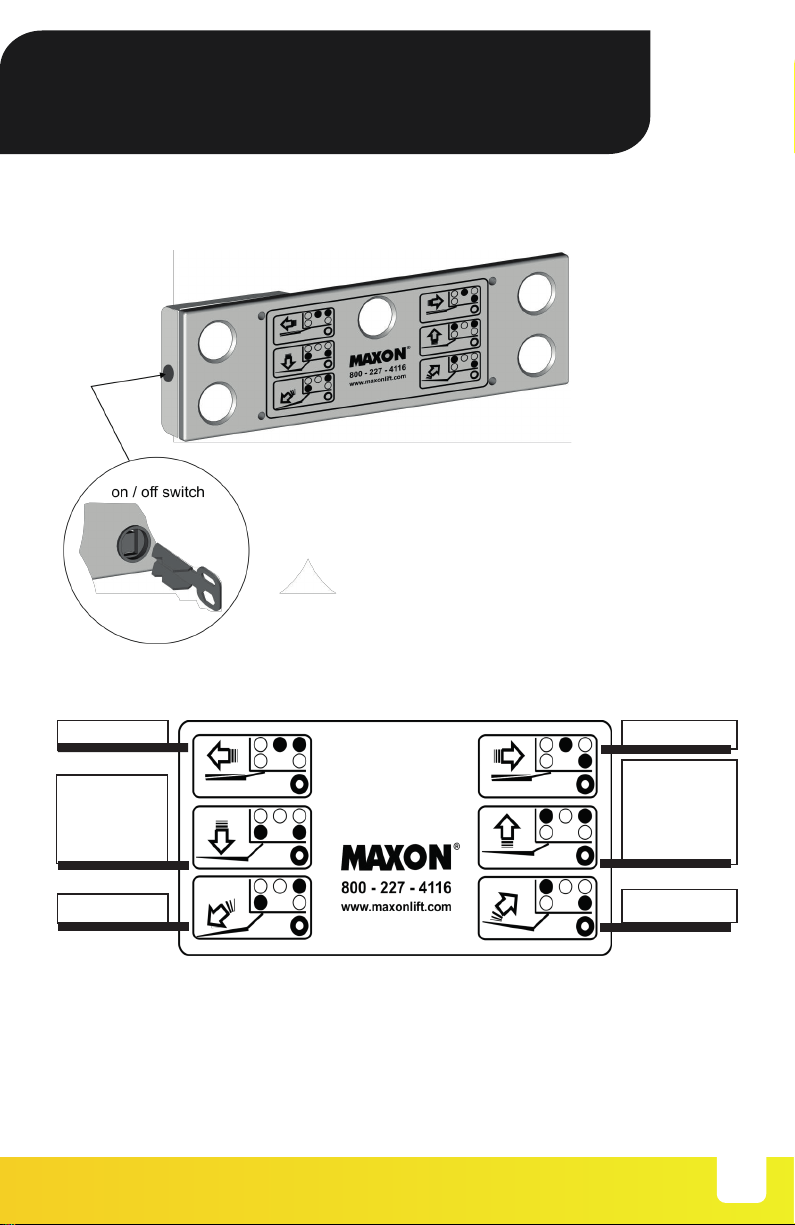
The Slidelift must only be operated, maintained and repaired by persons who have been
technically trained and who have especially been informed about the hazards that may occur
during operation. Otherwise, manufacturer's liability for resulting damages is void.
These operating instructions are valid for following lifts:
Daily verifications :
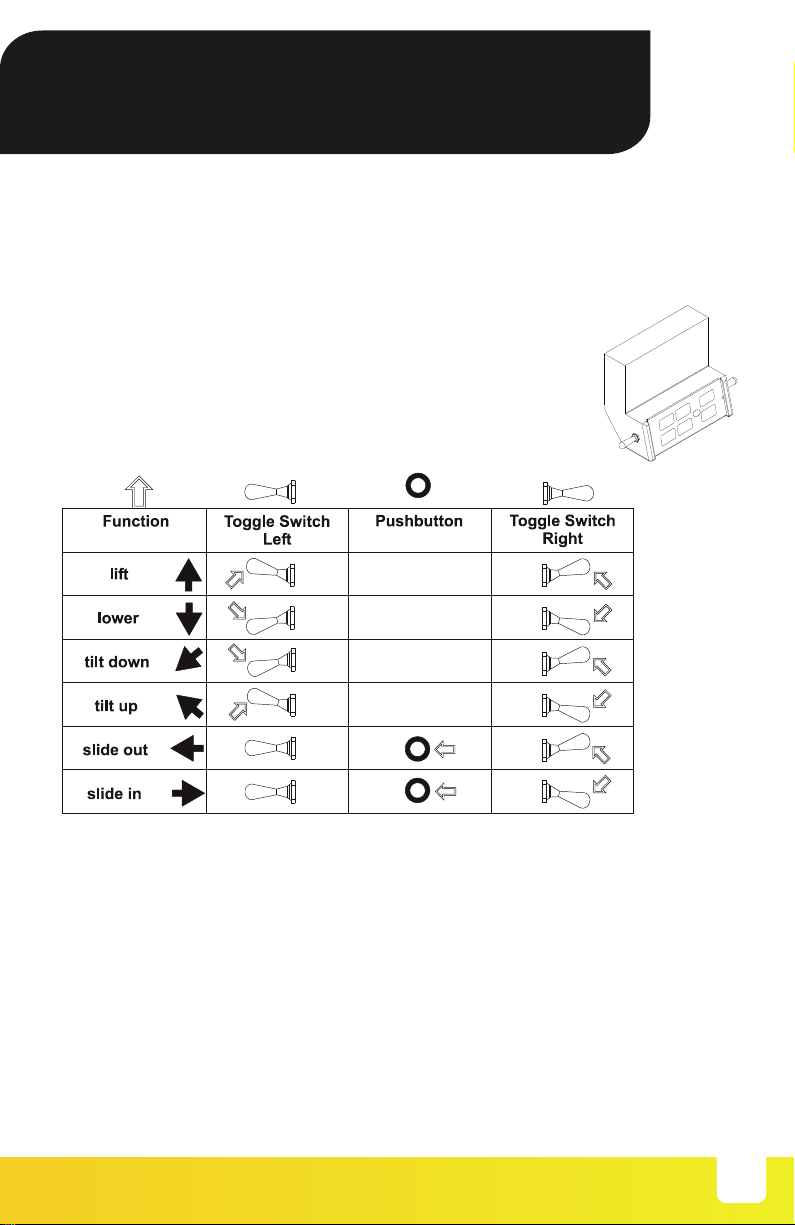
1. Function and completeness of all operating and security equipment
2. Legibility of all operating and information labels (replace if necessary)
3. Damages and completeness on bolts, bolt retainers, cracked or broken bolts and nuts
4. Damages and tightness of hoses, fittings and valves on hydraulic cylinders. Check all
hoses for leaks and tightness
5. Verify deformation of under ride device and energy absorber
6. Damages and function of platform warning lights
7. The function of the battery main switch (option) is to be checked
Recommended checks every month:
1. Check hydraulic fittings for tightness and tightening torque.
2. Check oil level.
If necessary correct with recommended oil.
3. Check wires and cables for damages.
Replace missing cable fasteners.
Correct if there are cutting and shearing risks.
4. Check hydraulic hoses for damages.
Replace missing fasteners.
Correct if there are cutting and shearing risks.
5. Check that al decals are in place and full readable.
Replace missing or damaged decals.
6. Check rubber seals at bearings.
Replace missing or damaged seals.
7. Check that all bearing pins are secured and without damage.
Replace if necessary.
Model
GPST 33 X1
GPST 44 X1
Capacity
3,300 lbs
4,400 lbs

2
RECOMENDACIONES
Recommended checks and maintenances every year:
1. Oil change.
Clean oil suction filter and air breather filter.
Fill up with recommended oil.
2. Hydraulic hoses.
Change every four years, or if damages appear.
3. Electric motors.
Check carbon brushes, and clean with compressed air.
4. Check battery voltage.
Measure acid density.
Clean cable connections at the battery.
5. Load test.
Function test with nominal load.
6. Check foot controls
If necessary renew the switch or the rubber.
7. Check mechanical components for cracks or deformation.
Any failure must be repaired immediately and any missing part is to be replaced at once!
The vehicle operator is responsible for repairs in due time of known damages
The operating instructions are to be carried in the vehicle at all times.
Annual verifications
The Slidelift is to be verified by an expert once a year after its first operation. The results of that
verification must be written down in the control book.
Battery capacity
When driving short distances, always choose higher battery capacity.
Reinforced alternators are always recommended
The operator is responsible for battery capacity and its loading condition
Lifting
capacity
3,300 - 4,400 lbs
Battery -
2 group 31 - 12VDC - parallel
Size

3
DESCRIPCIÓN Y OPERACIÓN
DE LOS CONTROLES
Switching on the "Slidelift"
A key switch is located in the control panel and must be pushed in prior to operating lift.
Control panel
Using the control panel, both hands must be used to operate.
SLIDE-IN
TILT-UP
until the
horizontal
position
is reached -
then LIFT
TILT-UP
SLIDE-OUT
LOWER
until the
ground is
reached –then
TILT-DOWN
TILT-DOWN

4
DESCRIPCIÓN Y OPERACIÓN
DE LOS CONTROLES
The foot controls are connected so that they only work when pushed in a specific order.
To lift and tilt up
Step 1 - activate foot control button for lowering
Step 2 - activate foot control button for lifting
To lower and tilt down
Step 1 - activate foot control button for lifting
Step 2 - activate foot control button for lowering
or
Hand Control box 2 Buttons (option)

5
Switching on the "Slidelift"
A key switch is located in the control box and must be pushed in prior to operating lift.
Control Box
Using the control box, both hands must be used to operate control box.
DESCRIPCIÓN Y OPERACIÓN
DE LOS CONTROLES

6
DISPOSITIVOS DE SEGURIDAD
Riding on the platform
As only one person at a time is allowed to ride on the platform, the operator must ensure to avoid
any endangering of other persons (especially children) while operating the Slidelift.
Description of the security devices
Hose bursting valves
If a hose, a tube or a fitting should burst, the lift will lower in a controlled manner, without
exceeding the maximum allowed speed, as long as one of the functions of the hand control box is
activated. Ifthe control is not operated any more, the lift stops immediately.
Pressure relief valve
The lift is secured against the lifting of loads which are heavier than its capacity, by an overload
security valve, set at the factory. An adjustment of this valve is allowed only by an expert,
equipped with a pressure gauge and an appropriate test load.
Electrical fuses
Defective fuses must be replaced by ones of same value, as stated on the wiring diagram.
Roll-off securities
The platform must be fitted with cart stops when using carts. The function of cart stops can be
altered through dirt. The operator must keep them clean at all times.
Warning lights
Warning lights are flashing when switching the lift on. Security equipment should always be in
perfect condition and kept clean.

7
ATENCIÓN AL DESLIZAR
Parallel to the sliding fram
No contact between
sliding frame and platform
Riding on the platform
When loading the platform,
please leave enough space to
ensure that the operator can
ride and operate the platform
safely. The handle (optional)
must be within reach at all
times during vertical platform
travel.
Contact
sliding frame
overloaded

8
Rolling and shifting loads must be secured on the platform.
On request, Maxon Slidelifts can be equipped with cart stops, securing rolling loads with the
Security instructions when operating the Slidelift
Caution at loading docks
Securing the loads
Secure the loads against tipping and
slipping!
ASEGURAR LA CARGA

9
CAPACIDAD
In addition to the operating instructions, the Slidelift loading diagram is also shown on its
identification plate. The load's centre of gravity should be in the middle between the lift arms.
The greater the distance of the load from the end of the flatbed, the lower the loading capacity.
The maximum loading capacity specified in the loading diagram must not be exceeded. The
platform may not be used as a bridge plate.
inch
Model
GPST 33 X1

10
In addition to the operating instructions, the Slidelift loading diagram is also shown on its
identification plate. The load's centre of gravity should be in the middle between the lift arms.
The greater the distance of the load from the end of the flatbed, the lower the loading capacity.
The maximum loading capacity specified in the loading diagram must not be exceeded. The
platform may not be used as a bridge plate.
CAPACIDAD

11
Loading from the truck or trailer onto the platform
It is not possible to protect the Slidelift against loads brought from the vehicle to the platform, that
are heavier than its rated capacity, nor against loads which are brought onto the platform at the
wrong loading distance. An overload can lead to heavy damage (breaking) of the platform.
The operator is responsible for loading the Slidelift according to the loading diagram.
Do not use Platform as a bridge plate
Use trailer or truck body still as load point
CARGA DEL CAMIÓN

12
Do not use a forklift.
Only when the Slidelift is retracted under the vehicle.
Despite the kind of loading performed, the vehicle has to be secured
against unintentional movement (use hand brakes or wedges)
Loading and unloading at a dock
Only when the Slidelift is retracted under the vehicle.
CARGA DEL CAMIÓN

13
Load transfer from one vehicle to another
During load transfer, do not use the platform as a bridge plate.
Service, maintenance, verification and repair
Before starting any maintenance work, the Slidelift must be secured against unforeseen
movement.
Check that all screw connections are tight. Check that cables and hoses are able to move freely.
Correct shearing and chafing points on cables and hoses. Immediately replace damaged hydraulic
hoses with ones of the same quality. Note down the replacement in the control book.
During cleaning it should be ensured that no moisture penetrates the power pack or the control
box. The bearing areas should not be cleaned with high pressure or steam jets, as this may allow
dirt and moisture to penetrate into the bearing. Check all hydraulics for leaks. With the Slidelift
platform completely lowered, check the oil level in the unit'stank (dipstick on the oil filler neck
cover). If necessary, top up with hydraulic oil of class HLPD 22 (temperature range 5°F to
+122°F).
The maximum oil level has been reached when the dipstick dips 3/8“ into the oil.
Carry out an annual oil change and clean the suction filter. Carry out the oil change before any
period of frost, in order to prevent the hydraulic unit from freezing up.
Hydraulic oil - recommendations
OIL SPECIFICATIONS
Grade ISO - (32)
Gravity, API - 29.5 Degrees
Pour Point, F - (-54 Degrees)
VISCOSITY
@ 40 Degrees C - 31.2 cSt
@ 100 Degrees C - 6.2 cSt
VISCOSITY INDEX - 154 VI
Flash Point, F - 325 Degrees
TRANSFERENCIA DE CARGA
DE UN VEHÍCULO A OTRO

14
Repairing bearing elements
Repairs on bearing elements of the Slidelift can only be performed in an authorized service dealer,
must be verified by an expert and have to be recorded in the control book.
Defective under ride energy absorbers can not be repaired and must be replaced.
For any malfunctioning, first check voltage level
Troubleshooting
Problem
possible cause
1. Motor of pump box
does not turn on
Battery cable or ground cable not connected or defective
Main fuse defective
Fuse in aggregate defective
The power relay is defective and doesn't activate
Motor defective
2. Motor does not work
on one function only
Toggleswitch on hand control box defective
Cable from hand control box to pump box defective
Wiring inside pump box defective
Switch relay defective (Starter Solenoid)
3. Slidelift does not
come out or comes out
slowly
Lift stuck on vehicle chassis
Cable connection to magnetic valves defective
Please refer to wiring
diagram attached to this
operator’s handbook
Magnetic valves on slide cylinders defective
Bypass inside tilting cylinder defective or blocked
Solenoid valves
4. Slidelift does not
lower or lowers very
slowly.
Magnetic valves Y3 are not activated or defective
REPARACIÓN DE ELEMENTOS
DE RODAMIENTO

15
Problem
possible cause
5. Slidelift tilts down
instead of lowering.
Switch S4 does not respond
Cable defective
Mechanical damage at lift cylinder
6. Platform tilts down
alone without operating
that function.
Solenoid valves on tilting cylinder defective
7. Platform does not tilt
down when touching the
ground.
Cable to pressure switch defective
Pressure switch defective
8. Slidelift does not lift
Pump box does not work
Lack of oil in the tank
Voltage insufficient (low Battery)
9. Slidelift does not lift
rated capacity
Load is placed in excess of permitted loading distance
Weight of load too high
Overload security valve not set properly
Pump defective
Voltage insufficient (low Battery)
10. Slidelift does not tilt up
from ground when unloaded
Toggleswitch does not operate
Mercury switch S2 defective or not set properly
Low voltage
11. Slidelift does not tilt up
from ground when loaded.
Load is placed in excess of permitted loading distance
Weight of load too high
Low voltage
Overload security valve not set properly
12. Slidelift tilts from ground
above horizontal
Mercury switch S2 defective or not set properly
Solution: Please contact an authorized service dealer and ask for repair or replacement.
REPARACIÓN DE ELEMENTOS
DE RODAMIENTO

SERVICIO TÉCNICO
MANUFACTURA FRIO VAN
AS GARANTÍA servicio técnico partes
.frimax.mx
VENT
www
This manual suits for next models
2
Table of contents
Other Frimax Industrial Equipment manuals
Popular Industrial Equipment manuals by other brands

Perma
Perma ULTRA installation guide

Watts
Watts LF909-FS Installation and repair manual

RINGFEDER
RINGFEDER TNZ ZCA manual

PASCOR ATLANTIC
PASCOR ATLANTIC FAS2-V quick start guide

Nidec
Nidec Leroy-Somer LSA 180 A Installation and Maintenance

Mi Swaco
Mi Swaco TOGA Installation, operation and maintenance manual

Motorline professional
Motorline professional AC-6001P User& installer's manual

Vahle
Vahle MKHD Mounting instructions

schmersal
schmersal AZM400Z-ST-I1-1P2P-T manual

PAC
PAC JUMBO LOK 1070T installation instructions

Hanskamp
Hanskamp MultiFill 003-561-005 Installation and operating instructions

Enerpac
Enerpac Pull-pac BRP106C instruction sheet