Frontiermedical toto User manual

pioneering simplicity
User guide
www.frontier-group.co.uk
Toto®Lateral Turning System, with Toto®Touch Control Unit
Système de latéralisation Toto®, avec dispositif de commande tactile Toto®
Toto®System zur seitlichen Umlagerung mit Toto®Touch-Steuereinheit
Gebruikershandleiding van het Toto®
Sistema de volteo lateral Toto®con unidad de control Toto®Touch
Sistema per la rotazione laterale Toto®con unità di controllo Toto®Touch
Toto®Touch Toto®
Toto®Toto®

2
Hier ontbreekt de NL vertaling van deze CE
Gelieve deze toe te voegen
© 2019 Frontier Therapeutics Limited. Todos los derechos reservados.
Toto lateral turning system is covered by UK patent no. GB 2449318
Toto lateral turning system is a registered trade mark of Frontier Therapeutics Ltd
© 2019 Frontier Therapeutics Limited. All rights reserved.
Frontier Therapeutics Limited
Newbridge Road Industrial Estate,
Blackwood, Caerphilly,
NP12 2YN, UK
+44 (0) 1495 235800
www.frontier-group.co.uk
E
GP0113_A56_04
Le système de latéralisation Toto est couvert par le brevet du Royaume-Uni numéro GB 2449318.
Le système de latéralisation Toto est une marque déposée de Frontier Therapeutics Ltd.
© 2019 Frontier Therapeutics Limited. Tous droits réservés.
Das Toto-System zur seitlichen Umlagerung ist Gegenstand des britischen Patents Nr. GB 2449318.
Das Toto-System zur seitlichen Umlagerung ist eine eingetragene Handelsmarke von Frontier Therapeutics Ltd
© 2019 Frontier Therapeutics Limited. Alle Rechte vorbehalten.
Il sistema per la rotazione laterale Toto è coperto da brevetto del Regno Unito n. GB 2449318
Il sistema per la rotazione laterale Toto è un marchio registrato di Frontier Therapeutics Ltd
© 2019 Frontier Therapeutics Limited. Tutti i diritti riservati.
2449318 GBToto
Frontier Therapeutics LtdToto
© 2019 Frontier Therapeutics Limited
Toto®Toto®
Toto®Toto®
© 2019 Frontier Therapeutics Limited
El sistema de volteo lateral Toto está protegido por el número de patente británica GB2449318
El sistema de volteo lateral es una marca registrada de Frontier Therapeutics Ltd
© 2019 Frontier Therapeutics Limited. Todos los derechos reservados.

User guide
English

2
Toto® Touch Lateral Turning System Labelling
This user guide contains important information on correct usage, handling, cleaning and
decontamination. Please read carefully prior to use.
This indicates a hazardous situation that could result in damage to property if it is not avoided.
65ºc for 10 minutes or
73ºc for 3 minutes
Max user weightBleaching agent
allowed
Do not pierce
or cut
Do not iron
Line dry
Refer to user manual CE compliant Type BF applied part
Air leak
Keep dry
Class II equipment Air hoses blocked
Disposal: Do not dispose of this
product as unsorted domestic
waste. It must be sent to a separate
collection facility for recovery
and recycling.
Caution symbol Service interval
Interface lock Fragile handle
with care
Audio pause Do not tumble dry
!
!
250

1
2
3
4
5
6 8
7 9
2 3
Kit Contents
Before you start, please ensure that you have all the necessary components listed below. If any
are absent, or in case of doubt, please contact Frontier Therapeutics Ltd Customer Services on
+44 (0) 1495 235800.
Toto Touch Control Unit Labelling
1. Starts, stops and pauses the control unit.
2. Air Cell side selection.
3. Air Cell inflation time.
4. Air Cell rest time.
5. Alarm mute and interface
lock mode.
6. Air leak alarm.
7. Blockage alarm.
8. Service indicator.
9. Interface lock indicator.
Toto Lateral Turning System Platform
• 1x Platform including a fitted cover.
• 1x CPR deflation valve and tubing set.
• 1x Pair of air cells with quick
connectors.
• 1x Transport Bag.
Toto Touch Control Unit
• 1x Toto Touch control unit.
• 1x Control unit power lead.
• 1x User guide.

4
Contents
Toto® Touch Lateral Turning System Labelling 2
Kit Contents 3
Product Specifications 5
Intended Use 6
Safety 7
Instructions for Use 8
Toto Touch Control Unit Operating Guide 10
Alarms and Alerts 15
Troubleshooting 16
Inspection and Care 18
Cleaning 20
Warranty 22
Technical Specification 23

4 5
Product Specifications
Toto Lateral Turning System - Standard: a fully
customisable control unit and patient turning
platform.
Product Depth (flat position - air cells
empty) mm (Inches)
Depth (raised position - air
cells inflated) mm (Inches) CPR Deflation Valve
Standard 35 (1.4) 185 (7.3) Quick Release Pull Tag
Product Weight - kg (lbs) Maximum User Weight - kg
(lbs)
Width - mm (Inches) Length - mm (Inches)
Standard 6.7 (14.7) 250 (551) 745 (29) 1850 (73)
Toto Platform
Toto Touch Control Unit
Specifications
Dimensions (width / depth / height) – mm (inches) 240 (9.5) x 100 (4) x 200 (8)
Weight - kg (lbs) 2.2 (4.8)
Rated voltage – EU 220 ~ 240VAC, 50/60Hz, 0.3A
Rated voltage – USA 110 ~ 120VAC, 60Hz, 0.3A
Rated input power (VAC) 20
Protection class Class 2
Power cord length - meters (Feet) 5 (16.4)
Air output (LPM) 11

6
Intended Use
Product Description
Toto is an automated lateral turning system which consists of a Toto Touch control unit and a
lightweight, roll-able turning platform with cover.
Designed to assist with patient turning and pressure ulcer prevention plans, the system is designed
around inflating alternating air cells within the turning platform positioned underneath the patient’s
mattress. The patient is then turned laterally via the mattress surface.
The digital control unit provides customised care with a user-determined side selection feature
and accurately timed digital inflation and rest durations. Sophisticated blockage and air leak alarms
help ensure patient safety, as well as an interface lock to avoid unwanted setting changes.
A convenient therapy pause mode enables patient interaction without having to stop therapy and
a service indicator to maintain performance also comes as standard.
The system is compatible with profiling beds and both standard and alternating pressure relieving
equipment.
The Toto lateral turning system does not replace pressure relieving and redistribution surfaces and
is supplementary to their use.
Bedsides should be used to help prevent patient egress and increase the feeling of security.
Indications
The Toto lateral turning system is a suitable supplementary device for the prevention of pressure
ulcers for the following patients:
• Those identified as being at moderate to high risk of developing pressure ulcers as defined by
Commonly used assessment tools.
• Weighing up to 250kg (551lbs).
• Who are unable to change their position without assistance.
• Identified as requiring regular turning and who are non-compliant with manual turning schedules.
Contraindications
• Do not use without a suitable pressure redistribution surface and package of care.
• Do not use with patients with unstable spinal cord injuries or who are undergoing traction.
• Do not use with patients with equilibrium disturbances.
Intended Care Setting
The Toto Lateral turning system is intended for use in the following care settings:
• Long-term or extended care, such as nursing homes and care homes.
• Home-care.
• Hospitals.

6 7
Safety
! Warnings and Precautions
Assess each patient before use and put in place appropriate pressure redistributing devices.
Please note the following:
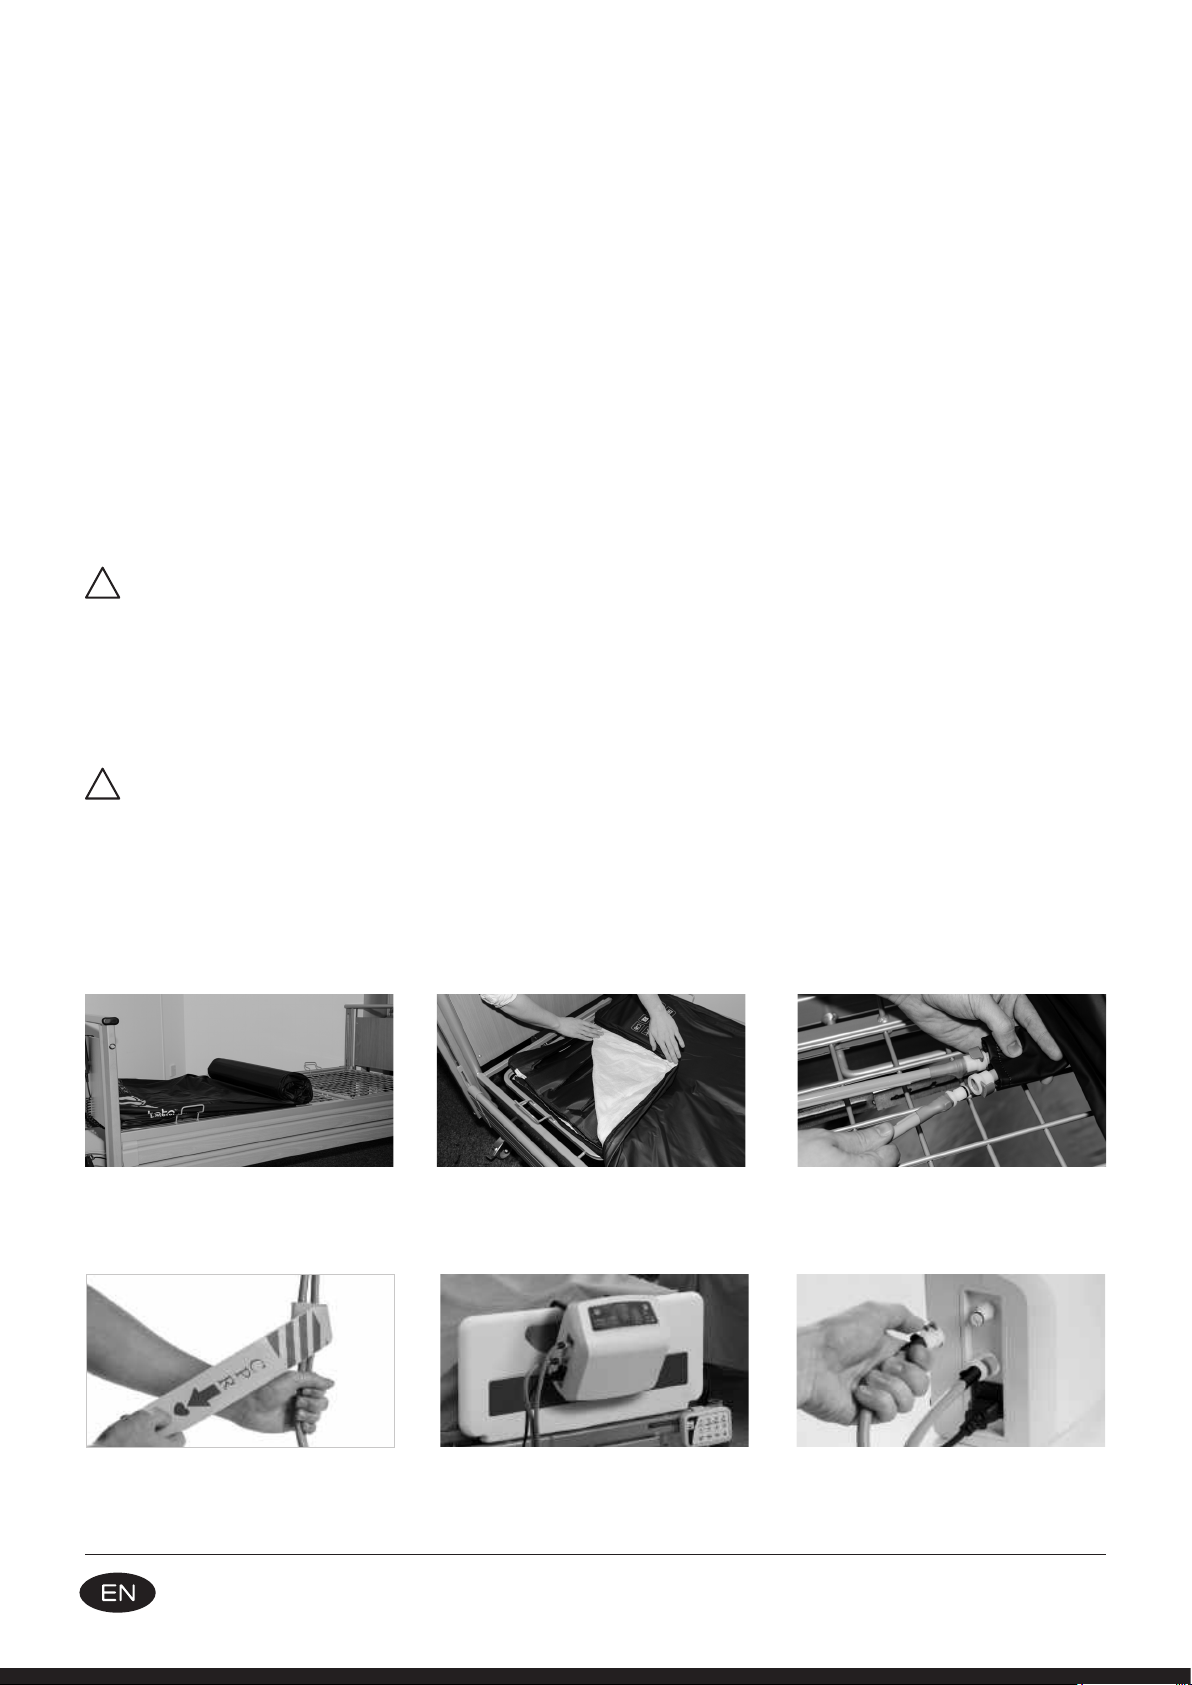
• Before use, check the integrity of the platform and air cells for any visible signs of damage.
Bursting air cells may result in injury.
• Do not use without a mattress.
• Assess for unusual body shapes and postures.
• Patients who have increased anxiety may not be suitable for automated lateral turning systems.
• Assess other medical devices for suitability.
• Fully deflate the Toto lateral turning system platform before attempting to leave the bed.
• Discontinue or engage therapy pause mode during hygiene procedures and when over-bed
tables are being used to avoid the risk of spillages.
• When elevating a profiling bed backrest, raise the knee break first.
• Ensure the surface of the bed frame is clear from debris before placing the Toto lateral turning
system platform, as this can damage the coating of the cover.
• Do not strap the mattress to the bed frame as this prevents the system from inflating.
• Secure mattress overlays to the mattress, not the platform.
• The Toto lateral turning system can be used with positioning systems, bed levers and linen
cradles if their support frame fits horizontally across the bed. Position under the Toto lateral
turning system platform.
• Place evacuation hammocks between the Toto lateral turning system platform and the mattress.
• Ensure bedsides are fully engaged when the system is active.
• Use bedsides during use. Check for clearance from the top of the mattress to the bottom of the
bedside (minimum of 185mm) and assess for risk of entrapment.
• If using footboard protectors, assess for compatibility.
• Do not place the control unit directly underneath the bed frame if placing on the floor so to
avoid lowering the bed onto it.
• Do not position the system so that it is dicult to access and operate the CPR deflation valve.
• Use only with the supplied AC power lead and with correct fuse fitted. Should there be a need
to replace the fuse, only the correct fuse rating is to be used (3A).
• Potential electromagnetic interference between the control unit and other devices may occur. If
interference is suspected, move equipment away from each other and contact the manufacturer.
• Keep away from pets and children.

8
Instructions for Use
Platform Installation and Operating Guide
To ensure the system is correctly installed and functions smoothly, follow this step-by-step guide.
1. Remove all items from packaging and inspect for damage.
2. Remove the mattress and place the rolled platform at the foot end of the bed, roll out until it is
fully extended and positioned centrally to the bed frame.
3. Ensure the air cells within the platform are secured in position via the popper fastenings by
unzipping the cover and visually inspecting.
4. If required, re-fit the cover and close the zip ensuring the air cell hoses are fed through the
opening at the foot end of the cover.
The platform cover should be free to move, allowing each side of the platform unrestricted
room to inflate.
5. Using the quick connectors, connect the air inflation hoses to the air cell hoses - ‘Red to Red’ -
ensuring the hoses are not twisted or kinked.
6. Check the CPR deflation valves are securely in place to ensure no air leaks.
7. Replace the mattress on top of the platform.
DO NOT strap or fasten the mattress to the bed frame.
8. Using the bed hooks, hang the control unit on the bed footboard.
9. Using the quick connectors, connect the air inflation hoses to the control unit - ‘Black to Control
Unit’ - ensuring the hoses are not twisted or kinked.
10. Connect the control unit to mains power via the lead supplied.
A. The platform should be placed directly
onto the bed frame and underneath the
existing mattress.
B. Inspect the platform for visible signs of
damage.
C. Using the quick connectors, connect
the air inflation hoses to the air cell hoses
- 'Red to Red' - ensuring the hoses are
not twisted or kinked.
D. Check the CPR deflation valves are
securely in place to ensure no air leaks.
E. Using the bed hooks, hang the control
unit on the bed footboard.
F. Using the quick connectors, connect
the air inflation hoses to the control unit
- ‘Black to Control Unit’ - ensuring the
hoses are not twisted or kinked.
!
!

8 9
G. Connect the control unit to the mains
power via the lead supplied.
Patient Positioning
Position supine patients along the centre line of the mattress by aligning the patient’s nose with
the centre of the headboard. Ensure the head and shoulders are supported preventing neck rolling
and pivoting at the hips.
Toto is indicated for side lying if patients can self-support, and they are in the middle of the bed.
When using bedsides, consider the use of padding, or net infills.
Centre Line

L
R
L & R
60 min
30 min
120 min
180 min
240 min
60 min
30 min
120 min
180 min
240 min
INFLATE TIME
REST TIME
touch
L
R
L & R
60 min
30 min
120 min
180 min
240 min
60 min
30 min
120 min
180 min
240 min
INFLATE TIME
REST TIME
touch
10
Instructions for Use
Toto Touch Control Unit Operating Guide
1. Start, stop and pause the control unit.
2. Air cell side selection - Left only, Right only or Both.
3. Air cell inflation time - Length of time the air cell remains inflated; minimum 30 minutes, maximum
240 minutes.
4. Air cell rest time - Length of time the air cells remain deflated and the platform is flat; minimum
30 minutes, maximum 240 minutes.
5. Alarm mute and interface lock mode activation.
Turning the Toto Touch Control Unit On
• Press and hold the start/stop button (1) for three seconds.
• A single beep confirms activation along with default lit LEDs.
• Note the system default settings below; please change as appropriate.
o Air cell side selection - both sides.
o Air cell inflation time - 120 minutes.
o Air cell rest time - 120 minutes.
• The pump automatically inflates the left side of the platform; please change as appropriate.
1
2
3
4
5
1

L
R
L & R
60 min
30 min
120 min
180 min
240 min
60 min
30 min
120 min
180 min
240 min
INFLATE TIME
REST TIME
touch
10 11
Air Cell Inflation Selection
• Press the side selection button (2) to scroll through the three available options:
o Left and right air cell (Default).
o Right air cell only.
o Left air cell only.
• Side selection refers to the patient’s side, as standing at the foot end of the bed.
• A single beep confirms activation along with a lit LED.
2

L
R
L & R
60 min
30 min
120 min
180 min
240 min
60 min
30 min
120 min
180 min
240 min
INFLATE TIME
REST TIME
touch
L
R
L & R
60 min
30 min
120 min
180 min
240 min
60 min
30 min
120 min
180 min
240 min
INFLATE TIME
REST TIME
touch
4
12
Changing the Air Cell Inflation Time
• Press the inflate time button (3) to scroll through the five available options:
o 30 minutes.
o 60 minutes.
o 120 minutes (Default).
o 180 minutes.
o 240 minutes.
• A single beep confirms activation along with the lit option LED’s.
Changing the Air Cell Rest Time
• Press the rest time button (4) to scroll through the five available options:
o 30 minutes.
o 60 minutes.
o 120 minutes (Default).
o 180 minutes.
o 240 minutes.
• A single beep confirms activation along with the lit option LED’s.
3

L
R
L & R
60 min
30 min
120 min
180 min
240 min
60 min
30 min
120 min
180 min
240 min
INFLATE TIME
REST TIME
touch
L
R
L & R
60 min
30 min
120 min
180 min
240 min
60 min
30 min
120 min
180 min
240 min
INFLATE TIME
REST TIME
touch
5
9
12 13
Therapy Pause Mode
The therapy pause mode temporarily deactivates all control unit functions, returning the platform
to a flat position.
• Press the start/stop button (1) a single beep confirms activation.
• The currently selected side selection, inflate and rest time LEDs flash when active.
• For safety, the alarm activates after 10 minutes. To continue in this mode for another 10 minutes,
press the Alarm Pause button (5), repeat this process until Therapy Pause Mode is no longer
required.
• To deactivate, press the start/stop button (1). A single beep confirms deactivation and the control
unit returns to the previously selected settings.
Interface Lock
The interface lock prevents any unwanted changes to the control unit settings.
• Press and hold the alarm mute button (5) for four seconds.
• Confirmed by the padlock LED (9) and a double beep.
• When the interface is locked, only the alarm mute button is operational.
• To deactivate, press and hold the alarm mute button (5) for four seconds.
• Deactivation is confirmed by the padlock LED (9) turning o, and a double beep.
15

L
R
L & R
60 min
30 min
120 min
180 min
240 min
60 min
30 min
120 min
180 min
240 min
INFLATE TIME
REST TIME
touch
5
14
Alarm Mute Control Button
When activated, the alarm can be paused for up to 10 minutes while troubleshooting, after which
time, the alarm recommences if the problem remains.
• To mute the alarm, press the alarm mute button (5).
If a new alarm condition occurs when paused, the initial alarm terminates and the new alarm
activates.

L
R
L & R
60 min
30 min
120 min
180 min
240 min
60 min
30 min
120 min
180 min
240 min
INFLATE TIME
REST TIME
touch 6 8
7
5
14 15
Alarms and Alerts
The Toto Touch control unit has three integrated alarms and one information alert to ensure patient
safety and ecacy.
The sound pressure level of the alarm audio or the reminder audio signal may range 55dB-85dB.
The alarm frequency is 150HZ to 1000HZ.
While troubleshooting, the alarm can be muted for up to 10 minutes. If the fault is not corrected
during this time, the alarm reactivates.
If a new alarm condition occurs within 10 minutes, mute will cease, and the new condition will
generate an alarm.
Note: The corresponding alarm indication LED remains lit when the alarm is muted.
If the alarm condition is corrected while muted, the LED and mute will automatically terminate.
Alarms and Alerts Alarm Condition Indicated by an audible alarm and:
Air Leak Alarm
The pressure in the system
has fallen below the minimum
operational requirements, i.e.
an air leak.
Low priority Air Leak LED permanently lit yellow
(when activated) (6).
Blockage Alarm
Airflow between the control unit
and the platform is prevented, i.e. a
blocked air hose.
Low priority
Blockage LED permanently lit yellow
(when activated) (7).
Service Interval
Service required; default at one-year
use. n/a Service LED permanently lit amber
(8) (NO AUDIBLE alarm).
Power Loss Alarm
Power to the control unit has been
interrupted.
Low priority Audible alarm, no LED lit.
Initialisation Failure
Control unit fails to start n/a All ‘Inflate time LEDs’ and ‘Rest time
LEDs’ flashing (when activated).

16
Do not open the control unit. Opening the unit could cause personal injury or equipment damage.
!
System Error Trouble Shooting Guide
Problem Cause Initial Checks / Trouble Shooting
No LEDs lit; no audible
alarm heard.
• Control unit may not
be attached to a power
source.
• The fuse may need
replacing.
1. Check that the mains power outlet is live and active.
2. Check the control unit is switched on.
3. If following points 1 and 2 does not resolve the
problem, switch o and unplug the control unit:
- Check the mains plug fuse (3A).
- Check the control unit fuse (1A).
4. Restart the control unit.
If the problem persists, contact Frontier
Therapeutics Ltd Tel. +44 (0) 1495 235800 for
assistance.
Air-leak alarm
LED (6) lit permanently
yellow with an audible
alarm.
• Pressure has fallen below
the minimum operational
requirements.
1. Press the alarm pause button.
2. Check the CPR valve is closed and correct.
3. Check all air cells and hoses for any air leakage.
4. Resolve and wait for the alarm to reset.
If the problem persists, contact Frontier
Therapeutics Ltd Tel. +44 (0) 1495 235800 for
assistance.
Blockage alarm
LED (7) lit permanently
yellow with an audible
alarm.
• Airflow obstruction
between the control unit
and the platform.
1. Press the alarm pause button.
2. Check for twists or kinks in the air hoses between
the platform and control unit.
3. Resolve and wait for the alarm to reset.
If the problem persists, contact Frontier
Therapeutics Ltd Tel. +44 (0) 1495 235800 for
assistance.
Service LED (8)
permanently lit amber.
• Service required. Please contact Frontier Therapeutics Customer
Services for support Tel. +44 (0) 1495 235800
The Control Unit continues to function even though
the service LED remains lit.
Interface panel is lit
but unresponsive.
• Interface panel is locked. 1. Check that screen lock LED is lit amber (9).
2. Press and hold the alarm mute button for four
seconds to deactivate.
If the problem persists, contact Frontier
Therapeutics Ltd Tel. +44 (0) 1495 235800 for
assistance.
An audible alarm is
sounding; no LEDs lit.
• Loose or absent power
lead.
• Accidental mains power is
turned o.
• Mains power failure.
1. Reconnect mains power lead to the control unit.
2. Check the mains power wall switch is turned on.
3. Attempt to restart the control unit.
If the problem persists, contact Frontier
Therapeutics Ltd Tel. +44 (0) 1495 235800 for
assistance.
!
!
!
!
!
!
!

68
79
16 17
CPR Emergency Deflation System
The Toto lateral turning system features a quick release CPR deflation valve which allows for rapid
deflation for emergency procedures.
In the event of an emergency, firmly pull and release the yellow tab.
To re-inflate the system, replace the CPR tag ensuring both sealing connectors are firmly attached
and restart the Toto Touch control unit.
CPR Deflation Valve Closed CPR Deflation Valve Open

18
Care
Inspection and Care
The Toto lateral turning system cover, platform, air cells and control unit has a unique GS1 compliant
barcode which should be retained and used in the event of a warranty claim. NEVER remove these
labels.
Cover
Regularly inspect the outer and inner surfaces of the cover for signs of damage.
Report damaged covers to the ward or department manager or appropriate healthcare
professional.
Withdraw torn covers from service and replace.
Check zip fasteners for function and integrity.
Platform
Regularly inspect the interior and exterior of the platform, ensuring that the poppers and air cells
are intact.
Ensure the platform has not drifted out of position and the air hoses are not blocked, kinked or
twisted.
Fitting / Replacing Damaged Air Cells
In the event of an air cell puncture or leak, it is possible to replace either or both air cells. Please
contact Frontier Therapeutics Customer Services for replacement parts Tel: +44 (0) 1495 235800.
1. Switch o the control unit and disconnect from mains power.
2. Disconnect the air hoses from the platform using the quick connectors.
3. Unzip and pull back the cover revealing the platform.
4. Determine the faulty air cell and remove by unfastening the popper fastening.
5. Inspect the platform for other signs of damage, including the potential source of the damage.
6. Fit the new air cell ensuring it is in-line with the correct section and secure in place with the
popper fastening.
7. Replace the cover ensuring correct orientation and feed air cell hoses through apertures at the
bottom.
8. Reattach the hoses using the quick connectors - ‘Red to Red’ - ensuring they are not twisted or
kinked.
Other manuals for toto
4
Table of contents
Other Frontiermedical Medical Equipment manuals
Popular Medical Equipment manuals by other brands

ResMed
ResMed Astral 100 GUIDELINES FOR THE OPERATION

ARJO HUNTLEIGH
ARJO HUNTLEIGH MAXI MOVE Quick reference guide

Waterpik
Waterpik Waterflosser WP-150 Series manual

Diamedica
Diamedica DPA 02 Instructions for use manual

Trumpf
Trumpf TruLight 1000 installation manual

Porter
Porter Matrx MDM installation manual