manuals.online logo
Brands
  1. Home
  2. •
  3. Brands
  4. •
  5. Frymaster
  6. •
  7. Fryer
  8. •
  9. Frymaster LOV User manual

Frymaster LOV User manual

Other manuals for LOV

4

Other Frymaster Fryer manuals

Frymaster BK1814E Series User manual

Frymaster

Frymaster BK1814E Series User manual

Frymaster M2000 User manual

Frymaster

Frymaster M2000 User manual

Frymaster FilterQuick FQG100T User manual

Frymaster

Frymaster FilterQuick FQG100T User manual

Frymaster 1824/2424G User manual

Frymaster

Frymaster 1824/2424G User manual

Frymaster PERFORMANCE PRO SERIES 35 User manual

Frymaster

Frymaster PERFORMANCE PRO SERIES 35 User manual

Frymaster YSCFC24 Series User manual

Frymaster

Frymaster YSCFC24 Series User manual

Frymaster RE Series User manual

Frymaster

Frymaster RE Series User manual

Frymaster 8196203 Guide

Frymaster

Frymaster 8196203 Guide

Frymaster 45 Building instructions

Frymaster

Frymaster 45 Building instructions

Frymaster BIELA14 Building instructions

Frymaster

Frymaster BIELA14 Building instructions

Frymaster FilterQuick FQE30-T User manual

Frymaster

Frymaster FilterQuick FQE30-T User manual

Frymaster CF User manual

Frymaster

Frymaster CF User manual

Frymaster Enodis RE14-2TC User manual

Frymaster

Frymaster Enodis RE14-2TC User manual

Frymaster XFPRE80 Guide

Frymaster

Frymaster XFPRE80 Guide

Frymaster GEN II LOV BIGLA30 Series User manual

Frymaster

Frymaster GEN II LOV BIGLA30 Series User manual

Frymaster 824E User manual

Frymaster

Frymaster 824E User manual

Frymaster Heated Landing Zone HLZ 18 User manual

Frymaster

Frymaster Heated Landing Zone HLZ 18 User manual

Frymaster FPH17 Series Guide

Frymaster

Frymaster FPH17 Series Guide

Frymaster FPEL114C User manual

Frymaster

Frymaster FPEL114C User manual

Frymaster FR3 BIELA14 User manual

Frymaster

Frymaster FR3 BIELA14 User manual

Frymaster YFPRE1817E User manual

Frymaster

Frymaster YFPRE1817E User manual

Frymaster LOV BIEL14 SERIES User manual

Frymaster

Frymaster LOV BIEL14 SERIES User manual

Frymaster Protector FPEL214 User manual

Frymaster

Frymaster Protector FPEL214 User manual

Frymaster BIELA14-T Series User manual

Frymaster

Frymaster BIELA14-T Series User manual

Popular Fryer manuals by other brands

GILES EOF-BIB/FFLT/24/24 manual

GILES

GILES EOF-BIB/FFLT/24/24 manual

GE 168997 manual

GE

GE 168997 manual

Falcon G350/11 Installation and servicing instructions

Falcon

Falcon G350/11 Installation and servicing instructions

GoWISE USA GW22612 instruction manual

GoWISE USA

GoWISE USA GW22612 instruction manual

Wolf IF15/S Specification sheet

Wolf

Wolf IF15/S Specification sheet

Electrolux Thermetic 9CHG583284 Operating and safety instructions

Electrolux

Electrolux Thermetic 9CHG583284 Operating and safety instructions

DeLonghi D677UX Instructions for use

DeLonghi

DeLonghi D677UX Instructions for use

SEVERIN DEEP FRYER - Dimensions

SEVERIN

SEVERIN DEEP FRYER - Dimensions

Toastmaster TMFG18-NAT Installation and operation instructions

Toastmaster

Toastmaster TMFG18-NAT Installation and operation instructions

Domo DO465FR Instruction booklet

Domo

Domo DO465FR Instruction booklet

Russell Hobbs RDF300 Instructions and warranty

Russell Hobbs

Russell Hobbs RDF300 Instructions and warranty

Henny Penny PFG-691 Technical manual

Henny Penny

Henny Penny PFG-691 Technical manual

Farberware FBW FT 43721 B manual

Farberware

Farberware FBW FT 43721 B manual

GERMANICA GEAF5L3LD instruction manual

GERMANICA

GERMANICA GEAF5L3LD instruction manual

Wells F-85 Features and specifications

Wells

Wells F-85 Features and specifications

Philips HD9211 user manual

Philips

Philips HD9211 user manual

Lakeland 31796 Instruction booklet

Lakeland

Lakeland 31796 Instruction booklet

Dash Tasti-Crisp DFAF755 user manual

Dash

Dash Tasti-Crisp DFAF755 user manual

manuals.online logo
manuals.online logoBrands
  • About & Mission
  • Contact us
  • Privacy Policy
  • Terms and Conditions

Copyright 2025 Manuals.Online. All Rights Reserved.

Yes to Filter Prompt
1. Computer displays FILTER
NOW? Yes no and the blue
LED flashes.
2. Press 91 (YES) .
3. Computer displays SKIM VAT.
4. Use skimmer to remove debris from
frypot.
5. Computer displays
CONFIrM?
Yes no.
6. Press 91 (YES) .
7. Computer displays
draining,
washing, FILLING during fil-
tration.
8. Computer displays
LOW TEMP
until back to operating temperature.
9. Computer displays product name or
dashed lines.
No to Filter Prompt
1. Computer displays FiLTER
NOW? Yes no and the blue
LED flashes.
2. Press 82 (NO).
3. Fryer resumes normal operation.
JIB System (Jug In Box)
1. Orange LED on fryer lights.
2. Open cabinet door to access JIB.
3. Remove oil line from JIB
4. Remove JIB.
5. Open new oil jug and remove liner
under cap.
6. Position pick-up tube in new box
with attached cap in place.
7. Position the new jug in the fryer
cabinet.
8. Press and hold orange reset button
until orange LED goes out.
Bulk Oil System
1. Orange LED on fryer lights.
2. Open JIB door.
3. Press and hold orange reset button
until the jug is full then release.
DO NOT OVERFILL THE JUG.
4. Orange light goes out.
Responding to Filtration Questions on the M3000 Computer Display
Responding to Low
Oil Warning Light
Responding to Fryer
Filter Prompts
Is Vat Full?
1. Computer displays IS VAT FULL?
yes/no *.
2. Press 82 (NO).
3. Computer displays FILLING, as the oil is being
pumped back to the frypot.
4. After pumping cycle quits, computer displays IS
VAT FULL? Yes/no.
5. If pot is filled press 91 (YES) and go to Step 9.
6. If pot is not filled, press 82 (NO). The pump will run
again for 30 seconds and display Is VAT
FULL? Yes /no. (Three unsuccessful
attempts to fill the vat will lead to a change
filter pad? YES/NO display.)
7. Computer displays Change Filter pad?
YES/NO. Press 91 (YES) .
8. Clean the filter pan and replace the filter pad.
9. Once the pan is pulled from the cabinet for a mini-
mum of thirty seconds the computer display returns
to the last state or OFF.
10. Re-install the filter pan.
*NOTE: After six unsuccessful attempts to fill the vat, the
fryer displays Service Required. Pressing NO
allows cooking , but the fryer will re-prompt every 15 min-
utes. Call for service.
Clogged Drain
1. Computer displays CLEAR DRAIN changing to
IS DRAIN CLEAR? alternating with YES.
2. Clear debris from the drain using the fryer’s friend
and press the 9(1yes) button once the drain is
cleared to continue.
3. The computer displays DRAINING and normal
auto filtration operation resumes.
1. Press and hold Filter button for three
seconds (right side for full vat; desired
side for split vat).
2. Computer chirps, displays
FILTER
MENU and AUTO FILTER.
3. Use button to scroll to MAINT FILTER .
4. Press 91 .
5. Computer displays
MAINT
FILTER? and YES NO.
6. Press 91 (YES).
7. Computer displays
FIL-
TERING.
8. Oil drains from frypot
9. Computer displays
SCRUB
VAT COMPLETE? and
YES.
10. Scrub vat and Press 91 (YES).
11. Computer displays is oil sen-
sor clean? and YES (gas only).
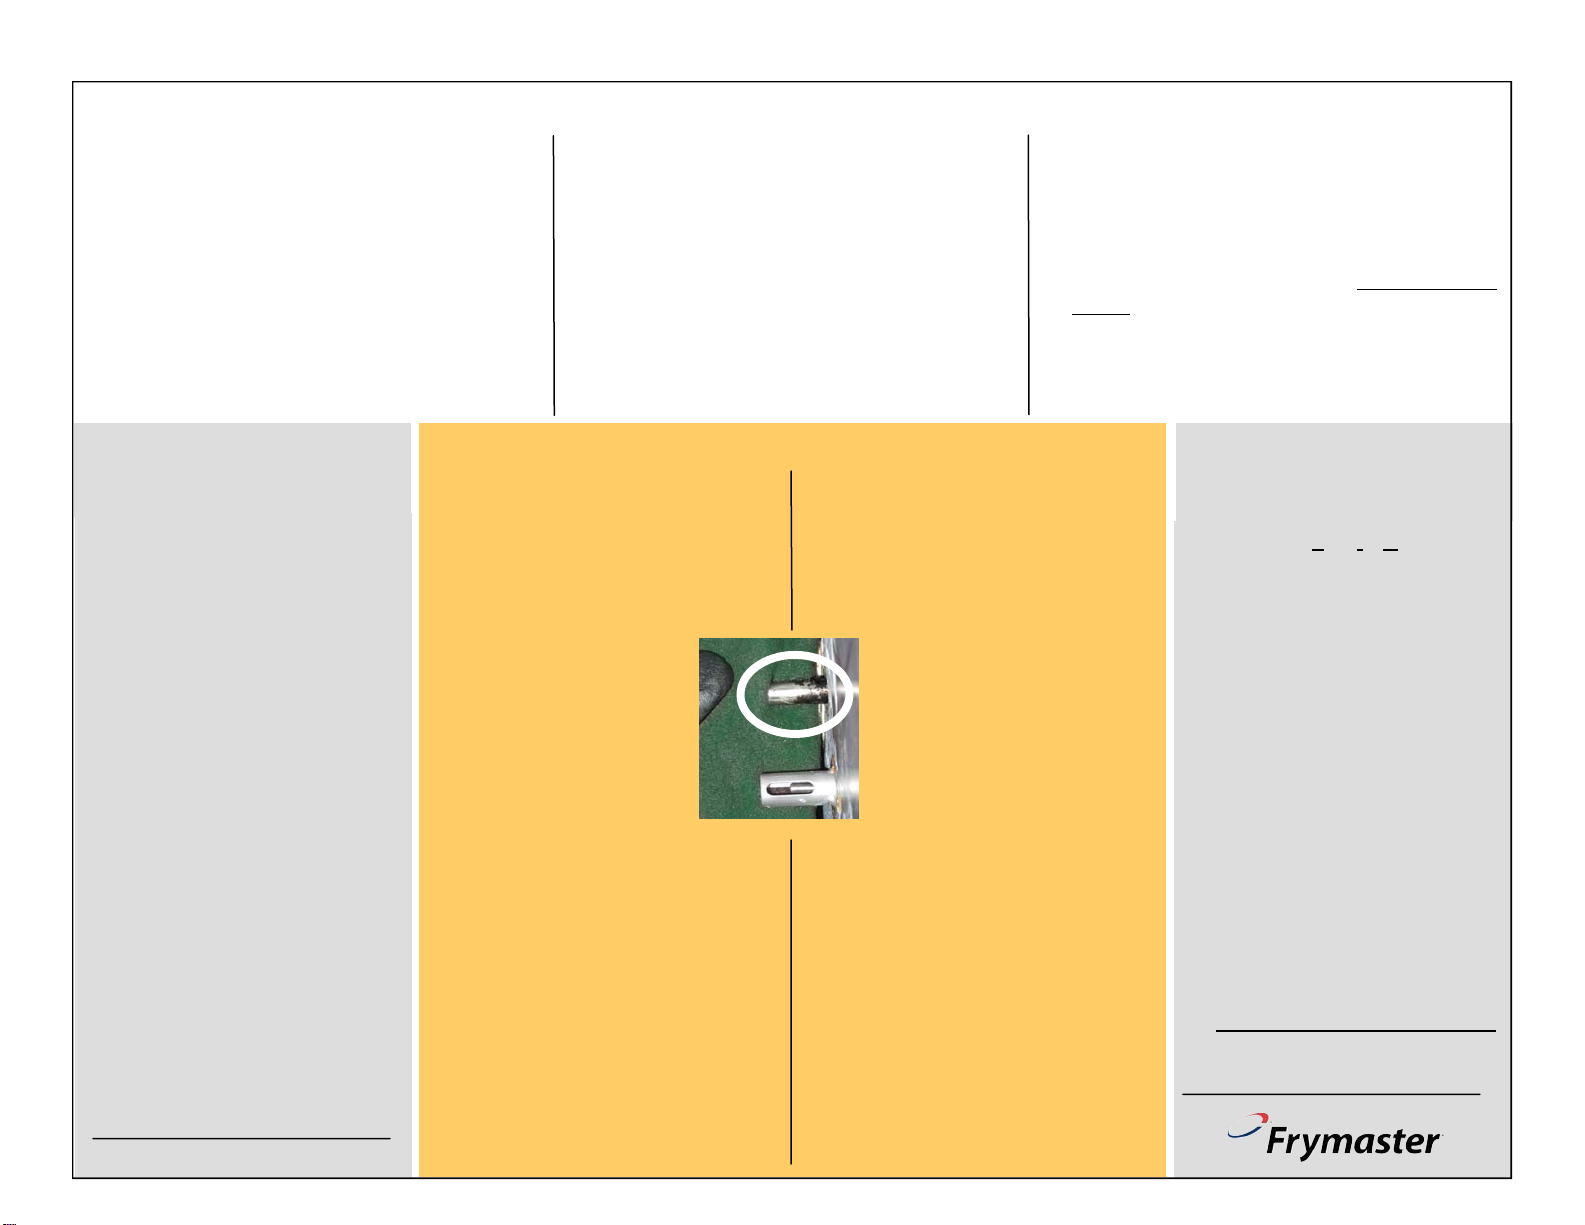
12. Clean oil sensor (gas only) with a no
scratch pad and press 91 (YES) (see
photo).
13. Computer displays
WASH VAT? and
YES.
14. Press 91 (YES).
15. Oil flows across frypot and computer
displays WASHING.
16. Computer displays
WASH AGAIN?
and YES NO.
17. Press 82 for NO; 91 for YES.
18. After NO response, computer displays
RINSING.
19. Oil washes across frypot.
20. Computer Displays
RINSE AGAIN?
and YES NO.
21. Press 82 for NO; 91 for YES.
22. After NO response, computer
displays POLISH? and YES NO.
23. Press 91
24. Oil flows through frypot.
25. Computer displays
POLISH-
ING and a five-minute countdown
timer.
26. After five minutes, or a pressing of the
82 button to stop the polishing, the
computer displays FILL VAT? and
YES.
27. Press 91 (YES).
28. Frypot fills and displays FILLING.
29. Computer displays IS VAT FULL?
and YES NO.
30. Press 91 for yes; 82 for no.
31. With yes selection, computer displays
OFF.
32. With a no selection, pump runs and
steps repeat, starting at step 29.
819-645302/10 LOV™ Fryer
LOV Quick Reference
Daily Maintenance Filtration
Daily Filter Pan Cleaning and Preparation
1
The filter pan must be
cleaned daily and the fil-
ter pad replaced. Follow
these instructions to pre-
pare the filter pan:
Remove and disassemble
the pan. Discard old filter
pad. Clean thoroughly.
Leave no water in the pan.
Reassemble the pan in this
order:
1. Position the inner screen.
2. Place the filter pad, textured
side up, in the pan.
3. Position the hold-down ring
on the filter pad.
4. Position the crumb tray.
5. Firmly seat the filter pan in
the cabinet. Ensure the MIB
display is on A.
2 3
4
The filter pad in a LOV™
fryer must be replaced at
least once daily. In high-
volume stores it should
be replaced more often.
Replace O-rings every 90 days.