FSA GT1-70 User manual

GT1-70 Shuttle | Portable RO System
Contents
WARNING:...................................................................................................................................................................... 2
I. Before You Begin.................................................................................................................................................... 2
II. Important Note:....................................................................................................................................................... 2
Reverse Osmosis Filtration........................................................................................................................................... 2
I. Overview................................................................................................................................................................... 2
II. Feed Water Conditions......................................................................................................................................... 2
Installing Inlet Fitting...................................................................................................................................................... 3
I. Kitchen Diverter Valve............................................................................................................................................ 3
II. ¾” Garden Tap Adaptor........................................................................................................................................ 3
III. Washing Machine Block Adaptor....................................................................................................................... 3
IV. Connecting Tubing Using Compression Fittings............................................................................................. 4
System Installation/Start-Up......................................................................................................................................... 4
I. Pre-Flushing............................................................................................................................................................. 4
II. Tubing Connections............................................................................................................................................... 4
III. Initial Start-Up........................................................................................................................................................ 4
IV. Using the System................................................................................................................................................. 5
V. After Use & Storage.............................................................................................................................................. 5
VI. Long Periods of no use ....................................................................................................................................... 5
Maintenance.................................................................................................................................................................... 5
I. Sanitation ................................................................................................................................................................. 5
II. Replacement Parts................................................................................................................................................ 5
III. Replacement Filters ............................................................................................................................................. 5
IV. Testing Filters ....................................................................................................................................................... 6
Troubleshooting.............................................................................................................................................................. 6
Replacement Filters & Parts....................................................................................................................................... 10
Diagrams ....................................................................................................................................................................... 10

WARNING:
For correct operation of this appliance, it is essential to observe the manufacturer’s instructions.
I. Before You Begin
Quick Connect Fittings: If you come across a push-fit fitting, you need to firmly push the tubing into the
opening until you feel a “click” which signifies that the tubing has pushed through the internal O-ring and is
seated correctly. If leaking occurs, it may be due to roughly cut tubing OR the tubing is not pushed in far
enough. To remove tubing from push-fit fittings, depress the floating collet (shown in below photo), then pull
the tubing out.
NOTE: You will need to remove the Blue/White plug from the end of the outlet line marked
“Drinking Water”. Use the above steps to remove this plug. Do not discard the plug as it is used to
seal the drinking water line between use to prevent bacterial contamination.
II. Important Note:
Laws and regulations prevent us from wet-testing these filtration systems prior to sending them out.
Therefore, during assembly of these systems they are not pressure tested so it is possible to have a small
leak in a connection (which is simply fixed by re-seating the tubing or tightening a fitting). As the filters are
dry packed, the systems will require flushing before first use – Our systems purposely have the inlet filter
disconnected from the membrane so that you can do an initial flush of the pre filters to prevent fouling the
membrane with carbon fines. When first flushing the unit – remember that this tubing is disconnected and
should be aimed into a sink/bucket during the flushing process. When flushing is finished – re-connect the
tubing to the inlet of the membrane housing (Screw Cap End).
Reverse Osmosis Filtration
I. Overview
The Reverse Osmosis Membrane is the workhorse of any RO system. It is constructed from a wrapped
semi-permeable membrane material that uses pressure to separate impurities such as ions, minerals and
other larger molecules from the water, carrying them to waste.
*Reverse Osmosis membranes do not have a litre Capacity for filter replacements due to the variables that
can make the filter life vary significantly. This is mostly due to the water quality. The most accurate way to
test a RO membrane for effectiveness is to use a TDS Meter. TDS meters measure the total dissolved
solids in ppm in the water. To test your membrane, get a baseline reading out of your tap (unfiltered water)
and then compare that to a reading directly off the membrane (disconnect the tube before it goes into the
post filter cartridge). You can expect to get a difference of approx. 90-98% between the readings which
indicate that the membrane is functioning correctly. If this % is beginning to drop below 90% it suggests
that the RO membrane requires replacement
II. Feed Water Conditions
•Pressure: 50 - 100 psi
•TDS: <1,000 mg/L
•Hardness: <250mg/L
•Iron: <0.02
•Manganese: <0.01
•Temperature: 1°C - 26°C

Installing Inlet Fitting
I. Kitchen Diverter Valve
This fitting adapts to most kitchen taps that have either a 22mm Male Thread or a 24mm Female Thread.
There are some taps on the market that are not compatible with diverter valves so please check before
purchase. Firstly, unscrew the aerator from your tap. If this exposes a male thread, simply screw the
diverter valve straight onto the tap (ensure the black rubber washer is inside the valve). Usually hand
tightening is sufficient but gripping tools may be required depending on the tap. NOTE: The knurled section
of the diverter valve (top swivel ring) is the part that will tighten, you must tighten this to the tap, not the
whole valve. You will know if the diverter has sealed on the washer if you will be able to swivel the valve
from side to side but you should feel some resistance. If the valve swivels freely and does not feel secure –
you may not have added the black washer, the tap thread may be too long (in which case, you can double
up using the existing washer from the aerator you just removed) or it has not been tightened enough at the
knurled section. If you need to use the thread adaptor to install to a female threaded tap, install the adaptor
into the diverter valve first, then install it onto the tap.
The Diverter Valve is designed to replace your existing aerator so should be left installed permanently.
Below is an example graphic. The tubing is usually supplied connected to the valve but there are
instructions below showing this process if required.
II. ¾” Garden Tap Adaptor
The garden tap adaptor is simple,
just screw it onto an outdoor tap ¾” thread
III. Washing Machine Block Adaptor
Similar principle to the Kitchen Diverter Valve but this time, you firstly turn off the cold water to your
washing machine (lay a towel down for water leakage). Using either your hands or a pair of gripping tools,
slowly unscrew the washing machine hose which will begin to leak water due to static pressure. Install the
laundry block (large Chrome Fitting) in place (ensure that the washers are used so it seals). If you find that
the thread on the adaptor is not long enough – remove one of the blocks and steal the washer (only 1 block
is required, 2 are supplied for this reason) – doubling up the washer is usually enough to provide an
adequate seal. You do not need to use thread tape to do the above steps.
Once the block is securely installed, use standard white plumbers’ tape to wrap the male thread of the
small inline valve supplied with the adaptor – you will need to wrap around 8 – 10 times. Carefully screw
the valve into the female port on the adaptor using a shifter/spanner until firmly installed. While the valve is
in the ‘off’ positing (90° angle to the water flow), slowly turn the cold water back on and check for leaks.

IV. Connecting Tubing Using Compression Fittings
Compression fittings are used in both the Kitchen Diverter Valve & the Washing Machine Adaptor. Rather
than an o-ring seal with teeth (like the quick connect fittings), compression fittings crimp the tubing around a
stem to seal the water, the compression ring then prevents the tubing from being removed. Inserting the
tubing over the stem of the compression fitting can sometimes be difficult as the tubing needs to stretch
over it, if you are having trouble, you can run the end of the tubing under warm water (not hot) to help
soften the tubing. The below diagram demonstrates how this it to be installed.
System Installation/Start-Up
I. Pre-Flushing
As previously mentioned above, the portable units are assembled with the inlet filter disconnected from the
membrane to allow pre-flushing. To pre-flush the inlet filter, firstly plug the tubing joining the inlet valve to
the inlet port of the system. Turn on the inlet feed water to maximum, this will flush the pre filter at high
pressure to clear out any carbon fines. The water will run black and cloudy for a few moments, shut off the
tap and give the filter a shake (To stir up the media) and repeat a few times until the water runs consistently
clear.
Note: This process can also be done to the other inline filters in the system, for example the alkaline filters.
It is recommended (but not required) to remove each filter (1 at a time so you don’t lose track of filter
position) and repeat the above step to clear the fines out of each filter. Flushing filters directly off the mains
pressure will greatly decrease the flushing time at the initial start-up stage.
II. Tubing Connections
Following the above flushing process, check your systems fittings and tubing to ensure everything looks
sound; there are no kinks, damaged fittings or tubing that is not plugged in. Connect the inlet filter to the
inlet side of the membrane (screw cap end). You should have 2 lengths of tubing that are only connected at
one end, these lines will be your drain line (waste water) which is connected to the inline valve marked
‘Drain Line’ of Flow 200/300/400. The other line will be the drinking water line which is the finished product
water. Once all tubes are accounted for and everything is in order, start-up can commence.
III. Initial Start-Up
For the first run, allow both the waste and drinking water lines to flow to waste into a sink. Turn on the inlet
water to the system on full pressure/flow. The Drain line will begin to flow almost straight away which is
normal, you may notice some slight discolouration. The drinking water line will take longer to begin flowing,
this is due to the water slowly making its way through the membrane filling the filter cannisters as it goes. 3
Stage systems generally start flowing within a few minutes where the 6 stage units can take over 5 minutes

for the water to make its way through the unit. This will only happen on first use until the system is wetted,
additional start ups should begin flowing relatively quickly from when the inlet it turned on.
If you have completed flushing of ALL inline filters as mentioned in the Pre-Flushing Section, you will only
need to run your filter system for about 30 – 60 minutes before it is ok to be used. If you did not pre-flush
the post membrane filters, you will need to let the unit run for a few hours to adequately flush the filters.
This is because mains pressure flushed quickly, but if you run water post membrane, it is much slower and
does not stir up the filters as vigorously.
If you are using a system that has a post alkaline filter, you may notice the pH of the water will be very high
(9.5 – 10.5) while the system is new. This is normal and will slowly reduce with further flushing. High
Alkaline Systems create hydrogen which will show a very high pH (10 +/-) when it is initially filtered which is
normal, once you let the water sit for a period of time the hydrogen will vent and the pH will begin to lower.
pH and Alkalinity are different things.
IV. Using the System
Once the filters have settled and it is ready for use, run the drain line into the sink/drain. Your drinking water
tube will then run into a container or tank to fill with fresh filtered water. It is recommended to keep the
container you are filling in a water safe area – for example on the sink top in case of spillage (or more
commonly – if it overflows because you forget you turned it on) so you don’t come back to a flooded room.
A handy tip is to use a timer the first time you use the unit and note how long it takes to fill your desired
storage container.
V. After Use & Storage
When the system is no longer in use, replace the blue plug back into the drinking water line to prevent
bacteria. The drain line can be left open as there is no chance of backflow or contamination on this line.
The system can then be stored away in a cabinet – if you have a plastic container or tub to put it in it is
ideal to prevent any water leaks.
VI. Long Periods of no use
If the system has been in storage for longer than a few days, it is best to run the unit for 15 minutes before
collecting the water. Bacterial contamination is not usually an issue with intermittent use but is possible
after over a month of storage. If there are any smells, tastes or changes to the water quality it is best to
replace the filter cartridges and start fresh to avoid any possible issues.
Maintenance
I. Sanitation
Due to the ‘open circuit’ nature of the portable systems, it is possible for bacterial contamination to occur
over time. Tubing may need to be sanitised or replaced along with the fittings.
The membrane housing (Which is one of the only parts that doesn’t get replaced) can be cleaned using
warm soapy water and then soaked in diluted HydroSil-ULTRA with water. Rinse off the excess HydroSil
and then re-connect.
II. Replacement Parts
As mentioned above, tubing and fittings should be periodically replaced to ensure the system remains
clean and functional. There is no set time frame for these items to be replaced, rather you can monitor
them ongoing and if they appear to be at their end of life, change them. As a general guideline, Tubing
(inlet, outlet and drain) should be replaced every 2 years. Fittings should be replaced every 3 years (due to
wear and tear).
III. Replacement Filters
As portable systems are made up from predominantly inline filter cartridges, when you replace the filters
you are getting almost a completely new ‘system’ as only the tubing and fittings + some other things
remain. Filters have a varying life time but generally can be replaced with the following principle; Pre filters
(Pre-Membrane) every 6 months. Post Filters (Post-Membrane) Every 12 months. The membrane itself has
a largely varying life time. It may last anywhere between 1 and 4 years depending on usage, water quality
and age.

IV. Testing Filters
Reverse Osmosis membranes have a variance in their filter life and this is affected by several things
including water quality, usage, temperature and filter maintenance. As they are the workhorse of the
system, they are the most important filters to monitor and keep maintained.
To measure the effectiveness of the RO membrane you will need a TDS/EC test meter. Draw a sample of
tap water (to get your base reading), then collect a sample of water directly off the membrane outlet (before
it goes through any other filters). This is your ‘pure’ water. To calculate the membrane effectiveness, you
will need to subtract the percentage of contaminant reduction from the feed water. E.g. Feed Water
200mg/L TDS – RO Membrane removes 97% (+/-) Therefore, 200 – 97% = 6mg/L. Factors can influence
the final TDS of the water and it will depend upon what is in the feed water to begin with. A membrane is
deemed to be ‘expired’ if the overall reduction rate is <90% (as a general rule). To apply this to the above
example, 200 – 90% = 20mg/L. So, if your test reading was approaching 20mg/L or higher, it would be time
to change the membrane.
Troubleshooting
Problem
Possible Cause
Solution
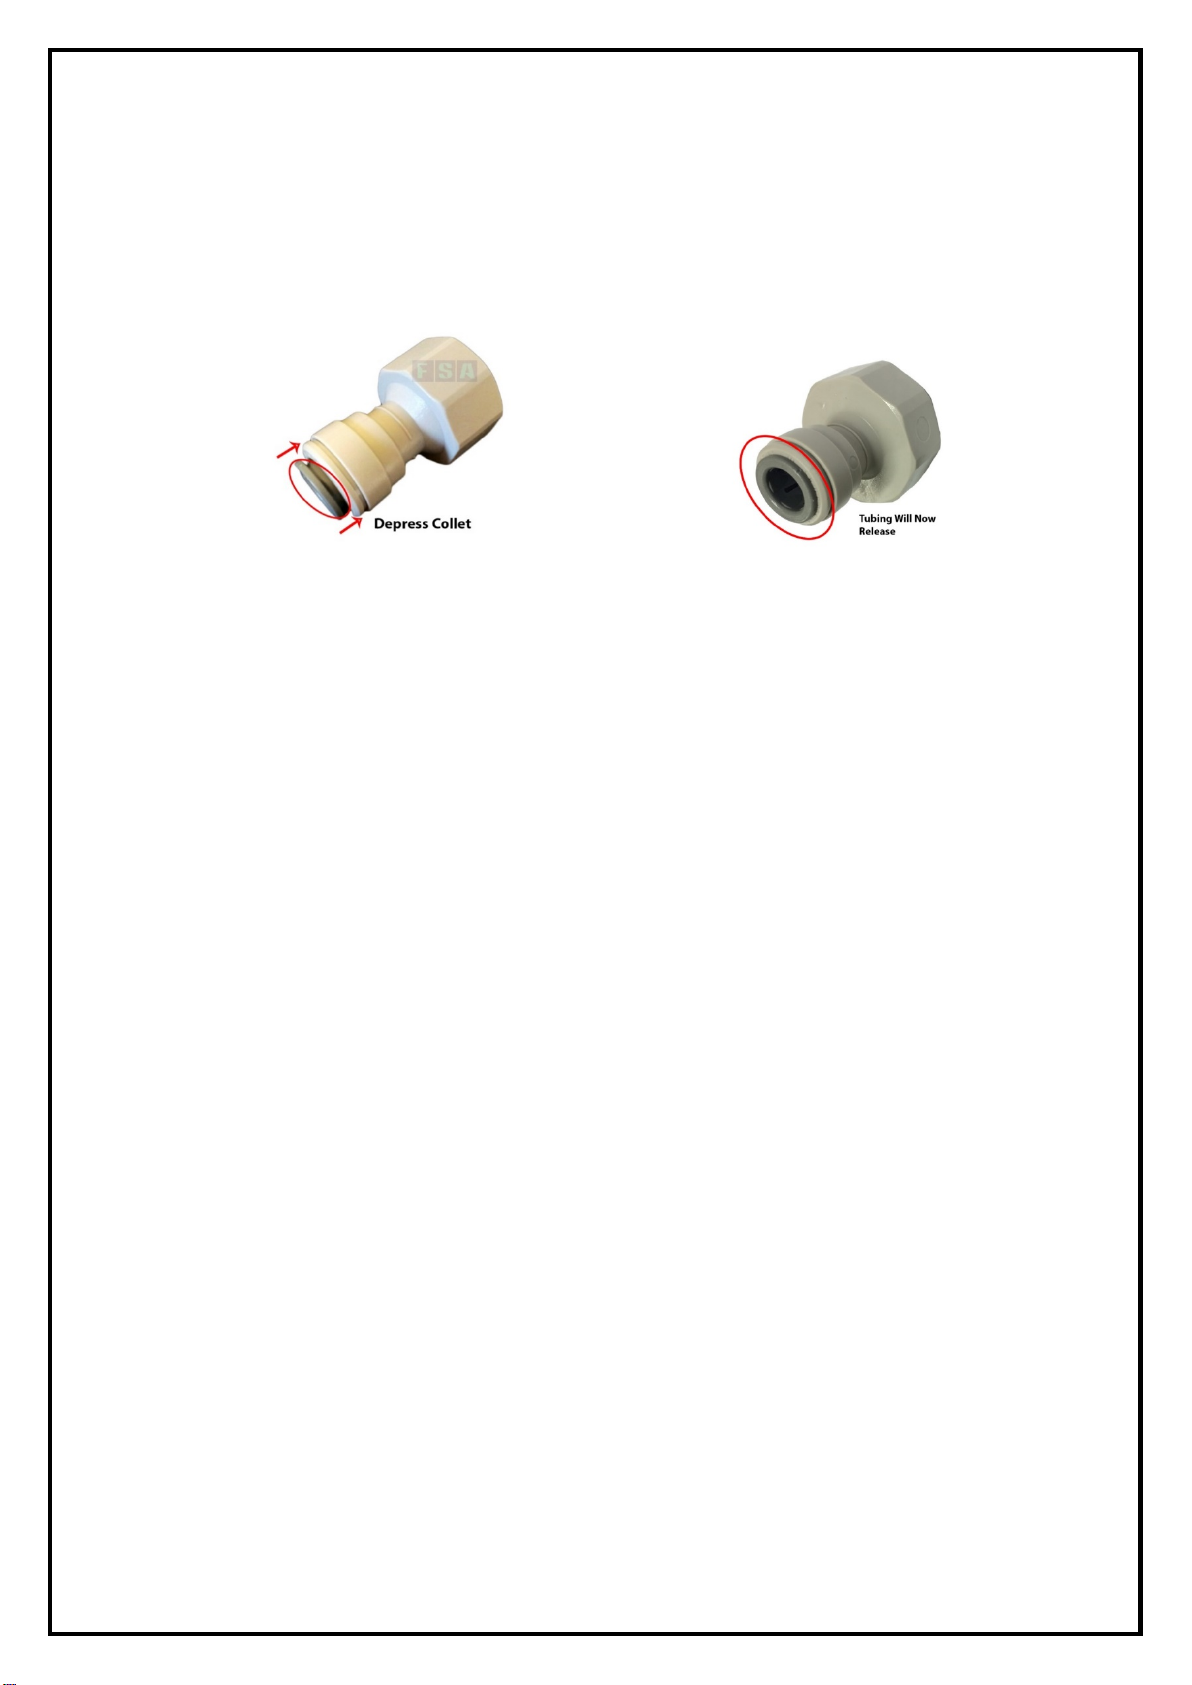
Water Leaking Between fitting
and tubing.
Unseated Tube
Check all tubing connections by
firmly pushing them into the
fitting. Check that there are no
kinks or any obvious issues. If
the problem persists, remove the
tubing and check for a clean cut
with no burs. Push the tubing
back in and try again. If this does
not work please contact
customer support.
Water Leaking Between Fitting &
Filter
Fitting not tight enough /
Insufficient Thread Tape /
Damaged Fitting or Filter
If the fitting appears to be not
fully tightened, gradually tighten
the fitting to see If this fixes the
leak. If this does not work,
remove the fitting and check for
any signs of damage either on
the fitting or the female port of
the housing. If there are no
obvious signs of damage, apply
white plumbers’ tape. Use 6
rounds for 1/8” fittings
(membrane housing fittings) and
8 rounds for all other ¼” fittings.
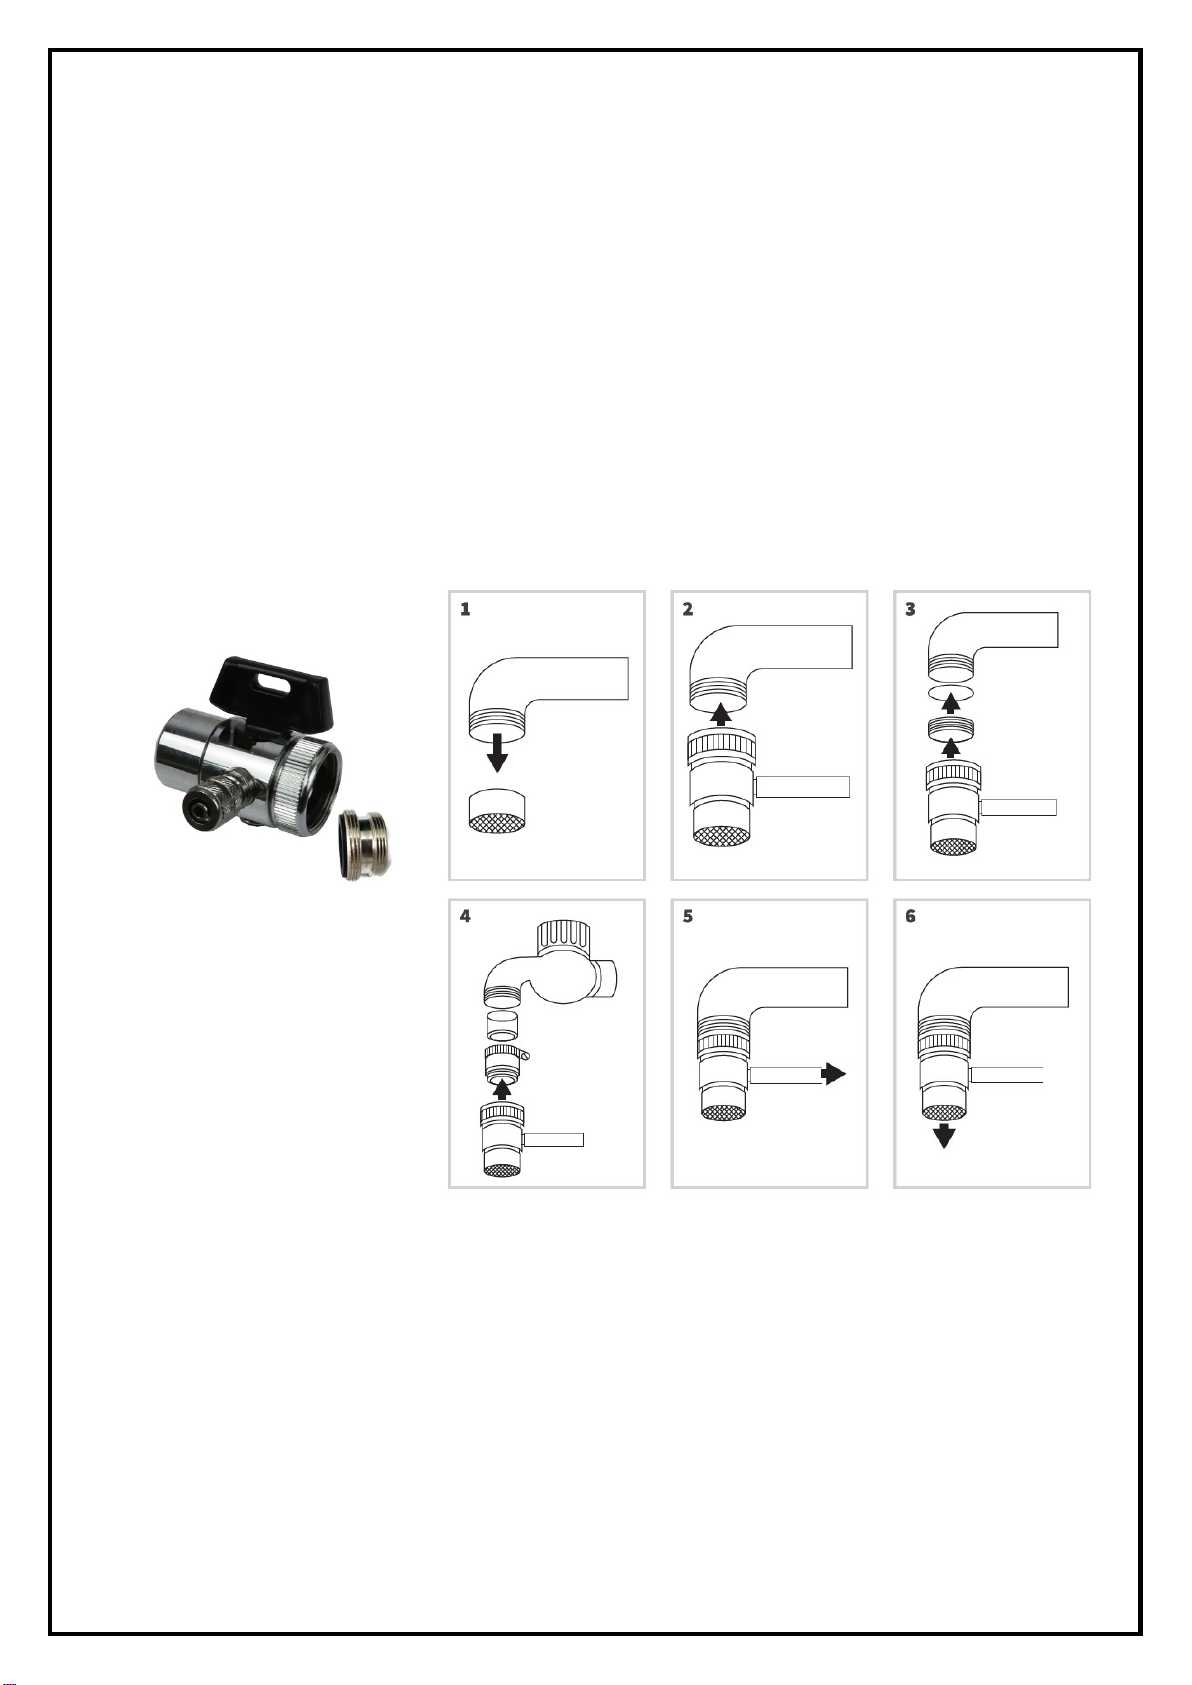
Water Is Leaking from My
Diverter Valve
1. Damaged/Missing Washer
2. Not Tight Enough
3. Thread is too Short
1. Check the diverter valve to see
if the washer is inside, if it is
damaged it may need replacing –
this is a common size washer
and can be purchased from most
hardware/plumbing stores.
2. If the diverter valve is loose (or
you can easily swivel the fitting
without resistance, the fitting is
not tightened enough. It may feel
like you can’t tighten it anymore
and it just keeps spinning but if
you use a gripping tool (multi
grips) to grab the collar of the
fitting and use your hand to hold
the valve itself steady, you will be
able to further tighten the valve.
The valve is tight enough when
you feel light to moderate

resistance when trying to swivel
the valve.
3. If you screw the valve on and
the collar ‘bottom’s out’ on the
tap, you may need to add
another washer (to bulk up the
space).
The unit is not producing any
water?
1. Water Supply is off or
disconnected.
2. Pre-Filter has a blockage
3. Insufficient Water Pressure
4. Blue Plug Still Installed
1. Turn on the water supply and
ensure there are no obstructions
to the water flow.
2. Disconnect the tube between
the membrane and pre-filter (like
the pre-flushing instructions) and
run water at full pressure to see if
water comes out of the filter. – If
the water does not come out (or
is very weak pressure) the filter
may need to be changed.
3. Reverse Osmosis required
50psi (Minimum) to operate –
70psi+ is ideal. If you have lower
than 50psi pressure this unit may
not be suitable for you. Low
Pressure Membranes are
available for an additional charge
that will work down to 20psi.
4. Remove the blue plug from the
drinking water line.
Water is coming out slowly
Reverse Osmosis
RO filtration is a slow process,
depending on the system you
have purchased, you will only get
about 8 – 12L of water per hour.
I am getting much more waste
water than filtered water
1. Water Pressure
2. Water Quality
3. Blockage
1. Our units are designed to run
at approx. 1:1 – 1:1.5 waste
water ratio at 70 psi. If your
pressure is lower than 70 psi, the
production rate may decrease
and cause more drain water than
filtered water.
2. If your inlet water quality is
poor and contains higher salts
and hardness the filter may
produce lest water than the
specified amount.
3. If you have good pressure,
and average water quality it is
possible there is a small
blockage somewhere in the
system. Try to follow the water
flow along the system,
disconnecting 1 tube at a time to
try and pinpoint where the water
is ‘stopping’
High pH Reading
1. Alkaline Filter
2. GAC Filter
3. Insufficient Testing Equipment
1. Alkaline Filters are designed to
increase the pH of the water.
When the filter is new it will be
high but will soon settle to the
advertised levels after adequate
flushing.

2. If you have a post GAC filter
(Carbon), this will naturally
increase the pH of the water. pH
is the measure of Hydrogen in
the water and this hydrogen will
vent off the water if you leave it
to stand and the pH will then
drop back down to the normal
level.
3. pH testing equipment can
range from a cheap test pen right
up to lab grade equipment.
Before coming to a conclusion on
pH issues, it is best to ensure the
equipment used to measure the
pH of the RO water is of high
standards and suitable for
reading pH levels in low EC
water (i.e. The guy at the pool
shop is not going to cut it). We
have access to high quality
testing equipment and frequently
test our units and conduct
research. If you feel that there is
an issue with your pH, please
contact us.
Strange taste to the water (New
System)
1. High Alkaline Filter
2. Residue
3. Contamination
1. If you are using an alkaline
filter system, the unit requires
adequate flushing before first
use. Usually all taste is gone
within a week of use. This taste
is normal and in most cases is
your body adjusting to the high
pH water (which some people
can describe as a slight metallic
taste).
2. The filters are dry packed, the
carbons, alkaline filters will have
‘fines’ on them as they are
granular medias, this will go
away with flushing. The
membrane has a food grade
preserve inside it to prevent
contamination during storage,
this will also flush away quickly.
3. Bacterial contamination is
highly unlikely, but not
impossible. If there is a strong
‘foul smell’ or organic taste to the
water, it is possible that there is
some form of contamination.
Contact us straight away so we
can rectify (or diagnose) the
problem if there is one present.
The TDS Is Higher than the inlet
water (or the same).
1. New Filter
2. Alkaline Filter
1. While filters are new, it is
normal for the TDS to be
elevated while the system is
flushing. Continue flushing the
system & contact support if the
high TDS persists.

3. Expired Filters
4. Mixed Up Drain Line and
Drinking Line
2. Alkaline filters will naturally
increase the TDS of the water,
especially when new. If you have
low TDS water already, it is
possible for the TDS level out of
the alkaline filter to be higher
than your inlet water. This is
because you are adding minerals
back into the water therefore
increasing the TDS and alkalinity.
3. If the filters have not been
changed as per the
recommendations, it is likely that
the increased TDS is due to the
filters needing replacing.
4. This is common as sometimes
the lines may be mixed up. Make
sure that the tubing connected to
the ‘Drain Line’ flow restrictor is
being run to waste, do not use
this water for drinking. Your
drinking water line should be
marked with either ‘outlet’,
‘Drinking Water’ or ‘Aquarium
Water’.
Hot Water has been run through
the filter
Reverse Osmosis units are
designed for cold water only. If
you accidentally run hot water
through the membrane for a
short period of time, it may still
undamaged. What will happen in
the pore size in the membrane
will expand and allow more
contamination through. Run the
unit on cold water for 15 minutes
and test to make sure there is no
issues.

Replacement Filters & Parts
Filter Cartridges:
GT6-21S Inline Activated Carbon Filter (Pre-Filter) 6 Months
“ “ “ “ “ “ (Post-Filter) 12 Months
GT6-32 Puretron T300 Hydrogen Rich Cartridge 12 Months
GT6-10 Inline FAR Infrared Cartridge 1 – 2 Years
GT13-59-ALP 50GPD Reverse Osmosis Membrane 1 – 4 years
(TDS Testing Required)
Fittings:
GT10-22LS ¼” Male x ¼” Tube Fitting
GT10-23LS ¼” Male Elbow x ¼” Tube Fitting
GT10-2LS 1/8” Male x ¼” Tube Fitting
GT10-13LS 1/8” Male Elbow x ¼” Tube Fitting
Valves:
GT25-3S1/4 Kitchen Tap Diverter Valve ¼”
GT25-15 Male x Male Thread Adapter 22 – 24mm
GT13-1S 200CC Flow Restrictor ¼”
Housings:
GT8-31 1812 Membrane Housing
Diagrams
Continue Over Page

Rev. 16/02/2021
Definitions
¹ Water Filter Systems are defined as systems designed for drinking water under our Water filter Systems, Reverse Osmosis Systems & Ultraviolet
Sanitation Categories – Excluding Cartridges and Shower Filters.
² Other products not manufactured or assembled by FSA are covered under the applicable manufacturer’s warranty.
³ FSA specifies recommended or required filter maintenance – see product information for further details. If a maintenance schedule is not
specified, filter maintenance is required at least once per 12 month period.
* Unsuitable environmental conditions include but are not limited to; Excessive hot or cold, Weather extremes.
Reverse Osmosis Portable Kits
Inline Filters / Housings
General Warranty
Water Filter Systems¹ (Excluding consumables) Manufactured or Assembled² by Filter Systems Australia (FSA) are
covered under a 12-month Warranty Against Defects (Manufacturer’s Warranty). This warrants the water filter system
to be free from defects in material and workmanship for a period of 12 months from date of sale.
If applicable, FSA may cover the return freight in the form of a re-imbursement after the system has been inspected
and confirmed it is a valid warranty claim.
FSA will not cover any labour charge incurred by the consumer for the replacement or repair of a product. The
warranty is strictly parts only for the parts supplied by FSA. This warranty only applies to the original consumer of the
product and is non-transferable. If you have purchased the system through a re-seller, please contact them to facilitate
the warranty on your behalf. All replaced or exchanged parts become the property of FSA.
FSA does not cover the workmanship of the plumber who originally installed the system. Responsibility for damages
that occur during installation fall with the plumber.
Qualification for Warranty
These systems are designed to be installed on existing tap connections. A plumber is not legally required for this type
of installation unless a new tap or water outlet is required. The system is compliant to WaterMark AS/NZS 3497 and
therefore is compliant with permanent installation – however the units are not designed to operate that way.
Filter systems must be maintained as per FSA recommendations³ including the use of replacement filters, fittings and
components supplied by FSA. Failure to maintain the filtration systems using FSA supplied/approved products may
void warranty.
The warranty only applies if the product was used and/or installed in accordance with the user guide and/or installation
instructions. This warranty is given in lieu of all other express or implied warranties and manufacturer shall in no
circumstance be held liable for damages consequential or otherwise or delays caused or faulty manufacturing except
as excluded by law.
Warranties need to be approved by FSA to ensure the product was not incorrectly used, installed or claimed. False
and incorrect claims will be pursued at FSA’s discretion including chargeable inspection and transit costs incurred.
FSA does not take responsibility for retaining customer records, it is the consumer’s responsibility to retain all invoices
or proof of purchase from the original sale and ongoing maintenance records as proof of upkeep.
Warranty Exclusions
FSA Standard Warranty shall be void if the product sustains damage or failure resulting from
any of the following:
•If your system(s) fails to be maintained in accordance with recommended servicing and as per the
manufacturers operating instructions.
•Unauthorised or abnormal use or operation.
•Exposure to unsuitable environmental conditions*.
Warranty – Australia
This warranty is given by Filter Systems Australia (Jacknel Pty Ltd ATF The J & N Family Trust). ABN 64 855 305 562
Located at 1/38 Jade Drive, Molendinar QLD 4214. Ph 07 5597 4585 & email info@filtersystemsaustralia.com.au
This warranty is provided in addition to other rights and remedies you have under law. Our products come with
guarantees which cannot be excluded under the Consumer Guarantees Act.

Rev. 16/02/2021
Definitions
¹ Water Filter Systems are defined as systems designed for drinking water under our Water filter Systems, Reverse Osmosis Systems & Ultraviolet
Sanitation Categories – Excluding Cartridges and Shower Filters.
² Other products not manufactured or assembled by FSA are covered under the applicable manufacturer’s warranty.
³ FSA specifies recommended or required filter maintenance – see product information for further details. If a maintenance schedule is not
specified, filter maintenance is required at least once per 12 month period.
* Unsuitable environmental conditions include but are not limited to; Excessive hot or cold, Weather extremes.
Extended Warranty
Filter Systems Australia RO Portable Systems are eligible for an extended 4-year warranty (commencing no later than
12 months from sale date), to provide a total warranty of 5 years. This extended warranty is subject to terms and
conditions outlined below. This extended warranty covers the below parts of the system.
•GT8-31 Reverse Osmosis Housing
•GT8-0S Twin O-ring White Housing (GT1-39 Models Only)
•GT8-38S Twin O-ring Clear Housing (GT1-39 Models Only)
The following components are also eligible for an extended 12-month warranty (commencing no later than 12 months
from sale date), to provide a total warranty of 2 years. This extended warranty covers the below parts of the system.
•GT25-3S1/4 Diverter Valve
•GT10-31-DM DMfit ¾” Outdoor Tap Adaptor
•GT15-33S ¾” Laundry Block Adaptor
•GT14-2LS ¼” Inline Brass Tap
•GT13- 200/300/400 cc Flow Restrictor
•GT13-73LS 600cc Manual Flush Valve (GT1-39 Models Only)
Extended Warranty Qualification
Extended Warranty is valid only if the following conditions are met:
•All conditions under “Qualification for Warranty” are met.
•The System was installed in accordance with the manufacturer’s instructions
•The system was maintained in accordance with FSA recommendations in Maintenance – Section II & III.
Replacement Cartridges.
oCartridges must be purchased through FSA or participating supplier/reseller of FSA products
oProof of purchase for replacement filters required.
Other manuals for GT1-70
1
Table of contents
Other FSA Aquarium manuals
Popular Aquarium manuals by other brands

TMC Aquarium
TMC Aquarium V2 Auto Top Up Compact Instructions for installation and use

Waterbox
Waterbox REEF LX190.4 product manual

SuperFish
SuperFish Home 15 Warranty and manual

Interpet
Interpet AQUACUBE LED quick start guide

Aqua Exclusive
Aqua Exclusive C-30 PRO owner's manual

TMC
TMC Next Wave Tank 60 instructions

Aqua One
Aqua One AquaStart 600 instruction manual

Blue Marine
Blue Marine WavePower 1200 instruction manual

AQUA EL
AQUA EL Reef Circulator 2600 user manual

Aqua Medic
Aqua Medic DC Runner 400 Operation manual

All Pond Solutions
All Pond Solutions FW-7 manual

Aqua Medic
Aqua Medic Refill System easy Operation manual