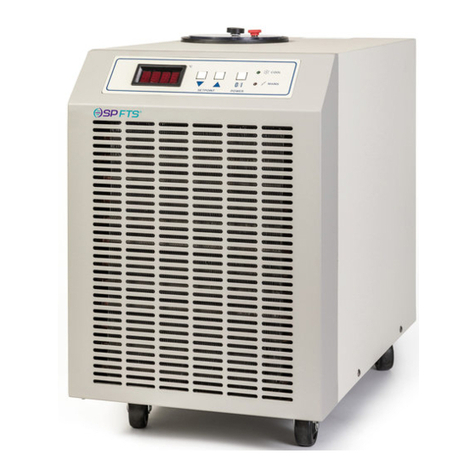
FTS MAXI-COOL User manual

RECIRCULATING CHILLER OPERATOR’S MANUAL
M
AXI
-C
OOL
with EDC Control


Rev 007, 04/12 i
© SP Scientific 2012
Copyright © 2012 SP Scientific. All marks herein are used under license.
All brand or product names mentioned may be trademarks or registered trademarks of their respective
companies.
Part Number MNL-044-A
Rev 007, 04/12
SP Scientific
815 State Route 208
3538 Main Street
Gardiner, NY 12525 USA
Stone Ridge, NY 12484
USA
(800) 431-8232
(845) 255-5000
SP Scientific Service
(877) 548-4666
SP Scientific Service Fax
(845) 687-0024
Website
http://www.spscientific.com/
This Recirculating Chiller Operator’s Manual contains confidential and proprietary information of SP
Scientific and may be used only by a recipient designated by and for purposes specified by SP Scientific.
Reproduction of, dissemination of, modifications to, or the creation of derivative works from this
Recirculating Chiller Operator’s Manual, by any means and in any form or manner, is expressly
prohibited, except with the prior written permission of SP Scientific. Permitted copies of this document
must retain all proprietary notices contained in the original.
The information in this document is subject to change without prior notice. Always confirm with SP
Scientific that you are using the most current version of this document. SP Scientific is free to modify any
of its products and services, in any manner and at any time, notwithstanding the information contained in
this document.
THE CONTENTS OF THIS DOCUMENT SHALL NOT CONSTITUTE ANY WARRANTY OF ANY KIND,
EITHER EXPRESSED OR IMPLIED, INCLUDING BUT NOT LIMITED TO THE IMPLIED WARRANTIES
OF MERCHANTABILITY AND/OR FITNESS FOR A PARTICULAR PURPOSE OR GIVE RISE TO ANY
LIABILITY OF SP SCIENTIFIC, ITS AFFILIATES OR ITS SUPPLIERS.
The terms and conditions governing the use of this Recirculating Chiller Operator’s Manual shall consist
of those set forth in written agreements with SP Scientific.

ii Rev 007, 04/12
© SP Scientific 2012
Important Symbols
WARNING! INJURY OR EVEN
DEATH MAY RESULT IF A
RECOMMENDATION MARKED
WITH THIS SYMBOL IS NOT
HEEDED.
CRUSH HAZARD. KEEP HANDS
CLEAR WHEN OPERATING DOOR.
ELECTRIC SHOCK DANGER!
USE APPROPRIATE CAUTION
TO AVOID INJURY OR DEATH.
CORROSIVE CHEMICAL. WEAR
SUITABLE GLOVES, SAFETY
GLASSES, AND PROTECTIVE
CLOTHING.
BURN DANGER! POTENTIALLY
HOT SURFACE. USE
APPROPRIATE CAUTION.
PROPERTY CAUTION! TO PREVENT
DAMAGE TO CHAMBER EQUIP-
MENT AND/OR LOAD, ADHERE TO
PROCEDURES MARKED BY THIS
SYMBOL.
DO NOT STORE FLAMMABLE
MATERIALS IN CHAMBER.
PRACTICAL OPERATING TIP.
THESE RECOMMENDATIONS
STREAMLINE UNIT OPERATION
AND PREVENT COMMON
OPERATOR ERRORS.
WEAR SAFETY GLASSES.
EXPLOSIVE MATERIALS HAZARD!
KEEP OBJECTS AWAY FROM HEAT.
Safety Warnings
Always transport the unit with care. Sudden jolts or drops may damage the refrigeration system.
Always observe all warning labels.
Always turn off the unit and disconnect the line cord from the available power source prior to performing anyservice or maintenance procedures.
Always turn off the unit and disconnect the line cord from the available power source prior to moving the unit.
Always empty the reservoir / bath chamber prior to moving the unit.
Never operate equipment with damaged line cords.
Never operate the unit without cooling fluid in the reservoir / bath chamber.
Never remove warning labels.
Never operate damaged or leaking equipment.

Rev 007, 04/12 iii
© SP Scientific 2012
Warranty Information
Maxi-Cool recirculating chillers are warranted by SP Scientific to be free of defects in material and workmanship when
operated under normal conditions as specified in the instructions provided in this manual. Please take this opportunity
to locate the serial tag on your new Maxi-Cool and record the information below for future reference. SP Scientific also
recommends that you complete and return your unit’s warranty registration card.
Model Number
Serial Number
Part Number
Limited Warranty
SP Scientific (the “Company”) shall warrant each of its products against defects in material or workmanship for a period
of 12 months from the date of shipment (whichever comes first) provided that the product is used in a reasonable
manner under appropriate conditions and consistent with the applicable operating instructions.
The obligation of the Company shall be, at its option, to repair or replace, without charge any parts that prove to be
defective within the warranty period, if the purchaser notifies the Company promptly in writing of such defect. No
product shall be returned to the Company without prior approval of the Company.
This limited warranty shall cover the costs of parts and labor to repair or replace all defective product(s) at the Seller’s
factory. For all products installed by the Company and located within the Company service travel areas, this warranty
shall cover transportation charges to ship the product to and from the Company’s factory and/or the costs of travel,
room and board if the Company’s employees conduct repair at the Buyer’s location. In lieu of repair or replacement at
the Company’s factory, the Company may, in its discretion, authorize a third party to perform the repair or replacement
at the Buyer’s location, and at the Company’s sole expense.
The Company shall not be responsible for labor charges payable with respect to persons other than Company
employees. Replacement or repair of parts pursuant to this warranty shall not in any way extend the original warranty
period. The Company shall not be responsible for any unauthorized repairs, replacements or product modifications, nor
will it be responsible for any product failures resulting from such unauthorized repairs, replacements or product
modifications negligently or otherwise made by persons other than Company employees or authorized representatives
of the Company. The buyer shall assume transportation charges to ship the product to and from the Company’s factory
and the costs of travel, room and board if the Company’s employees conduct repair at the Buyer’s location within the
warranty period if the product was not installed by the Company’s and/or is not located within the Company’s service
travel areas.
THE COMPANY DOES NOT MAKE AND EXPRESSLY DISCLAIMS ANY WARRANTY OF MERCHANTABILITY OR
FITNESS FOR A PARTICULAR PURPOSE OR ANY OTHER WARRANTY, EXPRESSED OR IMPLIED, WITH
RESPECT TO THE SALE, INSTALLATION, DESIGN OR USE OF ITS PRODUCTS. ADDITIONALLY, THE
COMPANY SHALL NOT BE LIABLE FOR ANY CONSEQUENTIAL DAMAGES RESULTING FROM THE USE OF OR
ANY DEFECTS IN ITS PRODUCTS.
The Company’s employees are available to provide general advice to customers concerning the use of the Company’s
products; however, oral representations are not warranties with respect to particular products or their uses and may not
be relied upon if they are inconsistent with the relevant product specifications for the items set forth herein.
Notwithstanding the above, the terms and conditions set forth in the Company’s formal sales contracts shall be
controlling and supersede any inconsistent terms contained herein, and any changes to such contracts must be made
in writing and signed by an authorized executive of the Company.
WARNING! THE DISPOSAL AND/OR EMISSION OF SUBSTANCES USED IN CONNECTION WITH
THIS EQUIPMENT MAY BE GOVERNED BY VARIOUS FEDERAL, STATE OR LOCAL
REGULATIONS. ALL USERS OF THIS EQUIPMENT ARE URGED TO BECOME FAMILIAR WITH
ANY REGULATIONS THAT APPLY IN THE USERS AREA CONCERNING THE DUMPING OF
WASTE MATERIALS IN OR UPON WATER, LAND OR AIR AND TO COMPLY WITH SUCH
REGULATIONS.

iv Rev 007, 04/12
© SP Scientific 2012

Rev 007, 04/12 v
© SP Scientific 2012
Contents
Important Symbols...............................................................................................................................................ii
Safety Warnings................................................................................................................................................... ii
Warranty Information .......................................................................................................................................... iii
Introduction .................................................................................................................1
Overview..............................................................................................................................................................1
Key Features...................................................................................................................................................1
Installation and Startup ...............................................................................................3
Initial Inspection...................................................................................................................................................3
Setup ...................................................................................................................................................................4
Physical Location ............................................................................................................................................4
Ambient Air Requirements...............................................................................................................................4
Water Requirements .......................................................................................................................................4
Electrical Requirements...................................................................................................................................5
Selecting a Process Fluid.....................................................................................................................................6
General Properties of Process Fluids..............................................................................................................7
Unit Check ...........................................................................................................................................................8
Short Circuit Hose Hook-Up............................................................................................................................8
Removal of Panels..........................................................................................................................................9
Installation..........................................................................................................................................................10
Add Fluid.......................................................................................................................................................10
Optional High Pressure Bypass Hook-up......................................................................................................12
Connect to the Process.................................................................................................................................13
Prime the Fluid Loop.....................................................................................................................................14
Operation..................................................................................................................15
System Preparation ...........................................................................................................................................15
Basic Operation .................................................................................................................................................15
Start Up.........................................................................................................................................................15
Control...........................................................................................................................................................16
Shut Down.....................................................................................................................................................16
High Pressure Bypass Adjustment.....................................................................................................................17
User Menu ................................................................................................................19
Overview............................................................................................................................................................19
Operating Mode.................................................................................................................................................20

Contents
Maxi-Cool
vi Rev 007, 04/12
© SP Scientific 2012
Proportional Control Menu.................................................................................................................................21
SPAN Menu.......................................................................................................................................................22
Miscellaneous Menu ..........................................................................................................................................23
Communications Menu ......................................................................................................................................24
PID Tuning.........................................................................................................................................................25
It and dt .........................................................................................................................................................26
CCt................................................................................................................................................................26
CPb ...............................................................................................................................................................27
Maintenance .............................................................................................................29
Lockout/Tagout Procedure.................................................................................................................................29
Removal of Panels........................................................................................................................................30
Fuse Replacement.............................................................................................................................................31
Cleaning.............................................................................................................................................................32
Draining Fluid.....................................................................................................................................................32
EDC Programmer’s Reference..................................................................................33
Overview............................................................................................................................................................33
Hardware ...........................................................................................................................................................33
Communications................................................................................................................................................34
Communication Data .........................................................................................................................................34
Data Format.......................................................................................................................................................34
Received Data ...................................................................................................................................................34
Transmitted Data ...............................................................................................................................................36
Transmitted Data Format...................................................................................................................................38
Acknowledge.................................................................................................................................................38
Error ..............................................................................................................................................................38
Value.............................................................................................................................................................38
Terminator.....................................................................................................................................................39
Commands and Codes ......................................................................................................................................39
Command Set ...............................................................................................................................................39
Alarm Codes..................................................................................................................................................46
RS-232 Error Codes......................................................................................................................................47
Sample Program................................................................................................................................................50
Program.........................................................................................................................................................50
Appendix A: Troubleshooting....................................................................................51
Appendix B: System Safeties and Alarms.................................................................55

Rev 007, 04/12 1
© SP Scientific 2012
Chapter
1
Introduction
Overview The Maxi-Cool is a portable, caster mounted recirculating chiller system that provides
temperature controlled fluid over a wide range. All SP Scientific chillers feature
innovative design, high-quality construction, and highly dependable components. This
chiller will reliably serve your cooling needs for years to come.
THE MAXI-COOL IS NOT INTENDED FOR USE WITH EXTREMELY FLAMMABLE FLUIDS
SUCH AS ISOPENTANE (C5H12).
Key Features
Small Footprint
Digital / RS-232 Control
+/- 0.1°C stability
Wide Temperature Range
Mechanical Refrigeration (air or water cooled)

Introduction
Maxi-Cool
2 Rev 007, 04/12
© SP Scientific 2012

Rev 007, 04/12 3
© SP Scientific 2012
Chapter
2
Installation and Startup
Initial Inspection
Your Maxi-Cool chiller was carefully packed and thoroughly inspected before leaving
the SP Scientific factory. However, in the unlikely event that shipping damage has
occurred, retain all packing material and contact your freight carrier immediately.
DO NOT ACCEPT DAMAGED SHIPMENTS FROM A CARRIER WITHOUT A SIGNED
NOTIFICATION OF DAMAGES.
Upon receiving your shipment, inspect all contents of your equipment for damage.
Uncrate and/or unwrap the unit. Carefully remove all packing material from the unit
and inspect for visible damage. Check packing material for small accessory items.
Inspect the inside of the unit and related parts for visible damage and leaks. Check for
visible liquid at or near the base of the unit.
If concealed damage or loss is discovered, contact the freight carrier immediately.
1
Keep all contents, packing material and related paperwork intact until a written report
is obtained.
Note: SP Scientific will cooperate in the matter of collecting your claim, but is not responsible
for the collection or free replacement of the material. When possible, replacement parts will be
shipped and invoiced to you, making them a part of your claim.
1
“Concealed damage or loss”refers to damage or loss that does not become apparent until the merchandise has been
unpacked and inspected. Should damage or loss be discovered, you may make a written request for inspection by the carrier's
agent within 15 days of the delivery date. You may then file a claim with the freight carrier or SP Scientific, depending on the
terms of your shipment. If your shipment was “FOB Destination” file your claim with SP Scientific and include the inspection
report and any other supporting documents. If your shipment was “FOB Shipping Point” file your claim with the freight carrier
and include the inspection report and any other supporting documents.

Installation and Startup
Maxi-Cool
4 Rev 007, 04/12
© SP Scientific 2012
Setup Physical Location
The area where you place the unit should be smooth, level, and capable of safely
supporting the weight of the machine. Space should be provided so that air can
properly circulate around the unit. If obstacles are blocking the airflow, the compressor
may overheat. This reduces performance, and can lead to early compressor failure.
The environment should be well ventilated to prevent excessive buildup of heat.
Normal room ventilation is usually adequate.
NEVER PLACE THE UNIT IN AND AREA WHERE EXCESSIVE HEAT, MOISTURE OR
CORROSIVE MATERIALS ARE PRESENT.
Ambient Air Requirements
This unit is designed for operation in a normal indoor environment. Systems should
not be mounted outside or otherwise exposed to the elements. The environment
should be free from air containing large amounts of moisture, salt or sulfur. If your
system utilizes an air-cooled condenser, the fan in the system draws ambient air
across the condenser (radiator) to cool the refrigerant.
Ambient Air Temperature Requirements
55°F to 69°F (12°C to 21vC)
Acceptable
70°F to 75°F (21°C to 24°C)
Ideal
75°F to 80°F (24°C to 27°C).
Acceptable, but some degradation of the cooling capacity of the
unit should be expected
80°F to 85°F (27°C to 29.5°C)
Expect reduced reliability. Warranty may be voided
Over 85°F (Over 29.5°C)
Not Acceptable. Warranty will be Voided.
NEVER OPERATE THE MAXI-COOL IN AN AREA WITH AN AMBIENT TEMPERATURE ABOVE
32°C (90°F).
Water Requirements
If your unit is water cooled it will require 2-3 gpm of clean utility water at 30-60 psi., at
a temperature of 13°C to 22°C.

Maxi-Cool
Installation and Startup
Rev 007, 04/12 5
© SP Scientific 2012
Electrical Requirements
The voltage and frequency requirements are specified on the serial tag on the rear of
the unit. Standard variances in frequency (+/-3Hz) and voltage (-5%, +10%) are
allowed.
CAUTION! IF YOU ARE UNSURE ABOUT THE AVAILABLE ELECTRICAL VOLTAGE SUPPLY IN
YOUR FACILITY, CONSULT A QUALIFIED ELECTRICIAN.
Verify that the facilities voltage matches the requirement for the machine,1. which is printed on the serial tag on the rear of the machine.
The electric service wiring must be of a large enough wire gauge that the2. voltage is maintained to the receptacle even when a full load is applied to the
receptacle. Additionally, the receptacle voltage should be measured while that
receptacle is under load.
This unit has a NEMA 5-15P or 6-15P line cord, install an appropriate (NEMA3. 5-15R or 6-15R) receptacle where the unit is to be run (some 50 Hz machines
are shipped with no plug).
Ensure the proper amperage circuit breaker is installed in the line and located4. near the equipment.
Ensure the POWER switch on the front panel of the machine is in the EMO5. position (0).
Plug in the line cord. Avoid the use of long extension cords, these cause a6. significant power drop between the wall receptacle and the machine.
Check for power at the unit by moving the POWER switch to the ON (I)7. position, the amber POWER light on the front panel should illuminate
Note: For Lock Out / Tag Out plug the appropriate device into the line cord.

Installation and Startup
Maxi-Cool
6 Rev 007, 04/12
© SP Scientific 2012
Selecting a Process Fluid
This recirculator is designed for operation with a host of industry standard fluids. The
fluid you choose will depend on what temperature range is required. Ethylene Glycol
and water (60/40 mix) is an inexpensive and readily available fluid for –25°C to +60°C.
For a fluid outside this temperature range, SP Scientific suggests using HT-30
Silicone Oil for –60°C to +100°C.
There are other fluids available, but to avoid potential application problems and to
speed troubleshooting; it is suggested that one of the fluids mentioned above be used.
DO NOT USE AUTOMOTIVE ANTI-FREEZE (it contains clotting agents). If for some
reason one of the above fluids is not suitable, and you select a different one, be sure
that it has a viscosity of less than 20 centistokes over the full temperature range of the
unit.
Note: All of the above mentioned fluids have viscosity of less than 20 centistokes across their
useable temperature ranges.
Since most systems have capability to achieve temperatures below 0°C, water should
not be used as a process.
Fluid
Temperature
Range (°C)
Flammability
Toxicity
Dielectric
Ethylene Glycol/Water (60/40 mix)
-25 / +60
Low
Low
Low
HT-30 Silicone Oil (Recommended)
-60 / +100
Low
Very Low
High

Maxi-Cool
Installation and Startup
Rev 007, 04/12 7
© SP Scientific 2012
General Properties of Process Fluids
Expansion/Contraction1.
It is important to note that some fluids expand as much as 14% from +25°C to
+125°C. Do not confuse contraction of the fluid for fluid losses.
Fluid Creep2.
Fluids will find any non-sealed connection.
Dissolved Gases3.
At room temperature, the fluid contains dissolved gas. As the fluid
temperature is increased the amount of dissolved gas decreases dramatically,
causing excess gas to be released from the fluid. This release of gas should
not be mistaken for boiling of the fluid.
Water Solubility4.
Process fluids are water-soluble. After long periods of operation at low
temperatures, water will mix with the fluid and decrease the performance of
the system. To remove the excess water, warm the fluid to room temperature
and pump the fluid through a molecular sieve or desiccant material.
Alternately, simply run the system at temperatures over 100°C, this will boil off
any water present in the fluid. (Only applies to the systems that are capable of
temperatures over 100°C)
Low surface tension and high vapor pressure5.
This means that the fluid evaporates very easily and that any improperly
sealed joints will leak.

Installation and Startup
Maxi-Cool
8 Rev 007, 04/12
© SP Scientific 2012
Unit Check
Short Circuit Hose Hook-Up
The input and output connections for the process fluid have 1/2” male pipe 1. threads on them.
Use a short hose (1/2” ID) to connect the process fluid outlet directly to the 2. inlet. This will allow the unit’s functionality to be verified before connecting to
your process.
Check that the drain is plugged and the drain valve is closed.3.

Maxi-Cool
Installation and Startup
Rev 007, 04/12 9
© SP Scientific 2012
Removal of Panels
Ensure the power is turned off (rocker switch to EMO (O)).1.
Loosen and remove screws along edges of the panels.2.
Pull off panels and place them out of the way.3.
Place a piece of clean cardboard under the unit.4.

Installation and Startup
Maxi-Cool
10 Rev 007, 04/12
© SP Scientific 2012
Installation
Add Fluid
CORROSIVE CHEMICAL!. WEAR SUITABLE GLOVES, SAFETY GLASSES, AND PROTECTIVE
CLOTHING.
WEAR SAFETY GLASSES.
Remove reservoir lid1.
Fill reservoir to 1” (2.5cm) from the top 2.
Replace and tighten lid.3.
Move the rocker switch on the front panel to the ON (I) position, the amber4. POWER light should illuminate.
Press the I/O button to start the unit5.
Use the buttons to adjust the display to +20°C.6.
Run the unit continuously for 3 to 4 hours with the short circuit hose hooked up and
the panels off.
If there are any fluid leaks in the system, they will be highlighted by the1. cardboard.
Also, measure the wall voltage while the unit is running to be sure that it is in2. an acceptable range (compare with voltage listed on serial tag on back of the
unit)
Call SP Scientific Service if there is a problem.3.

Maxi-Cool
Installation and Startup
Rev 007, 04/12 11
© SP Scientific 2012

Installation and Startup
Maxi-Cool
12 Rev 007, 04/12
© SP Scientific 2012
Now that the unit has its cooling medium, it is time to tie the hook the unit up to your
process. But first:
Press the I/O button to shut off the pump.1.
Move the rocker switch to the EMO (O) position.2.
Replace panels.3.
Optional High Pressure Bypass Hook-up
The high-pressure bypass allows the user to control the pressure of the process fluid
going to the application. This can be particularly useful if an application is sensitive to
pressure such as a glass jacketed reaction vessel.
1) Thread Part 1 onto the
process fluid output and
tighten. The barb should face
toward the back of the unit.
Long side of insulation goes
down. (remember to use pipe
thread sealant on all metal to
metal connections)
2) Thread Part 2 onto the
process fluid input and tighten.
The opening should point
toward right-hand side of the
machine (operators right when
looking at the control panel).
Long side of insulation goes
down.
3) Thread Part 3 onto
Part 2 and tighten so
that the hose points
toward the back of the
machine.
4) Pull insulation on Part
3’s hose back and slide
the hose clamp (Part 4)
onto the hose.
5) Slide the hose from Part 3 all the way
onto the hose barb on Part 1. Position the
hose clamp (Part 4) and tighten so that
the hose is firmly gripped between the
hose barb and the hose clamp.
Connect process fluid lines to
Parts 1 and 2 as per the
following instructions.
Table of contents
Other FTS Chiller manuals
Popular Chiller manuals by other brands

CIAT
CIAT HYDROCIAT LW ST Series manual

Trane
Trane Stealth RTAE installation instructions

Polar Refrigeration
Polar Refrigeration GH463 instruction manual

Carrier
Carrier AquaForce PUREtec 30XBEZE 200 Installation, operation and maintenance instructions

Nordcap
Nordcap NUOVAIR N150T1 Industry Maintenance manual

Trane
Trane BAYLOAM103 Installer's guide