FUELL Flluid 1 User manual


FUELL Inc.
244 Fifth Avenue, Suite A209, New York, NY 10001, USA
2021 06 006

Owner’s Manual Flluid 1 - Flluid 1S - Flluid 1E

Be sure to read this manual carefully to
familiarize yourself with your Flluid. The
expert treatment, in addition to the regular
care and maintenance of the Flluid serves
to maintain its value.
Cycling, riding your Flluid, and other simi-
lar activities carry a risk of injury or death.
Please read these instructions and com-
ply with all regulations regarding the use
of your Flluid in your jurisdiction.
For reasons of safety, please also pay at-
tention to the information about modica-
tions, accessories and spare parts.
Provide these operating instructions when
selling your Flluid to a new owner.
FUELL is constantly working on the fur-
ther development of all models. Please
understand that changes to the scope of
delivery in terms of shape, equipment and
technology are therefore possible at any
time. Therefore no claims can be derived
from the information, illustrations and de-
scriptions of these operating instructions.
All texts, illustrations and instructions of
this manual are to be found on the infor-
mation applicable at the time of printing.
The information contained in this manual
is valid on the printing date. Updates and
omissions are possible.
Reproduction, duplication or translation,
even in part, is not permitted without per-
mission. All rights under the copyright law
are expressly reserved to Fuell Inc. and
are subject to change.
FUELL Inc.
Safety symbols and notes
Please note:
WARNING
Precautions to protect against potential
accident, injury or death.
CAUTION
Important information and precautions that
prevent damage to the vehicle. Failure to
follow these precausions may lead to a
warranty exclusion.
NOTE
Special notes for better handling during
operation, checking and adjustment pro-
cesses as well as care work.
FOREWORD Flluid 1

An introduction to electric bicycles
What does the term Pedelec, S-Pedelec
mean and what is the difference between
them? In this section we explain the differ-
ent versions of the Flluid.
PEDELECS - with pedal assistance
The Flluid- 1 is a Class 1 Pedelec (Pedal
Electric Cycle) supporting the rider with
an electric motor with an output up to 500
watts but only while the rider is also pedal-
ing. The motor will assist up to a maxi-
mum speed of 20 mph. The bike can be
ridden faster via the rider pedaling, but the
motor will not assist at speeds in excess
of 20 mph. The degree of assistance can
be set in several stages and depends on
the pedal force and the rider's pedaling
frequency.
The denition of a pedelec follows from the
US Code of Federal Regulations Title 16
Chapter II Subchapter C Part 1512. On a
Federal level it is classied a bicycle. How-
ever, many states have additional laws gov-
erning the use of E-Bikes, helmet and age
requirements, as well as restrictions on
where they can be operated. Be sure to
check your local laws before operating
your
E-Bike.
SPEED-PEDELECS - with pedal assis-
tance
The Flluid- 1S and 1E are Class 3 Pede-
lecs (Pedal Electric Cycles) supporting the
rider with an electric motor with an output
up to 500 watts but only while the rider is
also pedaling. The motor will assist up to
a maximum speed of 28 mph. The bike
can be ridden faster via the rider pedal-
ing, but the motor will not assist at speeds
in excess of 28 mph. The degree of as-
sistance can be set in several stages and
depends on the pedal force or the rider's
pedaling frequency.
On a US Federal level the Flluid 1S is still
classied a bicycle, however, state laws
governing Class 3 Pedelecs vary even
more widely including some states requir-
ing riders have a valid license. Be sure
to check your local laws before operating
your E-Bike.
E-BIKES - with throttle (twist and go)
Class 2 E-bikes are similar to Class 1,
however, they also include a throttle that
enables the bike to operate at speeds up
to 20 mph without the rider pedaling.
At this time FUELL Inc. does not offer a
Class 2 E-Bike.
FOREWORD
Flluid 1

Flluid 1
f

Flluid 1
1
CONTENTS
USING YOUR FLLUID
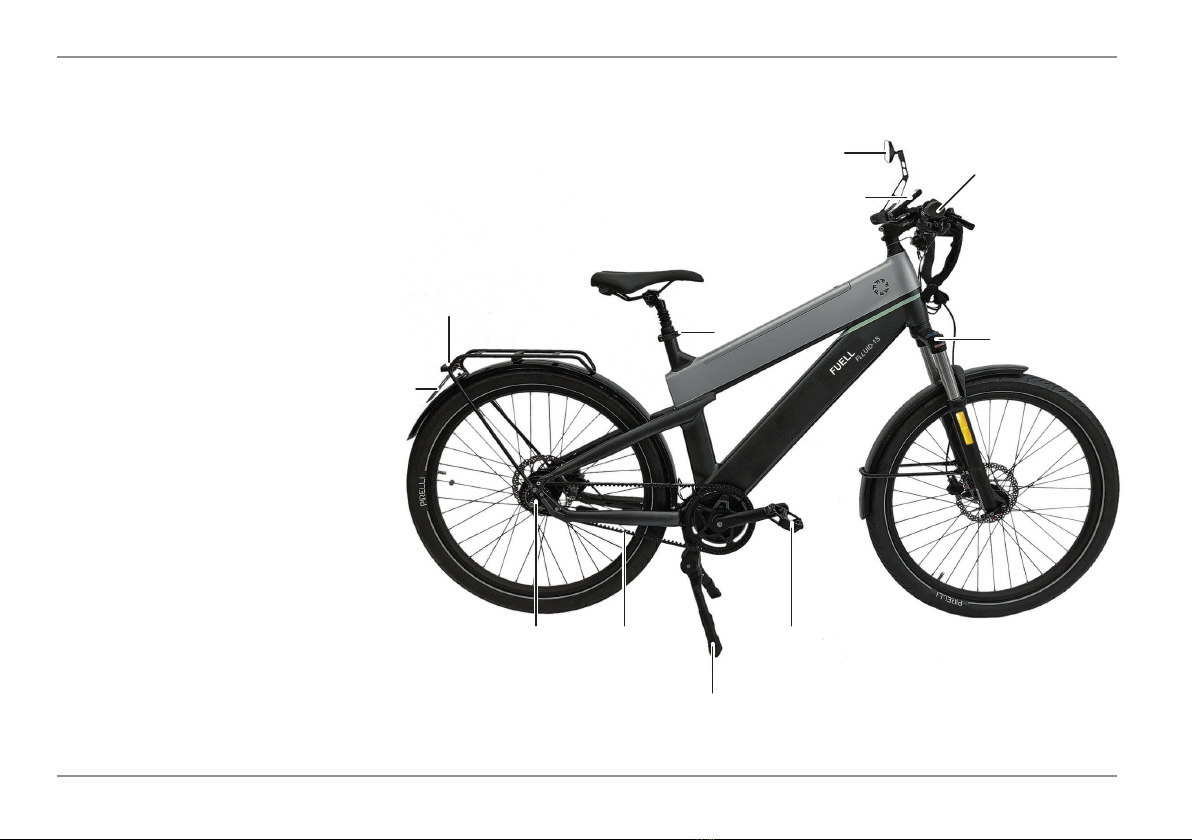
Vehicle Side Views ..............................2-3
Vehicle Dimensions ................................ 4
Handlebar Controls.................................5
Display - Introduction..............................6
Display Features.....................................7
Display Functions ...................................8
Display Control .......................................9
Riding with Engine Assistance................ 9
Shifting Between Speed and Distance
Mode.......................................................9
Push Assist (6 km/h).............................10
Data Reset............................................10
Setting up your Display....................11-17
Display - Basic Info..........................18-20
Product Information ..............................21
Battery Information ...............................22
Error Codes ..........................................24
Seat Position ........................................25
Seat Adjustment ...................................26
Handlebar Position ...............................27
Front Suspension Adjustment...............28
Safety NOTE: Charger .........................29
Charger Features .................................30
Safety NOTE: Battery......................31-32
Handling of the Battery and Charger....33
MAINTENANCE
Maintenance and Care ....................50-52
Cranks, Pedals ....................................53
Gear Shifting....................................54-56
Drive Belt Inspection.............................57
Spokes..................................................57
Steering Bearing Inspection .................58
Steering Bearing Adjustment................58
Battery Fuse Inspection........................59
TECHNICAL SPECIFICATIONS
Chassis............................................60-61
Engine and Battery Charger.................62
WARRANTY AND SERVICE
Warranty / Guarantee ......................63-64
Maintenance Schedule.........................65
Maintenance Records...........................66
Error Checklist.................................67-68
Bike Pass..............................................69
Charging the Battery........................34-36
Battery Charge Level............................37
Ring Lock .............................................38
Tire Pressure ........................................38
RIDING
Starting .................................................39
Riding in Pedelec Operation.................39
Range ..................................................40
Riding - Brakes.....................................40
Turning off your E-Bike.........................41
Security NOTE.................................42-43
Transport .............................................44
Transport of Loads ...............................44
Theft .....................................................44
Removing and Reinstalling Front Wheel
45
CARE
Bike Care.........................................46-47
Disposal................................................48
Technical changes, accessories, spare
parts, ....................................................49

Flluid 1
2
USING YOUR FLLUID
Right Side View
1. Quick Release Seat Adjustment Lever
2. Display
3. Rearview Mirror
4. Hand Controls
5. Front Suspension Adjustment
6. Pedal, Right
7. Stand
8. Drive Belt
9. Geared Hub
10. License Plate
11. Tail Light / Brake Light
5
6
2
9
7
1
4
3
8
10
11

Flluid 1
3
Left Side View
USING YOUR FLLUID
12 Horn
13 Headlight
14 Battery Lock, Upper
15 Battery
16 Battery Lock, Lower
17 Battery
18 Rear Brake
19 Pedal, Left
20 Drive Motor
21 Front Brake
22 Reectors
18
15
21 19
20
13
12
17
14
16
22

Flluid 1
4
Vehicle Dimensions
USING YOUR FLLUID
650 mm
1800 mm
1200 mm

Flluid 1
5
Function and SERVICE Handlebar Controls
USING YOUR FLLUID
Handlebar Controls, Left
1 Fixed Grip
2 Front Brake Lever
3 Panel
4 High/Low Beam Button
5 Horn Button
Handlebar Controls, Right -
Flluid-1, 1S
6 Rear Brake Lever
7 Fixed Grip
8 5-level shifting twist grip
Handlebar Controls, Right - Flluid-1E
9 Continuous shifting twist grip
8
6
7
2
1
34
5
9

Flluid 1
6
USING YOUR FLLUID
Product Name
- TFT-LCD-Display
- Model: APT TFT 850C 3
ElectricalSpecications
- IPS- Screen 3.2 Inches
- Input Voltage 24 V / 36 V / 48 V
- Nominal Operating Current: 40 mA
- Max Operating Current: 100 mA
- USB Charging Port: 5 V, 500 mA
- Operating Temperature:-20°- +70 °C
- Storage Temperature -30° - +80°C
Material and Dimensions
- Housing; ABS
- Screen: High Strength Acrylic
- Dimensions:
Display Housing 92 mm (L) x 60 mm
(W) x 14 mm (H)
Display - Introduction Specications Material / Dimensions

Flluid 1
7
USING YOUR FLLUID
Display Features
Features
- Suitable for low temperatures down to
-20 °C/ -4 °F.
- High-Contrast 3.2 inch color IPS matrix
display.
- Ergonomically shaped user interface
points, user-friendly
- Speed Display: Current Speed, Max
Speed, Average Speed
Metric or Imperial Units: Units are user
selectable
- Smart Battery Indicator: Accurate
state of charge
- 5 Levels of Assist:
Assist Level Power Assist %
1 50%
2 80%
3 150%
4 210%
5 300%
- Mileage Indicator:: Odometer / Trip-
meter / Clock / Ride Timer
- Power Display: Real time Power Indi-
cator, digital or analog
- Speed limit value indicator
- Error code indicator
- Light sensor
- USB charging port: 5 V / 500 mA

Flluid 1
8
USING YOUR FLLUID
Display Functions
Batterie
Scheinwerfer
Uhr
Geschwindigkeit
Einschalttaste
Unterstützungsstufe
Lei
st
ungsanzeige
Strecke
Zeit
Tachometer
Lei
st
ungsskala
Umschaltbereich
Lei
st
ungsschleife
Clock Battery
High Beam
Power Indicator
Speed Value
Speed Scale
Power
Time
Power Indicator
Power Assist Level
Power Scale
Switchable Page
Mileage

Flluid 1
9
USING YOUR FLLUID
Powering the display
To Switch On and Off
1. ON / OFF Button
2. DOWN / - Button
3. UP / + Button
Press and hold button (1) for 1.5 seconds
to turn the display and the drive system
on or off.
The display will auto shut off after 5 minutes
of inactivity. This setting can be adjusted in
the display menu.
NOTE
Head light and tail light turn on automa-
tically when display is powered on.
Driving with Motor Assistance
Briey press the keys DOWN/- (2) or UP/+ (3) to change the assist level. The strongest
assist is available at level 5; at level 0 there is no rider assist.
TOUR
3 50
2
3
1

Flluid 1
10
USING YOUR FLLUID
Briey press the ON / OFF button (1) to switch between speed and distance mode:
Trip Odometer Range (not available on Flluid) Trip
Time Max Speed Average Speed
If there is no input for 5 seconds, the display automatically returns to "speed"
Switch Between Speed and Distance Modes
1

Flluid 1
11
USING YOUR FLLUID
Push Assist 3.5 mph (6 kmh)
Press and hold the UP and DOWN but-
tons for one second to clear various tem-
porarily stored data:
AVERAGE SPEED/ MAX SPEED/ TRIP/
TIME.
Temporary data is stored in memory and
will not be lost when the display is pow-
ered off.
Data Reset
CAUTION
If riding conditions exceed the rider’s
ability, eg. For example, on steep slopes
ordifcultterrain,thepushassistcan
be used if the rider is not seated on the
e-bike.
NOTE
The push assist switches off if the speed
exceeds 3.5mph.
To engage the push assist press and hold
the DOWN / - button (1).
-Press DOWN / - (1) until the push as-
sist symbol P (2) appears on the dis-
play.
- To disengage the push assist release the
DOWN / - button (1).
1
2

Flluid 1
12
USING YOUR FLLUID
Press the power button (1) in quick succession twice (within 0.3 seconds) to access the
setup menus. Use the UP / DOWN (2/3) buttons to change the parameter setting and
to move to the next parameter. Press the power button (1) twice, to exit the menu.
- The display closes the menu automatically if no operation is performed for 30 sec-
onds.
- For safety reasons, the menu can not be acceseed while riding.
- The menu automatically closes if the bike starts moving.
The parameters are displayed in the following order:
Setting up your Display
2
3
1

Flluid 1
13
USING YOUR FLLUID
Setting up your Display
System: System: Press the UP or DOWN
key to toggle between metric and English
units.
Brightness: Press the UP or DOWN but-
ton to adjust the brightness of the back-
light. I is the darkest, IIIII the brightest.
Imperial

Flluid 1
14
Menü Menü
USING YOUR FLLUID
Setting up your Display
Automatic Shutoff: Press the UP or DOWN key to set the idle time until automatic
shutoff. You can choose between 1 to 9 minutes to switch off or off. When set to OFF, the
automatic shutdown is disabled. The default is 5 minutes.
Scenes: Analog Only (Default)
This manual suits for next models
2
Table of contents