fuji impulse V-300 User manual

http://www.fujiimpulse.co.jp
4-23-18 Shonai Sakaemachi, Toyonaka, Osaka 561-0834, Japan
Tel: (81)-06-6335-1234, Fax: (81)-06-6335-5719
.
TABLETOP VACUUM SEALER
V-300 OPERATING
INSTRUCTIONS

V-300 series Operating Instructions

1
ABOUT INDICATIONS
This manual uses the following warning system to alert the operator to possible danger.
Warning labels are also attached to the body of the V-300. Be sure to observe these warnings
and use sufficient care during operation.
Caution
Ignorance of this warning may partly damager the V-300 or cause light injury
Warning
Ignorance of this warning may severely damage the V-300 or cause serious injury.
Danger Ignorance of this warning may severely damager the V-300 or cause death
Thank you for purchasing the Fuji Impulse Co., Ltd V-300 series. Please read this instruction
manual carefully before the operation.
Keep this manual on hand when operating the sealer.
Set the heating time according to the material and thickness of the film.
As a result of certain design improvement, some details in this instruction manual might be
different from the machine you bought. If you have any question, please contact your local dealer
or fax Fuji Impulse at 81-06-6335-1234, Fax:81-06-6335-5719
Warning
Voltages and plug configurations differ according to various worldwide specifications. A verify those
of your particular unit before beginning operation. Connecting the power cord to an outlet of a different
Before using, always verify the voltage specification of your particular unit and operate it
at the correct voltage. Please note the following:
specifications is extremely hazardous.
1. The voltage specification of your unit is listed on the label which displays the serial number.
This label can be found on the machine body.
2. The explanations and illustrations in this operators' manual utilize the following standard plug
configurations most common in Japan. However, due to the various configurations in use worldwide,
these may not necessarily correspond with the one attached to your specific unit.
PREFACE
V-300 series Operating Instructions
This manual is designed to cover machines of various voltages

2
2
About V-300 ........................................................................................................... Page 3
1 Specifications .................................................................................................. Page 3
2 Accessory parts ...............................................................................................Page 4
3 Routine maintenance parts and replacement parts kit .................................... Page 4
4 Heating method and film thickness for sealing ................................................Page 5
5 Place and content of caution/warning labels ................................................... Page 5
6 Operating precautions ..................................................................................... Page 6
For safety operating .......................................................................................Page 6
For smooth operation .....................................................................................Page 7
Other safeguards ...........................................................................................Page 9
7 Description of parts and their functions ........................................................... Page 10
8 How to use your portable vacuum sealer correctly ..........................................Page 11
9 When air flushing is desired .............................................................................Page 15
10 How to remove the hoses ................................................................................Page 15
11 Changing routine maintenance parts .............................................................. Page 16
1 Indexing teflon glass cloth sheet ..............................................................Page 16
2 Replacing heating element ...................................................................... Page 17
3 Replacement of self adhesive sarcon sheet and self adhesive glass
4 Replace the Silicone rubber .....................................................................Page 19
5 Cleaning filter and replacement of filter cartridge .................................... Page 20
6 Replacing the nozzle ................................................................................Page 21
12 Adjusting sealing pressure ..............................................................................Page 22
13 Electrical schematic ........................................................................................ Page 23
14 Common problems and solutions ................................................................... Page 24
cloth tape ..................................................................................................Page 19
V-300 series Operating Instructions
Index

3
ABOUT V-300
The model V-300 &V-300-10D vecuum sealer is provided with a vacuum pump for reducing the air
in the pouch prior to sealing. Compared with conventional sealers, the additional function of removing
air from the package can increase the life of foods and prevent oxidation of metal parts, as well as
protecting parts against scratching cach other in the pouch.
In cases where high protection is required, it is recommended that a doexidizer or dessicant should
be used in conjunction with the vacuum seal.
Preservation of foods sometimes requires refrigeration, gas flushing, etc. Please check food
regulations for the proper method.
Remenber, laminated material should be used when vacuum sealing is necessary. Before carrying
out your packaging work, please do a number of tests to determine what the best are settings.
V-300 series Operating Instructions
.
1 Specification
Code
Model D
Power supply 110V or 220V AC (See unit for Voltage)
Rate power consumption 1050/560W 1050W
Weight 12 Kg 12.7 Kg
Dimensions of seal
300 mm Length
10/5 mm width 10 mm width
Vacuum capability
Maximum temperature of seal
Vacuum time 1 ~ 20 seconds

4
V-300 series Operating Instructions
2 ACCESSORY PARTS
Please make sure following accessories are included when you open the package.
If not, please contact with your local dealer. These accessories are located in the
parts cover under the body of machine.
Although the routine maintenance parts are sold separetaly, the replacement parts kit which
include a small number of each parts is very convenient and a good value.
Table
Heating element
Self adhesive
Cross-point screwdriver
Teflon sheet
glass cloth tape
3 ROUTINE MAINTENANCE PARTS/REPLACEMENT PARTS KIT.
Caution
V-300 and V-300-10D have different parts. When you order the parts, please specify the model.
Filter cartridge
Model V-300 V-300-10D
Spare heating elements 5 mm width 5 pcs -
10 mm width 5 pcs 10 mm width 10 pcs
Teflon glass cloth sheet 1 pc (250x315 mm) 2 pcs (250x315 mm)
Self adhesive glass cloth tape 1 roll (19mm x 5M) 1 roll (19 mm x 5M)
Philips screw driver 1 pc
Filter cartridge 1 pc
Table 1 pc
Routine maintenance parts Sales unit Included in parts replacement kit
Heating element (5mm/10mm width) 20 pcs 3 pcs (5mm or 10mm width)
Teflon glass cloth tape 2 pcs 2 pcs (250x315)
Self adhesive flass cloth tape 1 pc 1 roll
Silicone rubber 2 pcs 1 pc (12x310)
Filter cartridge 3 pcs 2 pcs
Sarcon sheet 2 pcs 1 pc (13x320)

5
4 HEATING METHOD AND FILM THICKNESS FOR SEALING
Warning/Caution labels are on the place where there is a possibility of machine damage
or human injury. Please take note of the position of the labels before operating.
1 The impulse sealer is a machine which sends strong electric current quickly to the
thin ribbon heater, which presses against the film and instantly heat seals packages.
Though this machine yields superior quality sealing, it is not compatible with thick films,
sponge-like sheets, and materials which are not able to withstand high heat.
into the pouch over time, negating the effectiveness of a vacuum seal
2Vacuum packaging requires a laminated pouch made with high-barrier property materials
such as nylon-based films. Using films with low gas barrier properties will allow air to seep
3 The V-300 and V-300-10D can seal pouches of the following thicknesses. It cannot, however
seal pouches thicker than that and may damage the unit should you attempt to do so.
5 PLACE AND CONTENT OF CAUTION/WARNING LABELS
If the warning labels peel off or are lost, please purchase
the proper label and place them in the appropriate
location.
The label is placed on
the pressure lever.
The label is placed on the back
of the timer.
Do not remove unless neccessary
The label is placed on the right
side of frame.
Caution hot
Electricshock
Caution
When you open the cover and
perform maintenance, unplug
the machine from the wall outlet
or an electric shock may occur.
Heating method Model Sealing width Film thickness
Single V-300 5 mm Less than 0.3 mm total.
Single V-300 10 mm Less than 0.4 mm total.
Double V-300-10D 10 mm Less than 0.5 mm total.
V-300 series Operating Instructions

6
Warning
1 In an emergency, unplug the power cord immediately
This sealer incorporates a number of safety devices and is carefully
designed to prevent fires or other malfunction. However, should all of
the safety devices fail simultaneously, there is a possibility of the teflon
catching fire due to a failure of the heating circuit's tripping mechanism
that results in the heating element overheating. Should smoke or fire
appear from the teflon, immediately turn OFF the power or unplug the
Warning
2 The power consumption varies according to the machine type.
Check that the capacity of the outlet is larger than the power
consumption of the sealer, and plug it firmly into the outlet. Use of
an outlet with a smaller capacity or an extension cord causes a drop
in voltage, resulting in malfunction or even fire, be sure to use an
appropriate outlet.
power cord from the outlet.
.M{
Warning
3 Do not splash water
Since this machine is not water proof, do not splash water on the
machine and not seal the pouch which contains liquid. It may cause
electric shock or damager.
Warning
4 Do not insert any metal objects into the sealing area
If any metal objects are inserted into the sealing area, they may
come into contact with the heater causing an electrical shock hazard.
Warning
5 When replacing routine parts, unplug the power plug
Routine maintenance parts will wear as you use your sealer. Perform
periodical checks of them and set-up an appropriate maintenance schedule.
Parts should be replaced in accordance with "Parts Replacement" on the page
of instruction manual and perform the steps correctly. Before replacing parts,
Warning
6 Do not modify the machine
Please do not tamper with the machine without the guidance or
permission of our engineers. Accidents or damage caused by
modification by the customer is the sole responsibility of the customer.
unplug the machine from the power source otherwise, it may cause electrocution.
For safety operating
6 Operating precautions
V-300 series Operating Instructions

7
Warning
7 Do not use the parts except those which are specified by our company.
Please replace with the specified parts. Otherwise, we do not
take any responsibility for the damage.
Warning
8 If the power switch automatically turns to the OFF position and the
machine shuts down, do not use the machine.
The power switch turns off automatically if the heating does not stop
within 4 seconds. Until investigation the cause of the machine shutting
down and repairs have been made, do not operate the machine.
Caution
9 Do not operate the machine in the following places.
The machine has a possibility of damager if you use in the
following places:
1 A place full of dust or powder.
2 A place of extreme temperature.
3 A place with high humidity
Caution
10 Do not place your hand in the sealing area
With prolonged use, the sealing area will become hot. You may burn
if you touch this.
Be careful not to pinch your fingers in the sealing area. Pressure is
applied to the sealing area.
Caution
11 Read the operating instruction carefully and operate sealer correctly
Accidents or damages caused by misuse of the machine not in
accordance with the operating instructions are the sole responsibility of
the customer.
Caution
12 Perform sufficient tests headband when you require a particularly
Sealing results vary according to heating, cooling, and pressure. A
certain type of film may greatly affect the necessary sealing settings.
Perform a number of sealing tests to find the most suitable heating
cooling time and pressure setting for your film before start sealing opeartion.
strong vacuum seat operation.
work productivity and unnecessary power consumption.
1 Heating time should be set at a minimum
Set sealer so that an acceptable seal is completed in the least amount of
heating time. Excessively long heating times (increasing the heat setting
unnecessarily) will damage the Teflon, glass tape and other consumables,
as well as result in heating element breakage. This will lead to decreased
For smooth operation
V-300 series Operating Instructions

8
2 Allow sufficient cooling time
Cooling temperature is important when using an impulse sealer. After
the film is heated, the film must be cooled with the frame and pressure
lever in the closed position. If cooling temperature is extremely lower,
the working efficiency will come down. So please set the appropriate
cooling temperature according with the film. Set the cooling time more
3 When the teflon, Silicone rubber becomes damaged
The teflon, silicone rubber will start to wear with use. Once they are
damaged, it will be difficult to achieve smooth and strong seals.
Thoroughly read how to replace the parts and be careful when doing so.
4 Prolonged operation
The temperature of sealing section will become high if the machine is
operated for a long time. Since sealing conditions will change, shorten
the heating time and lengthen cooling time appropriately.
5 Adjust sealing presure to make tight seal.
Follow the instruction to adjust sealing pressure, see the page 22.
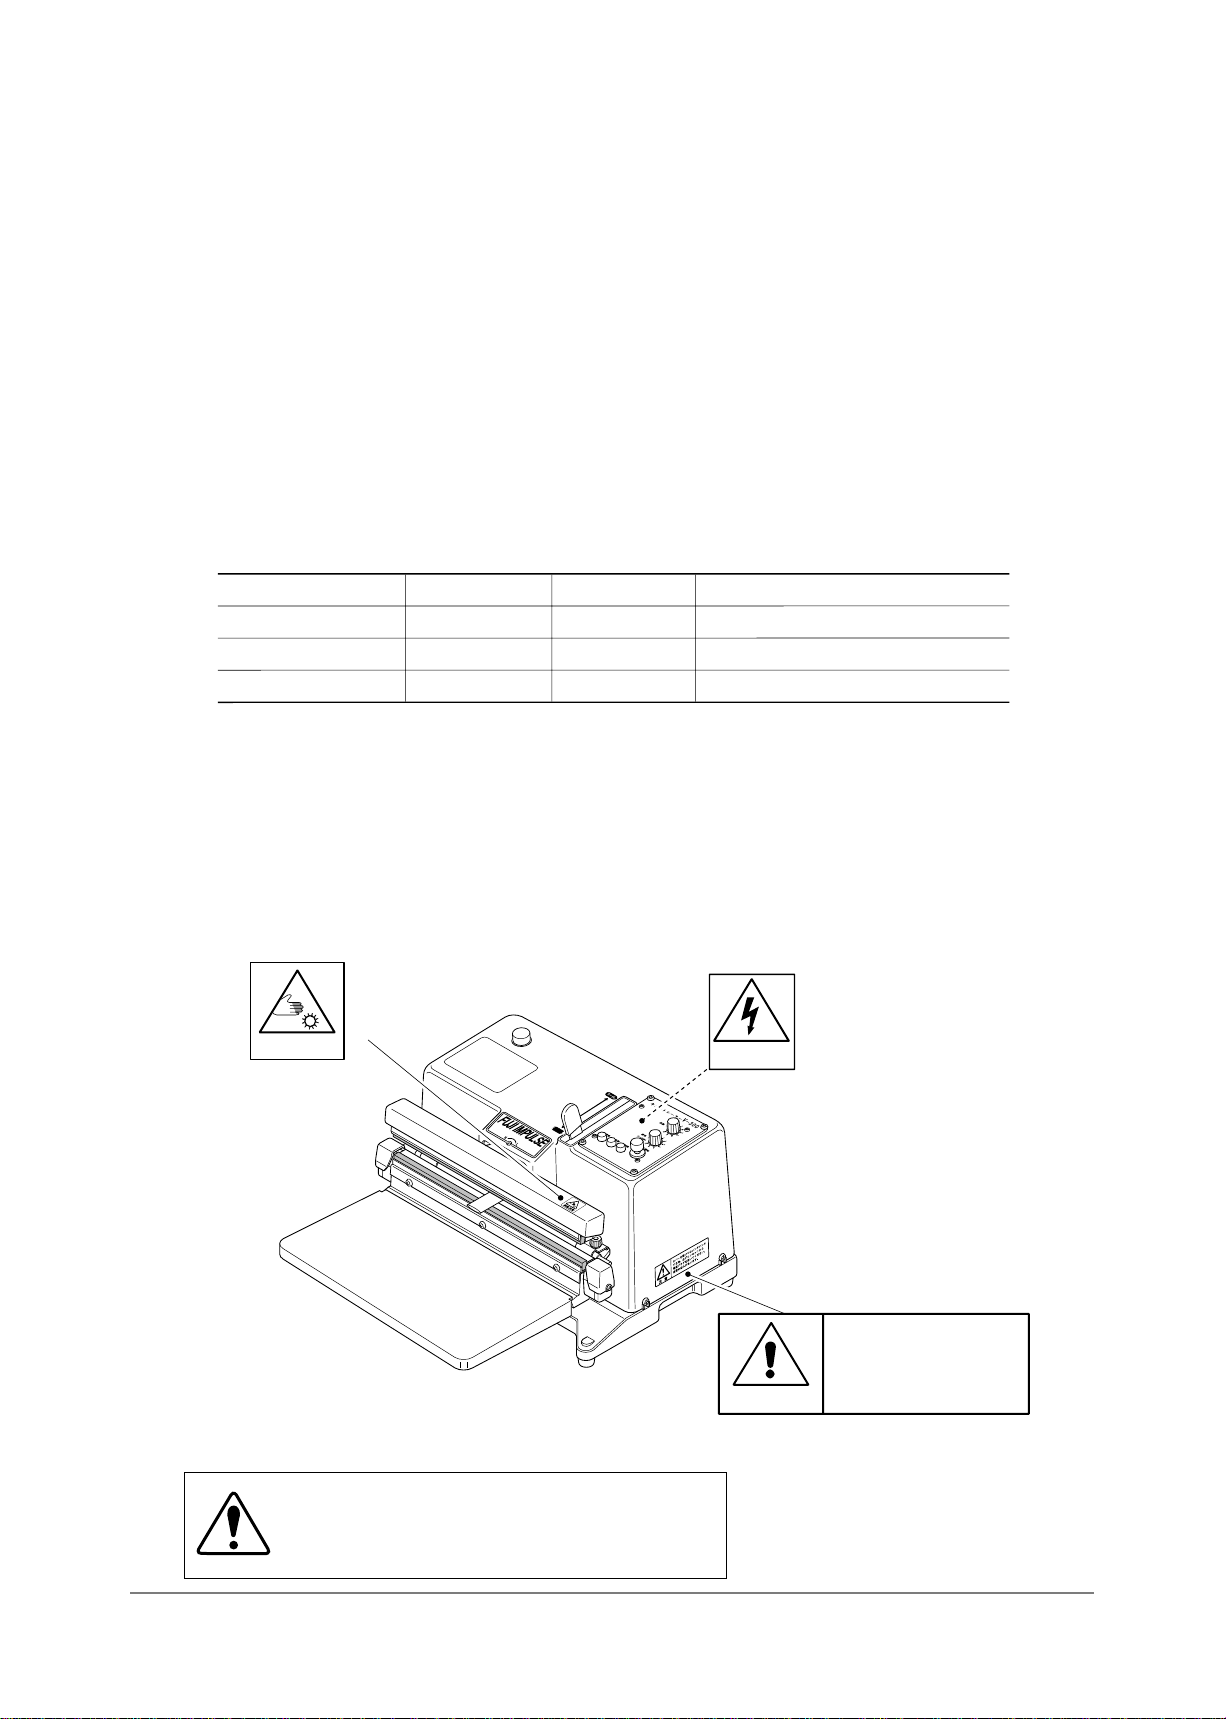
6 Dust in the sealing area.
Dust will prevent attainment of a smooth seal. It will also cause
damager to parts of the heater.
Before using the machine, clean the sealing area.
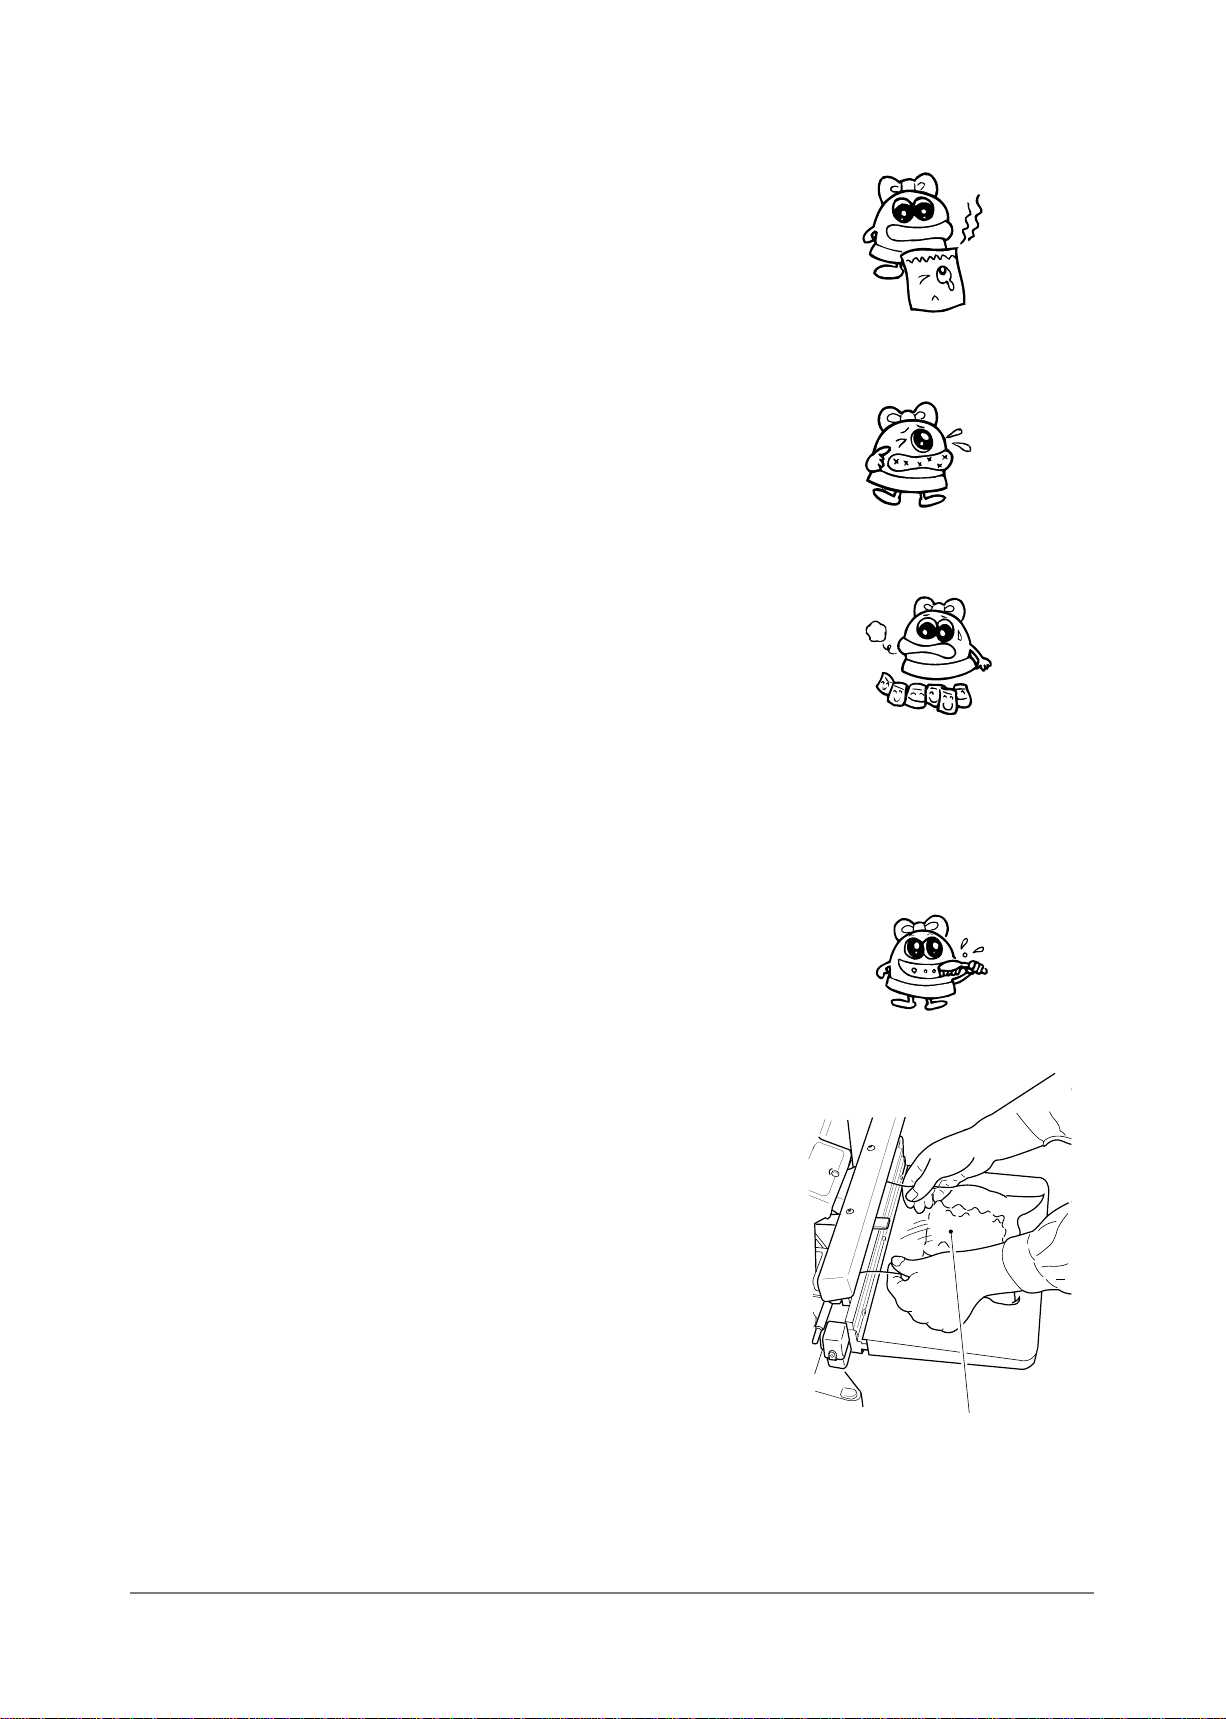
7 When vacuum sealing liquids or powders, regular maintenance of
the nozzle is necessary.
Particularly when sealing sticky liquids, the nozzle should be regularly
flushed with water and allowed to air dry. When flushing the nozzle,
water will pass through the filter and be discharged outside the unit,
so please ready a container to catch the water coming from the hose.
If the blockage in the nozzle is particularly severe, refer to the
instructions on page 21 on how to remove the nozzle. Remove as
illustrated and clean thoroughly.
H
L
Wet a sponge with water and place it
inside the pouch. Press the vacuum
button to flush the water from the
sponge through the nozzle. Repeat
this 2 - 3 times to loosen the blockage.
than 1.5 times of the heating time.
V-300 series Operating Instructions

9
8 If the surface of the Silicone rubber pab become damaged, this could
cause an air leak during the vauum operation. (you will hear a whining
sound). Should this happen, remove the pab and inspect it carefully for
any damage. If it is damaged, you can turn it over and use the other side.
Once both sides have become worn, please replace with a new one.
vacuum seat..
1 Perform sufficient tests headband when you require a particularly strong
Sealing results vary according to heating, cooling, and pressure. A certain
type of film may greatly affect the necessary sealing settings. Perfoem a
number of sealing tests to find the most suitable heating cooling time and
pressure setting for your film before start sealing operation.
2 Impulse sealer
Fuji Impulse sealers utilize an impulse heating system, meaning that
the heater section does not become hot simply because the power has
been turned on.
Please note, however, the sealing section may become hot after prolonged
operation.
Other safeguards
V-300 series Operating Instructions

10
V-300 series Operating Instructions
7 DESCRIPTION OF PARTS AND THEIR FUNCTIONS
FUJI IMPULSE
Power indicator lamp
Lights up when the power is turned on
Vacuum indicator lamp
Lights up when the vacuum pump is in operation
Heating indicator lamp
Lights up when the heating element is in operation
Vacuum pump start button
Vacuum begins when the button is pushed.
Vacuum time adjustment knob
Adjust for optimal vacuum based on bag size
and contents.
will extend beyond the sealing surface..
Impulse time adjustment knob
Adjustable for different types of
films and film thicknesses.
pulling vacuum.
Silicone sponge rubber
To hold pouch closed while nozzle is
Control cover screws
Remove to lift cover.
table to lowest point.
Glass cloth holding bar screws
Lossen screws to remove or change
glass cloth.
Parts cover
Accessories are stored here
Vacuum nozzle
This is for air removal
Table
Sealing is accomplished by pressing
Floating pressure bar
Frame cover
Nozzle lever
Pull nozzle lever toward you. The nozzle
Power switch
Push to turn on the power. Push again
to turn off the power
Terminal
Silicone rubber holding bracket
Remove when glass cloth needs to be
indexed or when replacing heating element
V-300
Remove the terminal cover when
replacing heater element (V-300 only)

11
8 How to use your portable vacuum sealer correctly
Setting up the machine
Set the machine on a horizontal surface. Do not use
machine in a location where it could tip over up or where
it would be unstable
Mounting table
The table can be installed as shown in the figure
on the right.
Insert screws located on the table into the designated
holes and fasten with the white plastic nuts.
Connecting power cord
Insert plug firmly into socket. make sure that the
power source has greater electrical power than the
machine's consumption before plugging it in.
outlets may overload and cause fire.
Warning
When the machine plug is operated on an outlet with
inadequate current carrying capacity, the plug and wall
Turn on the power
Push the power switch located on the top of the housing
frame. Power indicater lamp on the timer unit will light up.
Follow these instructions carefully when operating this machine.
FUJI IMPULSE
H sotti
FUJI IMPULSE
Power switch
Push
V-300 series Operating Instructions

12
V-300 series Operating Instructions
Adjust the seal setting with the impulse heat time control knob
Adjust impulse heat time control knob in accordance
with the material thickness. Please set the lowest temperature
which can seal. Seal speed will increase and useless consumption
of parts can be lost
●Adjust the heating time
(0.1 ~ 2.3 Sec.) by turning impulse heat time control
knob. Start with a short heat time and, based on a
number of seal tests, gradually adjust it to the shortest
heating time that sealing is still possible.
Warning
There is a possibility of danger (ie. fire), if
you do not take enough cooling time as
described in the instructions.
●Adjust the vacuuming
Necessary air removal time varies depending on the
pouch size and the volume of air to be drawn out.
Determine proper setting after several air removal tests.
Especially soft products may be crushed if the vacuum
is too strong vacuum time may be set up to 20 sec.
normally set the vacuum time to 10 sec.
Advance the nozzle
Pull nozzle lever towards you. The nozzle will extend
beyond the sealing surface. When only sealing, there is
no need to pull the nozzle forward.
Set the bag
1 Hold the bag with both hands at the seal position
Move your hands inward to allow enough of an
opening for easy nozzle insertion. Insert nozzle.
place the nozzle away from the contents..
2 Move your hands outward, stretching the pouch to
minimize wrinkles. As you stretch the pouch sideways,
press the table down into its locking position.
3 If the contents are solids, place the nozzle as near
as you can to the contents without covering the nozzle
opening. This will make it easier for the vacuum nozzle
to function. If the contents are liquid or powder, however
4 Arrange the contents neatly in the pouch.
Vacuum sealer
Vacuum sealer
H
L
FUJI IMPULSE
Pull
Sealing only
Nozzle lever
Vacuuming

13
Push vacuum pump start button
When you push the vacuum start button, the pouch
will start to collapse. This will occur for the amount of
time set on the vacuum timer. If the air removal is not
sufficient, push the vacuum pump start button again.
If the vacuum is still not sufficient, the above operation
may be performed repeatedly until the desired vacuum is
Press the table further down
When the vacuum timer stops, the pump stops. At this
time, push the nozzle lever back quickly with your right
hand and press the table further down with your left hand.
achieved. However, reset the vacuum pump timer before
MEMO To operate the vacuum manually
Stopping the air removal once the appropriate
vacuum level has been reached is as simple as
pushing the nozzle back to the "SEAL" position.
This will stop the vacuum in mid-cycle and allow
you to seal the pouch.
Cooling time
Insufficient cooling time could cause poor seals and
shorten the life of the routine maintenance parts.
In addition, poor seals could contribute to the
oxidation and/or deterioration of touch contents.
starting the operation again.
pressure factors and try again.
Sealing is complete
After heating and cooling have taken place, lift up
the pressure lever to complete the sealing cycle. If
the seal is unsatisfactory, adjust the heating/cooling/
FUJI IMPULSE
FUJI IMPULSE
Pull back nozzle
Press further
Vacuum pump start button
Impulse indicater
Release table 1 to 2 seconds after
impulse indicater light goes off.
V-300 series Operating Instructions

14
Turn off the power switch
Turn off the power switch once the sealing
operation is complete.
Pull out the power cord plug from the outlet if you do not
intend to use the machine for an extended period oftime.
Filter check
After the operation, make sure there are no foreign
objects in the air filter.
If there are, remove the filter by following the
instructions on page 20 and clean.
FUJI IMPULSE
FUJI IMPULSE
Push
Filter
.
FUJI IMPULSE
Nozzle
Power switch
V-300 series Operating Instructions

15
1 Using a philips (+) screwdriver, loosen the
screw which holds the frame cover and lift
it off.
2 Remove the IN hose from the air filter elbow
joint and set it so that it sticks out of the
machine frame.
3 Plug the OUT hose into the air filter elbow
joint which was connected to the IN hose.
9 When air flushing is desired
10 How to remove the hoses
When removing the vacuum/flushing air lines,
pull the hose while pushing on the release ring
around the elbow joint (this is unnecessary when
plugging in the hoses).
The check-valve-action of the collet will prevent
the hoses from slipping out. The leak-proof seal is
thanks to a V-type seal.
Caution
When the hose is only partially plugged in (under
18mm). it may cause an air leak and weaken the
vacuum. Make sure the hose is plugged in firmly.
The V-300 not only removes air, but can flush it as well. It is as simple as reversing the air hose
lines on the vacuum pump. The procedure for chaning the hose connections is detailed below.
OUT hose
Remove IN hose Air filter elbow joint
To nozzle
Filter
IN hose
Place outside the
frame cover Insert the OUT hose Air filter elbow joint
To nozzle
Release ring
(Pulloutthe hosewhilepushing this
V-seal
Hose
O-ring
Collet
Joint frame
Screw
Note how far the hose must be plugged in
V-300 series Operating Instructions

16
[Essentail tools] Phillips screwdriver
[Replace when] When the teflon sheet is torn, burnt or
sealing is dirty
Heating element are sold either by themselves
or as a part of the spare parts replacement kit
1 Remove glass cloth holding bar screws
2 Loosen plastic nuts enough so that the
glasscloth sheet can be pulled forward in the
direction of the arrow.
3 Pull until a new surface appears
4 Cut away excess with scissors.
5 Tighten plastic nuts and reassemble
Sealing parts are composed of the following routine maintenance parts. If they are damager,
proper replacement is important.
Warning Always unplug power plug before replacing any parts. There is a danger of
electrocution if conducted with the plug still inserted.
Warning Do not replace parts according to other methods not described in the operating
instructions. It is dangerous if incorrect methods are used.
The sealing section is constructed with parts illustrated in the diagram at left. When replacing parts,
be careful to arrange the parts in the same exact order.
Always unplug power plug from the wall
outlet before conducting any maintenance.
1 Indexing teflon glass cloth sheet
1 V-300 sealing section structure 2 V-300-10D sealing section structure
Pressure lever
Silicone rubber (white)
Teflon glass cloth sheet
Glass cloth tape
Sarcon sheet (13mm wide)
Heating element
Pressure lever
Silicone rubber (white)
Teflon glass cloth sheet
Glass cloth tape
Sarcon sheet
Heating element
Glass cloth tape
Glass cloth tape
Heating element
11 Changing routine maintenance parts.
Silicone sponge rubber
Teflon holding bracket
Teflon glass cloth sheet
Teflon roll core
Plastic nut 5mm (white)
Holder
V-300 series Operating Instructions

17
Heating element are either sold by themselves
(20pcs/set) or as a part of the spare parts
Warning If you lose screw C (M4x6), do not use longer
screw as a substitue for it. Otherwise, there is
a possibility of electrical short by touching
the screw D.
replacement kit.
Warning
For your safety always reattach the electrode
cover after installing the heating element.
Use a heating element specified for this
model. Using a different element may
cause transformer failure.
[Essential tools] Phillips screwdriver
[Replace when] The heating element has burned out,
sealing is dirty or uneven.
2 Replacing heating element
Components of electrode
Electrode bracket
Terminal plate
Terminal plate cushion
Electrode cover
Screw A
Screw C
(M4×6)
Screw B
Screw D
Terminal cover
(for single heating method)
V-300 series Operating Instructions

18
1 Remove the teflon glass cloth sheet (see to
page 16)
2 Remove the glass tape which is on the
upper side of heating element.
3 Loosen the terminal cover mounting screw
and remove the terminal cover. (As shown at
right) Then, loosen the screw in the hole on
the electrode cover and remove heating element.
5 When mounting, fasten the heating element
mounting screw C while holding the heating
element down with your finger to make sure
that it doesn't slip from position.
On the upper section, place the glass tape so
that it slightly overlaps both sides of the electrode
bracket.
Instructions on the replacement of the teflon sheet
for the lower section are detailed page 16.
Heating element
Glass cloth tape (19mm wide)
Teflon glass cloth sheet
Heating element
Push and turn the screw
with the included Philips
screwdriver
Screw C
Screw C
Upper section
Lower section
V-300 series Operating Instructions
Table of contents
Other fuji impulse Food Saver manuals