fuji impulse V-301 User manual

http://www.fujiimpulse.co.jp
Operating Instructions
V-301series
Table top, Nozzle type vacuum sealer
Printed OCT 2008
1st Edition 1.02E

V-301 series Operating Instructions Ver1.02E
2
WhenV-301 model is re-packaged
We would like to request the following items at re-packaging to transport this machine.
1. Don’t move the machine with the nozzle combined between.
2. At transporting, please fix the machine with packing as following illustration.
*For precaution of re-packaging, please keep the box and packing
Before
transportation
Packaging process
Cardboard (back)
Packing (top)
Pressure lever
Packing
(controller side)
Packing (filter side)
Sealer
Box
Cardboard (bottom)
Packing (lever)
Packing (holder)
Partition board
Table
Operating instructions
1.Insert the power
plug into the
wall socket.
2.Push NOZZLE IN /
OUT button to
withdraw the
nozzle.
3.Confirm the
nozzle not to
be combined
between
pressure lever
and holder.
Holder

V-301 series Operating Instructions Ver1.02E
3
₁₀₀V
₁₅A以下
₂₀₀V
₂₀A
₁₀₀V
₂₀A
₂₀₀V
₃₀A
₁₀₀V
₂₀A、₃₀A
Before using, always verify the voltage specification of your particular unit and
operate it at the correct voltages.Please note the following.
1 The voltage specification of your unit is listed on the label which displays the
serial number.
This label can be found on the machine body.
2 Please confirm the plug configuration on your specific unit.
The explanations and illustrations in this operator's manual utilize the plug
configurations most common in Japan.
The following marks are used in this manual to easily identify the conditions of risks,
damages, or some tips for the optimal use of your unit.
Caution � � Minor injuries or damages to the unit may occur when the instruction is
ignored.
Warning � � Severe injuries or fatal accidents may occur when the instruction is
ignored.
Danger � � Critical injuries or fatal accidents will almost certainly occur when the
instruction is ignored.
Attention �� Important Notes and Restrictions - Read the directions in order to avoid
misuse of the unit.
TIPS �� Great Tips and References when using the unit - Highly recommend
reading through the information.
Thank you for purchasing the Fuji Impulse V-301 series sealer.
Please read all of the safety and operating instructions before operating this machine.
Periodic maintenance and proper operation are necessary to ensure safety when using
this impulse sealer.
Keep this manual on hand when operating this sealer.
V-301 series controls heating time by dial setting on the control panel.
Also sufficient cooling time and pressure adjustment produce beautiful sealing
performance.
As a result of research to further improve the V-301 series, some details in the
operating instructions may differ from your actual machine. For operating problems or
product information, please contact your local dealer.
Foreword
This manual is designed to cover machines of various voltages
and plug configurations
About the warning labels
Warning Voltages and plug configurations differ according to various worldwide
specifications.
Always verify those of your particular unit before beginning operation. Connecting
the power cord to an outlet of a different specification is extremely hazardous.

V-301 series Operating Instructions Ver1.02E
4
1 Specifications ………………………………………………………………………………………… 5
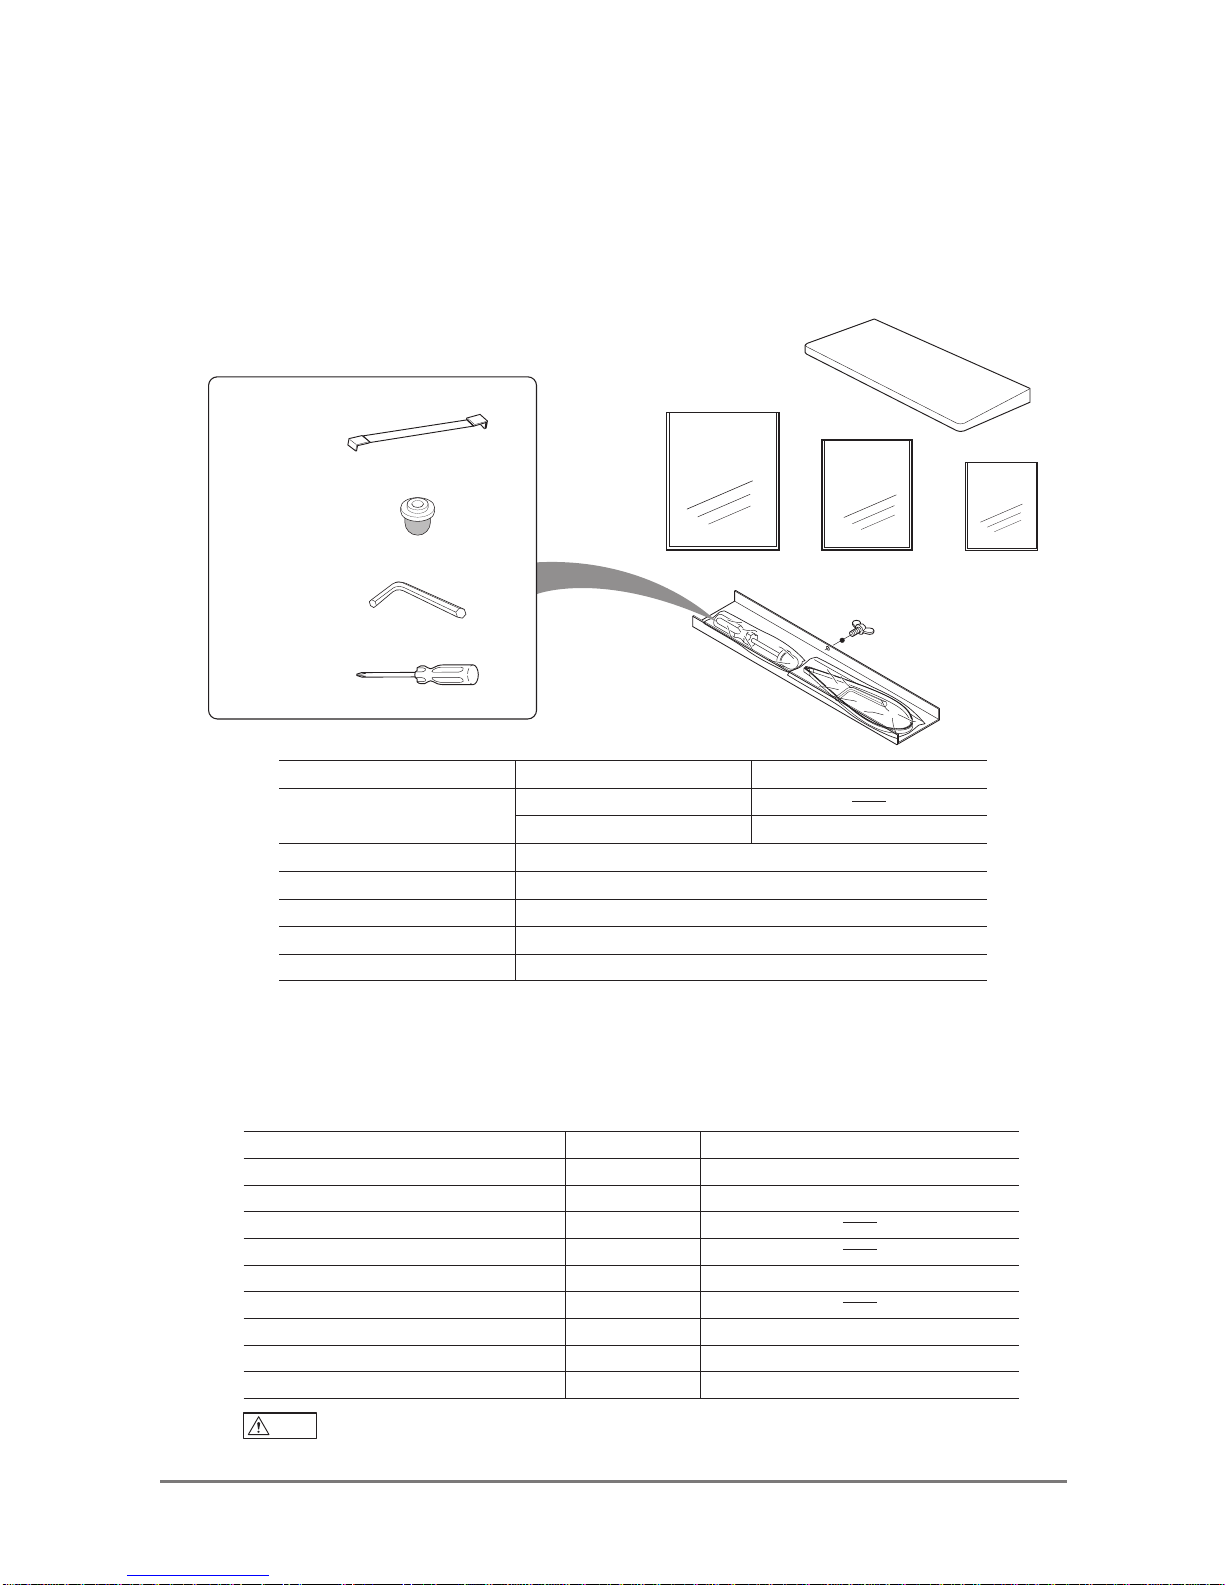
2 Accessories …………………………………………………………………………………………… 6
3 Replacement parts …………………………………………………………………………………… 6
4 Proper operating boundaries for the V-301 series ……………………………………………… 7
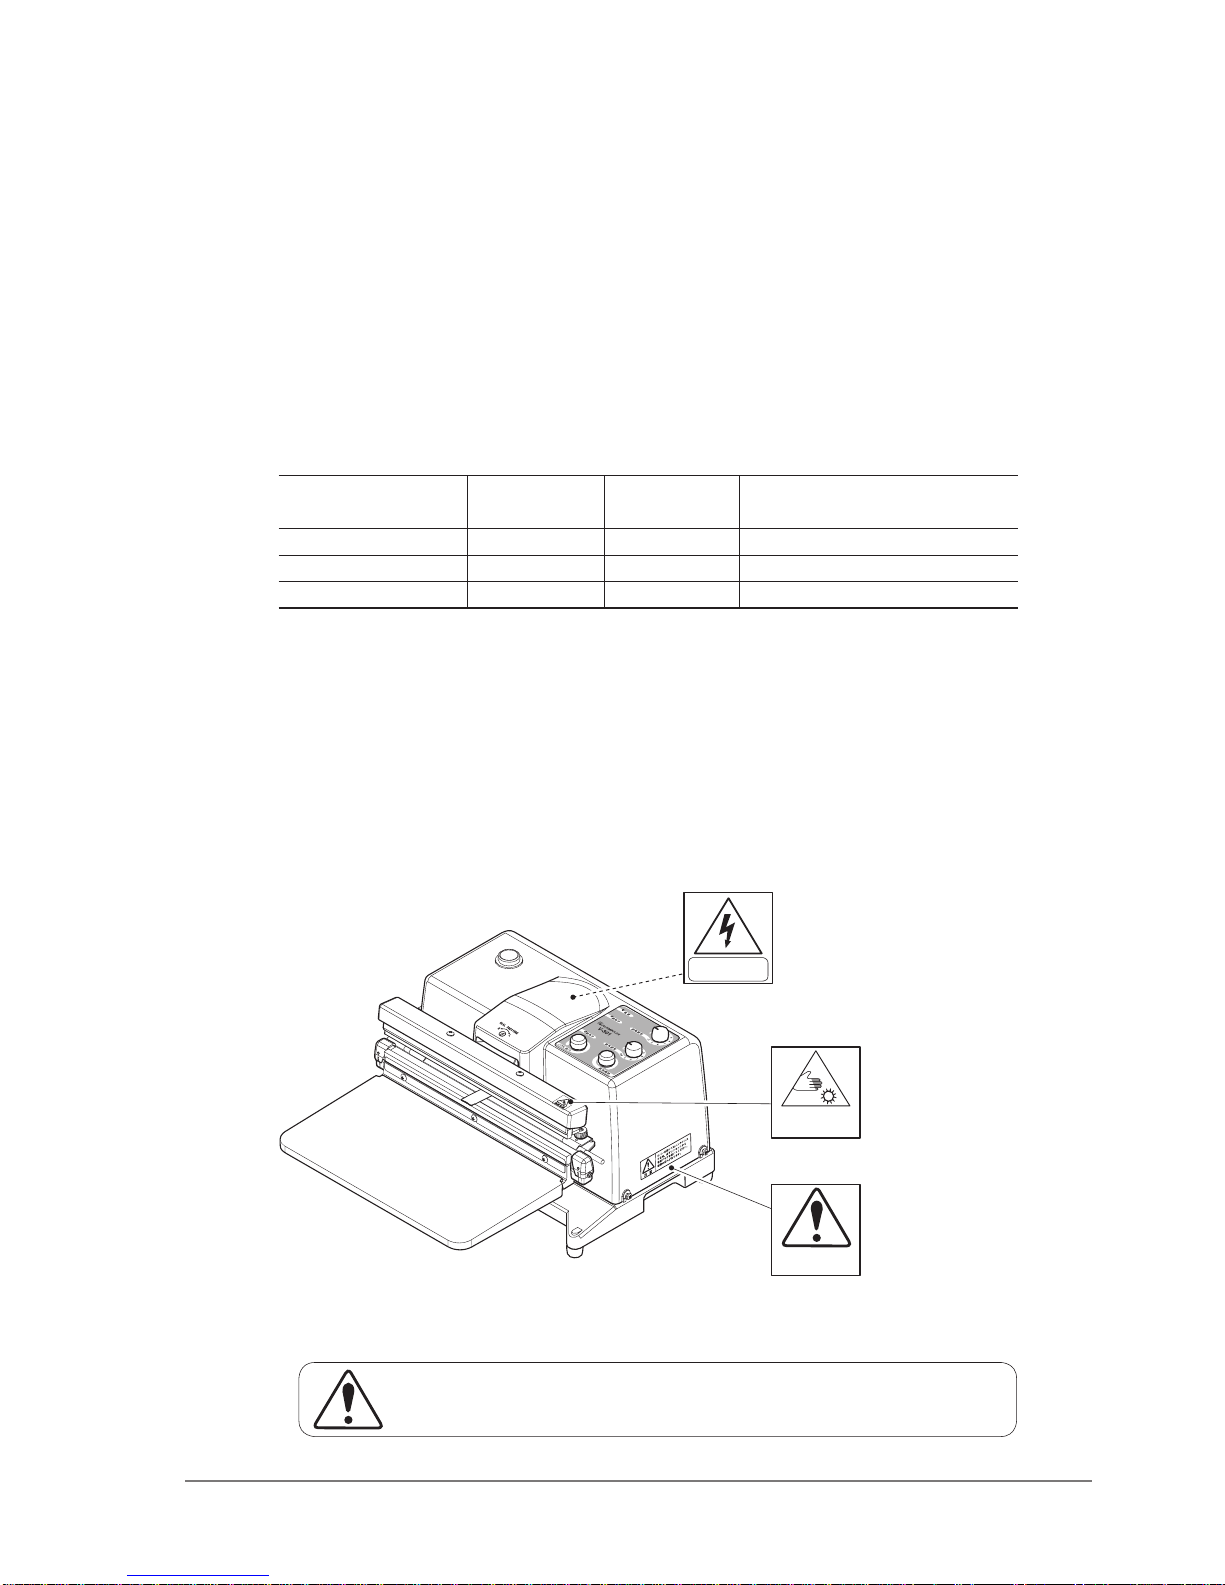
5 Warning - Caution label location and content …………………………………………………… 7
6 Operating precautions ………………………………………………………………………………… 8
For safety operating ………………………………………………………………………………………………………………………… 8
For smooth operation ……………………………………………………………………………………………………………………… 10
Other safeguards …………………………………………………………………………………………………………………………… 11
7 Major parts and functions ………………………………………………………………………… 12
8 Proper use of the sealer …………………………………………………………………………… 13
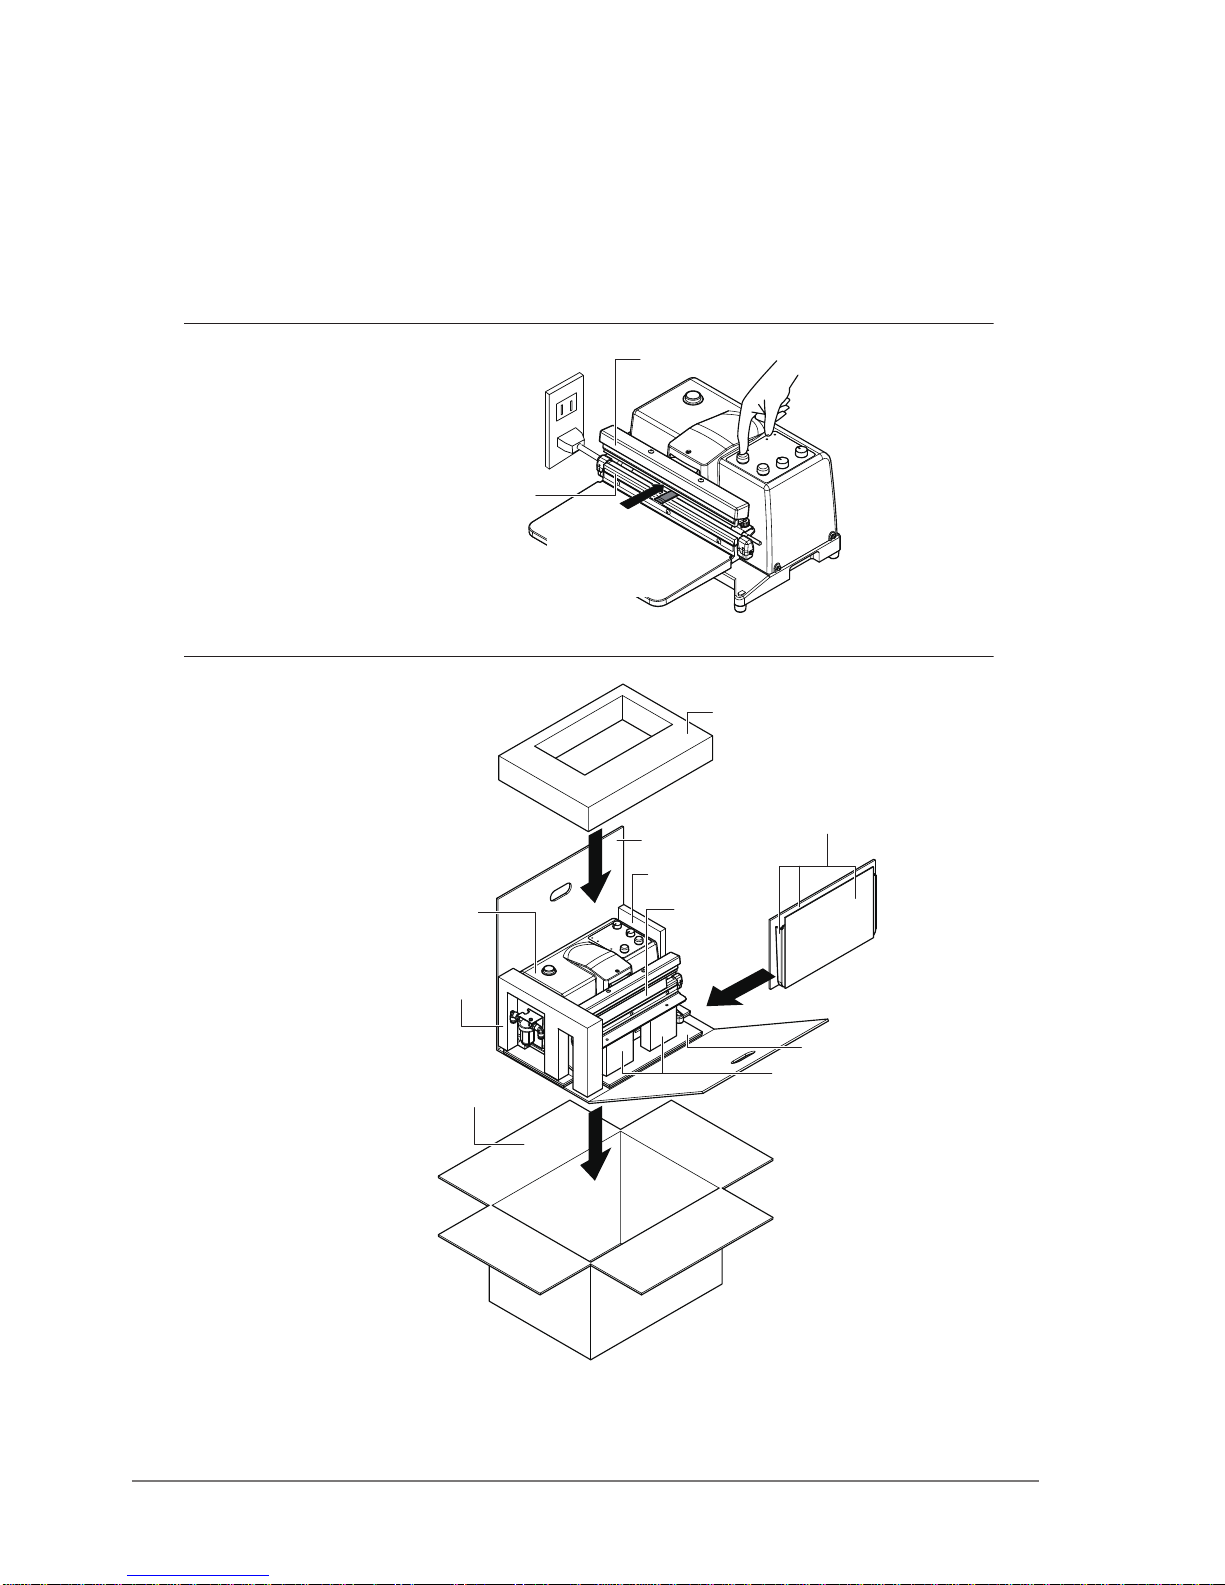
8-1 Set up the machine ………………………………………………………………………………………………………………… 13
8-2 Install the table ……………………………………………………………………………………………………………………… 13
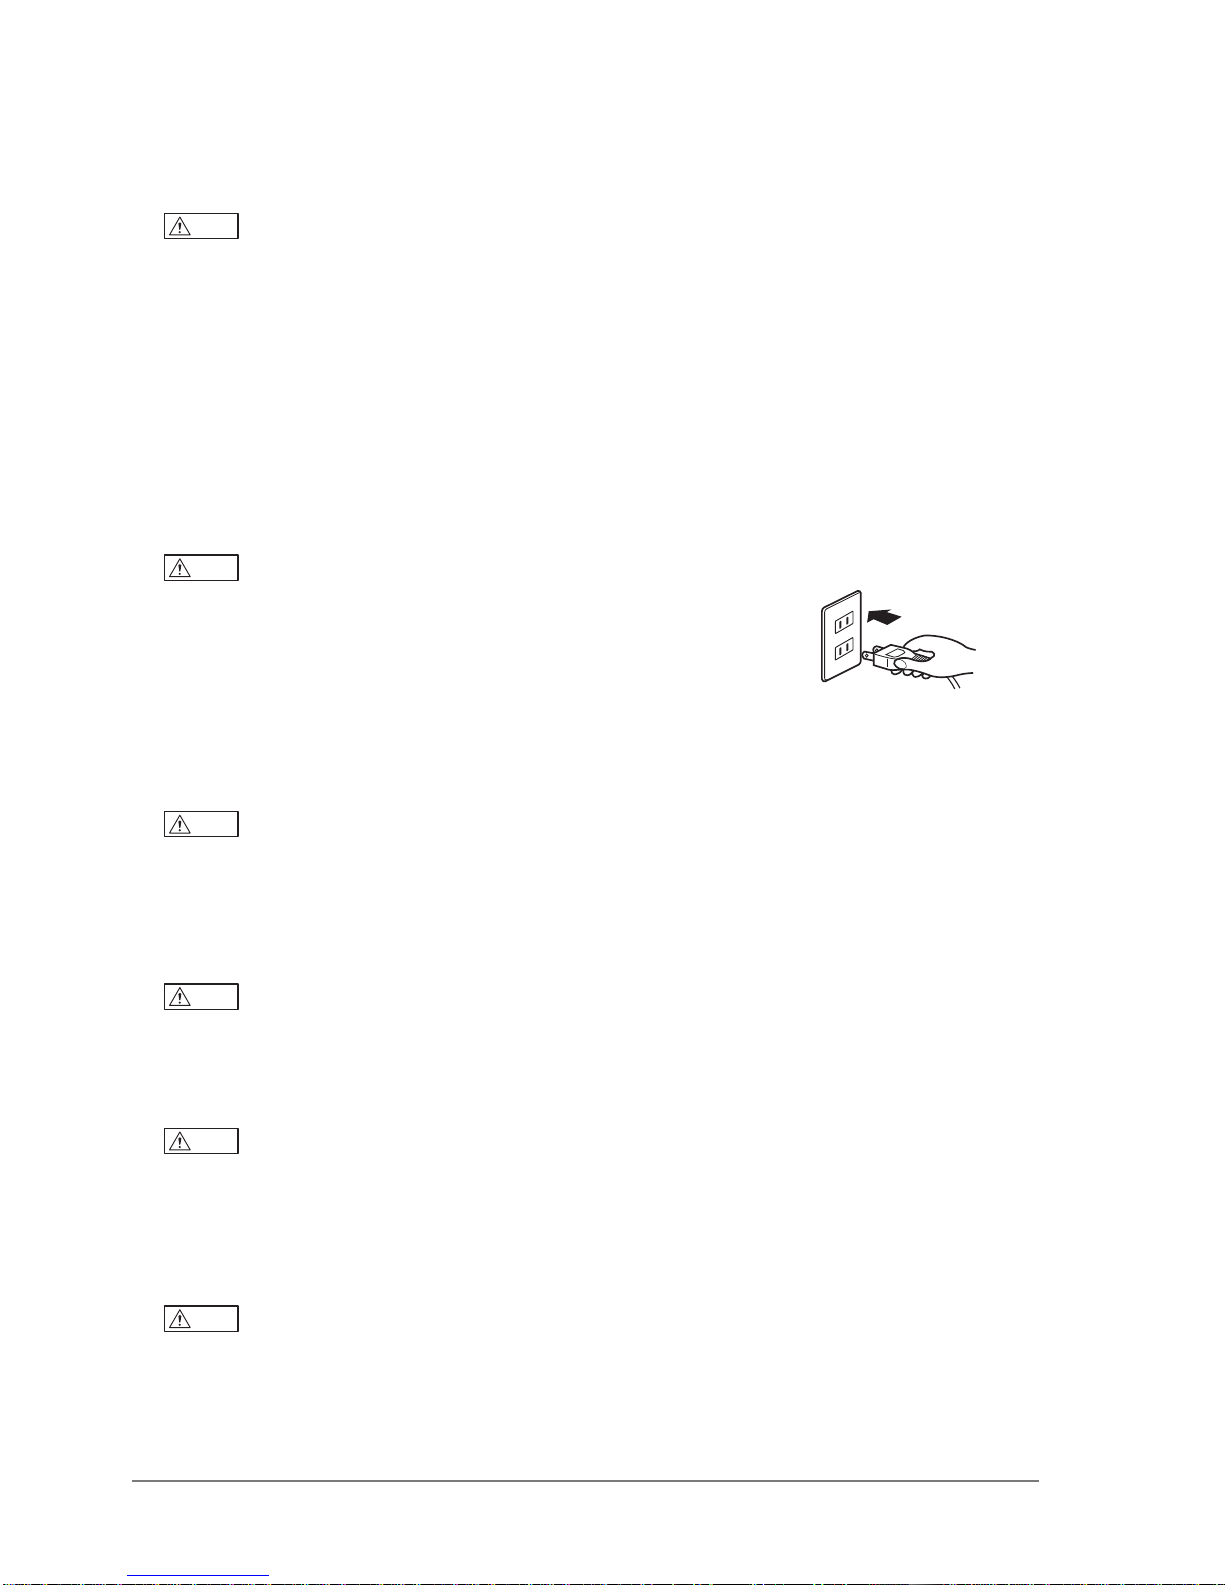
8-3 Connect the power cord …………………………………………………………………………………………………………… 13
8-4 Turn on the power …………………………………………………………………………………………………………………… 13
8-5 Adjust the sealing conditions ……………………………………………………………………………………………………… 14
8-6 Advance the nozzle ………………………………………………………………………………………………………………… 14
8-7 Set the pouch ……………………………………………………………………………………………………………………… 15
8-8 Push the table ……………………………………………………………………………………………………………………… 15
8-9 Push the vacuum start button …………………………………………………………………………………………………… 15
8-10 Press the table further down …………………………………………………………………………………………………… 16
8-11 Cooling process …………………………………………………………………………………………………………………… 16
8-12 Sealing is complete ……………………………………………………………………………………………………………… 16
8-13 Turn off the power switch ………………………………………………………………………………………………………… 17
8-14 Check after the operation ………………………………………………………………………………………………………… 17
9 Safety measurement and Error message ……………………………………………………… 17
10 When air flushing is desired ……………………………………………………………………… 18
11 How to remove the hoses ………………………………………………………………………… 18
12 Replacing he routine maintenance parts ……………………………………………………… 19
12-1 Slide the teflon sheet …………………………………………………………………………………………………………… 20
12-2 Change the heating element …………………………………………………………………………………………………… 20
12-3 Change the glass tape, sarcon sheet ………………………………………………………………………………………… 22
12-4 Change the silicone rubber (white)……………………………………………………………………………………………… 22
12-5 Clean the filter and replace the cartridge ……………………………………………………………………………………… 23
12-6 Replace the nozzle ……………………………………………………………………………………………………………… 24
12-7 Clean or replace the nozzle coupler …………………………………………………………………………………………… 25
13 Adjust the sealing pressure ……………………………………………………………………… 26
14 Electric diagram …………………………………………………………………………………… 27
V-301 Electric diagram …………………………………………………………………………………………………………………… 27
V-301-10D Electric diagram …………………………………………………………………………………………………………… 27
15 Common problems and solutions ………………………………………………………………… 28
Table of contents

V-301 series Operating Instructions Ver1.02E
5
"V-301 series" vacuum sealer is provided with a vacuum pump for reducing the air in the pouch prior
to sealing.
Set the suitable pressure and heating time according to the material or thickness of film, and take
sufficient cooling time to make a beautiful and strength seal without burning or melting of film.
Compared with conventional sealers, the additional function of removing air from the package can
increase the life of foods and prevent oxidation of metal parts. But it is not effective than what is
called as vacuum packaging.
In cases when the higher protection is required, we recommend to enclose the deoxidizer into your
package.
Preservation of foods sometimes requires refrigeration or freezing. Please don't overestimate the
freshness-keep sealing by this model.
Although this sealer keeps freshness of foods, the main purpose is protecting the contents against
scratching each other in the pouch, or lessening the volume of package to reduce the cost in
transportation.
Please make a sufficient test and take care to the various conditions to get the effective air-reduce
packaging.
*1 Vacuum pump capacity is measured before it is assembled.
*2 Ultimate pressure 0torr equal 0 Pa.
Code A Type
Model V-301 V-301-10D
Power supply AC 110V
50/60Hz
AC 220V
50/60Hz
AC 110V
50/60Hz
AC 220V
50/60Hz
Power consumption 1050/560W 1050W
Weight 12.3kg 13kg
Eective seal length
width
300mm
10/5mm exchangeable 10mm
Vacuum pump: Pumping speed Ultimate
pressure
10L /min (pumping sp eed) *1
-
58.6Kpa / 320torr (Ultimate pressure) *2
Sealing area maximum temperature 230℃
Vacuum timer 0.1
-
20 seconds, consecutive
Measurement 400 (W) X 420 (D) X 228 (H) mm
V-301 series
1 Specifications

V-301seriesOperatingInstructionsVer1.02E
6
Pleasemakesurethatalloftheaccessoriesdescribedbelowareincluded.
Ifnot,pleasecontactyourdealer.Theseaccessories(excepttableandstandardpouchsample)are
locatedinthepartscoverunderthebodyofmachine.
Whenthepackageisopened,makesurethattheheatingscaleonthecontrolispointingto1.
Ifnot,adjustheatingdialsothattheheatingscaleispointingto1.
Theseillustrationsarenotreducedequally.
Replacementpartscanbepurchasedthroughyourlocaldealerindividuallyorinkitsasdetailed
below.Pleasecontactwithyourlocaldealer.
Parts name V-301 V-301-10D
Spare heating element 5mm (W): 5pcs.
10mm(W): 5pcs. 10mm(W): 10pcs
Phillips screwdriver 1pc.
Hexagonal wrench 1pc.
Filter cartridge 1pc.
Standard pouch sample XL-28:3pcs., XL-20:3pcs., XL-14:3pcs.
Table 1pc.
Partsname Salesunit Contentsofmaintenancepartskit
Heatingelement(5mm/10mmwidth)
20or10pcs.
3(5mmor10mm)
Teflonsheet 2pcs. 2(315x250mm)
Glasstape13mm(W)X5Mroll 1pcs.
Glasstape13mm(W)X10Mroll 1pcs.
Glasstape25mm(W)X5Mroll 1pcs. 1pc.
Glasstape25mm(W)X10Mroll 1pcs.
Siliconerubber(white) 2pcs. 1pc.(12x310mm)
Filtercartridge 3pcs. 2pc.
Sarconsheet 2pcs. 1pc.(13x320mm)
2 Accessories
3 Replacementparts
Table
Standardpouch
XL-28 XL-20 XL-14
Partscover
Thesepartsarestoredin
thepartscoverunderthe
bodyofmachine.
Phillipsscrewdriver
Heatingelement
Filtercartridge
Hexagonalwrench3mm
Caution V-301andV-301-10Dhavedifferentparts.Whenyouordertheparts,pleasespecifythemodelexactly.

V-301 series Operating Instructions Ver1.02E
7
SHOCK
WARNING
CAUTION
HOT
CAUTION
1 The impulse sealer is a machine which sends strong electric current quickly to the thin
ribbonheater, which presses against the film and instantly heat seals the package. Though this
machine
yields superior quality sealing, it is not compatible with films thicker than that indicated in the
diagram below, sponge-like sheet, and materials which are not able to withstand high heat.
2 Vacuum packaging requires a laminated pouch made with high-barrier property materials
such as nylon-based films. Using films with low gas barrier properties will allow air to seep
into the pouch over time, negating the effectiveness of a vacuum seal.
3 Film thickness limits for the V-301 and V-301-10D are described below. The machine cannot
seal pouches which are thicker than the indicated. The machine may malfunction if you try to
exceed the limits of the machine.
Warning - Caution labels are placed in locations where there is a danger of injury to a person or
damage to the machine. Label location details are illustrated below.
Please check them before beginning operation.
Labels not readily apparent are indicated by dotted lines.
Heating method Model Heater width Film thickness
(combined total of two sheets)
Single side heating V-301 5mm 0.3mm or less
Single side heating V-301 10mm 0.4mm or less
Double side heating V-301-10D 10mm 0.5mm or less
4 Proper operating boundaries for the V-301 series
5 Warning - Caution label location and content
This label is located on the back of
the frame cover.
This label is placed on the
right side of the frame.
This label is placed on the
pressure lever.
If Warning, Caution labels peel off or are lost, please purchase the
proper labels and place them in the appropriate location.

V-301 series Operating Instructions Ver1.02E
8
Warning In an emergency, unplug the power cord
immediately
This sealer incorporates a number of safety devices and is
carefully designed to prevent fires or other malfunctions.
However, should all of the safety devices fail simultaneously,
there is a possibility of the teflon catching fire due to a failure
of the heating circuit's tripping mechanism that results in the
heating element overheating. Should smoke or fire appear from
the teflon, immediately release the table or turn OFF the
power.
Warning Confirm proper electric power source
Make sure power source has the specified voltage and electric
power as explained in the operating instructions. Do not use an
extension cord, as the machine may malfunction or may result
in fire. Machine will malfunction if connected to anything other
than the specified voltage.
Insert the electric power plug fully into the wall outlet.
Warning Do not pour water on the machine.
Do not splash water on the machine or use machine for
packaging liquids since machine is not waterproof. There is a
danger of electrocution or malfunction of the machine.
Warning When replacing parts, unplug the power plug
Maintenance of the machine is important. Parts should be
replaced in accordance with the operating instructions. There is
a risk of danger if the parts are not replaced properly. Before
replacing parts, unplug the machine from the power source.
Warning
Do not insert any metal objects into the sealing area
Please do not place any metal objects into the sealing area
during operation. This might cause electrocution.
Warning Do not use for pumping a liquid
Take care so that the vacuum nozzle does not draw a liquid.
(Use the optional large-volume filter for vacuum packaging of
watery items.)
6 Operating precautions
For safety operating

V-301 series Operating Instructions Ver1.02E
9
Warning Do not modify the machine
Modification of the sealer or the use of unspecified parts may
not only lead to damage of the machine. but there is also a risk
of danger to the operator. Please do not tamper with machine.
Accidents or damage caused by modification by the customer
is the sole responsibility of the customer.
Caution Do not place hands in the sealing area
With prolonged use, the sealing area will retain heat and
become hot. If you place your fingers in this area, there is a
possibility of burns.
In addition, sealing pressure is very strong. Please take
sufficient care not to pinch your fingers.
Warning If the power switch automatically turns to the OFF
position
If after 4 seconds heating is not complete after it has been
initiated, the power switch will automatically turn to the OFF
position. There is a possibility of the machine malfunction.
Do not operate the machine until the cause of the shut down is
ascertained and the problem has been addressed.
Caution Run test trials first before beginning operation
Achieving a superior seal with an impulse sealer is determined
by heating / cooling /pressure strength. Depending on the type
of film being used and the contents of the bag, heating / cooling
/ pressure strength conditions may drastically differ. Find the
optimum searing conditions by conducting seal tests before
proceeding.
Caution Do not use in the following places
Do not operate machine in the following places since there is a
danger of malfunction:
1 Dusty locations
2 Locations not within normal temperature
3 Locations with high humidity
Caution Use machine properly
Read this operating instructions carefully and operate sealer
correctly. Accidents or damage caused by misuse of the
machine not in accordance with the operating instructions are
the sole responsibility of the customer.

V-301 series Operating Instructions Ver1.02E
10
● Heating temperature should be set at a minimum
Set sealer so that an acceptable seal is completed in the least
amount of heating time.
Excessively long heating time will damage the teflon, glass tape
and other consumables, as well as result in heating element
breakage. This will lead to decreased work productivity and
unnecessary power consumption.
● Allow sufficient cooling time
With an impulse type sealer, residual heat after the heating
cycle has been completed is dispersed through the pressure
lever and machine frame, allowing the film to set under
pressure.
Be sure to allow sufficient cooling time (above 1.5 times than
heating time) for each cycle. (Refer to the "Proper use of the
sealer" section.)
Releace the table after “P” (indication buzzer for seal
completinon) sounds.
If the table is released before the buzzer, seal performance will
be not good.
● When the teflon, silicone rubber becomes damaged.
The teflon, silicone rubber will start to wear with use.
Once they are damaged, it will be difficult to achieve smooth and
strong seals.
Thoroughly read how to replace the parts and be careful when
doing so.
Caution Take care with nozzle
After the sealing process, nozzle comes forward automatically.
Please take sufficient care not to put hand or face close to
nozzle, beside if the sealed pouch is still left on the sealing area,
advanced nozzle might hurt the contents.
Caution When the frame cover is opened
Inside the sealer's body, there are metal plate parts which have
sharp edge.
If the frame cover would be removed for the replacement of
parts, please take care not to be injured.
For smooth operation

V-301 series Operating Instructions Ver1.02E
11
● To achieve a strong seal
Proper sealing pressure is important in achieving a strong seal.
Follow directions on proper sealing pressure adjustments and
set accordingly.
● When operating machine for extended periods of time
The machine's temperature will rise upon prolonged use of the
machine. As the temperature of the machine rises, the
condition of the seal will change. Thus, heating time should be
shortened and cooling time should be lengthened accordingly.
● Dust in the sealing area
Dust will prevent attainment of a smooth seal. It could also
cause damage to heating element and / or other routine
maintenance parts. Before using the machine, clean the sealing
area.
● When the sponge pad is damaged
The damage for surface of sponge pad (upper or lower) cause an
air leak at the vacuum operation (with a small noise). When such,
remove the sponge pad and check whether there is any
breakage on the surface. If it is broken, replace the sponged pad
to use opposite side. When both sides are damaged, exchange to
the new one.
● Run test trials before beginning operation
Depending on the type of film being used, heating / cooling /
pressure strength conditions will differ. Run test trials to find
the optimum sealing condition, especially when trying to find
the tightest seal possible.
● The Fuji Impulse V-301 series is an impulse sealer
Do not become alarmed if the sealing area does not become hot
after the power switch is turned to the ON position. The
machine has not malfunctioned.
The Fuji Impulse sealer uses an impulse method so that the
heating element will not become hot just by plugging the unit in
or turning the power switch to the ON position.
The heater will only become hot for an instant when the heating
process is in operation.
However, after extended periods of use, the sealing area may
become hot.
Other safeguards

V-301 series Operating Instructions Ver1.02E
12
POWERPOWER
HEAT CYCLEHEAT CYCLE
VAC CYCLEVAC CYCLE
HEAT TIMERHEAT TIMER
VAC TIMERVAC TIMER
VACUUM STARTVACUUM STARTNOZZLE IN/OUTNOZZLE IN /OUT
V-301-10D has same structure. Details are shown in the exploded view and parts list from
page 31.
7 Major parts and functions
V-301
Control Panel
Power lamp
Vacuum lamp
Heating lamp
Vacuum start button
Vacuum timer dial
Heating timer dial
Sponge pad
Frame cover fixing screw
Teflon holder fastening screw
Parts cover
Nozzle
Table
Pressure plete
Frame cover
Power switch
Electrode
Teflon holder
Light on when the power switch is
ON
ight on during the vacuum
pump activates
Light on during the heating cycle
Push and vacuum start.
Adjust the scale according to the material,
thickness of pouch (0.1 – 2.3 seconds).
Adjust the vacuum time (0.1 – 20 seconds)
and try to find the optimum vacuum degree
Packing for vacuum / provide the air
Loosen 2-3 times to remove the frame cover.
Loosen 2-3 times to remove the teflon sheet.
Accessories are stored in.
The air is removed
from this nozzle
Depress the table to seal.
Push around the depressing position
label.
Remove the teflon holder
in sliding the teflon sheet
or replacement of heating
element
Remove the electrode cover in
replacement of heating element
Push to turn ON.(switch down)
Push again to turn OFF
Nozzle IN/OUT button
Push to make the nozzle go
forward or back,
Control panel

V-301 series Operating Instructions Ver1.02E
13
Set the machine on a stable place which has a
horizontal surface.
When it is placed on the tip of the table, take
care not to drop the machine by pulling the cord.
1 Remove the plastic nut (white) on the table
and insert two threaded stop screws on
the bottom of the table through the two
fastening holes.
2 Then tighten two screws by the plastic
nut.
Push the power switch located on the top of the
frame.
Power lamp on the control panel will light up.
Use only as described in this manual.
There is a risk of danger and malfunctions may result if the machine is used not in accordance with
this manual.
Be sure to connect the power plug directly into
an outlet with an appropriate capacity.
Insert the plug fully into the outlet.
8 Proper use of the sealer
8-1 Set up the machine
8-2 Install the table
8-3 Connect the power cord
8-4 Turn on the power
Plastic nut(white)
Power switch
Push
Warning When the machine plug is operated on
an outlet with inadequate current carrying
capacity, the plug and wall outlets may
overload and cause fire.

V-301 series Operating Instructions Ver1.02E
14
₅
₆
₇
POWER
POWER
HEAT CYCLEHEAT CYCLE
VAC CYCLEVAC CYCLE
HEAT TIMERHEAT TIMER
VAC TIMER
VAC TIMER
VACUUM START
VACUUM START
NOZZLE IN /OUTNOZZLE IN /OUT
₅
₆
₇
POWER
POWER
HEAT CYCLEHEAT CYCLE
VAC CYCLEVAC CYCLE
HEAT TIMER
HEAT TIMER
VAC TIMER
VAC TIMER
VACUUM START
VACUUM START
NOZZLE IN /OUTNOZZLE IN/OUT
Push "Nozzle IN/OUT button". Nozzle will extend
beyond the sealing surface.
�Adjust the vacuum time
Turn the vacuum timer dial. Turn clockwise (to
larger scale) and vacuum time becomes longer.
(= 0.1 〜 20 seconds, and manual)
Normally, set the scale to 9. When a pouch is
small, decrease the scale and determine proper
setting after the several tests.
At the vacuum test, set the heating scale to 1.
Since sealing cannot be done, you can test the
vacuum setting many times.
Heating time and vacuum time can be adjusted
by the knob on the control panel. Set the proper
time by material, thickness and size of each
pouch (film).
�Adjust the heating time
Turn the heating timer dial. Turn clockwise (to
larger scale) and heating time becomes longer.
(= 0.1 〜 2.3 seconds)
Start with a short heating time, and based on a
number of seal test, gradually adjust it to the
shortest heating time that sealing is still possible.
It will increase the productivity and prevent the
waste of consumable parts.
8-5 Adjust the sealing conditions
8-6 Advance the nozzle Nozzle IN/OUT button
Warning If you do not take enough cooling
process as described in page 16, and set
a long heating time in continuous sealing
work, there is a possibility of fire.
Attention If vacuum timer is set to manual position,
buzzer sound "beep" one time (when
manual is reset, sounds two times), and it
means limitless time setting. Vacuum
process continues (vacuum pump
activates) until "Nozzle IN/OUT" button
is pushed.

V-301 series Operating Instructions Ver1.02E
15
H
L
1 Hold the pouch with both hands at the seal
position.
Move your hands inward to allow enough
of an opening for easy nozzle insertion.
Insert nozzle.
2 Move your hands outward, stretching the
pouch to minimize wrinkles.
3 If the contents are solids, place the nozzle
as near as you can to the contents without
covering the nozzle opening. This will
make it easier for the vacuum nozzle to
function.
If the contents are liquid or powder,
however, place the nozzle away from the
contents.
4 Arrange the contents neatly in the pouch.
When you push the vacuum start button, the
pouch will start to collapse. This will occur
for the amount of time set on the vacuum
timer. If the air removal is not sufficient,
push the vacuum start button again, or set
the longer vacuum time.
Press the table down with both hands.
When "Click" sounds, pressure lever is locked.
8-7 Set the pouch
8-9 Push the vacuum start button
8-8 Push the table
Vacuum start button
Caution Please push the area recommended by
the seal label on the table.
If another area (ex. end of the table) is
pushed, table might be damaged.

V-301 series Operating Instructions Ver1.02E
16
After heating and cooling process, release your
hand from the table, pressure lever is raised up
to complete the sealing cycle.
If the seal is unsatisfactory, adjust the heating /
cooling / pressure factors and try again.
Keep pressing the table until signal buzzer
sounds after the heating lamp turns off.
With an impulse type sealer, residual heat is
dispersed through the pressure lever and
machine frame, allowing the film to set heating
cycle has been completed.
In V-301 series, after the heating lamp goes out,
keeping – cooling process for 2 〜 3 seconds is
necessary to produce good sealing performance.
After the nozzle returns, press the table further
down with both hands.
Heating starts. Keep the pressure to the table.
8-12 Sealing is complete
8-11 Cooling process
8-10 Press the table further down
Heating lamp
Release table 2 〜 3 seconds
after the heating lamp goes off.
Push further
Caution Insufficient cooling time could cause
poor seals and shorten the life of the
routine maintenance parts.
In addition, poor seals could contribute to
the oxidation and / or deterioration of
touch contents.
Attention To operate the vacuum manually - when
you stop the air removal once the
appropriate vacuum has been reached,
push the Nozzle IN/OUT button during
the vacuum process.
This will stop the vacuum in mid-cycle
and nozzle returns to the initial position.
Attention If vacuum timer is set to manual position,
vacuum time becomes limitless. Vacuum
process continues until "Nozzle IN/OUT"
button is pushed.

V-301 series Operating Instructions Ver1.02E
17
After the operation, make sure there are no
foreign objects in the air filter.
If there are, remove the filter and clean it by
following the instructions on page 23.
● If the heating time is over
If after 4 seconds heating is not complete after it
has been initiated, the power switch will
automatically turn to the OFF position. There is
a possibility of the machine malfunction.
Do not operate the machine until the cause of the
shut down is ascertained and the problem has
been addressed.
●
If the control board could not catch the initial setting
"Beep" alarm "P, P, P,------P, P, P,------" continues
until the power is turned off.
● When the heating element is not attached correctly
『"Beep" alarm "P, P, P, P,------ P, P, P, P,------"
continues until the power is turned off.
● When the nozzle doesn't work correctly
"Beep" alarm "P, P,------P, P,------" continues until the
power is turned off.
Turn off the power switch once the sealing
operation is complete.
Pull out the power cord plug from the outlet if
you do not intend to use the machine for an
extend period of time.
9 Safety measurement and Error message
8-13 Turn off the power switch
8-14 Check after the operation
Filter
Power switch
Push
Caution To prevent the nozzle from the damage,
always push Nozzle IN/OUT button to
storage the nozzle before turning the
power off.

V-301 series Operating Instructions Ver1.02E
18
19〜
21mm Releasering
(Pulloutthehose
whilepushingthis.)
V-seal
Hose
O-ring
Collet
Jointframe
Screwsection
Notehowfar
thehosemustbepluggedin
1 Using a Phillips screwdriver, loosen the
screw which holds the frame cover and lift
it off.
2 Remove the IN hose from the air filter
elbow joint and set it so that it sticks out
of the machine frame.
3 Plug the OUT hose into the air filter
elbow joint which was connected to the IN
hose.
The air becomes provided into a pouch.
When removing the vacuum / flushing air lines,
pull the hose while pushing on the release ring
around the elbow joint.
This is unnecessary when plugging in the hoses.
The check-valve-action of the collet will prevent
the hoses from slipping out.
The leak-proof seal is thanks to a V-seal of joint.
V-301 series sealer does not only remove the air, but can flush it as well.
It is as simple as reversing the air hose lines on the vacuum pump.
The procedure for changing the hose connections is detailed below.
10 When air flushing is desired
11 How to remove the hoses
Elbow joint OUT hose
Filter
To nozzle
Remove IN hose
IN hose
Place outside the frame cover
Insert the OUT hose
Elbow joint
To nozzle
Caution When the hose is only partially plugged
in (under 18mm), it may cause an air leak
and weaken the vacuum.
Warning Always unplug before replacement of the
parts.
There is a danger of electrocution if the
plug is still inserted.

V-301 series Operating Instructions Ver1.02E
19
The sealing area is constructed with parts illustrated in the diagram below.
When replacing the parts, be careful to arrange the parts in the same exact order.
Replace parts according the following directions in order to maintain your machine in optimum
operating condition.
12 Replacing he routine maintenance parts
Construction of the sealing section
Pressure lever
Silicone rubber
Teflon
Glass tape (25mm)
Sarcon sheet
Heating element
Heating element
Glass tape (13mm)
Glass tape (13mm)
Pressure lever
Teflon
Glass tape (25mm)
Sarcon sheet
Heating element
Glass tape (13mm)
Silicone rubber
V-301 V-301-10D
Always unplug the power plug from the wall outlet before
conducting any maintenance.
Warning Always unplug the power plug before replacing any parts. There is a danger of electrocution, if
conducted with the plug still inserted
Warning Do not replace parts according to other methods not described in the operating instructions.
Otherwise electrocution or burns may occur.
Warning When replacing parts, always use only specified parts sold through Fuji Impulse. Otherwise
malfunction may occur.

V-301 series Operating Instructions Ver1.02E
20
[Essential tools] Scissors, Phillips screwdriver
[Replace when] Teflon sheet is torn, burnt or
sealing is dirty.
Teflon sheet is sold by themselves or as a part of
the replacement parts kit.
1 Remove the teflon holder securing screws
(3pcs.) and pull out the end of teflon sheet.
2 Loosen the plastic nuts enough so that the
teflon sheet can be pulled forwar in the
direction of the allow.
3 Cut away excess with scissors.
4 Set the end of teflon sheet between the
teflon holding bracket and holder, and
fasten the screw.
5 Roll up the teflon roll bar to lose the slack
of teflon sheet.
6 Turn the plustic nuts and fix the teflon roll
bar.
[Essential tools] Phillips screwdriver
[Replace when] Heating element has burnt out,
Sealing is an uneven.
Heating element is sold by themselves or as a
part of the replacement parts kit.
The electrode section consists of the parts shown
at left.
12-1 Slide the teflon sheet
12-2 Change the heating element
Teflonholder
Teflon sheet
Holder
Teflonsheet roll bar
Plastic nut(white)
Sponge pad
Screw D
Electrode bracket
Electrode plate
Electrode plate spring
Electrode cover
Screw C (M4x6)
Screw B
Screw A Terminal cover
(mounted to the
single side heating
model only
Warning If you lose screw C (M4x6), do not use
longer screw as a substitute for it.
Otherwise, there is a possibility of
electrical short by touching
Caution When replacing the heating element, be
sure to check the damage of glass tape
or sarcon sheet. If they are damaged,
Otherwise, heating element touches with
sealer's frame directly, and it may occur
the electrical short.
TIPS Heating element can be replaced without
removing the electrode cover to prevent
the loss of electrode or screws.
This manual suits for next models
1
Table of contents
Other fuji impulse Food Saver manuals