FujiClean Residential CE Series User manual

Contractor Installation Manual
Residential Systems
CE and CEN Models
Rev. 2-25-18
Fuji Clean USA ●41-2 Greenwood Road ●Brunswick Maine 04011 ●Tel: 207-406-2927 ●Fax: 207-406-2929 ●www.fujicleanusa.com
Warranty Activation
To activate system warranty, Fuji
Clean USA must receive Warranty
Activation Card! Please see page 13.
Please Note:
Product warranty requires proper system
installation as described in this Manual.

Equipment Supplied by Fuji Clean USA
SJE Rhombus
Signalmaster Float
Switch
(Center chamber with
3-1/2” tether)
FujiMAC
Air Blower
1/8” (ID) Vinyl Micro-
Tubing for Air Pressure
Sensing Alarm
Alarm / Control Panel
(NEMA 4X Rated)
Thank you for choosing to install a Fuji Clean USA treatment system. We care that the system is
installed properly and thoughtfully. Fuji Clean USA or your qualified distributor will train and
certify you for proper installation. PLEASE contact your distributor or Fuji Clean USA for
assistance or with ANY questions.
Fuji Clean USA ●41-2 Greenwood Road ●Brunswick Maine 04011 ●Tel: 207-406-2927 ●Fax: 207-406-2929 ●www.fujicleanusa.com
NSF Dataplates (2)
Installation Manual
Owner’s Manual
Warranty Card
Fuji Clean Processor
Air Vent Plug
(Tighten clockwise.
Plugs the vent hole if
venting through house)
Pressure Line Barb
(Screws with rubber washer
into blower)
Tank Adapter
(Unglued. Glue during installation.)
Air Blower Adapter
(Unglued. Glue / clamp during installation.)

Equipment Supplied by Contractor
Fuji Clean USA * 207-406-2927
* www.fujicleanusa.com
Risers and Covers per Site & Regulatory Requirements
Note: Tuf-Tite and Polylok Risers in 6” or 12” height increments and covers are available from your
distributor . If not already installed, please refer to page 5 for installation instructions.
Allowed 24” riser height or less.
Model CE5: Three (3) 20” Risers
Models CE7, CE10 and CEN Series: Two (2) 20” Risers plus One (1) 24-inch
Insulation for Cold Climate Installations
To maintain optimal treatment conditions, Fuji Clean recommends insulated risers and covers as well as
foam board or insulating material (min. R-Value 8) over the upper half of the treatment tank.
Septic Tank and/or Pump Station.
If local code or site conditions mandate. Fuji Clean system are designed to accept straight wastewater.
Fresh Water
Systems must be filled with fresh water to Low Water Mark (LWM) before start-up. Approx. gallons
required per model: (CE5: 435; CE7: 610; CE10: 925; CEN5: 610; CEN7: 925; CEN10: 1,230).
Piping/Conduit
•4” Schedule 40 for inlet and outlet lines.
•¾” PVC conduit for air line (minimum 6-in. deep).
•Electrical conduit for float switch line (or use direct burial line).
Electrical
•Please use licensed electrician and adhere to applicable national/local electrical code(s).
•Two (2) standard 115V, 15A circuits for control/alarm panel connection.
•Float Switch Wire: #18 AWG (comes with standard 30’-ft. length). May extend up to 50-ft.
•Float Switch: May come pre-installed in treatment system. For electrical hookup, please refer to SJE
Rhombus installation instructions.
•Miscellaneous fittings and connectors to assure watertight connections.
Anti-Float Devices, if necessary
•Please refer to high water, anti-float recommendations in this manual.
Materials for Blower / Controller Installation
•Concrete base (or equivalent) on which to set air blower.
•Protective cover for air blower (vented and able to achieve free airflow in all conditions).
•Materials or location on which to mount control panel and protect from elements.
Crushed Stone, Fill, Loam etc.
•Fuji Clean USA is not responsible for design, installation or materials associated with leachfield or
treated wastewater disposal area.
Please note: Proper installation permitting is the responsibility of the installing contractor.
Contractor Installation Manual –Residential Systems
3

Installation Overview
For connection of SJE Rhombus Signalmaster float switch cord to alarm panel,
drill hole in riser and use male fitting and electrical conduit. Plug fitting with
sealant standard that meets ASTM C990-96 to assure water-tight seal and to
prevent septic gas transmission into control panel. Install on the pumpback line
using the provided hose clamp and mounting fixture in the center of
Chamber 2, (Anaerobic Contact Filtration Chamber) with 3-1/2” (9 cm) of
electrical cord tether.
Fuji Clean USA
Treatment Tank
Please Note:
1. Fuji Clean systems are designed to accept straight septic wastewater
and do not require a preceding septic or settling tank. However, a
preceding septic tank is acceptable is some states. Please contact
Fuji Clean for details.
2. “Clearwater” water softener backwash should be discharged directly
to a separate drywell, leaching pool or other approved area.
Using grommets or a waterproof adhesive, labels meeting NSF standards (supplied by
Fuji Clean USA) shall be affixed in two locations, inside the inlet riser and on the
inside of the controller.
4” PVC inlet and outlet pipe
Pump Station
(if site conditions or
design dictates)
System Controller/Alarm (supplied
by Fuji Clean USA) Suffolk County
requires FujiMACRII series blower
power connection to be hardwired
to control panel.
Sample Label
24” Max Riser Height
For connection air line to tank,
use Fuji Clean supplied tank
adaptor and either ¾” or 1”
conduit or flexible pipe. Air
line should be less than 100’
and have 5 or fewer “elbows.”
(If site conditions will not
allow, please contact Fuji Clean
for blower upsize calculation.
System vents through
house vent system. For
houses with house traps
installed, vent system
separately through vent
hole.
Hardwired power
connection
3” vent hole for systems with
house traps or otherwise
encumbered access house vent
Air Line
4
Outdoor rated outlet
power connection

Section 2. Treatment Process Overview
Fuji Clean’s “contact filtration” treatment is a simple, well engineered process that consists of a controlled, circuitous
flow train through anaerobic and aerobic chambers and in direct contact with assorted proprietary fixed film medias
on which biological digestion of organic matter occurs. Media is also designed and positioned to provide mechanical
filtration of process wastewater.
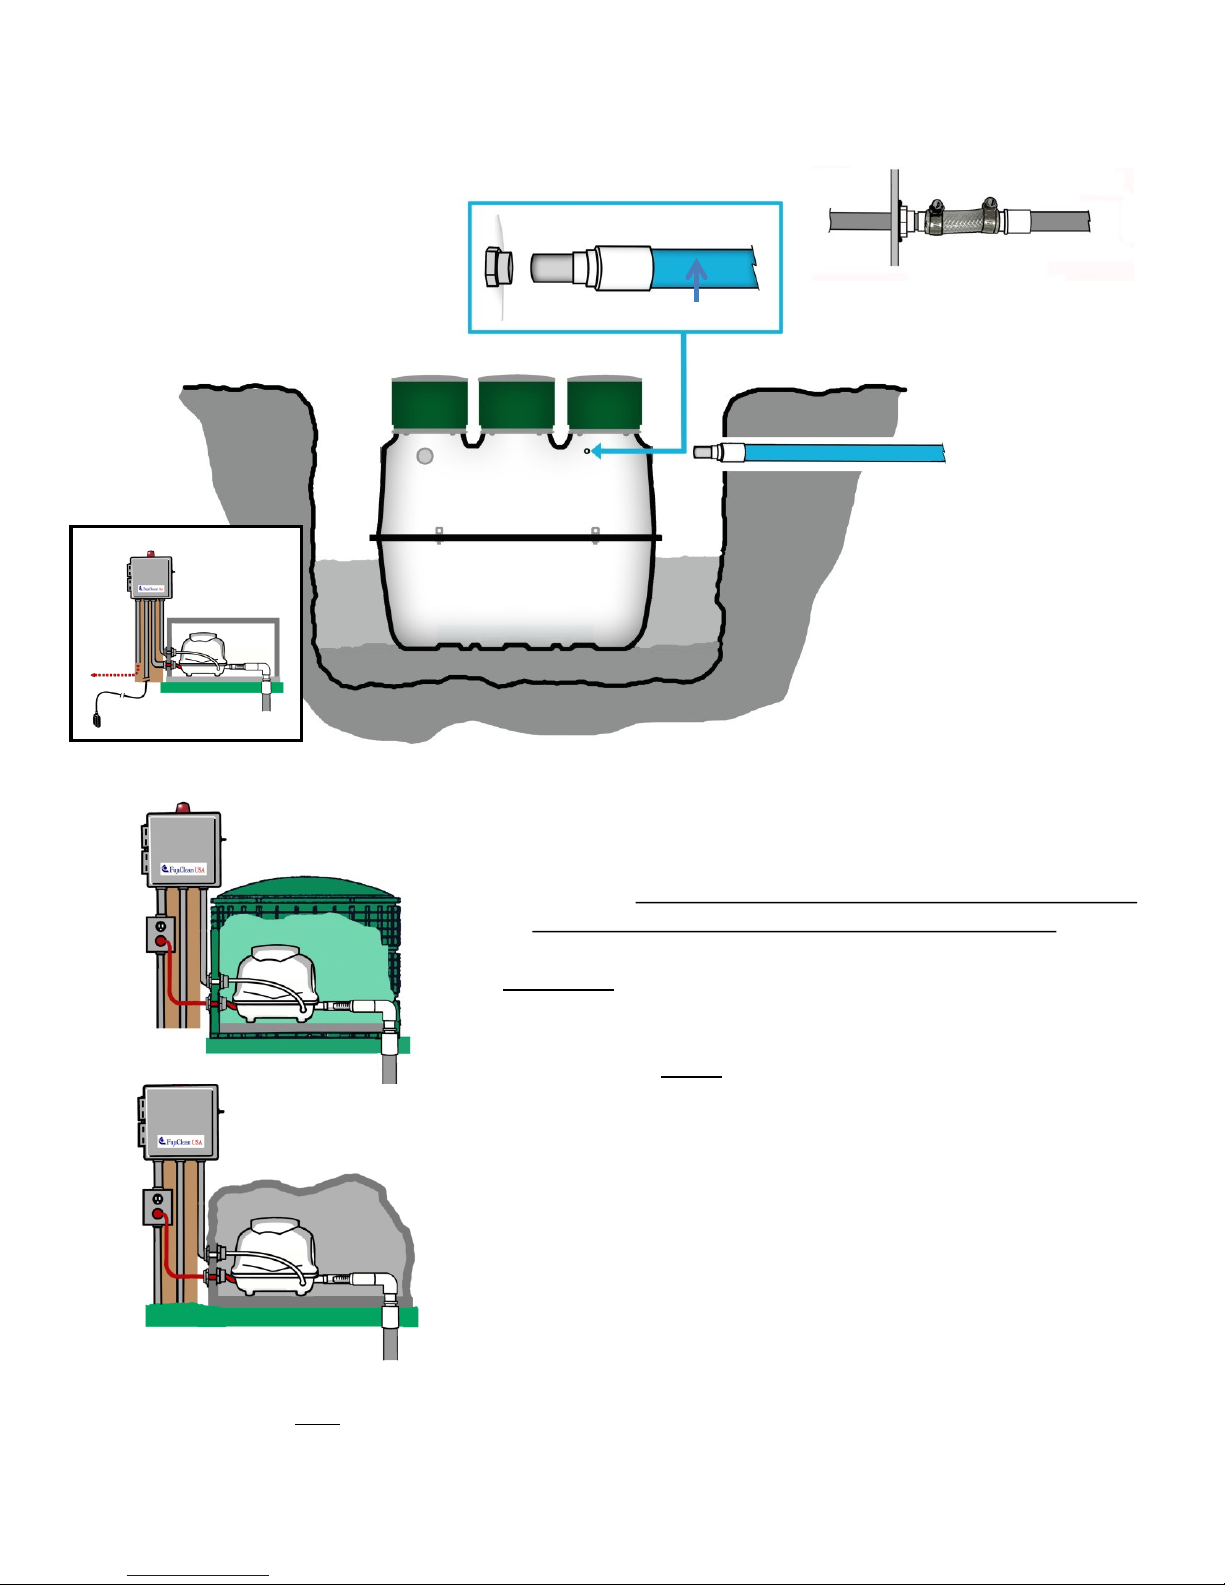
The system includes two air lift pumps (see diagram below) The Recirculating Airlift Pump returns process water and
sludge from the aerobic zone to the sedimentation chamber, recirculating 2-4 times inflow per day for CE models and
4-6 times inflow for CEN (enhanced denitrification) models. The Effluent Airlift Pump is designed to help equalize flow
and discharge treated effluent.
Outlet
Air
Sludge Transfer
(Recirculating air lift
pumpback) See airlift
pump info below.
Chamber 3B. Disinfection Chamber (final zone before
discharge –option for chlorination tablet disinfection)
Chamber 1.
Sedimentation
Chamber (separates
solids and greases)
Chamber 3. Aerobic Contact
Filtration Chamber
(both board and cylindrical hollow
mesh media) oxygen rich zone for
aerobic microbe digestion activity,
solids filtration and nitrification of
ammoniac nitrogens to nitrates
Powered by the FujiMACRII Series
Blowers State-of-the-art linear
diaphragm air blowers manufactured
by Fuji Clean Co sized to provide
about 2.8 cubic feet per minute to
most residential systems.
Chamber 2. Anaerobic Contact
Filtration Chamber (spherical-
skeleton filter media) organic matter
decomposition by micro-organisms,
suspended solids captured and
nitrates are denitrified
Chamber 3A. Storage Chamber (settling zone)
Two Air Lift Pumps. One
Recirculating Air Lift pump sending
process water and solids back to
Chamber 1, and one Effluent Air
Lift Pump for measured discharge
of treated effluent. (See airlift
pump info below).
Airlift Pumps. This generic illustration
shows the mechanics of the “airlift
pumps” used in this system, which are
simple pipe conduits through which
pressurized air (from blower) is
introduced at the bottom and by fluid
pressure, water is carried up the pipe
by ascending bubbles.
Flow Equalization
When water level
exceeds LWL, treated
water is discharged
through Chamber 3B
via the Effluent Air Lift
pump. If water level
exceeds HWL, then
treated water is also
discharged through an
overflow effluent weir.
Overflow Effluent Weir
During treatment,
water level fluctuates
between high and
low water levels
Inlet
5

Fuji Clean USA * 207-406-2927
* www.fujicleanusa.com
Installation Procedure
Step 1: Prepare excavation to be at least 1 to 2 feet
larger than Fuji Clean system dimensions as listed below.
Important Note: Riser height should not exceed 24”.
Step 2. Prepare 4”- 6” bed of stone
(¼” to ½”), level to within 1/8”.
Unloading Instructions:
Upon delivery, inspect Fuji Clean tank, both outside and inside for possible damage incurred during
transport. If you find damage, or have a question, please contact your distributor immediately.
6
FUJI CLEAN USA
DESIGN
SPECIFICATION TABLE
Residential CE Series
BOD, TSS, TN*
Residential CEN Series
BOD, TSS, TN
(Enhanced Nitrogen Removal)
Model
CE5 CE7 CE10 CEN5 CEN7 CEN10
Tank Volume Total (gallons)
544 749 1,069 749 1,069 1,498
Height (inches)
61.8 65.7 73.6 65.7 73.6 77.4
Length (inches)
85 95.7 98.8 95.7 98.8 118.9
Width (inches)
43.7 49.2 56.7 49.2 56.7 68.9
Weight (lbs.)
397 463 705 463 705 926
Inlet Invert (inches to 1/8”) 49 53 61 53 61 62
Outlet Invert (inches, to1/8”) 47 51 59 51 59 59.5
Blower Size (Standard**) 80 L/min 80 L/min 100 L/min
80 L/min 100 L/min
100 L/min
Power Use (kWh/day) 1.2 1.2 1.7 1.2 1.7 1.7
* TN data was obtained during CE testing, but not to NSF245 testing protocol. CEN testing was to NSF245 protocol.
** Assumes blower siting conforms to parameters outlined in Step 8 of this Manual and site is below 10,000 ft. in
altitude. If site if above 10,000 ft., please refer to table below for recommended blower sizing.
Use 4-point
lifting lugs
Step 3: Carefully
lower and set
tank. Level to
within 1/8-inch.
Blower Capacity vs Altitude
Blower Size (L/min)
Model
0
-
10,000 ft
> 10,000 ft
CE5/CEN5 80 100
CE7/CEN7 80 100
CE9/CEN9 100 120
Recommended blower sizing for site above
10,000 ft. above sea level.

Fuji Clean USA * 207-406-2927
* www.fujicleanusa.com 7
Do NOT use
Lifting Lugs
for uplift
restraint.
Uplift Restraint with Tie-Down Straps
Uplift Restraint with Concrete Collar
Cable tie-down detail.
Tie down straps
Step 4: If any part of the tank is below the estimated seasonal high water table, then engineer shall
provide buoyancy calculations to assure adequate tank uplift restraint. Recommended uplift restraint
options include:

Fuji Clean USA * 207-406-2927
* www.fujicleanusa.com
Please note: To assure tank water tightness, please check in 24 hours to be sure that the water level has
not dropped. Please contact your distributor or Fuji Clean USA if water level has dropped.
Low water line in sedimentation chamber
Step 6: Backfill about ¾ way up
tank in layered, compacted 6”
lifts using peastone or equivalent
material that form-fits into tank
corrugations.
8
Step 5: After rechecking that tank is level to 1/8-inch, (fore and aft as well as side to side), fill tank
with fresh water to the low water line mark. Note: Alternate chambers while filling for evenly
balanced fill.

Fuji Clean USA * 207-406-2927
* www.fujicleanusa.com
Step 7: Using supplied adaptors and fittings, attach air pipe fitting to tank and connect to ¾”
conduit in prepared trench (min. 6” deep) to location of air blower. Please note: ¾” flexible
irrigation line, 100 PSI Max, may also be used for the airline.
9
Step 8: Locating and Installing Blower/Control Panel.
USING ¾-INCH CONDUIT, LOCATE BLOWER WITHIN 100-FT.
OF TREATMENT TANK AND WITH NO MORE THAN FIVE (5)
ELBOWS. If site conditions prevent this, please contact your
distributor or Fuji Clean USA for technical assistance.
Air Blower shall be:
in as close proximity to control panel as possible
on a solid (e.g. concrete) pad to minimize vibrations
in a location above water level
away from grease exhaust fans.
away from bedroom windows and other locations where
operational sounds (although minimal) may be a nuisance
In a location that allows unencumbered access for
inspection and maintenance activity
with proper electrical grounding
with wiring and electrical connections made by a licensed
electrician.
with no objects on top of electrical cord.
in a well-ventilated space out of direct sunlight and
protected from elements such as direct rain or snowfall.
Hardwired to power in states and jurisdictions that require
a hardwired connection.
¾” PVC conduit
Note: Some states and contractors require
a flexible airline adaptor as shown.
(adaptors supplied by Fuji Clean USA)
Two possible blower protection
options. Be sure to vent covers
to allow free air draw even in
deep snow pack.
Hardwired power
connection option
Note: 1-inch air line may be
substituted for ¾” line.

Fuji Clean USA * 207-406-2927
* www.fujicleanusa.com 10
For additional important detail about installing and maintaining blower, please review and refer to
provided FujiMAC Blower Installation-Maintenance Manual, which is provided inside the blower
box.
Plan view shows trench
excavations for inlet and
outlet lines
1/8” (ID) Vinyl Micro-Tubing
for Air Pressure Sensing Alarm
Step 8 continued: Locating
and Installing
Blower/Control Panel cont.
Alarm Panel shall be:
in a well ventilated area as
dry and protected from
elements as possible
in as close of proximity to
FujiMAC Blower as possible
wired by qualified
electrician
in a location that allows
unencumbered access for
inspection and maintenance
activity
Note: Some states and
installing contractors require
hard wired blower connection

Fuji Clean USA * 207-406-2927
* www.fujicleanusa.com 11
Step 9: For cold climate installations, please install insulated risers and covers and cover upper half
of treatment unit with min. R-8 value insulating material (i.e. foam board)
Step 11: Prepare Tank Inlet and Outlet for
4” Sched. 40 Inlet and Outlet Lines
Seal around inlet and outlet
tank fittings using a sealant
that meets ASTM C990-96
standards
Apply primer and cement to 4”
PVC inlet and outlet pipe
sections.
IMPORTANT NOTE: Inlet and
outlet fittings are slightly
tapered. 4” Sched. 40 pipe
must be cut as shown to fit
completely into fitting.
For connection of float switch cord to
alarm panel, drill hole in riser and use
male fitting and electrical conduit. Plug
fitting with sealant standard that
meets ASTM C990-96 to assure water-
tight seal and to prevent septic gas
transmission into control panel.
3-1/2” tether for float switch
Step 10: Install Float Switch on pumpback
line in 2nd chamber with 3-1/2” tether.
Float switch electrical cord should exit riser
wall through male adaptor (caulked
watertight to prevent gas leakage) or
watertight fitting. An interior connection
to direct burial cable is also acceptable.
Approx.
1-inch
deep cuts

Fuji Clean USA * 207-406-2927
* www.fujicleanusa.com 12
Step 12: In nearly all cases, the Fuji Clean system will vent properly through the house septic influent
line. In cases where there is a influent pump, or in severe downdraft locations, a separate vent should
be considered. If you do choose to install a vent, be sure that the vent slopes toward the tank so that
any moisture accumulation drips back down toward the tank.
If optional air vent line is installed,
slope conduit toward tank to
prevent moisture accumulation
3” port for optional air vent line. If not
used, install plug in port by turning
clockwise to tighten.
Step 13: During final landscaping, seeding etc., be sure to pitch final grade away from covers to
sweep surface water away from treatment tank.
Step 14: Fill out Warranty Activation Card (received with this Installation Manual) and return to
Fuji Clean USA to activate system Warranty. If this card cannot be found, please contact Fuji
Clean USA for voice or online Warranty activation. 207-406-2927.
24” Max Riser Height

System Components - Alarm / Control Panel
NEMA 4X rated, the Alarm/Control Panel monitors tank water level and blower operation. An audible
horn and red beacon light will activate in the event of either a tank high water condition or if the
blower ceases to operate (causing a drop in air pressure). Please note: upgraded controllers with
telecommunication, alarm tracking and data logging capabilities are available.
A 3-way toggle switch (Test-Normal-Silence) allows check for proper operation by toggling the side
panel switch to “Test” mode. When switch is released, it will return to normal operation.
In the event of an alarm condition the “Silence” switch may be engaged to silence the audible alarm.
The beacon will continue to flash until normal operation is restored and the alarm will reset. If a new
alarm condition occurs, the “Silence” mode will expire and the unit’s horn will begin sounding again.
All conduits between panel and treatment tank must be sealed to prevent gas leakage into panel.
Fuji Clean USA offers a choice of customized alarm/control panels, each with different features.
Control panel customization is also available to match unique site or job requirements. Please consult
Fuji Clean USA for details.
Model Features Controller AController CController DController E
SJE Rhombus Model # 1041972 1045040 IFS41W914X6A8AC10E27D IFI41W914X6A8AC10E27D
NEMA 4X Weather Proof
Enclosure XXXX
Three 120 Volt AC Breakers
(Pump, Compressor, Alarm) XXXX
Alarm/Test/
Normal/Silence Switch XXXX
Compressor Low Pressure
Alarm Switch XXXX
Communication Contacts
(Alarm Aux) XXX
Elapsed Time Meter XXX
Duplex Pump Demand or
Timed Dosing Control XX
Data Logging Panel via USB Port
to Flash Drive X
UL Listed to Meet and/or
Exceed Industry Safety
Standards
XX
Dual Safety Certification for U.S
and Canada XX
13

Circuit
Breaker
Air Blower
Pressure Switch
Horn
Test/Normal/
Silence Switch
Neutral Block
Terminal Blocks
Circuit Breaker
(Extra component if
necessary, such as
discharge pump)
Alarm Circuit Breaker
Float Switch, Pressure Switch,
Test/Normal/Silence Switch
Power In
Wiring Diagram
Alarm Beacon
Incoming Air
Pressure Tubing
Float Alarm Line
Blower Hardwire
Line
Grounding
Block
Watertight
Fittings
Fuji Clean USA
Controller “A”
14

Controller “A” Wiring Diagram
15

Controller “C” Wiring Diagram
16

Fuji Clean USA * 207-406-2927
* www.fujicleanusa.com
Float Switch Information
The SJE Rhombus Signalmaster float switch is pre-mounted in Fuji Clean USA treatment systems. This
information from SJE Rhombus is supplied for informed, proper handling during the installation process.
17
ELECTRICAL SHOCK HAZARD
Disconnect power before installing or servicing this
product. A qualified service person must install and
service this product according to applicable electrical
and plumbing codes.
EXPLOSION OR FIRE HAZARD
Do not use this product with flammable liquids. Do not
install in hazardous locations as defined by National
Electric Code, ANSI/NFPA 70.
Failure to follow these precautions could result in serious injury or death. Replace product immediately if switch becomes damaged or severed. Keep
these instructions with warranty after installation. This product must be installed in accordance with National Electric Code, ANSI/NFPA 70 so as to
prevent moisture from entering or accumulating with in boxes, conduit bodies, fittings, float housing, or cable.
PREVENTATIVE MAINTENANCE
•Periodically check the product. Check that the cable has not become worn or that the housing has not been damaged so as to impair the protection
of the product. Replace the product immediately if any damage is found or suspected.
•Periodically check to see that the float is free to move and operate the switch.
•Use only SJE Rhombus replacement parts.
•The Sensor Float and Sensor Float Mini control switches contain mercury and MUST be recycle or disposed of according to local, state and federal
codes.

18
□1. Outside Environment Check.
The system is accessible and nothing inhibits access to maintenance.
•Surface water is draining away from risers and covers.
•No signs of physical damage to the treatment system, piping, alarms or components
•No unusual smells around the system.
•No unusually loud blower noise, such as rattling.
□2. Blower Box Check.
•Open the blower box, make sure that it is operating properly.
•Inspect all fittings and vents to ensure they are clean and dry and that blower is located
so that it is protected from dust and particles, will remain dry and not be submerged.
□3. Blower Operation and Blower Alarm Check.
•Make sure the blower operates properly.
•Turn off the blower (unplug or turn off at alarm/control panel breaker switch) for few
moments to check that the alarm is triggered.
Fuji Clean USA * 41-2 Greenwood Road, Brunswick, ME 04011
207-406-2927 * www.fujicleanusa.com
Open all access covers and secure the area around the access
openings.
□4. Water Level is at LWL.
•Check that tank has been filled to LWL mark in Chamber 1.
□5. High Water Float Switch Check.
•Check that the high water float switch is operating
freely. Lift up the high water float switch to check
that the alarm is triggered.
•(Note: Float should have 3.5” tether. Activation
horizon is 1.5” above or below level horizon).
□6. Set Recirculation Control Valve. (gray)
The recirculation valve (gray) should be set to its default
setting range according to the table below for ALL flows. At
the discretion of the system’s start-up technician, within
each default range, the valve shall be at the lower end for
anticipated below average hydraulic flows and at the higher
end for hydraulic flows that are anticipated to be above
average.
Start-Up Procedures

19
Fuji Clean USA * 41-2 Greenwood Road, Brunswick, ME 04011
207-406-2927 * www.fujicleanusa.com
□7. Check Recirculation Flow Rate.
•Normal recirculation flow should be level
with the top edge of the airlift pumpback line
cut-out spilling into Chamber 1, the
Sedimentation Chamber.
□8. Check/Set Aeration Balance Control Valve (blue).
•The default, normal setting for the Aeration
Control Valve is 50%.
•Visually observe the airflow rates on each
side of the plant by checking to see if bubbles
are evenly distributed on both sides of
Chamber 3, The Aeration Chamber. If there is
an obvious discrepancy in airflow between
the two sides, adjust the Aeration Balance
Control Valve so that the airflow is equal.
Important!
□9. Check/Set Effluent Airlift Valve (white). The
Effluent Control Valve is initially set to 40% and there is
typically no need for it to be adjusted under standard
conditions.
□10. Check Effluent Airlift Pipe.
Check the observation port in the airlift line to see if
there is smooth water flow from the effluent airlift
pump. If not, then check to be sure that there isn’t a
clog in the airlift pipe with a cleaning brush.

20
Fuji Clean USA * 41-2 Greenwood Road, Brunswick, ME 04011
207-406-2927 * www.fujicleanusa.com
□11. Add Disinfectant Tablets to Chlorinator (if
appropriate)
•If chlorine tablets are to be used for
disinfection, check to be sure that they are
removed from packaging and placed in the
disinfectant cylinder.
•Be sure that disinfectant cylinder remains
closed for all start-up steps to prevent corrosive
activity to exposed metallic surfaces.
•Note: Chlorine dissolve rate can be adjusted by
rotating the bottom cap of the Chlorinator.
□12. Check Alarm/Control Panel
•Check to be sure that Alarm/Control Panel is
located in a secure, accessible location.
•Check fittings and wire connections are tight
and secure. This includes connection between
air hose and pressure switch.
•Important: Check to be sure that all panel
penetrations are air and watertight. Be sure no
gas from treatment system can leak into
Alarm/Controller.
•Be sure electrical cord between blower and
outlet is free and clear and no object is on cord.
•Check to be sure that panel is closed, secure
and toggle switch is set to “Normal” setting.
□13. Final Site Preparation
•Close and secure all access covers.
•Close and secure blower cover.
□14. Owner Communication
•Be sure that home/business owner has a copy
of the Fuji Clean USA Owner’s Manual (with
Warranty information included).
•Be sure that service provider contact
information is affixed to Alarm/Control Panel as
well as on Homeowner’s Manual.
This manual suits for next models
7
Table of contents
Other FujiClean Water Filtration System manuals
Popular Water Filtration System manuals by other brands

Hoshizaki
Hoshizaki WOX-40WA-EW installation manual

Microlene
Microlene W10PR Installation and operating instructions

Lanaform
Lanaform LA 79615 manual

Kinetico
Kinetico Premier RO owner's manual

Apec Water
Apec Water ROES-50 Installation instructions & owner's manual

CALEFFI
CALEFFI DIRTMAG PRO 5463AM Series Installation, commissioning and servicing instructions