manuals.online logo
Brands
  1. Home
  2. •
  3. Brands
  4. •
  5. Fumex
  6. •
  7. Welding Accessories
  8. •
  9. Fumex PORTA-FLEX 200 Guide

Fumex PORTA-FLEX 200 Guide

2020
1980 40
YEARS
Operation & Maintenance
User Manual for
PORTA-FLEX
200 & 400 (Twin Motor)
80mm Magnetic Flexible Nozzle
Extraction Hose
Connection Port
(Intake Port)
Front Cover Toggle Fastener (x4) Carry Handle (Optional cable/hose storage)
2.5m Extraction Hose
Internal Cartridge Filter
Thank you for purchasing the Fumex Porta-Flex 200/400 welding fume extractor. Our Porta-Flex 200 & 400 are user-
friendly, portable units, designed to capture harmful welding gases at source. Ideal for use in conned spaces or dicult to
reach locations, making them ideal for general service and repair work.
Power Switch 200 / Twin Switch 400
Contents
Front Cover
2
Contents & Overview Page 2
Quick Start Guide Page 3
Safe Operation & Routine Maintenance Page 4
Routine Maintenance cont. Page 5
Troubleshooting, Spare Parts & Technical Data Page 6
Overview
Quick Start Guide
1. Check the power supply cable for damage, if any damage is visible, it must only be replaced by the manufacturer or
qualied electrician to avoid a hazard.
2. Check that the extraction hose is not split or damaged, as this will reduce the eciency of the unit.
3. To protect against electrical shock, do not immerse the power supply cable, plug or extractor in water or other liquid.
4. Our fume extractors are designed for interior use only and should not be used outside in wet conditions.
BEFORE USE
12
34
5 6
Plug power supply cable into electrical socket
and turn on power switch (200) or both switches
(400 Twin motor) located on side of unit.
Place the Porta-Flex on a sturdy, level surface
and connect the 2.5m extraction hose to the
intake port. This is located on the front of the
unit.
Connect the other end of the 2.5m extraction
hose to the magnetic exible nozzle.
Position magnetic nozzle so that fumes/gases
are drawn AWAY from the operator. Ensure that
hose is not kinked or trapped. Please refer to
certification for capture distance.
On completion of welding, turn o the Porta-
Flex and disconnect the power supply cable
from the socket.
Disconnect extraction hose from both the
nozzle and unit. The power supply cable and
extraction hose can be wound around the carry
handle for storage.
3
The Porta-Flex 200/400 are welding fume extraction units. Designed to capture dangerous fumes/gases and particles
produced by the welding process, at source. These by-products are captured via the magnetic nozzle and removed by the
internal cartridge lter. Our Porta-Flex models are for light welding use only.
Safe Operation
1. Check the power supply cable for damage, if any damage is visible, it must only be replaced by the manufacturer or
qualied electrician to avoid a hazard.
2. Check that the extraction hose is not split or damaged, as this will reduce the eciency of the unit.
3. To protect against electrical shock, do not immerse the power supply cable, plug or extractor in water or other liquid.
4. Our fume extractors are designed for interior use only and should not be used outside in wet conditions.
BEFORE USE
OPERATION
1. Place the Porta-Flex on a sturdy, level surface and connect the 2.5m extraction hose to the intake port on the front
cover.
2. Connect the other end of the 2.5m extraction hose to the magnetic exible nozzle.
3. Plug power supply cable into a suitable electrical socket and turn on power switch (200), or both switches (400),
located on side of unit. Please ensure that the power cable is not a trip hazard to anyone.
4. Position the magnetic exible nozzle to draw welding fumes AWAY from the operator (see section 4 - Quick Start
Guide). For exact capture distance, please refer to certification. Make sure the extraction hose is not kinked or trapped,
as this will reduce extraction eciency.
5. On completion of welding, turn o the Porta-Flex and disconnect the power supply plug from the socket.
6. Disconnect the extraction hose from both the magnetic nozzle and the unit. Both the power supply cable and the
extraction hose can be wound around the carry handle for storage (see section 6 - Quick Start Guide).
Routine Maintenance
ALWAYS wear the correct RPE when replacing the cartridge lter or cleaning the spark trap. Due to the carcinogenic
nature of the waste material, RPE must include a fully tted mask (with correct lters), disposable overalls and
gloves. Replacing the cartridge lter must be carried out OUTDOORS to minimise the risk of inhalation of any dust
etc. The Porta-Flex must be disconnected from the power supply BEFORE undertaking any maintenance.
All Porta-Flex 200 or 400 units should be COSHH tested at least every 14 months, to ensure compliance to HSE 258.
Fumex Ltd have a team of dedicated COSHH engineers who operate all over the UK, please call us for details.
CLEANING THE SPARK TRAP
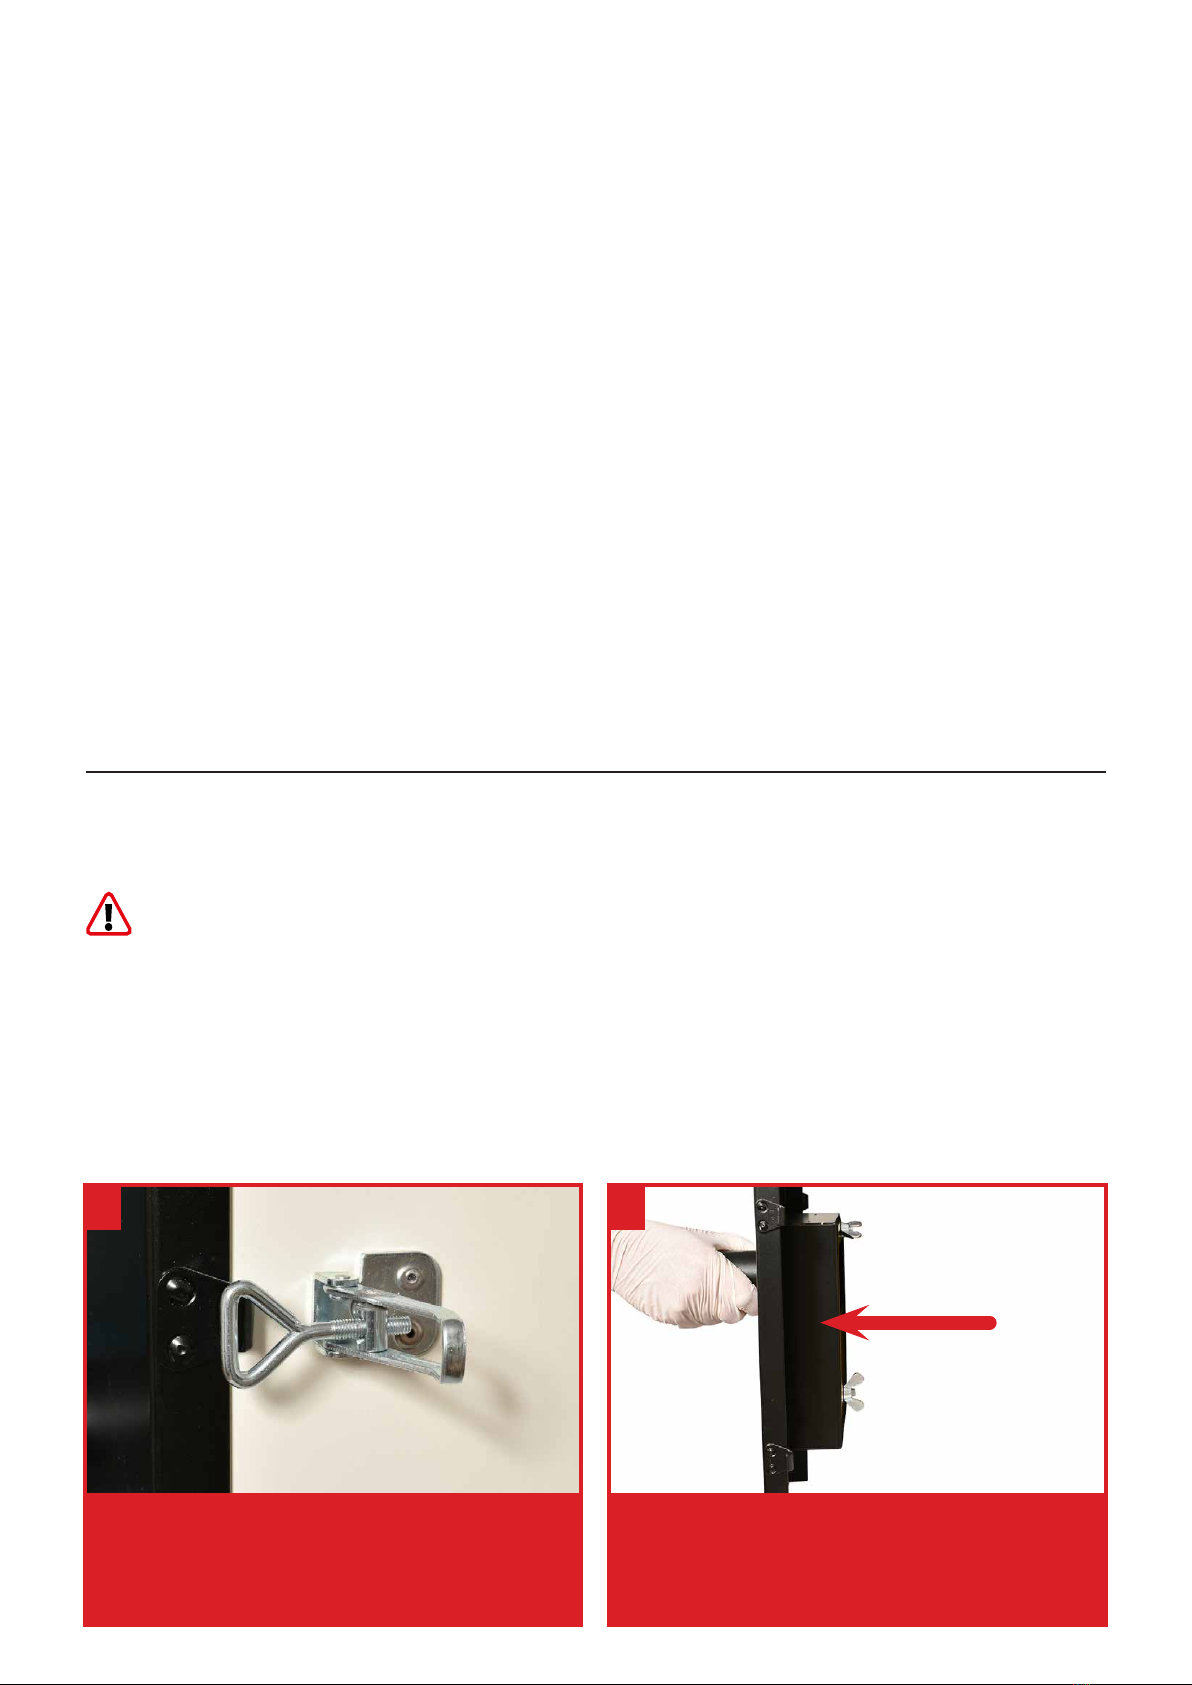
1
To access the spark trap, release the four toggle
fasteners and unhook the front cover.
The spark trap is located behind the inlet port on the front cover. It should be regularly checked and cleaned as necessary.
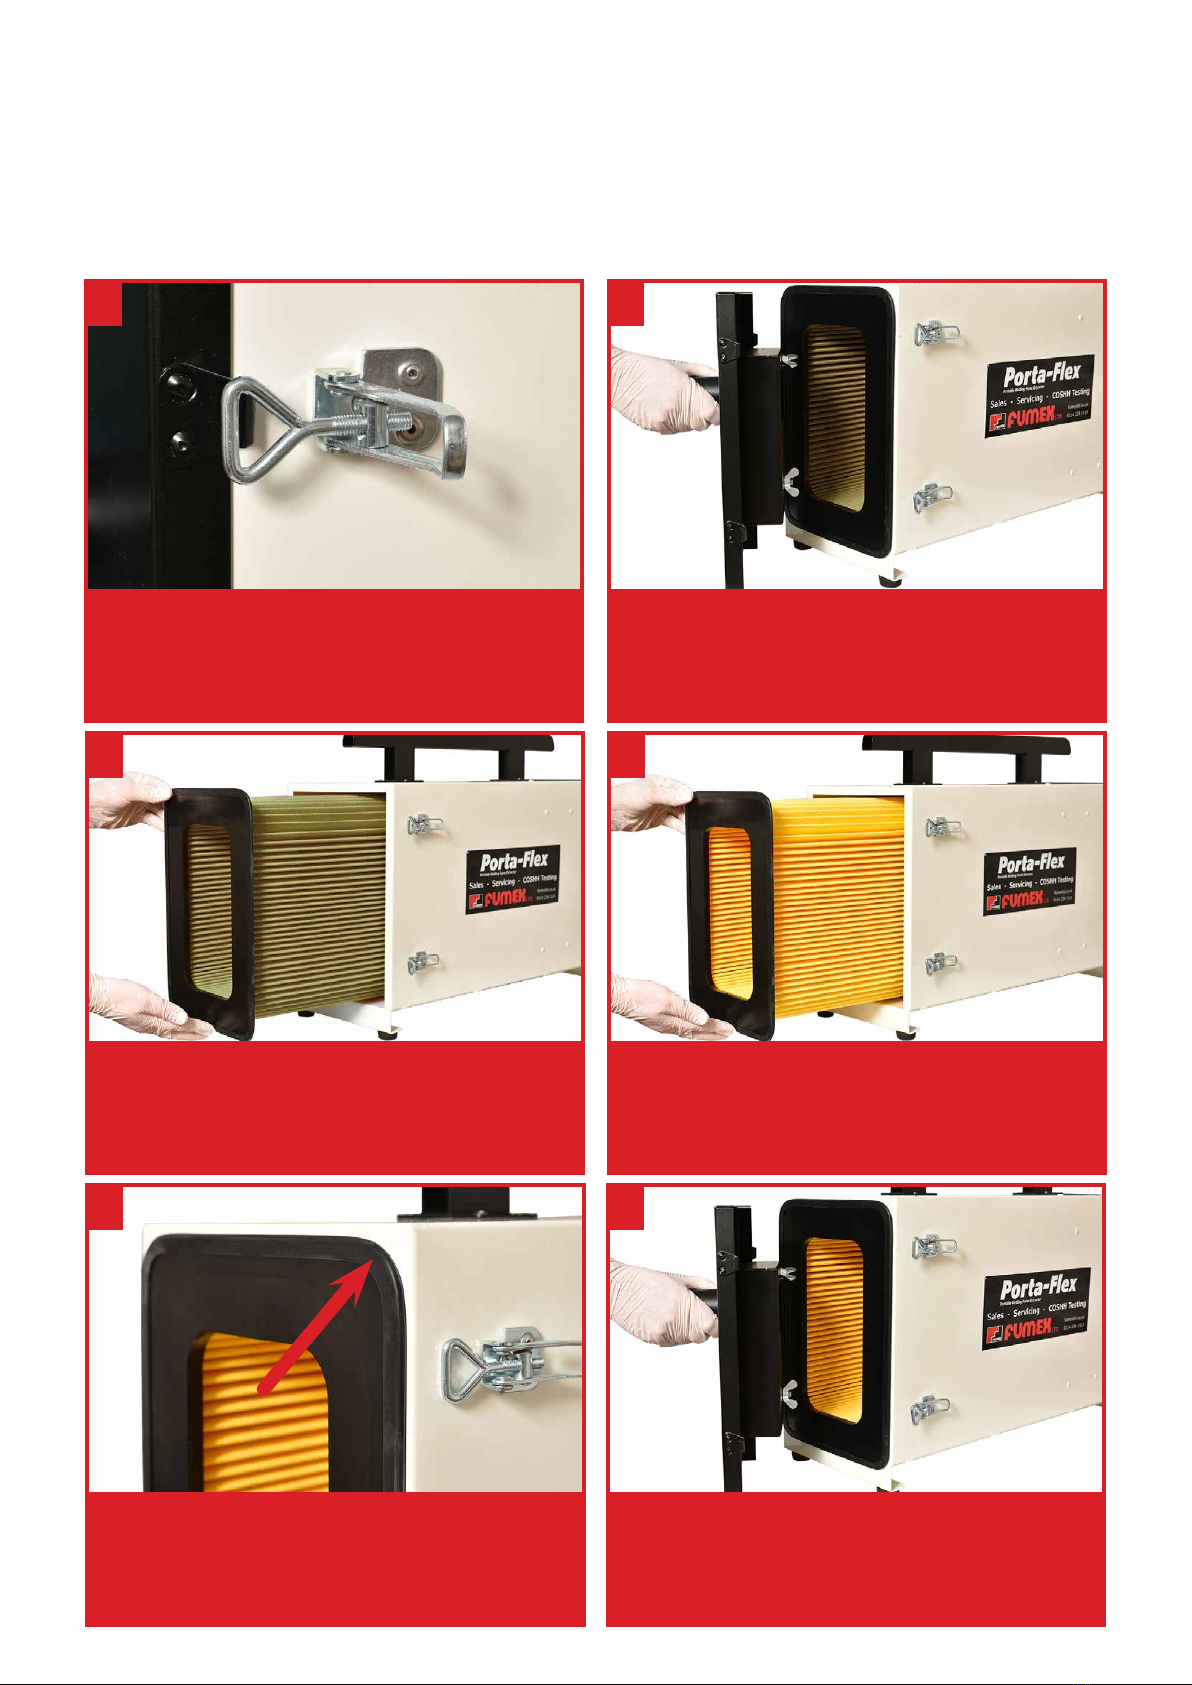
2
Carefully remove the front cover and combined
spark trap (arrowed). To check the spark trap,
remove the two wing nuts and clean if required.
4
Routine Maintenance cont.
REPLACING THE CARTRIDGE FILTER
2
34
5 6
Slowly withdraw the old lter horizontally and
place in a plastic bag and then seal the bag
with tape. NB. Old lters must be disposed in
accordance with Local Authority Guidelines.
Carefully remove the front cover and combined
spark trap. Check the spark trap, by removing
the two wing nuts and clean if required.
Install a new Fumex cartridge lter into the
extractor. Using non-genuine lters will void the
Porta-Flex warranty and may have a detrimental
eect on eciency.
Ensure the rubber seal (on lter) is ush up to
the cabinet.
Ret the front cover and then reattach the
four toggle fasteners to secure it in place. The
extractor is now ready for use.
1
To access the cartridge lter, release the four
toggle fasteners and unhook the front cover.
The cartridge lter is located behind the front cover. It should be replaced when the extraction eciency decreases (this is
dependent on usage).
5

This manual suits for next models

1

Popular Welding Accessories manuals by other brands

RelFar FWH20-S10A manual

RelFar

RelFar FWH20-S10A manual

Lincoln Electric LT-7 Tractor Technical specifications

Lincoln Electric

Lincoln Electric LT-7 Tractor Technical specifications

Cornwell Tools MMWC1 Operator's manual

Cornwell Tools

Cornwell Tools MMWC1 Operator's manual

Dohle ExOn2A operating instructions

Dohle

Dohle ExOn2A operating instructions

Nederman Fume Eliminator FE 840/2500/P150 user manual

Nederman

Nederman Fume Eliminator FE 840/2500/P150 user manual

3M Speedglas 9100 Series user manual

3M

3M Speedglas 9100 Series user manual

Miller Electric OM-842 owner's manual

Miller Electric

Miller Electric OM-842 owner's manual

Miller A-200 Series owner's manual

Miller

Miller A-200 Series owner's manual

Abicor Binzel ABIMIG WT Series operating instructions

Abicor Binzel

Abicor Binzel ABIMIG WT Series operating instructions

Miller MIGmatic M-25 owner's manual

Miller

Miller MIGmatic M-25 owner's manual

Abicor Binzel xFUME PRO Original operating instructions

Abicor Binzel

Abicor Binzel xFUME PRO Original operating instructions

iWeld NORED EYE user manual

iWeld

iWeld NORED EYE user manual

Sthor 74483 manual

Sthor

Sthor 74483 manual

Miller I-22 CE owner's manual

Miller

Miller I-22 CE owner's manual

LAHTI PRO L1540400 instruction manual

LAHTI PRO

LAHTI PRO L1540400 instruction manual

Lincoln Electric K3091-1 Operator's manual

Lincoln Electric

Lincoln Electric K3091-1 Operator's manual

Miller Electric A1D-4RV owner's manual

Miller Electric

Miller Electric A1D-4RV owner's manual

Tregaskiss TOUGH GUN TT3 Reamer owner's manual

Tregaskiss

Tregaskiss TOUGH GUN TT3 Reamer owner's manual

manuals.online logo
manuals.online logoBrands
  • About & Mission
  • Contact us
  • Privacy Policy
  • Terms and Conditions

Copyright 2025 Manuals.Online. All Rights Reserved.