funtronic OnEvo Floor User manual

User Manual
ALL RIGHTS RESERVED


User Manual
Table of Contents
1 General information
1.1 Product description
1.2 Set contents
1.3 Base
1.4 Room
1.5 Remote control
2 Set installation
2.1 Set installation (short description)
2.2 LAN installation
2.3 Turning the device on and off
3 Use
3.1 Area selection
3.2 Selecting and adding games to favourites
3.3 How to play
3.4 Optional settings
4 Use guidance
4.1 Diode functions
4.2 Replacing batteries in the remote control
5 Troubleshooting
6 Technical specifications
4
5
5
5
5
6
7
7
8
8
9
9
10
11
12
14
14
14
14
15
www.funtronic.eu

www.funtronic.eu 4
General information
• Use batteries compatible with the
device technical specications.
Do not heat up or burn batteries.
Do not install batteries with wrong
polarity in the device.
• The product must not be placed
near re nor be exposed to direct
sunlight.
• Avoid electrical discharge and
short circuits – they may damage
the product.
• Be careful and do not look directly
at the light source of the projector
for an extended period of time.
• Do not make any attepmts
to modify this device. This
can cause re, injury, electric
shock or serious damage to
the unit. Technical inspections,
maintenance and repairs should
only be carried out by Funtronic
technical service.
• Please read the manual carefully to
be able to use product correctly.
• Contact the Funtronic Service Centre
if you need extra support.
• Funtronic does not accept liability
for any lost prots or damage caused
due to product malfunction.
• All brands and product names
featured in this manual are
registered trademark and belong to
their respective owners.
• The technical data given in this
manual are subject to change
without notice.
Do not discard the device in the bin.
Return the device to the manufacturer
or a specialised recycling company.
ADDITIONAL
INFORMATION
DANGER ATTENTION !
ONEVO FLOOR
General informtation

www.funtronic.eu
5
The onEVO Floor is a breakthrough in entertainment, preschool and school education, and
rehabilitation. The product combines a variety of functions and helps with overall children’s
development through physical, intellectual and entertainment activities. It offers high
quality and reliability at an attractive price.
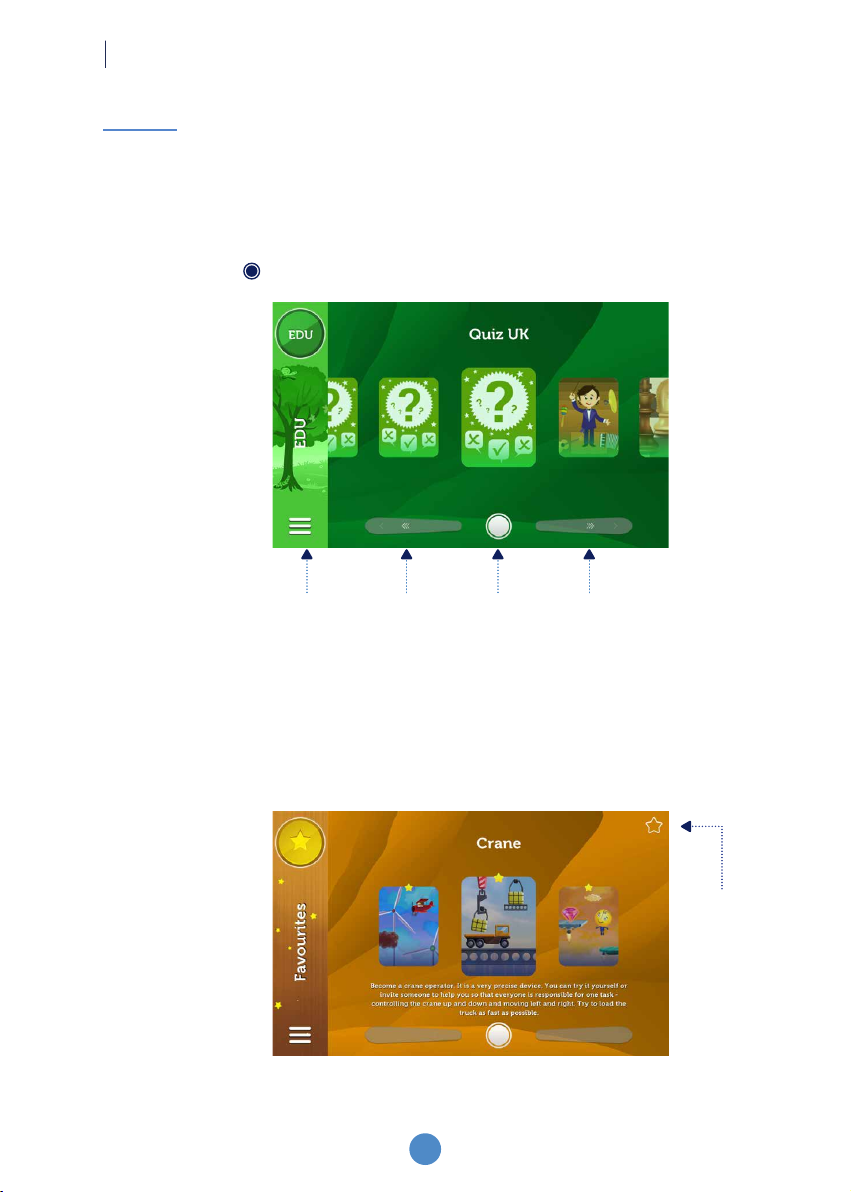
The onEVO Floor is an integrated motion detector system that includes a projector, a
computer and educational game packages to support pre-school and school teachers and
rehabilitation therapists. The games are intuitive as the onEVO Magic Carpet detects the
movement of children walking or crawling around the image displayed on the oor, and
hand movements within the area displayed on the table.
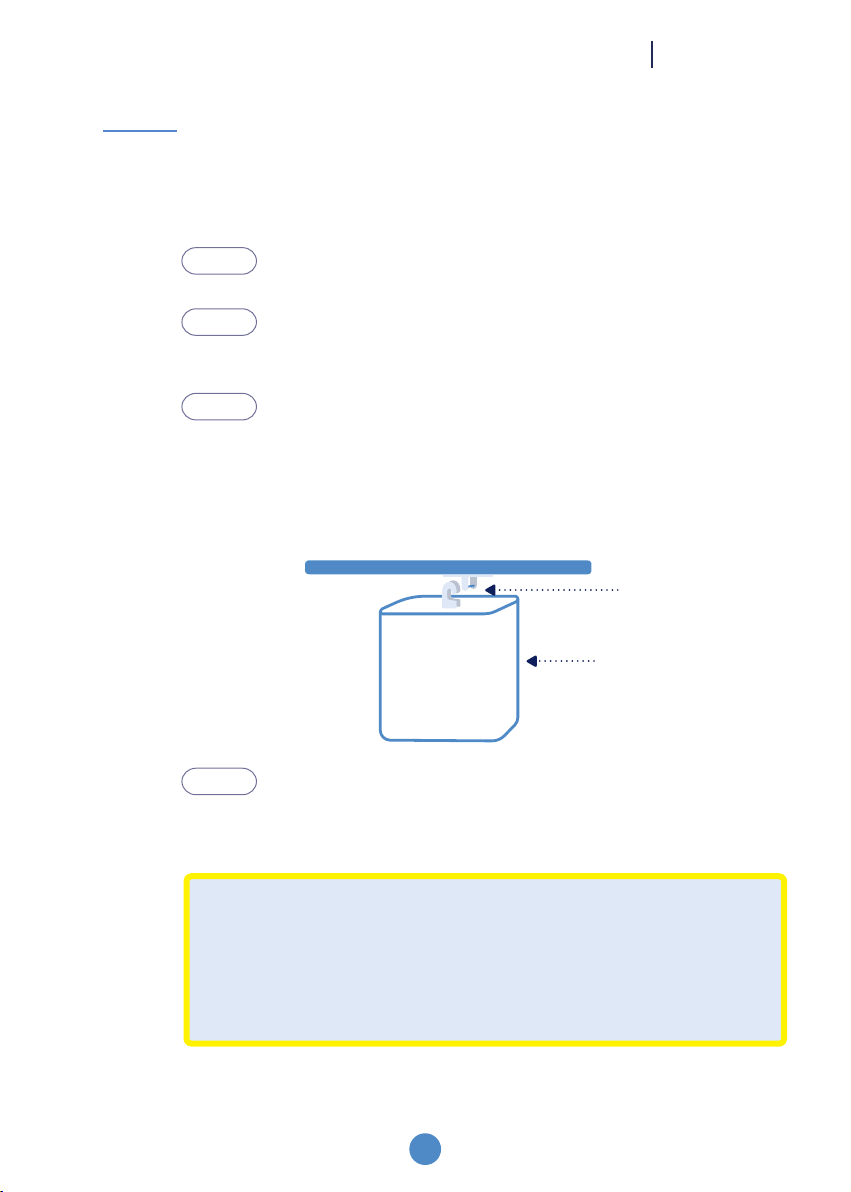
The onEVO Floor can be used on the oor or table. It is recommended that the base should
be smooth, uniform, bright and non-slip.
The room where the onEVO Floor will be used should be equipped with curtains or blinds
to allow it to be darkened on sunny days. For the best working comfort, the device should
be installed in shaded areas. The area should be far enough from the windows and walls
so that an empty rectangular surface of 410 x 256 cm can be designated for that purpose
on the ground below the appliance. The minimum safe distance from the walls is 1.5 m.
Product description
Set contents
Base
Room
The onEVO Floor Magic Carpet is operated with the remote control. Once xed to the
ceiling, it displays the image from the projector on the oor or table. After turning the device
on, simply select the game and start classes with the children according to the specic
scenario.
ONEVO FLOOR General information
• The onEVO Floor (including projector, built-in computer, stereo sound system and set
of interactive educational games)
• Power cord
• Cieling hanger
• 2 remote controls with battery packi
• User manual with warrany sheet
• Indoor installaion instructions
• Wi-Fi antennas for signal boost
• Tronic mascot included with funtronic devices
1.1
1.2
1.3
1.4

www.funtronic.eu 6
Remote control
1.5
The set includes 2 remote controls. The remote control buttons have the functions described below.
*By activating this option, an overlay will be activated which enables the user to set a timer
for a break or a stopwatch to measure time while children perform additional tasks.
ONEVO FLOOR
General informtation
ON / OFF
OPTIONS
BACK
VOLUME ADJUSTMENT VOLUME ADJUSTMENT
CHOOSE AREA
PAUSE GAME
SELECTION ARROWS
STOPWATCH*

www.funtronic.eu
7
Set installation (short description)
2.1
ONEVO FLOOR Set installation
All the elements required to mount the onEVO Floor set are included in the box. The whole
installation process is presented in the following several steps:
STEP 1
STEP 2
Bring grounded power supply cable near the onEVO Floor.
Attach the hanger bracket to the ceiling using the 4 (four) expansion bolts
supplied. For different types of ceilings it may be necessary to use different
methods to install the bracket.
STEP 3 Hang the onEVO Floor on the mounted ceiling hanger bracket. In case of a
suspended ceiling, the hanger should be xed directly to the ceiling and
extended with the adjustable arm (included). Level the whole unit and tighten
the assembly with the enclosed xing screws.
STEP 4 Connect the power cord to the socket on the top panel of the onEVO Floor
and switch the power button into position “1”. A red light will light up on the
front panel.
• The size of the displayed image depends on the height at which the device is mounted. The higher the onEVO
Floor, the larger the image projected. Optimal working conditions can be achieved by installing the device at
heights between 2.0 m and 4,5 m. Example image sizes are given in Section 6 “Technical specications”.
• The method of mounting the hanger onto the ceiling depends on the type of the ceiling. Before starting the
installation of the device, check the type of the ceiling and choose an appropriate (safe) method of installation.
• For a detailed description of the installation, please refer to the “Installation Manual” supplied with the unit.
IMPORTANT !
CIELING
HANGER
ONEVO FLOOR

www.funtronic.eu 8
ONEVO FLOOR
Set installation
LAN installation
2.2
The onEVO Floor has a built-in LAN port (access to computer network).
During the installation, we suggest connecting the device to the Internet by connecting a
LAN cable to the RJ-45 port on the top panel of the device or by using the built-in wireless
Wi-Fi adapter.
• Please use a xed LAN connection when it is impossible to use Wi-Fi.
• If you do not have access to the Internet, you can order a flash drive with an update. Connect the flash drive via
the USB input port on the top panel of the device.
Turning the device on and o
2.3
To switch on the device, press the switch on button on the remote control. To switch off the
device, proceed in the same way by pressing the switch-off button.
IMPORTANT !
• While the device is switching off, the lamp in the projector cools down. It may take a few minutes. Turning the
unit on again will be delayed by the time it takes to cool down the lamp in the projector.
• It is not allowed to disconnect the device from the power supply before it has cooled down (before hearing a
double beep) at the risk of invalidating the warranty.
• For optimum durability and reliability, disconnecting the power supply or switching the device on with the main
switch is allowed when the red signal light is constantly on.

www.funtronic.eu
9
ONEVO FLOOR Use
Area selection
3.1
When you start up the device, area selection screen will be displayed on the oor. Activate
area selection by moving your leg or hand over the area icon or by using arrows on the
remote control. Once the area has been accepted, the device will proceed to individual
game packages selection.
There are three areas to choose from:
Basic – includes games that entertain and teach children in a natural and
friendly way. It can be used for educational activities, gymnastics or speech
therapy, learning a foreign language or just for fun. It is designed for day care
centres, nursery schools, grades 1 to 3 of primary school, playrooms and
other places where children spend their time. In addition, in the Basic area you
will nd 4 general knowledge quizzes, which also include four personalised
mechanisms available with the EDU Quizzes Edit package, in which you can
enter your own questions by logging into the designated website.
Edu – educational games are with educational packages for children from
preschool to grade 8 of primary school.
Rev – games serving revalidation and rehabilitation functions for children with
various degrees of dysfunctions.
Vip – package available only on devices with preordered dedicated
applications.
Favourites – persenolized package which enables to add favouirtites games
and create custom work or event sets.

www.funtronic.eu 10
Selecting and adding games to favourites
3.2
One of the available options is to create your own folder with your favourite games,
accessible from the area selection panel. To add a game to this folder, activate the star
in the upper right-hand corner of the screen that appears above your favourite game. To
remove the game from your favourites, simply reactivate the star in the corner.
After selecting the desired area, a board with packages containing individual games will
be displayed. The eld with arrows allows you to scroll at different speeds, depending on
which of the arrows is prompted. The selection must be conrmed by activating
the eld o .
ONEVO FLOOR
Use
Accept Scroll
games to
the right
Scroll
games to
the left
Back to
previous
panel
Adding or
removing games
from favourites
Favourites
Selection of packages

www.funtronic.eu
11
EXAMPLE Below is a sample board from the “Balloons” game
• Volume can be adjusted using the buttons . (louder), or . (quieter) locatted on the remote control.
• After 3 minutes of no movement in the game area, the device will activate the screen saver, when you wake it
up again, buttons will appear to exit or repeat the game.
ATTENTION !
Return to the game slection menu by using the button on the remote control.
How to play
3.3
The onEVO Floor detects movement against the background of the displayed image. This
means that the device is operated by activating interactive elements by shading them with
your hand, leg or other part of the body. The mechanisms detect both the movement of
people on the board- standing or lying down - and outside its outline if they cast a shadow.
Games are selected in a similar way to selecting packages. Once you accept your game
selection, the game will be launched.
Games selection
ONEVO FLOOR Use

www.funtronic.eu 12
Optional settings
3.4
3.4.1
3.4.1
3.4.2
3.4.3
3.4.4
3.4.5
3.4.6
3.4.3
3.4.2
When the MODE button on the remote control is selected, optional settings will be displayed.
Options can only be selected by using the remote control. Press the arrows (left, right,
up, down) to select the desired option and press OK to conrm. To return to the previous
screen, use the button .
The REMOTE CONTROL ONLY option allows you to control the device only with the
remote control. To deactivate the interactive menu, select “On” for this option using the OK
button on the remote control.
The COLLECT TOKEN option allows you to generate an individual device token, which
can then be used to enter your own questions into quizzes. For more information, please
refer to the quiz entry guide supplied with your EDU Quiz package.
The ZOOM IN option allows you to set the scale of the displayed image. You can use this
option if you want to display the image on a table or if the image displayed is too large for
the room.
ONEVO FLOOR
Use

www.funtronic.eu
13
The NETWORK option allows you to connect your device to a Wi-Fi network. Use the
remote control to select the desired network from the list of “Available networks” or enter
the name of the network if it is a hidden network, then enter the password in the “Password”
eld (a virtual keyboard appears) and nally conrm with OK. The network connection
status is always shown in the bottom right-hand corner of the displayed image.
The SCHEDULE OPTION allows you to set the date and time for automatically switching
the device on and off. To activate the Schedule, select the “On” option. Next, set day of the
week, switch on time and working time in the selection panel.
3.4.4
3.4.5
3.4.6
The AUTOMATIC GAME SWITCH option after entering options menu and enabling
„Automatic game switch” and proceed to game of chosen set, the device will be detecting
any movement on the eld. If the device will not detect any movement after one minute it
will automaticaly change to next game (from same set which was chosen). This option
is useful on events, exhibitions or any place that prots from activated device for long
period of time and is usefull to showcase different games. Enabling this option will block
screensaver display.
ONEVO FLOOR Use

www.funtronic.eu 14
ONEVO FLOOR
Operating instructions / Troubleshooting
Diode functions
Replacing batteries in the remote control
Troubleshooting
4.1
4.2
On the front panel of the onEVO Floor you can see a colour LED light indicating the current
status of the device:
onEVO FLOOR remote control is battery-powered. If the batteries run out, the remote
control will stop working. In such a case, replace the batteries with new ones – 2 x AAA.
Light is off – the device is not connected to the power supply or it has been switched
off using the main switch.
Red – the device is in standby mode and is ready to be turned on using the remote
control. A red ashing light indicates that the device is starting up.
Green – the device is on but is not connected to the Internet. Flashing green light
means that the device is in the process of switching off.
White – the device is on and connected to the Internet.
PROBLEM SOLUTION
The LED on the front of the unit does not light
up red
Ensure the device’s power outlet is live and the main
switch of the device is in position “I”.
The device does not switch on when using
the remote control
Check that the red LED light on the front of the unit is
on. If not, see point 1. Try to start the device with the
second remote.
The LED light on the front of the unit does not light
up red despite the power supply being connected
and the switch being in position “I”
Check that the fuse in the power socket is not
blown.
The device does not respond to the
remote control when switched on
Check that the device responds to the buttons when
you point the remote control exactly at the device. If
the unit is still not responding, repeat the test with the
other remote control. If the device works correctly with
the second remote control, the cause of the problem is
probably out of use batteries.
The image from the projector is barely visible (not
much brighter than the surroundings)
Close the curtains in the room and switch off
unnecessary light sources.
Game menu responds / does not respond to
movement
Use the “Options” button and make sure that the
“Remote control only” option is enabled.

www.funtronic.eu
15
ONEVO FLOOR Technical specications
Technical specifications
Operating conditions*
• Recommended installation height above the oor: 2 –4,5 m
• Proportions of the displayed image: 16:10
• Size of the displayed image:
The warranty for the device
is provided by:
HEIGHT ABOVE FLOOR IMAGE WIDTH IMAGE HEIGHT
2,0 m 2,35 m 1,45 m
2,5 m 2,90 m 1,80 m
3,0 m 3,50 m 2,20 m
3,5 m 4,10 m 2,55 m
4,0 m 4,70 m 2,90 m
4,5 m 5,25 m 3,30 m
Projector*
• Lamp life: 4000 hours
• Lamp brightness: 3200 ANSI lumen
• Contrast: 13000:1
• Resolution of the displayed image: 1280 x 800
Computer
• Intel platform
Other components of the onEVO Floor
• 1 x USB-3.0
• LAN connector (RJ-45)
• Wi-Fi module (AC/B/G/N) with antennas
• Power supply 110 - 240 V
• Maximum power consumption: 375 Wat
• Dimensions (H x W x D) 330 x 310 x 205 mm (without handle)
• Weight: 8,3 kg
• Adjustable ceiling bracket: 90 mm, 400 - 500 mm.
* The image size and parameters may vary in the interactive table mode.

Ofce: Kolumbijska 11, 01-991 Warsaw | Landline telephone: 22 610 02 30 | E-mail: biur[email protected]Funtronic Sp. zo.o. |
onEVO Floor User Manual
www.funtronic.eu
Other manuals for OnEvo Floor
1
Table of contents
Other funtronic Projector manuals