NOTICE DE MONTAGE - ASSEMBLY INSTRUCTIONS - MONTAGEANLEITUNG - MANUAL DE MONTAJE - ISTRUZIONI PER IL MONTAGGIO
BIEN ETUDIER LA NOTICE DE MONTAGE.
REPEREZLES PIECES CONSTITUANT VOTRE
MEUBLE.
REGROUPEZET CONTROLEZ LA QUINCAILLERIE.
MUNISSEZ-VOUS DE L’OUTILLAGE NECESSAIRE.
AMENAGEZ-VOUS UNE ZONE DE MONTAGE.
PROCEDEZ AU MONTAGE.
NE JAMAIS FORCER LES ASSEMBLAGES.
RESSERREZ LES VIS APRES QUELQUES TEMPS
D’USAGE.
GARDER VOTRE NOTICE DE MONTAGE,SI UNE
PIECE VENAIT A MANQUER,ELLE SERAIT LE
PLUS CLAIR MOYEN DE COMMUNIQUER AVEC
VOTRE MAGASIN.
READTHE ASSEMBLY INSTRUCTIONS CAREFULLY.
IDENTIFY THE ELEMENTS CONSTITUINGYOUR
PIECE OF FURNITURE.
GROUP AND CHECKTHE HARDWARE FITTINGS.
GET THE TOOLS NEEDED.
CLEAR SPACETO WORK.
PROCEED TO ASSEMBLE.
NEVER FORCE THE FITTINGS.
TIGHTENTHE SCREW AFTER USING FOR
SOMETIME.
KEEP YOUR ASSEMBLY INSTRUCTIONS,IT
COULD HELP FOR BETTER COMMUNICATION
WITH YOUR STORE,IN THE EVENT OF QUERY.
DIE MONTAGEANLEITUNG SORGFÄLTIG
DURCHLESEN.
DIE EINZELTEILE DES MÖBELSTÜCKSERMITTELN.
DIE BESCHLÄGE ZUSAMMENLEGENUND
PRÜFEN.
DAS NOTWENDIGE WERKZEUG ZURECHTLEGEN.
EINEN MONTAGEBEREICH FREIMACHEN.
DAS MÖBELSTÜCK ZUSAMMENBAUEN.
NIEMALS DIE VERBINDUNGEN ZU STARK
ANZIEHEN.
DIE SCHRAUBEN NACH EINIGER ZEIT DES
GEBRAUCHS ERNEUT FESTZIEHEN.
DIE MONTAGEANLEITUNG GUT AUFBEWAHREN:
SOLLTE EIN TEIL FEHLEN,IST SIE DAS BESTE VERS
TÄNDIGUNGSMITTEL MIT IHREM GESCHÄFT.
ESTUDIE ATENTAMENTE EL MANUAL DE
MONTAJE.
LOCALICE LAS PIEZAS QUE CONSTITUYEN SU
MUEBLE.
REUNAY CONTROLE LOS TORNILLOS.
EQUIPE-SE DE LAS HERRAMIENTAS
NECESARIAS.
PREPARE UMA ZONA DE MONTAJE.
REALICE EL MONTAJE.
NO FUERCE NUNCA ENLAS UNIONES.
APRIETE LOSTORNILLOS DESPUES DE CIERTO
TIEMPO DE UTILIZACION.
CONSERVE SU MANUAL DE MONTAJE,SI
FALTARA UNA PIEZA,SERIA LAMANERA MAS
FACIL DE COMUNICAR CONLA TIENDA.
STUDIARE BENE LE ISTRUZIONI DI MONTAGGIO.
PRENDERE CONOSCENZA DEI PEZZI CHE
COSTITUISCONO IL MOBILE.
RAGGRUPPARE E CONTROLLARE LA
FERRAMENTA.
MUNIRSI DEGLI UTENSILI NECESSARI.
PREPARARE UNA ZONA DI MONTAGGIO.
PROCEDERE AL MONTAGGIO.
NON FORZARE MAI GLI ASSEMBLAGGI.
RISTRINGERE LE VITI DOPO UN PERIODO
D’USO.CONSERVARE QUESTE ISTRUZIONI DI
A
B
90 mn
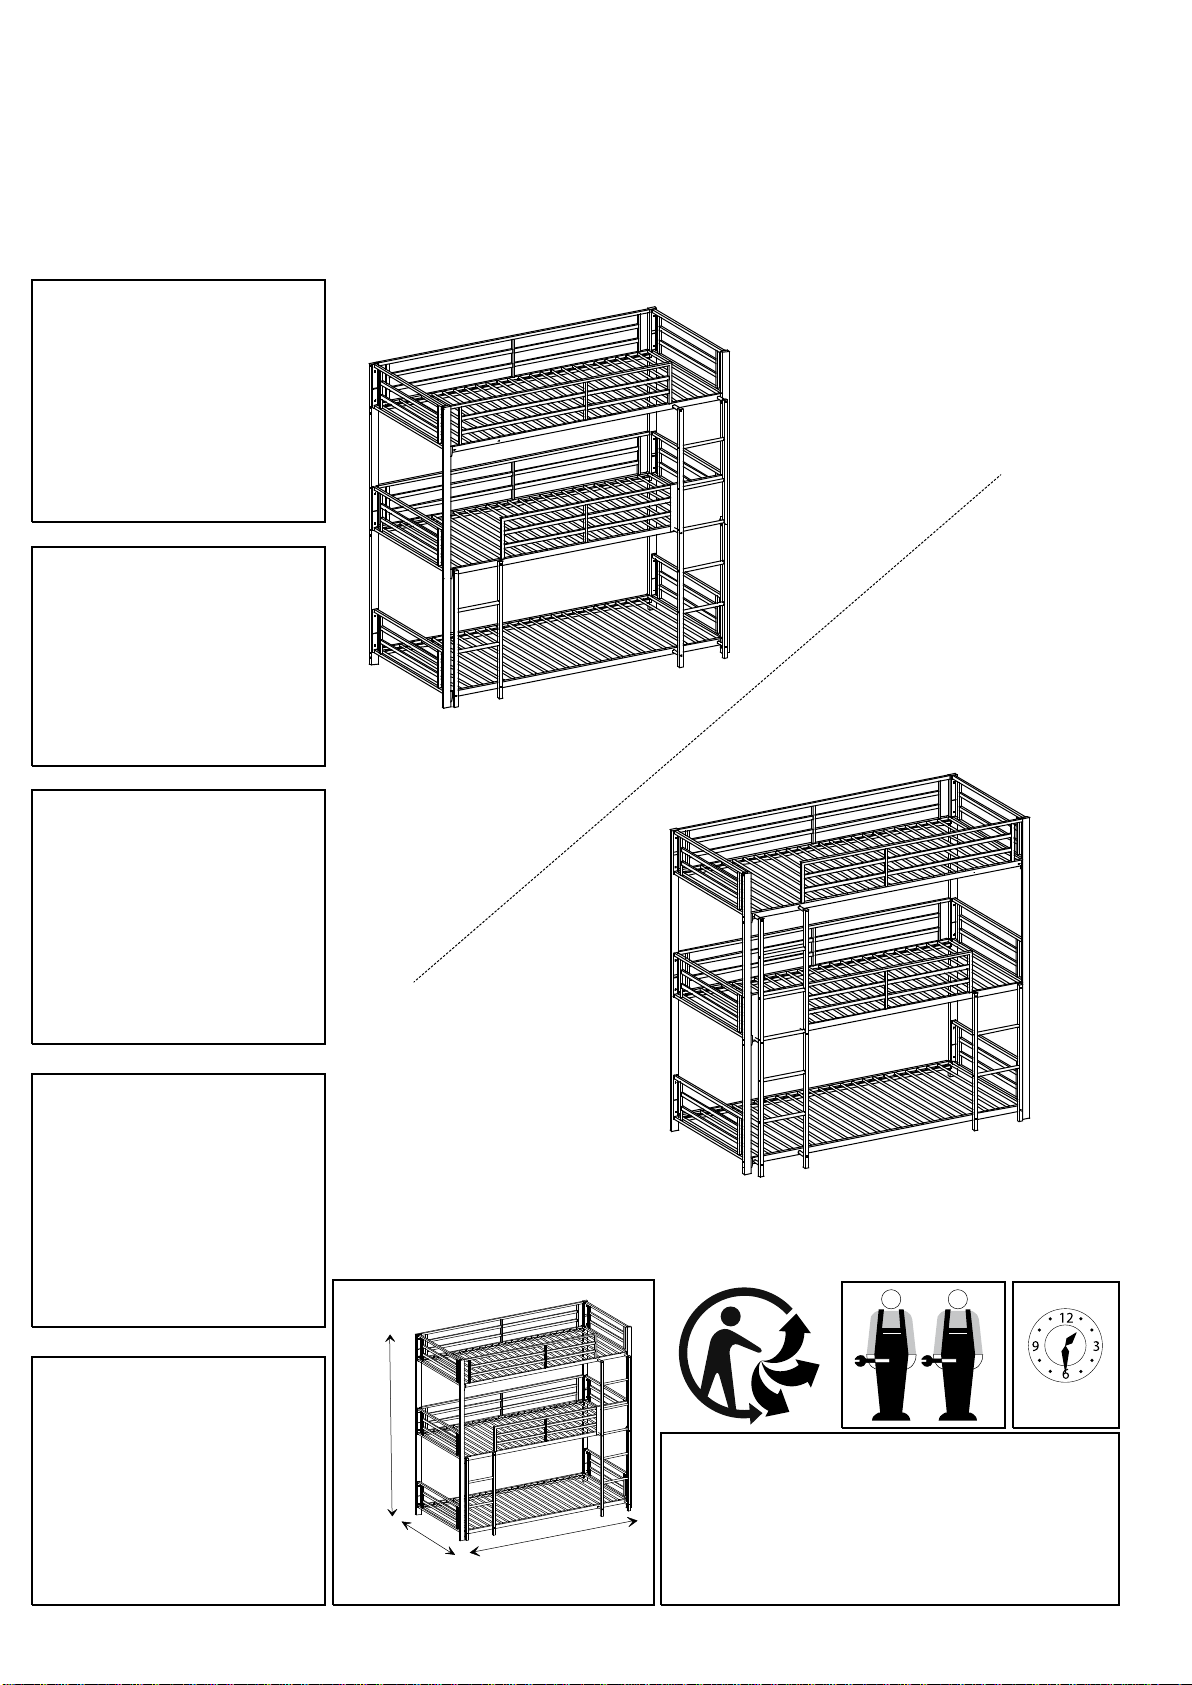
200,5 cm
205 cm
98 cm
Elément :
TRIO lit superposé enfant gris/ LITS
SUPERPOSES TRIPLE
TRI40391200(TRI4.039)
Structure en tube d’acier
Finition laquée epoxy
Pour l’entretien, utiliser uniquement un chiffon
légèrement humide. Ne pas utiliser de solvant.
-
MONTAGGIO,SE UN PEZZO VENISSE A
MANCARE SAREBBE IL MIGLIORE MEZZO DI
COMUNICAZIONECON IL RIVENDITORE.
4/13