manuals.online logo
Brands
  1. Home
  2. •
  3. Brands
  4. •
  5. Furniture To Go
  6. •
  7. Indoor Furnishing
  8. •
  9. Furniture To Go Scandi 1020401 User manual

Furniture To Go Scandi 1020401 User manual

Assembly Instructions - Please keep for future reference
1020401
Issue 1 - 23-01-2013
Scandi - 6+6 Drawer Chest
Dimensions
Width
Depth
Height
:
:
:
350218-01-MDF
123.3 cm
39.7 cm
104.3 cm
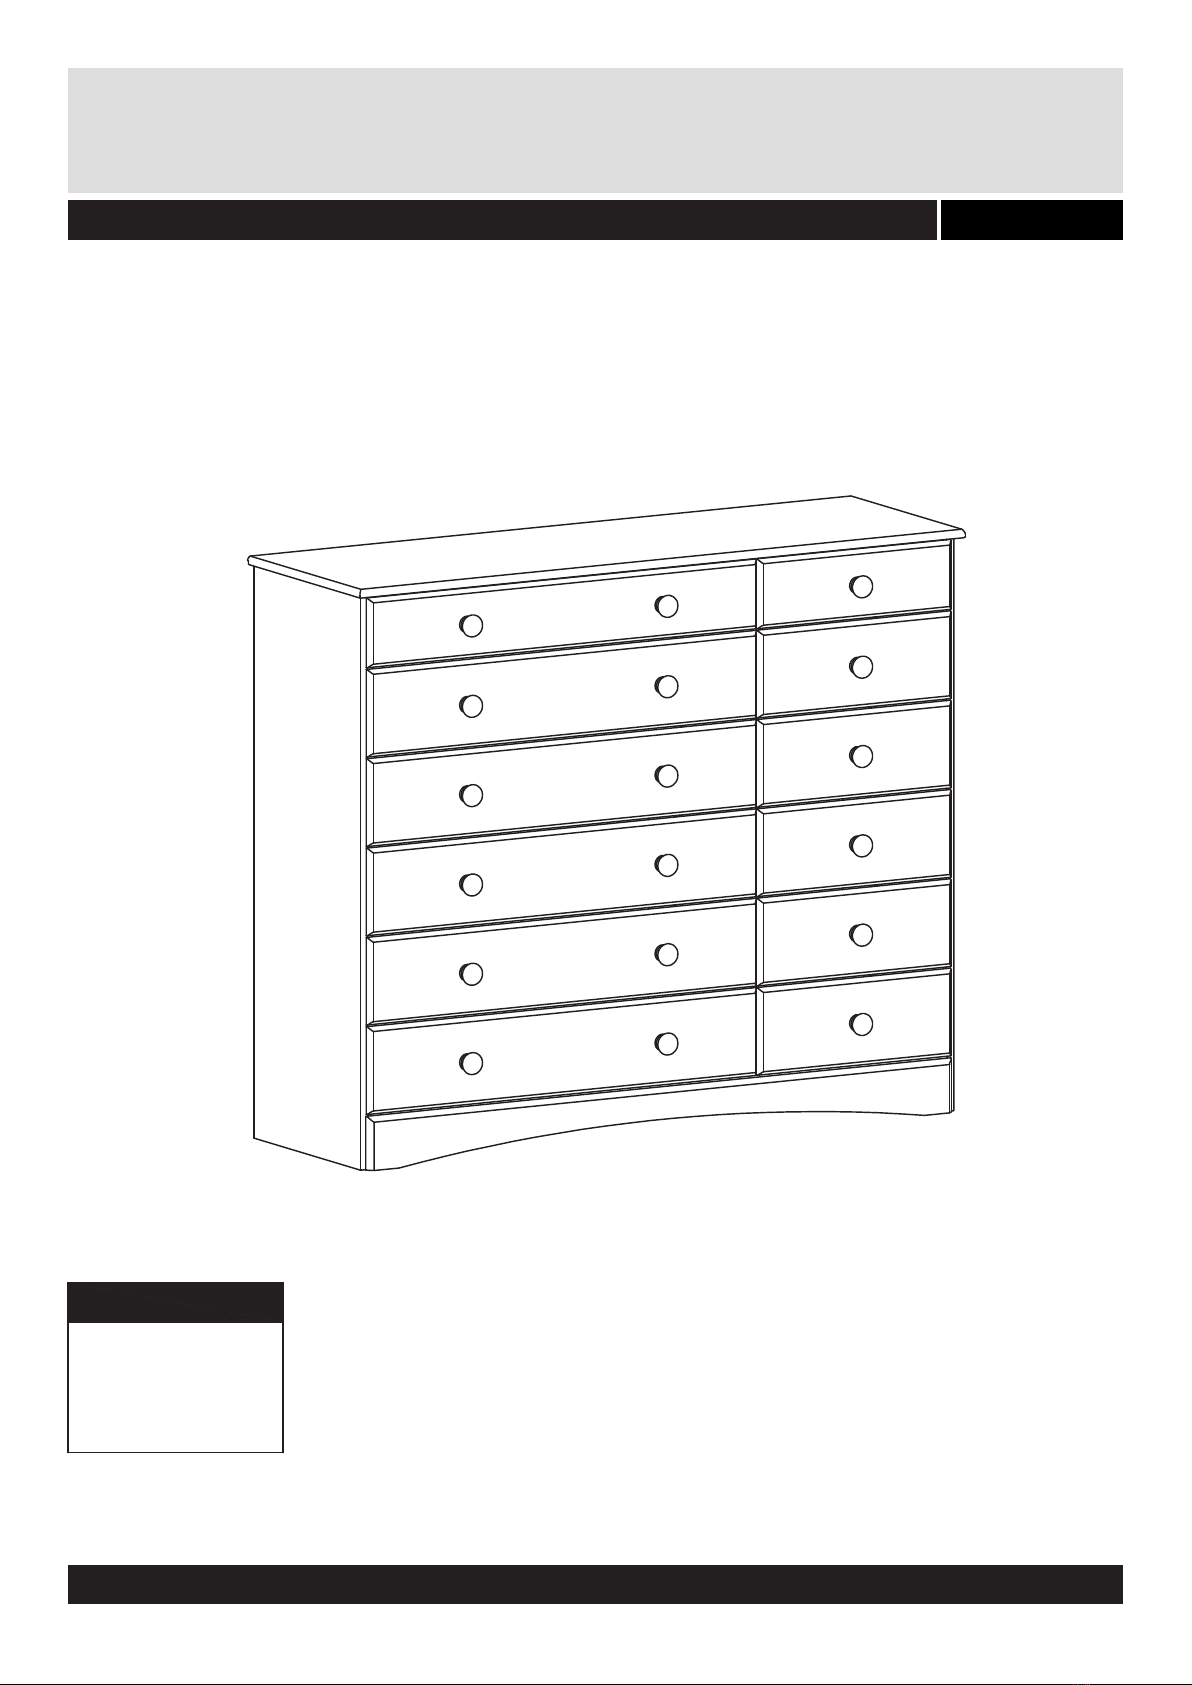
!Safety and Care Advice
Important - Please read these instructions fully before starting assembly
Care and maintenance
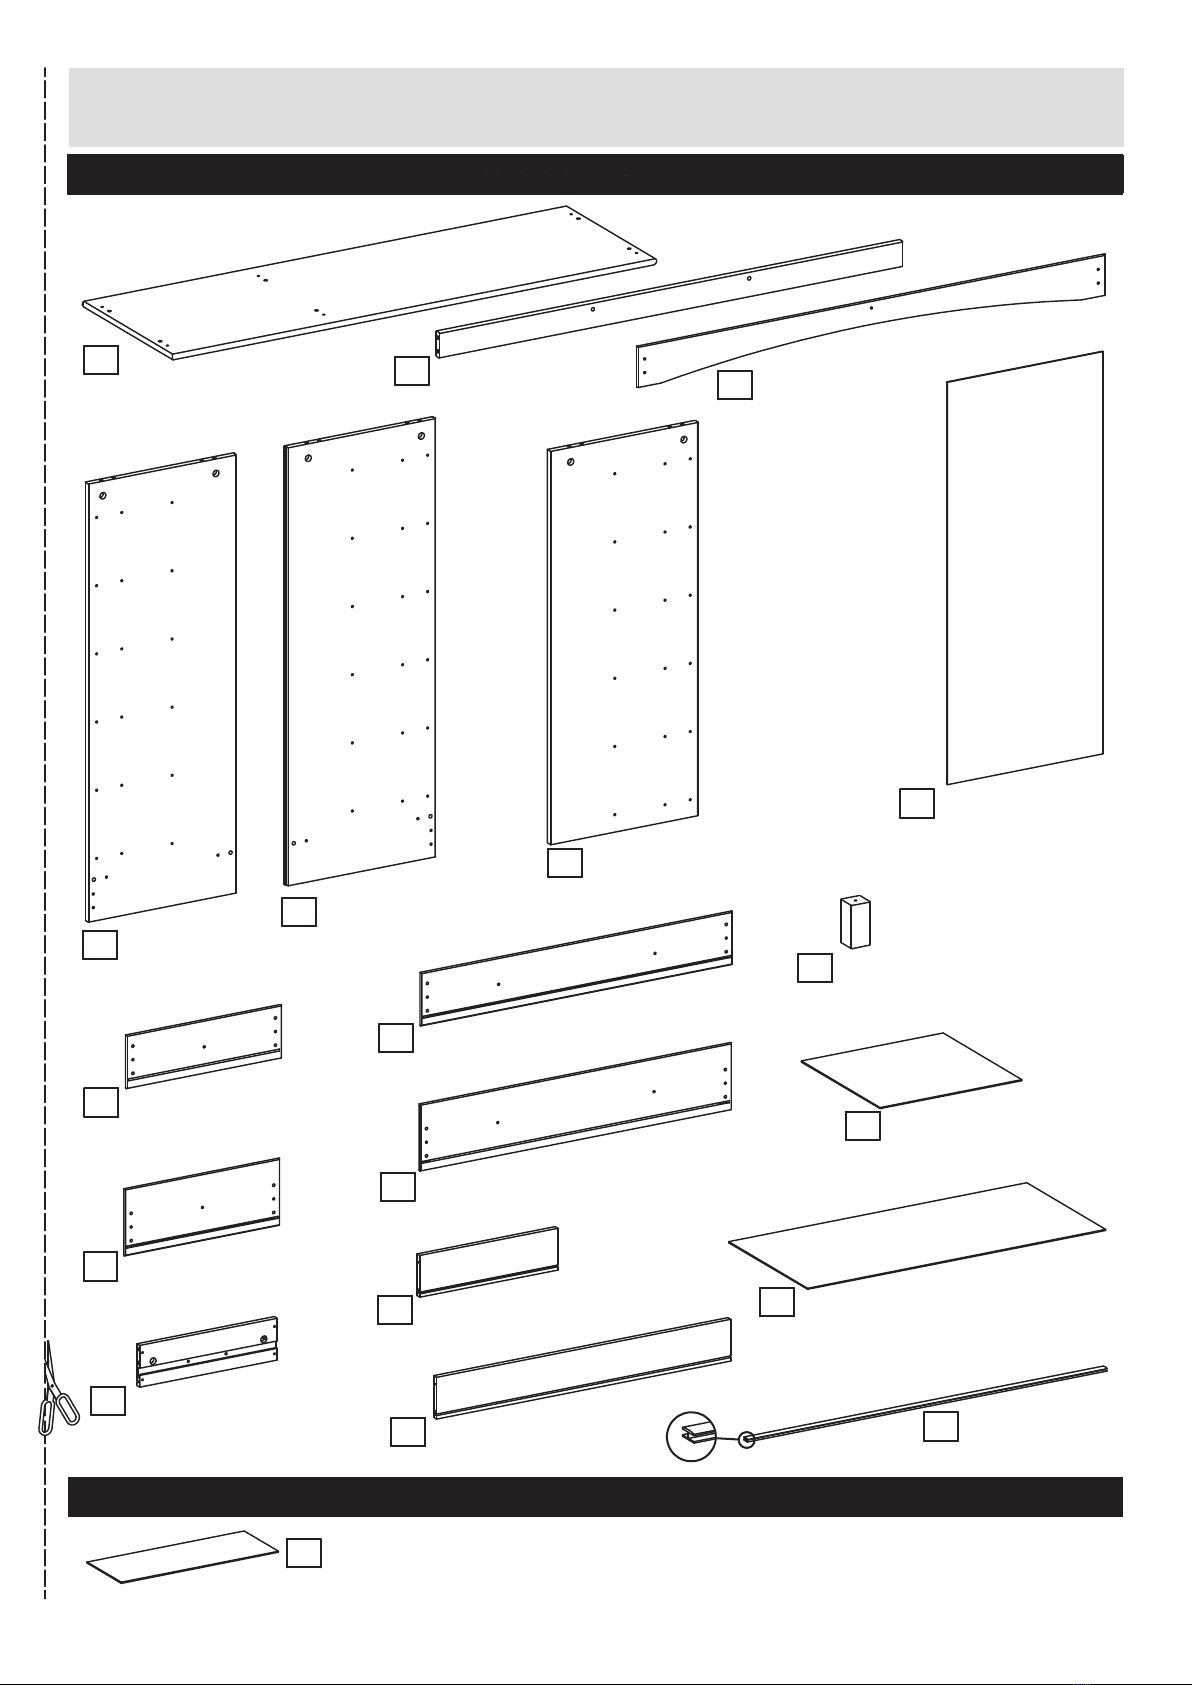
1
• Check you have all the
components and tools listed on
pages 2 and 3.
• Remove all fittings from the
plastic bags and separate them
into their groups.
• Keep children and animals
away from the work area, small
parts could choke if swallowed.
• Make sure you have enough
space to layout the parts before
starting.
• Do not stand or put weight on
the product, this could cause
damage.
• Assemble the item as close to
its final position (in the same
room) as possible.
• Assemble on a soft level
surface to avoid damaging the
unit or your floor.
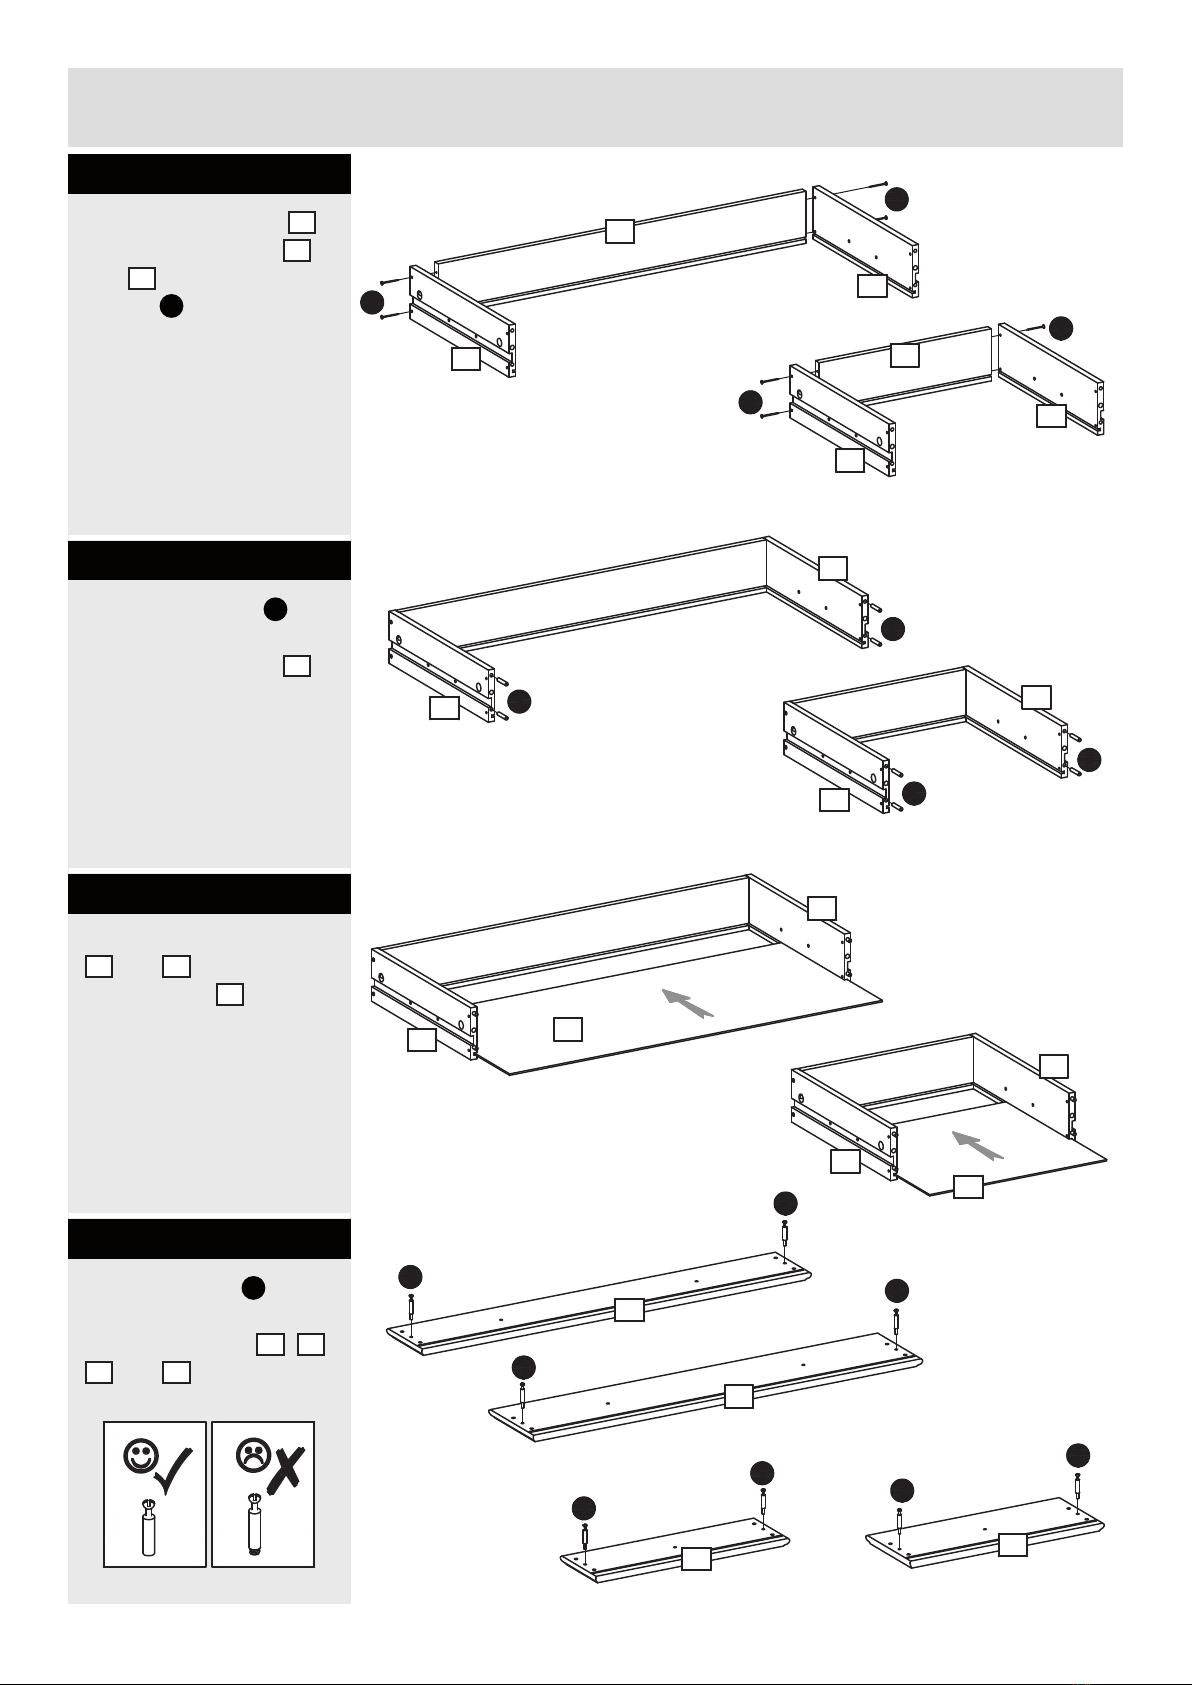
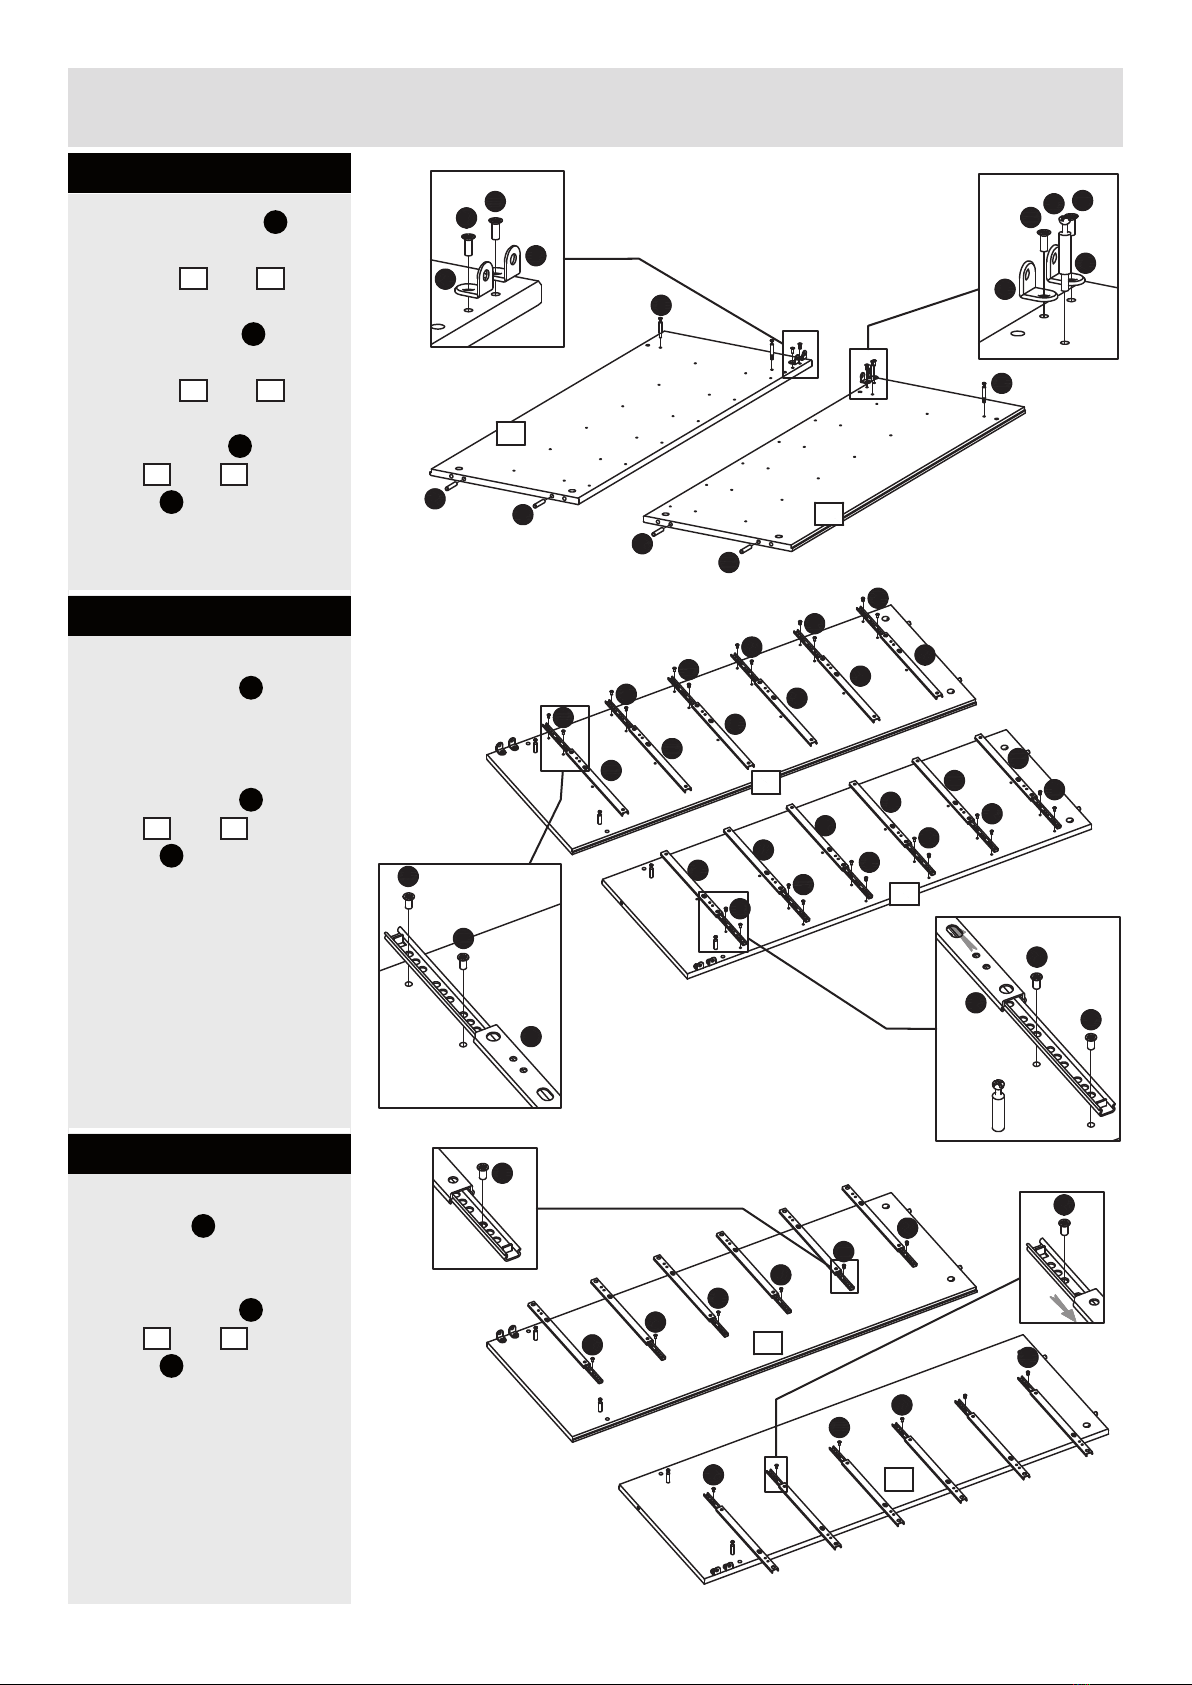
• Parts of the assembly will be
easier with 2 people.
• We do not recommend the use
of power drill/drivers for
inserting screws, as this could
damage the unit. Only use hand
screwdrivers.
• Dispose of all packaging
carefully and responsibly.
• Only clean using a damp cloth
and mild detergent, do no use
bleach or abrasive cleaners.
• From time to time check that
there are no loose screws on
this unit.
• This product should not be
discarded with household waste.
Take to your local authority
waste disposal centre.
Note: if required the next
page can be cut out and used
as reference throughout the
assembly. Keep this page
with these instructions for
future reference.
350218-02
Components - Panels
Please check you have all the panels listed below
Please note !! The following packaging material, can be disposed after the product is assembled.
2
Components - Panels
Please check you have all the parts listed below
350170-03
5
(102,8 cm x 37,9 cm)
Side, right
4
(102,8 cm x 37,9 cm)
Side, left
2
(117,9 cm x 6 cm)
Plinth, back
18
(91,5 cm x 1,7 cm)
H-profile
15
(74,9 cm x 9,8 cm)
Drawer back
11
(79,3 cm x 15,7 cm)
Drawer front
3
(119,1 cm x 9,6 cm)
Plinth, front
7
(94,4 cm x 39,6 cm)
Back
1
(123,3 cm x 39,7 cm)
Top
8
(39,5 cm x 12,5 cm)
Drawerfront, small
14
(35,1 cm x 9,8 cm)
Drawer back, small
17
(75,9 cm x 34,7 cm)
Drawer bottom
16
(36,1 cm x 34,7 cm)
Drawer bottom, small
13
(35 cm x 9,8 cm)
Drawer side, right/left
10
(39,5 cm x 15,7 cm)
Drawerfront
9
(79,3 cm x 12,5 cm)
Drawer front
12
(9 cm x 4,3 cm)
Foot
6
(92,3 cm x 38 cm)
Divider
2
x
3
x
5x
6
x
5
x
6
x
6
x
6
x
24
x
19
(40,0 cm x 15,1 cm)
Waste
350218-03
Components - Fittings
Please check you have all the panels listed below
Note: The quantities below are the correct amount to complete the assembly. In some cases more ttings
may be supplied than are required.
3350170-04 MDF
10
ø7.8 x 40mm Wooden dowel x
Aa Ab
ø6 x 30mm Wooden dowel x
48
Cb
ø5 x 11, cc34mm Bolt x
34
Ca
ø15 x 10.5mm Cam x
34
ø4 x 35mm Screw x
Jc
18
1.2 x 20mm Nail x
Da
75
Kb
ø5.8 x 8mm Screw x
72
Sk
24
245 x 17 x 10mm Drawer runner x
Gc
18
ø40 x 35mm Wooden Knob x Wall strap and instruction x 1
Fh
17060 16040 90 15013070 120100 14011050 803020100
Ruler - Use this ruler to help correctly identify the screws
Tools required
Flatblade screwdriver
(Medium)
Hammer
Phillips screwdriver
(Medium & large)
Ke
10
ø6.1 x 11.5mm Screw x
Back fitting w. ø3.5 x 15mm Screw x
Fi
24
Va
Angle 20 x 20 x 16mm x
5
Yd
1
Nail holder x
ø3 x 35mm Screw x
Bp
48
Hk
24
M4 x 9mm Screw x
ø4 x 60mm Screw x
Bb
1
ø7 x 50mm Screw x
Db
2
4mm Allen key x
Ya
1
350218-04 MDF
Assembly Instructions
Knock the dowels
Ab
into the holes indicated
on the drawer sides 13
using a smal hammer.
Step 2
Step 4
Screw the bolts
Cb
into
the holes indicated on
the drawer fronts 8, 9,
10 and 11 .
Fix the drawer sides 13
to the drawer backs 14
and 15 as shown, using
screws
Bp
.
Step 1
Slide the drawer bottoms
16 and 16 into the
drawer sides 13 .
Step 3
4
350170-05
15
17
Bp
Bp
Ab
Ab
14
13
16
8
Cb
Cb
Ab
Ab
Bp
Bp
13
13
13
13
13
13
13
13
13
13
13
6
x
6
x
6
x
6
x
6
x
6
x
1
x 5
x
Cb
Cb
Cb
Cb
9
10
11
Cb
Cb
5x
1
x
350218-05
Assembly Instructions
Step 5
Push the drawer fronts
8, 9, 10 and 11 onto
the drawer sides 13 as
shown.
Push cams
Ca
into the
holes indicated. Arrow
pointing towards the
front.
Turn the cams
Ca
to the
right to x the fronts.
Step 6
!
Important!
Make sure the
angle between the
drawer fronts
8
/
9
/
10
/
11
and the drawer sides
13
is 90° before the drawer
bottoms
16
/
17
is xed.
Fix the drawer bottoms
16
and
17
to the drawer backs
14
and
15
and the drawer
fronts
8
,
9
,
10
and
11
using
Fi
.
To adjust the angle between
the drawer sides and the
drawer fronts push the tting
Fi
sidewards. See details.
Step 7
Fix the Wooden knobs
Gc
to the drawer fronts 8,
9, 10 and 11 using
screws
Jc
.
350170-06
5
90°
90°
90°
90°
90°
90°
90°
90°
90°
90°
90°
90°
90°
90° 90°
90°
90°
Ca
Ca
11
Cb
Ca
14
8
11
15
Fi
Fi
Gc
8
Ca
Ca
11
8
13
13
13
13
Gc
Jc
Jc
Gc
Gc
Fi
Fi
Ca
Ca
Ca
Ca
Fi
Fi
Fi
Fi
Gc
Gc
Jc
10
9
14
10
15
9
10
13
13
13
13
9
17
17
16
16
1
x
5
x 5
x
1
x
1
x
1
x
5x
5
x
5
x
1
x
1
x
5
x
Fi
Fi Fi
Jc
Jc
Jc
350218-06
Assembly Instructions
Slide the top of the drawer
runners
Sk
backwards.
Fix the front end of the
drawer runners
Sk
to
the divider
9
using
screws
Kb
into the holes
indicated. See details.
Slide the top of the drawer
runners
Sk
forwards.
Fix the backend of the
drawer runners
Sk
to
the divider
6
using
screws
Kb
into the holes
indicated.
Step 9
Turn around the
divider 6.
Fix the the drawer
runners
Sk
to the divider
6as shown. Same
procedure as step 9.
Step 10
Knock the dowels
Aa
into
the holes indicated on
the divider 6using a
small hammer.
Step 8
6
350170-07
6
6
6
Aa
Aa
Sk
Sk
Sk
Sk
Sk
Sk
Kb
Kb
Kb
Kb
Kb
Kb
Kb
Kb
Kb
Kb
Kb
Kb
6
6
Kb
Kb
Kb
Kb
Kb
Kb
Kb
Kb
Kb
Kb
Kb
Kb
Sk
Sk
Sk
Sk
Sk
Sk
Kb
Sk
Kb
Kb
Kb
Kb
Sk
Kb
350218-07
Assembly Instructions
Slide the top of the
drawer runners
Sk
backwards.
Fix the front end of the
drawer runners
Sk
to the
sides 4and 5using
screws
Kb
through the
holes indicated.
See details.
Step 12
Slide the top of the draw-
er runners
Sk
forwards.
Fix the backend of the
drawer runners
Sk
to the
sides 4and 5using
screws
Kb
through the
holes indicated.
See details.
Step 13
Knock the dowels
Aa
into
the holes indicated on
the sides 4and 5.
Screw the bolts
Cb
into
the holes indicated on
the sides 4and 5.
Fix the angles
Va
to the
sides 4and 5using
screws
Ke
. Place the
angles as shown.
See details.
Step 11
350170-08
7
Sk
Kb
Kb
Sk
Sk
Sk
Sk
Sk
Sk
Sk
Sk
Sk
Sk
Sk
Sk
Kb
Kb
Kb
Kb
Kb
Kb
Kb
Sk
5
4
Kb
Kb
Kb
Kb
Kb
Aa
Aa
Cb
Aa
Aa
Cb
Va
Va
5
4
Kb
Kb
Ke
Ke
Va
Va
Cb Ke
Ke
4
5
Kb
Kb
Kb
Kb
Kb
Kb
Kb
Kb
Kb
Kb
Kb
Kb
350218-08
Assembly Instructions
Step 14
Screw the bolts
Cb
into
the holes indicated on
the top 1.
Place the divider 6onto
the top 1.
Its important that the
divider 6is placed
exactly as shown. Note
the holes indicated.
Tighten using cams
Ca
into the holes indicated.
Push cams
Ca
into the
holes indicated. Arrow
pointing towards the
top 1.
Turn the cams
Ca
to the
right to x the divider 6.
Step 15
Knock the dowels
Aa
into
the holes indicated on
the back plinths 2.
Step 16
8
350170-09
Cb
Ca
1
1
6
Cb
Cb
Cb
Cb
Cb
Cb
Ca
Ca
Aa
Aa
Aa
Aa
2
2
350218-09
Assembly Instructions
Press the top 1onto
the sides 4and 5.
Push
cams
Ca
into
the
holes
indicated
on the sides 4
and 5. Arrow pointing
towards the top 1.
Turn the cams
Ca
to the
right to x the top 1.
Fix the divider 6to the
back plinths 2using
screws
Db
. Tighten using
the allen key
Ya
.
Step 18
Step 17
Place the sides 4and
5onto the back
plinths 2.
Push cams
Ca
into the
holes
indicated
on the back
plinths 2.
Arrow pointing
towards the sides 4
and 5.
Turn the cams
Ca
to the
right to x the sides 4
and 5.
350170-10
9
4
2
2
5
6
2
2
1
4
5
Ca
Ca
Ca
Ca
Db
Db
Ca
Ca
350218-10
Assembly Instructions
Turn around the chest.
Place the front plinth 3
as shown.
Fix the front plinth 3to
the sides 4and 5
using screws
Ke
into the
angles
Va
.
Fix the foot 12 onto the
back plinth 2using
screw
Bb
.
Step 19
Step 20
Place the backs 7into
the rabbets in the sides
4and 5and the
top 1and into the
H-prole 18 .
!
Important!
Make sure the
angle between
the top
1
and the sides
4
and
5
is 90° when the
backs
7
is attached.
Fix the backs
7
to the
sides
4
and
5
, the top
1
, the divider
6
and the
back rail
2
using nails
Da
.
Use the nail holder
Yd
and a
small hammer.
10
350170-11
Yd
7
7
18
Da
Da
Da
Da
Da
Ke
Ke
Va
Ke
Bb
Ke
Da
2
2
3
7
12
12
2
2
5
4
5
4
1
6
350218-11
Assembly Instructions
Pull out the drawer
runners. Slide the
drawers onto the
runners.
Fit and x the lower
drawer rst and work
your way up.
Fix drawers to drawer
runners using screws
Hk
.
Step 22
Step 21
!
Warning!
The chest of
drawers is heavy.
Lift with care.
Its recommended that the
chest is xed to the wall.
Use the ttings
Fh
. Follow
the instructions included
with the ttings.
350218-12
11
Wall strap and instruction
x
Fh
1
Hk

Other Furniture To Go Indoor Furnishing manuals

Furniture To Go 1040601 User manual

Furniture To Go

Furniture To Go 1040601 User manual

Furniture To Go Scandi 4+2 Drawer Chest 1020201 User manual

Furniture To Go

Furniture To Go Scandi 4+2 Drawer Chest 1020201 User manual

Popular Indoor Furnishing manuals by other brands

VISIONARY DESIGNS MOD-1212 Assembly

VISIONARY DESIGNS

VISIONARY DESIGNS MOD-1212 Assembly

Germania Hangevitrine 1502 Assembly instruction

Germania

Germania Hangevitrine 1502 Assembly instruction

Bassett INSPIRED LUCCA BP-LUCWD58 Assembly instructions

Bassett

Bassett INSPIRED LUCCA BP-LUCWD58 Assembly instructions

Steelcase CPRSLFO installation instructions

Steelcase

Steelcase CPRSLFO installation instructions

visplay Xero Struc 4 Assembly and operating instructions

visplay

visplay Xero Struc 4 Assembly and operating instructions

Saint Birch BX8400 Assembly instructions

Saint Birch

Saint Birch BX8400 Assembly instructions

mopio BROOKLYN NIGHTSTAND Assembly instructions

mopio

mopio BROOKLYN NIGHTSTAND Assembly instructions

Direct Supply Mattress Extender owner's manual

Direct Supply

Direct Supply Mattress Extender owner's manual

Manhattan Comfort 12GMC1 Assembly guide

Manhattan Comfort

Manhattan Comfort 12GMC1 Assembly guide

Fumagalli DORY user manual

Fumagalli

Fumagalli DORY user manual

Mocka Kirra Buffet Assembly instructions

Mocka

Mocka Kirra Buffet Assembly instructions

American Standard 2171 installation instructions

American Standard

American Standard 2171 installation instructions

BRICK D3977 Assembly instruction

BRICK

BRICK D3977 Assembly instruction

Cooper Lighting Neo-Ray Cirque 6-DIP Specification sheet

Cooper Lighting

Cooper Lighting Neo-Ray Cirque 6-DIP Specification sheet

Knight Scroll Assembly instructions

Knight

Knight Scroll Assembly instructions

Furniture of America CM-FC609 Assembly instructions

Furniture of America

Furniture of America CM-FC609 Assembly instructions

Bouclair 9391029 Assembly instructions

Bouclair

Bouclair 9391029 Assembly instructions

Ameriwood HOME 9897396COM Assembly manual

Ameriwood HOME

Ameriwood HOME 9897396COM Assembly manual

manuals.online logo
manuals.online logoBrands
  • About & Mission
  • Contact us
  • Privacy Policy
  • Terms and Conditions

Copyright 2025 Manuals.Online. All Rights Reserved.