Furrion FSRI22LA-SS User manual

1
Operating and Installation Instructions
RV Gas Oven
Furrion FSRI22LA-SS
RV Gas Oven
This manual is for use with

2
IMPORTANT SAFETY INSTRUCTIONS
WARNING: If the information in this manual is not
followed exactly, a fire or explosion may result
causing property damage, personal injury or
death.
— Do not store or use gasoline or other flammable vapors and
liquids in the vicinity of this or any other appliance.
— WHAT TO DO IF YOU SMELL GAS
• Do not try to light any appliance.
• Do not touch any electrical switch.
• Do not use any phone in your recreational vehicle.
• Clear the recreational vehicle of all occupants.
• Turn off the gas supply tank valve(s) or main gas supply.
• Immediately call your gas supplier for instructions.
• If you cannot reach your gas supplier, call the fire department.
— Have the gas system checked and leakage source corrected by a
qualified installer, service agency, manufacturer or dealer or the
gas supplier.
Keep this instruction manual with your appliance for future use.
The model and serial number are printed on the enclosed product
registration card.

3
Welcome
Furrion FSRI22LA-SS RV Gas Oven
Thank you for purchasing a Furrion FSRI22LA-SS RV Gas Oven.
Before installation and use, please read all instructions carefully. This will ensure safe
use and reduce the risk of injury to persons.
Thank you for your purchase of our Furrion RV oven, we hope you will have an enjoyable
experience with this product and it provides many memorable mealtimes.
With your purchase, you receive one of the best warranties in the RV industry. Take a
moment to read the full warranty statement. It’s also important to register your Furrion appli-
ance to ensure that you don’t miss out on exclusive owner benets, such as; assistance
that you will be taken care of in the unlikely event that service becomes necessary during the
warranty period, and a proof-of-purchase record in case of a insurance claim. You may
register online at http://furrion.com/productregistration-com/
If you have any further questions regarding our products, please contact us at

4
Contents
SAFETY ADVICE .................................................................................
Oven Feature Guide ..........................................................................
Using Your Oven ................................................................................
Installation .........................................................................................
Cooking Advice .................................................................................
Maintenance ......................................................................................
Warranty .............................................................................................
Exploded Drawing.............................................................................
5-7
8
9-10
11-14
15-16
17-18
19-20
22-23

5
SAFETY ADVICE
GENERAL SAFETY PRECAUTIONS
1. Always use dry oven gloves or pot holders when removing pans from this
appliance. Wet or damp pot holders or oven gloves can cause steam burns.
Do not use a towel or bulky cloth in place of oven gloves or pot holders.
2. Exercise caution when opening the oven door. Let hot air or steam escape
before looking or reaching into the oven.
3. Be sure that the oven cool air intake (located below the door) and oven
exhaust vent (located on the countertop) are unobstructed at all times.
4. Oven exhaust vent is extremely hot during and after oven operation. Do not
touch when or just after using the oven.
5. Position oven racks in desired locations when oven is cool. If a rack must be
repositioned after the oven is already hot, be sure oven gloves or pot holders
does not contact the gas burner in the oven.
6. Read this guide carefully before using this appliance to reduce risk of fire,
electric shock or injury.
7. This appliance must be properly installed and serviced by a qualified installer
or service agency and grounded by a qualified technician.
8. Clean only those parts listed in this guide.
9. Do not touch heating elements or interior surfaces of oven. Heating
elements may be hot even though they are dark in color. Interior surfaces
become hot enough to cause burns. During and after use, do not touch, or
let clothing or other flammable materials contact heating elements, interior
surfaces or rear vent of oven until they have had sufficient time to cool.
CAUTION
Do not place cookware on oven floor or use aluminum foil or other material
to line oven floor or side walls. Failure to adhere to this notice will damage
the porcelain interior and will void your warranty.
WARNING: Gas leaks cannot always be detected by smell. Use a gas detector
approved by UL or CSA to check gas lines. For more information,
contact your gas supplier. If a gas leak is detected, follow the “What
to do if you smell gas” instructions.

6
SAFETY ADVICE
IMPORTANT SAFETY INSTRUCTIONS
WARNING: To reduce the risk of fire, electrical shock, injury to persons, or
damage when using the range, read this user manual before use.
All installation must conform with state or other codes or, in the absence of such
codes, with the Standard for Recreational Vehicles, ANSI/NFPA 1192.
WARNING:
NEVER use this appliance as a space heater to heat or warm the room. Doing
so may result in carbon monoxide poisoning and overheating of the oven.
Important Safety Notice
The California Safe Drinking Water and Toxic Enforcement Act requires the
Governor of California to publish a list of substances known to the state
to cause cancer, birth defects or other reproductive harm, and requires
businesses to warn customers of potential exposure to such substances.
WARNING: NEVER cover rear vent on countertop, internal cavity holes or space
at bottom of oven door or cover an entire rack with materials such
as aluminum foil. Doing so blocks air flow through the oven and may
cause carbon monoxide poisoning.
CAUTION: Do not store items of interest to children in cabinets above a oven or
near the back oven vent – children climbing around the oven to reach
items could be seriously injured.
Disconnect power before servicing.
Injuries may result from the misuse of appliance doors or drawers such as
stepping, leaning, or sitting on the doors or drawers.
Keep oven area clear and free from combustible materials, gasoline, and other
flammable vapors and liquids. Flammable materials should not be stored in an
oven or near surface units.
The appliance must be isolated from the gas supply piping system by closing its
isolation valve during any pressure testing with a pressure more than 13.8WCI
Pressure / Leak test using 11 - 13.8 WCI pressure

7
SAFETY ADVICE
To maintain the eciency and safety of this appliance, we recommend that you
do the following:
• Only call the service centers authorized by the manufacturer
• Always use original spare part
• This instruction manual concerns a class 3 built-in appliance
• When handling the appliance, we recommend you always use the purpose
provided handles recessed into the sides of the oven to prevent harming
people or damaging the appliance itself.
• This appliance is designed for non-professional, house-hold use and its
functions must not be changed.
• These instructions are only valid for the countries whose symbols appear on
the manual and the serial number plate.
• When the appliance is in use, the burners and some parts of the oven door
become extremely hot. Make sure you don't touch them and keep children
well away.
The following items are potentially dangerous, and therefore appropriate
measures must be taken to prevent children and the disabled from coming into
contact with them:
- Controls and the appliance in general;
- Packaging (bags, polystyrene, nails, etc);
- The appliance itself, immediately after use of the oven or grill due to the heat
generated;
- The appliance itself, when no longer in use (potentially dangerous parts must
be made safe).

8
Oven Feature Guide
Feature
Oven feature guide:
1 Product Rating Label (top of oven)
2 Adjustable Oven Racks
3 Control Panel and Display
4 Cooling Fan
5 Cavity Temperature Probe
6 Halogen Lighting
1
2
34
5, 6
Gas Oven : FSRI22LA-SS / FSRI22LA-SB

9
Using Your Oven
Using Your Oven
A C B
Suitable Cookware
A: Gas thermostat control knob
B: Time knob, sets timer for up to 1 hour
C: Digital temperature reading

10
Using Your Oven
LIGHTING INSTRUCTIONS
1. Before lighting, reset gas control knobs to the OFF position.
2. Check that the main inlet gas valve is OPEN.
3. Ensure to keep the oven door in the open position for the full ignition
process to view the pilot and burner until lit
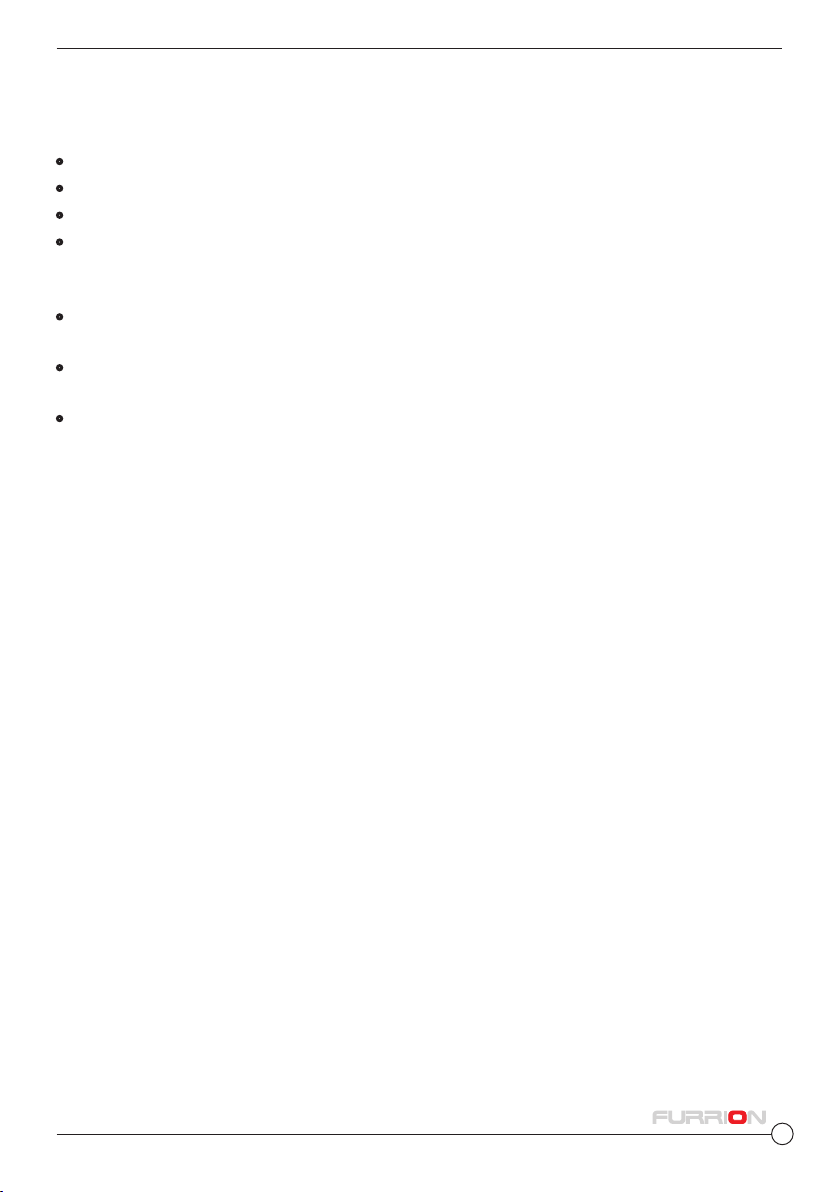
4. Push and turn the gas control knob counterclockwise to
position until burner lights. (you will hear a small clicking
noise.)
5. If ignition does not occur in 5 seconds, turn gas control knob
off, wait 2 minutes and repeat the lighting procedure.
6. Once the pilot flame is lit, continue to hold the oven control knob in for 10-15
seconds, then release knob and verify pilot stays lit. Repeat the above steps if pilot
goes out after releasing the knob. (Keep the oven door open for this process)
7. After the pilot flame is ignited and the control knob is released, then turn the
control knob counter-clockwise to the required temperature setting.
8. Within 20 seconds of the pilot flame being lit the main burner flame will
automatically ignite, confirm with a visual inspection before closing the oven
door.
SHUT OFF INSTRUCTIONS
1. To extinguish the burner, push the oven control knob and rotate clockwise to
OFF. Extinguish all pilots when refueling or traveling.
2. Turn the main gas supply off.
3. Before transit, turn the main gas supply off at the shut off valve.
4. The fan will continue to run for 10 – 15 minutes after turning off.
The Burner Flame
Keep your arms and face away from being directly above the cooking area. Look
through the cooking grate and observe the burner's ame below.
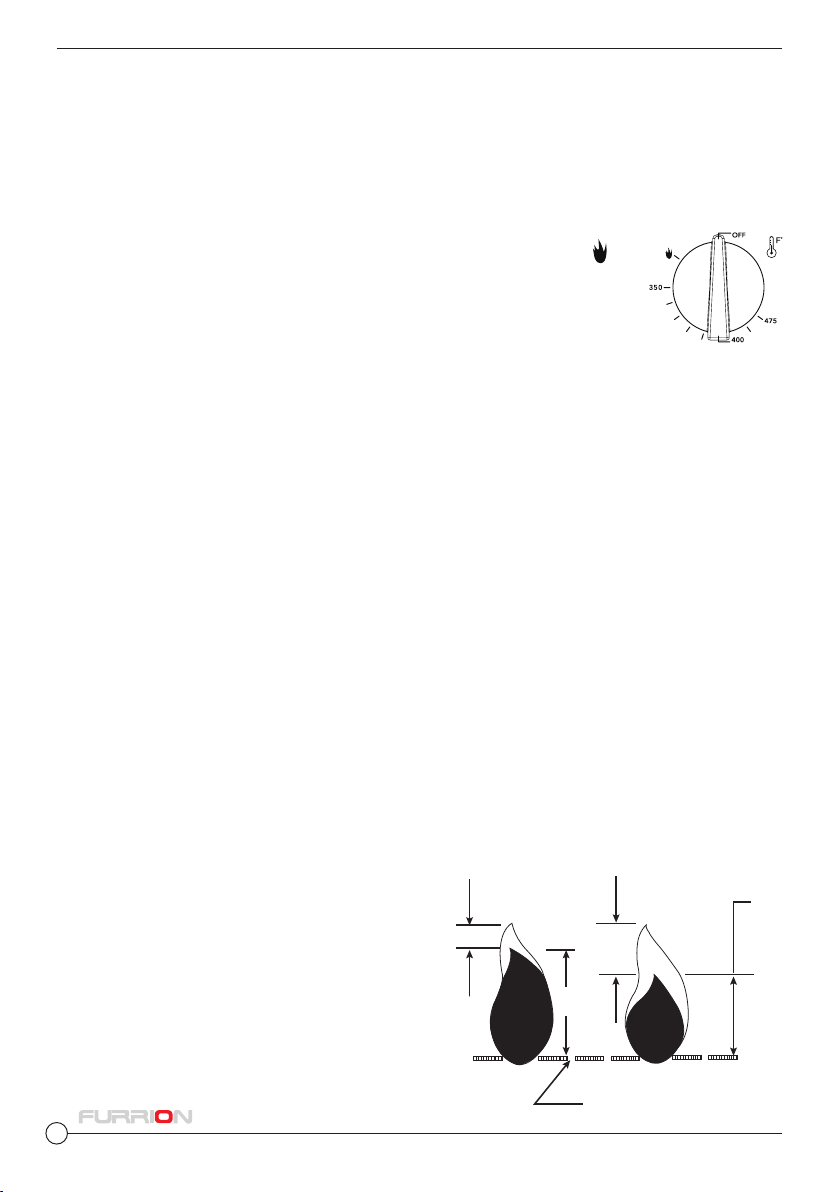
Flames should appear similar to the good ame show in diagram right.
A good ame should be blue with a yellow tip.
Some yellow tips on ames up to 1 inch in
length are acceptable as long as no carbon or
soot deposits appear.
If ames are excessively yellow and irregular,
the oil residue may not be completely burned
o, or the venturi may be clogged or may not
be properly positioned over the orices. Allow
the appliance to cool before repositioning the
venturi over the valve and orices.
Good
Blue
Blue
Bad
Yellow
Yellow
Holes in Burner

11
Installation
The appliance must be installed only by a qualied person in compliance with the
instructions provided.
Please ensure to install this product per manufacturers instructions to avoid
harm to persons, animals or damage property.
Important: The power supply to the appliance must be cut off before any
adjustments or maintenance work is done on it.
This oven can be used with Propane Gas only.
This oven is fitted with a threaded 5/8-18UNF male attachment. For installation
use copper pipe and CSA or UL certified fitting and connectors which comply to
USA and Canadian safety standards.
Ensure when this oven is installed the gas supply pipe cannot contact any
moving parts. Make sure adequate space is available so the supply pipe will not
be bent or damaged after installation.
Instruction
• Build or adjust kitchen cabinets to Fig. A
• Ensure the oven height from the top of the counter top is 4”
• Ensure there is a ventilation hole in the cabinet for air circulation around the
oven
• Cut the oven vent hole in the countertop, ensure the rear of the cut out
position measures 18”from the front of the cabinets for correct positioning.
• Install a copper gas supply pipe with a shut off valve and 5/8-18UNF
connection to the upper left rear corner of the oven cavity
• From a 12V DC power source run a min 16AWG 2C cable or above to the
upper right rear corner of the oven cavity, use a 5A fuse at the power source
for protection.
• Connect the Gas pipe and 12V cable to the oven. Ensure to connect the wires
with the correct polarity. + = Black, - = White

12
Installation
• Once installation is complete, before final fitment check all pipe fittings for
gas leaks. Pressure the system to 13.8WCI then using a soapy solution or
certified gas leak detector to check for possible leaks. Always perform a leak
test according to the manufacter's instructions.
• Slide the oven into the cabinet, then open the oven door and fix the oven
with four wood screws .
• Pay attention to fix the oven securely.
• Ensure the countertop ,surrounding materials and bonding agents have a
temperature rating of no less than 193˚F (95˚C) to avoid deformation.
Turn on the power supply only after installation has been completed.
1
2
gas pipe conect hole
12V DV power connect hole
2¾”
(70mm) 2 ¾”
(70mm)
1 ⁄”
(35mm)
12
2”min
(51mm min)
2”min
(51mm min)
2”min
(51mm min)
23 ½”
(597mm)
16 ⁄”
(422.3mm)
23 ½”
(597mm)
20 ¼”
(515mm)
1 ⁄”
(48mm)
4 ”
(102mm)
Fig. A

13
Installation
Electrical Connection
See below for wiring diagram.
1
2
23
1/2
”
(597mm)
2”min
(51mm min)
2”min
(51mm min)
18 3/8”
(467mm)
16
3/4
”
(426mm)
23
1/2
”
(597mm)
20
1/4
”
(515mm)
4 ”(102mm)

14
Installation
Install the ventilation
1. After the oven has been securely mounted, install the vent through the
counter top cut out.
2. Ensure the vent has the cooktop lip facing inwards and is positioned correctly
onto the oven vent outlet
3. Fix the long screws through the vent assembly and affix to the oven body.
Tighten enough to compress the gasket. Do not over tighten
4. Fit the top stainless or black vent cover on top and affix with the 4 screws
provided.
Technical Specications
BTU/HR 9,000 BTU
Fuel Propane (LP Gas)
Inlet Pressure 10”WCI Min to 13.8”WCI Max
Power Input 12VDC < 2 amp
Inner Volume of the Oven 58L
This appliance conforms with the following directives: ANSI Z21.57
2
3
1

15
Cooking Advice
The oven offers a wide range of alternatives which allow you to cook any type
of food in the best possible way. With time you will learn to make the best
use of this versatile cooking appliance and the following directions are only a
guideline which may be varied according to your own personal experience.
Baking:
For best results slide the stone baking tray into the oven.
Preheat the oven for about 20 minutes before placing items inside.
Cooking Pizza
For tasty crispy pizzas:
Slide the stone baking tray into the oven
Preheat the oven for at least 20 minutes
Use a light aluminum pizza pan, placing it on the rack supplied with the oven. If
the dripping pan is used, this will extend the cooking time, making it difficult to
get a crispy crust.
Do not open the oven door frequently while the pizza is cooking;
Cooking Fish and Meat
When cooking white meat, fowl and fish, remove the stone tray from the oven.
For red meat that should be well done on the outside while tender and juicy
in the inside, it is a good idea to start with a high temperature setting(390℉~
430℉) for a short time, then turn the oven down afterwards.
Selector
knob
setting
Food to be
cooked
Weight
(in kg)
Cooking
rack
position
from oven
bottom
Preheating
time
(minutes)
Thermostat
knob
setting ( ℉)
Cooking
time
(minutes)
Oven
Lasagne 2.5 1 15 390 55-60
Cannelloni 2.5 1 10 390 40-45
Pasta bakes 2.2 1 10 390 50-55
Veal 1.7 2 10 410 80-90
Chicken 1.5 0 10 390 70-80
Turkey roll 2.5 1 10 390 80-90
Duck 1.8 0 10 390 90-100
Rabbit 2.0 0 10 390 80-90

16
Selector
knob
setting
Food to be
cooked
Weight
(in kg)
Cooking
rack
position
from oven
bottom
Preheating
time
(minutes)
Thermostat
knob
setting ( ℉)
Cooking
time
(minutes)
Oven
Pork Ioin 1.5 1 10 390 70-80
Leg of lamb 1.8 0 10 390 80-90
Mackerels 1.3 2 10 390 30-40
Dentex 1.5 2 10 355 30-40
Trout baked in
foil 1.0 2 10 390 30-35
Neapolitan-
style pizza 0.6 Stone 15 410 15-20
Dry biscuits 0.5 3 15 355 25-30
Tart 1.1 3 15 355 30-35
Chocolate cake 1.0 3 15 330 50-60
Leavened cakes 1.0 3 15 330 50-60
Grill
Soles and
cuttlefish 1 2 5 - 6
Squid and
prawn kebabs 1 2 3 - 4
Cod filet 1 2 3 - 10
Grilled
vegetables 1 3 - - 8-10
Veal steak 1 2 5 - 20-25
Chops 1.5 2 5 - 20-25
Hamburgers 1 3 3 - 10-15
Sausages 1.7 3 5 - 20-25
Toasted
sandwiches 3 3 - 2-3
With rotisserie(where present)
Veal on the spit 1.0 80-90
Chicken on the
spit 1.5 80-90
Lamb on the
spit 1.0 80-90
N.B.: cooking times are approximate and may vary according to personal
taste. Use baking stone for baking, cooking pizza or large meat items. The
stone will regulate an even heat inside the oven cavity for best results.
Cooking Advice

17
Maintenance
How to keep your oven in shape
Before cleaning your oven, or performing maintenance, disconnect it from the
power supply.
To extend the life of your oven, it must be cleaned frequently, keeping in mind
that .
• Do not use steam equipment to clean the appliance.
•The enameled or stainless steel parts should be washed with lukewarm water
without using any abrasive powders or corrosive substances which could ruin
them; Stainless steel could get stained. If these stains are difficult to remove,
use special products available on the market. After cleaning, it is advisable to
rinse thoroughly and dry.
•The inside of the oven should preferably be cleaned immediately after use,
when it is still warm, with hot water and soap; the soap should be rinsed
away and the interior dried thoroughly. Avoid using abrasive detergents (for
example cleaning powders ,etc…) and abrasive sponges for dishes or acids
(such as limescale-remover, etc…) as these could damage the enamel. If the
grease spots and dirt are particularly tough to remove, use a special product
for oven cleaning, following the instructions provided on the packet.
•If you use your oven for an extended period of time, condensation may form.
Dry it using a soft cloth.
•There is a rubber seal surrounding the oven opening which guarantees its
perfect functioning. Check the condition of this seal on a regular basis. If
necessary, clean it and avoid using abrasive products or objects to do so.
Should it become damaged, please contract your nearest After-sales Service
Centre. We recommend you avoid using the oven until it has been repaired.
•Never line the oven bottom with aluminium foil ,as the consequent
accumulation of heat could compromise the cooking and even damage the
enamel.
•Clean the glass door using non-abrasive products or sponges and dry it with
a soft cloth.

18
Oven rack guide:
The oven racks feature an anti tip locking system.
To remove the racks push inside fully, then unclip the rear tabs from the locking
channel by pushing upwards and slide out.
To replace the racks slide the racks in fully, then push down on the back side to
slip the tabs into the anti tip locking system.
Replacing the Oven Lamp
•Disconnect the oven form the 12V DC power supply by means of the switch
or fuse.
• Unscrew the lamp-holder glass cover
• Remove the lamp and replace high temperatures (300 )
• Voltage: 12V
• Wattage: 15 W
• Type G9
• Screw on the glass cover and reconnect the oven to the mains power supply.
Maintenance

19
Your appliance is covered by a one year limited warranty. For one
year from your original date of purchase, Furrion will pay costs
for repairing or replacing any parts of this appliance that prove to
be defective in materials or workmanship when such appliance is
installed, used and maintained in accordance with the provided
instructions.
Exclusions
this warranty does not cover the following:
1. Products with original serial numbers that have been removed, altered or
cannot be readily determined.
2. Product that has been transferred from its original owner to another party or
removed outside the USA or Canada.
3. Rust on the interior or exterior of the unit.
4. Products purchased second hand are not covered by this warranty.
5. Products used in a commercial setting.
6. Service calls which do not involve malfunction or defects in materials or
workmanship, or for appliances not in ordinary household use or used other
than in accordance with the provided instructions.
7. Service calls to correct the installation of your appliance or to instruct you
how to use your appliance.
8. Expenses for making the appliance accessible for servicing, such as removal
of trim, cupboards, shelves, etc., which are not a part of the appliance when
it is shipped from the factory.
9. Service calls to repair knobs, handles, or other cosmetic parts.
10. Surcharges including, but not limited to, any after hour, weekend, or holiday
service calls, tolls, ferry trip charges, or mileage expense for service calls to
remote areas, including the state of Alaska.
11. Damages to the finish of appliance or home incurred during installation,
including but not limited to floors, cabinets, walls, etc.
12. Damages caused by: services performed by unauthorized service
companies; use of parts other than genuine Furrion parts or parts obtained
from persons other than authorized service companies; or external causes
such as abuse, misuse, inadequate power supply, accidents, fires, or acts of
God.
Warranty

20
Customer’s sole and exclusive remedy under this limited warranty shall be
product repair or replacement as provided herein. Claims based on implied
warranties, including warranties of merchantability or fitness for particular
purpose, are limited to one year or the shortest period allowed by law, but not
less than one year. Furrion shall not be liable for consequential or incidental
damages such as property damage and incidental expenses resulting from any
breach of this written limited warranty or any implied warranty. Some states and
provinces do not allow the exclusion or limitation of incidental or consequential
damages, or limitations on the duration of implied warranties, so these
limitations or exclusions may not imply to you. This written warranty gives you
specific legal rights. You may also have other rights that vary from state to state.
Keep your receipt, delivery slip, or some other appropriate payment record to
establish the warranty period should service be required. If service is performed,
it is in your best interest to obtain and keep all receipts. Service under this
Product features or specifications as described or illustrated are subject to
change without notice.
Warranty
Other manuals for FSRI22LA-SS
2
Table of contents
Languages:
Other Furrion Oven manuals