Fusion X422 User manual

User Manual

User Manual
Contents
1. Appearance and Keypad Operations..............................................................................................1
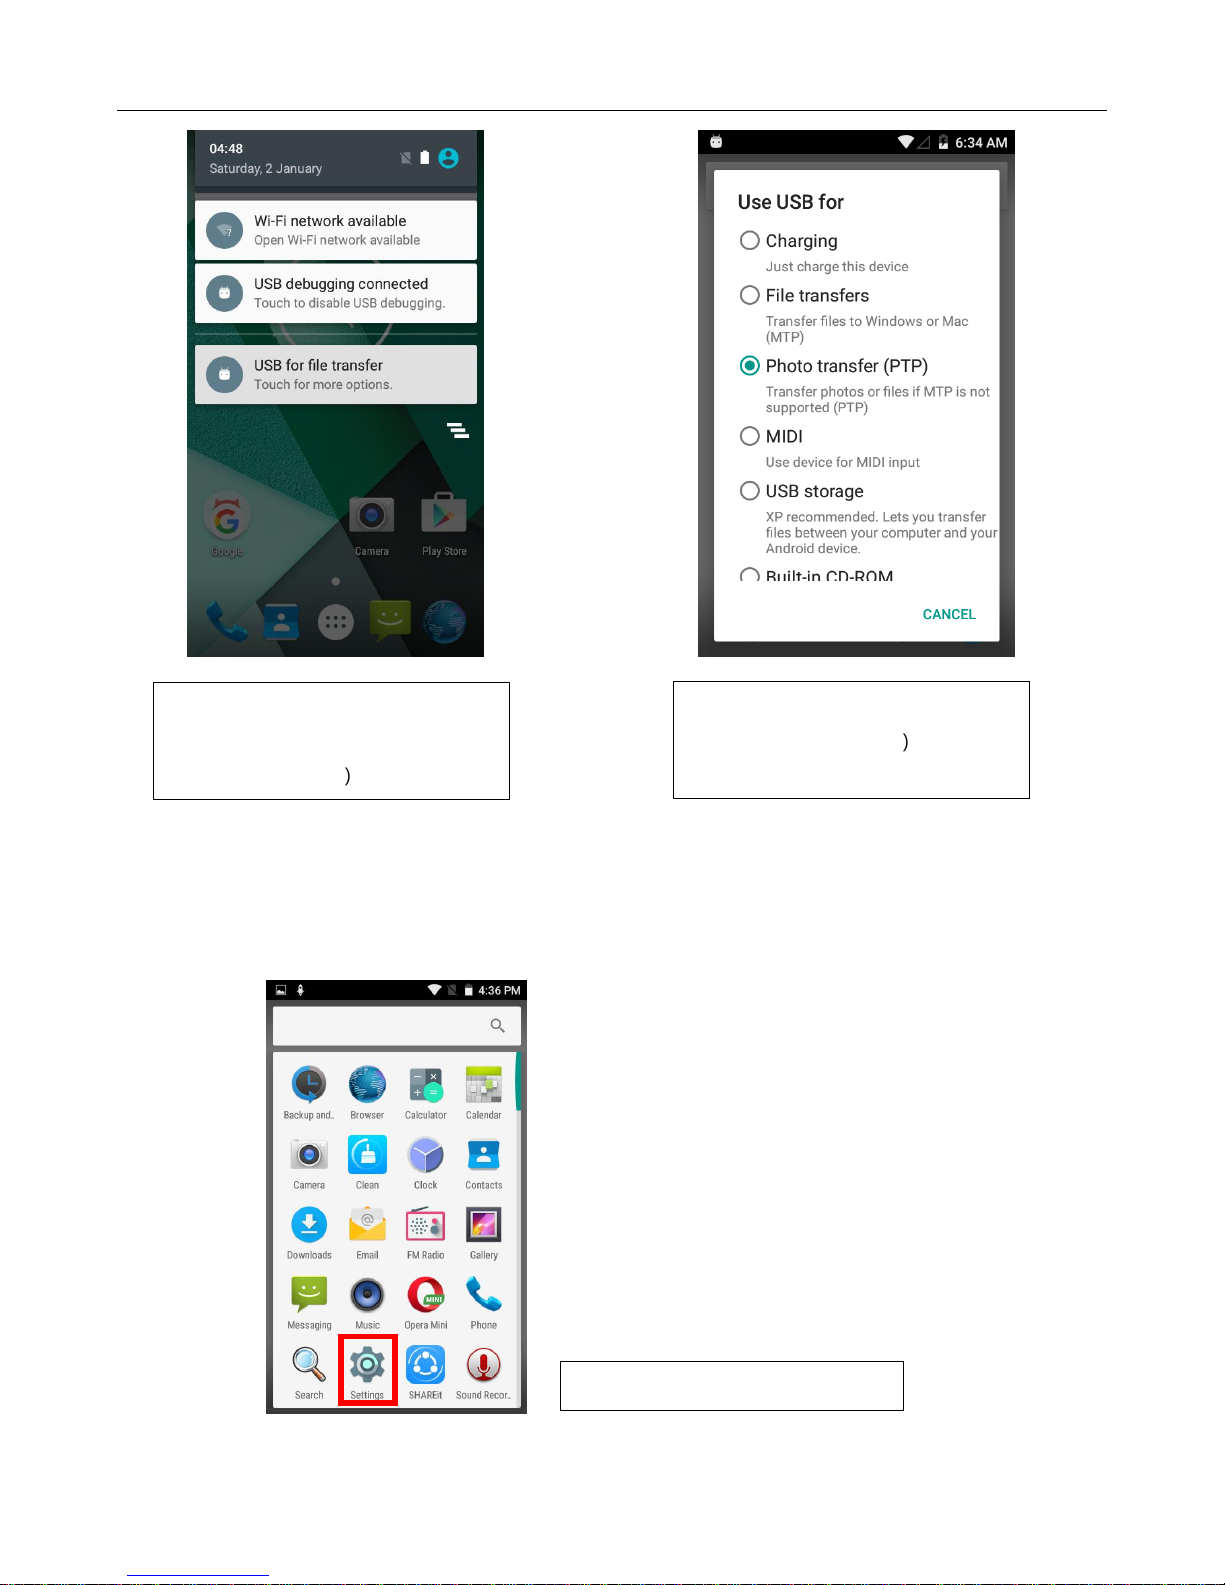
2. Using the Device as a Memory Card.............................................................................................1
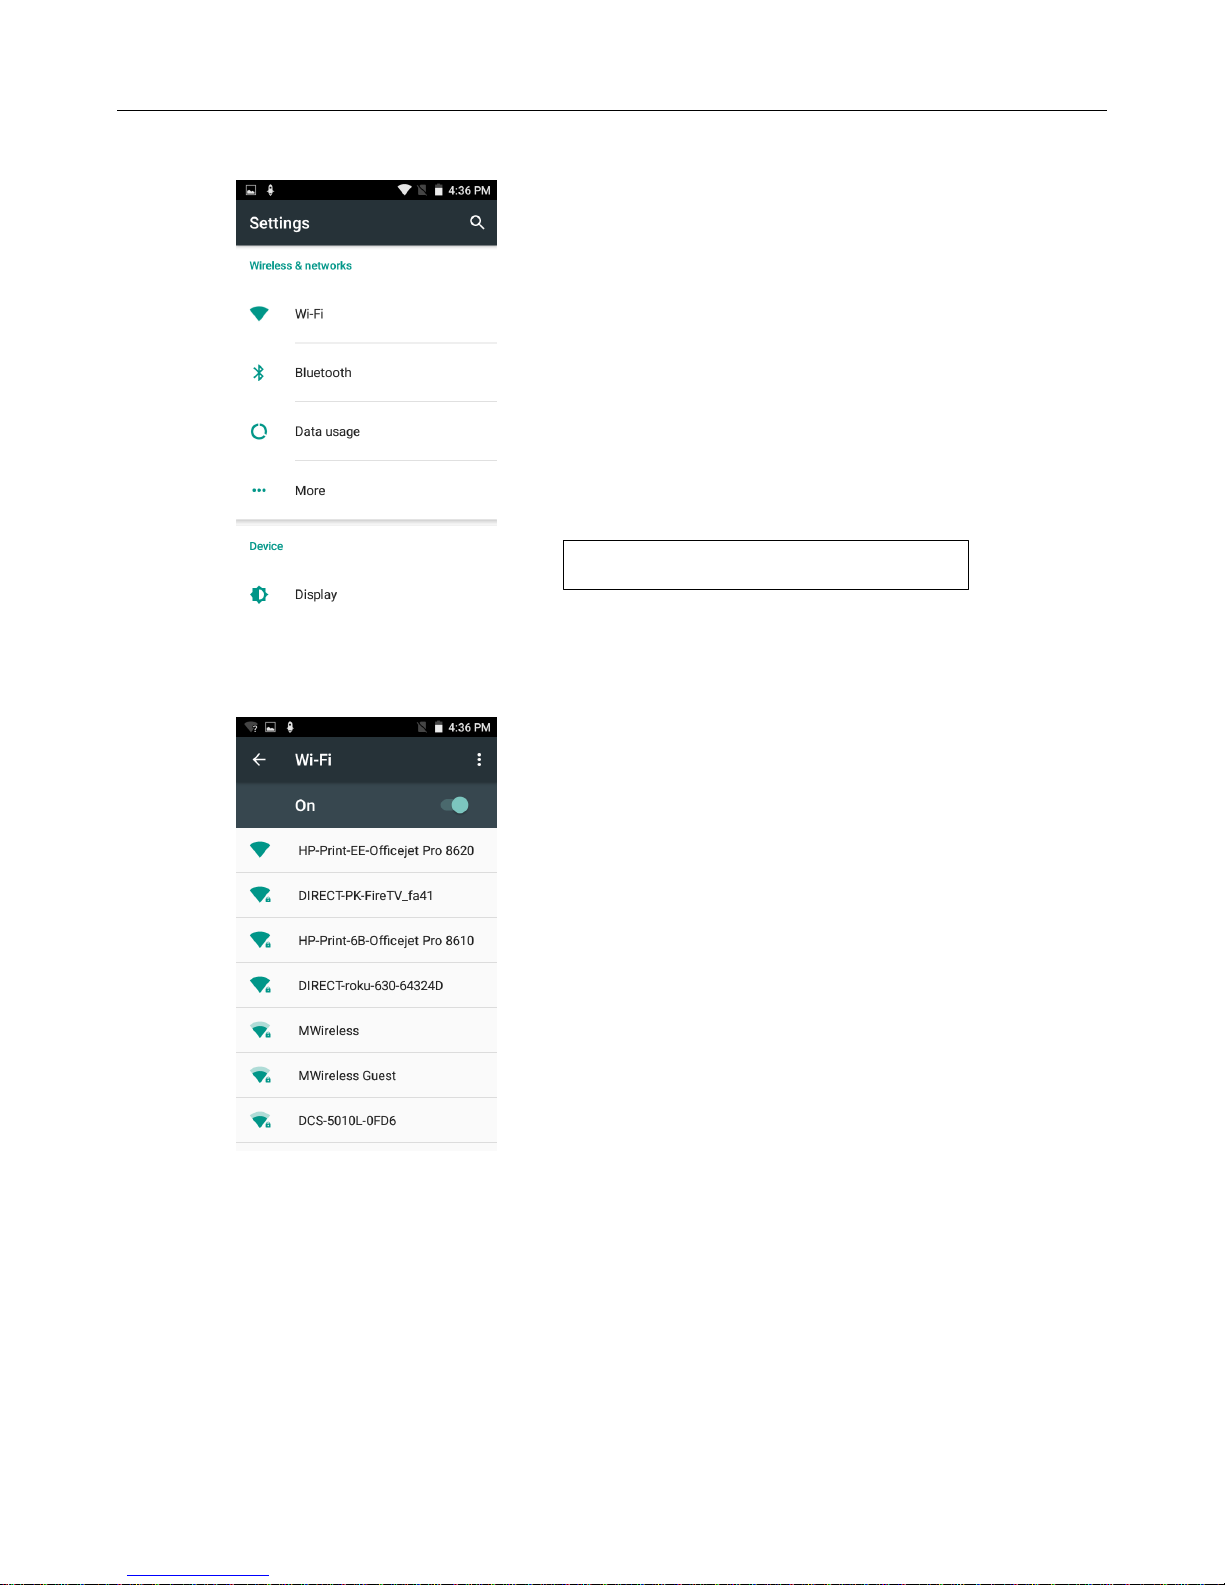
3. Wi-Fi..............................................................................................................................................2
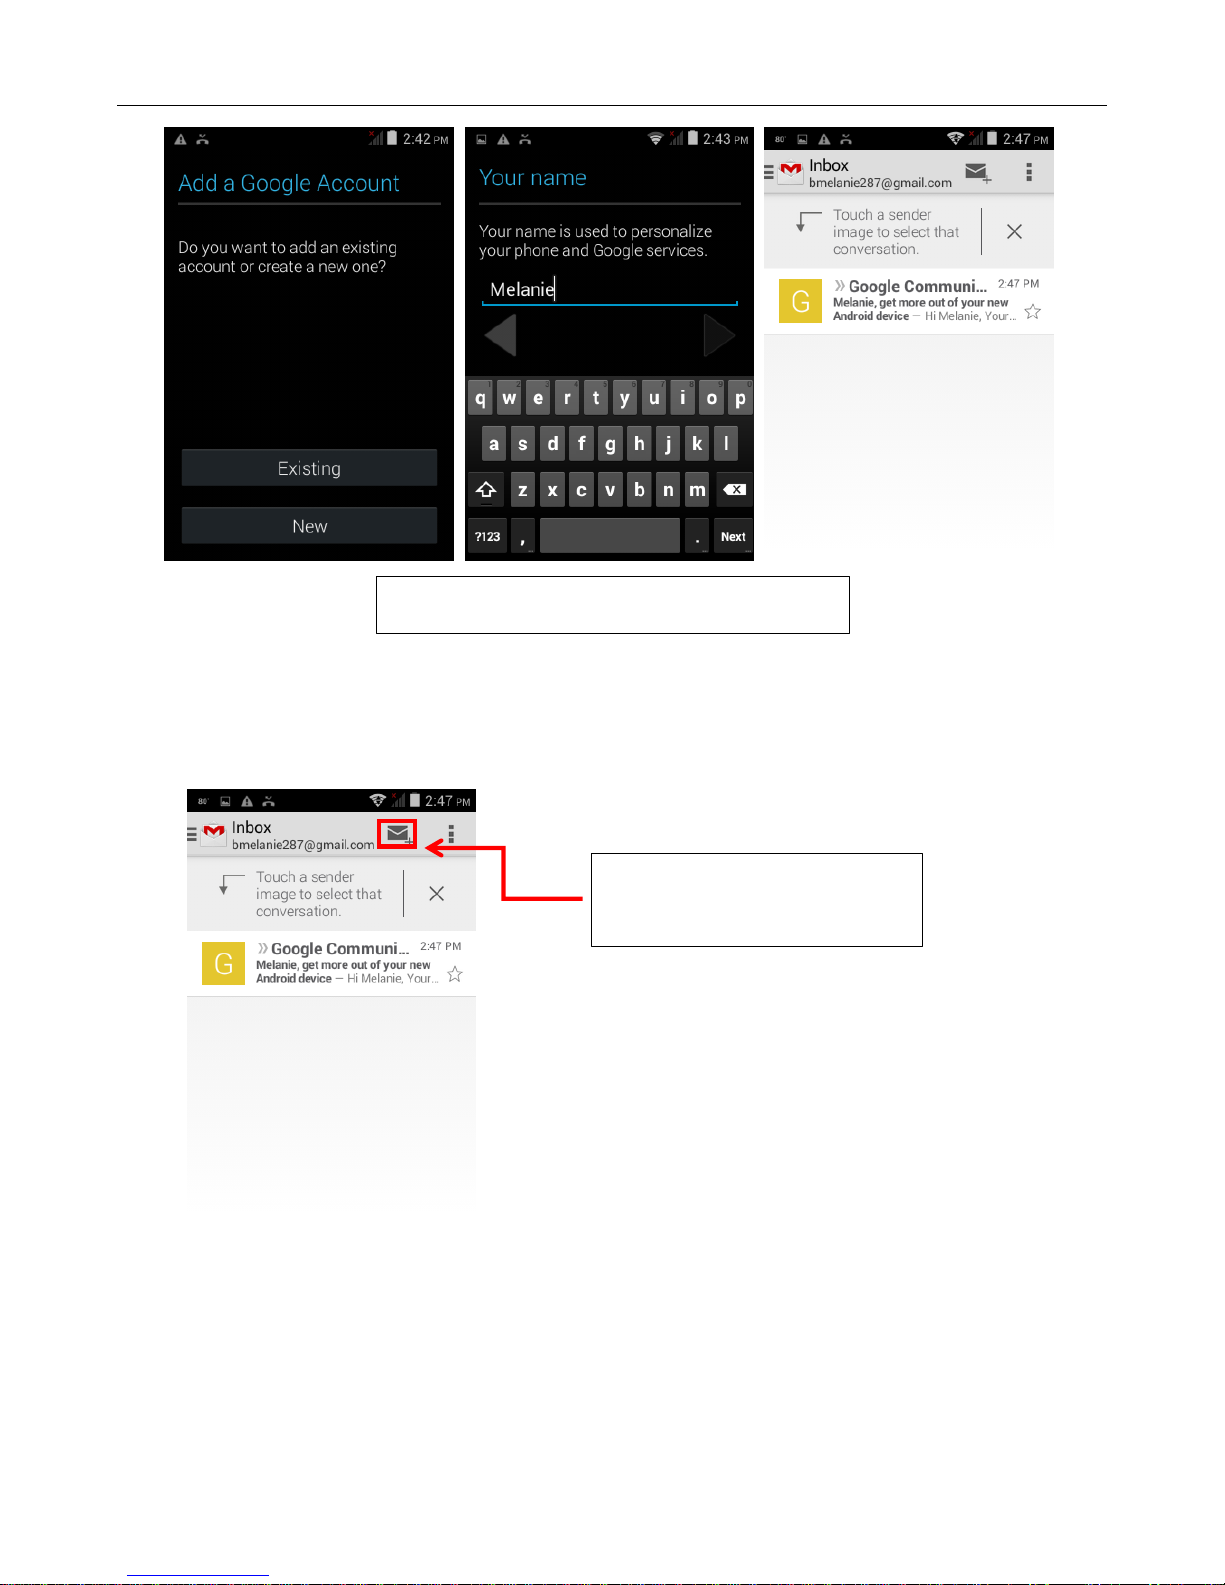
4. Mail................................................................................................................................................4
5. Dialing............................................................................................................................................6
6. Messaging......................................................................................................................................9
7. Contacts........................................................................................................................................11
8. Internet Explorer..........................................................................................................................12
9. Sound Recorder............................................................................................................................13
10. Clock..........................................................................................................................................14
11. Calculator...................................................................................................................................15
12. Camera.......................................................................................................................................15
13. Gallery........................................................................................................................................17
14. Music..........................................................................................................................................17
15. Calendar.....................................................................................................................................19
16. FM Radio...................................................................................................................................20
17. Settings.......................................................................................................................................21
18. Notices for the use of phone ......................................................................................................24

User Manual
1
1.Appearance and Keypad Operations
Keys
Functions
Home
Press this button to return home from any application or interface.
Long press it to open recently opened application window.
Menu
Press it to open recently opened application window.
Back
Press it to exit.
Power
Press it to boot up or shut down the device;
Long press it to open the menu of “Power off, Reboot, Airplane mode &
Notification mode”.
Volume up
Press it to increase the volume.
Press it to switch to
Volume down
Press it to decrease the volume.
2. Using the Device as a Memory Card
You can use your phone to store music, pictures or other files from your computer.
1. Set your phone to be used as a “Media Device”
a) Connect the phone to the computer with the USB cable. A notification will appear in the status
box on top of the screen on your phone (as shown in picture 2.1).
b) Click on the “USB for file transfer” notification to view more settings
c) Change the settings to “USB connected as a media device” (as shown in picture 2.2)

User Manual
2
3. Wi-Fi
To connect to the wireless network:
1) Go to the settings in the app menu on your device (as shown in picture 3.1 below).
Settings in app menu (Picture 3.1)
Notification panel on top of phone
screen shows USB connectivity
options (picture 2.1)
USB settings menu to transfer
various files (picture 2.2)

User Manual
3
2) Select the Wi-Fi option to open different Wi-Fi networks (See picture 3.2 below).
3) Your phone will automatically scan for available wireless networks. Click on the Wi-Fi network name
desired and your phone will connect to o automatically.
4) If there are security settings for the network, then it will require a password. Type in the password
and click “connect”. Phone will connect to it automatically
Settings options (Picture 3.2)

User Manual
4
Note:when the phone is connected to the wireless network, this Wi-Fi icon() will be displayed in
the notifications bar. Bars in the icon stands for WIFI strength.
4. Mail
5.1 Gmail
Creating a Gmail Account
Create an electronic mail account with Gmail to be able to send and receive messages, as well as
download new apps on your device via the Google Play Store.
1) To create a Gmail account, go to the Gmail app located in the app menu.
2) Select “New” to create a new account. Go through each step, filling in your information until account
set-up is complete (as shown in pictures 5.1, 5.2, and 5.3).

User Manual
5
Note: If you already have an existing Gmail account, click “Existing” instead of “New” in Step 2, and
proceed signing into your account.
Creating and Sending Emails
1) Go to the Gmail app and sign in using your account information.
2) Click on the envelope icon to start a new email (as shown in picture 5.4 below).
3) Fill in the information and click send (as shown in picture 5.5 below).
Gmail Account Setup (Pictures 5.1, 5.2, and 5.3)
Click the envelope to create a
new email message (Picture 5.4)

User Manual
6
5. Dialing
You can send and receive calls using your device when using the appropriate network. Put your SIM
card into your phone and restart/reboot the phone. After rebooting, a signal bar will appear on the top
right corner of your device, which shows the network signal strength. If there is a strong signal, then all
bars will be present in the signal icon (as shown in picture 5.1 below).
5.1 Start Dialing
1) To access the dialer on your device, go to the main screen. You will see a dialer icon on the bottom
of the screen (as shown in picture 5.2 below).
2) Click on the dialer icon to go to the keypad, where you will dial the phone number of the person
you would like to contact.
Click the send button after filling
in the information and writing
the message (Picture 5.5)

User Manual
7
3) Dial the phone number of the contact person and click the phone icon on your screen to make the
call.
Note: if the person you are trying to reach is already saved in your contacts list, then their name will
pop-up on your screen as you begin typing their phone number.
4) To end the call, click on the phone icon on your screen to hang up. (as shown in picture 5.3 below).

User Manual
8
5.2 Telephone recording
1) Dial the phone number of the person you wish to contact.
2) During the call, go to the call settings in the upper right-hand corner of the screen (as shown in
picture 5.4 below).
3) Click on “Start recording” to begin recording your call.
4) Once the call is complete, the recording will save in the Internal Storage of the phone in the Phone
Records.
5) To listen to your recorded calls, go to the settings in the app menu on your device.
6) Click on “Storage & USB”.
7) Go to “Other” and click on the “Explore” option that pops up on your screen.
8) Find and click on “Phone Record”. There you will find all recorded phone calls saved.
5.3 Call settings
For more call settings, go to the call history screen (as shown in picture 6.5 below). Click on the
options button in the top right corner of the screen. Select the “Settings” option and then select
the “Calls” option. There you will find the following list of settings:
Telephone recording
(Picture 5.4)

User Manual
9
1) Voice Mail: This where you can setup the voicemail function on your phone.
2) Fixed Dialing Numbers (FDN): This is where you can setup manage phone numbers or people from
your contacts list for speed dialing.
3) Call forwarding:Go here to setup calls to be forwarded to another phone number when you cannot
be reached on your phone number.
3) Call barring: This is where you can restrict or block phone numbers or people from your contacts list
from calling your phone.
4) Additional Settings:
a. Caller ID: This is to allow others to see your phone number whenever you call their device.
b. Call waiting: This will allow your phone to notify you when you are receiving a call while you
are on another call.
6. Messaging
SMS (text messages) and MMS (photo or video messages) are two forms of messaging you can use to
send and receive to other people’s cellular devices.
6.1 Send SMS
1)To send a new text message, go to the messages icon on the bottom of the main screen of your
device.
2)Select the new message icon and type in a name or number for the person receiving the message.
Call settings (Picture
5.5)

User Manual
10
3) Now begin typing the message and click the send button once you are finished and ready to send
your message.
6.2 Send MMS
1) in the "writing" screen, press the Menu button, click "Add Subject", automatic into the MMS
message:
2) Press the “Attach” icon on the right top, after adding attachment the message will be automatically
converted into MMS.
Send messages to multiple numbers
Enter multiple numbers in the input cell.
Click on the right side of the head with the receiver plus icon, you can choose any contact from the
address book.
Notice: At present group message can only support up to 100 recipients.
While the number of recipient is more than 100, notice will pop out reminding you "recipient" too
much, and recipients will not be added successfully. You must manually add again.

User Manual
11
6.3 Message settings
You can find the message settings by pressing the menu icon on the top right corner.
7. Contacts
1. Contact displays all mobile phone contacts and SIM card contacts by default, sorted by initials.
a) Click “Add Contact” icon to create new contacts.
b) Select to save contacts to phone or SIM card.
c) You can edit contact head, name, telephone number, group, save to and more, and then click
"finish" to complete.
2. In contact interface, Click Menu->Search: You can enter the contact search interface.

User Manual
12
Enter the list of Numbers or letters and part name, search results will be displayed.
If there is no match, it will show “No contacts”.
3. Press menu on the top right, you will find the following:
a) Contacts to display: You can define what contacts need be displayed, SIM contacts or Phone
contacts;
b) Import/export: Import or export contacts;
c) Groups: Set up groups for contacts;
d) Accounts: Add email accounts as you like;
e) Settings: General settings for Contact;
8. Internet Explorer
Internet explorer
1) In the browser screen, click address bar & input URL.
2) Using the keyboard input web address. At the same time, in the address you entered, there may be
some recommendations. You can touch the URL directly to the page or continue to enter URL
3) Menu button stands for the Menu function while browsing the webpage:
a. Menu >Refresh
Refresh the current web page;
b. Menu > Stop
Stop the loading of the webpage;
c. Menu >Home
This menu will take you to the homepage of the browser.
d. Menu >Save to bookmarks
This enables you to save your favorite page in records.
e. Menu >Close
Exit the browser or minimize the browser.
f. Menu >Save for offline reading
Automatically save the current page and content, to browse next time even without networks.
g. Menu >Share page
Select the Bluetooth, email, or SMS to share the current web page with friends.
h. Menu >Find on page

User Manual
13
Input keyword and it will help you to find in the current page.
i. Menu >Request desktop site
Browse the pages in the form of PC;
j. Menu >Bookmarks/History
It can help you to find they pages you saved or viewed.
k. Menu >Settings
It enables you to make some changes to the browser settings.
9. Sound Recorder
Recorder can record voice, and send it quickly via Bluetooth or MMS as well as make it as ring tone.
1) Click the recorder application.
2) Keep the phone’s microphone close to the voice source.
3) Click recorder to record voices, and click to stop or Recording list.
All recordings save in my recording folder in the default music program.

User Manual
14
10. Clock
Open the menu of application, click .
Clock enables you the following:
a) Set alarms;
b) Check date & time;
c) Use as a timer;
d) Use as a stopwatch;

User Manual
15
11. Calculator
Calculator
This function can turn your phone into calculator, which can do some simple calculations.
12. Camera
12.1 camera
Open camera
1)Aim your object with the screen.
2)Touch the “shutter” button on the screen.
3)After taking, photos will save to the camera’s galley folder with the name of taking time.
4)You can view the photos by touching the preview in the bottom right.
5)Camera settings: You can touch the Settings button in the bottom left.

User Manual
16

User Manual
17
12.2 Video camera
Take video
Press Video icon to start making videos.
1) Focus on what you want to take.
2) Press the Video icon.
3) After the shooting, video will be named automatically and saved to the gallery by default
camera photo folder.
4) At the bottom right corner, touch the picture box to review.
5)Video settings: Please refer to the Camera settings part.
13. Gallery
1. You can check videos & pictures taken by the Camera here;
2. You can select one video or picture and share with others via message, BT or email;
3. You can make simple modification for pictures like cropping, adding a filter, etc.;
14. Music
You can enjoy audio files in this app. The following formats are available :AMR、M4A、MIDI、MP3、
WAV、OGG.
1. Your music files are classified according to the following four categories:Artists, albums, songs
and play lists. Choose one of these categories and you can view the list inside.
1) Artists
2) Albums
3) Songs
4) Playlists

User Manual
18
2. Tap the song name to play. In the music play interface, tap menu option in the top right:
a) Play shuffle
b) Add to play list: Add the current playing song playlists
c) Use as ringtone: Set the current song as a ringtone
d) Delete: Delete the current songs
e) Sound effects: Choose to adjust the sound effect
f) Library----Press to return to the Music main screen
Table of contents