Olitech EasyFlip 2 User manual

Quick Set-Up Guide V1
Model number: OLT2908V2
EasyFlip 2

2
Contents
SIM insertion ..................................................3
Powering on/off..............................................3
Notification light settings ..............................4
Save contacts to phonebook ........................5
Photo/speed dial ............................................6
Ringtone .........................................................7
Loudspeaker ..................................................8
Voice guidance...............................................9
Amplify receiver volume..............................10
Volume key/torch key status .......................10
Emergency key setup ..................................11
Share location ..............................................12
Low battery notification...............................13
Auto answer .................................................14
Menu visibility ..............................................14
Alarm and Calendar reminders ...................15
Use camera and view images......................15
Complete factory reset ................................16
Resources ....................................................16

3
SIM Insertion
The EasyFlip 2 uses a nano sized SIM to
connect to the mobile network. This is the
smallest size SIM card and is 8.8 mm X 12.3 mm.
Prior to SIM insertion, Olitech strongly advise
that users review the SIM insertion instructions
in the EasyFlip 2 User Manual (pages 10 – 13)
and/or the instructional videos on Olitech’s
website https://www.olitech.com.au/pages/
easyflip2videos. Please request assistance to
insert the SIM card if you are not confident with
SIM insertion.
Powering on/off
To power the EasyFlip 2 on/off, press and hold
the red “end call” key for 5-6 seconds.
The start-up takes approximately 10-20 seconds.

4
Notification light settings
The EasyFlip 2 has three notification lights
located on the front of the phone.
•Missed call light: located on the left, flashes
in blue when there is a missed call that has
not been viewed in the call logs.
•New/unread text message light: located in
the middle, flashes in green when there is a
new/unread text message.
•Low battery/charging light: located on the
right and illuminates in red.
oLight flashes when the phone has low
battery;
oFlashes when the phone is connected to
a charger and is charging; or
oRemains constantly illuminated when the
phone is fully charged and connected to
a charger.
The notification lights can be turned off in the
phone’s settings. To do so:
1. Press the top left key to select Menu
2. Scroll to and select Settings
3. Scroll to and select Notification lights
4. Select On/Off

5
Save contacts to Phonebook
1. Press the top right key to select Phonebook
2. Press the top left key to select Options
3. Scroll to and select New
4. Select Phone or SIM (storage location)
5. Edit name and phone number (required); and
add photo and/or change ringtone (optional).
6. Select Save
Additional information:
•The options of adding a photo and changing
the ringtone are only present when saving a
contact to the phone.
•A voice recording can be created and used
as a ringtone. The enables the contact’s
name to be sounded when receiving an
incoming call from them (e.g: “Ryan’s
calling”). See pages 23 - 24 of the EasyFlip 2
User Manual for additional information.
•When typing the name and phone number,
press the # key to change the input method
(letter settings or numbers). Additional
information regarding input methods can be
found on page 32 of the EasyFlip 2 User
Manual.

6
Photo/speed dial
Eight photo/speed dial phone numbers can be
programmed to the number keys 2-9; the
number 1 key is reserved for voicemail. These
programmed numbers can be dialled via two
different methods. The dialling method used
depends on what screen is present when the call
is initiated:
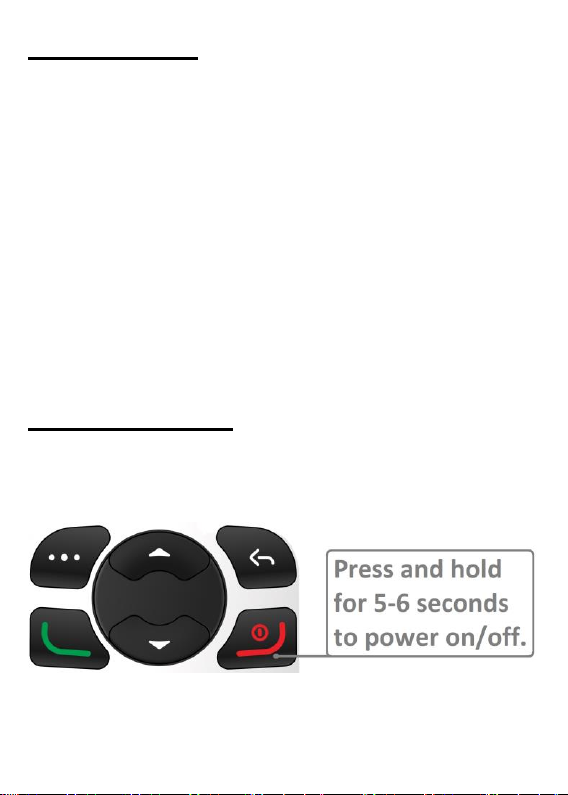
Dialling method one: When on the home/main
screen or if photo dial is accessed by pressing
the dedicated photo dial key (contacts displayed
4 per page), press and hold the allocated
number key for 3 seconds to initiate call.
Dialling method two: If photo dial is accessed
via the main menu, i.e.: press Menu → Photo
dial, scroll to the contact you want to dial
(contacts displayed 1 per page) and press the
green key (single press) to initiate call.
Additional information:
•In both the 4 contact per page and single
contact per page photo dial screens, use the
navigation keys to scroll through contacts.
•If having multiple methods of dialling is not
suitable for the user, photo dial can be set up
in the main menu and then the photo dial

7
option hidden from the main menu (via Menu
visibility). In this way, photo dial can only be
accessed via the direct access speed dial key
and method one is the only dialling method
available.
Photo/speed dial numbers are programmed
through the Photo dial settings in the main
menu. To programme photo dial:
1. Press the top left key to select Menu
2. Scroll to and select Photo dial
3. Select Options
4. Select Add from phonebook to add a saved
contact OR Enter details to manually enter
details (name, phone number, photo and
ringtone) and select Save.
Ringtone
Ringtones and other alert sounds can be
changed in the EasyFlip 2’s Audio settings. To
change the ringtone:
1. Press the top left key to select Menu
2. Scroll to and select Settings
3. Scroll to and select Audio settings
4. Scroll to and select Normal

8
5. Scroll to and select Settings
6. Select Ring settings
7. Select Caller ringtone
8. Select Fixed ringtone
9. Scroll to and select your preferred ringtone
Additional information:
•Audio files saved on the EasyFlip 2 can be
used as a ringtone. To programme an audio
file as a ringtone, at step 8, select More
ringtones. A list of audio files saved on the
phone (audio recordings and transferred
audio files) will now appear. Scroll to and
select desired audio file. Refer to the
Connecting to PC section of the EasyFlip 2
User Manual (page 44) for instructions
regarding how to upload files to the EasyFlip
2.
•To change a message ringtone, select
Message ringtone at step 7.
•Key tone, low battery alert tone, dial tone and
flip tone can be activated/deactivated by
selecting Other alert rings at step 6.
Loudspeaker
The loudspeaker can be activated/deactivated

9
by pressing the direct access Loudspeaker key
(key above number 1) OR top right key during an
active call. If the preference is that audio for all
calls always divert to the loudspeaker, this can
be programmed in the phone’s settings. To do so:
1. Press the top left key to select Menu
2. Scroll to and select Settings
3. Scroll to and select Loudspeaker always
on
4. Select On
Note: if Loudspeaker always on is On, call
audio cannot be transferred back to the earpiece
speaker by pressing the loudspeaker key (key
above number 1) or the top right key during a call.
Voice guidance
The EasyFlip 2 is programmed to speak the
function of number and symbol keys, e.g.: “2”
and “#” (hash); and main menu headings, e.g.:
“phonebook”.
To deactivate/activate this function:
1. Press the top left key to select Menu
2. Scroll to and select Settings
3. Scroll to and select Voice guidance
4. Select either Key voice output or Main menu

10
voice output
5. Select Deactivate/Activate
Amplify receiver volume
The volume of the earpiece speaker can be
boosted an additional 25db by pressing the
Amplify receiver volume key (key above
number 2) during a call. Once pressed during a
call, a red ear icon will appear along the top of
the screen; Amplify receiver volume will
remain on for all calls until it is turned off.
To use this function, please ensure the Amplify
receiver volume key is On in the phones
settings. To do so:
1. Press the top left key to select Menu
2. Scroll to and select Settings
3. Scroll to and select Amplify receiver
volume
4. Select On
Volume key/torch key status
To avoid the volume settings being changed
unintentionally or torch being accidently
activated, the volume and torch keys can be

11
activated/deactivated in the phone’s settings. To
change the status of these keys:
1. Press the top left key to select Menu
2. Scroll to and select Settings
3. Scroll to and select Volume key status
4. Select On/Off
1. Press the top left key to select Menu
2. Scroll to and select Settings
3. Scroll to and select Torch key status
4. Select On/Off
Emergency key setup
Information in regards to the functionality of the
Emergency key can be found in the EasyFlip 2
User Manual (pages 50-54).
To access the Emergency key settings:
1. Press the top left key to select Menu
2. Scroll to and select Safety
3. Select Emergency key
In the Emergency key settings, the following can
be programmed:
1. Status (turn Emergency key On/Off)
2. Emergency contacts (phone numbers to be
contacted when the Emergency key is

12
activated; phone numbers that can request
the EasyFlip 2’s location*)
3. Activate/deactivate Send (text) message
4. Customise Emergency (text) message
5. Activate/deactivate Warning tone
6. Turn Share location on/off
* Share location must be on in order for
emergency contacts to request the EasyFlip 2’s
location. See Share location for more details.
Note: all programmed emergency contacts must
have the length of their ringtone set to 15
seconds or more to ensure their voicemail
cannot answer the emergency call.
Share location
The Share location function enables mobile
phone numbers programmed in the Emergency
contacts list (Emergency key settings) to receive
a text message containing a Google Maps link
showing the EasyFlip 2’s location. This location
link should be received within 5 minutes of:
•Activation of the emergency key; and/or
•remotely requesting the EasyFlip 2’s location
(at any time) by sending a text message

13
stating Location to the EasyFlip 2.
Please consult page 53 of the EasyFlip 2 User
Manual for more information about the Share
location function and factors that may impact on
its functioning.
Low battery notification
The low battery notification function allows up
to 3 mobile phone numbers to receive a text
message stating that the user’s phone battery is
low. This message is sent when the phones
battery drops below 10% capacity.
To set-up the low battery notification function:
1. Press the top left key to select Menu
2. Scroll to and select Safety
3. Scroll to and select Low battery notification
4. Select Status to On
5. Select Notification contacts and add
numbers (up to three mobile numbers can be
added)
6. To edit the notification text message, select
Notification SMS, edit the message and
select Save.

14
Auto answer
Auto answer enables incoming calls from
programmed phone numbers to automatically
answer. When the EasyFlip 2 automatically
answers it diverts audio to loudspeaker.
To set-up the auto answer function:
1. Press the top left key to select Menu
2. Scroll to and select Safety
3. Scroll to and select Auto answer
4. Select Status to On
5. Select Auto answer contacts and add
numbers (up to three phone numbers can be
added)
Menu visibility
Menu visibility allows the following menu items
to be shown or hidden from the main menu:
Phonebook, Message, Call logs, Photo dial,
Camera, Organiser, Multimedia and Safety.
Please note, if Message, Photo dial or
Phonebook are hidden in Menu visibility, the
functions are hidden from the main menu only;
their allocated shortcut keys will still function and
open the selected function.

15
To show/hide menu items:
1. Press the top left key to select Menu
2. Scroll to and select Settings
3. Select Menu visibility
4. Select menu items to show/hide
Alarm and Calendar reminders
Alarms and calendar events can be set in the
EasyFlip 2’s Organiser. A voice recording can
be programmed to sound at the time of an alarm
or event, thus creating a voice reminder. See
pages 39 - 41 of the EasyFlip 2 User Manual for
details regarding the programming of alarms and
calendar events.
Use camera and view images
To access the camera:
1. Press the top left key to select Menu
2. Scroll to and select Camera
Camera opens
3. To take a photo press the magnifier key
(key above number 2 key)
When the camera is open, captured images can
be viewed by pressing the top left key to select

16
Options → select Image viewer.
Images can also be viewed in Organiser → My
files → Phone or Multimedia → Images. For
additional information, see pages 44 and 46 of
the EasyFlip 2 User Manual.
Complete factory reset
1. Press the top left key to select Menu
2. Scroll to and select Settings
3. Select Phone settings
4. Scroll to and select Restore factory
settings
5. Input password 1234
6. Select OK
7. Confirm OK
Note: Restoring factory settings will erase all
data stored on the phone.
Resources
1. EasyFlip 2 User Manual V1
2. Instructional videos
www.olitech.com.au/easyflip2videos
3. Customer service: support@olitech.com.au
03 9755 8885
Other manuals for EasyFlip 2
1
This manual suits for next models
1
Table of contents
Other Olitech Cell Phone manuals