manuals.online logo
Brands
  1. Home
  2. •
  3. Brands
  4. •
  5. Futech
  6. •
  7. Test Equipment
  8. •
  9. Futech VOLTPEN 200-12 User manual

Futech VOLTPEN 200-12 User manual

This manual suits for next models

1

Other Futech Test Equipment manuals

Futech TEMPPOINTER 2 User manual

Futech

Futech TEMPPOINTER 2 User manual

Futech HT4700 User manual

Futech

Futech HT4700 User manual

Futech TEMPPOINTER1 User manual

Futech

Futech TEMPPOINTER1 User manual

Futech VOLTTESTER 4.6A User manual

Futech

Futech VOLTTESTER 4.6A User manual

Popular Test Equipment manuals by other brands

Ambit P.F. Series instruction manual

Ambit

Ambit P.F. Series instruction manual

Megger BMM500 Series user guide

Megger

Megger BMM500 Series user guide

RJG Lynx Sensor Tester operating instructions

RJG

RJG Lynx Sensor Tester operating instructions

Mark-10 TT02 Series user guide

Mark-10

Mark-10 TT02 Series user guide

Martel 3001 Operator's manual

Martel

Martel 3001 Operator's manual

ElproSys DiagProg4 instruction manual

ElproSys

ElproSys DiagProg4 instruction manual

Redtech TRAILERteck T05 user manual

Redtech

Redtech TRAILERteck T05 user manual

Venmar AVS Constructo 1.0 HRV user guide

Venmar

Venmar AVS Constructo 1.0 HRV user guide

Test Instrument Solutions SafetyPAT operating manual

Test Instrument Solutions

Test Instrument Solutions SafetyPAT operating manual

Hanna Instruments HI 38078 instruction manual

Hanna Instruments

Hanna Instruments HI 38078 instruction manual

Kistler 5495C Series instruction manual

Kistler

Kistler 5495C Series instruction manual

Waygate Technologies DM5E Basic quick start guide

Waygate Technologies

Waygate Technologies DM5E Basic quick start guide

StoneL DeviceNet CK464002A manual

StoneL

StoneL DeviceNet CK464002A manual

Seica RAPID 220 Site preparation guide

Seica

Seica RAPID 220 Site preparation guide

Kingfisher KI7400 Series Training manual

Kingfisher

Kingfisher KI7400 Series Training manual

Kurth Electronic CCTS-03 operating manual

Kurth Electronic

Kurth Electronic CCTS-03 operating manual

SMART KANAAD SBT XTREME 3G Series user manual

SMART

SMART KANAAD SBT XTREME 3G Series user manual

Agilent Technologies BERT Serial Getting started

Agilent Technologies

Agilent Technologies BERT Serial Getting started

manuals.online logo
manuals.online logoBrands
  • About & Mission
  • Contact us
  • Privacy Policy
  • Terms and Conditions

Copyright 2025 Manuals.Online. All Rights Reserved.

6
2
1
3
4
5
DESCRIPTION
1. Battery Cover
2. Flashlight button
3. Power button ON/OFF
4. LED Indicator
5. Detector Tip
6. Flashlight
LED INDICATOR
· Green light high voltage mode (> 200V)
· Yellow light low voltage mode (>12V) and self-test mode
· Red light voltage detected
VOLTPEN 200-12
electrical tester
A
B
C
D
BATTERIES
Prior to initiate the self-test, check whether the batteries have been installed cor-
rectly inside the device.
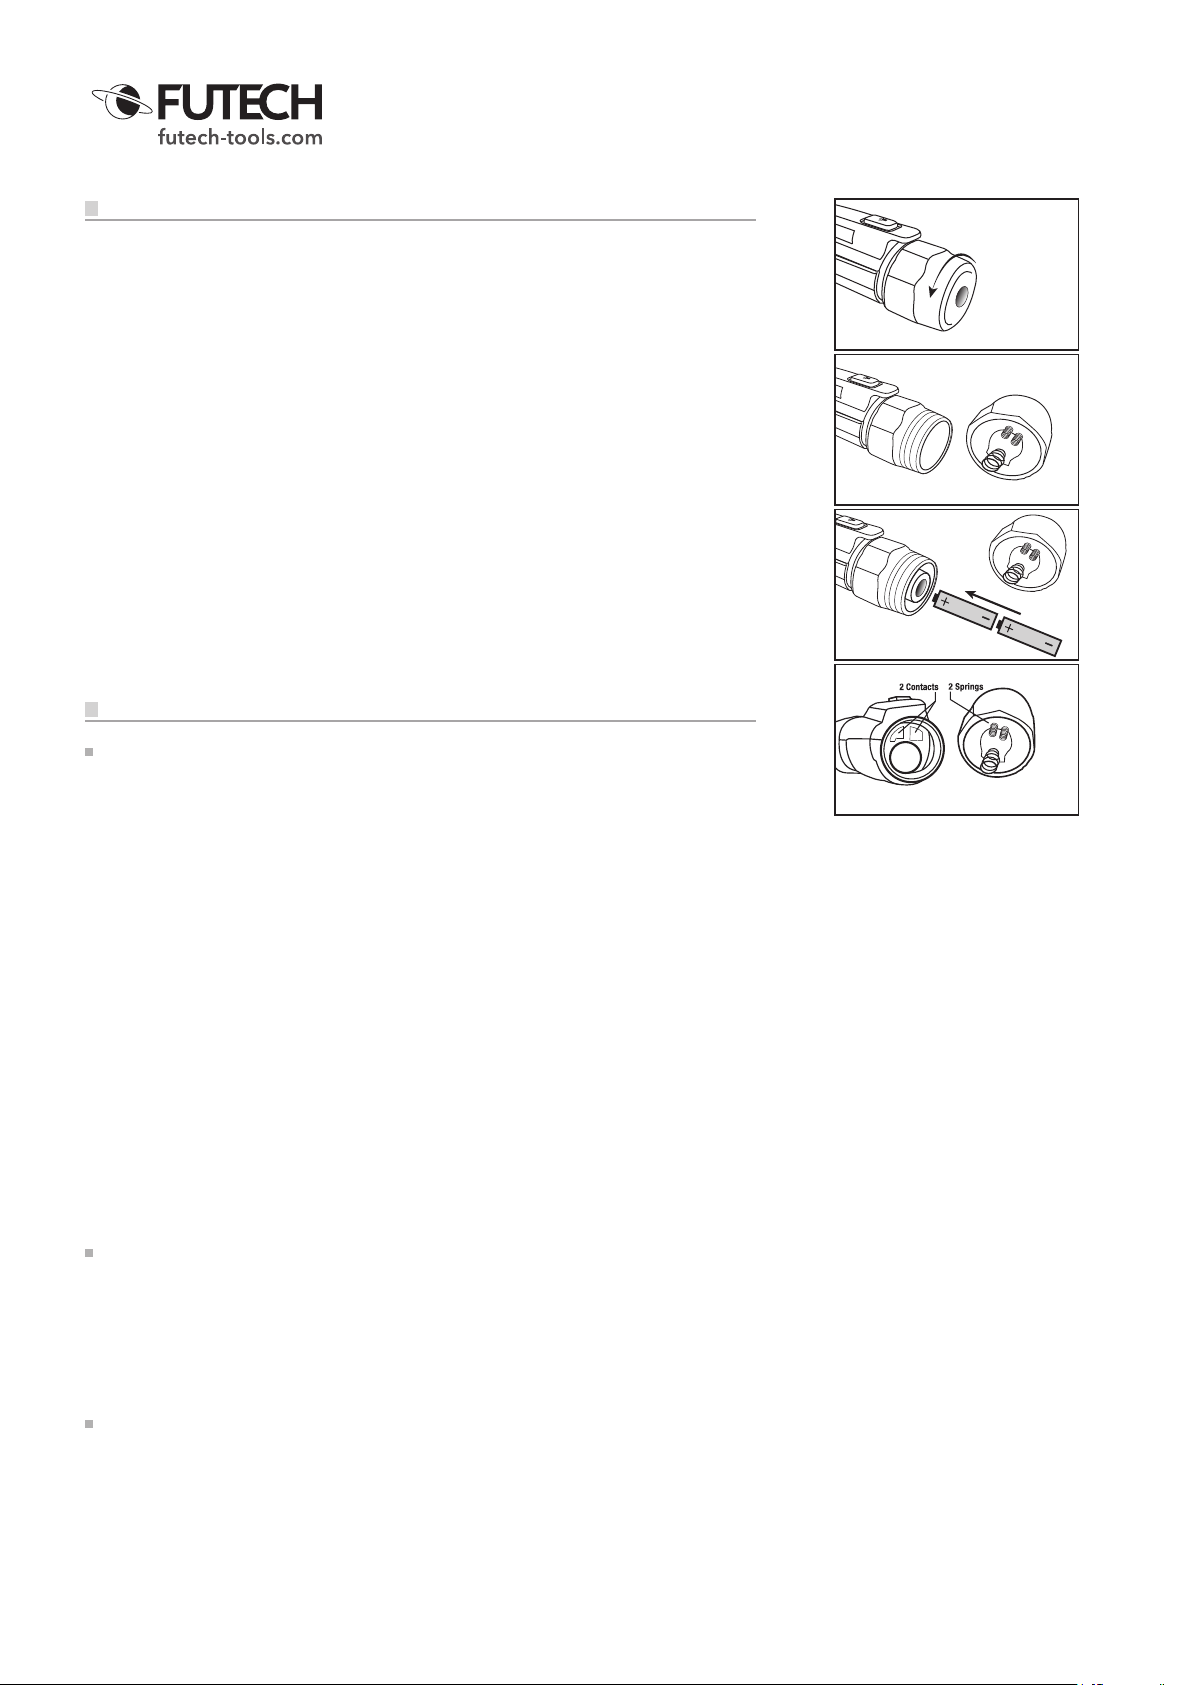
A. Carefully unscrew the Battery cover [1] by hand anti- clockwise
B. Lift off the Battery cover [1]
C. Insert the batteries making sure that the poles of the batteries are in the right
position.
D. Align 2 springs on Battery cover [1] to 2 contacts inside the rear of de de-
vice, screw the Battery cover [1] clockwise to close the Battery cover [1] rmly.
NOTE
·OnlyuseAAAbAttery.
·ClOsethebAtteryCOver[1]firmlytOmAintAiniP67wAterAnddustPrOteCtiOn.
·remOvethebAtteriesifthedeviCeisnOtusedfOrAlOngerPeriOd.
·lOwbAtteryindiCAtiOn-thedeviCebeePsfOr3timesAndlightdisAPPeArsfrOm
ledindiCAtOr[4].
·whenlOwbAtteryisindiCAted,dOnOtOPerAtethedeviCe,AndrePlACethe
bAtteryimmediAtely.
OPERATION
SWITCH ON/OFF AND SELF-TEST
The self-test checks the functionality of the device and battery. Always verify the
self-test on a known live AC voltage within the detection voltage range.
· Press the power button ON/OFF [3] to switch on the device. You hear one beep
sound. This means that the device passes the self-test and is switched on.
· A light inside the LED indicator [4] is switched on. A yellow light indicates the
device is switched on low voltage mode. The green/yellow light ash fast every
5 seconds. This indicates the device performed a self-test and all work correctly.
· Press the power button ON/OFF [3]. The device beeps two times and the light
in LED indicator [4] disappears. This means the device is switched off.
· Automatic switch-off:
- when the device is not in use for about 5 minutes
- when the battery runs out (you will hear two beep sound)
NOTE
·AfterswitChingOn,ifthedeviCekeePsbeePingAndtheyellOw/greenlightin
ledindiCAtOr[4]flAshesfOr5seCOnds,thismeAnsthedeviCefAilsself-test
AndisnOtreAdyfOruse.PleAseswitChOffthedeviCeAndCheCkifthein-
strumentisinPerfeCtCOnditiOn(brOkenhOusing,leAkingbAtteries,unPrOPer
funCtiOningAtAnunknOwnvOltAgeetC.).
SWITCH BETWEEN LOW VOLTAGE & HIGH VOLTAGE MODE
· When the device is switched on, hold the power button ON/OFF [3] for 2 sec-
onds, you will see the light inside the LED indicator [4] will switch from yellow to
green or from green to yellow.
· Hold the power button ON/OFF [3] againfor 2 seconds to return to the initial
mode.
TURN OFF SOUND NOTIFICATION
· When the device is off, hold the Power button [3] until yellow or green light ap-
pears in LED indicator [4], the sound notication is turned off and you can now
operate the device without beep sound.
· When the device is on, sound notication can’t be turned off.
FLASHLIGHT
· Press Flashlight button [2] to turn on ashlight
NOTE
·tOsAvebAttery,theflAshlightwillturnOffAutOmAtiCAllywhentheACtivAted
deviCeisnOtinusedduring5minutes
CARRY OUT VOLTAGE TEST
LOW VOLTAGE MODE (DETECTION VOLTAGE RANGE: 12V TO 1000V AC)
When the device is switched on, please check the device is working on low volt-
age mode (=yellow light in LED indicator [4])
· Place the Detector tip [5] near a test object and move the device smoothly
along the test object.
· When the device detects an AC voltage in the range between 12V and 1000V
AC, the yellow light in LED indicator [4] is replaced by ashing red light and the
device starts to beep.
HIGH VOLTAGE MODE (DETECTION VOLTAGE RANGE: 100V TO 1000V AC)
When the device is switched on, please check the device is working on high volt-
age mode (=green light in LED indicator [4])
· Place the Detector tip [5] near a test object and move the device smoothly
along the test object.
· When the device detects an AC voltage in the range between 100V and 1000V
AC, the green light in LED indicator [3] is replaced by ashing red light and the
device starts to beep.
NOTE
·thedeviCeCAn’tdeterminetheACtuAlvOltAge.thePresenCes/levelOfACvOlt-
AgedeteCtingisAffeCtedbythiCknessAndtyPeOfinsulAtiOn,thedistAnCe
frOmthevOltAgesOurCeAndOtherfACtOrs.
·mAkesureyOuhOldthedeteCtOrtiP[5]AsClOseAsPOssibletOthevOltAge
sOurCe.theClOseryOuhOld,themOrereliAbletestresultswillbe.
SPECIFICATIONS
Detection Voltage Range 100V to 1000VAC, 12V to 1000VAC
Frequency Range 50/60Hz
Batteries Two AAA 1.5V batteries
Operating Temperature 0 to 50°C (32 to 122°F)
Storage Temperature -10 to 60°C (14 to 140°F)
Humidity 80% max.
Altitude 2000 meters
Pollution Degree 2
Safety Compliance CAT IV 1000V
IP Rating IP67
Futech is a registered brand of Laseto NV, Belgium.
Futech declares that the Voltpen 200-12
is in conformity with the following standards:
·
following the provisions of Directive:
·
Tested by
Certicate number