FUTUR Trident Mini User manual

AIR PURIFIER (MINI)
INSTRUCTION MANUAL

CONTENTS
Product & Accessories
Packing List
Parameter Informaon
Product Working Principle
Use Instrucons
Wi-Fi Connecon
Air Quality Display
Safety Precauons
Daily Cleaning & Maintenance
Common Troubleshoong Methods
2
2
2
3
3
4
5
5
6
8

REPAIR TIPS ENVIRONMENTAL IMPACT
STATEMENT
1. All the packaging materials are environmentally friendly and
recyclable. Please dispose of these packaging materials in an
environmentally friendly manner to maintain a good environment.
2. Do not allow children to play with the plasc films and cartons,
which may cause a room-breathing accident, so please keep
packaging materials away from children.
3. It should be discarded when the old air purifier cannot be used.
Please dispose of it as it cannot be reused before discarding. The
old one contains useful materials that can be reused. Please assist
in proper disposal or recycling to contribute to environmental
protecon.
Please read this user manual carefully to ensure correct
and safe use of this product.
Only the personnel trained and qualified maintenance for
air purifier can repair the device.
Other personnel are not allowed to repair the air purifier
without permission, so as to avoid serious consequences.
When the air purifier is abnormal, please refer to the
Common Faults Analysis and Exclusion.
If you can't troubleshoot the fault, please unplug the wire
and cut off the power, then contact us. Any product quality
or inconvenience caused by the device can be obtained from
the local merchant customer service center consultaon and
services.
01
• Before using, please remove the packing bag of the filter in the purifier.
• For the removal and installaon method of the filter, please refer to "Daily Cleaning & Maintenance" on page 7.
TIPS

PRODUCT & ACCESSORIES
DESIGNAIR PURIFIFIER
1. Air Outlet Grid
2. Control Panel
3. PM2.5 Indicator
4. VOC Indicator
5. VOC Sensor Cover
6. PM2.5 Sensor Cover
7. Air Inlet
8. Wheels
9. Filter Cover (back)
Aluminum Mesh Filter
Electrostac Filter
Ozone Decomposion Filter
Cold Plasma
PACKING LIST
PARAMETER INFORMATION
Rated Voltage 220V
Rated Frequency 50Hz
Rated Power 60W
PM CADR 600m3/h
Lifespan 10 Years
Coverage Area 32-74m2 (340-800 sq. )
Name
Air
Purifier
Aluminum
Mesh Filter
(inside)
Electrostac
Filter (inside)
Ozone
Decomposion
Filter(inside)
Cold Plasma
(inside)
Manual
1pc 2pcs 2pcs 2pcs 1pc 1pc
Q’ty
02

1. ON/OFF:
The icon lights up red when the power is on, and press the buon
to turn on/off respecvely. When the machine is turned on, all
keys light up white.
2. AUTO/SLEEP:
Short press for auto mode, the buon and "AUTO" are fully lit;
long press 3 seconds for sleep mode, the buon and "SLEEP" are
all on, at the same me, all display lights on the panel and machine
are in off state.
3. AIRFLOW: Short press the buon and switch to speed
1~2~3~4, icon 3 and icon 8 display correspondingly at the same
me; the PM2.5 display will be restored aer 5 seconds.
USE INSTRUCTIONS
High-voltage electrostac adsorpon is through the electrostac
adsorpon device under the acon of a high-voltage generator
can generate 4KV-8KV DC high voltage and form a strong
electrostac field inside the electrostac adsorpon device.
When the indoor air passes through the electrostac adsorpon
device, the parculate maer in the air (including
microorganisms) is instantaneously polarized and charged with
posive and negave charges due to the high-speed impact of
posive and negave electrons when passing through the
electric field. The charged parcles aract each other due to the
opposites when running in the electric field. The negavely
charged parcles will shi to the anode plate, and the posively
charged parcles will shi to the cathode plate, causing the
charged parcles to collide with each other in moon. The
posive and negave charges will also discharge at the moment
of collision and release a large amount of energy to destroy the
cell wall and electrolyte of virus and bacteria, so as to achieve the
purpose of disinfecon and sterilizaon.
Home, office, school, hospital, food, catering, etc
PRODUCT WORKING PRINCIPLE
1. Sterilizaon Principle:
2. Applicaon:
Airflow Display
Timing Display
Filter Reset
Wi-Fi Connecon Display
Display Window
03

4.TIMING/CHILD LOCK:
Short Press and switch to ming mode, and then shi to
1~2~4~6~8H,icon 4 and icon 9 display correspondingly. The
PM2.5 display will be restored aer 5 seconds. Press long for 3
seconds to switch to child lock mode, buon and "CHILD LOCK"
are all on, the machine gives a "beep" prompt sound, and other
keys fail. Press long for 3 seconds to release.
5. UVC:
Short press for uvc sterilizing mode, buon and "UVC" are all on.
Press again to disable.
6. WIFI/RESET:
Press the buon for 3 seconds to enable the wifi network
configuraon mode, icon 6 and icon 11 blink simultaneously,
the “WIFI” icon is steady on aer the network is configured
successfully. When the filter remaining me is less than 15%, icon
10 and “RESET” are blinking at the same me. Press the buon for
5 seconds, and machine will give a "beep" prompt sound, the filter
is reset successfully. Icon 10 will be lit up, number "038" will be
displayed as "100" (i.e. full) and PM2.5 display will be restored
aer 2 seconds.
WI-FI CONNECTION
7. DISPLAY WINDOW
8. AIRFLOW DISPLAY
9. TIMING DISPLAY
10. FILTER RESET
11. WIFI CONNECTION DISPLAY
04
DOWNLOAD AND REGISTRATION
1. Scan the QR code to download "Smart Life" APP. You can also
search "Smart Life" in either APP store or Google Play to install
the APP.
2. Open the "Smart Life APP", tap "Register" to register a "Smart
Life" account with your phone number or E-mail. Then sign in
the APP.
3. Open the "Smart Life APP", click "add device" or tap "+" on the
top right corner of the APP homepage. There are two methods
to enter the page of "add device" -Add WiFi manually or search
for the devices automacally.
In the homepage of add device manually, choosing any one of
product rang to enter a new homepage and ensure the indicator
light flash quickly.
The devices provide two configuraon methods. In the homep-
age of Easy mode, tap “Other methods” on the top right corner to
enter Easy mode and AP mode, then could choose one of mode
to connect with WiFi.
Make sure your smart device is energised and your mobile phone
is connected to your WiFi network. If the WiFi indicator of smart
device do not flash, please press the center buon of the light
ring for more than 5 seconds unl the indicator light keeps
flashing quickly, it means the device is ready for configuraon.

1.Use only two-pin sockets that conform to the standard voltage
on the nameplate.
2.Do not use this product when the power cord, plug and power
socket are damaged.
3. When unplugging the power, you must hold the plug instead
of pulling the power cord, otherwise it may cause electric shock
or fire due to short circuit.
4. Clean the dust on the power plug regularly.
5. If the power cord is damaged, it must be replaced by the
manufacturer or professional maintenance personnel.
1. Do not use the machine without installing the filters.
2. Do not insert fingers or other things into the air inlet or outlet.
3. Do not block the air inlet/outlet.
4. Do not close to or put on heat source objects (such as heang
stove and other places that may contact with flammable gas).
5. If there is any smoke, odor and other malfuncons, should pull
out the power plug immediately.
1. Do not use if there is oil residue, smoke, flame when lighng
up a cigaree, or chemical odor in the air.
2. Do not use the machine in an environment full of flammable
gases such as hydrogen, natural gas, propane, etc. to avoid
electric shock, fire and other damage.
3. Do not use this unit when using inseccide spray.
4. Do not use it in unstable places such as easy dumping,
hot,humid and wet places such as bathrooms, in order to avoid
electric shock, fire or other damage.
1. When moving, stop running and pull out the power plug.
2. When moving, hold the handle on the side of the machine ;
don’t hold the front panel, lest the machine fall and injure people.
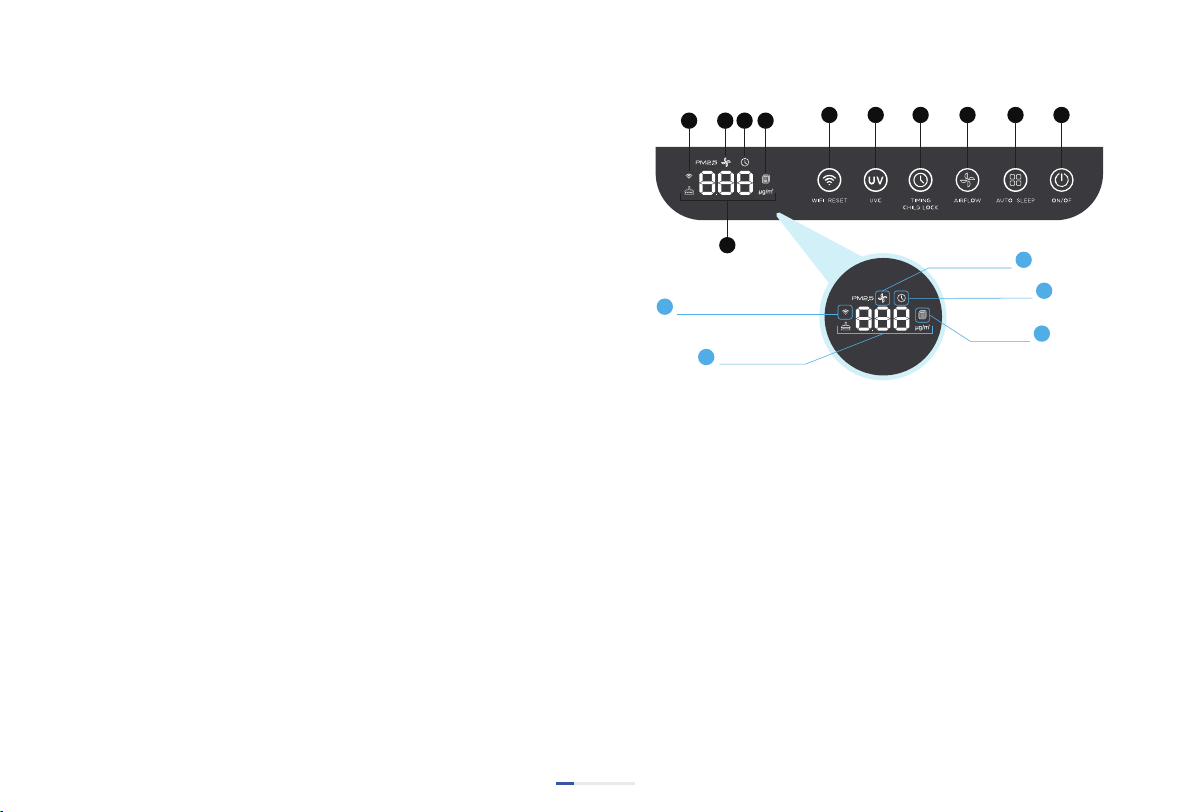
The PM2.5 indicator light above the front panel of the machine
shows different colors according to the current PM2.5 status:
•Blue: Excellent •Green: Good
•Yellow: Moderate •Red: Poor
Meanwhile, the display window on the control panel will display
the current PM2.5 value synchronously.
The VOC indicator light under the front panel of the machine
shows different colors according to the current status of gaseous
pollutants:
•Blue: Excellent •Green: Good
•Yellow: Moderate •Red: Poor
AIR QUALITY DISPLAY
SAFETY PRECAUTIONS
05
About Power
In use
Service Restricons
About Moving

1. Do not clean ozone lter and composite hepa lter by water.
2. Caution should be taken when cleaning the machine, as strong
corrosive cleaners will damage the machine surface.
3. Only use soft cloth to clean the machine surface, otherwise it may
be damaged or broken, and may cause sensor failure.
4. Do not use alcohol or organic solvents to wipe the product, or it will
cause damage or electric shock,re, etc.
5. When cleaning or not using the machine, please unplug the power
from the socket, otherwise it may cause electric shock or re due to
short circuit.
1. The host cannot start if the front panel is not installed correctly.
2. Do not install near the sensors directly to the tuyere, otherwise it
may aect the normal operation of the machine.
3. Do not install near objects (such as curtains, etc.) that may contact
with the air inlet or outlet, otherwise the object may get contaminat-
ed or cause this unit to malfunction.
4. Do not install the unit where it may be directly exposed to conden-
sation. Please use it at room temperature of 0-40 degrees.
5. Do not install in the place that will produce black smoke (such as
kitchen, etc.), otherwise it may cause the machine surface to crack or
sensor failure.
1. There should be a certain space around the machine to let the air
ow naturally, so as to improve the purication eect.
2. This machine is not suitable for the disabled, the perceptual
disturbance, the mentally handicapped or children to operate
by themselves.
Clean the Top Outlet and Inlet Grille
1. Use a so brush to remove dust and debris.
2. If necessary, use a slightly wet paper or cloth to remove large
deposits, and do not use any irritang abrasives or cleaning
pads on any parts of the equipment.
Clean VOC Sensor
The VOC sensovr is located in the middle right side of the
machine, above the air inlet grille.
1. Use a so cloth to clean dust and debris around the
VOC sensor to maintain accurate smell idenfificaon.
2. Do not modify or open the VOC sensor, and do not spray in
or near the grille opening above the VOC sensor, which may
cause sensor and warranty failure.
DAILY CLEANING & MAINTENANCE
06
Noce for Cleaning
About Installaon
Warm Reminding

Cleaning Dust Sensor
1. Open the sensor cover
2. Use a wet coon swab to clean the lens, air inlet and air outlet.
3. Use a dry coon swab to remove residual water stains of the
dust sensor.
• The dust sensor needs to be cleaned regularly (approximately
every two months) for the machine to operate efficiently.
• The dust sensors needs to be cleaned more frequently if the
machine is placed in areas where dust accumulates.
• Do not use the swab on any part or area other than
the dust sensor.
Guidance for Cleaning Ozone Decomposion Filter
Use a vacuum cleaner or cloth to remove dust and fluff.
Recommend cleaning the filter me is about 8-12 years
(this replacement cycle greatly varies from different
environments)
Guidance for Cleaning Aluminum Mesh Filter
The aluminum mesh filter collects large parcles and should be
cleaned at least once every two months depending on the using
environment.
1. Use a vacuum cleaner or ssue to remove dust or fluff.
2. Wash with soap water.
3. Thoroughly rinse and remove soap residue from the filter.
4. Dry the filter.
Cleaning Electrostac Filter
1. Take out the electrostac filter
2. Spray with neutral detergent and let stand for 5-10 minutes.
3. Shake well in warm water (under 40 degrees) and get out.
4. Repeat step 2 and 3 unl it is clean.
5. Rinse the dirt on the dust collector with warm water.
6. Use a hair dryer or dry the filter in the sun.
07
Sequence of Filter Installaon
Aluminum mesh filter (washable)
Electrostac filter (washable)
Ozone decomposion filter (unwashable)
*Plasma Tube (Recommended to replace
every 2 years)
Filter Assembly
This purifier is equipped with 7 different
pre-assembled filters. When the filters
should be replaced or cleaned, please
install the back cover aer the filters
are assembled.

Whole Machine Cleaning
Clean with a damp sponge or cloth
Do not immerse the air purifier in water
Do not disassembly fixed parts for cleaning
The air outlet with odor
The effect of dust
removal and purificaon
are not obvious, and
the air quality is not
significantly improved.
Too much noise
when running
The filter can’t fit in
The machine won't
turn on
Motor abnormalies
Motor turns plugging/
motor overheat protecon,
machine prompts, and
does not work
There are many polluon
sources in the room
It is suggested that the room
be venlated by opening
the window.
The filter is heavily polluted
The machine has no filter Install the filter
Clear the blockage or
move somewhere else
The filter is too dirty
Sundries in machine
The filter is inversely
installed
Filter cover or filter
not installed properly
Whether the installaon
is not firm enough
Clean or replace the filter
Remove debris
Adjust the filter in the correct
direcon and align it with the
boom slot
1.Re-install the cover and filter
2.Contact aer sales
service center
1. Unplug, cool for 1-2 hours
and reconnect
2.Contact aer sales
service center
Contact aer sales
service center
The machine is placed in a
narrow place or there are
obstacles nearby, which
affect the purificaon effect
Replace a new filter
Cleaning of Condenser Mesh
1.Gently unscrew the quartz condenser.
2.Remove the OUTSIDE MESH of the condenser : if it seems to be
difficult, rotate the net slightly on the quartz condenser.
3.Clean the quartz condenser by using a moist cloth. WARNING :
Do not use detergents, soaps or similar products.
4.Check whether the condenser shows any cracks or other damage.
If so, replace it.
5.As soon as a whish layer appears on the metal grill inside the
condenser, it means the condenser should be replaced.
6.Reposion the metal mesh on the condenser, placing it over the
internal grill. WARNING : Leave a minimum distance of 6-7mm
from the boom of the condenser.
7.Check that SPRING TAB touches the metal MESH OUTSIDE and
pushes in against the glass of the quartz condenser.
COMMON TROUBLESHOOTING
METHODS
08
Mesh
Condensor
Base in PVC
6-7 mm
GAP
MALFUNCTION POSSIBILITY METHOD
Table of contents
Other FUTUR Air Cleaner manuals