FUTURA MOBILITY ST7 Operator's manual

www.futuramobility.com
ST7 FLEX Workstation
QUICK RESOURCE GUIDE


TABLE OF CONTENTS
1. Specications .................................................... 3
2. Included Hardware ........................................... 3
3. Equipment Classication .................................... 3
4. Regulatory Statements ...................................... 4
5. Warnings and Cautions ..................................... 5
6. Unpacking the Workstation................................ 6
7. Technical Support .............................................. 6
8. Key Features ..................................................... 7
9. Operating the Workstation ................................ 8
10. Using the UPS ................................................... 11
11. Technology Access ............................................. 13
12. Using the Standard Keypad Locks ..................... 14
13. Using the Enhanced Keypad Locks ..................... 16
14. Power System ................................................... 18
15. Fleet Management ............................................ 19
16. Storage, Transportation & Repair ...................... 20
17. Cleaning the Workstation .................................. 21
ST7 Standard Workstation Quick Resource Guide 2

1. SPECIFICATIONS
• Work Surface Size: 19.5” x 20.5”D
• Base Size: 17.5” x 17.25” wheel to wheel
• Weight: Approximately 120 lbs (base unit)
• Maximum Standing Height: 45” (to work surface)
• Minimum Sitting Height: 33” (to work surface”
• Height Adjustable Monitor: 6”
• Four 5” medical grade, sealed swivel casters
2. INCLUDED HARDWARE AND ACCESSORIES
• Work Surface Keys
• Mouse Cubby
• Storage Basket
• Monitor Mount (CPU version)
• Electronic Locking Double Drawers (optional)
• Universal Corded Scanner Bracket (optional)
• Vitals Monitor Mount (optional)
• Technology Tray (optional)
• Wireless Mount (optional)
• Quick Resource Guide
3. EQUIPMENT CLASSIFICATION
• Class 1 Equipment
• DC supplied and internally powered
• No applied parts
• Not protected against ingress of water
• Notsuitableforuseinpresenceofammableanaesthetic
mixture with air or with oxygen or nitrous oxide
• Designed for continuous operation
ST7 Standard Workstation Quick Resource Guide 3

ST7 Standard Workstation Quick Resource Guide 4
4. REGULATORY STATEMENTS
The following statements apply to the ST7 Flex Workstation.
United States – Federal Communication Commission (FCC)
This device complies with Part 15 of the FCC Rules. Operation is subject
to the following two conditions: (1) this device may not cause harmful
interference, and (2) this device must accept any interference received,
including interference that may cause undesired operation. NOTE: This
equipment has been tested and found to comply with the limits for a
Class B digital device, pursuant to Part 15 of the FCC Rules. These
limits are designed to provide reasonable protection against harmful
interference when the equipment is operated in a commercial environment.
This equipment generates, uses, and can radiate radio frequency
energy and, if not installed and used in accordance with the instruction
manual, may cause harmful interference to radio communications.
Operation of this equipment in a residential area is likely to cause
harmful interference in which case the user will be required to correct
the interference at his own expense.
Warning: Changes or modications not expressly approved by Futura
could void the user’s authority to operate the equipment.
EMC - FCC Part 15 Class B and CISPR 22
CISPR 22 and ANSI C63.4-2003
Safety - IEC/EN 60601-1: 2nd Edition
Standards considered:
UL 60601-1 First edition
CSA C22.2 No. 601.1-M90
IEC 60601-1: Second edition
UL 1778 Fourth Edition
CSA C22.2 No. 107.3-05
IEC62040-1: 2008

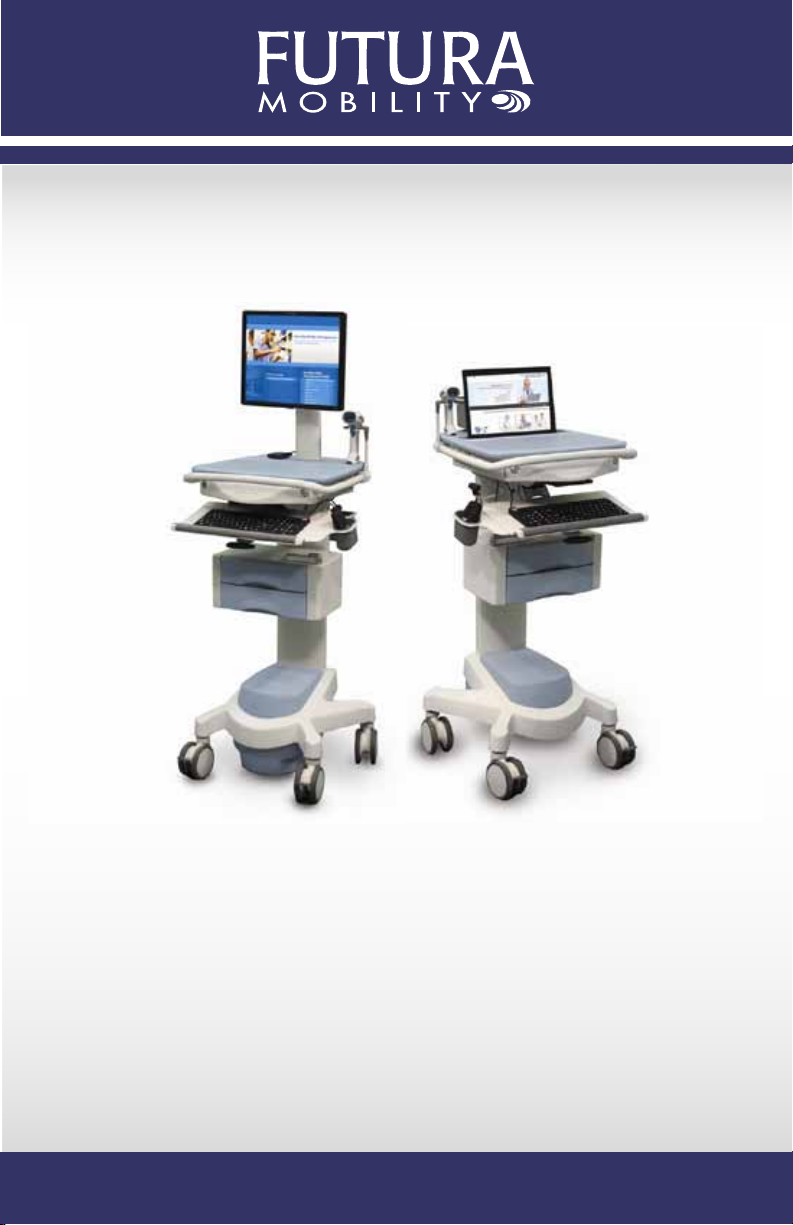
ST7 Standard Workstation Quick Resource Guide 5
5. WARNINGS AND CAUTIONS
Electromagnetic Interference
The function and performance of this Product may vary from the published
specicationsduetomanyfactors,including,withoutlimitation,siteimpairments
from structural effects, metal objects in the vicinity, interference from other
electrical devices, atmospheric effects, installation, and maintenance. There
may be other factors which also affect performance of this Product.
Long-Term Storage
If the ST7 Flex Workstation is to be stored or not used for more than 3 months,
in addition to the short term storage instruction, disconnect or completely
remove the Continuum Power System. As well, if the optional drawers are
installed, remove the lock mechanism batteries. Refer to page 14 lock for
details.
Routing Maintenance and Inspection
The ST7 Flex Workstations do not require routine maintenance or inspection
exceptasspeciedinsections“CleaningtheWorkstation”onpage20.Also,
please refer to the Continuum Power System guide for information on proper
battery maintenance.
Setup and Preperation
The ST7 Flex Workstation must be unpacked and inspected, and the battery
fullychargedbeforerstuse.Referto“UnpackingtheWorkstation”onpage
7 for details.
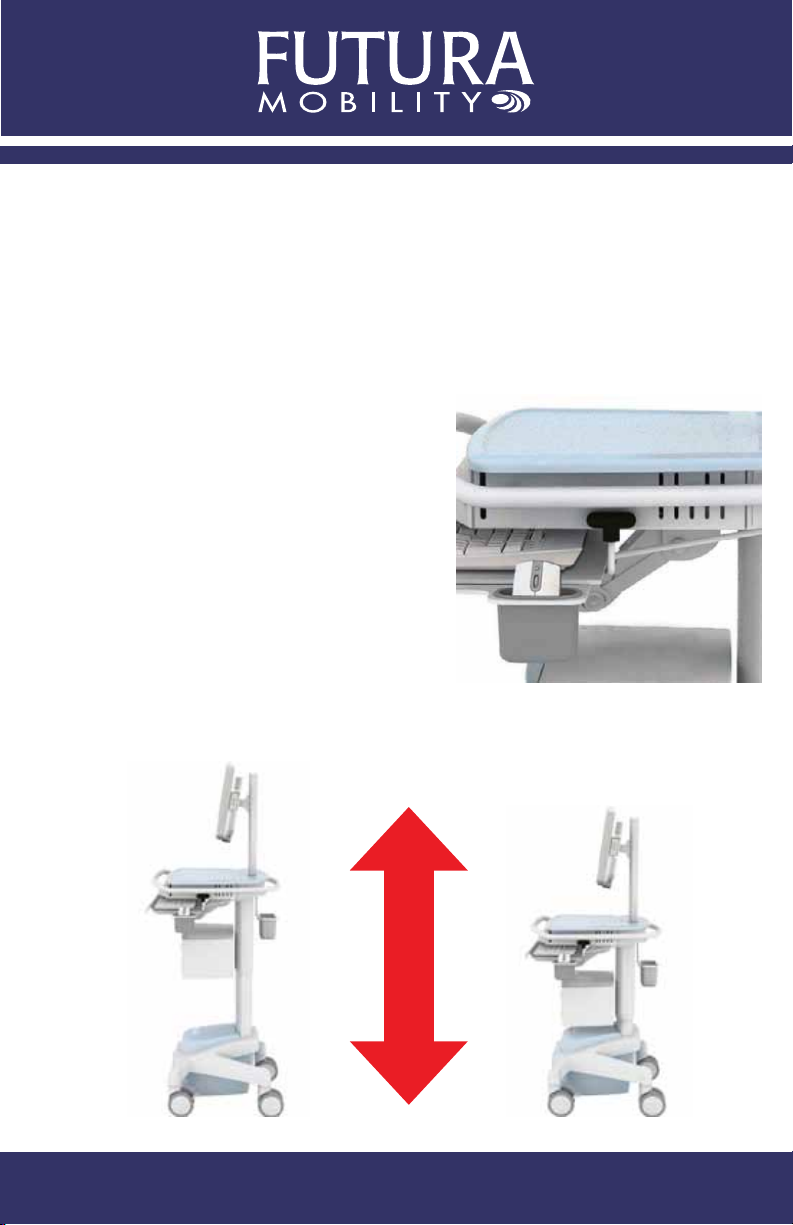
USB (Universal Serial Bus) and LED Indicator
Do not touch either the USB connector contacts or the LED indicator board
and a patient simultaneously when the cart is used in the vicinity of a patient.
Equipment Disposal (End of Life)
Follow local or municipal regulations for disposal or recycling of the power
system (including batteries) and the product.

ST7 Standard Workstation Quick Resource Guide 6
6. UNPACKING THE WORKSTATION
NOTE: Futura Mobility offers on-site unpacking and integration services as a
value add to hospitals to streamline deployment of mobile workstations.
1. Remove all packaging material from workstation
2. Dispose of all packaging material according to local waste management
regulations or facility policy
3. Inspect the workstation for damage, and immediately report and damage
found to Futura Mobility
4. Plug the workstation into power and allow the battery to charge for 1
hour before installation and use.
7. TECHNICAL SUPPORT
To initiate support, call 1-877-754-2478. We can be reached Monday
through Friday from 8:30 AM to 5:30 PM Eastern time or via email at
support@futuramobility.com.

8. KEY FEATURES
1. Work Surface for Technology Housing
2. Keyboard Tray
3. Electronic Keypad Lock (optional)
4. Cable Management Cover - Cart
5. Front Caster Lock (2)
6. Power System Case and Cover
7. Locking Double Drawers (optional)
8. Keyboard Tray Adjustment Lever
9. Wrist Rest
10. Battery Status Indicator
11. Work Surface Key Locks
12. Monitor Mount - VESA 75 and 100 (CPU Version)
13. Back Technology Access Panel
14. Power Cable Holder
15. Power Cable
16. Power Switch
17. Storage Basket
18. Height Adjustment Lever
19. Mouse Cubby and Tray
20. Universal Corded Scanner Holder (optional)
21. Cable Management Cover - Monitor Mount
ST7 Standard Workstation Quick Resource Guide 7
ST7 Standard Workstation Quick Resource Guide 8

9. OPERATING THE ST7 FLEX WORKSTATION
The ST7 workstation comes fully assembled and ready to use. There
are a few height adjustable features on the cart that can be changed
to accommodate users of different heights.
Work Surface Adjustment
To raise and lower the work surface,
there is a hand lever located inside
the front handle of the cart.
Simply squeeze the lever towards you and
either pull up or push down on the handle
to raise/lower.
Please Note: Do not push lever down or use
excessive force as those actions may cause
lever to break.
ST7 Standard Workstation Quick Resource Guide 8

Keyboard Tray Adjustment
You can adjust the keyboard tray in three directions: Retract, Height, and Tilt.
Retracting: The keyboard tray freely retracts in and out below the work surface
Height & Tilt: There is a lever on the underside of the keyboard tray that tilts
the tray positively and negatively. Squeeze the lever up towards the tray to
adjust. This same lever also allows the keyboard tray to move up and down.
Mouse Cubby/Tray
The mouse cubby holds the mouse when it is not in use. The cubby is attached
to a mouse tray that slides out from the keyboard tray. The cubby and tray
can be switched to the other side of the keyboard tray for left-handed users.
ST7 Standard Workstation Quick Resource Guide 9

Monitor Height Adjustment
For CPU carts, the monitor is easily adjustable by lifting the display up or
pulling the display down. In addition to elevation, adjustable vertical tilt
and 180° horizontal motion is available.
Monitor Specications
For CPU carts, the monitor mount holds up to a 24” monitor with either
a 75 or 100 mm VESA pattern. The cabling for the monitor is routed
through the hole in the monitor mount pole and into the work surface.
ST7 Standard Workstation Quick Resource Guide 10

10. USING THE POWER SYSTEM
The power system, is shipped from the factory ready to use. Before turning
onthepowersystemforthersttime,referto“UnpackingtheWorkstation”
on page 7. Failure to follow the directions can cause damage to attached
computers, auxiliary devices and the battery inside the power system.
Turning the Power System on
To power up the battery, press the rear switch of the
batterytotheupor“ON”position.Turnonthecomputer
and auxiliary devices on the mobile cart, if installed.
Turning the Power System off
Before turning off the battery, be sure to follow the
manufacturers’ recommendations for turning off any
computer and auxiliary devices powered by the power
system. To turn the power system off, press the rear
switchtothedownor“OFF”position.
Power Indications
ThePowerSystemcommunicatesitsstatususingtheve-segmentLED
indicator mounted on the front edge of the mobile cart work surface. During
operation a number of LEDs will remain lit to indicate how much charge
is left in the system. Five LEDs indicates full charge, and LEDs turn off from
right to left to indicate a decreasing charge. When one LED is lit it is time to
plug in the UPS to charge it.
ST7 Standard Workstation Quick Resource Guide 11

When low battery occurs the power system automatically disconnects the
outputs and shuts itself off to preserve the onboard battery. It is necessary
to plug the power system in before power can be restored to the computers
and/or auxiliary devices plugged into the system.
Note: When the power system shuts off power, computers without
internal batteries will also shut off, causing the possible loss or
corruptions of data. Futura could void the user’s authority to
operate the equipment.
Charging the Power System
To charge the power system, plug it into a wall outlet at any time. The
power system automatically detects the battery status and begins charging
the battery. There is no need to fully discharge the battery before charging
it. While charging, a scrolling light moves from left to right on the LED
indicator as capacity is returned to the battery. When the battery is fully
charged,itautomaticallyswitchestoa“oatcharge”mode.AllveLED
sections on the front of the mobile cart change to solid green. It is safe to
leavethebatterypluggedinwhilein“oatcharge.”
ST7 Standard Workstation Quick Resource Guide 12

11. TECHNOLOGY ACCESS
If technology integration has been purchased through Futura Mobility,
the cart will come from the manufacturer with the appropriate
technology already installed. If that service option was not chosen or
access to the technology is required for any reason, there is are two
key locks located on the front of the cart (A) that will remove the work
surface.
Under the work surface, the is a place for the computer and routing
holes (B) for the keyboard, mouse and bar code scanner cables. For
powered carts (with UPS), the power cable will come up from the large
hole (C) located in the back of the clamshell. For non-powered carts
(without UPS), the power cable can be routed through the access panel
(D) located on the backside of the clamshell.
The USB cable is used to provide battery information to the basic
monitoring software on the cart computer if you have purchased the
cart with the Continuum Power System and standard software. For
information regarding Futura Mobility’s enhance MobileForce Fleet
Management software see page 19 .
ST7 Standard Workstation Quick Resource Guide 13

ST7 Standard Workstation Quick Resource Guide 14
12. USING THE STANDARD KEYPAD LOCK
(for optional locking double drawers)
General Operating Instructions
The default master lock code is 2-2-4-4.
To unlock, enter the code on the cor-
responding push buttons. The Blue LED
will turn on indicating acceptance of the
code. Rotate the oval lever forward. To
lock, rotate the oval lever backward.
Tamper Time Out/Penalty Time
Entering three incorrect codes causesthe lock to shutdown for 10 seconds.
Battery Power
The lock is powered by two (2) AAA 1.5v batteries. The lock will provide
over 15,000 openings before the low battery signal starts.
Low Power
Whenthebatterypowerislow,theRedLEDwillash3timesafteracode
has been entered. Batteries should be changed immediately. The lock will
operate on low power for approximately 100 openings.
Battery Replacement
Toreplacethebatteriesremovetherear-xingboltandswingthelock
over the edge of the door to reveal the battery compartment.

Battery Failure Override
If a low power signal is ignored, the electronic lock will
stop working. The lock has a built-in override feature
to provide access to replace the batteries.
To Override the Lock:
• Place the contact points of the 9 volt battery
against the contact points surrounding the Blue
and Red LED’s.
• The positive + 9 volt terminal against the RED LED
contact point and the negative – 9 volt terminal
against the Blue LED.
• Enter the Master Code.
• The motor will withdraw the locking pin allowing the lock to be
opened.
• Remove batteries as instructed on Page 15.
Programming and Coding
To program, the lock must be in the open position with the # button
visible. Every program command must commence by pressing the #
button, followed by the default master lock code.
To change the master code:
#[Master Code] *01 *[New Master Code] *[New MasterCode] **
To change the User code:
#[Master Code] *02 *[New User Code] *[New User Code] **
Note: All User Codes are 4 digits long
ST7 Standard Workstation Quick Resource Guide 15

ST7 Standard Workstation Quick Resource Guide 16
13. USING THE ENHANCED ELECTRONIC KEYPAD LOCK
(for optional electronic locking double drawers)
General Operating Instructions
The default master lock code is 0009. Once a numeric key is pressed, the
blue Status LED will light. The user will then enter the remaining 3 digits
of their code. If the access code is accepted, the blue Status LED will blink
andthedoorlatchwillbereleasedforthetimeperiodspecied.
If the code is not accepted, the red Status LED will blink. If a mistake is
madeduringthecodeentry,the“*” key can be used to clear previous
key strokes and start over. This will also turn off the blue Status LED.
Once a key is pressed, the keypad will wait 30 seconds for the next input.
If thirty seconds elapse with no input, the keypad will clear previous key
strokes, shut off the blue Status LED, blink the red Status LED and return to
sleep mode.
Program Door Release Time
The length of time the latch(es) are released can be programmed from 1
second to 100 minutes. To change from the default of ten seconds:
• Pressthe“*” key, then enter the 4 digit supervisor code followed by
the“*” key. The blue Status LED will light.
• Pressthe“6”key,followedbythe“*” key.
• Enter the desired amount of time in the format ‘MMSS’ where MM is
the number of minutes and SS is the number of seconds.
TheblueStatusLEDwillashindicatingprogrammingiscomplete.Ifan
invalidkeyispressed(“*”,“Lock”),theredStatusLEDwillash.

ST7 Standard Workstation Quick Resource Guide 17
Programming the Keypad
Allprogrammingfunctionsareinitiatedbyenteringthe“*” key, then the
defaultcode,followedbythe“*” key. Next, the programming code is
entered. See table below for programming codes.
CODE DESCRIPTION
0 Restore Default Settings
1 Erase all User Access Codes - Output 1
2 Erase all User Access Codes - Output 2
3RemoveaSpecicUserCode
4 Add User Access Code - Output 1
5 Add User Access Code - Output 2
6 Program Door Release Time
7 Program New Default Code
Keypad Key
1. Blue Status LED - indicates accepted
command or controller waiting for input
2. Red Status LED - indicates incorrect input
or time-out
3. “Lock”Key-re-locksdoorsduring
access time
4. “Clear”Key-clearspreviouskeystrokes

14. POWER SYSTEM
The ST7 Flex Workstation is powered by the Continuum Power System
from Futura Mobility. The Continuum Power System is a propriatary power
system utilizing lithium iron phosphate (LiFePO4) technology.
Caution: End users who use non-approved medical computers
and monitors when in the vicinity of a patient will void
the conformity of this product
If the power system was purchased with the cart, the battery outputs come
pre-programmed from the factory. The Continuum Power System has three
(3) outputs capable of providing 5-24 volts DC. We recommended that
you make sure the outputs are set to the correct DC voltage for the com-
puter and auxiliary devices that will be plugged into the Continuum Power
System. If the power system is not pre-programmed, the outputs are turned
offandtheyneedtobeconguredproperlybeforeattachingequipmentto
the Continuum Power System. The Continuum Power System Quick Re-
source Guide is included in the battery packaging. If the guide has been
misplaced, please contact Technical Support for an electronic copy.
Note: Failure to follow the directions can cause damage to the attached
computer, auxiliary devices and Continuum Power System. Futura Mobility
is not responsible for device damage as a result of improper programming
or connection of the device to the Continuum Power System. For best
performance, do not let the Continuum Power System completely
discharge. When the battery runs down, always charge it immediately.
The Continuum Power System should be charged once a month during
storage.Batteriesshouldbestoredwiththepowerswitchinthe“off”
position.ForContinuumPowerSystemcongurationorbatteryremoval/
replacement, please consult the Continuum Power System Quick Reference
Guide.
ST7 Standard Workstation Quick Resource Guide 18

ST7 Standard Workstation Quick Resource Guide 19
ST7 Standard Workstation Quick Resource Guide 20
15. MOBILEFORCE FLEET MANAGEMENT
Futura Mobility offers our MobileForce Fleet Management software to
enable you to monitor power levels in mobile carts deployed across your
hospital at an enterprise level. The tool can also be used to track sched-
uled maintenance and warranty status, as well provide comprehensive
and customized reporting. For more information on MobileForce Fleet
Management, or to request access to our live web-based demo, visit
www.futuramobility.com/eetmanager.
Client Software Features:
• Intelligent user interface provides real-time
data on key metrics including estimated run
time, remaining charge percentage and
temperature
• Detail status screen provides battery
information including charge state, voltage
andconrmcommunicationswithconsole
• Customizableusersettingsfornotications
• Password protected administrator settings
Console Software Features:
• Main dashboard provides average power
usage and projected end-of-life to measure
ROI and budget for new product needs
• Easily identify missing assets by serial
number and assigned locations
• Battery temperature monitoring ensures
safety compliance
• Ability to schedule maintenance and
monitor warranty status
• Send messages and alerts to assets and users
Table of contents