FXTUL M3 User manual

USER MANUAL
MOTORCYCLE
DIAGNOSTIC TOOL
摩托車故障诊断仪 M3


1
TABLE OF CONTENTS
Product Overview.............................................................. 2
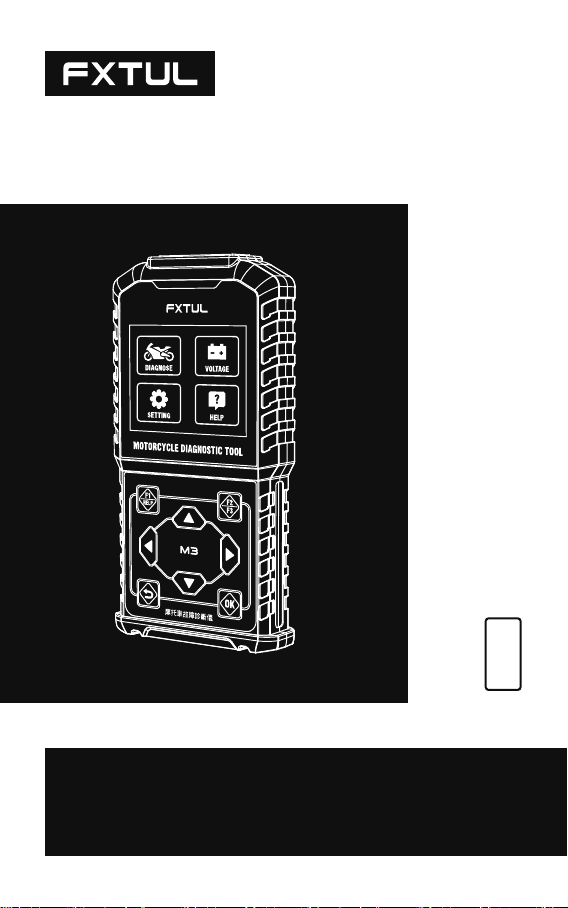
Product Picture ................................................................. 2
Functions....................................................................... 2
Button instructions ...................................................... 2
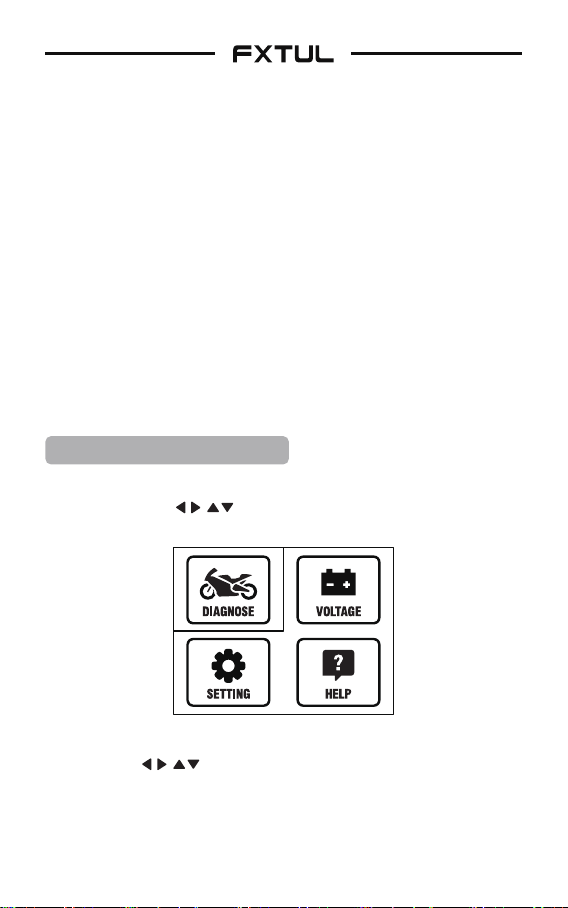
Diagnose............................................................................. 2
System diagnosis features......................................... 2
Functions....................................................................... 3
Operation Guideline.......................................................... 3
Brand model selection ................................................ 3
Mode selection............................................................. 3
Quick test...................................................................... 4
Single system diagnosis ............................................. 5
Module information ..................................................... 6
Read fault code............................................................ 6
Clear fault code ........................................................... 7
Real-time data stream ............................................... 7
Read freeze frame data.............................................. 8
Actuation test ............................................................... 8
Voltage detection......................................................... 9
Settings.......................................................................... 9
Help ............................................................................... 10
About Software Upgrades.............................................. 11
Warranty ............................................................................ 11

FXTUL M3 is a handheld motorcycle diagnostic tool for
mainstream motorcycle brands and can help technicians
diagnose problems faster and make repairs. This tool has
functions such as voltage detection, multi-language selec-
tion, and unit switching. It has a clear interface and is easy
to operate. It is a good helper for motorcycle maintenance.
System Diagnosis Features
2
PRODUCT OVERVIEW
PRODUCT PICTURE
DIAGNOSE
1 2
3 4
Supports scanning, identification and code reading of
all systems of the current model, and reports the
assembly status of all systems and whether there are
fault codes for each system.
Support to browse the assembly status and fault code
●Short press to select [F1]
●Long press to select [HELP]
●Short press to select [F2]
●Long press to select [F3]
●[ ] Left/Right/Up/Down
●[ ] Back
●[OK] Confirm
Functions:
1. Diagnose
Button Instructions:
2. Voltage
Detection
3. Settings 4. Help
●
●

Functions
3
OPERATION GUIDELINE
description of all systems of the vehicle model.
Support one-click code clearing of all systems.
Display data stream with oscillogram.
●
●
●
●
●
●
●
●
●
●
Support engine / ABS / Tire pressure / Anti-theft and
other systems
Read system information
Read fault code
Clear fault code
Read data stream
Read freeze frame data
Actuator test
Service function (including idle speed regulation /
throttle position learning, etc.)
Brand Model Selection
Press the [ ] key to select the diagnostic icon,
and press the [OK] key to select the model brand.
●
Mode Selection
Press [ ] to select the vehicle brand, and press
[OK] to enter the diagnosis mode selection. There are
●

4
OBD-II SUZUKI
EUROV
VESPA
Diagnose
Control Unit
1/2
Quick Test
Quick Test
F1-[Repo]
6/6
F2-[Quick] F3-[Pause]
[ECM](Engine Control Module)
[ABS](Anti-lock Brake System)
[BODY](Body Computer)
[IP](Instrument Cluster)
[IMMO](Immobilizer)
Pass
Fault I (2)
Pass
Fault I (6)
Scanning
(71%)
Quick Test
[Quick Test] is to automatically scan the assembly
status of all systems of the vehicle model and read the
fault codes. During the system scanning process, you
can press and hold [F3] to pause the scanning (the
screen is shown below).
●
two options: [Quick Test] and [Control Unit] (the screen
is shown below).

5
[F1] - [Report]
Repo
F1-[Esc]
1/34
[ABS](Anti-lock Brake System)
480860
None
This fault code is set when the voltage
present at the control unit is <9.2V
480862
Fault I (2)
Diagnose
Actuation Test
1/7
Modult Information
Read Fault Code
Clear Fault Code
Live Data Stream
Read Freeze Data
Single System Diagnosis
Customers independently choose the functions to be
performed (the screen is shown below).
●
●Display the assembly status of the system, explain
whether there is a fault code, and expand the fault
code description (the screen is shown below).
[F2] - One-click code clearing
●For systems that have been assembled and have fault
codes, all codes shall be cleared and the fault codes
shall be read again.

6
Module Information
F1-[Esc]
1/3
Calibration ID number
Calibration ID
VIN
00000096
ZSEFI_01
CGJFZS150ZH
_19D_1
Diagnose 7/7
Seice / Maintenance
Read Fault Code 1/2
Read Fault Code (CURRENT)
Read Fault Code (PENDING)
Module Information
[Module Information] will display system information,
such as production date, serial number and other
information (the screen is shown below).
●
●(Note: manual selection of [Current / Pending] is not
Read Fault Code
[Read Fault Code] (the screen is shown below).
●

7
Read Fault Code
F1-[Help]
1/8
F3-[Freeze]
Code:P0122
State:None
Throttle Position ( Sensor A) Circuit Low
lnput
Operator Message
F1-[OK] F3-[Cancel]
Fault code and freeze information will be
erased. Are you sure to continue?
●
required for some vehicles.)
Press the [ ] button to select one of them, press
the [OK] key to view the fault code information in the
system, (the screen is shown below).
●Press the [ ] key to switch the fault codes.
Clear Fault Code
[Clear Fault Code], the screen will show the relevant
prompts for code clearing (the screen is shown below).
●
Press [F1] to perform code clearing.
●
Real-time Data Stream
Press the [ ] key to select [Real-time Data Stream]
to enter the data stream selection interface. You can
press [F1] to select all or press the [OK] key to select
the specified data stream (the screen is shown below).
●

8
Live Data Stream
F1-[All]
1/7
F3-[Done]
Engine speed
Engine temperature
lgnition timing advance (cylinder 1)
Intake air temperature
Manifold pressure (absolute)
Read Freeze Data
F1-[Esc]
1/4
Engine speed
Engine temperature
Fault code
Intake air temperature
0.00
80
P0122
25
rpm
deg C
deg C
Actuation Test
Fuel lnjector 1 test
1/17
Coolant temperature warning light
Electronic fuel pump
Engine warning light
Exhaust ap seomotor
Fan
Read Freeze Frame Data
Press the [ ] key to select [Read Freeze Frame
Data] to read the freeze frame information (the screen
is shown below).
●
Actuation Test
Press the [ ] key to select [Actuation Test] (the
screen is shown below).
●

9
Staing test(Batte)
F1-WAVE
1/1
Current Voltage 12.05 V
Current Voltage
Max 12.08 V 12.05 V
Min 11.99 V
Voltage Detection
Press the [ ] key in the main menu to select
[Voltage Detection], and the OBD battery voltage can
be detected in real time (the screen is shown below).
●
After selecting the desired function, operate according
to the prompts.
●
Press [F1] to enter the waveform display (the screen is
shown below).
●
Settings
Press the [ ] key to select the [Settings] icon,
press the [OK] key, there are three functions: voice
switch, unit switch, and language selection (the screen
is shown below).
●

Setting 1/3
Voice
Unit
Language
10
Voice Settings
Press the [ ] key to select [Voice], press the [OK]
key to turn on or off the voice.
●
Unit Settings
Press the [ ] key to select [Unit], press [OK] to
select metric / imperial units switch.
●
Language Settings
Press the [ ] key to select [Language], press the
[OK] key to select the language of different countries.
●
Help
Press the [ ] key to select the [Help] icon, press
the [OK] key to view the current system version and
software package version.
●

11
ABOUT SOFTWARE UPGRADES
Connect the device to the computer and wait for the
device to be recognized by the computer. After the
recognition is successful, a new drive symbol will
appear on the computer. Open this and replace the
“DIAGNOSE" folder in the drive with the downloaded
“DIAGNOSE" upgrade folder, and then power on again.
The updated files can be obtained by contacting the
customer service or the official website.
●
WARRANTY
Thank you for choosing our products, we will provide you with
the following services and commitments:
repair fee.
Please contact the manufacturer after failure, we will
give you the most perfect service in the shortest time.
●The warranty period of this product is 3years.
●After the warranty expires, replacing parts will incur a
●
The following items are not covered by the warranty:
The wearing parts are not covered by the warranty.
Products purchased through informal channels.
Damage caused by use and maintenance not in accor-
dance with the product manual.
●
●
●

12
目 录
产品概述............................................................................. 13
产品主图............................................................................. 13
主界面功能显示............................................................ 13
按键说明 ....................................................................... 13
诊断 .................................................................................... 13
车型系统诊断特点 ........................................................ 13
诊断支持的功能............................................................ 14
诊断操作指引 ..................................................................... 14
品牌车型选择................................................................ 14
诊断模式选择................................................................ 14
快速测试 ....................................................................... 15
单系统诊断 ................................................................... 16
模块信息 ....................................................................... 17
读取故障码 ................................................................... 17
清除故障码 ................................................................... 18
实时数据流 ................................................................... 18
读取冻结帧 ................................................................... 19
动作测试 ....................................................................... 19
电压检测 ....................................................................... 20
设置............................................................................... 20
帮助............................................................................... 21
关于软件升级 ..................................................................... 22
售后保修............................................................................. 22

FXTUL M3 是一款手持式摩托车诊断工具,它具有适用于主要摩
托车品牌的诊断功能,可以帮助技术人员更快地诊断问题并进行
维修。该工具具有电压检测、多语言选择、单位切换等功能,界面
清 晰 、操 作 简 单 ,是 摩 托 车 维 修 的 好 帮 手 。
车型系统诊断特点
13
产品概述
产品主图
诊断
1 2
3 4
支持当前车型全系统扫描识别并读 码 ,报 告 车 型 全 系 统 装 配
状态及各系统是否存在故障码。
支持浏览车型全系统装配状态及故障码描述。
支持全系统一键清码。
数据流波形图显示。
●[F1]键选择短按
●[HELP]键选择长按
●[F2]键选择短按
●[F3]键选择长按
●[ ]向左/向右/向上/向下键
●[ ]返回键
●[OK]确认键
主界面功能显示:
1. 诊断
按键说明:
2. 电压检测
3. 设置 4. 帮助
●
●
●
●

14
诊断支持的功能
支持发动机 / ABS / 胎压 / 防盗等系统;
单系统下支持:
读取系统信息;
读取故障码;
清除故障码;
读取数据流;
读取冻结帧;
执行器测试;
服务功能(含怠速调节 / 节气门位置学习等)。
●
●
品牌车型选择
诊断操作指引
主菜单按[ ]键选中诊断图标,按[OK]键进入选择车型
品牌。
●
诊断模式选择
按[ ]选择车辆品牌,按[OK]键进入诊断模式选择,
有[快速测试]和[控制单元]两个选项 (屏幕显示如下)。
●

15
快速测试
[快速测试]是自动扫描车型全部系统的装配状态并读取故
障码,在系统扫描过程中可以长按[F3]暂停扫描(屏幕显示
如下)。
●
OBD-II SUZUKI
国四电喷
VESPA
[F1]键 - [报告]
展示系统装配状态,说明是否存在故障码以及展开故障码
描述(屏幕显示如下)。
●
诊断
控制单元
1/2
快速测试
快速测试
F1-[报告]
5/5
F2-[快速清除] F3-[暂停]
[ECM] 发动机
[ABS] 防抱死
[BODY] 车身
[IP] 仪表
[IMMO] 防盗
通过
故障 I (2)
通过
故障 I (5)
正在扫描...
(71%)

16
[F2]键 - 一键清码
已装配并且存在故障码的系统全部执行清码,并且重新读取
故障码。
●
单系统诊断
用户自主选择需要执行的功能(屏幕显示如下)。
●
报告
F1-[Esc]
1/31
[ABS] 防抱死
480860
无
当控制单元上的电压 <9.2V 时设置此故障代码
480862
故障 I (2)
诊断
动作测试
1/7
模块信息
读取故障码
清除故障码
实时数据流
读取冻结帧
诊断 7/7
服务/维护

模块信息
F1-[Esc]
1/3
校准ID号
校准ID
VIN
00000096
ZSEFI_01
CGJFZS150ZH
_19D_1
17
模块信息
[模块信息],将展示系统信息,如 生 产 日 期 、序 列 号 等 信 息 (
屏幕显示如下)。
●
读取故障码
[读取故障码](屏幕显示如下)。
●
(备注:在某些车辆中不需要手动选择[当前 / 历史]。)
按[ ]键选择 其 中 一 项 ,按 [OK]键 ,查 看 系 统 中 故 障 码 信
息(屏幕显示如下)。
●
●
读取故障码 1/2
读取故障代码 (当前)
读取故障代码 (待定)

读取故障码
F1-[帮助]
1/8
F3-[冻结]
代码:P0122
状态:无
节气门位置 ( 传感器 A) 电路低输入
操作员消息
F1-[OK] F3-[取消]
故障代码和冻结信息将被清除,确定要继续吗?
18
点击[ ]键可以进行故障码的切换显示。
●
清除故障码
[清除故障码],屏幕显示清码的相关提示(屏幕显示如下)。
●
实时数据流
按[ ]键选择[实时数据流]将进入数据流选择界面,可按
[F1]键全选或按[OK]键选择指定的数据流(屏幕显示如下)
●
按[F1]键进行清除故障码。
●
。
Table of contents