Fytech KRS-505 User manual

Battery Powered Rivet Gun
Special for Aluminium Car Body
KRS-505 Kit
Instruction Manual

01
Content
1.Safety Precautions
2.
3.
3.1 Introduction
3.2
3.3
Symbols and Definitions
Introduction and Specifications
Technical Data
Applications and Features
5.
6.
Self-piercing riveting kit for using in riveting, pressing out ,punching and shaping
Hole punching riveting kit for using in riveting,pressing out,punching and shaping
7
9
10.
11.
.Installation
8.
.Shaping of the rivet head
Pressing out rivets and accessory kit instructions
Punching and shaping(new and old metal components)
Charging, cleaning and maintaining the battery
02
03
04
04
05
05-06
07
08
09
10
11
12
13
4.Warnings and Important Notices
05

02
Warning: he
following basic safety precautions must be paid attention to before using
the battery powered rivet gun:
1. Workplace
A. Keep the workplace clean and bright. Accidents may happen at chaotic
and dark workplace.
B. Do not use or store this equipment in environment with strong acidic,
strong alkali, other corrosive liquid and gas or high temperature in case of
equipment corrosion and components aging.
C. Do not charge or use this equipment in environment with flammable
and explosive liquid, gas or dust.
2. Electrical Appliance Safety
A. The power plug of the charger must match the socket. The plug must
not be modified.
B. Do not expose the charger, the battery and the equipment in moist
environment.
C. Do not abuse the power cable like using it to drag the charger or pull
out the plug.
D. Once the charger suffers severe impact or other damage, hand it over
to professional maintenance personnel.
E. Do not charge the battery when the temperature is under 10°C or
above 40°C. Do not cover the charger and the battery ventilation holes
during charging.
F. Unplug the charger plug in thunderstorm and lightning weather.
G. Do not short-circuit or burn the battery in case of explosion.
3. Personnel Safety
A. Keep awake when using this equipment. Do not use it when tired, after
taking medicine or after drinking.
B. Do not use this equipment by brute force. Do not start and stop
unconsciously.
C. Do not put fingers between the two die heads during operation to avoid
injury.
D. Keep the equipment out of the reach of children and unprofessional
personnel.
To avoid accidents like fire, electric shock or injury, t
1.Safety Precautions

03
2.Symbols and Definitions
Release Button: Automatically release pressure. The piston will return
to its original position when the pressure reaches maximum value.
Temperature Sensor: The unit produces heat after long running period.
If the temperature exceeds 60°C, the output will be stopped
automatically. Wait about 30 minutes for unit to cool.
Alert Signal: A short beep sound and flashing red LED occur when the
unit is connected to battery, is running out of power or has an error in
riveting process.
Rotatable Arm: The arm can rotate 360° that makes it possible to rivet
the most difficult applications.
LED Lighting: After pressing the trigger, the LED lamp will be lighted
for 10 seconds to brighten your operational area.
Microprocessor Control: Always provide correct hydraulic pressure with
double protection during riveting process. After riveting, the piston will
move forward slowly.
Compact Structure and Ergonomically Designed: The removable handle
can be moved to either side of the rivet gun, lower center of gravity for
easily balance.
Manual Reset: If there is something wrong during riveting process, the
piston can be returned to its original position by pressing the Reset
button.
Lithium-ion Battery: Use high performance lithium-ion battery offering
a powerful electrical source without memory effect. With ultra-low
power consumption design, this battery offers up to 6 months standby
time. Equipped with discharge protection to extend battery life.
Double Acting Hydraulic: A powerful pushing force ensures a fast
forward motion for the piston during low riveting pressure. The piston
returns to its original position and the motor stops running
automatically when the pressure cycle is complete.

16
4
2
3
5
A
F
n u t
I
H
G
B
C
D
E
7
8
9
10
12
11
04
3.Introduction and Specifications
1. Die heads box
2. Charger
3. Wrenches
4. Charger plug
5. Arm handle
6. Rivet gun
7. U-arm
8. Die head slot
9. Indicator
10. Reset button
11. Start button
12. Battery
Die heads box
3.1 Introduction

05
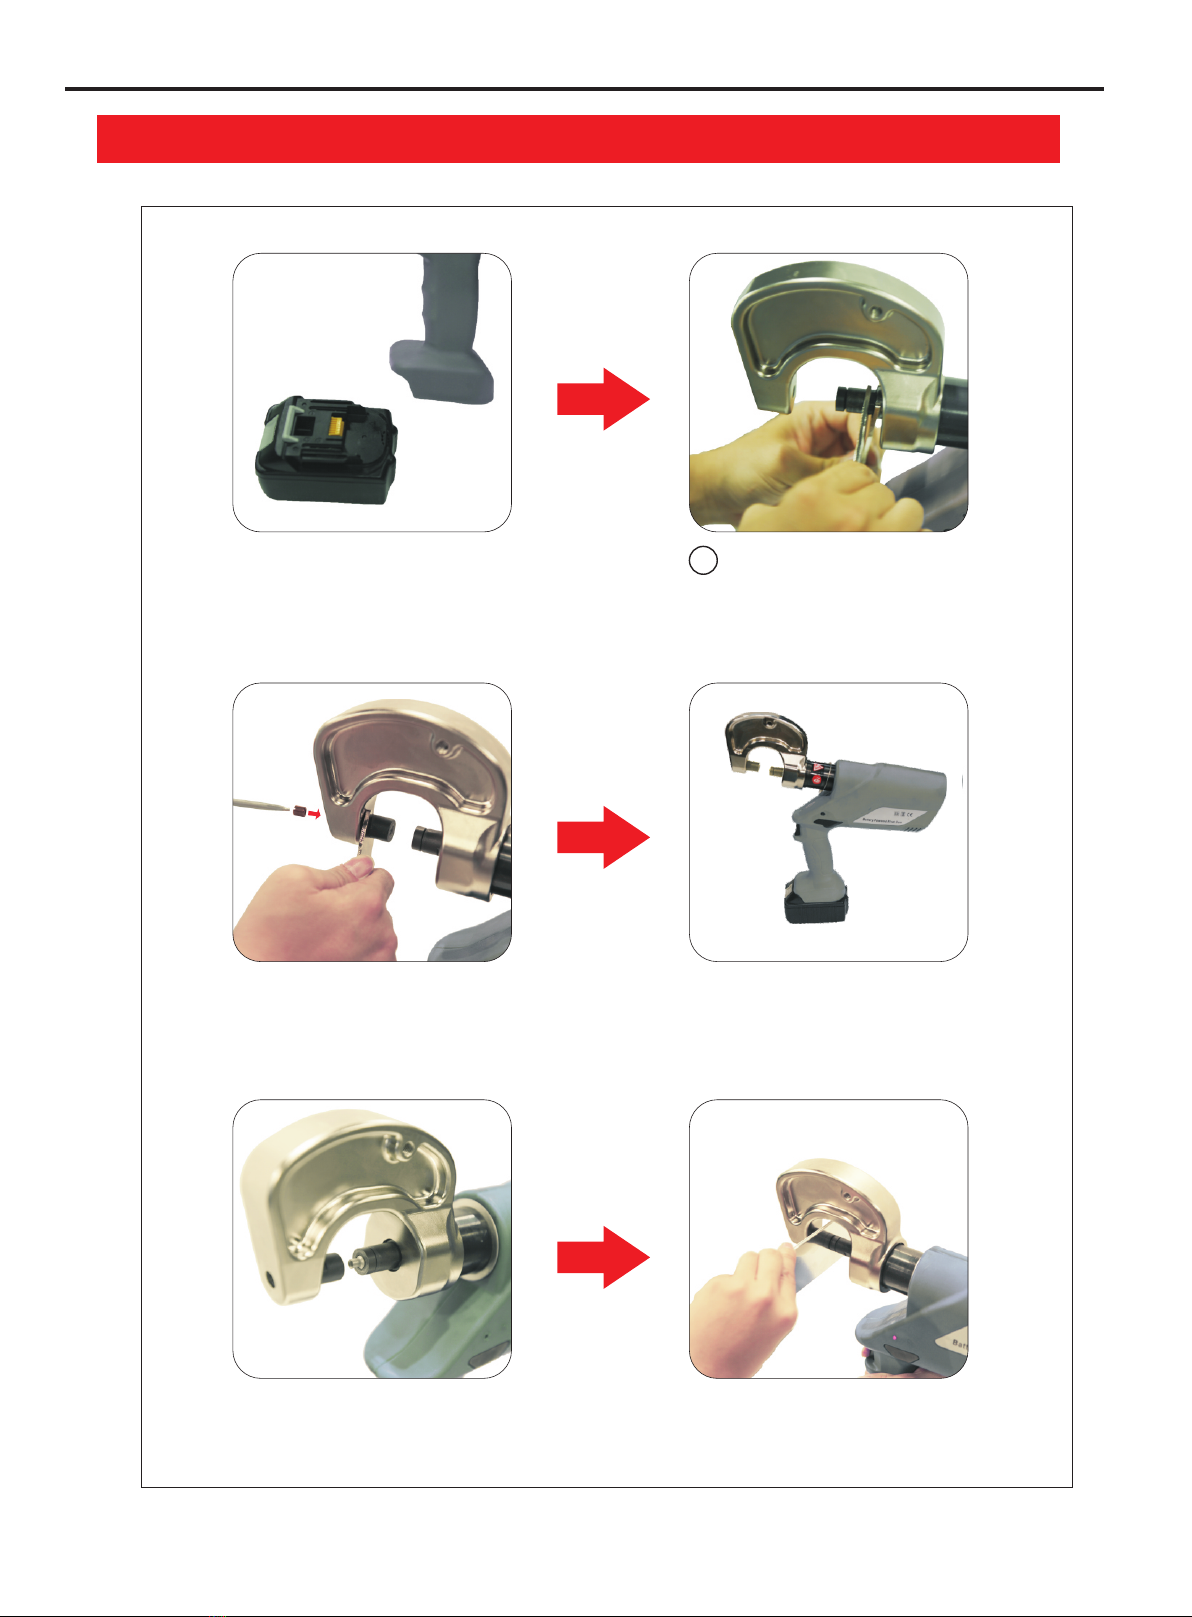
Before using the equipment, check the
conditionof the tool for any damage, for
example oil leakage or loosen components.
Such damage could cause severe physical injuries during use.
保证产品的 安 全,不要随意乱扔 或 防止
高处掉落。 不 要用于操作说明书 上 注明
以外的其他 用 途。不要交给未经 培 训的
人员操作本 产 品。
4.Warnings and Important Notices
Press capacity max
Input voltage
Battery Capacity
Stroke
Ambient temperature
Safety Requirement
Main machine weight
60 kN
220V
3.0Ah
33mm
5-50 C°/ 41 122°F-
Safety glasses,Face Shield
3.0kg
3.2 Technical Data
6.
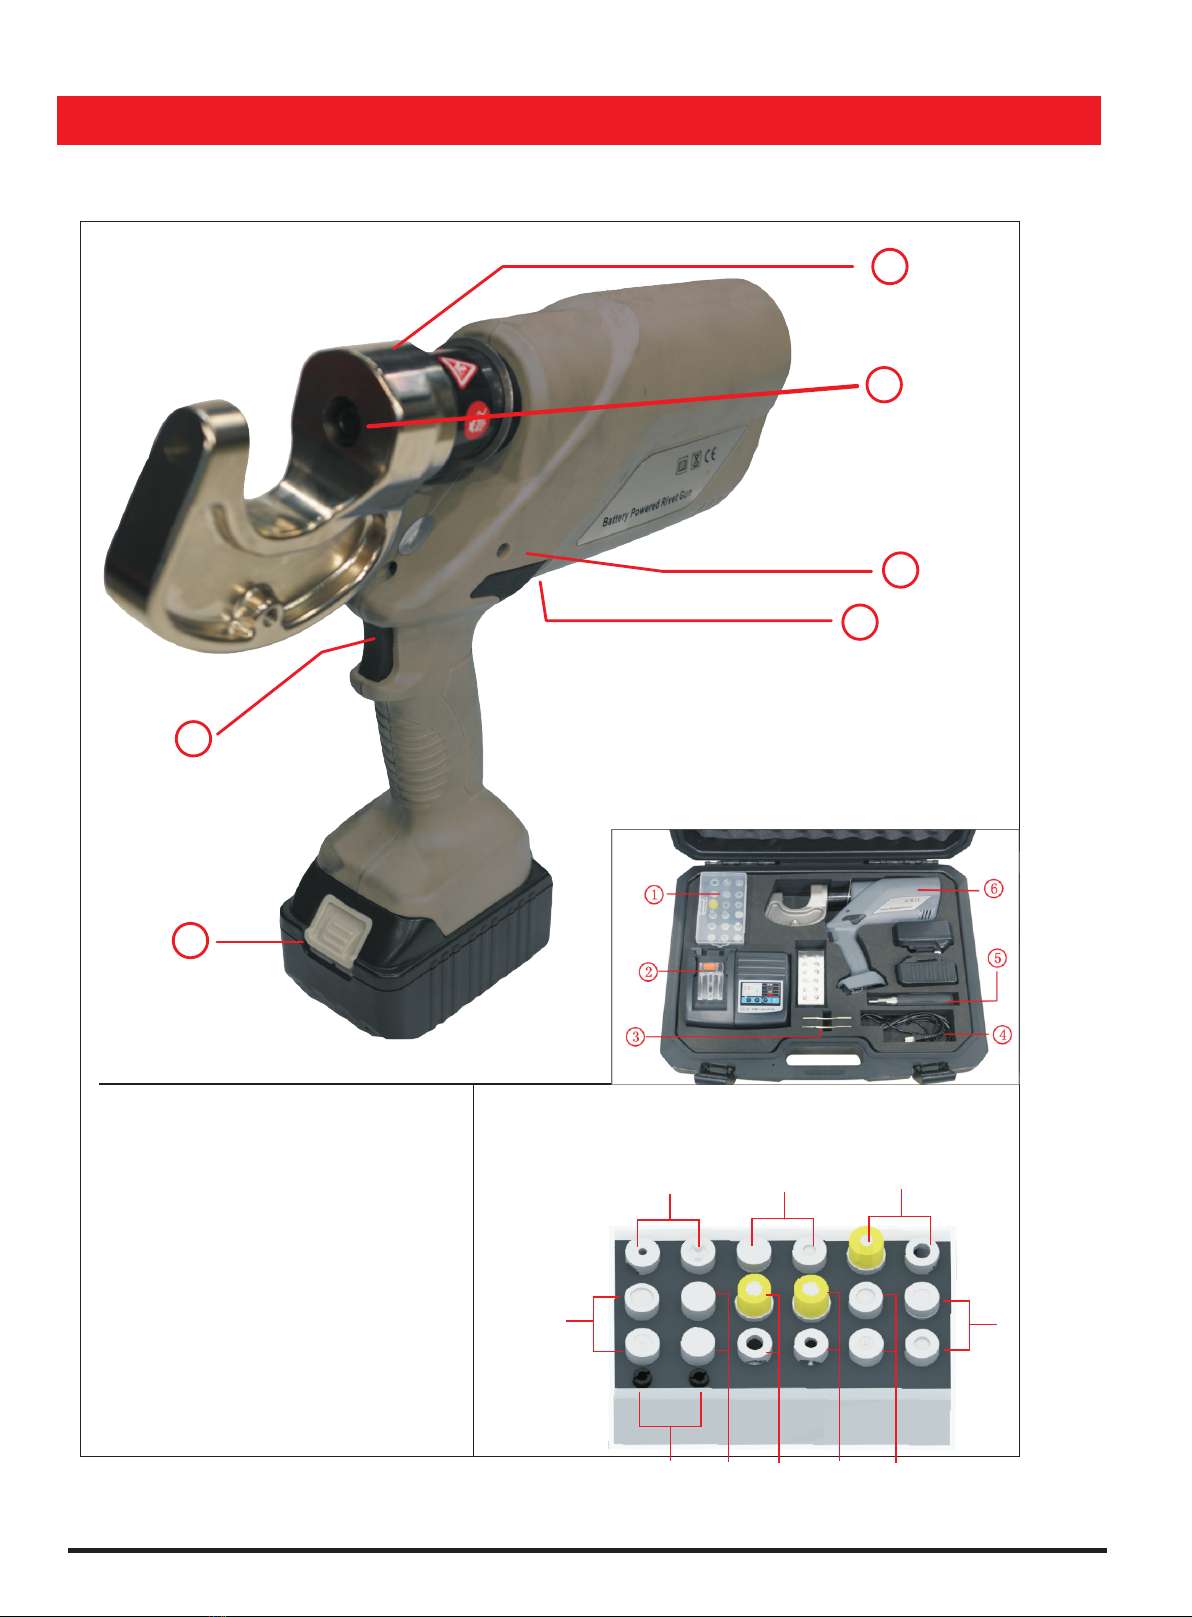
7.Motor stops quickly, ensuring high security for user.
8.Starts quickly and die heads are 180° rotatable.
9.The safety valve can automatically or manually resewhen it reaches a certain pressure.
10.Alerts to recharge when the battery is running low.
Piston with infinitely variable speeds.
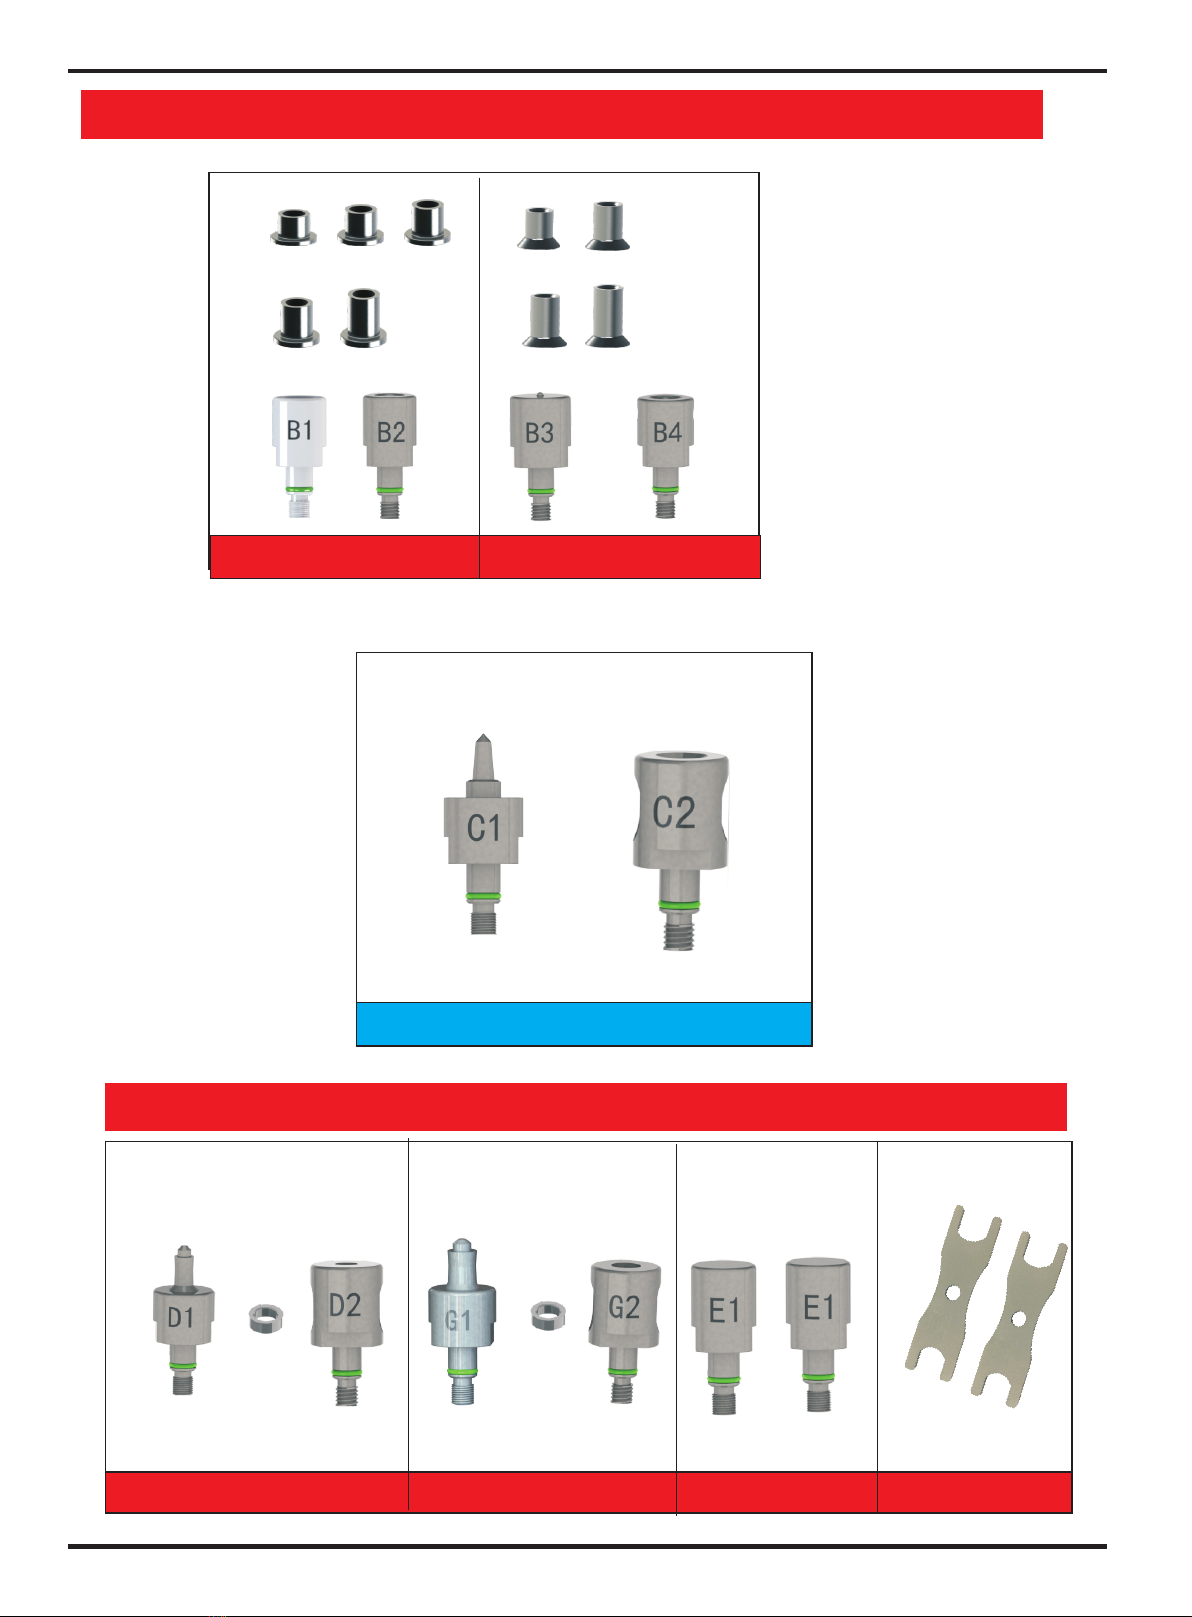
1.Available for removing rivets.
2.Available for sheet shaping and flattening.
3.Available for self-piercing riveting
4.Available for semi-tubular riveting.
5.Available for piercing.
3.3 & FeaturesApplications
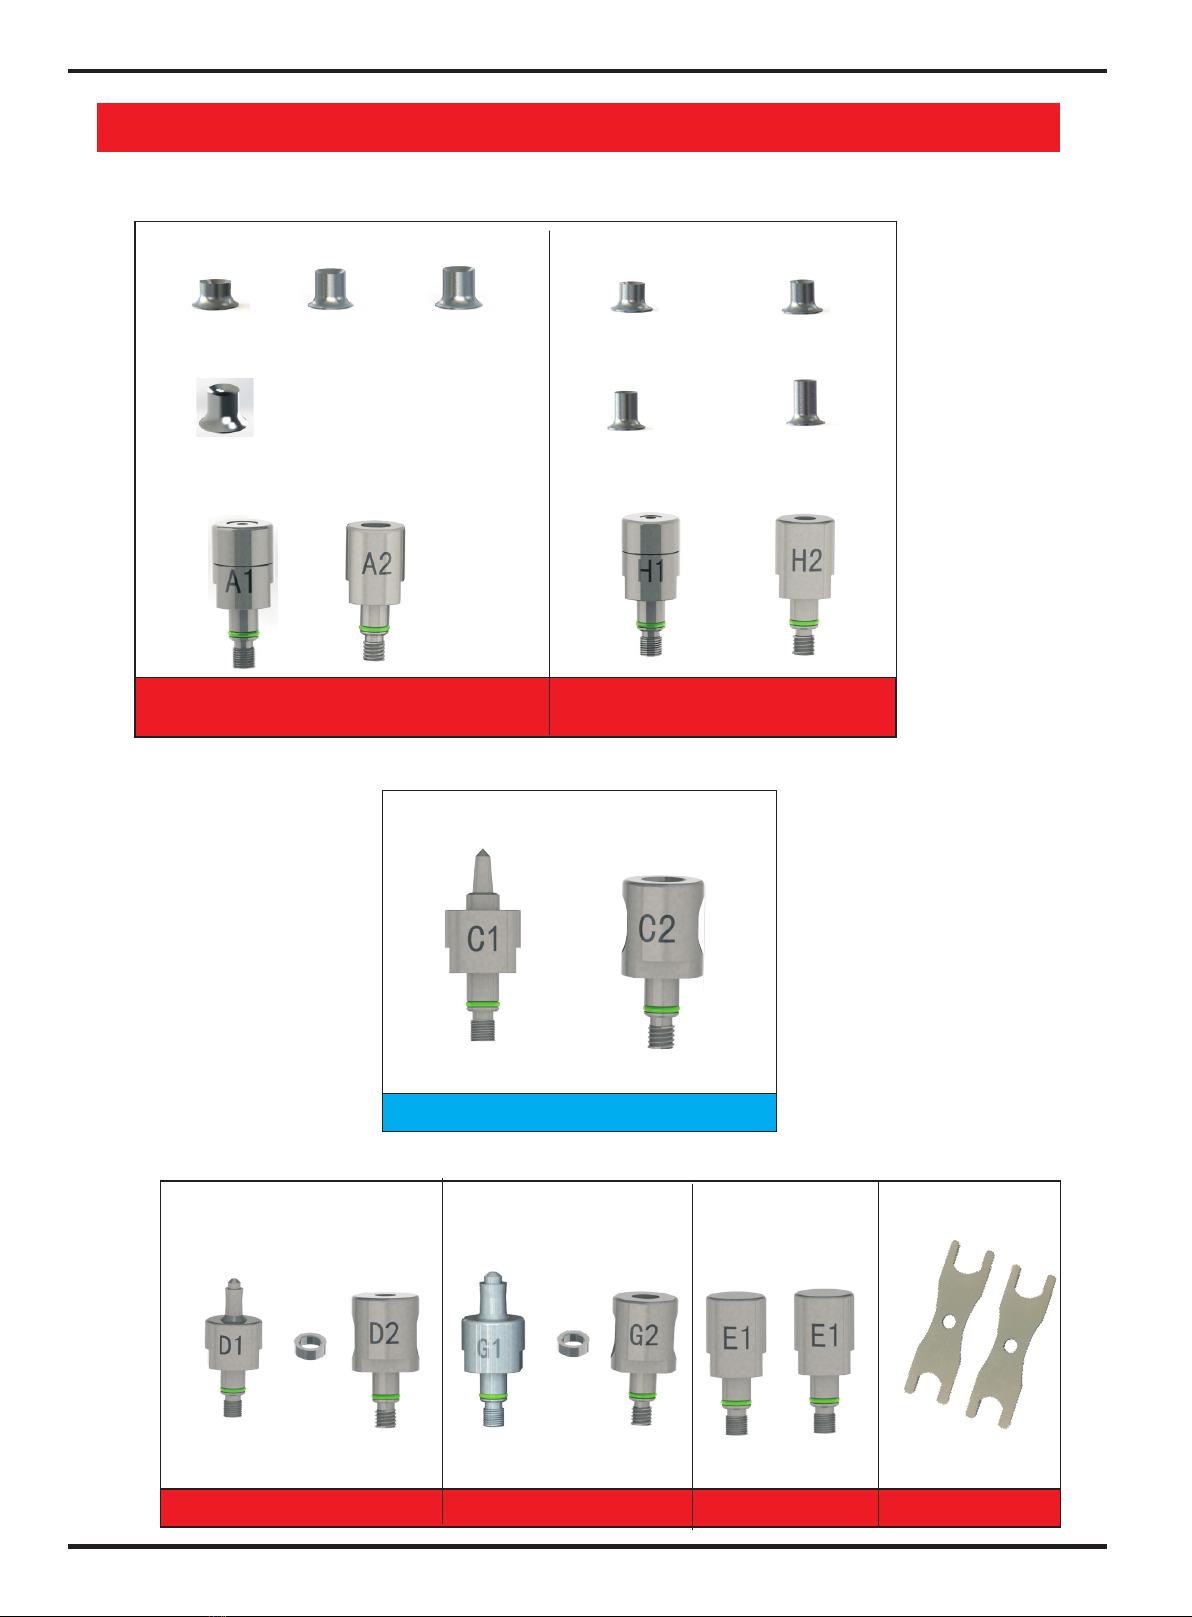
Use only manufacturer's suggested replacement parts and
consumablesThe warranty shall not apply to equipment
which has been used for operation outside of the
specifications for the equipment,such as using the
equipment with other consumables oraccessories that
are not supplied by the manufacturer.There is a risk of
damage to the equipment and to the safety of users.
Using non-genuine accessories/consumables
Use only original accessories/consumables.
is a safety hazard.
Do not throw the tool or allow it to fall.
Never misuse the tool or let it to
untrained personnel.
The tool must only be used in temperature
5C(41F) and 50C(122F).
The tool must never be used in
potentially explosive areas.

06
Only trained personnel should use this equipment
Make sure to read the instruction manual before operating the equipment.
Observe the applicable national regulations for accident prevention.
operated or misused,causing a severe physical injury.
Wear face shield and protective gloves when operating the equipment.
The metallic parts can fly off with high pressure if the equipment is improperly
parts made by other manufacturers.
The manufacturer has no liability for damage or injury
caused by improper service or the use of replacement

07
NO.666201
Tool sets for pressing out old rivets
Tool sets for punching and riveting
Tool sets for punching, riveting and shaping
A1+A2 H1+H2
G1 G28mm刀 E1+E1 6011
C1+C2
D1 D26mm刀
NO.666202
NO.666203 NO.666204
NO.666206 NO.666207 NO.666208
NO.666209
5.Self-piercing riveting kit for using in riveting, pressing out ,punching and shaping

08
S0 S1 S2
S3 S4
CS1 CS2
CS3 CS4
6.Hole punching riveting kit for using in riveting, pressing out ,punching and shaping
Tool sets for pressing out old rivets
Tool sets for hole punching riveting
Tool sets for hole punching and shaping
B1+B2 B3+B4
C1+C2
G1 G28mm blanking bits E1+E1 6011
D1 D26mm blanking bits
The rivets must have a distance 3-4mm to ensure the quality of riveting.

7.Installation
1.The indicator lights after
inserting the battery into the
base of the equipment; if
not, it runs out of battery.
2. Choose required die head
and install it into the slog.
Use wrench to tighten up.
2
3. Install the front die head
and tighten it up by wrench.
4. Installation is finished.
5. Put on the rivets. 6. Start operation.
09

10
8.Pressing out rivets and accessory kit instructions
3 extension C-arms are available in the tool box for riveting.
C5735 Maximum depth 35mm
C80120 Maximum depth 120mm
C130/230 Maximum depth 230mm
5-1-a
5-1-b
When repairing body panel,old or defective rivets often need to
be removed from the metal structure.
Instead of drilling out the old rivets,they can be pressed out of the sheet metal
structure using the accessories C1+C2,thereby minimizing damage to the sheet metal.
5.1.1 Pressing out rivet
Pressing out kit C1 and C2 mounted on
C-arm C 5735
5-1-1-a
5-1-1-b
5-1-1-c
5-1-1-d
Press and hold trigger until the old
rivet is pressed out
Position C1 on the old rivet
The old rivet was completely
pressed out

11
9.Shaping of the rivet head
Tool kit E1+E1
5-2-a5-2-b
5-2-c
5-2-d
5-2-e
5-2-f
Install the kit as shown above Position the shaping kit on the rivet head
Apply shaping.
The defective metal component can be removed after the shaping
and the new metal can be replaced.
.

12
10.Punching and shaping(new and old metal components)
SKR 6mm
In order to punch and shape a hole on the new metal combination,remove the calibration
die from the punch stud and install the corresponding blanking bits (Apllicable to old intact
sheet metal or metal to be repaired)
Select the corresponding blanking bits
Check the hydraulic pressure before each use!
Insert the blanking bits on the
punch stud Position blanking bit centred on the old rivet
Pressing out old rivet and making a
new hole at the same time
The blanking bit can be reused several times.
Tp finish the next process FFR Riveting
,see chapter 5.6
5-2-1-b
5-2-1-c
5-2-1-d
5-2-1-e
5-2-1-f
Install the kit-The kit is applicable for punching and shaping a hole (6mm and 8mm) and
thickness less than 8.6mm

13
11.Charging, cleaning and maintaining the battery
5-6-f
1
2
3. Insert into the charger
1. Press the button
2. Pull out the battery
Note:
1. Recharge the battery every 1-2 months when the battery is used only
occasionally. The battery would lose its capacity to store electricity if it is not being
recharged for a long period. The battery should be recharged once it is empty.
2. There is a locator between the arm and oil tank to limit the arm rotation. To
prevent damage to sealing component , the arm should not be swivelled more than
360°.
3. The gun will make a sound alert to let you know its temperature is over
60°C.Please shut off power and wait about 30 mints for unit to cool.
4. The indicator light flashes when the battery run out of power, battery voltage as
low as 13V-15V. Then alarm occurs and the power automatic shuts off. Please
recharge or replace the battery.
5. If the unit has not be used for 4 hours continuously, the power will be
disconnected by microprocessor causing starting failure. Please unplug the battery
from the unit and replug it back.
6. Do not connect the positive terminal and the negative terminal of the battery to
each other with any metal objects (such as wire). It will cause a spark, fire or even
explosion in extreme case.
7. In any case, do not place the battery in fire or heat the battery.
8. Always charge battery in a well-ventilated area. The charger should not be
covered by anything when battery is charging. Doing so may cause a fire.
9. Do not disassemble or modify the battery or charger. All repair service must be
made by qualified personnel or manufacturer. Please contact your local distributors
to receive more information.
Hardened metal debris or residues that have not
been cleared can resultfailure of riveting.
Before starting work,use a new tool component if
there is a contaminated component that cannot be cleaned.
Clean the tool adapters and accessories after
each use with a clean cloth.
Use cleaning solvent such as acetone to
clear all affected tool components.
Table of contents
Popular Tools manuals by other brands

Forney
Forney SPOOL PRO HORNET SG 250 quick start guide

LockTech
LockTech AccuReader X270 instructions

Cooper Tools
Cooper Tools Wire-Wrap 14G1 Operating instruction

BorMann
BorMann BWR5019 quick start guide

Air Creation
Air Creation NuviX 15 Pilot operating handbook

DeWalt
DeWalt DPS8016-XJ Original instructions

Arion Aircraft
Arion Aircraft LS-1 Lightning Pilot operating handbook

SIG
SIG Fokker D-VII Assembly instructions

4PRO
4PRO PET Series Installation, Warnings, and Operation Instructions

Festool
Festool ST Assembly instructions

RIDGID
RIDGID PFMR15025N instruction manual

Toro
Toro TX 1000 installation instructions