Göldo EL900 User manual

PROFESSIONAL
SHIELDING KIT
for guitar and bass
CONTENTS:
2 x self-adhesive copper foil 127 x 180 mm
1 x self-adhesive copper foil 30 x 350 mm
1 x self-adhesive copper foil 12 x 500 mm
2-core shielded high-quality cable, 50 cm
Stranded wire, 23 cm
Bare wire, 23 cm
Insulating tape
Instructions
EL900

Göldo Professional Shielding Kit
Instruments that are not shielded or insufciently shielded are sensitive to interference
such as magnetic interference from mains transformers or stray elds from uorescent
lamps etc.. To protect an instrument against interference, all signal-carrying components
and cables must be surrounded by a shield connected to ground.
Important: Any shielding is only effective if there is a connection to ground!
Required tools:
Soldering iron (approx. 40 W) with ne tip, screwdriver, open-ended or ring spanner for
loosening the nuts of potentiometers, switches and sockets, tweezers or pointed pliers,
wire stripper or sharp knife, scissors, and a soft pad for the instrument.
Required skills:
You should have some practice with a soldering iron, and also basic knowledge of guitar
electronic. Without basic knowledge it is better to have a repair shop, a luthier or other
specialist do this work.
We are not liable for damages that may occur through the installation of the Göldo
Professional Shielding Kit!
In order to retrot a good shielding, it is usually essential to desolder and disassemble
electrical components. In order to reassemble all elements correctly afterwards, it makes
sense to make notes and sketches before disassembly.

Shielding the electronic compartment, cover, pickguard:
First remove the knobs (for knobs with screw fastening, loosen the set screw on the side
rst). Unscrew all nuts and pull potentiometers, switches and jacks out of the holes. Keep
the nuts and washers in a safe place or screw them back onto the threads. Before you
remove the potentiometer/switch group, it is recommended to desolder the pickup con-
nections. Don‘t forget to make notes!
Before applying the foil, remove any paint residue and dust to ensure that the foil is ap-
plied ush and clean. Apply the copper foil pieces 127 x 180 mm on the bottom of the
electronic compartment as well as on the lid - if necessary also on the area of the pickgu-
ard where the controls are located. To do this, either roughly sketch the contours of the
compartment/lid on the foil before removing the protective lm and cut it out with scissors,
or glue the overlapping copper foil to the wall of the electronic compartment.
To ensure secure adhesion, press the foil down rmly. The holes for the potentio-
meters can be pierced easily.
Use the 30 mm copper foil for the wall of the electronic compartment. Usually, this size
corresponds to the height of the wall (cut to size if necessary!). Then connect all foil in
the cavity with some solder points (see drawing). To establish connection with the cover
shield, put short strips of copper foil onto the edge of the compartment and don‘t forget to
solder them (see drawing).
The strips should be clamped between the lid and the electrical compartment‘s rim when
the lid is screwed on.
Routed jack (Strat) or switch (Les Paul) cavities may also be shielded if necessary.
Use the enclosed strand wire for ground connection.
Shielding the pickups
Single-coil pickups: In order to optimize the shielding, the pickup winding must be cove-
red with copper foil. The 12 mm wide copper foil (spool height usually 12 mm) is suitable
for this.
Remove the pickups, carefully pull the bobbin out of the pickup cover or push it out pres-
sing on the magnets from above. If the bobbin is glued to the cover, consult a specialist!

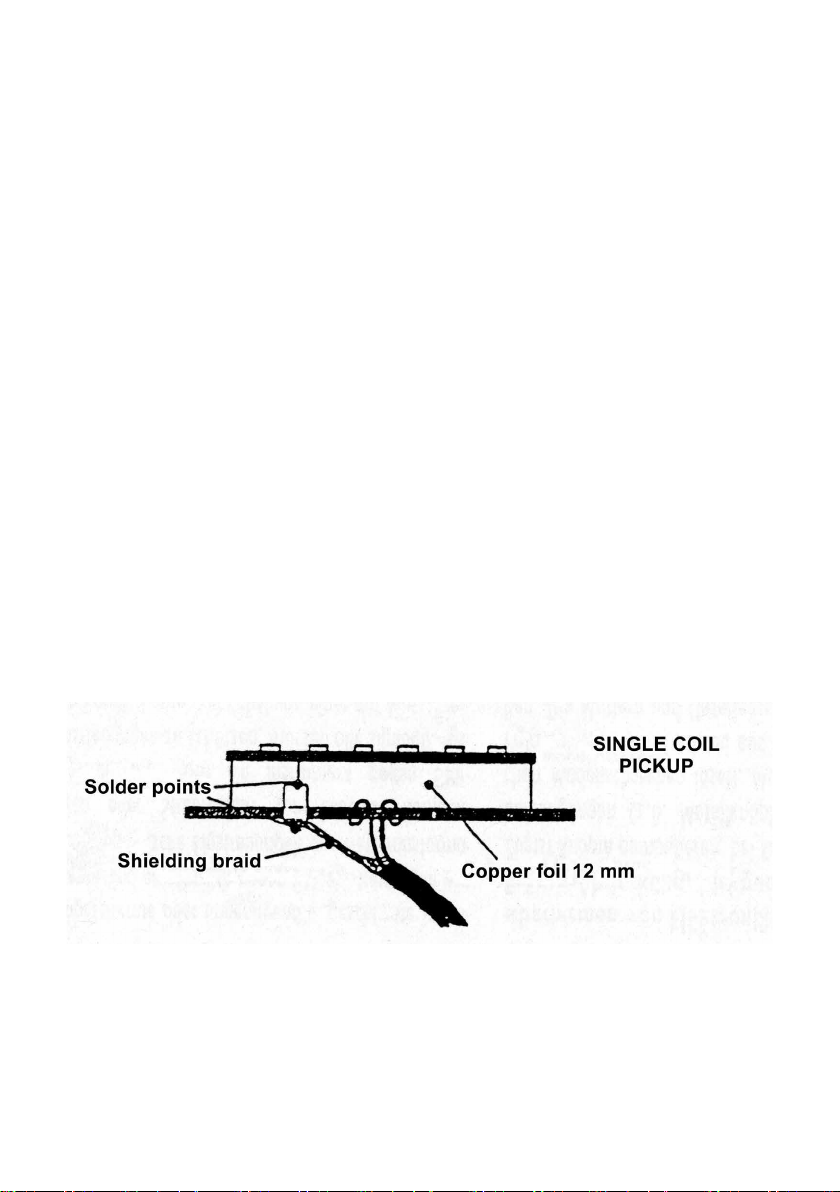
In order to avoid damage to the coils during soldering, an insulating tape strip should be
applied under the subsequent soldering point before applying the copper foil (included in
the kit on the back of the 12 mm wide copper foil). Then cover the winding in one layer
with copper foil. For the ground connection, place a short copper foil bridge (see drawing)
and solder carefully. Since the copper foil can be soldered very well, a short heating is
sufcient.
If the pickup cables are not shielded, replace them with the supplied 2-core cable. To do
this, cut off the cable according to the lengths of the original cable and strip approx. 2 cm
of insulation from both sides of the outer insulation (use a wire stripper or knife). Twist the
shielding braid. Tin all strand ends and shielding braid with the soldering iron. Desolder the
original leads. Important: Note the assignment of the connections beforehand! Now
solder the two inner leads to the pickup and the shielding braid to the copper foil bridge on
the underside of the bobbin (see drawing).
For large pickups with plastic cover (e.g. P-90) it is also possible to line the inside of
the cover with copper foil and to connect the shield to ground with a strand. Caution when
soldering: Plastic is not very heat-resistant!
With double coil pickups (humbuckers), shielding only makes sense if they are also
operated in single coil mode. Work steps as for single-coil pickups.
Safety
With poorly shielded instruments, noise is signicantly reduced when the strings are
touched with the hand because the strings of many instruments are connected to earth
(ground) via cable to the amplier. So your entire body is grounded when touching the
strings and thus acts as a shield.
This can be life-threatening! If for some reason the amplier housing is carrying live
current, the musician will be carrying live current, too!
With a well shielded instrument, the noise level should be so low that the strings can be
separated from the ground (usually a bare wire under the bridge). No need for „human
shielding“.
Troubleshooting
If you worked carefully and in accordance with the instructions, the instrument should
function perfectly after shielding with signicantly reduced interference noise.
No output signal?
Probably a short circuit. Find out if signal-carrying parts are connected to ground.
Loud hum?
Probably a ground wire confused with a signal line. Simply swap the wires.
Table of contents
Other Göldo Accessories For Musical Instruments manuals