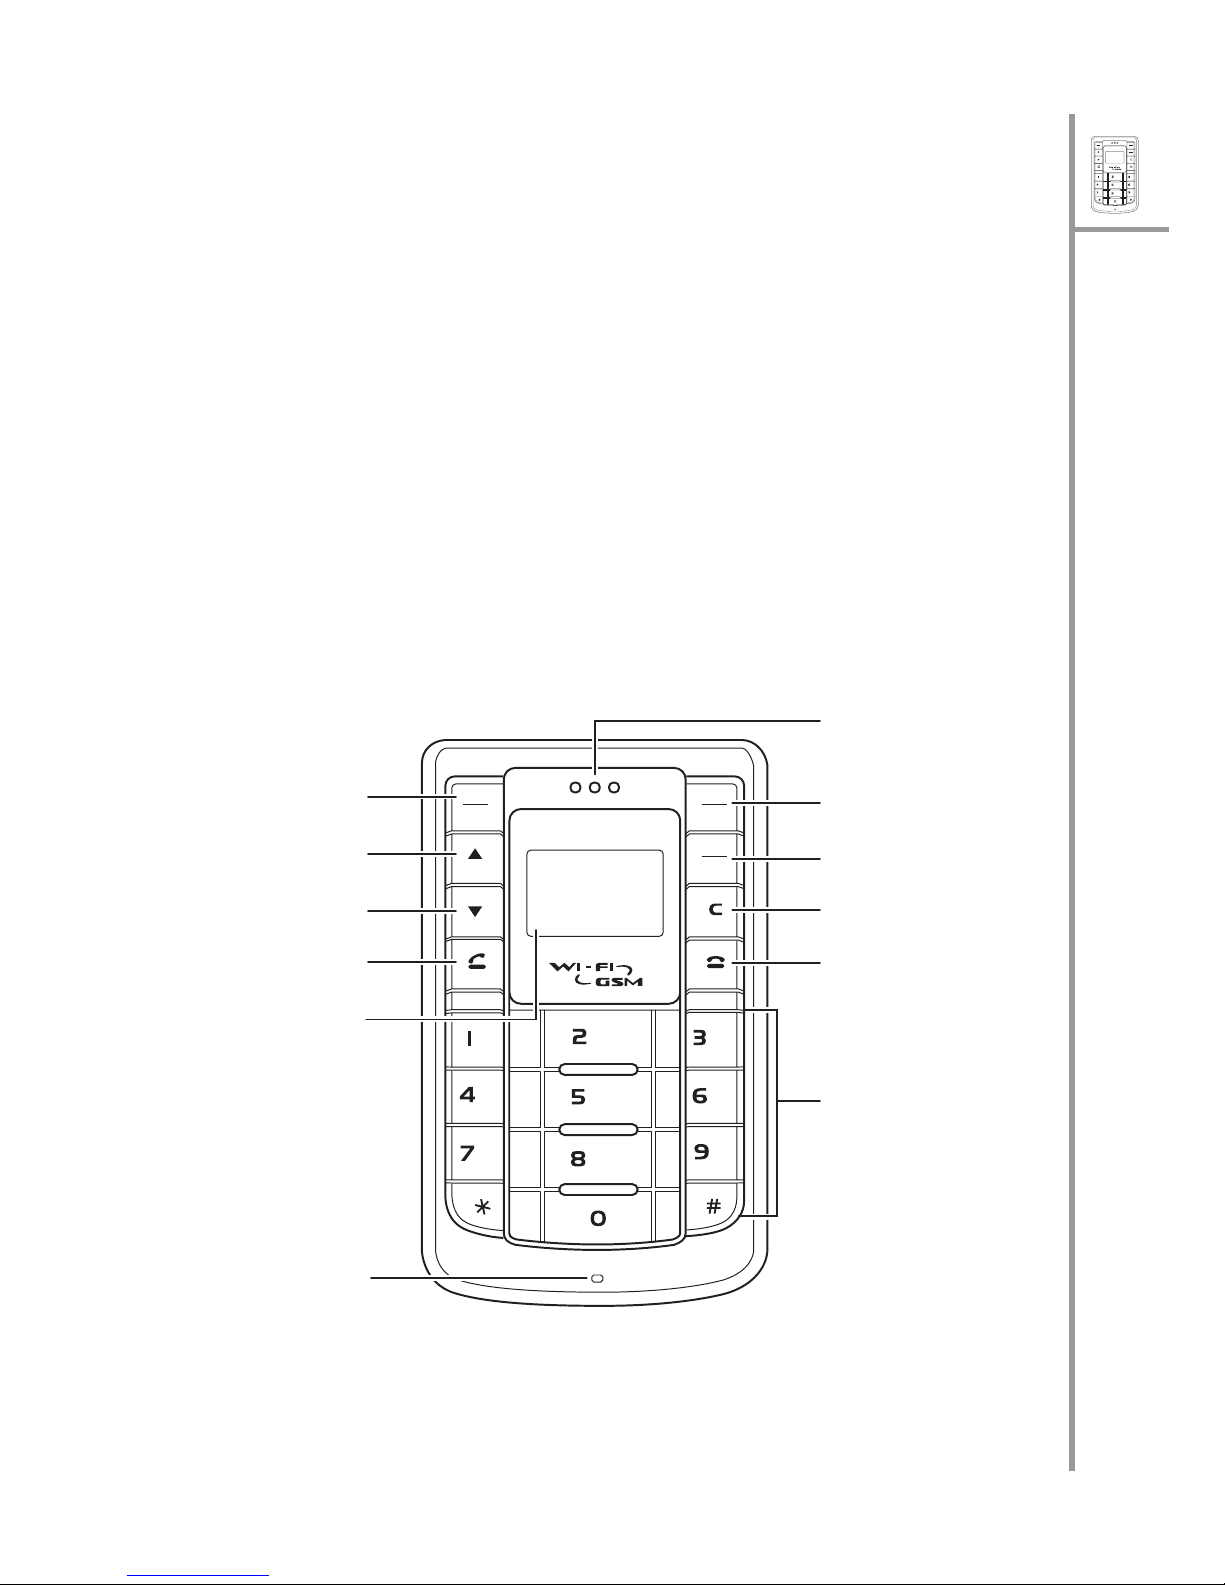
G-Tek PWG-500 User manual

Menu
Select
Wi-Fi
On/Off
VoIP
GSM
ABC
DEF
JKL
GHI
PQRS
MNO
WXYZ
TUV
1
Quick Guide
PWG-500 QUICK GUIDE
Congratulations on your purchase of the PWG-500, a VoIP (Voice over Internet
Protocol) and GSM (Global System for Mobile communications) phone that also
functions as your personal wireless gateway for connecting to wireless networks.
Read this user manual carefully to understand how to operate the product and
take advantage of its useful features.
The PWG-500 enables you to make phone calls using GSM or VoIP networks.
Moreover, you can also connect to Wi-Fi (Wireless Fidelity) (802.11b) or GPRS
(General Packet Radio Service) networks using the PWG-500 as a modem or
using Bluetooth.
About the PWG-500
Front view
Menu
Select
Wi-Fi
On/Off
VoIP
GSM
ABC
DEF
JKL
GHI
PQRS
MNO
WXYZ
TUV
Speaker
Wi-Fi On/Off
VoIP / GSM
Clear / Delete
End / Reject
Keypad
Menu / Select
Up arrow
Down arrow
Send / Answer
Display
Microphone

2
Menu
Select
Wi-Fi
On/Off
VoIP
GSM
ABC
DEF
JKL
GHI
PQRS
MNO
WXYZ
TUV
Quick Guide
Side views
Display indicators
In standby mode, the PWG-500 screen displays the following icons:
Left view Right view
Power button
Earphone
Power in
USB port
Volume up
Reset button
Volume down
Chunghwa
,PTSGI-AP,
Default0
12:33 AM
Battery
charge
GSM
signal strength
VoIP / GSM
mode
VoIP
bandwidth Wi-Fi
signal strength
GSM carrier
Wi-Fi access
point
Time
VoIP
profile

Menu
Select
Wi-Fi
On/Off
VoIP
GSM
ABC
DEF
JKL
GHI
PQRS
MNO
WXYZ
TUV
3
Quick Guide
Using the menu
The G-Tek PWG-500’s menu lets you access the product settings and set up the
device according to the network conditions. The menu is set up in a simple and
easy-to-understand manner. Follow these steps to access the menu and menu
items.
1. In standby mode, press the Menu/Select key to access the menu. The first
menu option, Phone Book, is displayed.
2. Scroll through the main menu options using the Sor Tarrows keys and
press the Menu/Select key to view the submenu. For example, scroll to
Messages and press Menu/Select to view text messages.
3. Repeat the previous step to browse through the menu items, submenus
and options. For instance, to write a text message, select Messages and
then Create New.
4. To choose a menu setting, press the Menu/Select key to save it.
Menu map
• Phone Book
•Search
•Add
•Edit
•Delete
• Assign Speed Dial
• Messages
• Create New
• Inbox
• Outbox
• Call Logs
• Missed Calls
• Received Calls
• Dialed Calls
• Recent Calls
• Tones
• General
• Silent
• Meeting
• Outdoor
• Pager
Note: For a detailed version of the
menu map, refer to the user’s manual.
• Settings
• General
•Wi-Fi
•VoIP
•GSM
•GPRS
•SMSsettings
•Bluetooth
•Clock
• Save to Flash
•Status
• GSM Status
•Wi-FiStrength
•Channel
• Transfer Rate
• SSID
•Wi-FiHome
• Link Quality
•NetworkMode
• Encryption Status
• MAC Address
• Battery Strength
• Auth. Status
• VoIP Strength
• Bluetooth Strength
• GPRS Data Account
• Version Number

4
Menu
Select
Wi-Fi
On/Off
VoIP
GSM
ABC
DEF
JKL
GHI
PQRS
MNO
WXYZ
TUV
Quick Guide
Inserting the SIM cards and battery
1. Push the tab on the back to
remove the battery cover.
2. Move the desired SIM card
slot in the direction shown
to unlock it.
3. Lift up the SIM card slot.
4. Slide in the SIM card in the
card holder with the gold
contacts facing down.
5. Place the SIM card holder
back in place.
6. Slide the SIM card holder
upwards to lock the card in
place.
7. Repeat steps 2 through 6
to insert the second SIM
card.
8. Place the battery in the bat-
tery slot with the metal
contacts properly aligned.
9. Replace the back cover.

Menu
Select
Wi-Fi
On/Off
VoIP
GSM
ABC
DEF
JKL
GHI
PQRS
MNO
WXYZ
TUV
5
Quick Guide
Charging the battery
The PWG-500 is provided with a rechargeable Li-ion battery with 4 hours talk
time and 72 hours standby time. To charge the battery, connect the battery
charger to the Power in slot and insert the power connector into a power outlet.
Connecting the wired earphones
Connect the wired earphones to the earphone jack to
enjoy handsfree operation, and answer or place calls
with ease.
Note: If the G-Tek PWG-500 is paired with a Blue-
tooth-enabled headset, the wired headset will not
work.
Turning the phone on/off
Press the Power button on the right side of the PWG-
500 to turn the device on or off.
Setting the interface language
Use the language setting to specify the interface language. Press Menu/Select
and select Settings, General, Language. Select the language of your choice from
these options: English, Spanish, German, and Chinese.
Menu
Select
Wi-Fi
On/Off
VoIP
GSM
ABC
DEF
JKL
GHI
PQRS
MNO
WXYZ
TUV

6
Menu
Select
Wi-Fi
On/Off
VoIP
GSM
ABC
DEF
JKL
GHI
PQRS
MNO
WXYZ
TUV
Quick Guide
Setting the time and date
The clock settings enable you to set the time and date on the PWG-500. Press
Menu/Select and select Settings, Clock to view the clock settings. The following
options are available:
•Set Time: sets the time. Use the arrow keys to move between the hour,
minute and AM/PM fields. Use the keypad to key in the time.
•Set Date: sets the date. Use the arrow keys to move between the day,
month and year fields. Use the keypad to key in the time.
•Set time format: specifies the time format. Choose from 12 hours and 24
hours format.
•Set date format: specifies the date format. Choose from MMD/DD/YYYY,
DD/MM/YYYY, YYYY/MM/DD, and YYYY/DD/MM.
Saving settings
To save all the changes to the PWG-500’s internal flash memory, press Menu/
Select and then choose Settings, Save to Flash. All settings are saved.
Locking/unlocking the keypad
You can lock the keypad to prevent the keys from being pressed accidentally, for
example, when your phone is in a bag or in the pocket.
• To lock the keypad, press the Menu/Select key and then press the *key.
• When the keypad is locked, press the Menu/Select key and then press *
to unlock the keypad.
Making calls
Do one of the following to specify the type of the phone call you wish to make:
•PresstheVoIP/GSM key to switch between VoIP, GSM, or Auto mode.
•PressMenu/Select to view the menu and then scroll to Settings, General,
Out Going Call. Choose an option from GSM, VoIP, or Auto.
If you select the Auto option, the PWG-500 first searches for a Wi-Fi hotspot in
the vicinity to enable a VoIP call. If Wi-Fi is not available, a GSM network is used
to make an outgoing call.

Menu
Select
Wi-Fi
On/Off
VoIP
GSM
ABC
DEF
JKL
GHI
PQRS
MNO
WXYZ
TUV
7
Quick Guide
Using the keypad to dial
1. Key in the phone number using the keypad. If you key in an incorrect digit,
press the Clear/Delete (C) key to delete the character to the left of the cur-
sor.
2. Press the Send/Answer key to call the number.
3. Press the End/Reject key to terminate the call after you finish talking.
Using the phone book to dial
1. Press the Menu/Select key to display the menu.
2. Select Phone Book, Search, and press the Menu/Select key to locate a
contact.The Search screen is displayed.
3. Key in the first few letters of the name. Press the Menu/Select key to
search for the contact. A list of names that correspond most closely to
your search criteria is displayed.
4. Scroll through the list till you find the contact you want to call.
5. Press the Send/Answer key to call the number.
6. Press the End/Reject key to terminate the call after you finish talking.
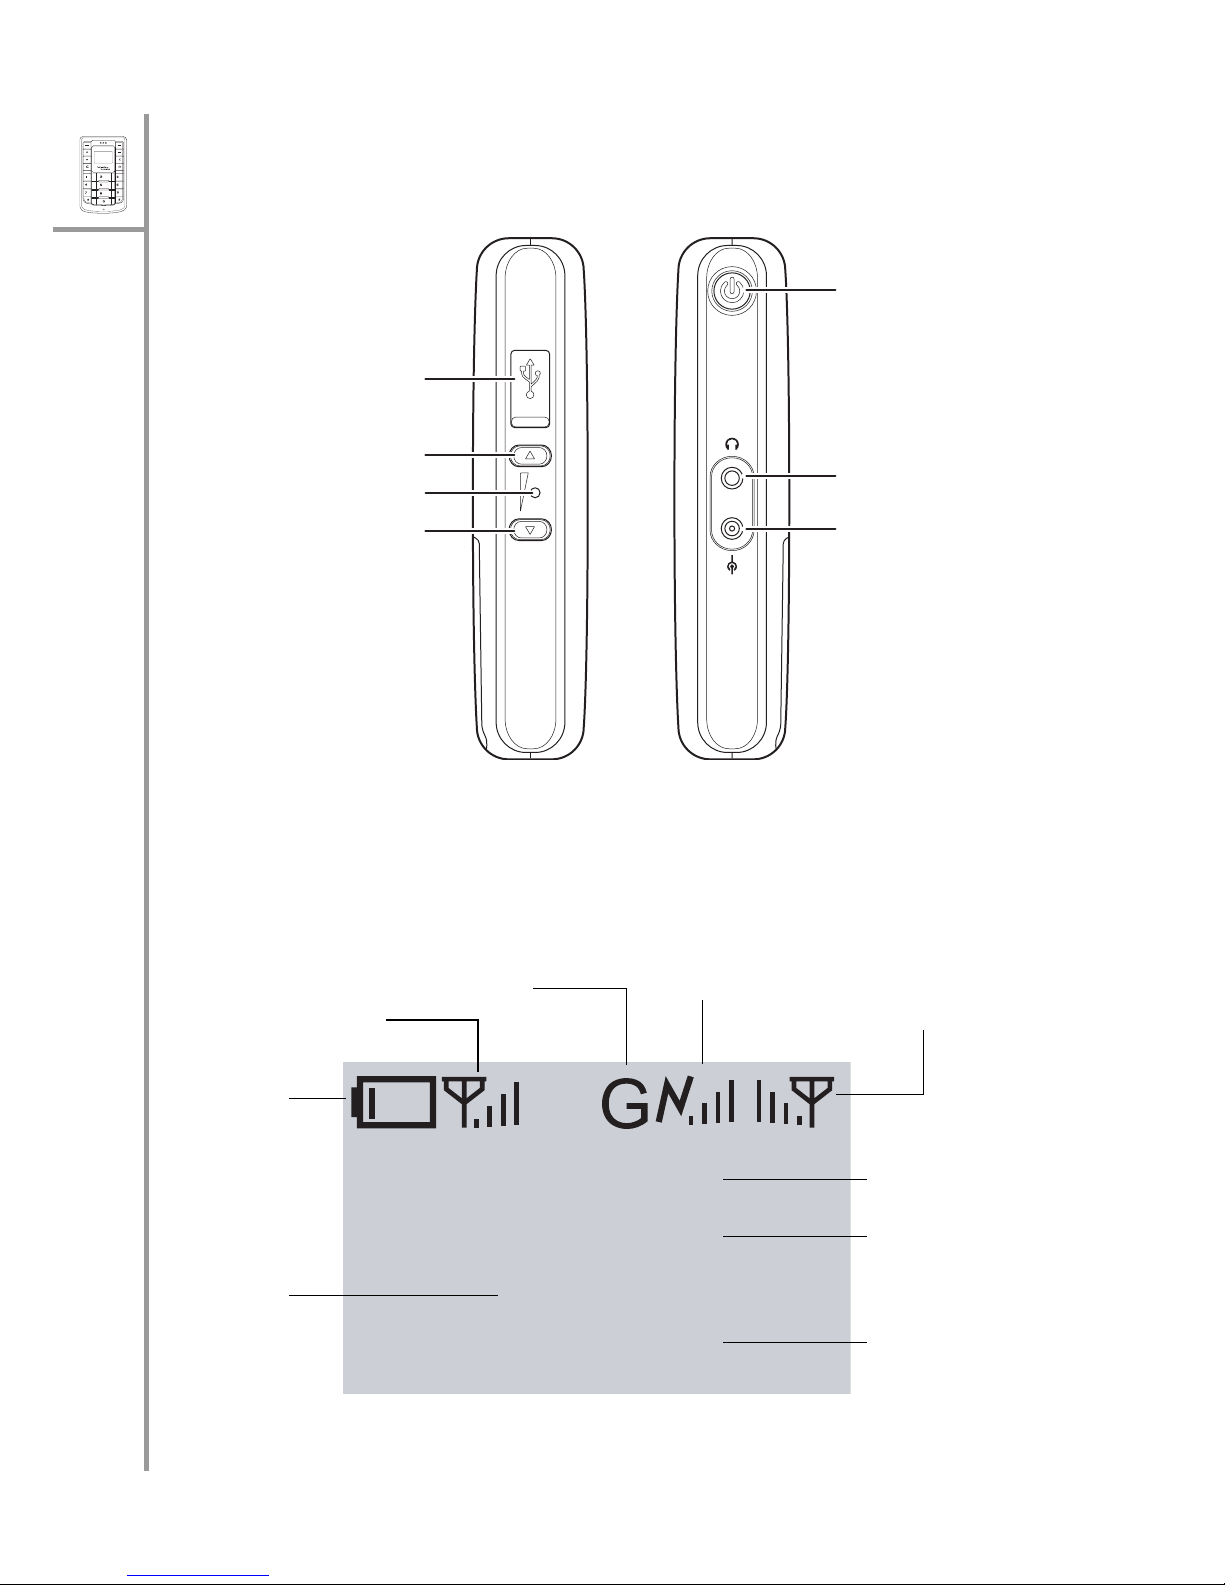
Adjusting the volume
While talking on the PWG-500, use the Volume up/down keys to increase or
decrease the volume according to your preference. You can also adjust the ring
tone using the keys when not talking on the phone.
Answering or rejecting a call
An incoming call is indicated by a ringing tone and a vibration if selected. Choose
one of the following options:
•PresstheSend/Answer key to answer an incoming call.
•PresstheEnd/Reject key to reject an incoming call. The call is for-
warded or transferred if you have activated call forwarding.
Using the speaker phone
For handsfree operation, you can use the built-in speaker to talk on the phone. Do
one of the following to use the speaker phone.
•PresstheClear/Delete (C) key to enable the speaker phone. Press the key
again to disable the speaker phone.
• While talking on the phone, press Menu/Select and then select Speaker On
from the options. The speaker is enabled. To disable the speaker phone,
either terminate the call or press Menu/Select and Speaker Off.

8
Menu
Select
Wi-Fi
On/Off
VoIP
GSM
ABC
DEF
JKL
GHI
PQRS
MNO
WXYZ
TUV
Quick Guide
Using the phone book
The phone book is an important component of the PWG-500 for storing contact
information about your friends, relatives, and colleagues. This eliminates the need
for you to memorize important phone numbers.
Note: The storage capacity of the phone book depends on the SIM card memory.
Adding contacts
The phone book feature enables you to create new entries for your contacts and
edit their contact information. It also enables you to store a number from a
missed or received call in your phone book.
Creating a new entry
1. Press Menu/Select and then select Phone Book, Add to add a new entry to
the phone book.
2. Type the name of the new contact.
3. Press Menu/Select to save the name.
4. Enter the phone number of the new contact.
5. Press Menu/Select to save the number.
Searching for a contact
1. Press Menu/Select and then select Phone Book, Search to start searching
for contacts.
2. Key in the first few letters of the contact that you are looking for and press
Menu/Select.
Phone book entries that closely match your search criteria are displayed. For
example, if you key in the letters SU while searching, the first phone book entry
starting with SU and successive entries are displayed. Press Send/Answer to
dial the entry or press Menu/Select and select an option from Edit, Delete, or Call
as required.

Menu
Select
Wi-Fi
On/Off
VoIP
GSM
ABC
DEF
JKL
GHI
PQRS
MNO
WXYZ
TUV
9
Quick Guide
Wi-Fi settings
The general settings for Wi-Fi mode specify the type of wireless connectivity and
enable you to turn on Wi-Fi mode. Press Menu/Select and choose Settings, Wi-Fi,
General and choose one of the following options:
• Select Wi-Fi On/Off and select On to enable Wi-Fi mode.
• Select Wi-Fi Connectivity and select Automatic to connect to a wireless
network in the vicinity automatically. The PWG-500 scans for wireless
hotspots automatically. Alternatively, select Manual to connect to a wire-
less network manually. A list of hotspots is displayed. Select a hotspot to
connect to the corresponding wireless network.
VoIP settings
These settings provide the basic setup for VoIP mode. Press Menu/Select and
select Settings, VoIP, and General to configure these settings as follows:
•VoIP On/Off: enables or disables VoIP mode.
•Stun Server: specifies the Stun server for VoIP mode. Key in the server
name using the keypad.
•Speaker Volume: Adjusts the speaker volume in VoIP mode. Choose from
Level 1 through Level 10.
•Microphone Volume: Adjusts the microphone volume in VoIP mode.
Choose from Level 1 through Level 10.
•Preferred Codec: specifies the codec to be used for VoIP calls. Select from
GSM, a Law, HLaw, G726, G729, and G723.1.

10
Menu
Select
Wi-Fi
On/Off
VoIP
GSM
ABC
DEF
JKL
GHI
PQRS
MNO
WXYZ
TUV
Quick Guide
GSM settings
The GSM settings are used to customize the GSM parameters when making GSM
phone calls. Press Menu/Select and select Settings, GSM to configure the GSM
settings. The following options are available:
•GSM On/Off: Enables GSM mode. Select On to enable GSM.
•SIM Switch: Switches between the two SIM cards.
•Speaker Volume: Adjusts speaker volume in GSM mode. Choose from
Level 1 through Level 10.
•Microphone Volume: Adjusts speaker volume in GSM mode. Choose from
Level 1 through Level 10.
GPRS settings
GPRS is a network service that allows you to use your phone for sending and
receiving data over an IP network. The GPRS settings enable you to set up the
PWG-500 for GPRS mode. Press Menu/Select and select Settings, GPRS to con-
figure the GPRS settings. The following options are available:
•Access Point Name: Key in the name of the access point to be used for
GPRS mode.
•IP Address: Key in the IP address of the access point to be used for GPRS
mode.
Bluetooth settings
The PWG-500 is equipped with Bluetooth compatibility enabling it to connect and
communicate with a Bluetooth device in the vicinity. For instance, you can pair
the PWG-500 with a Bluetooth headset using Bluetooth technology and create a
communication channel between the two devices. The Bluetooth settings enable
you to configure the PWG-500 for Bluetooth operation.
To pair a headset with the PWG-500, do the following:
1. Press Menu/Select and select Settings, Bluetooth, and Headset.
2. Select Find Headset to locate a Bluetooth-equipped headset in the vicinity.
A list of available headsets in the vicinity is displayed.
3. Select a headset from the list and press Menu/Select to connect to it.
4. Enter the PIN number required for pairing (refer to headset documentation
for details) and press Menu/Select. The pairing information is saved.
Alternatively, select Paired Headset after step 1 to see which headset has been
paired with the PWG-500.

Menu
Select
Wi-Fi
On/Off
VoIP
GSM
ABC
DEF
JKL
GHI
PQRS
MNO
WXYZ
TUV
11
Quick Guide
Connecting to the PC
Use a mini USB cable to connect the
PWG-500 to a PC as shown.
Installing the USB drivers
and WIM
To use the PWG-500 as a USB modem
for your PC, you need to install the
drivers for the device. When you con-
nect the device to the PC, the PC
detects the new hardware and starts
the New Hardware Found Wizard. Fol-
low the instructions on the screen to
locate and install the USB drivers for
the PWG-500 on the PC. The USB
driver files can be found on the utility
CD provided in your package.
WIM (Wireless in Motion) is an appli-
cation that helps you in configuring
and using the PWG-500. The utility
CD contains two versions of WIM, one
for your PC and one for your PDA
(Pocket PC only). Select the appropri-
ate version of WIM from the utility CD and double-click Setup.exe. Follow the
instructions on the screen to install the software. Refer to your PDA documenta-
tion for details about installing software on your PDA.
Using WIM
The WIM application is a useful interface that lets you set up and configure the
PWG-500 from your PC or PDA. You can select GSM, VoIP, GPRS, and Wi-Fi pro-
files and personalize them according to your network specifications. You can also
use the application to download ringtones, configure SOS numbers for the phone,
and make any setup changes for the phone.
Menu
Select
Wi-Fi
On/Off
VoIP
GSM
ABC
DEF
JKL
GHI
PQRS
MNO
WXYZ
TUV

12
Menu
Select
Wi-Fi
On/Off
VoIP
GSM
ABC
DEF
JKL
GHI
PQRS
MNO
WXYZ
TUV
Quick Guide
Double-click the WIM icon to start the
application from your PC or PDA.
Click the tabs on the interface to access
various functions and features of the
application.
Phone book
Use the Phone Book to store your
address and contact details. Click the
Phone Book button to launch the phone
book.
Use the Manage option to add, remove,
or modify contacts.
Dialer
To make a phone call, click Dialer. The
Dialer screen is displayed. Enter the num-
ber and click the 5button to start dial-
ing. Press the 4button to cancel.

Menu
Select
Wi-Fi
On/Off
VoIP
GSM
ABC
DEF
JKL
GHI
PQRS
MNO
WXYZ
TUV
13
Quick Guide
Messages
To send an SMS, click the Messages but-
ton. The SMS screen is displayed. Use the
Edit option to write text messages.
Config. Stat
To configure WIM, click the Config.Stat
button.
This brings up the WIM configuration util-
ity. Select a profile from the options and
click Edit Profile, Personalize to modify the
profile settings. Alternatively, click General
to modify the general setup.
When you edit a profile, all the options and
settings relevant to the profile are dis-
played and are available for modification.
For instance, if you select the GSM-GPRS option, you can configure the GSM call-
ing settings such as the default SIM, SOS numbers, call waiting options and
GPRS configuration parameters such as access point name and IP address. These
options have been described under “Configuring the settings” in the user manual.

14
Menu
Select
Wi-Fi
On/Off
VoIP
GSM
ABC
DEF
JKL
GHI
PQRS
MNO
WXYZ
TUV
Quick Guide
Browsing the Internet from the PC
You can use the PWG-500 to browse the Internet or check e-mails using a Wi-Fi
network or a GPRS network.
If Wi-Fi has been enabled and a wireless hotspot is available in the vicinity, then
Internet connectivity is automatically achieved through the Wi-Fi network. If Wi-Fi
is unavailable, GPRS is automatically selected for Internet connectivity.
To connect to the Internet, follow these steps:
1. Connect the PWG-500 to your PC using a USB cable. Make sure that the
device drivers have been installed correctly.
2. Set up a dial-up network connection as follows:
– Click the Start button on the task bar and then select Settings | Net-
work and Dial-up Connections.
– Double-click the Make New Connection icon. The Network Connec-
tion Wizard guides you through the steps for setting up a dial-up con-
nection.
– Select the correct port during the set-up process. To see the port,
open the Device Manager under System on your PC. The COM port
number appears under the Ports item.
– Enter your User name and Password to connect to the Dial-up ser-
vice. Consult your local service provider for this information.
3. When the dial-up connection has been set up, double-click the connection
icon to dial into the network and access the Internet.

Menu
Select
Wi-Fi
On/Off
VoIP
GSM
ABC
DEF
JKL
GHI
PQRS
MNO
WXYZ
TUV
15
Quick Guide
Connecting to a PDA
The PWG-500 can be used along with Bluetooth enabled devices (like PDAs) that
conform to the Serial and Dial-up Networking profiles. When the PWG-500 inter-
faces with the PDA, you can use it to make and receive calls, browse the Inter-
net, chat using MSN, and send SMS messages. It is recommended that the
distance between the PWG-500 and the other Bluetooth device be less then 10
meters away. Make sure that there are no other devices between these two
devices that may interfere with transmission and reception.
Pairing is a process of associating Bluetooth devices with each other such that
they can automatically connect when they are within range of each other. The
PWG-500 can be paired with an unlimited number of Bluetooth devices.
You can pair the PWG-500 with your PDA by adding the PWG-500 to the list of
paired devices using the Bluetooth manager. For pairing, you have to enter the
pass-key or PIN (Personal Identification Number). The default pass-key is 1. This
can be changed using the WIM configuration-status utility.
Note: If you are pairing a new device with the PWG-500 for the first time, you
have to pair it twice consecutively before trying to establish a connection with
the device.
To connect the PWG-500 to your PDA, do the following:
1. Using Bluetooth Manager from your PDA, scan and locate all Bluetooth
devices in the vicinity. A list of devices is displayed.
2. Select the PWG-500 from the list of devices displayed.
3. Pair the PDA with PWG-500. Enter the PIN when prompted.
When paired with a PDA, you can use the PWG-500 with Wi-Fi or GPRS networks
to access the Internet

16
Menu
Select
Wi-Fi
On/Off
VoIP
GSM
ABC
DEF
JKL
GHI
PQRS
MNO
WXYZ
TUV
Quick Guide
Using GPRS to browse the Internet
In order to use GPRS to connect to the Internet, you have to first set up a dial-up
connection to the GPRS network. GPRS settings differ for different area net-
works. Consult your service provider for additional information about your local
GPRS settings.
1. To create a dial-up network, click Start |
Programs | Settings |Connections |
Modify | New.
2. A Make New Connection screen is dis-
played. Enter the name, modem, and
baud rate in the corresponding fields.
Specify the modem as Bluetooth Dialup
Modem.

Menu
Select
Wi-Fi
On/Off
VoIP
GSM
ABC
DEF
JKL
GHI
PQRS
MNO
WXYZ
TUV
17
Quick Guide
3. Click Next.
4. In the My Connection screen, enter the
country code, area, code, and phone
number to connect to the GPRS number.
Consult your service provider for this
information. Click Next | Finish to com-
plete creating the connection.
5. Under the Internet Settings, a new item
called My Connection is now displayed.

18
Menu
Select
Wi-Fi
On/Off
VoIP
GSM
ABC
DEF
JKL
GHI
PQRS
MNO
WXYZ
TUV
Quick Guide
6. Open Bluetooth Manager and set up a
dial-up networking connection to the
PWG-500. Select this new connection
that you just created and click OK to
connect. A login screen is displayed.
7. Enter the user name and password for
the GPRS network and click OK. The
PWG-500 connects to the GPRS net-
work and the PDA in turn is also con-
nected.
After you are connected to the network, you
can browse the Internet or check e-mails as
needed.
Note: The steps described above for creating a
dial-up network connection and connecting to
it may differ according to the PDA and your
service provider settings.

Menu
Select
Wi-Fi
On/Off
VoIP
GSM
ABC
DEF
JKL
GHI
PQRS
MNO
WXYZ
TUV
19
Quick Guide
Using Wi-Fi to browse the Internet
In order to browse the Internet using Wi-Fi, you have to set up and enable Wi-Fi
on the PWG-500. This can be done directly from the PWG-500 as described in
the user manual under “Wi-Fi settings” or from the PDA using the WIM configu-
ration utility. Set up the wireless connection mode, security settings, and authen-
tication parameters such as user name, password, and ESSID from the PWG-500.
After you set up the wireless parameters, connect to a wireless network manually
or automatically using the PWG-500. Set up a dial-up connection from the PDA to
the PWG-500 as described in the previous section and connect to the PWG-500.
When the connection is established, open Internet Explorer to start browsing the
Internet.
Note: To browse the Internet using Wi-Fi, use the same user name and password
that were entered for the Wi-Fi parameters.
Other manuals for PWG-500
1
Table of contents
Other G-Tek Cell Phone manuals