GA SMART MINI TS-EVC07-003 User manual


Table of content
1. Product overview........................................................................................................................................................................................................................... 3
1.1. Appearance............................................................................................................................................................................................................................ 3
1.2. Product specification............................................................................................................................................................................................................... 3
1.3. Content of the package............................................................................................................................................................................................................ 4
1.4. Storage and transportation...................................................................................................................................................................................................... 4
2. Installation instruction.................................................................................................................................................................................................................... 4
2.1. Safety tips.............................................................................................................................................................................................................................. 4
2.2. Installation guide .................................................................................................................................................................................................................... 4
3. Charging instructions...................................................................................................................................................................................................................... 7
3.1. Charge preparation................................................................................................................................................................................................................. 7
3.2. Start to charge – using the app................................................................................................................................................................................................. 7
3.3. Help and issue feedback .......................................................................................................................................................................................................... 9
3.4. LCD indicator light..................................................................................................................................................................................................................10
4. Maintenance instructions...............................................................................................................................................................................................................10
4.1. Caution.................................................................................................................................................................................................................................10
4.2. Error signals..........................................................................................................................................................................................................................10
5. Warranty card...............................................................................................................................................................................................................................11

Application
The Smart Mini Charging Station is a device that connects to an AC
(alternating current) network to charge the battery of an electric vehicle with
sufficient power.
Main Functions
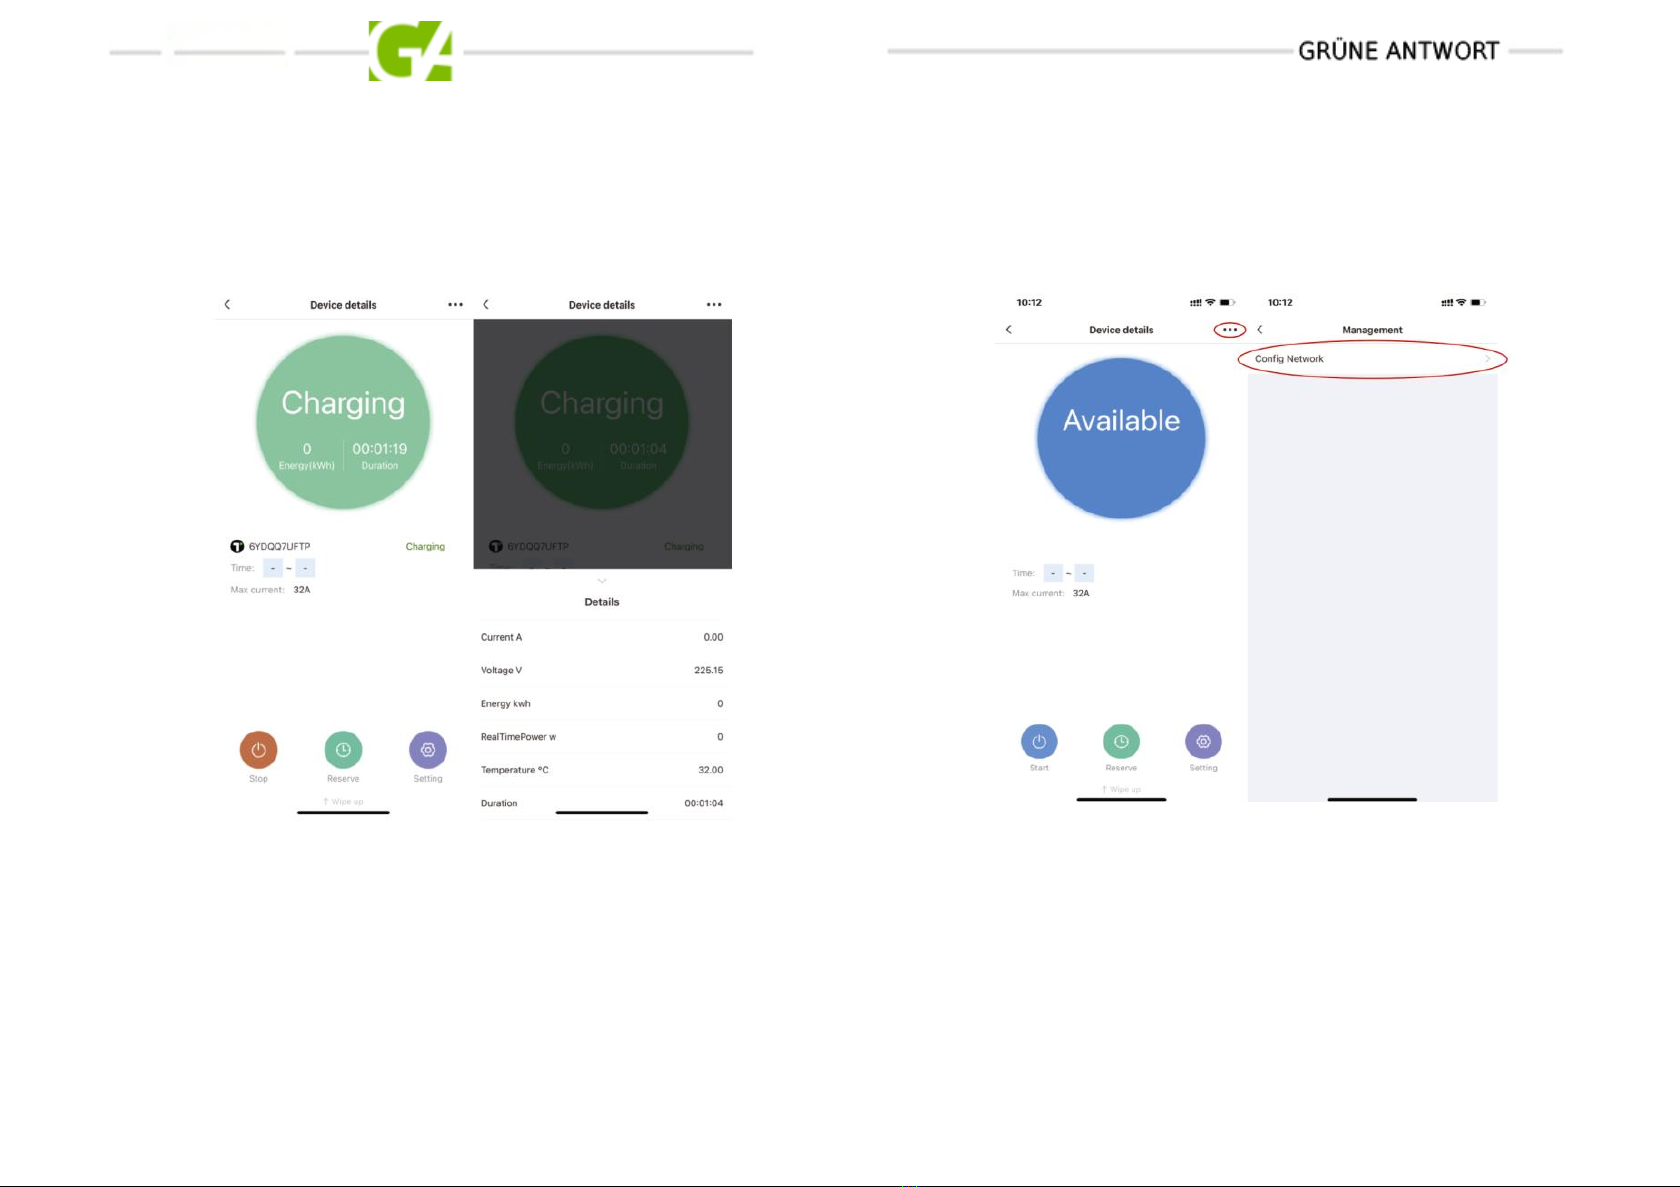
•Supports smart charger control via an app (Scheduled charging,
Start/Stop charging)
•Plug and Play function
•Chargingstatus can be monitored via the app
Additional features are also available via Wi-Fi/4G network:
- Charging data are saved to the cloud and can be viewed via the app
- Charger PIN code can be viewed and updated
- Updatingfirmware
WARNING
You may cause danger, damage or injury if you do not operate and use the
device in accordance with the safety guide.
SAFETY INSTRUCTIONS
•The person installing and using the charger must follow the
instructions for safety. The electrical infrastructure must be checked
by a qualified electrician before using the charger.
•Before switchingon the charger, make sure that it is properly earthed
to avoid accidents.
•Before charging, always check that there is no visible damage to the
charger. The contact surface of the charging socket must be free from
dirt and moisture. The insulation of the charging cable must be free
from cuts or abrasions.
•Unauthorized modification, alteration or repair of the charger is
strictly prohibited and will void the warrantyimmediately.
•Do not use the charger near gases or flammable materials or objects.
•Children are strictly prohibited from touching or using the charger. Do
not allow children near the charger during use.
•Do not unplug the charger during charging.
•Stop using immediately if a charging fault or abnormality occurs.
•Protect from moisture, rain, sunlight and corrosive environment
•The product is intended for charging electric vehicles only and should
not be used for any other purpose.

1.Product overview
1.1.Appearance
1.2.Product specification
Model:
TS-EVC07-003
TS-EVC11-003
TS-EVC22-003
Rated voltage
230V AC
±10%
380V AC
±10%
380V AC
±10%
Max output current
32A
16A
32A
Frequency
50/60Hz
50/60Hz
50/60Hz
Max output power
7 kW
11 kW
22 kW
Charging socket
Type1 or Type2 + 4M charging cable
Housing material
PCV0 for outdoor usage
Installation method
Wall-mount/Floor-stand
Safety standard
EN 61851-1
Warranty
1 year
Protection level
IP65
Temperature/
Humidity
-30 - +60°C / 5% - 95% without condensation
Atmospheric
pressure
80kPa - 101kPa
Network gateway
Bluetooth, Wi-Fi, 4G (LTE)
Smartphone APP
(iOS and Android
supported)
Scheduled charging, start/stop charging,
current adjustment, charging status display,
Plug and Play function
Product size
228.5*228.5*100mm
Product weight
4.4KGS
5.2KGS
5.4KGS
Optional parts
modular TYPE B (30mA AC + 6mA DC)
residual current protection
OCPP function
RFID function

1.3.Content of the package
1.4.Storage and transportation
The product is packed with adequate protection before leaving the factory.
During transport, please ensure that the package does not receive any sharp
pounding, jolt or damage to the packaging. Storage and transport
temperature should be between -40 and +70℃, humidity between 5 and 95%.
Ambient air must not contain corrosive or explosive gases.
2.Installation instruction
2.1. Safety tips
The charger does not contain any user-repairable parts. Do not attempt to
repair or service thecharger yourself.If your device needs repair, contact us.
Protect the charger from external impact.
Unplug the charger before cleaning it. Do not use cleaning solvents for
cleaning. Use a clean, dry cloth to remove accumulated dust and dirt.
Make sure that the charger cable is positioned so that it is not stepped on,
tripped over it or damaged.
Keep children away from the device.
2.2.Installation guide
For comfortable use, the recommended lowest point for placing the charger
is 0.4 metres and the highest point is 1.5 metres from the ground.
Smart Mini charger
1
Wall-mount bracket
1
Mountingmaterials
1
User manual (available online)
1

Wall-mounted dimension
Pedestal installation dimension

Wall installation
Installation method 1:
Installation method 2:
1. Use a drill to make
mounting holes in
suitable locations on
the wall.
2. Insert the fixing
dowels into the
holes.
3. Screw the charger
backplate fastener to
the wall.
4. Align the charger
from the top and
place it on the
mounting back plate.
5. Arrange and secure
the incoming cables
of the charger.
6. Remove the
protective film from the
front of the charger to
start using the product.
1. Remove the two fixing screws
from the bottom of the cover
plate, then push the front plate
upwards to remove.
2. Remove the seven fixing
screws around the internal
panel and remove the
panel.
3. Use the drill to
make mounting
holes in suitable
locations on the
wall.
4. Insert the fixing
dowels into the
holes.
5. Fix the
disassembled filler
back panel to the
wall.
6. Replace and
secure the removed
panel and front
panel.
7. Remove the
protective film from
the front of the
charger to start using
the product.

3.Charging instructions
3.1.Charge preparation
After turningon the charger, download the "TEISONME" mobile app to your
device. Download it from the App Store for iOS and from the Google Play
store for Android.
3.2.Start to charge – using the app
3.2.1. Register your user account then you receive a confirmation email to
activate your account.
3.2.2. After successful login, the app will list the available
available devices.
3.2.3. When you select the device, the main operation page appears, where
you can control and adjust the charger.

3.2.4. There are three function buttons in the lower menu bar: Start/Stop
(Charging start/stop), Reserve (Scheduled charging setting), and
Setting, where you can set the charging current and the Plug & Play
mode.
3.2.5. Click on the function button in the top right corner to access
network settings. You can then choose to set up a Wi-Fi or 4G (LTE)
connection.

3.2.6. Enter the correct Wi-Fi settings (Wi-Fi name, password) for the charger,
after successful connection the charger will configure the network settings.
Once the network settings are completed, the charger will be online. If the
Bluetooth connection remains active, the user can control the charger via Wi-
Fi or Bluetooth connection.
3.3.Help and issue feedback
3.3.1. The charger is on and connected correctly, but it is not
found in the app:
a) Make sure that the LCD display does not show an error message.
b) Make sure the Bluetooth function on your phone is turned on.
3.3.2. Network issue:
a) If a 4G network connection has been configured, check that the
4G (LTE) card is inserted correctly.
b) Make sure that your phone is connected to a 2.4GHz Wi-Fi
network and then share the Wi-Fi with the charger.
3.3.3. Notes:
1. After a successful network setup and connection, the use of the
device is restricted, only the user who has made the connection
can control the charger.
2. The charger can be shared with other users, in which case the PIN
code for the charger must be entered by the other user in Bluetooth
mode.
4. In Bluetooth mode, you can override the restriction, then another
user can set the restriction.

3.4. LCD indicator light
LED status
Red/Green/Blue
Standby
Blue on
Blue flashes slowly
Connected/ charging finished /
fully charged
Green on
Reserved status (scheduled)
Green on
Charging
Green flashes slowly
Error
Red on
4. Maintenance instructions
4.1.Caution
Check the incoming and outgoing wires on a monthly basis to make sure they
are not damaged.
4.2.Error signals
Red light flash times
(N+ 5s stop)
Condition
LED status
1
Electric leakage
Indicator light
flashes slowly
2
Over-voltage
3
Under-voltage
4
Over-current
5
Overheating
6
Electrical leakage self-
test error code
7
/
8
CP pilot error code
9
Relay error code
10
/
11
System 12V error code
12
System -12V error
code

5. Warranty card
Product name:
Model:
Warranty date:
Name of the user:
Contact phone:
Mail address:
Name of distributor:
Email of the distributor:
This manual suits for next models
2
Table of contents
Popular Batteries Charger manuals by other brands

KUBE SYSTEMS
KUBE SYSTEMS KS Clock user guide

LinkPower
LinkPower CS300 installation manual

DeWalt
DeWalt DXAEWPC4 instruction manual

Battery Controller
Battery Controller BC BOOSTER K10000 PRO user manual

Manson Engineering Industrial
Manson Engineering Industrial SBC-9138 user manual

Deutronic
Deutronic DBL300 instructions