Gaggenau VF 411-610 Service manual

Operation and assembly instructions
VF 411-610
Electric deep fryer


VF 411-610
1
Important safeguards Page 3
1. Important Notes Page 4-5
For your safety Page 4
About use Page 5
Operating for the first time Page 5
2. Features Page 6
Features Page 6
Special accessories Page 6
3. Operation Page 7-10
Operating principle Page 7
Switching on Page 8
Switching off Page 9
Residual heat display Page 9
Holiday safeguard Page 9
Draining the deep frying oil or fat Page 9
Visual signals Page 10
4. Practical tips Page 11
5. Settings table Page 12
6. Cleaning and care Page 13
7. Maintenance Page 14
8. Installation Page 15-19
Technical data Page 15
Important notes on installation Page 15
Preparing the cabinet Page 16-17
Installing the control panel Page 18
Installing the appliance Page 19
Fitting the appliance cover Page 19

2
Congratulations on buying your new
“Vario” appliance.
Before switching your appliance on for the first
time, we would like you to familiarize yourself with
your new appliance. In this manual you will find
important notes on safety and operation. These
will serve to ensure your personal safety and the
lasting value of your appliance.
You will find notes on Page 4 that you ought to
observe before operating the appliance for the
first time.
The chapters entitled “Features" and “Operation"
tell you all about what your appliance can do and
how you operate it.
The chapter entitled “Cleaning and Care" gives
tips on how to keep your appliance looking good.
And now we wish you lots of fun with your
deep fryer.

1. Read All Instructions.
2. To eliminate the risk of burns or fire by reaching
over the heated surface units, cabinet storage
space located above the surface units should be
avoided. If cabinet storage is to be provided, the
risk can be reduced by installing a range hood
that projects horizontally a minimum of 5 inches
(127 mm) beyond the bottom of cabinets.
3. Important instructions
a) Ensure that this appliance is properly
connected and grounded by a qualified elec-
trician.
b) Never use this appliance for warming or hea-
ting the room.
c) Do Not Leave Children Alone – Children
should not be left alone or unattended in area
where appliances are in use. They should ne-
ver be allowed to sit or stand on any part
of the appliance.
d) Wear Proper Apparel – Loose fitting or han-
ging garments should never be worn while
using the appliance.
e) User Servicing – Do not repair or replace
any part of the appliance unless specifically
recomended in the manual. All other servi-
cing should be referred to a qualified techni-
cian.
f) Storage in or on Appliance – Flammable ma-
terials should not be stored in an oven or near
surface units.
g) Do Not Use Water on Grease Fires – Smother
fire or flame or use dry chemical or foam-type
extinguisher.
h) Use Only Dry Potholders – Moist or damp po-
tholders on hot surface may result in burns
from steam. Do not let potholders touch hot
heating elements. Do not use a towel or other
bulky cloth.
i) Never Leave Surface Units Unattended at
High Heat Settings – Boilover causes smoking
and greasy spillovers that may ignite.
k) Use extreme caution when moving the grease
kettle or disposing of hot grease.
4. DO NOT TOUCH HEATING ELEMENTS OR
AREAS NEAR UNITS. Heating elements may be
hot even though they are dark in color. Areas ne-
ar heating elements may become hot enough to
cause burns. During and after use, do not touch
or let clothing or other flammable materials
contact heating elements or areas near units un-
til they have had sufficient time to cool.
5. CAUTION:
Do not store items of interest to children in cabi-
nets above a range. Children climbing on the
appliance to reach items could be seriosly inju-
red.
6. Note – To avoid jeopardising the electrical sa-
fety of the appliance, it is forbidden to use high-
pressure or steam jet cleaning devices.
7. Save These Instructions.
Important safeguards
3

4
For your safety
Do not operate the appliance if it is damaged.
The appliance must only be connected by
an authorised specialist, paying attention to
the relevant regulations of the power supply
companies and the regional construction
regulations.
Observe the assembly instructions!
The appliance could be damaged if connected
wrongly!
When connecting electrical appliances in the
proximity of the deep fryer, make sure that
connecting cables do not come into contact with
hot cooking surfaces.
Only operate the appliance under supervision.
Foodstuffs that are prepared in fat and oil must be
constantly supervised! Caution! Old or much used
fats and oils can ignite easily if they overheat.
Caution: Fire Risk! Do not store any combustible
objects in your appliance.
Caution! The appliance heats up during operation.
Keep children away.
Caution: Fire Risk! Keep naked flames away from
the appliance!
Observe particular caution when working with
water in the proximity of the warm appliance.
Explosion risk!
Caution! Over-greased filters are a fire risk if the
appliance is positioned under an extractor hood or
adjacent to a hob ventilator!
If a fire should break out, switch off the elec-
tricity at fuse point and close the appliance
cover. Smother burning fat or oil. Never
extinguish a deep fryer with water! Switch off
the extractor hood immediately because the
draught will otherwise intensify the fire!
To avoid jeopardising the electrical safety of the
appliance, do not use high-pressure or steam jet
cleaning devices.
Isolate the appliance from the mains during every
maintenance operation. To do this, remove the
mains plug or switch off the corresponding fuse.
Repairs must be carried out by authorised
specialists, thus ensuring electrical safety.
As the user, you are responsible for maintenance
and proper use in the household. No warranty
claims can be lodged for any damage resulting
from failure to observe these instructions.
Note:
the appliance cover must not be closed until the
appliance has cooled down completely. Do not
operate the appliance with the cover closed! Heat
development may damage the appliance and the
cover. Do not use the appliance cover as a surface
for placing objects or for keeping things warm.
Caution! Do not use the glass cover of the steam
cooker for the deep fryer.
Subject to technical change without notice.
1. Important Notes

5
About use
The appliance is intended solely for household use
and must not be put to any other uses.
Use the appliance to prepare meals only. Do not
use the appliance to heat up the room in which it is
installed.
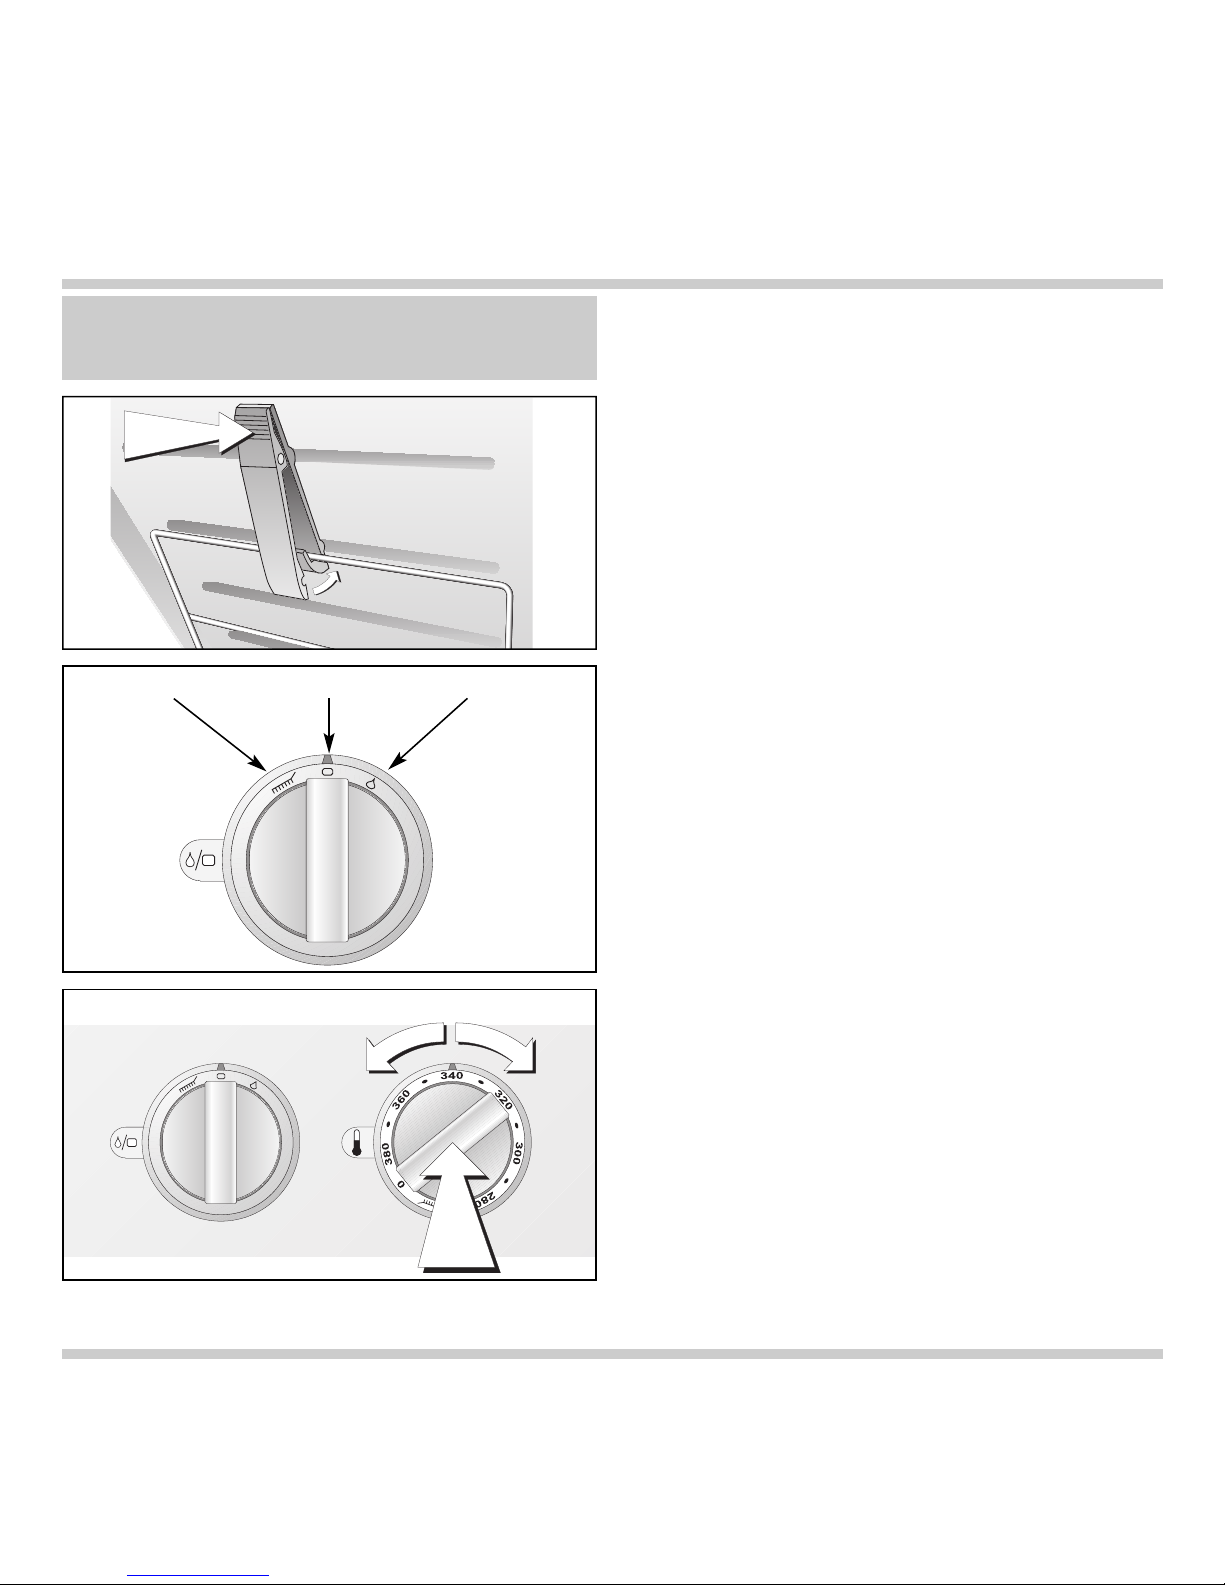
The appliance must not be operated empty. If the
appliance is switched on empty, the temperature
control will switch off the appliance automatically.
Turn the “Temperature" control knob to the OFF
position. Wait until the appliance has cooled down.
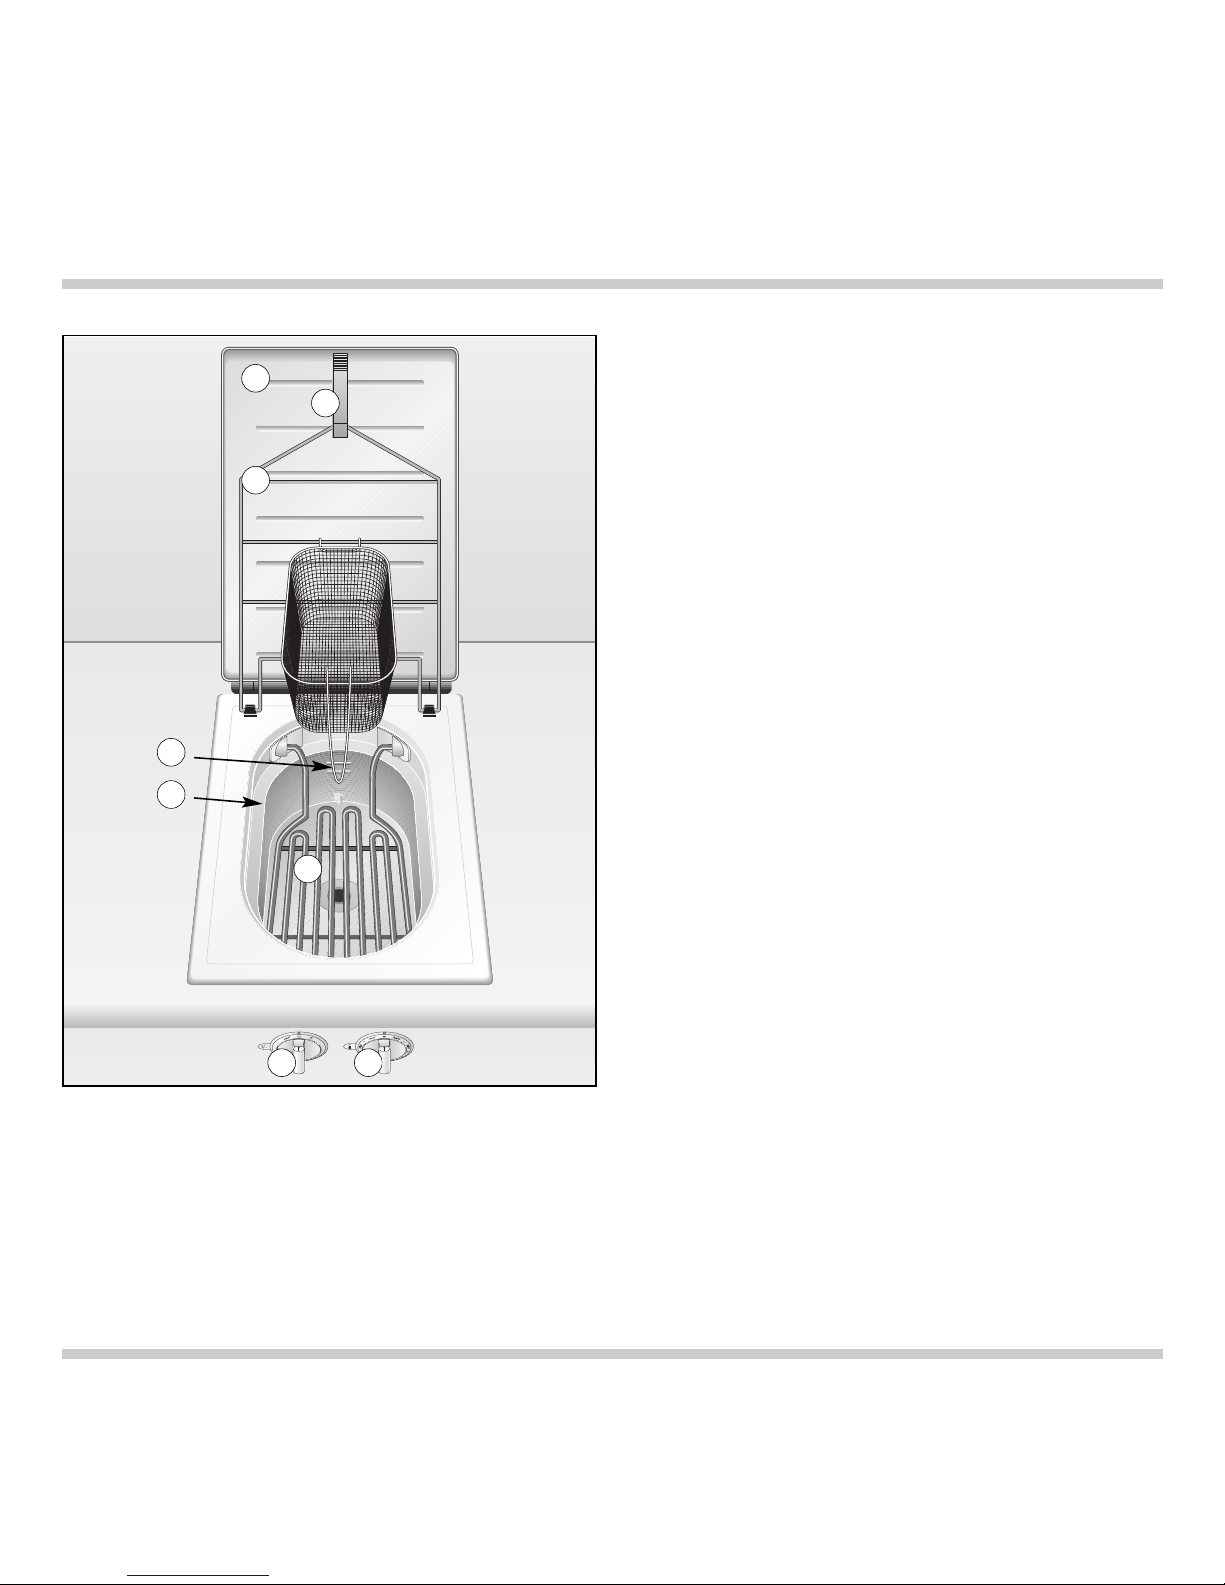
Only use the intended deep frying baskets.
The deep frying oil/fat will foam over if foodstuffs
are too wet or if excessive quantities are inserted.
Risk of burns!
Keep ventilation openings open (doors, extractor
hoods and windows).
Top up oil or fat as soon as it is below the minimum
level (bottom marking). Caution: there is a fire
risk if the oil/fat level should drop below the
bottom marking!
Switch off the appliance after use.
The door(s) of the base cabinet must be locked if
there are small children in your household. This
reduces the risk of burns.
Fire risk! Clean your appliance at regular intervals
and change the oil/fat regularly. Old/soiled fat must
be replaced if it becomes brown, has an unpleasant
smell and/or smokes prematurely (340 - 350 °F). Old
oil/fat tends to foam over easily and has a lower
ignition temperature.
Built-in overheating protection prevents overheating
of the appliance and of surrounding kitchen
furniture.
In the event of malfunction, first check your house-
hold fuses. If the power supply is in proper working
order, but the appliance is still not functioning,
please inform your specialist dealer or your nearest
Gaggenau after-sales service.
Operating for the first time
Remove the packaging from the appliance and
dispose of it according to local regulations.
Be careful to remove all accessories from the
packaging. Keep packaging elements and plastic
bags away from children.
Check the appliance for transport damage before
installing it.
The appliance must be installed and connected by
an authorised specialist before operation. Before
operating the appliance for the first time, make
sure that the mains connection is in proper working
order.
The serial number of the appliance can be found on
the quality control slip which is included with these
instructions. This quality control slip should be kept,
for guarantee reasons, together with your operating
and assembly instructions.
Read through these instructions attentively before
operating your appliance for the first time.
Thoroughly clean the appliance and accessories
before using them for the first time. This will elimi-
nate any 'newness’ smells and soiling (see chapter
“Cleaning and care”).

6
Features
Special accessories
1Appliance cover
2Holding clip for frying basket holder
3Frying basket holder
4Minimum / maximum level marker
5Foaming edge
6Heating element (3 000 W)
7Control knob to select fat / oil / cleaning setting
8Temperature control knob
You can order the following special accessories:
FK 020-000 Frying basket
VV 400-000 Connecting trim
VZ 400-700 Connecting trim with timer
2. Features
2
1
4
3
5
8
6
7

Operating principle The two marks on the rear of the deep fryer
indicate the maximum and minimum levels for the
deep-frying oil or fat. The oil/fat level should always
be between the two marking lines.
The food to be fried should always be completely
covered by the deep-frying oil or fat; if this is
impossible, turn the food after half the frying time.
The appliance has a special fat setting when using
fat for frying. To keep the fat from overheating, it is
first melted slowly and then heated to the required
temperature.
Any water contained in the food sinks to the bottom
of the Gaggenau Electric Fryer into so-called cold
oil zone. This prevents the oil frothing over. Also,
any particles of food which break away during
frying fall through the basket and sink to this cold
zone. The lower temperature in this zone prevents
the oil breaking down and considerably prolongs
the time for which the oil or fat can be used. The
foaming edge serves to accommodate the foam that
occurs during deep frying.
Built-in overheating protection prevents overheating
of the appliance and of surrounding kitchen
furniture.
The deep fryer is switched off, the luminous disc
behind the right control knob flashes.
Possible causes:
• No or not enough fat/oil in the fryer.
• The fryer has been switched on with the oil setting
selected, although it is filled with fat.
Turn the temperature control knob to 0. The
flashing will stop, as soon as the temperature on
the heating element drops below a critical value.
Put fat/oil into the deep fryer. Now the deep fryer
can be switched on again as normal.
7
3. Operation

8
Switching on
• Open the appliance cover. Fit the frying basket
holder into the two clips on the edge of the basin
and secure the holder in the clamp on the cover.
• Fill the frying basin either with 3 - 3.5 l of heat-
resistant oil (e.g. peanut oil, palm oil or special
deep frying oil) or 2.5 - 3 kg of heat-resistant fat
(e.g. coconut fat, lard or special frying fat). Cut the
fat into approx. 250 g pieces if necessary and
place these evenly in the frying basin. The fat
should be room or fridge temperature, but on no
account frozen.
• Press down the left control knob and turn it to the
oil or fat setting required.
• Press down the right control knob and turn it to the
required temperature between 270 and 380 °F.
• The luminous disc behind the control knob
flashes, while the appliance is heating up. When
the required temperature is reached, the luminous
disc lights constantly.
• When using fat, although the required tempera-
ture has been reached, some fat may remain hard
in the cold oil zone. This does not affect the frying
result. You can start frying, when the luminous disc
behind the right control knob lights constantly.
• Fill the frying basket at the side of the appliance
and insert the basket into the hot oil.
• When the food is ready (see settings table), take
out the deep frying basket, shake it lightly and
hang it on the frying basket holder. This will make
sure that the oil can drip off faster. Use the upper
three runs of the frying basket holder. When using
two frying baskets simultaneously, hang them side
by side (only the two top runs) or one above the
other onto the frying basket holder.
Important: Never switch on the deep fryer
empty. The oil/fat level in the frying basin should
always be between the two marking lines.
Switching on
cleaning setting fat setting oil setting

Switching off
Fully turn the right control knob to the OFF position.
Residual heat display
After switching off the deep fryer, the luminous disc
behind the right control knob will flash, as long as
the appliance has not cooled down sufficiently to
be touched safely.
The appliance cover must not be closed until the
appliance has cooled down completely.
Holiday safeguard
(Automatic switch-off)
The appliance is set to automatically switch off
4 hours after the last operation. The luminous disc
behind the right control knob flashes. Turn the
control knob to 0. Now the deep fryer can be
switched on again as normal.
Draining the deep frying oil or fat
Drain used oil only after the residual heat display
has gone off. Avoid contact with the oil or fat.
Use a temperature-resistant bucket with a capacity
of at least 10 litres to collect the oil/fat.
The deep frying oil or fat is drained off through the
oil drain valve, which is located under the funnel-
shaped base of the deep frying tub: first unscrew
the plastic cap from the drain valve, and then open
the drain valve by pulling the handle down. After
draining the oil, close the drain valve and screw the
plastic cover back on. If fat does not drain, it might
have hardened in the cold oil zone.
Dispose of used oil and fat in accordance with local
regulations.
9
Switching off

Visual signals
10
Luminous disc Luminous disc Signification Cause / Remedy
behind the left behind the right
control knob control knob
lights OFF appliance is switched OFF
right control knob appliance is ON normal use
lights constantly
flashing of appliance is normal use
right control knob heating up
flashing of residual heat The appliance is too hot to be
right control knob display touched safely.
fast flashing of appliance was Appliance was switched on without
right control knob operated empty any or not enough fat or oil. Oil
or overheating setting was used with fat.
protection Turn right control knob to 0 and let
the appliance cool down.
fast flashing of holiday safeguard The appliance setting has not been
right control knob changed for over 4 hours. Turn right
control knob to 0 and then switch
on again if required.
fast flashing of power cut After a power cut, the appliance
right control knob stays switched off for safety
reasons. Turn control knob to 0
and then switch on again if
required.
fast flashing of faulty installation Connecting cable between the
both control knobs appliance and the control panel
alternately is not plugged in. Check that cable
is plugged in firmly.

11
4. Practical tips
• The deep frying temperature range lies between
320 and 360 °F. The maximum temperature is
380 °F.
• According to the general recommendations for
healthy frying, a temperature of 350 °F should not
be exceeded (see cooking table). There should
be 100 g maximum of food per 1 litre of oil/fat and
it should only be fried until the food obtains a
golden yellow.
• The surface will crust too fast if the frying fat is too
hot. Its interior, however, will remain raw. The food
will take on too much fat if the fat is too cold.
• If the fat is at the right temperature, its pores will
close swiftly when it is dipped in and a protective
crust will form. Thus, only a small amount of fat is
able to penetrate the food. Drain freshly deep
fried food on absorbant kitchen paper. This redu-
ces the amount of fat even more.
• Use heat-resistant oil or fat (with a smoke point of
at least 390 °F). Suitable e.g. peanut oil, palm oil or
coconut fat. Unsuitable e.g. native olive oil, soya
or wheat germ oil.
• Replace the deep frying oil or fat completely if it
smells or tastes unpleasant, foams, begins to
smoke at 340 - 350 °F or if the food you are deep
frying no longer becomes crispy despite having
set the correct temperature.
Smoking of the oil is not to be confused with water
steam which occurs when frying moist food.
• After every use of the deep fryer, remove any
resulting remainders of food (e.g. bread crumbs)
from the oil or fat.
• If you would like to re-use the oil, filter the cooled
oil through a fine metal sieve.
• Do not salt or season the food or fill the basket
over the deep fryer.
• The following foodstuffs are suitable for deep
frying: small pieces of meat and fish, vegetables,
potatoes, pastries, fruit and breaded foodstuffs.
• The food to be fried should be completely
covered with oil or fat, otherwise it will need to
be turned after half of the frying time has elapsed
or pushed down using a second frying basket.
• During deep frying (from 340 °F), oil and fat takes
on neither an odour nor taste. So, you can deep fry
fish and fruits straight after one another.
• Moist or frozen food leads to particularly excessive
foaming of the fat when it is inserted. Thoroughly
dry all moist foods and slowly dip in the filled
basket several times. This prevents overflowing
of the fat. Remove ice from frozen food.
• Do not fry large quantities of food at the same
time, so that the oil can circulate well and transfer
the heat quickly to the food. Shake the basket
throughout frying to prevent food sticking together
and to allow the oil to circulate better.
• After cooling down, close the appliance cover.
This is necessary for safety reasons and prevents
things from falling into the fat.

12
5. Settings table
Item Temperature Quantity Deep frying Remarks
(°F) time (min.)
Snacks and hors d'oeuvres
Camembert, breaded 300 2 7 - 8
Spring rolls 320 4 - 6 5 - 7 Depending on size
Pears filled with Roquefort cheese 320 2 5 - 7 Turn frequently
Flaky pasties (e.g. filled with mushrooms, 350 4 - 5 6 - 7 Depending on size,
mince or feta cheese) turn frequently
Vegetables
Various vegetable pasties / vols au vent 340 - 350 6 - 8 5 - 8 Depending on cooked state
(e.g. aubergine and zucchini slices, oyster mush- and size, deep fry without
room, Brussels sprouts*, sellery slices*, cauliflower basket, turn frequently
florets*, mushroom heads) *pre-cooked firm
Onion rings 330 - 340 200 g 2 - 3
Vegetable strips (e.g. carrots, potatoes) 350 200 g 2 - 3
Potato croquettes, homemade 330 8 - 10 6 - 7 Turn frequently
Meat
Meatballs 320 10 5 - 7
Scallop of veal, breaded Viennese style 340 - 350 2 5 - 6
Cordon bleu, pork 350 2 6 - 7
Chicken legs, breaded 320 4 25 - 30 Turn frequently
Pieces of ham in sparkling wine dough 350 150 g 3 - 4
Fish and seafood
Fritto Misto 310 - 320 / — 2 - 3 Deep fry fish at 310 - 320 °F and
350 meat at 350 °F without basket
Fish fillet, breaded 310 - 320 2 9
King prawns in batter 340 - 350 10 4 - 5
Sweets
Apple-beignets 340 - 350 4 2 each side Deep fry without the basket,
turn once
Berlin-style pancake 350 4 2 each side Turn once
Doughnuts 330 5 - 6 2 each side Turn once
Plum dumplings 340 4 - 6 5 - 6
Fruits wrapped in pastry (e.g. pears, grapes, 350 — 4 Deep fry without the basket,
apricots, strawberries, pineapple slices, turn frequently
bananas, cherries, peach and kiwi halves)
Plum doughnuts 310 10 6 - 7
Shortbread 330 - 340 5 6-7 each side Deep fry without the basket,
turn once
The values specified here are guide values, which may differ depending on the condition of the food and personal taste.
Prepare deep frozen foodstuffs according to the information specified on the package.

Do not use any abrasive and caustic cleaning
agents (scouring or nitro polishing agents). Do not
use any cleaning agents containig chloride (for
example bleach), these can cause corrosion
damage to the appliance.
Do not use any abrasive sponges either.
Clean the appliance and accessories thoroughly
before using them for the first time.
Cleaning the frying basin
• Drain off oil/fat (see page 9). Remove the frying
basket.
• If necessary, remove food residues from the frying
basin with kitchen paper after draining the oil and
letting the heating element cool down.
• Fill the empty frying basin with approx. 4 litres of
soapy water.
• Press down both control knobs and turn them right
to the cleaning setting. The luminous disc behind
the right control knob flashes, as long as the
appliance heats up.
• Clean the frying basin with a soft dishwashing
brush once the appliance has heated up and the
luminous disc lights constantly.
• The water is drained off through the oil drain
valve, which is located under the funnel-shaped
base of the deep frying tub: unscrew the plastic
cap from the drain valve and open the oil drain
valve by turning the handle down. Use a
temperature-resistant bucket with a capacity
of at least 10 litres to collect the water.
• If you should wish to repeat the operation due to
heavy soiling, refill the basin with clean water and
turn the right control knob to the 0 position and
then back to the cleaning setting. The appliance
re-heats to 140 °F.
• To clean underneath the heating element, wait
until the residual heat display has gone off. Then
tilt up the heating element.
• Leave the bucket under the drain valve and rinse
the appliance with hot water and rub it dry.
Close the oil drain valve again and screw on the
plastic cap.
• The frying basin should not be treated with
stainless steel care agents because, in most
cases, these are not neutral as far as foodstuffs
are concerned.
Cleaning the frying basket holder and the
frying basket
Remove basket holder gently from clips. Clean
holder and basket after use in the dishwasher or
with mild soapy water.
Cleaning the control knobs
Wipe with a damp cloth. Cloth should not be too
wet, as moisture could penetrate behind the control
knob.
13
6. Cleaning and care
Note: to avoid jeopardising the electrical safety
of the appliance, do not use high-pressure or
steam jet cleaning devices – risk of short circuits!
Caution, risk of burns!
Before cleaning, please wait until the appliance
has cooled down completely.
Never switch on the fryer when the heating
element is tilted up.
Do not allow any water to come into contact with
hot fat or oil!
Cleaning setting

The appliance must be disconnected from the
power supply during all repair work.
If the appliance does not function correctly, check
the fuses first.
If the power supply is functioning correctly, but your
appliance still does not work, please contact your
Gaggenau dealer who will provide you with the
address and telephone number of your nearest
manufacturer’s authorized service agent or contact
Gaggenau USA on (800) 828-9165. Specify the
appliance type (see rating plate).
Repairs may only be carried out by authorised
technicians, in order to guarantee the safety of the
appliance.
Unauthorised tampering with the appliance will
invalidate any warranty claims.
Only ever use original spare parts.
14
7. Maintenance

Technical data
Total connected load: 3 000 W
AC 208/220-240 V / 60 Hz
Important notes on installation
This appliance can be combined with all Gaggenau
Vario 400 Series appliances.
Note: do not install the appliance directly next
to a steam cooker!
This appliance may be installed in kitchen combi-
nations made of wood or similar combustible
materials without taking additional safety measures.
The built-in furniture and worktop where the
appliance is installed must be heat resistant up to
temperatures of 200° F/90° C.
The appliance must only be connected by an
authorised specialist, paying attention to the
relevant regulations of the power supply companies
and the regional construction regulations.
When connecting electrical appliances in the
proximity of cooking surfaces, make sure that
connecting cables do not come into contact with
hot cooking surfaces.
The installation technician is responsible for the
correct functioning of the appliance at the place of
installation. He must instruct the user on how to
disconnect the appliance from electricity in an
emergency.
After unpacking, check the appliance for any
transportation damage and report this immediately
to the transportation company.
There must be a gap of at least 40 mm (19/16 ´´)at
the side between the appliance and any walls or
furnishings.
The minimum distance from the trough base to the
nearest heat-sensitive parts is 10 mm (13/32 ´´).
If all poles of the appliances cannot be isolated
from the mains by removing an accessible plug, an
isolating device with a contact gap of at least 3 mm
must be installed (e.g. domestic fuse).
Only a qualified electrician should install this
appliance.
This appliance must be hardwired.
The mains connecting cable must at least
correspond to the type SJTO 3x16 AWG 105°C.
The mains connecting cable must only be
purchased through and connected by an
authorised specialist. The appliance must be
properly grounded. Pay attention to the
information on the rating plate.
No warranty claims can be lodged for any
damage resulting from failure to observe these
instructions. Pay attention to the “Important
notes" on page 3 and 4.
Subject to technical change without notice.
15
8. Installation

Preparing the cabinet The minimum spaces that must be maintained
between the appliance cooking surface and the
horizontal surface above the cooking top shall be:
A = 30 inches (762 mm) minimum clearance
between the top of the cooking surface and the
bottom of an unprotected wood or metal cabinet;
or A = 24 inches (600 mm) minimum when bottom
of wood or metal cabinet is protected by no less
than 1/4-inch-thick flame-retardant millboard
covered with no less than No. 28 MSG sheet steel,
0.015-inch-thick stainless steel, 0.024-inch-thick
aluminimum, or 0.020-inch-thick copper.
1 Building back wall
2 Top building cabinet
3 Appliance cover
4 Building side wall
5 Building side wall
16
1
2
3
4
5
A

Preparing the cabinet • Cut out the recess for one or several Vario
appliances in your worktop. Proceed as indicated
on the installation sketch. The installation sketch
contains the measurements of the space required
for the trim between the appliances. Several
appliances can also be installed in individual
recesses, as long as a minimum clearance of
50 mm (2 ´´)is kept to between the appliances.
• As shown in the installation sketch, drill the
Ø35 mm (13/8´´)holes to secure the control knobs
in the cabinet front.
• If the cabinet front is thicker than 26 mm (11/32 ´´),
the front must be routed from the back to
max. 26 mm (11/32 ´´) on an area of 80 x 310 mm
(35/32 ´´-1213/64 ´´).
17
30
7
/
64
''
1
/
32
''
62
''
46
4
/
64
''
14
11
/
64
''
20
9
/
32
''
19
19
/
64
''
min.
1
31
/
32
''
min.
1
12
/
32
''
20
5
/
64
''
10
10
/
16
''
2
27
/
32
''
8
21
/
32
''
3
''
11
1
/
32
''
min.
4
9
/
64
''
max.
6
13
/
62
''
3
1/
2
''
2
23
/
64
''
1
12
/
32
''
14
31
/
32
''
D> 11/32''
D= 11/32''
3 5/32'' x
12 13/64'' x
min.13/64'' min.13/64''
20/32'' - 11/32''

Installing the control panel
• Before installation, remove all styrofoam
packaging from the control knobs and peel off
the protective film behind the luminous discs.
• Hold the support plate from the rear against the
cabinet front, insert control knobs into the holes,
secure from the rear with the nuts.
Take care to install control knobs in the correct
order: left control knob for mode selection, right
control knob for temperature selection.
• Secure the control panel with the included nuts
onto the support plate.
18
Note:
only install control panel with appliance of the
corresponding type.
Before connecting the appliance, make sure
the electricity is switched off at fuse point!
Table of contents
Other Gaggenau Fryer manuals

Gaggenau
Gaggenau VP 230 Teppan Yaki User manual

Gaggenau
Gaggenau VF 414 610 User manual

Gaggenau
Gaggenau VF 230 Product guide

Gaggenau
Gaggenau VF 230 614 User manual

Gaggenau
Gaggenau VF 230 614 User manual

Gaggenau
Gaggenau VF 230 Product guide

Gaggenau
Gaggenau VF 230-910 Product guide

Gaggenau
Gaggenau VF 230-610 Product guide

Gaggenau
Gaggenau VF 230 User manual

Gaggenau
Gaggenau VF 230 611 Product guide