manuals.online logo
Brands
  1. Home
  2. •
  3. Brands
  4. •
  5. GALA
  6. •
  7. Bathtub
  8. •
  9. GALA mitta User manual

GALA mitta User manual

Other manuals for mitta

2

Other GALA Bathtub manuals

GALA LAGUNA User manual

GALA

GALA LAGUNA User manual

GALA Sensitive Smart Mounting instructions

GALA

GALA Sensitive Smart Mounting instructions

GALA mitta User manual

GALA

GALA mitta User manual

GALA Emma User manual

GALA

GALA Emma User manual

GALA Vanesa-HM User manual

GALA

GALA Vanesa-HM User manual

GALA mitta User manual

GALA

GALA mitta User manual

GALA NUI-3/1500 T Guide

GALA

GALA NUI-3/1500 T Guide

Popular Bathtub manuals by other brands

Globo PAESTUM Vasca PA100 quick start guide

Globo

Globo PAESTUM Vasca PA100 quick start guide

Jacob Delafon LOVEE CE9287-00 Assembly instructions

Jacob Delafon

Jacob Delafon LOVEE CE9287-00 Assembly instructions

Crosswater US-N9CS installation instructions

Crosswater

Crosswater US-N9CS installation instructions

Clou CL/05.70020.20 installation instructions

Clou

Clou CL/05.70020.20 installation instructions

Agua BARTOLI-66 quick start guide

Agua

Agua BARTOLI-66 quick start guide

PAA PRELUDE owner's manual

PAA

PAA PRELUDE owner's manual

BETTE SILHOUETTE installation guide

BETTE

BETTE SILHOUETTE installation guide

agape MARSIGLIA AVAS1075 Assembly instructions

agape

agape MARSIGLIA AVAS1075 Assembly instructions

Kohler K-820-GC Roughing-In Guide

Kohler

Kohler K-820-GC Roughing-In Guide

Oliveri Naples installation instructions

Oliveri

Oliveri Naples installation instructions

Lyons Elite ETLxx663219 Series manual

Lyons

Lyons Elite ETLxx663219 Series manual

Woodbridge BJ500 Installation and care guide

Woodbridge

Woodbridge BJ500 Installation and care guide

Whirlpool Ariel ARL-702 installation manual

Whirlpool

Whirlpool Ariel ARL-702 installation manual

Kohler K-1151 Homeowner's guide

Kohler

Kohler K-1151 Homeowner's guide

American Standard 3052OD.X0X Installation instructions and owner's manual

American Standard

American Standard 3052OD.X0X Installation instructions and owner's manual

Kohler K-1111-H2 Roughing-In Guide

Kohler

Kohler K-1111-H2 Roughing-In Guide

Kohler K-1158 Roughing-In Guide

Kohler

Kohler K-1158 Roughing-In Guide

Kohler Hourglass K-1209-LA Roughing-In Guide

Kohler

Kohler Hourglass K-1209-LA Roughing-In Guide

manuals.online logo
manuals.online logoBrands
  • About & Mission
  • Contact us
  • Privacy Policy
  • Terms and Conditions

Copyright 2025 Manuals.Online. All Rights Reserved.

Mitta
D-E: (con faldón) / (with apron) / (avec tablier)
D’-E’: (sin faldón) / (without apron) / (sans tablier)
1700
1600
545 545-565
545 545-565
MITTA
1700
1600
270
270
270
270
545
545
545-565
545-565
AD’
B C D
130
130 130-150
130-150
130
130 130-150
EE’
130-150
700
700
750
750
BAÑERA ACRÍLICA - ACRYLIC BATHTUB - BAIGNOIRE ACRYLIQUE
2
Mitta
1
Mitta
INSTALACIÓN BASTIDOR - INSTALACIÓN BASTIDOR - INSTALACIÓN BASTIDOR
Únicamente para bañeras (sin hidromasaje) con el bastidor sin fijar
Only for bathtubs (without hydromassage) with not fixed metal frame
Uniquement pour les baignoires (sans hydromassage) avec le châsis sans fixer
NILA-S
4
Proteger la bañera antes de
proceder a su instalación.
Realizar el tendido de tuberías
de alimentación y desagüe
situando la grifería según, Fig-1.
Revestir paredes y suelo.
Colocar los soportes de apoyo
( n o s u m i n i s t r a d o s )
d i s t r i b u y é n d o l o s
uniformemente y depositar
silicona según Fig-2.
Antes de colocar la bañera en su
em pl az am ie nt o, m on ta r l a
grifería. (La ubicación que se
m u e s t r a e n F i g . 1 e s
únicamente a título orientativo).
Colocar la bañera. Regular la
altura y nivelar.
Fijar los pies al suelo.
C o n e c t a r e l d e s a g ü e
i n t e r c a l a n d o u n e l e m e n t o
elástico.
Efectuar el revestimiento mural
de la bañera o, en su caso,
montar el faldón.
Llenar la bañera de agua y sellar
las uniones con silicona según
Fig-3.
Sin pies:
En las bañeras instaladas sin
s o p o r t e m e t á l i c o , d e b e r á
realizarse la obra necesaria con
ladrillos o lecho de arena.
Protect the bathtub before its
installation.
Install the water supply and
drainage piping, placing the
taps as shown in Fig-1.
I n s t a l l f l o o r a n d w a l l
coverings.
Place supports (not included)
uniformly and apply silicone
as shown in Fig-2.
B e f o r e p o s i t i o n i n g t h e
bathtub,install the taps. (The
position showed in Fig-1 is
only a guide).
Place the bathtub. Regulate
height and set level.
Position the legs and secure
them to the floor.
Connect the drainage pipe
using an elastic joint.
Build the bathtub fronting or, if
applicable, install the skirting.
Fill the bathtub with water and
seal all joints with silicone, as
shown in Fig-3.
Without legs:
For steel bathtubs without a
me t al s up p or t str uc ture ,
mounting must be performed
with bricks or sanded.
Protéger la baignoire avant de
procéder a son installation.
P o s e r l e s t u y a u t e r i e s
d'alimentation et d'écoulement
d e s e a u x e n p l a ç a n t l a
robinetterie conformément à la
Fig-1.
Revêtir les murs et le sol.
Placer des appuis (pas inclus)
de manière uniforme et poser la
silicone conformément à la Fig-
2.
Avant d'installer la baignoire
dans I'emplacement qui lui est
réservé, monter la robinetterie.
(La situation décrite dans la
Fig-1 est uniquement à titre
indicatif).
Installer la baignoire. Régler la
hauteur et mettre à niveau.
Asseoir les pieds et les fixer au
sol
.
R a c c o r d e z l e t u y a u
d'é coule men t de s ea ux e n
i n t e r c a l a n t u n é l é m e n t
élastique.
Effectuer le revêtement mural
de l a b ai g no i re o u, l e c as
échéant, monter le tablier.
Remplir la baignoire d'eau et
sceller les jointures avec de la
silicone, conformément à la
Fig-3.
Sans pieds:
Dans les baignoires installées
s a n s s u p p o r t m é t a l l i q u e ,
l’installation se fera avec des
briques ou un lit de sable.
INSTALACIÓN BAÑERA
Español Français
English
BATH-TUB INSTALLATION
INSTALLATION DE LA
BAIGNOIRE
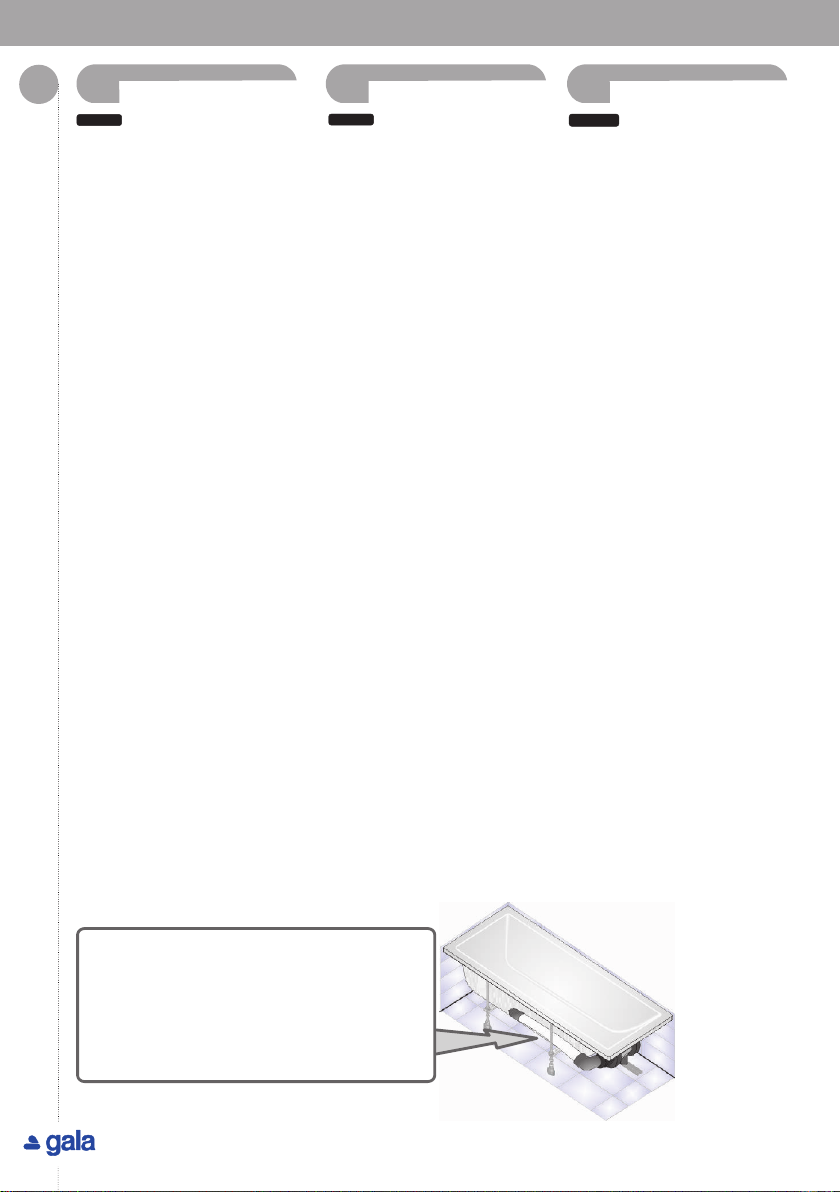
El sistema de aspiración irá siempre en la parte
accesible de la bañera.
The aspiration system of the bathtub must be
placed in the accessible part, in order to permit
easy servicing.
Le système d'aspiration de la baignoire sera
toujours situé dans la partie accessible.
Mitta
INSTALACIÓN PARA BAÑERA SIN EMPOTRAR
INSTALLATION FOR NOT BUILT-IN BATH-TUB
INSTALLATION POUR BAIGNOIRE SANS ENCASTRER
INSTALACIÓN PARA BAÑERA EMPOTRADA
INSTALLATION FOR BUILT-IN BATH-TUB
INSTALLATION POUR BAIGNOIRE ENCASTRÉE
Mitta
6INSTALACIÓN FALDÓN FRONTAL - INSTALLATION OF FRONTAL PANEL -
INSTALLATION DE TABLIER FRONTAL
Mitta
Únicamente para bañeras empotradas en la pared
Only for bathtubs that are built-in on the wall
Uniquement pour des baignoires encastrées au mur
Cortar el faldón por la parte próxima a la pared.
Cut the panel by the part next to the wall
Couper le tablier sur la partie qui répose contre le mur
Mitta
8INSTALACIÓN FALDÓN LATERAL DERECHO - INSTALLATION OF SIDE RIGHT PANEL
INSTALLATION DE TABLIER LATÉRAL DROIT
Mitta
Únicamente para bañeras empotradas en la pared
Only for bathtubs that are built-in on the wall
Uniquement pour des baignoires encastrées au mur
Mitta
MITTA
10
Mitta
INSTALACIÓN FALDÓN LATERAL IZQUIERDO - INSTALLATION OF SIDE LEFT PANEL-
INSTALLATION DE TABLIER LATÉRAL GAUCHE