Gallagher Smartfix User manual

3
Contents
English
Specifications....................................................................... 4
Using the Gallagher Smartfix in Volt Meter Mode ................ 4
Using the Gallagher Smartfix in Fault Finder Mode............... 4
Voltage Probe...................................................................... 7
Earth Lead Accessory ........................................................... 7
Replacing the Smartfix Battery ............................................. 7
Understanding your Electric Fence........................................ 8
Français
Caracteristiques: .................................................................. 9
Smartfix Kit.......................................................................... 9
L’utilisation de votre Smartfix Gallagher ............................. 11
Mode amperemetre........................................................... 11
Mode voltmetre................................................................. 11
Tige de terre ...................................................................... 12
Comment fonctionne votre cloture electrique .................... 12
Español
Especificaciones: ................................................................ 13
Smartfix package ............................................................... 13
Modo de utilizar su Gallagher Smartfix............................... 15
Funcion de medidor de corriente........................................ 15
Funcion de voltimetro ........................................................ 15
Comprendiendo su cerco electrico ..................................... 16
Deutsch
Angaben ........................................................................... 17
Benutzung Ihres Gallagher Smartfix-Gerätes im Voltmeter-
Modus............................................................................... 17
Benutzung Ihres Gallagher Smartfix- Gerätes im Fehler-Such-
Modus............................................................................... 17
Spannungsmess-Stift ......................................................... 20
Erdungsanschluss-Zubehör................................................. 20
Smartfix Batterie ersetzen .................................................. 20
Verstehen Sie Ihren Elektrozaun? ....................................... 21
Nederlands
Specificaties:...................................................................... 22
Smartfix Kit........................................................................ 22
Het gebruik van uw Gallagher Smartfix.............................. 24
Stroomsterktemodus ......................................................... 24
Voltmetermodus................................................................ 24
Hoe werkt uw elektrische Afrastering?............................... 25
Svenska
Specifikationer................................................................... 26
Använd Gallagher Smartfix i voltmätarläge......................... 26
Använd Gallagher Smartfix i felfinnarläge .......................... 26
Spännings sond: ................................................................ 29
Jordkabeltillbehör: ............................................................. 29
Byt batteri i Smartfix .......................................................... 29
Förstå ditt elstängsel .......................................................... 30

4
Using the Gallagher Smartfix in Fault
Finder Mode
Note: The current flow on the fence will vary depending
on the size of your Energizer, any vegetation and the size
of our fence network. With time you will learn normal
current flow on your fence. To obtain the best results from
your FaultFinder, Gallagher recommends that you check
the current while the fence is operating without any faults.
Then, when you suspect there is a fault on the fence line,
you can compare the current flow with the “normal”
current flow. This will indicate whether a fault exists and,
if so, how much the fault is affecting the performance of
the fence.
Specifications
Using the Gallagher Smartfix in Volt
Meter Mode
The LCD indicates the Smartfix is in Volt Meter mode by1. displaying the voltage in Kilovolts (kV or thousands of
volts).
If necessary push
the mode button
to change from
Fault Finder
mode to Volt
Meter mode.
Place the2. Smartfix on the fence
wire so the wire lies
in the top part of the
Measurement slot and
is making good contact
with the contact plate.
Check the fence voltage.3.
Handy Hint: Gallagher recommends that you
maintain a minimum of 3kV on your fence line.
Because most fence lines have some current flow, it is
only necessary to check for faults when the voltage
drops below the normal operating level.
• Voltage: 0.2 to 14 kV
• Current: 1 - 35 Amps
• Battery: CR2032

5
The LCD indicates1. the Smartfix is in
Fault Finder mode
by displaying the
current in Amps.
If necessary push
the Mode button
to change from
Volt Meter mode
to Fault Finder
mode.
Place the Smartfix on2. the fence wire so the
wire lies in the top part
of the Measurement slot and making good contact with
the contact plate.
The Arrow on the LCD will indicate which direction the3. current is flowing. The LCD will display the current in
Amps.
Following the direction of the current, take readings4. approx. every 50 - 100m or at junction points along your
fence line.
Note: At a junction point,
follow the wire with the
highest current flow.
A fault is indicated by a drop5. in current flow between two
checkpoints. The fault will be somewhere between the
two checkpoints.
Note: The arrow will still point in the direction of the
current flow if greater than 1A.
To narrow down location of the fault, work back along6. the fence checking the current flow at shorter intervals.
Correct the fault.7.
After correcting the fault you should see the current8. reading drop and the voltage go up. If not, check for
further faults.
Note: Multi-wire fences connected in parallel will have
similar current flowing in each wire. To get the total
fence current flow, add together the current flow in
each wire.

6

7
Use the Voltage probe in hard to reach areas such as Cut-out
switches. Touching the probe on a terminal will activate
the Smartfix to display a voltage reading. You should not
use the voltage probe for current readings as they will
not be accurate. The fence line needs to flow through the
measurement slot to obtain accurate current readings.
Note: Do not place the voltage probe on the
Energizer terminals. The Gallagher Smartfix will not
give accurate results within 3m (10’) of the energizer.
Earth Lead Accessory
Voltage Probe
Replacing the
Smartfix Battery
Remove the plastic caps1. covering the 4 screws on the
back of the Smartfix with a
sharp object such as a small
screwdriver or knife.
Remove the screws and carefully pull the Smartfix apart.2.
Slide out the used battery and insert a new one.3.
Push the Smartfix back together.4.
Note: Make sure the black seal sits neatly in place
to ensure the Smartfix is waterproof.
Replace the screws and press the screw caps into place.5.
The Smartfix has been
designed to give an
accurate
measurement of
voltage across a
wide range of
conditions. If
greater
accuracy is
desired the
Earth lead
should be used. If
you have an Earth Return
Fence system then use the Earth lead and
place it on the Earth wire. In all other
instances, placing your thumb
on the Earth Stud will be sufficient
(this will not give you a shock).

8
Compare your electric fence to a water supply system.
Fence Voltage = Water Pressure
Electric Current = Water Volume/Flow
A perfectly performing Electric fence is similar to a
water system that has a pressure pump (Energizer) at
one end and a bung at the other. There would be high water
pressure (voltage) and a high flow potential with no water
leaking.
Understanding your Electric Fence
When an animal touches this fence there is total delivery of
volume and current for a maximum shock.
A normal electric fence is similar to a water pipe with one or
two leaks (faults). While a minor flow of water (current) will
flow into these leaks and reduce overall pressure (voltage)
at point B, the pressure is still significant enough to deliver
enough water (current) at point B as needed.
When an animal touches the fence, there is still sufficient
voltage and current to deliver an effective shock.
An electric fence with a substantial fault on the fence line is
similar to a water system with a major leak. Hence you will
see significant flow of water (current) along the pipe to this
leak. As most of the water is flowing out of this leak very little
water (current) reaches point B.
When an animal touches the fence at point B, there is
insufficient voltage and current to deliver an effective shock.
Note: To avoid excessive battery use caused by accidental
activation, do not leave your Gallagher Smartfix on or near
the energizer or electric fence.

9
Caracteristiques:
• Tension: de 0,2 à 14 kV
• Intensité de courant: 1-35 A
• Pile: CR2032
Smartfix Kit
Ce kit contient: • 1 x appareil Smartfix (complet avec pile)
• 1 x Tige de terre
• 1 x Mode d’emploi
• 1 x Etiquette
Le Smartfix Gallagher représente la technologie la plus
avancée en matière de clôtures électriques. Ce détecteur
multifonctionnel combine en un seul dispositif les fonctions
de Voltmètre et d’Ampèremètre. En mode Voltmètre vous
pourrez sans peine mesurer les prestations de votre clôture.
Et par simple commutation au mode Ampèremètre vous
aurez vite fait de repérer la moindre anomalie sur votre
clôture.
Diagramme 1
1.Encoche de
mesurage Un fil
électrique est posé sur
la plaquette de
contact.
2. Détecteur de tension (escamotable)
Permet l’utilisation en des lieux d’accès
difficile comme les commutateurs ou
bornes de raccordement d’un
électrificateur. Lancez le mesurage en
enfonçant le bouton de
détection.
Note: Ne pas
utiliser en mode
Ampèremètre.
3. Commutateur
de fonction
Appuyez sur ce
bouton pour
passer du mode
Ampèremètre
en mode
Voltmètre .
4. Ecran d’affichage LCD
Lecture de la tension et de
l’intensité de courant - Voir
diagramme 2.
5. Connecteur de
terre Raccordement
pour détecteur.
6. Tige de terre
Convient pour
des mesures
précises du
voltage,
notamment
pour les
tensions en
dessous de
1kV.

10

11
Attention: Mesurez à partir de l’électrificateur pour trouver de façon
logique l’eventuelle anomalie.
L’utilisation de votre Smartfix
Gallagher
Mode voltmetre
L’écran LCD indique que le Smartfix se1. trouve en mode Voltmètre en mention-
nant la tension en Kilovolts (kV ou
nombre de milliers de volts).
Enfoncez au besoin le commutateur de
mode pour passer du mode
Ampèremètre en mode Voltmètre.
Appliquez le Smartfix contre le fil de2. clôture de sorte que celui-ci se trouve
bien engagé dans l’encoche de
mesurage et parfaitement en contact
avec la plaquette.
Contrôlez la tension de la clôture3. .
Conseil pratique: Gallagher recommande de maintenir la
tension sur votre clôture à 3kV minimum. Si la tension tombe
en deçà de cette valeur, passez en mode Ampèremètre pour
détecter l’origine de la chute de tension sur votre clôture.
Mode amperemetre
1. L’écran LCD indique que le Smartfix se trouve en mode
Ampèremètre en mentionnant l’intensité de
courant en Ampères.
Enfoncez au besoin le commutateur de mode pour passer du
mode Voltmètre en mode Ampèremètre.
Appliquez le Smartfix contre le fil de clôture de sorte que2. celui-ci se trouve bien engagé dans l’encoche de mesurage et
parfaitement en contact avec la plaquette. Veillez à ce que le
fil se trouve bien en contact avec l’encoche de mesurage.
La flèche sur l’écran LCD indique la direction de circulation du3. courant. Le Chiffre indique l’intensité de courant, 3 Ampères
représentant par exemple une intensité basse et 30 Ampères
une intensité élevée. Votre clôture fonctionne bien lorsque
l’intensité de courant est basse est qu’aucune flèche n’est
visible sur l’écran.
Suivez le sens de circulation du courant. Mesurez l’intensité de4. courant à des intervalles d’environ 100 mètres ou aux points
de jonction sur votre clôture.
Si le Smartfix affiche entre deux points de mesurage une5. intensité de courant netteement inférieure, il vous suffira de
reculaer et de mesurer à nouveau. Si la valeur en ampères
augmente à nouveau, vous saurez alors que la perte de
courant se situe entre les deux points de repérage.
Réparez l’anomalie.6.
Après avoir réparé l’anomalie, l’intensité de courant devrait7. diminuer et la tension augmenter. Si ce n’état pas le cas,
contrôlez alors si d’autres problèmes subsistent.
Conseil pratique: L’intensité du courant (en Ampère) sur votre
clôture dépend entre autres du raccordement électrique, de
l’abondance de la végétation, et des dimensions totales de votre
clôture. Après quelque temps, vous vous rendrez compte par vous
même de l’intensité de courant type de votre installation.

12
Comment fonctionne votre cloture
electrique
Une clôture ressemble à un circuit hydraulique.
Tension de la clôture = pression d’eau
Courant électrique = Débit et sens de circulation
Une clôture fonctionnant de manière optimale peut être
comparée à un circuit hydraulique. Un circuit comporte d’une
part une pompe hydraulique, l’alimentation (électrificateur) et
un bouchon d’arrêt à l’autre extrémité (voir diagramme 3). On
constate alors une forte pression d’eau (ou tension de courant) et
un débit élevé lorsqu’aucune fuite n’apparaît sur le circuit.
Lorsqu’un animal touche la clôture, il est alors question de choc
maximal du fait qu’il ‘y a alors aucune perte de tension ni de
courant.
Une clôture ordinaire telle que nous en trouvons sur le terrain
dans la pratique de tous les jours peut être comparée à un circuit
hydraulique présentant une ou deux fuites. Même si la quantité
d’eau s’échappant par ces fuites (débit ou intensité du courant)
ne sera pas des plus importantes, ce qui réduira par conséquent la
pression ou la tension mesurable en un point B , cette pression ou
intensité du courant sera toutefois encore suffisante pour fournir
la quantité d’eau nécessaire en un point B (voir diagramme 4).
Lorsqu’un animal entre en contact avec la clôture, il y a encore
suffisamment d’intensité de courant pour que le choc soit
performant.
Une clôture électrique présentant une perte de courant
importante sur le fil de clôture peut être comparée à un circuit
hydraulique présentant une fuite importante. La conséquence sera
que d’importantes quantités d’eau (ou de courant) s’échapperont
par la fuite en question. La plus grande quantité d’eau
s’échappant de la sorte, il n’y aura pas assez de débit (courant)
arrivant au point B. (Cfr diagramme 5).
Lorsqu’un animal entre en contact avec la clôture, il y a à peine
suffisamment de tension et de courant pour que le choc soit
efficace. Une réparation est donc nécessaire.
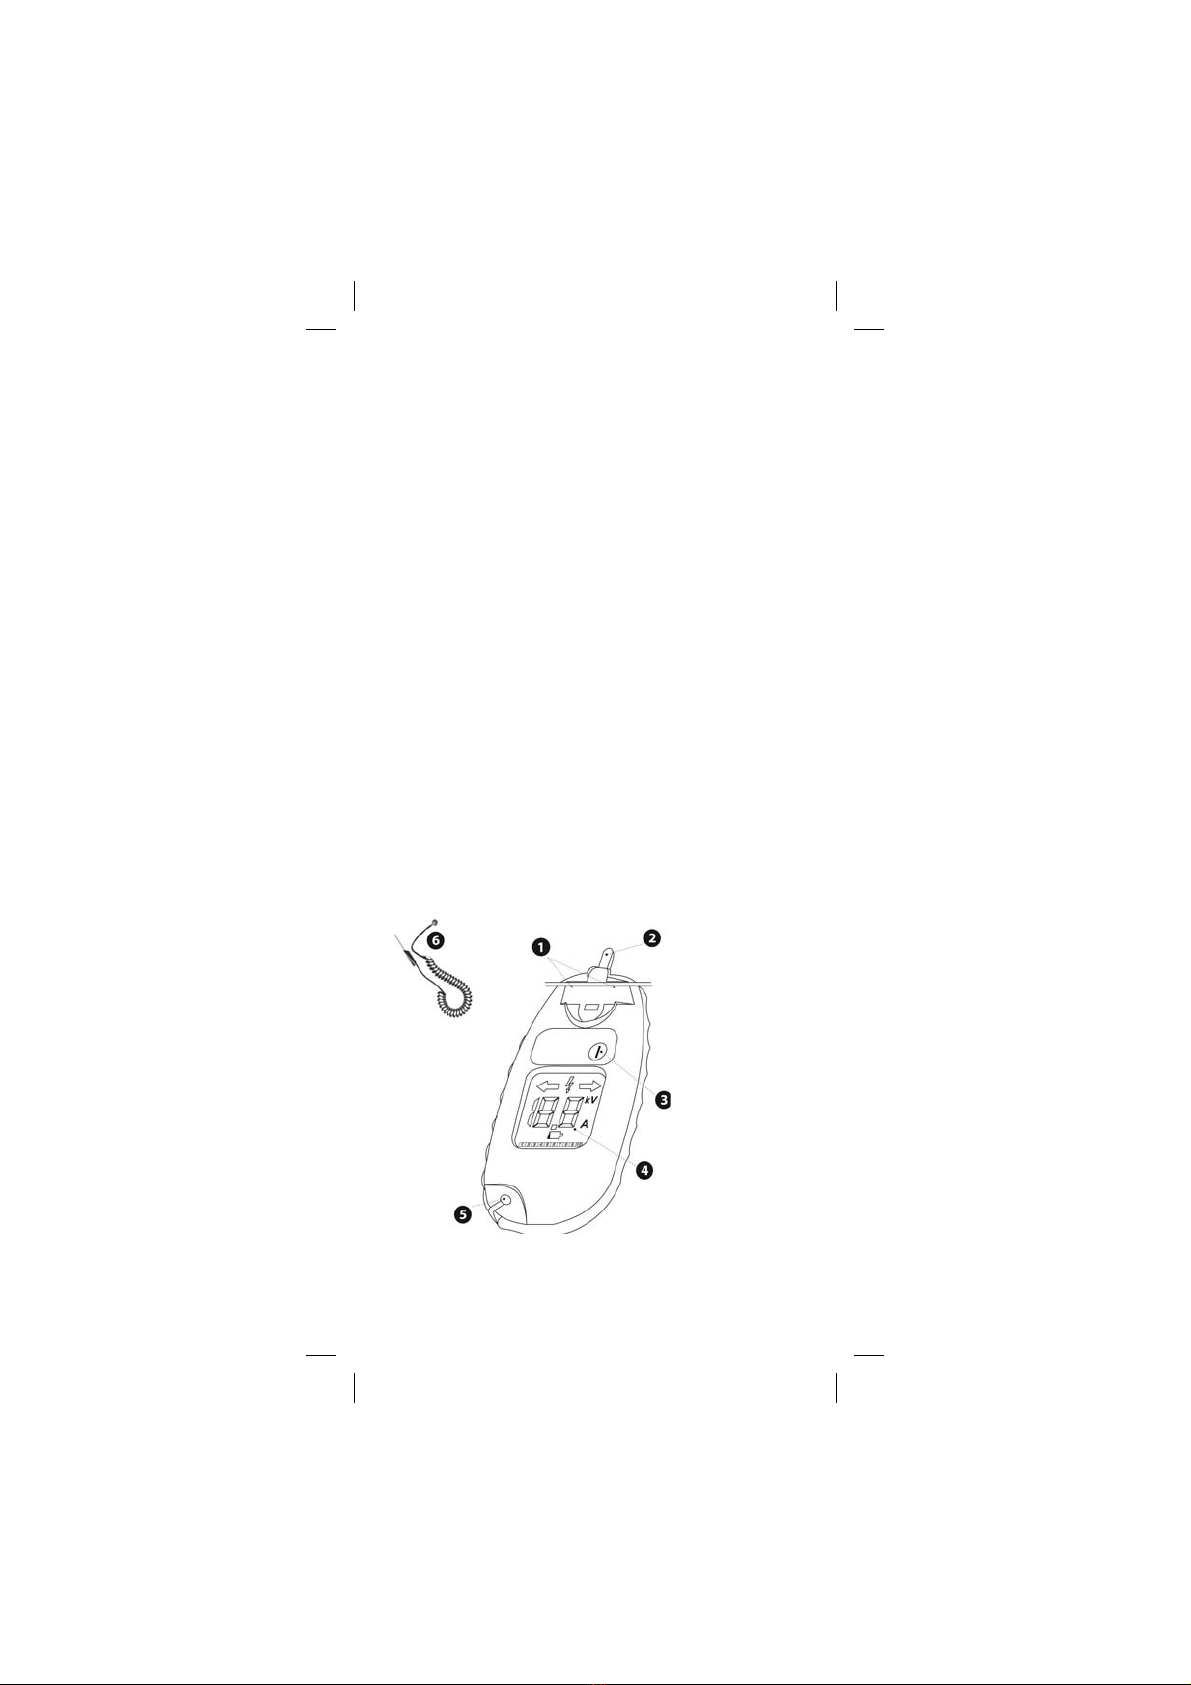
Detecteur de tension
Utilisez le détecteur de tension aux endroits d’accès difficile tels
que les interrupteurs de mise hors circuit. Le Smartfix est activé en
touchant la pointe du détecteur, après quoi il sera alors possible
de lire la tension. L’intensité mesurée ne sera toutefois pas précise
étant donné que le fil de clôture ne passe pas dans l’encoche de
mesurage.
Tige de terre
Le Smartfix est conçu pour mesurer les tensions de courant
de manière suffisamment fiable dans un grand nombre de
circonstances. Si la plus grande précision est requise, il sera fait
usage de lat tige de terre. Si vous disposez d’un système de mise
à la terre en boucle, utilisez alors la tige de terre en la plaçant
contre le fil de terre.
Diagramme 3
Diagramme 4
Diagramme 5

13
Especificaciones:
• Voltaje: 0.2 a 14kV
• Corriente: 1-35 amperes
• Batería: CR2032
Smartfix package
Este paquete contiene:
• 1 x unidad Smartfix (completa con batería)
• 1 x sonda a Tierr
• 1 x Manual de Instrucciones
• 1 x etiqueta
Gallagher Smartfix introduce una nueva generación de
tecnología en cercos eléctricos. Este rastreador de pérdidas
dos-en-uno, es una combinación de voltímetro y medidor de
corriente. Cuando funciona como Voltímetro usted puede
monitorear facilmente el funcionamiento del cerco y
simplemente cambia la función a medidor de Corriente para
encontrar el sentido de la posible pérdida. Práctico de usar
e interpretar, el Gallagher Smartfix ha sido diseñado para
simplificar el uso de Power Fencing, mayor eficiencia y más
confiabilidad para Ud, nuestro cliente.
Diagrama 1
1.Ranura de Medición
Lugar donde la unidad
hace contacto con el
alambre.
2. Sonda de Voltaje (retráctil) Para
usar en áreas difíciles de alcanzar
como Llaves de Corte o Terminales
del Energizador. Se despliega al
presionar la tecla
Probe.
NOTA: no la
utilice para
medir la
corriente
3. Tecla de
Función
Presionela para
cambiar de
Medidor de
Corriente a
Voltímetro.
4. Visualizador de Cristal
Líquido (VCL) Lectura del
Voltaje y Corriente - vea el
diagrama 2.
5. Botón a Tierra
Conexión de Salida
a Tierra.
6. Salida a Tierra
Para la conexión
al Botón a Tierra.
Se utiliza para
una lectura del
voltaje más
precisa,
especialmente
cuando el voltaje
está por debajo
de 1kV.

14

15
Modo de utilizar su Gallagher
Smartfix Funcion de voltimetro
El VCL indicará que el Smartfix1. funciona como Voltimetro al mostrar
el voltaje en Kilovatios (kV o miles de
voltios).
Si es necesario oprima la tecla de
función de Medidor de Corriente a
Voltimetro.
Coloque la unidad Smartfix sobre2. el alambre del cerco asi encaja en
la ranura de Medición y toca la
placa de contacto. Asegurese que el
alambre haga un buen contacto con
la ranura de Medción.
Controle la Medicion del Voltaje.3.
Consejo Práctico:
Consejo Práctico:
Gallagher recomienda mantener un
mínimo de 3kV en el cerco. Si el voltaje disminuye por
debajo de estos niveles o por debajo de los niveles que
normalmente funciona el cerco, cambie a la función de
Medidor de Corriente para detectar pérdidas en el cerco
.
.
Funcion de medidor de corriente
El VCL indicará que el Smartfix funciona como Medidor de1. Corriente al mostrar la la Corriente en Amperes.
Si es necesario oprima la tecla de función para cambiar
de Voltímetro a Medidor de Corriente.
Coloque la unidad Smartfix sobre el alambre del cerco así2. encaja en la ranura de Medición y toca la placa de contac-
to. Asegurese que el alambre haga un buen contacto con
la ranura de Medición.
La Flecha en el VCL indicará el sentido y la cantidad de3. corriente que circula. Si la lectura de la corriente es baja y
no se visualiza la flecha, no hay pérdidas en el cerco.
Siguiendo el sentido de la corriente, mida la misma cada4. 100 metros o en los puntos de empalme a lo largo del
cerco.
Si se pasa el sector de la pérdida, Smartfix indicará una5. circulación de corriente significativamente menor. Vuelva
hacia atrás y si la corriente aumenta sabrá que la pérdida
se encuentra entre esos dos sectores.
Arregle la pérdida.6.
Una vez reparada la pérdida, notará que la lectura de la7. corriente baja y el voltaje aumenta. Si ello no ocurriera,
busque otras pérdidas.
Consejo Práctico: La Cantidad de Corriente (Amperes) en
el cerco varía de acuerdo a la capacidad de su Energizador,
el crecimiento de la vegetación y la extención del cerco.
Con el tiempo aprenderá las condiciones normales del buen
funcionamiento de su cerco.

16
Comprendiendo su cerco electrico
Compare su cerco eléctrico con un sistema de suministro
de agua.
Voltaje del Cerco = Presión del Agua
Corriente Eléctrica = Volúmen/Flujo de Agua
Un cerco Eléctrico en perfecto funcionamiento es igual a un
sistema de agua que tiene una bomba a presión (Energizador)
en un extremo y un tapón en el otro. (Vea el Diagrama 3)
Habrá una alta presión (voltaje) de agua y un flujo potencial
alto sin pérdida de agua.
Cuando un animal toca el cerco, hay un suministro total de
volúmen y corriente para una máxima descarga eléctrica.
Un cerco eléctrico normal es igual a un tubo de agua con
una o dos pérdidas. Mientras que un pequeño flujo de agua
(corriente) circulará por esas pérdidas y reducirá la presión
total (voltaje) en el extremo B, la presión será todavía
significante para suministrar suficiente agua (corriente) al
extremo B como se requiera (vea el diagrama 4).
Cuando un animal toca el cerco, hay suficiente voltaje y
corriente para liberar una descarga eléctrica efectiva.
Un cerco eléctrico con una pérdida considerable en la línea,
es igual a un sistema de agua con una pérdida grande. Por lo
tanto habrá un significante flujo de agua (corriente) a lo largo
del tubo hasta la pérdida. Como la mayor parte del agua se vá
por la pérdida, muy poca agua (corriente) llega al extremo B
(diagrama 5).
Cuando un animal toca el cerco, no hay suficiente voltaje ni
corriente para producir una descarga eléctrica efectiva.
Sonda de voltaje
Utilice la sonda de Voltaje en aquellas áreas difíciles de
alcanzar como llaves de Corte. Tocando un terminal con la
sonda, activará Smartfix y se visualizará el voltaje. La lectura
de la corriente no será precisa ya que la línea del cerco no se
mide a través de la ranura de Medición.
Accesorio de salida a tierra
La unidad Smartfix ha sido diseñada para ofrecer una
medición más precisa del voltaje bajo una amplia gama de
condiciones. Para una mayor precisión se recomienda el uso
de la salida a Tierra. Si tiene un sistema de Retorno a Tierra,
conecte la salida a Tierra en el alambre a Tierra.
Diagrama 3
Diagrama 4
Diagrama 5

17
Benutzung Ihres Gallagher Smartfix-
Gerätes im Fehler-Such-Modus
Anmerkung: Die Stromstärke (Ampere) an Ihrem Zaun
variiert je nach Größe Ihres Elektrozaungerätes, Bewuchs und
Länge Ihres Zaunsystems. Mit der Zeit lernen Sie die normale
Stromstärke Ihres Zaunes zu erkennen. Um die besten
Resultate mit Ihrem Smartfix zu erzielen, empfiehlt Gallagher,
dass Sie die Stromstärke überprüfen während der Zaun ohne
Fehler arbeitet. Dann, wenn Sie glauben, dass ein Fehler am
Zaun ist, können Sie die Stromstärke mit der „normalen“
Stromstärke vergleichen. Dies wird zeigen, ob ein Fehler
existiert und wenn ja, wie stark der Fehler das Verhalten des
Zaunes beeinflusst
Angaben
Benutzung Ihres Gallagher Smartfix-
Gerätes im Voltmeter-Modus
Das Smartfix-1. Gerät ist im
Voltmeter-
Modus wenn
die LCDAnzeige
die Spannung
in Kilovolt
(kV oder 1000
Volt) anzeigt. Falls
notwendig, drücken
Sie die Modus-Taste,
um vom Fehler-Such-
Modus zum Voltmeter-
Modus zu gelangen.
Halten Sie das Smartfix-2. Gerät an den Zaundraht, so dass der Draht im oberen Teil
der Mess-Kontaktplatte einen guten Kontakt bekommt.
Überprüfen Sie die Zaunspannung.3.
Praktische Hinweise: Gallagher empfiehlt ein Minimum
von 3kV an der Zaunleitung. Da bei den meisten
Zaunleitungen die Stromstärke (Ampere) variiert, ist es
nur dann notwendig nach Fehlern zu suchen, wenn die
Spannung unter das normale Niveau sinkt.
• Spannung: 0.2 to 14 kV
• Stromstärke: 1 – 35 A
• Batterie Typ: CR2032 Lithium-Knopfzelle

18
Das Smartfix-Gerät ist1. im Fehler-Such-
Modus wenn die
LCD-Anzeige die
Stromstärke in
Ampere anzeigt.
Falls notwendig,
drücken Sie die
Modus-Taste, um
vom Voltmeter-
Modus zum Fehler-
Such-Modus zu
gelangen.
Halten Sie das Smartfix-2. Gerät an den Zaundraht,
so dass der Draht im oberen Teil der Mess-Kontaktplatte
einen guten Kontakt bekommt.
Der Pfeil in der LCD-Anzeige zeigt die Stromrichtung an.3. Die LCD-Anzeige zeigt die Stromstärke in Ampere.
Folgen Sie dem Stromfluss, überprüfen Sie den Zaun4. etwa alle 50 – 100 m oder an Verbindungsstellen Ihrer
Zaunleitung.
Anmerkung: An Verbindungsstellen folgen Sie dem
Draht mit der höchsten Stromstärke.
Ein Fehler wird angezeigt indem die Stromstärke zwischen5. zwei Überprüfungsstellen nach unten geht. Der Fehler
liegt irgendwo zwischen diesen beiden Stellen.
Anmerkung: Der Pfeil zeigt immer noch in die
Richtung der Stromstärke wenn sie über 1 Ampere
ist.
Um die Fehlerstelle zu finden, gehen Sie zurück und6. überprüfen Sie die Stromstärke in kürzeren Abständen.
Beheben Sie den Fehler.7.
Nach Beheben des Fehlers sollte die Stromstärkeanzeige8. nach unten gehen und die Spannungsanzeige nach oben.
Falls nicht, weitere Fehler suchen.
Anmerkung: Mehrdrähtige Zäune, die parallel
verbunden sind, haben ähnliche Stromstärken in
jedem Draht. Um die gesamte Zaunstromstärke zu
erhalten, addieren Sie die Stromstärke in jedem Draht.

19

20
Benutzen Sie den Spannungsmess-Stift an schwer
zugänglichen Stellen, wie Zaunschalter. Durch das Berühren
des Stiftes mit einem Zaunanschluss wird das Smartfix-Gerät
aktiviert. Sie sollten den Spannungsmess-Stift nicht zur
Stromstärken-Messung benutzen, er zeight sie nicht genau
an. Der Zaunstrom muss durch die Mess-Kontaktplatte
fließen, um ein korrektes Ergebnis zu erzielen.
Anmerkung: Benutzen Sie den Spannungsmess-Stift
nicht an einem Elektrozaungeräteanschluss. Das Gallagher
Smartfix-Gerät liefert keine genauen Messungen innerhalb
3 m Abstand zu einem Elektrozaungerät.
Erdungsanschluss-Zubehör
Spannungsmess-Stift
Smartfix Batterie
ersetzen
Entfernen Sie auf der Rückseite1. des Smartfix-Gerätes die
Plastikdeckel, die die 4
Schrauben abdecken mit einem
scharfen Gegenstand, wie z. B.
ein kleiner Schraubenzieher oder
ein Messer.
Entfernen Sie die Schrauben und2. ziehen Sie das Smartfix-Gerät auseinander.
Entfernen Sie die gebrauchte Batterie und legen Sie eine3. neue ein.
Setzen Sie das Smartfix-Gerät wieder zusammen.4.
Anmerkung: Achten Sie darauf, dass die schwarze
Dichtung genau platziert ist, damit das Smartfix-Gerät
wasserdicht ist.
Ziehen Sie die Schrauben wieder an und setzen Sie die5.
Plastikdeckel wieder auf.
Das Smartfix-Gerät
wurde
entwickelt,
um unter den
verschiedensten
Bedingungen genaue
Messergebisse zu
liefern. Falls größere
Genauigkeit
benötigt wird,
sollte der
Erdungsanschluss
benutzt werden.
Falls Sie ein Referenz-Erdsystem
haben, benutzen Sie den Erdungsanschluss und
verbinden Sie ihn mit dem Erdungsdraht.
Für alle anderen Bedingungen reicht
es, wenn Sie Ihren Daumen auf den
Erdanschluss-Kontakt legen (Sie werden
keinen Stromschlag bekommen).

21
Vergleichen Sie Ihren Elektrozaun mit einem
Wasserleitungsnetz.
Zaunspannung = Wasserdruck
Stromstärke = Wasserdurchflussmenge
Ein perfekt funktionierender Elektrozaun ist ähnlich
wie ein Wasserleitungsnetz mit einer Pumpe
(Elektrozaungerät) an einem Ende und einer
Wasserentnahmestelle am anderen. Es ist ein starker
Wasserdruck (Spannung) vorhanden und ein hohes
Wasserfließ-Vermögen besteht. Es treten keine
Wasserverluste auf.
Wenn ein Tier den Zaun berührt, gibt es eine
vollständige Übertragung von Spannung und Strom
für einen maximalen Stromschlag.
Ein normaler Elektrozaun ist ähnlich einer Wasserleitung
mit einer oder zwei undichten Stellen. Obwohl eine
kleine Menge Wasser (Strom) durch diese undichten
Stellen verloren geht und der Gesamtdruck (Spannung)
am Punkt B damit reduziert wird, ist der Druck hoch
genug um genügend Wasser (Strom) am Punkt B zu
liefern.
Wenn ein Tier den Zaun berührt, ist noch genügend
Spannung und Stromstärke vorhanden, um einen
wirksamen Stromschlag zu erzeugen.
Ein Elektrozaun mit einem schwerwiegenden Fehler
an der Zaunleitung ist ähnlich wie ein
Wasserleitungsnetz mit einem großen Loch. Also wird
eine größere Menge Wasser (Strom) durch die Leitung
zu diesem Loch fließen. Da das meiste Wasser durch
dieses Loch austritt, erreicht sehr wenig Wasser (Strom)
Punkt B.
Wenn ein Tier den Zaun berührt, ist zu wenig Spannung
und Strom vorhanden, um einen wirksamen Stromschlag
zu erzeugen.
Verstehen Sie Ihren Elektrozaun?

22
Specificaties:
• Voltage: 0,2 tot 14 kV
• Stroomsterkte: 1-35 A
• Batterij: CR2032
Smartfix Kit
Deze kit bevat:
• 1 x SmartFix apparaat (compleet met batterij)
• 1 x Aardingspen
• 1 x Gebruikershandleiding
• 1 x Etiket
De Gallagher SmartFix vertegenwoordigt de nieuwste
technologische ontwikkeling in elektrische afrasteringen. Deze
multifunctionele probleemzoeker combineert in één apparaat
een volt- en stroomsterktemeter. Als voltmeter kunt u er
moeiteloos de prestaties van uw afrastering mee meten. En
door eenvoudig over te schakelen naar “stroomsterktemeting”
is elk probleem met uw afrastering snel gevonden. De Gallagher
SmartFix is niet alleen makkelijk te begrijpen en te gebruiken,
maar is ook speciaal ontworpen om u, als onze klant, te helpen
bij het eenvoudiger, efficiënter en betrouwbaarder omgaan
met uw elektrische afrastering.
Diagram 1
1.Meetgleuf De
stroomdraad wordt
over de contactplaat
geplaatst.
2. Voltage meetpen (intrekbaar)
Bestemd voor gebruik in moeilijk te
bereiken plaatsen zoals schakelaars of
aansluitknoppen van het
schrikdraadapparaat. Start de meting
door op de Detectieknop te
drukken.
Noot: Niet
gebruiken in
Stroomsterktemodus.
3. Modusknop
Druk op deze
knop om te
wisselen tussen
Stroomsterkteen
Voltage
modus.
4. LCD Scherm Aflezen van
Voltage en Stroomsterkte -
Zie diagram 2.
5. Aardingsklem
Aansluiting voor
aardingspen.
6. Aardingspen
Men dient de
meetpen te
gebruiken voor
het exact meten
van het voltage,
vooral bij voltages
onder de 1kV.
Table of contents
Languages:
Other Gallagher Test Equipment manuals