Garage Smart GS100 User manual

GarageSmartTM User’s Manual 1
User’s Manual
English (US)
Version 1.5
For use with models:
GS100, GS200, GS300
(2nd Generation)
S100N

2 GarageSmartTM User’s Manual
Do NOT return product back to store
(Best Buy, EBay, Amazon, etc.)
Please contact GarageSmart™ Customer Service
directly for all matters including returns/exchanges,
help with installation (including Wi-Fi configuration), or
any questions or comments that you may have.

GarageSmartTM User’s Manual 3
The information contained herein may be changed at any time without prior notification. This
manual nor any parts thereof may not be reproduced for any purpose whatsoever without the
express written consent of GarageSmart. All technical specifications, drawings, etc., are subject
to copyright law.
© 2017, GarageSmart
All rights reserved.

4 GarageSmartTM User’s Manual
Table of Contents
Introduction ......................................................................................................... 6
About this User Guide ..................................................................................................................... 6
List of nomenclature .................................................................................................................... 6
List of definitions ......................................................................................................................... 6
List of icons ................................................................................................................................. 6
Precautionary and Safety Information ............................................................................................. 7
Legal notices .................................................................................................................................... 8
Liability ........................................................................................................................................ 8
Trademarks ................................................................................................................................. 8
FCC Part 15 Class B Verification Statement .............................................................................. 9
Customer Service .......................................................................................................................... 10
E-mail ........................................................................................................................................ 10
The GarageSmart™ e-Store ...................................................................................................... 10
Welcome ............................................................................................................ 11
Introducing Your GarageSmart™ Device ................................................................................. 11
Getting Started .................................................................................................. 12
What’s Included ......................................................................................................................... 12
Optional Parts and Accessories ................................................................................................ 12
Tools Required for Installation .................................................................................................. 12
Setup .................................................................................................................. 13
Setup and Verification ................................................................................................................... 13
Activating and Registering the GarageSmart™ Device ............................................................ 13
Configure the GarageSmart™ Device to a secure Wi-Fi network ............................................ 13
Port Forwarding Setup .............................................................................................................. 17
Installation ......................................................................................................... 20
Residential Installation ................................................................................................................... 20
Mounting the GarageSmart™ Device ....................................................................................... 20
Mounting and connecting the GarageSmart™ Sensors ........................................................... 21
Custom mounting and connecting the GarageSmart™ Sensors .............................................. 24
Connecting the GarageSmart™ Device to the Garage Door Motor ......................................... 24
Commercial Installation ................................................................................................................. 27
Verification of Installation ................................................................................ 29
Verification and Alignment ............................................................................................................. 29
Verifying Sensor Alignment ....................................................................................................... 29
Verifying Garage Door Control .................................................................................................. 30
Controlling the GarageSmart™ Device ........................................................... 31
Open and Closing Garage Doors Remotely .................................................................................. 31
Open/Close Garage Doors through a Web Browser................................................................. 31
Open/Close Garage Doors using a Smartphone/Tablet Web Browser .................................... 31

GarageSmartTM User’s Manual 5
Open/Close Garage Doors using the GarageSmart™ App ...................................................... 32
Open and Closing Garage Doors using non-smartphones (via SMS text messaging) ............ 34
Verify Garage Door Status Remotely ............................................................................................ 35
Verify Garage Door Status through a Web Browser ................................................................. 35
Verify Garage Door Status using a Smartphone/Tablet Web Browser ..................................... 35
Verify Garage Door Status using the GarageSmart™ App ...................................................... 36
Maintenance ...................................................................................................... 37
Cleaning ......................................................................................................................................... 37
Adjustments ................................................................................................................................... 37
Scheduled or Preventative Maintenance ....................................................................................... 37
Troubleshooting ................................................................................................ 38
Frequently Asked Questions ........................................................................... 41
Technical Specifications .................................................................................. 42

6 GarageSmartTM User’s Manual
Introduction
About this User Guide
List of nomenclature
PC Personal Computer
RF Radio Frequency
ISP Internet Service Provider
DST Daylight Savings Time
GSX+ Garage Sense positive inputs (GS1+, GS2+, GS3+)
GSX- Garage Sense negative inputs (GS1-, GS2-, GS3-)
GDX+ Garage Drive positive outputs (GD1+, GD2+, GD3+)
GDX+ Garage Drive negative outputs (GD1-, GD2-, GD3-)
FCC Federal Communications Commission
List of definitions
FCC An independent U.S. government regulatory agency responsible
for overseeing all interstate and international communications.
Port Forwarding Port forwarding is a feature that forwards inbound traffic from the
Internet on a specific port, to reach a single device on your local
network.
DHCP reservation Router assigns a unique, static (fixed) IP address to a specific
device on your network.
List of icons
A Video (visual information or tutorial) is available within the specified
section of the manual.
Some sections within the manual contain Notes (located at the end of
each section), which provides further information pertaining to an item
or step within the section. This is shown by one or more numbers at the
end of a sentence or paragraph, Example: (1) (2)

GarageSmartTM User’s Manual 7
Precautionary and Safety Information
CAUTION:
Internal circuit card components are extremely sensitive to
electrostatic discharge. Be careful not to touch internal circuitry prior
to discharging any static buildup on yourself. To discharge yourself,
touch a grounded metal object such as conductor an earth-grounded
metal enclosure.
CAUTION:
Do not install the
GarageSmart
™
device
outside
(except for inside a
garage as directed) as this may damage the unit and void its warranty.
CAUTION:
Do not
get
the
GarageSmart
™
device
wet
or expose to extreme
moisture as this may damage the unit and void its warranty.
CAUTION:
The included
AC Power Adapter
is provided by a third party and
should not be used with any other devices other than the
GarageSmart™ device. As many other devices require their own
chargers or AC Power Adapters; GarageSmart™ will not be responsible
for any damage of any kind that may occur from using the included
third party AC Power Adapter.
CAUTION:
Do not remove the cover or touch inside the
G
arageSmart
™
device
with power applied as shock may occur.

8 GarageSmartTM User’s Manual
Legal notices
Liability
The software, websites, apps and the manual are subject to change without notice.
GarageSmart™ is not liable for the accuracy of the information contained in this manual,
on its websites, in its apps or for damages resulting from the use of the GarageSmart™
device, this manual, websites or apps.
Trademarks
GarageSmart™ is a trademark of GarageSmart™
is a trademark of GarageSmart™
All other trademarks mentioned herein are property of their respective companies.

GarageSmartTM User’s Manual 9
FCC Part 15 Class B Verification Statement
GarageSmart™
Model No: GS100, GS200, GS300
This device complies with Part 15 of the FCC Rules. Operation is subject to the following
two conditions:
this device may not cause harmful interference, and
this device must accept any interference received, including interference that
may cause undesired operation.
Note: This equipment has been tested and found to comply with the limits for a Class B
digital device, pursuant to Part 15 of the FCC Rules. These limits are designed to provide
reasonable protection against harmful interference in a residential installation. This
equipment generates uses and can radiate radio frequency energy and, if not installed
and used in accordance with the instructions, may cause harmful interference to radio
communications. However, there is no guarantee that interference will not occur in a
particular installation. If this equipment does cause harmful interference to radio or
television reception, which can be determined by turning the equipment off and on, the
user is encouraged to try to correct the interference by one or more of the following
measures:
Reorient or relocate the receiving antenna.
Increase the separation between the equipment and receiver.
Connect the equipment into an outlet on a circuit different from the one which the
receiver is connected to.
Consult the dealer or an experienced radio/TV technician for help.
Modifications not expressly approved by the manufacturer could void the user's authority
to operate the equipment under FCC rules.

10 GarageSmartTM User’s Manual
Customer Service
Visit the GarageSmart™ website, www.garagesmart.net/support.html to view our support
page.
On this page you can:
• Reset your account password.
• Find warranty information.
• Send an e-mail to GarageSmart™ customer service.
• Faqs on the most asked questions and answers.
E-mail
To ensure a timely response, use e-mail at www.garagesmart.net/contact.html
Customers will receive a response within a short period of time.
The GarageSmart™ e-Store
If you need accessories or parts for your GarageSmart™ device, please visit the
GarageSmart™ web store at www.garagesmart.net/buynow.html

GarageSmartTM User’s Manual 11
Welcome
Introducing Your GarageSmart™ Device
Welcome to the exciting world of monitoring, opening and closing your garage doors.
With the use of a GarageSmart™ device, you can reliably monitor, open, close or stop
your residential or commercial garage doors anywhere in the world from any flip-phone,
smartphone, tablet, PC (basically any device that has internet or text message
capabilities) anytime while receiving email and text alerts.
The GarageSmart™ device even allows you to grant remote access with use of a shared
key or to as many users as you want by providing unique remote keys that expire when
you want them to. Provide one key to each member of your family to prevent fighting over
who gets the garage door opener or to a neighbor to allow them access to your home in
the event of an emergency or delivery. The GarageSmart™ keeps an accurate log so that
you'll always know exactly when and who is opening and closing your garage doors.
The GarageSmart™ device also contains built in Auto Shut features, such as “Weather
Guard” that will close all garage doors depending on the outside weather conditions.
Garage doors can also close at specific times that you set, as this feature is highly used
at night for security that prevents garage doors from being mistakenly left open all night
long or for long period of times.
The GarageSmart™ device was designed for both, basic and advanced users in mind as
Free Accounts never require any fees or subscriptions to operate or control the
GarageSmart™ device. Premium Accounts are for users that are looking for more
flexibility and control of their GarageSmart™ device which provides additional benefits,
features, notifications and includes a lifetime limited warranty.
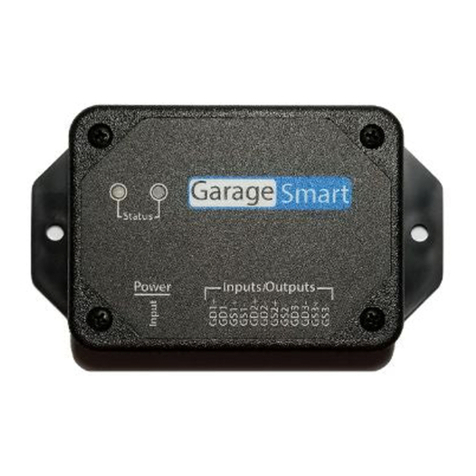
1 USB Power Cable input
2 Garage Door Drive (outputs) and Sensor (inputs)
3 Mounting Flanges
1
2
3

12 GarageSmartTM User’s Manual
Getting Started
What’s Included
Your GarageSmart™ device comes with the following parts or accessories:
• AC Power Supply (1)
• USB Power Cable
• Garage Door Sensor Kit(s) (2)
• One Free Month of Premium Account
• Welcome and Warranty Letter
1. AC Power Supply may also include a power adapter for certain countries that is determined at the time
of order.
2. The number of Garage Door Sensor Kits (shipped with the GarageSmart™ device) is determined at
time of order. GS100 includes one (1) sensor kit, GS200 includes two (2) sensor kits, and GS300
includes three (3) sensor kits.
3. If the contents are incomplete, please notify us within 7 days of purchase.
Optional Parts and Accessories
The following parts and accessories are available and can be purchased by contacting
GarageSmart™ or through the GarageSmart™ web store:
• Garage Door Sensors
• Hook-up Wire
• Garage Door Sensor Kits
• AC Power Supply’s
• USB Power Cables
• Premium Account Upgrade
Tools Required for Installation
The following tools are required for proper installation of the GarageSmart™ device and
sensors:
• Ladder or Step Stool high enough to reach garage door tracks, motor or top of door.
• Wire Strippers
• Wire Cutters
• Small Phillips Screw Driver

GarageSmartTM User’s Manual 13
Setup
Setup and Verification
Prior to mounting and installing the GarageSmart™ device, it is important to fully read and
understand all steps and notes in each section for proper setup of the GarageSmart™ device.
Activating and Registering the GarageSmart™ Device
1. Looking at the back of the GarageSmart™ device, write down the Mac Address
and Device ID and keep in a safe place as this will be needed later (1).
2. Visit https://www.garagesmart.net/account_setup.html
3. Enter in all required information on the Account Setup page using the
Mac Address and Device ID from the back of the GarageSmart™ device (2).
4. Once the GarageSmart™ device has been registered, you will then be able to log
into the Online Control Panel at https://www.garagesmart.net/login.html to update
information and settings pertaining to your GarageSmart™ device (3).
1. The Mac Address and Device ID can also be found anytime within the users online control panel by
logging into “My Account”.
2. Activating and Registration needs to be performed once on each GarageSmart™ device as each
requires its own Activation, Registration and Online Control Panel (Username) login.
3. Some settings require the GarageSmart™ device to be connected to a secured Wi-Fi network before
making changes, otherwise changes may not update properly.
Configure the GarageSmart™ Device to a secure Wi-Fi network
To successfully configure the GarageSmart™ device to a secured Wi-Fi network, the
router must be 802.11b, 802.11g, 802.11n, or 802.11ac (2.4 GHz) compatible. (1)
1. Plug the provided “USB Power Cable” into the provided “AC Power Supply” and
the other end into the GarageSmart™ device.
2. Plug the “AC Power Supply” into any power outlet. (2)
3. Using any Wi-Fi enabled device (such as a cellphone, tablet, computer, etc.),
search and connect to the “GarageSmart” Wi-Fi network. (3)

14 GarageSmartTM User’s Manual
4. When prompt for a password, enter the complete Mac Address of the
GarageSmart™ device (no spaces and lowercase letters only). (4)
5. Once connected to the GarageSmart Wi-Fi network, open any web browser and
type in the following address: http://192.168.4.1/wifisetup as the following screen
should be shown below; otherwise see note (5) below.
6. Enter the Network Name (SSID) and Password of your Wi-Fi network.
7. Select the Port from the dropdown menu (if shown), that your router will use to
talk to the GarageSmart™ device. Use the default port “31301” if this is the only
GarageSmart™ device that will be configured on your routers Wi-Fi network;
otherwise see note (6) below.
8. Click “Update”.
9. Within a few seconds the Status LED of the GarageSmart™ device will alternate
between RED and GREEN a few times, signaling the start of the Wi-Fi update
process. If not, use your browsers back button and repeat steps 5, 6, 7 and 8
above to resend the update.

GarageSmartTM User’s Manual 15
10. The Status LED will then remain RED for at least 5 seconds while the
GarageSmart™ device goes through a reboot process.
11. The Status LED will eventually blink a specific color and pattern. Using the table
below, determine the Result and Solution to perform (if necessary).
Status
Led Color
Number
of Blinks
Result Solution
RED
Solid Reboot started. Wait a few seconds for reboot process to
start.(7)
RED
1 Wi-Fi disconnected or wrong
password.
Repeat this procedure verifying that the
Network Name (SSID) and password is
correct.
RED
2 Searching for Wi-Fi network.
Repeat this procedure verifying that the
Network Name (SSID) is correct.
RED
3 Error Occurred Repeat this procedure verifying that the
Network Name (SSID) and password is
correct.
AMBER
1 GarageSmart™ device is
connected to the router;
however the internet
connection has been lost.
Verify and restore internet connection.
(
8
)
AMBER
2 GarageSmart™ device is
connected to the router.
However, the Device ID is
invalid on the GarageSmart™
network.
Contact GarageSmart for assistance.
AMBER
3 GarageSmart™ device is
connected to the router.
However, Port Forwarding has
not been set up on the router.
Perform the section called, “
Port
Forwarding Setup” in the below
sections.
GREEN
1 The GarageSmart™ device
has successfully connected to
the router and is fully online.
If not done so yet, the GarageSmart™
device is ready for installation. See
Installation sections below.
GREEN
Solid The GarageSmart™ device is
downloading new firmware.
Wait for the download to finish as the
device will eventually reboot.
Visit www.garagesmart.net/videos/ to view a video on how to Configure the
GarageSmart™ device to a secure Wi-Fi network.
1. The router must be 802.11b, 802.11g, 802.11n, or 802.11ac (2.4 GHz) compatible. The 2.4 GHz
Wi-Fi network must be used as the GarageSmart™ device will NOT work on 5 GHz Wi-Fi networks.

16 GarageSmartTM User’s Manual
2. For international countries, plug the “AC Power Supply” into a power adapter. Then plug the power
adapter into any power outlet.
3. The “GarageSmart” Wi-Fi Network name (SSID) may contain extra characters at the end of the SSID.
Whereas the first group (5 numbers) represents the Port that the GarageSmart™ device is currently
assigned to and last group (4 letters or numbers) represents the last four characters of the
GarageSmart™ devices Mac Address.
For example; “GarageSmart_31301_bc78” specifies that the GarageSmart™ device is currently
assigned to port “31301” and the last four characters of the GarageSmart™ devices Mac Address is
“bc78”.
Each GarageSmart™ device will have its own unique GarageSmart” Wi-Fi Network name (SSID).
4. The Mac Address can be found by looking at the back of the GarageSmart™ device or within the
users online control panel by logging into “My Account”. The Mac Address is twelve (12) characters
long, with each character being either a number “0” thru “9” or a lowercase letter “a” thru “f”.
5. If the GarageSmart Wi-Fi Setup screen does not appear after a few attempts, then first determine
which GarageSmart Wi-Fi Network (SSID) that your Wi-Fi enabled device is connected to. Then using
the table below, use the corresponding Web Address to connect to the GarageSmart™ device, as the
device may be configured to a different port.
GarageSmart Wi
-
Fi Network
(SSID)
Web Address
GarageSmart_80_XXXX
http://192.168.4.1/wifisetup
or
http://192.168.4.1:80/wifisetup
GarageSmart_31301_XXXX
http://192.168.4.1:31301/wifisetup
GarageSmart_31302_XXXX
http://192.168.4.1:31302/wifisetup
GarageSmart_31303_XXXX
http://192.168.4.1:31303/wifisetup
GarageSmart_31304_XXXX
http://192.168.4.1:31304/wifisetup
GarageSmart_31305_XXXX
http://192.168.4.1:31305/wifisetup
GarageSmart_31306_XXXX
http://192.168.4.1:31306/wifisetup
GarageSmart_31307_XXXX
http://192.168.4.1:31307/wifisetup
GarageSmart_31308_XXXX
http://192.168.4.1:31308/wifisetup
GarageSmart_31309_XXXX
http://192.168.4.1:31309/wifisetup
GarageSmart_31310_XXXX
http://192.168.4.1:31310/wifisetup
6. If more than one GarageSmart device is being connected to the same Wi-Fi router, then use the table
below to determine what port to select for each GarageSmart device, to avoid conflicts between
devices:
GarageSmart Device
Port
(to use)
1 31301 (default)
2 31302
3 31303
4 31304
5 31305
6 31306
7 31307
8 31308
9 31309
10 31310
7. During the reboot process, the Status LED of the GarageSmart™ device may blink different colors or
patterns at different times. The reboot process is complete when the color of the Status LED and the
number of blinks no longer changes.
8. The router must have an active internet connection in order for the GarageSmart™ to be able to
communicate with the GarageSmart™ network. Restore the routers internet connections or consult
with your local Internet Service Provider if service continues not to be available.

GarageSmartTM User’s Manual 17
Port Forwarding Setup
For the GarageSmart™ device to receive inbound commands from the Internet, Port
Forwarding must be setup properly within the router. The GarageSmart™ device will also
require a static (fixed) IP address, in which most routers have the ability to “reserve” or
“assign” a static IP address via DHCP (sometimes called DHCP Reservation). (1)(2)
1. Apply power to the GarageSmart™ device.
2. After a few seconds, verify that the Status LED is blinking AMBER 3 times (3x)
repeating.
3. Using any Wi-Fi enabled device (such as a cellphone, tablet, computer, etc.),
search and connect to the “GarageSmart” Wi-Fi network. (3)
4. Once connected, open any web browser and type in the default address:
http://192.168.4.1:31301/ip as the following screen should be shown below;
otherwise see note (4) below.
5. Write down the IP Address that the Wi-Fi router has assigned to the
GarageSmart™ device and the Port number that the GarageSmart™ device is
currently using, as they will be needed in the following steps.
6. Login into your router. (1)
7. Under your routers Port Forwarding Settings, add the following port to forward:
(1)(2)(5)
Application Name: GarageSmart (6)
Port Forward From: (Port number from step 5 above)
Port Forward To: (Port number from in step 5 above)
Protocol: TCP
IP Address: (IP Address from step 5 above)
8. Verify that the IP Address used in step 7 above is set to a static (fixed) IP
Address within the router. This setting is usually under “DHCP Reservation”
which tells the router to assign the same static (fixed) IP address to the
GarageSmart™ device every time it connects to the router. (1)(2)(5)
9. Save changes to the router.

18 GarageSmartTM User’s Manual
10. Remove power from the GarageSmart™ device for a few seconds, and then
reapply power.
11. After a few seconds, the Status LED should be blinking GREEN. If so, then Port
Forwarding has been successfully configured within the router and the
GarageSmart™ device is fully online.
Visit www.garagesmart.net/videos/ to view a video on how to Configure the
GarageSmart™ Device to a secure Wi-Fi network.
1. Every routers login, DHCP Reservation and Port Forwarding process is different from one another. If
you do NOT have access or know how to login into your router, enable DHCP reservation, assign a
static (fixed) IP Address, or add port forwarding to your router, then refer to your routers manual or
contact your Internet Service Provider (ISP) as they will be able to assist you on making the
required changes to your router easily.
2. For more information on port forwarding or a list of the most common type’s routers, visit
www.portforward.com/routers.htm and www.setuprouter.com
3. The “GarageSmart” Wi-Fi Network name (SSID) may contain extra characters at the end of the SSID.
Whereas the first group (5 numbers) represents the Port that the GarageSmart™ device is currently
assigned to and last group (4 letters or numbers) represents the last four characters of the
GarageSmart™ devices Mac Address.
For example; “GarageSmart_31301_bc78” specifies that the GarageSmart™ device is currently
assigned to port “31301” and the last four characters of the GarageSmart™ devices Mac Address is
“bc78”.
Each GarageSmart™ device will have its own unique GarageSmart” Wi-Fi Network name (SSID).
4. If the GarageSmart screen does not appear after a few attempts, then first determine which
GarageSmart Wi-Fi Network (SSID) that your Wi-Fi enabled device is connected to. Then using the
table below, use the corresponding Web Address to connect to the GarageSmart™ device, as the
device may be configured to a different port.
GarageSmart Wi
-
Fi
Network (SSID)
Web Address
GarageSmart_31301_XXXX
http://192.168.4.1:31301/ip
GarageSmart_31302_XXXX
http://192.168.4.1:31302/ip
GarageSmart_31303_XXXX
http://192.168.4.1:31303/ip
GarageSmart_31304_XXXX
http://192.168.4.1:31304/ip
GarageSmart_31305_XXXX
http://192.168.4.1:31305/ip
GarageSmart_31306_XXXX
http://192.168.4.1:31306/ip
GarageSmart_31307_XXXX
http://192.168.4.1:31307/ip
GarageSmart_31308_XXXX
http://192.168.4.1:31308/ip
GarageSmart_31309_XXXX
http://192.168.4.1:31309/ip
GarageSmart_31310_XXXX
http://192.168.4.1:31310/ip
5. Regardless of what brand the router is or what software is on the router, the same type of information
will be entered (a text field where you can type in the name of the application or service, which
incoming port number the router should watch for, and which protocol to use).
6. The “Application Name” can be named anything that you choose, such as; GarageSmart,
GarageSmart2, etc.

GarageSmartTM User’s Manual 19
Verify the GarageSmart™ Device is connected to your Wi-Fi network
Option 1:
1. Make sure that your existing Wi-Fi network is fully working.
2. Visit http://www.garagesmart.net/tools/connected.html
3. Enter the Mac Address and Device ID of the GarageSmart™ device (1).
4. Click “Submit”.
5. The Status LED on the left will blink a slow RED–AMBER–GREEN-OFF
pattern three (3) times indicating that the device is connected to your
secured Wi-Fi network.
Option 2:
1. Check that your existing Wi-Fi network is fully working.
2. Remove power from the GarageSmart™ device for five seconds.
3. Reapply power to the GarageSmart™ device as the status LED will start
to blink.
4. If the status LED changes to a blinking GREEN (2), then the
GarageSmart™ device is connected to the router and fully
working.
Visit www.garagesmart.net/videos/ to view a video verifying if the
GarageSmart™ Device is connected to your Wi-Fi network.
1. The Mac Address and Device ID can found on the bottom of the GarageSmart™ device or within the
users online control panel by logging into “My Account”.
2. The Status LED may stop blinking GREEN after 60 seconds and become completely off, as this is
normal.

20 GarageSmartTM User’s Manual
Installation
Residential Installation
Residential installation is for residential garage door motors (typically found in homes), that have
a single wall mounted pushbutton that opens and closes the garage door.
Mounting the GarageSmart™ Device
The GarageSmart™ device has a mounting flange that contains two mounting holes. The
two mounting holes are centered 3.875” across from each other.
1. Using two of the supplied tie wraps, mount the GarageSmart™ device to the
garage door bracket just above the motor as shown below (1).
2. Plug the “AC Power Supply” into any 120V outlet (an outlet is usually mounted on
the ceiling just above the garage door motor).
3. Plug one end of the “USB Power Cable” into the “AC Power Supply” and the
other end into the GarageSmart™ device.
Visit www.garagesmart.net/videos/mount to view a video on mounting the
GarageSmart™ Device.
1. For locations that have three (3) garage doors, mount the GarageSmart™ device to the middle
garage door bracket (just above the motor) as this will shorten the length of running wires to the other
garage door motors and sensors. Otherwise, additional wire will have to be used for proper
installation.
Tie wraps
Other manuals for GS100
2
This manual suits for next models
2
Table of contents
Other Garage Smart Garage Door Opener manuals
Popular Garage Door Opener manuals by other brands

SWS
SWS SeceuroGlide Classic installation instructions

CAME
CAME PRATICO SYSTEM BX Series installation manual

Record
Record DFA 127 operating instructions

Roger
Roger BG30 Series INSTRUCTIONS AND RECOMMENDATIONS FOR THE INSTALLER

Chamberlain
Chamberlain Security+ 4620 owner's manual

Chamberlain
Chamberlain MotorLift ML500 instruction manual