Garaventa STAIR-TRAC SA-2 User manual

Garaventa STAIR-TRAC SA-2
Owner’s Manual
Item 05116 Rev C Printed in Canada

Item 05116 Rev C - i - Printed in Canada
Table of Contents
1. Safety First .......................................................................................................................... 2
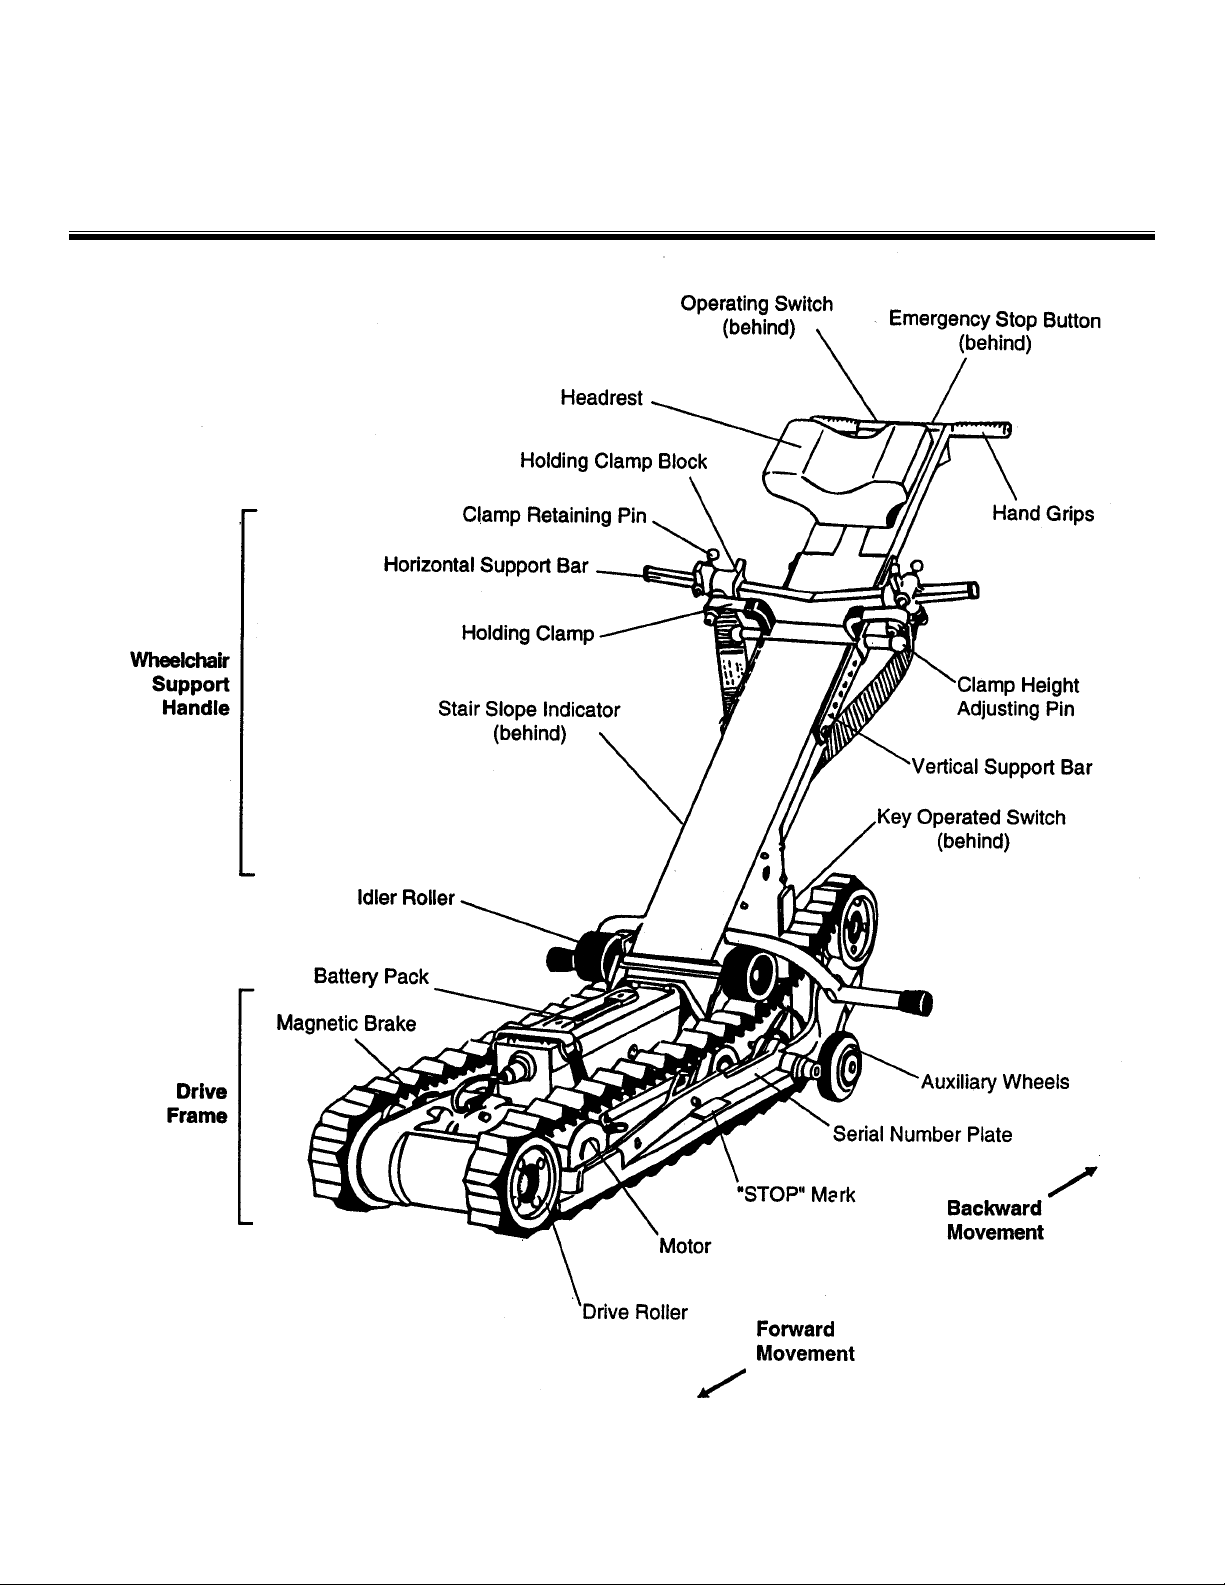
2. Terminology ......................................................................................................................... 4
3. Operating Instructions .......................................................................................................... 5
Introduction .......................................................................................................................... 5
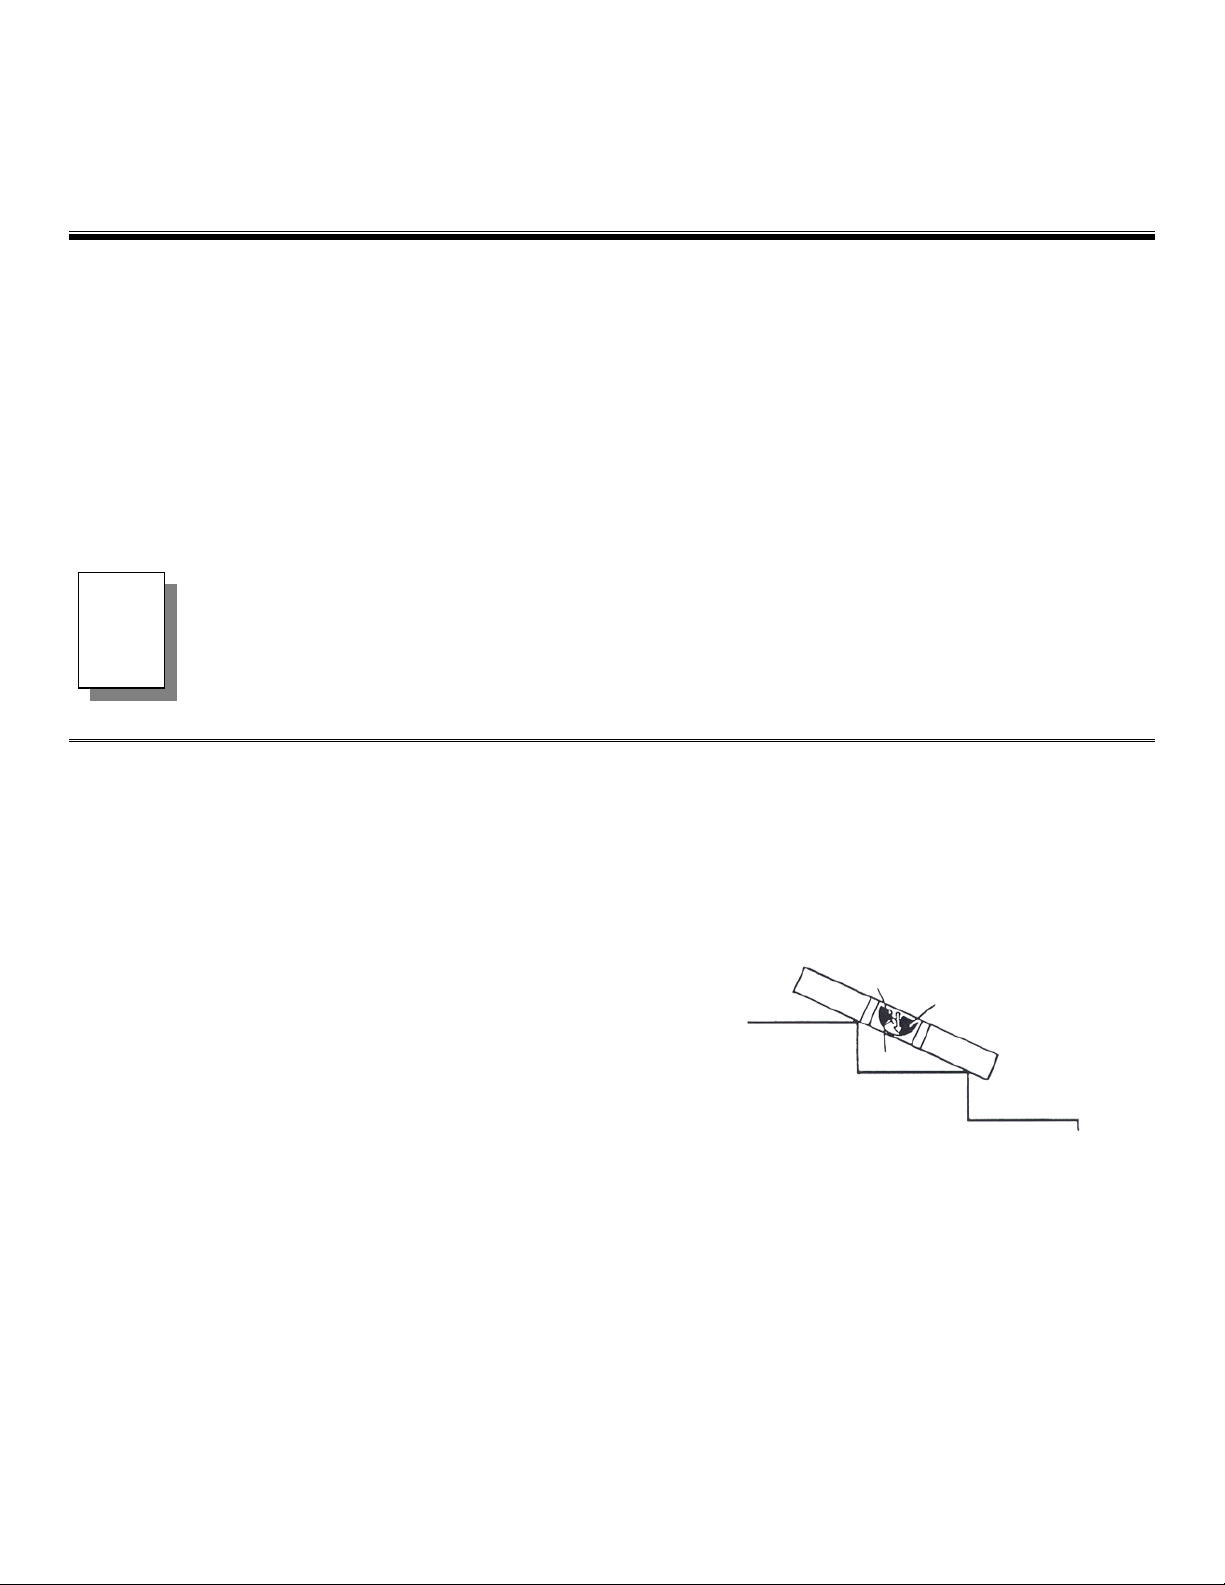
Stair Slope Indicator ............................................................................................................ 5
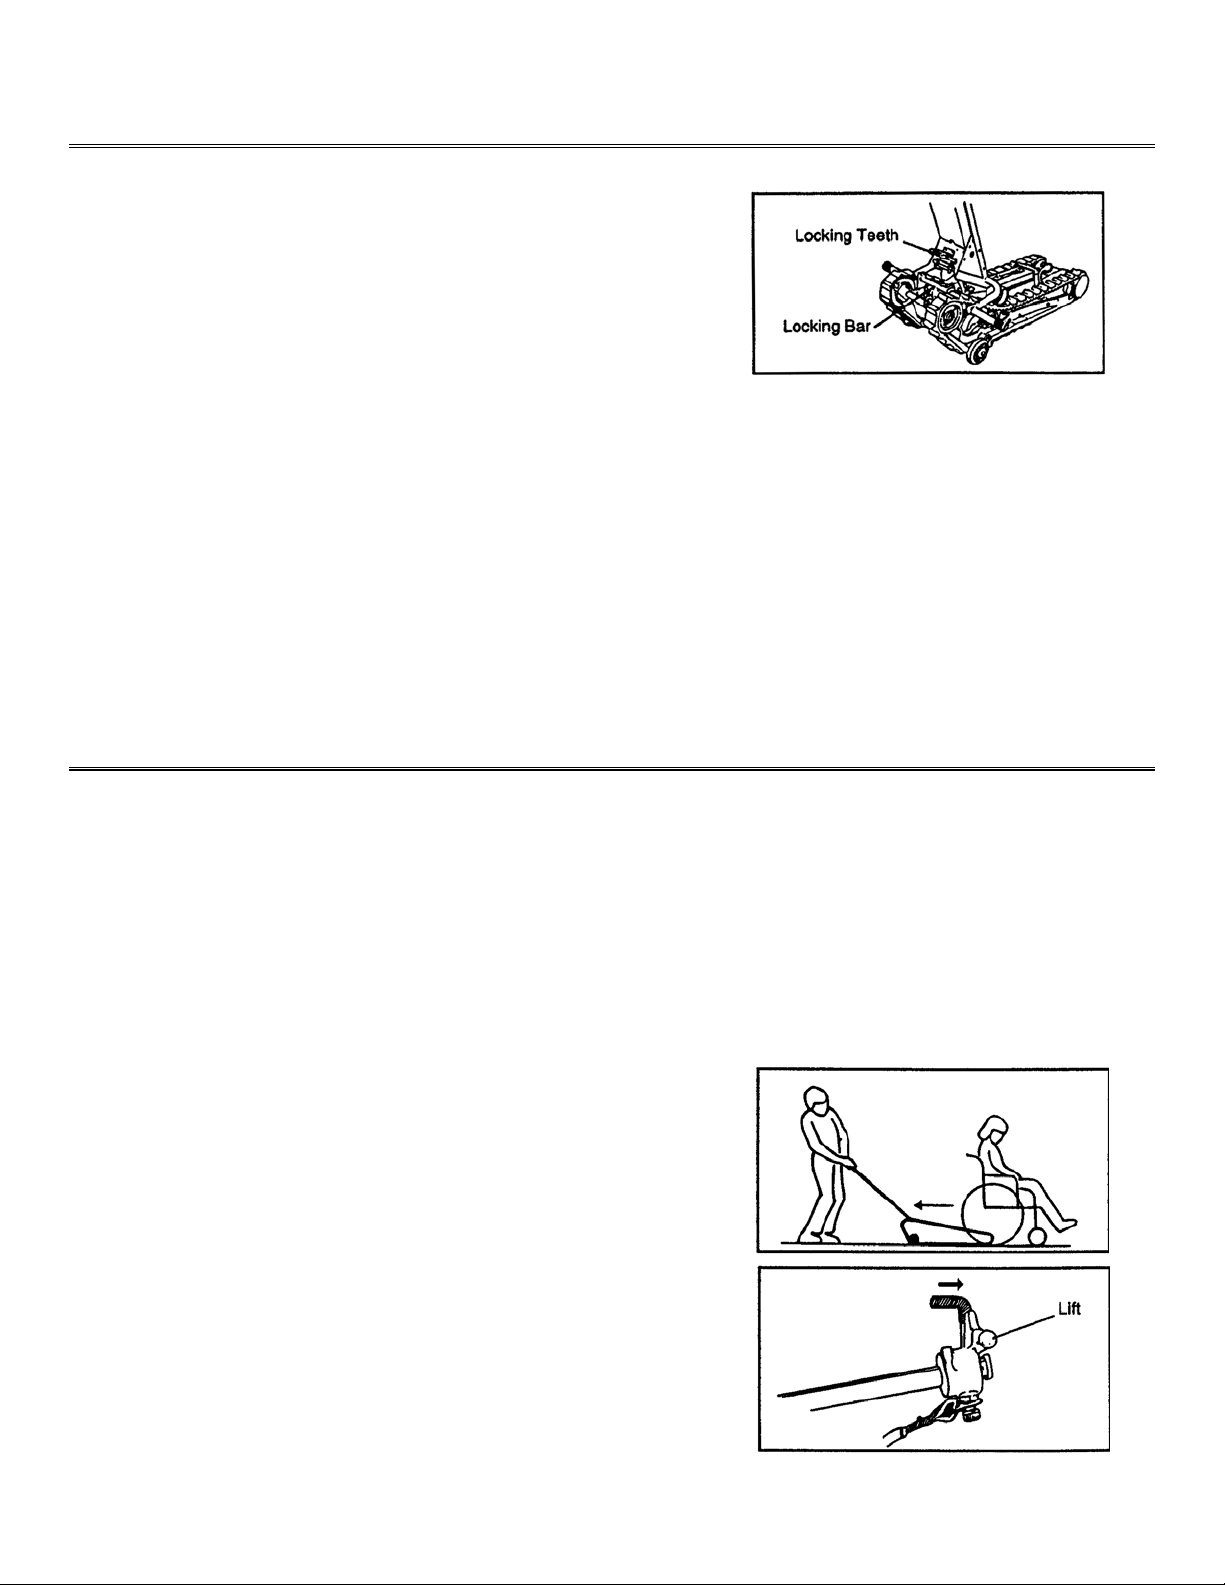
Attaching Wheelchair Support Handle ................................................................................. 5
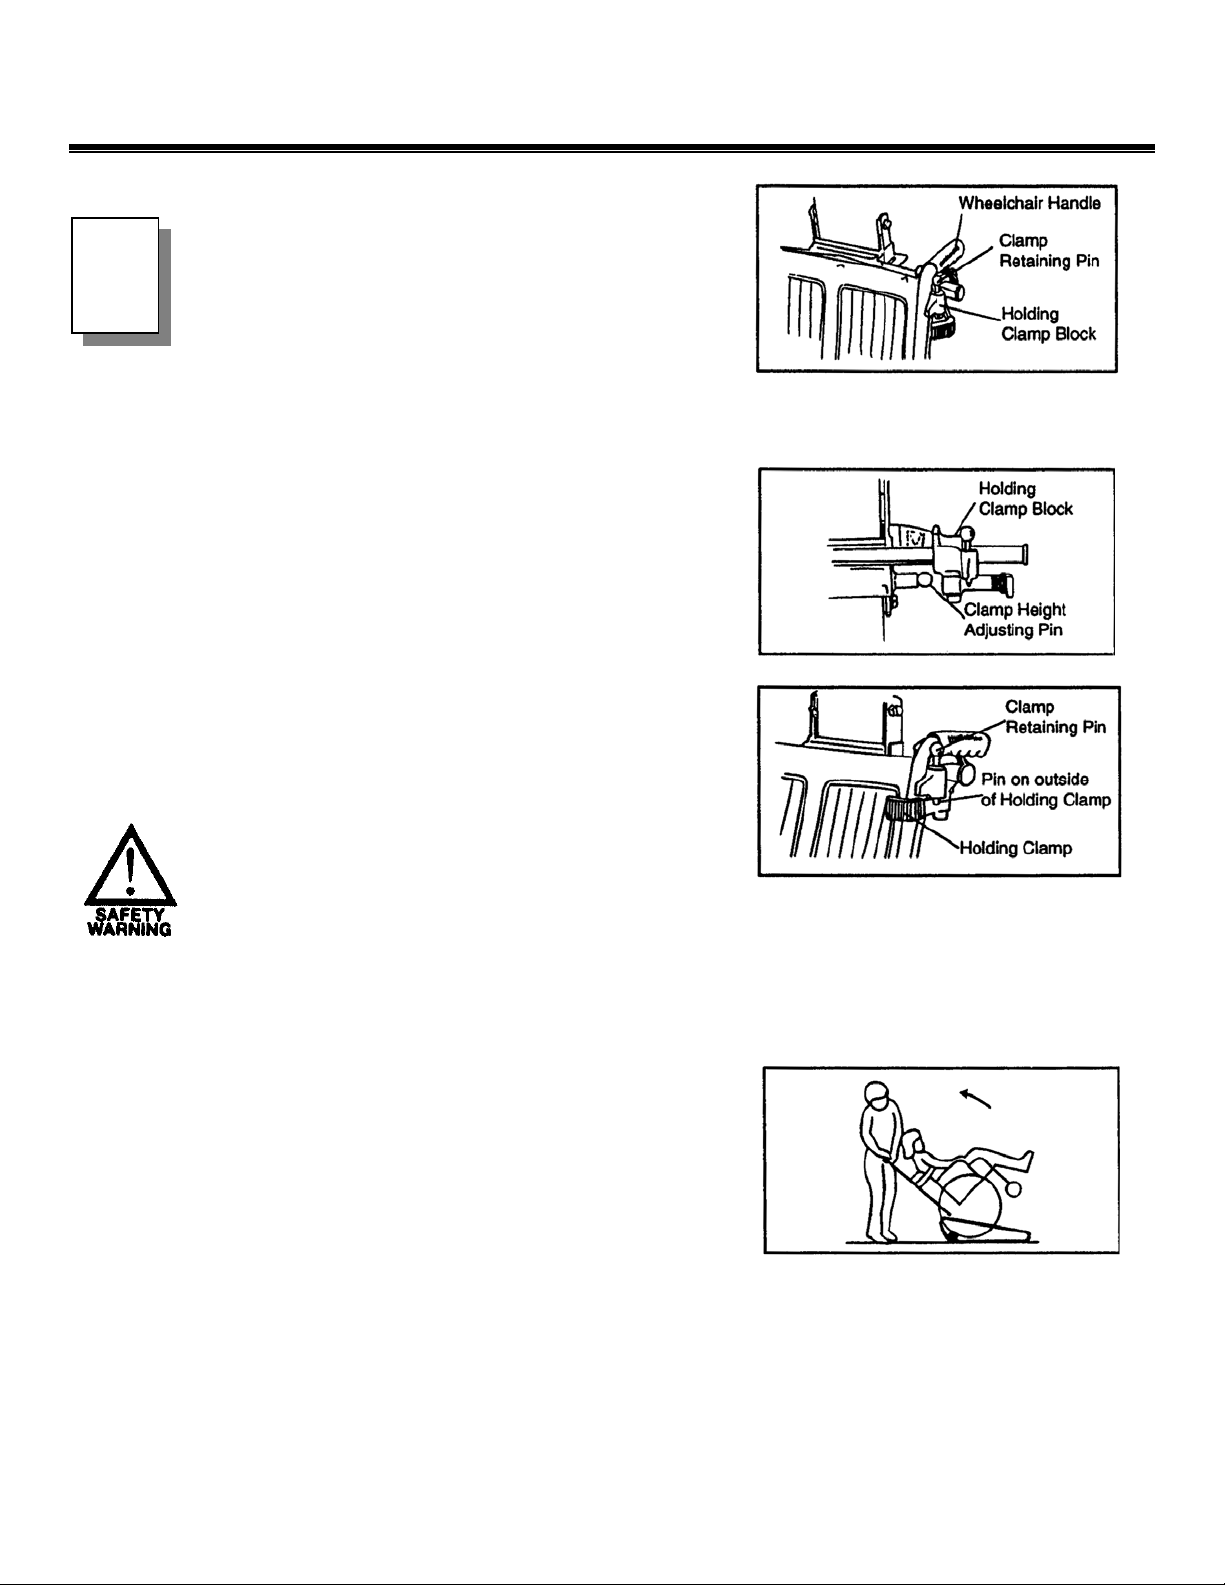
Attaching Wheelchairs ......................................................................................................... 6
Detaching Wheelchairs ........................................................................................................ 8
Horizontal Travel ................................................................................................................. 9
Emergency Stop Button ....................................................................................................... 9
Ascending Stairs .................................................................................................................. 9
Descending Stairs .............................................................................................................. 11
Storage .............................................................................................................................. 12
4. Operating Tips ................................................................................................................... 13
5. Optional Equipment ........................................................................................................... 15
Wheelchair Attachment Ramp ........................................................................................... 15
Vehicle Loading Ramp ....................................................................................................... 16
6. Service ............................................................................................................................... 17
Batteries ............................................................................................................................ 17
General .............................................................................................................................. 17
Charging Batteries .............................................................................................................17
Extending Battery Life ....................................................................................................... 18
Storing Batteries ................................................................................................................ 18
Holding Clamp Block ......................................................................................................... 19
Friction Adjustment.............................................................................................................19
Tracks ................................................................................................................................ 20
Alignment ........................................................................................................................... 20
Tension............................................................................................................................... 20
Tension Adjustment ........................................................................................................... 21
Removal and Replacement ............................................................................................... 21
Cleaning ............................................................................................................................ 22
Lubrication .......................................................................................................................... 23
7. Specifications .................................................................................................................... 24
8. Trouble-Shooting ............................................................................................................... 25
9. Clearances ........................................................................................................................ 26
10. Warranty ............................................................................................................................ 27

-1-
GARAVENTA STAIR-TRAC
Congratulations on the purchase of your new Garaventa Stair-Trac.
Stair-Trac has been designed to provide years of use in assisting physically disabled people to
overcome the barrier presented by stairs.
Before using the unit, please view the Operator Training video, and take a moment to read this
manual so you will have a thorough understanding of the operation of Stair-Trac. Ensure that Stair-
Trac is operated only by someone who has been properly trained.
Your Garaventa dealer is knowledgeable about the servicing requirements and safe operation of your
Stair-Trac. If you have any questions consult your dealer, or contact Garaventa by phoning 604-594-
In Canada: Garaventa Accessibility In USA: Garaventa Accessibility
7505-134A St. PO Box 1769
Surrey, BC Blaine, WA
V3W 7B3 98231-1769
Your Authorized Garaventa Dealer is:
Name: _________________________________________________________________
Address _________________________________________________________________
_________________________________________________________________
Telephone: __________________________________________________________________
Record your Stair-Trac serial number in the space below, and refer to it whenever you call your
Garaventa dealer about Stair-Trac.
Stair-Trac serial number: _______________________________________________________

1 Safety First!
This symbol is used throughout this manual to draw your attention to instructions
that must be carefully followed to avoid possible dangers.
The following procedures are important to ensure the safe operation of Stair-
Trac:
CHECK THE STAIRWAY
Do not use Stair-Trac on curved or spiral stairs, irregular or insecure stairs or
stairs with loose carpeting. Use extra caution on wet or slippery stairs.
CHECK THE STAIR ANGLE
Do not use Stair-Trac on stairs that have not been checked by using the Stair
Slope Indicator. Refer to page 5.
ENSURE THE WHEELCHAIR CAN BE PROPERLY ATTACHED
Stair-Trac is not designed to be used with electric wheelchairs, scooters, carts
and some models of sports chairs.
A chart on page 26 shows the sizes of wheelchairs that can be attached to Stair-
Trac. Use Stair-Trac only with wheelchairs that conform to these ranges and
clearances.
Some small wheelchairs may not be able to be pulled over the tracks due to their
low underside clearances. These may be able to be attached by using the
Wheelchair Attachment Ramp. Refer to page 16 for details.
-2-

-3-
DO NOT OVERLOAD
Do not use Stair-Trac when the total load being carried (passenger and wheelchair)
is more than 130 kg (285 Ibs).
DOUBLE-CHECK ALL ATTACHMENTS BEFORE OPERATING
Ensure the wheelchair is securely attached to the Wheelchair Support Handle.
Refer to step 6 on page 7.
Ensure the Wheelchair Support Handle is locked on the Drive Frame. Refer to step
8 on page 7.
Ensure the Safety Belt is securely fastened, and that it passes under the arms of
the passenger.
REMOVE ALL LOOSE ITEMS FROM WHEELCHAIR
Do not operate Stair-Trac if loose objects are hanging outside of the wheelchair.
Objects such as clothing or purses can be a safety hazard if they become caught
on the stairway or in the Stair-Trac drive mechanism.

2 Terminology
-4-

3 Operating Instructions
INTRODUCTION
To ensure the safety of the passenger and operator, read these operating
instructions carefully and view the Operator Training video. Practice sessions
should be held on a regular basis (monthly isrecommended) to maintain
operator proficiency. In addition, building occupants for whom the Stair-Trac is
provided should be familiar with and comfortable in using Stair-Trac.
The note symbol is used to direct you to a section in this manual containing
additional operating tips.
Note
STAIR SLOPE INDICATOR
The Stair Slope Indicator is used to assess whether the angle of the stairway is
within the optimum operating range of Stair-Trac. It should always be used.
Place the indicator across two stair
noses and observe the colored area to
which the arrow points.
Green: Optimum operating range.
Yellow: Use added caution when
operating.
Red: Stairway is too steep for safe operation. Do not use Stair-Trac.
ATTACHING THE WHEELCHAIR SUPPORT HANDLE
1. Place the U-shaped brackets
(at the bottom of the Wheelchair Support Handle)
on the Mounting Bar. Lock in place with the retaining pins.
-5-

-6-
2. Tilt the Support Handle backwards
until the Locking Teeth latch under the
Locking Bar
3. To disconnect the Support Handle,
pull the black Release Handle located
just below the controls on the Support
Handle. This lifts the Safety Bar. Then
push the red Sliding Catch forward,
raise the handle upright.
ATTACHING WHEELCHAIRS
1. Refer to page 26 to determine the types and sizes of wheelchairs that can be
attached to Stair-Trac.
2. Turn on the Key-Operated Switch located at the rear of the Drive Frame.
3. Back the wheelchair over the tracks,
and center it (side to side) over the
tracks.
4. Lift the Clamp Retaining Pins and
open the Holding Clamps.

5. Raise the Wheelchair Support Handle
and position the Holding Clamp Blocks
under the curve in the wheelchair
handle. Ensure that the wheelchair
handle rests in the hollow of the
Clamp Block.
Adjust the Clamp Blocks side to side by sliding them on their mounting bars.
Adjust their height by pulling out the
Clamp Height Adjusting Pins and
raising or lowering the entire clamp
assembly.
Note
Page 13
Item 2
6. Close the Holding Clamps over the
wheelchair handle, ensuring the
Retaining Pin is on the outside of the
Holding Clamp.
To ensure side-to-side stability, verify
that the wheelchair is centered over
the tracks (refer to step3 above).
7. Fasten the Safety Belt securely, ensuring that it passes under the arms of the
passenger. Adjust the Headrest.
8. Pull the Wheelchair Handle towardyou
until you hear a “click” sound as it
latches in its operating position with the
Locking Teeth latched under the
Locking Bar.
-7-

-8-
Since the weight of the passenger is tilted backwards at this point, always keep
both hands on the Support Handle Hand Grips for stability. Do not leave the
passenger unattended in this position.
DETACHING WHEELCHAIRS
1. To lower the wheelchair to a horizontal
position for detaching, firmly grip the
Support Handle and press down
slightly, but not enough to raise the front
of Stair-Trac off the ground.
2. Pull the black Release Handle located
just below the controls on the Support
Handle. This lifts the Safety Bar. Then
push the red Sliding Catch forward. Tip
the Support Handle and wheelchair
forward until the wheelchair touches the
floor.
Do not release the locking mechanism while on a stairway.
3. Lift the handle upright, release the Safety Belt and Holding Clamps, and remove
the wheelchair.

HORIZONTAL TRAVEL
Note
Page 14
Item 3
To move Stair-Trac on flat surfaces, push
down on the Support Handle until the
tracks are raised from the surface,then
push Stair-Trac along on its Auxiliary
Wheels.
EMERGENCY STOP BUTTON
In the unlikely event that the motor does
not stop after the Operating Switchhas
been released, power to the motor can be
disconnected by pressing and holding the
Emergency Stop Button.
If it is necessary to use the Emergency Stop Button, ensure that Stair-Trac is
examined by a qualified service person before it is used again.
ASCENDING STAIRS
Practice ascending stairs without a passenger until you feel confident of your
ability to use Stair-Trac. Practice ascending before you practice descending.
Note: Stair-Trac must travel “backward” when ascending stairs (Refer to
Terminology on page 4).
-9-

1. Use the Slope Indicator to determine if Stair-Trac can be used on the
stairway.
2. Position Stair-Trac at the base of the
stairs, at a right angle (90q} to the
stairway with the passenger's back
towards the stairs.
Note
Page 14
Item 4
3. Keeping both hands on the Hand
Grips, use your thumb to press the right side of the Operating Switch. Stair-
Trac will begin climbing the stairs backwards.
4. As you ascend, ensure that Stair-Trac remains at a right angle to the stairs.
Note
Page 14
Item 5
Note
Page 14
Item 6 5. Stop Stair-Trac at the top of the stairs
when the leading edge of the red
“STOP” mark on the Drive Frame
reaches the top stair nose.
Note
Page 15
Item 7
6. Keeping both hands on the Hand
Grips, slowly tilt Stair-Trac backward
onto the landing.
7. When Stair-Trac is level, press the
right side of the Operating Switch, and
back up until no part of Stair-Trac
extends over the stairs.
8. Move Stair-Trac as required using the procedures described under
“Horizontal Travel” (page 9).
-10-

DESCENDING STAIRS
Practice descending stairs without a passenger until you feel confident of your
ability to use Stair-Trac. Practice ascending before you practice descending.
Note: Stair-Trac must travel “forward” when descending stairs. (Refer to
Terminology on page 4)
1. Use the Slope Indicator to determine if Stair-Trac can be used on stairway.
Note
Page 14
Item 4
2. Position Stair-Trac at the top of the
stairs, at a right angle (90q) to the
stairway with the passenger facing
toward the stairs.
3. Keeping both hands on the hand
grips, use your thumb to press the left
side of the Operating Switch to move
Stair-Trac forward. Release the
Switch when the leading edge of the
red “STOP” mark on the Drive Frame
reaches the top of the stair nose.
Note
Page 14
Item 7
4. Keeping both hands on the Hand
Grips, slowly tilt Stair-Trac forward
until the tracks are resting on the stair
noses, then press the left side of the
Operating Switch to continue
descending the stairs.
-11-

5. As you descend, ensure that Stair-Trac remains at a right angle to the stairs.
6. On the lower landing, move Stair-Trac as required using the procedures
described under “Horizontal Travel” (page 9).
STORAGE
Stair-Trac occupies a minimal amount of
space when stored as shown. Simply
remove the Wheelchair Support Handle
and place it upside down on the Drive
Frame.
If Stair-Trac is to be stored for periods of 3 months or more, please follow the
instructions under “Storing Batteries” (page 19).
-12-

4 Operating Tips
Throughout this manual, the note symbol has been used to indicate areas where
additional operating tips may be helpful. Following are these tips.
Note
1. When attaching a small wheelchair, the chair’s cross-frame may contact the
tracks of Stair-Trac. The Wheelchair Attachment Ramp (optional item) can be
used to raise the wheelchair slightly and facilitate attachment and
detachment. Refer to “Wheelchair Attachment Ramp” on page 16.
2. Sometimes a wheelchair may be of such a height that with the clamp
assembly under the curve of the handle you can almost, but not quite, lift the
Clamp Assembly up to its next highest
locked position. Since it is important to
have as close a fit as possible, move
the chair forward so the clamps are
out from under the chair handles, and
raise the Clamp Assembly up to its
next highest locked position.
Ask the passenger to lean forward
slightly and move the chair and handle
forward until the Holding Clamp
Blocks can be positioned under the
curve in the handle.
Now move the chair back and raise
the handle upright at the same time. At
this point the handle may even be
supporting some of the chair's weight
and the chair may be slightly off the
ground.
-13-

-14-
3. Curbs or ridges higher than 50 mm (2 in) should be crossed by backing Stair-
Trac over them, powered by the tracks. For ridges less than 50 mm (2 in) that
Stair-Trac cannot easily rollover, simply lift upward on the handle and press the
left side of the Operating Switch while moving forward over the obstacle. This will
allow the tracks to pull Stair-Trac over the obstacle. Practice this maneuver first
without a passenger.
4. Operating Stair-Trac near the inner core of a stairway will keep the stairway clear
for pedestrians, facilitate turning corners at the landings and provide your
passenger with an added sense of comfort.
5. A slight bump may occur as the Auxiliary Wheels rollover the first stair nose. This
is normal. If the tracks slip and can't seem to push Stair-Trac past this point,
simply lift up slightly on the handle while Stair-Trac is moving backwards. This
will provide added traction between the tracks and the floor, allowing the Wheels
to ride over the first stair nose.
6. On some stairways Stair-Trac may “bump” slightly at one or two points during
ascent or descent. This will not happen on all stairways, and occurs because the
spacing between lugs on the tracks does not always coincide with the spacing
between stair noses. When the top of a lug contacts a stair nose the Stair-Trac
will shift slightly to position the base of the track on the stair nose, resulting in a
slight “bump”. There is no cause for alarm as Stair-Trac is perfectly stable and
safe. You should inform your passenger that these “bumps” may occur so the
passenger is not alarmed.
7. The red “STOP” mark identifies the balance point of Stair-Trac. Under most
conditions the mark is accurate; however, balance points will vary depending on
the size of the wheelchair and the weight of the passenger. Always use caution
when tilting Stair-Trac backward or forward at this point.

5 Optional Equipment
WHEELCHAIR ATTACHMENT RAMP
On small wheelchairs the cross-frame of
the chair may be too low to clear the
tracks of the Stair-Trac, making it difficult
to roll the wheelchair over the Drive
Frame.
This problem can be eliminated by
positioning the Wheelchair Attachment
Ramp as shown and backing the
wheelchair onto the Ramp.
Attach the wheelchair as described under “Attaching Wheelchairs” on page 6,
back the Stair-Trac away from the Ramp and proceed to the stairway. The Ramp
can now be carried to the destination area.
On stairways where the Ramp is used repeatedly it may be beneficial to obtain
two Ramps, locating one at each destination point.
To detach the wheelchair, move the Stair-Trac and passenger into position over
the ramp, then lower the wheelchair and detach it as described under “Detaching
Wheelchairs” on page 8.
-15-

VEHICLELOADING RAMP
Stair-Trac can easily be loaded into a van or a car trunk by using the Vehicle
Loading Ramp.
The Ramp was designed to support the Drive Frame only, and is not capable of
supporting Stair-Trac with a passenger.
1. Place the hook end of the Ramp over
the edge of the trunk lid or van bumper.
2. Line up the front of the Drive Frame
with the Ramp.
3. Remove the Wheelchair Support Handle.
4. Use the Operating Switch to make the Drive Frame crawl up the Ramp until it
is balanced over the top edge of the Ramp.
5. (a) Cars:
Tilt the front of the Drive Frame into the car trunk. When the tracks rest on the
trunk floor, swing the back of the unit into the trunk, using the Operating
Switch located on the Drive Frame to position Stair-Trac as required.
5. (b) Vans or wagons:
Tilt the front of the Drive Frame onto the vehicle floor and use the Operating
Switch located on the Drive Frame to move itinto the vehicle.
6. Place the Wheelchair Support Handle upside down on the top of the Drive
Frame. Refer to “Storage” (page 12).
-16-

-17-
6 Service
BATTERIES
General
Stair-Trac is powered by two 6-volt sealed batteries. These cells are spill-proof,
maintenance-free and rechargeable. Power capacity under a full load while travelling
upstairs is about 650 stairs or approximately 30 minutes on a full charge.
Charging Batteries
The Battery Charger is used to charge the Stair-Trac batteries from the mainline (120
VAC) supply. Your Stair-Trac comes supplied with a 12 volt Charger designed for
sealed batteries. It features the maximum recommended 4 amp charge rate and will
automatically switch to a trickle-charge rate when the batteries are close to fully
charged. At this point the Charger may be left connected indefinitely without damaging
the batteries. The trickle-charge feature is important to prevent over-charging of the
batteries and to help prolong their life.
Charging time will vary depending on battery use, but should not require more than
eight hours.
Caution: Use of unauthorized chargers may cause damage to the batteries. If a
substitute charger is used, ensure that it features a dual-mode automatic cut-off. Do not
use a lead/acid battery charger.
To use the Battery Charger:
1. Disconnect the Stair-Trac cable from the battery pack.
2. Connect the Battery Charger cable to the battery pack.
3. Plug the Battery Charger into a 110 VAC power supply.

-18-
4. The lamp will glow AMBER when the battery is charging and will change to GREEN
when the battery is fully charged.
Extending Battery Life
Battery life can be increased greatly by frequent charging. If a battery is totally
discharged before being recharged it might be cycled (charged and discharged) only
180 times before it becomes unusable. If this same battery had been charged more
often (for example at a 30% depth of discharge) it could be cycled over 1200 times. This
is a life increase of more than six times.
If a battery has been stored for a long period and has become discharged (but still
shows a voltage reading) it can be brought back to full charge by cycling it several
times. To do this, charge the battery about ten hours, then use it for a few minutes but
not long enough to totally discharge it. Then charge the battery again for about ten
hours then use it for a few minutes. Cycle it this way about five times over a period of
two weeks and the battery may recover. Whether or not it does will depend on the age
of the battery and the care it has been given.
Storing Batteries
Stored batteries should be fully charged every three months during the storage period.
Storage for a long period without recharging may cause batteries to become unable to
be restored to capacity. This period will vary depending on what use the batteries have
had before storage, their depth of charge at the time of storage, and the storage
conditions.
Ensure the batteries are fully charged when storing.
Table of contents
Popular Mobility Aid manuals by other brands

Decon wheel
Decon wheel XLT Assembly instructions

Pressalit Care
Pressalit Care R4806 Mounting instruction

Probasics
Probasics KNEE WALKER 1030 user manual

Direct Healthcare Group
Direct Healthcare Group Bure XL user manual

TGA
TGA Breeze Midi 3 Operating instructions and owner's handbook

Timago
Timago CARBON Instructions for use

Motion Concepts
Motion Concepts TRX MAXX PIVOT PLUS LEGREST installation manual

Drive
Drive Cristallo operating instructions

Orliman
Orliman actius ACAN01 UNI Instructions for use and care

CareCo
CareCo Access-Tec MS09130 Setup guide

Cobi Rehab
Cobi Rehab 0173-050-000 user manual

SANO
SANO Liftkar PT instruction manual