Gardenline GLGP 1002 User manual

Operating Instructions
Garden Pump
GLGP 1002
N16188
After Sales Support
TEL: 1300 130 579
WEB: www.rossmac.com
Anleitung GLGP 1002_SPK7:Anleitung GLSP 1002_SPK7 06.08.2007 8:52 Uhr Seite 1

After Sales Support TEL: 1300 130 579 WEB: www.rossmac.com
2
Garden Pump
What your 2 year warranty means
Great care has gone into the manufacture of this product and it should therefore provide you with years of
good service when used properly. In the event of product failure within its intended use over the course of the
first 2 years after the date of purchase, we will remedy the problem as quickly as possible once it has been
brought to our attention. In the unlikely event of such an occurrence, or if you require any information about
the product please contact us via our after sales support services, details of which can be found in this manual
and on the product itself.
Anleitung GLGP 1002_SPK7:Anleitung GLSP 1002_SPK7 06.08.2007 8:52 Uhr Seite 2

After Sales Support TEL: 1300 130 579 WEB: www.rossmac.com
3
Table of contents
1. Safety regulations page 4
2. Layout page 4
3. Proper use page 4
4. Operating instructions page 5
5. Fitting the carry handle page 5
6. Electrical connections page 5
7. Fitting a suction pipe page 5
8. Pressure line connection page 6
9. Starting up page 6
10. Maintenance instructions page 6
11. Replacing the mains cable page 6
12. Technical data page 6
13. Troubleshooting page 7
14. Ordering spare parts page 7
1
Anleitung GLGP 1002_SPK7:Anleitung GLSP 1002_SPK7 06.08.2007 8:52 Uhr Seite 3

After Sales Support TEL: 1300 130 579 WEB: www.rossmac.com
4
Before you put the water pump into operation,
carefully read the following safety regulations and the
operating instructions.
If you give the equipment to any other persons, give
them the operating instructions as well.
Keep these instructions in a safe place.
Packaging
The unit is supplied in packaging to prevent it from
being damaged in transit. The raw materials in this
packaging can be reused or recycled.
1. Safety information
Please read the instructions for use very carefully
and observe the information they contain. By
referring to these instructions, familiarise yourself
with the appliance, learn how to use it correctly,
and note the safety precautions to be taken.
Take the appropriate steps to ensure that children
have no access to the appliance.
The user of the appliance is responsible for any
third parties in the work area.
Before using the appliance for the first time, an
electrician must check that the necessary
electrical protection measures have been taken.
In stagnant water bodies, garden ponds,
swimming ponds and their surrounding areas the
pump may only be used with an earth-leakage
circuit breaker with an actuating rated current of
up to 30 mA (acc. to VDE 0100 part 702 and 738).
The pump is not designed for use in swimming
pools and paddling pools of any kind or other
bodies of water in which people or animals may
be present during operation.
It is prohibited to operate the pump if a person or
animal is in the danger area.
Ask your electrician!
Inspect the appliance before each use. Do not
use the appliance if the safety devices are
damaged or worn. Never deactivate the safety
devices.
Use the appliance only for the purposes specified
in these instructions for use.
You are responsible for safety in the work area.
Should the pump cable or plug be damaged by
external influences, the cable must not be
repaired! The cable must be replaced with a new
one. This work is to be performed only by an
electrician. (See section “Replacing the mains
cable“)
Your mains supply must comply with the voltage
of 240 V alternating voltage specified on the type
plate.
Never lift, transport or secure the pump by its
power cable.
Make sure the appliance is plugged into a socket
in a place where there is no risk of flooding and
which is protected against moisture.
Always remove the plug from the socket before
doing any work on the pump.
Avoid exposing the pump to a direct jet of water.
The operator is responsible for any local safety
and installation regulations. (Ask your electrician
for advice.)
Rule out any indirect damage caused by the
flooding of rooms following the failure of the pump
by adopting the appropriate measures (e.g. the
installation of an alarm system, a reserve pump or
the like).
Use only original spare parts
Never let the pump run dry and never operate it
with fully closed intake power. The manufacturerʼs
warranty shall lapse if the pump is damaged due
to it being allowed to run dry.
The pump must not be used to operate swimming
pools.
The pump must not be installed in the drinking
water pipe line.
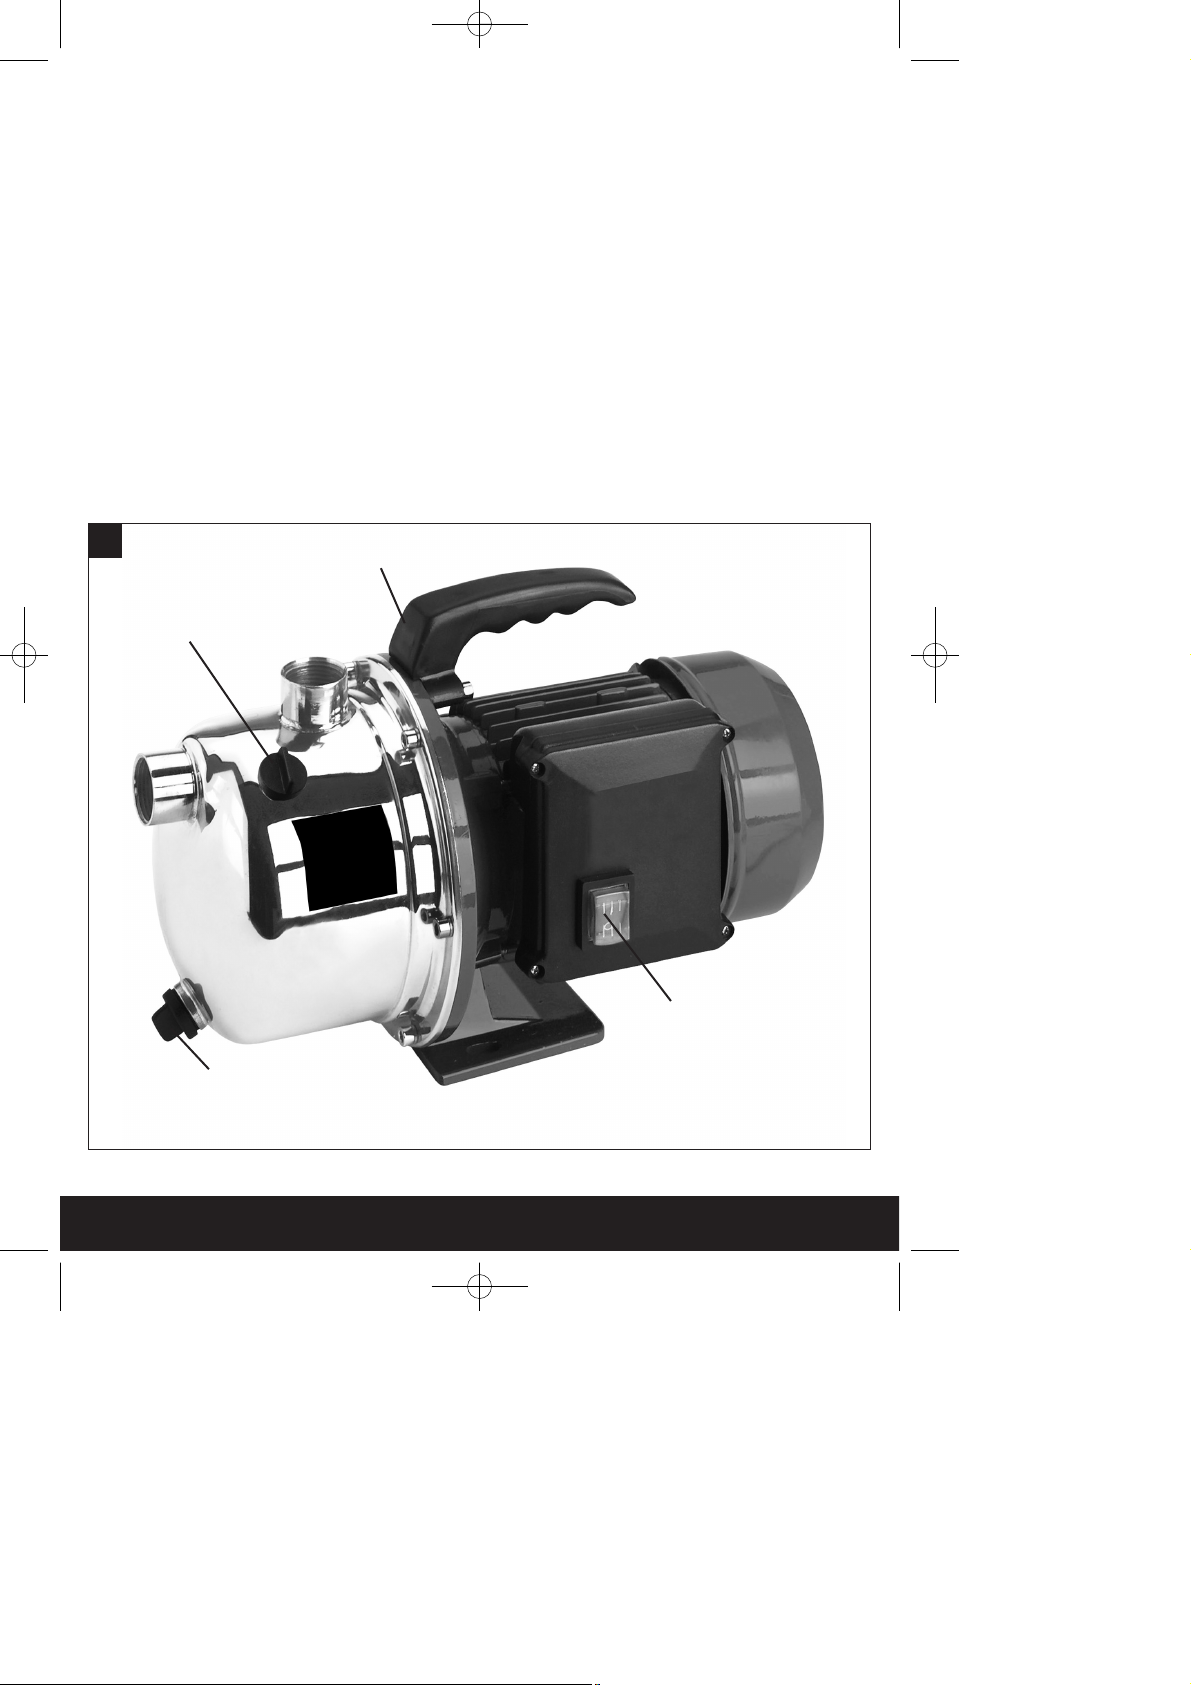
2. Layout (see Fig. 1)
1. ON/OFF switch
2. Carry handle
3. Water filler screw
4. Water drain screw
3. Proper use
Areas of use:
For irrigating and watering parks, vegetable
patches and gardens
For operating lawn sprinklers
With a prefilter, for drawing water from ponds,
streams, rain-butts, rain-water cisterns and wells.
Anleitung GLGP 1002_SPK7:Anleitung GLSP 1002_SPK7 06.08.2007 8:53 Uhr Seite 4

After Sales Support TEL: 1300 130 579 WEB: www.rossmac.com
5
Media which can be pumped:
For the pumping of clear water (fresh water), rain
water or mild suds/dirty water.
Please note that our equipment has not been
designed for use in commercial, trade or industrial
applications. Our warranty will be voided if the
machine is used in commercial, trade or industrial
businesses or for equivalent purposes.
The maximum temperature of the medium to be
pumped in continuous operation should not exceed
+35°C.
This pump is not to be used to pump combustible,
gaseous or explosive fluids.
The pumping of aggressive fluids (acids, alkalis, silo
seepage etc.) and abrasive substances (sand)
should also be avoided.
4. Operating instructions
Basically, we recommend the use of a prefilter and
an intake set with an intake hose, an intake strainer
and check valve in order to prevent long repriming
times and any unnecessary damage to the pump
caused by stones and hard foreign bodies.
5. Fitting the carry handle
Fasten the carry handle with the 2 supplied screws
(see Fig. 2).
6. Electrical connections
Connect the power cable to a 240 V ~ 50 Hz
earthed, 10 amp fuse minimum.
The appliance is switched on and off using the
integrated ON/OFF switch.
The motor is protected against overloading or
blocking by an integrated thermostat. In the event
of overheating, the thermostat switches off the
pump automatically. The pump will start up again
automatically after it has cooled down.
7. Fitting a suction pipe
Screw an intake hose (min. 3/4“ plastic hose with
spiral reinforcement) either directly or with a
threaded nipple to the pumpʼs intake connection
(1“ IG) (see Fig. 1).
The intake hose used should have an intake
valve. If the intake valve cannot be used, a check
valve should be installed in the intake line.
The intake hose should rise from the water pick-
up point to the pump. Always avoid laying the
intake line higher than the pump. Air bubbles in
the intake line delay and hinder suction.
The intake and pressure lines must be attached in
such a way that they do not place the pump under
any mechanical strain.
The intake valve should be so far immersed in the
water that the pump cannot run dry even if the
water level falls.
If the intake line is not air-tight, the intake of air
will hinder the intake of water.
Avoid drawing in foreign bodies (sand etc.).
If necessary, install a prefilter for this purpose.
2
Intake line
connection
Water drain
screw
Water filler
screw
Pressure line
connection
3
Anleitung GLGP 1002_SPK7:Anleitung GLSP 1002_SPK7 06.08.2007 8:53 Uhr Seite 5

After Sales Support TEL: 1300 130 579 WEB: www.rossmac.com
6
8. Pressure line connection
The pressure line (should be at least 3/4“) must
be connected to the pumpʼs pressure line
connection (1“ IG) either directly or via a threaded
nipple.
A 1/2“ pressure hose can also be used with the
appropriate screw connections, of course, but this
will reduce the delivery rate.
All shut-off devices (spray nozzles, valves etc.) in
the pressure line must be fully opened when
priming so that any air in the intake line can
escape.
9. Starting up
Set up the pump on flat and firm ground.
Attach the intake line ready for use.
Plug into the mains.
Fill the pump with water at the pressure
connection.
All shut-off devices in the pressure line (spray
nozzles, valves etc.) must be fully opened when
priming so that any air in the intake line can
escape.
Depending on the suction height and the amount
of air in the intake line, priming can take anywhere
between 30 seconds and 5 minutes. If it takes
longer than this, the pump should be refilled with
water.
If the pump is removed again after use, it must
always be refilled with water whenever it is
connected up and used again.
10. Maintenance instructions
The pump is basically maintenance free. To
ensure a long service life, however, we
recommend regular checks and care.
Warning!
Before every servicing, switch off the pump
and remove the plug from the socket.
If the pump is not going to be used for a long time
or has to be removed for the winter months, rinse
it out with water, empty it completely and allow it
to dry.
If there is a risk of frost, the pump must be
emptied completely.
After long stoppages, make sure the rotor turns
correctly by briefly switching the pump on and off.
If the pump becomes blocked, connect the
pressure line to the water line and remove the
intake hose. Open the water line. Switch on the
pump several times for approx. 2 seconds. Most
blockages can be removed in this way.
To drain the pump housing, undo the water drain
screw (Fig. 3) and tilt the pump slightly.
11. Replacing the mains cable
Warning! Disconnect the pump from the mains!
If the mains cable is defective, it must be
replaced by an electrician.
12. Technical data
Mains supply: 240V ~ 50 Hz
Power rating: 1000 W
Delivery rate max. 4600 l/h
Delivery height max. 45 m
Delivery pressure max. 4.5 bar
Suction height max. 6 m
Delivery and intake connection: 1” IG
Water temperature max. 35°C
Weight 9.3 kg
Anleitung GLGP 1002_SPK7:Anleitung GLSP 1002_SPK7 06.08.2007 8:53 Uhr Seite 6

After Sales Support TEL: 1300 130 579 WEB: www.rossmac.com
7
13. Troubleshooting
Motor fails to start up
Causes Solutions
No mains voltage Check voltage
Pump rotor blocked -thermostat switched off Dismantle and clean pump
No intake
Causes Solutions
Intake valve not in water Immerse intake valve in water
Pump chamber without water connection Fill water into intake
Air in intake line Make sure intake line is air-tight
Intake valve leaks Clean intake valve
Strainer (intake valve) blocked Clean strainer
Max. suction height exceeded Check suction height
Inadequate delivery rate
Causes Solutions
Suction height too high Check suction height
Strainer dirty Clean strainer
Water level falling rapidly Immerse intake valve deeper
Pump performance diminished by contaminants part Clean pump and replace wearing
Thermostat switches pump off
Causes Solutions
Motor overloaded - friction caused by foreign Dismantle and clean pump. Prevent intake of
substances too high foreign substances (filter)
Warning!
The pump must never be allowed to run dry!
14. Ordering spare parts
Please quote the following data when ordering replacement parts:
Type of machine
Article number of the machine
Identification number of the machine
Replacement part number of the part required
Anleitung GLGP 1002_SPK7:Anleitung GLSP 1002_SPK7 06.08.2007 8:53 Uhr Seite 7

After Sales Support TEL: 1300 130 579 WEB: www.rossmac.com
EH 07/2007
The reprinting or reproduction by any other means, in whole or in part,
of documentation and papers accompanying products is permitted only
with the express consent of ISC GmbH. Technical changes subject to change
Never place any electric tools in your household refuse.
Seek advice on correct disposal from local waste authorities.
Anleitung GLGP 1002_SPK7:Anleitung GLSP 1002_SPK7 06.08.2007 8:53 Uhr Seite 8
Table of contents
Other Gardenline Water Pump manuals