Gardol GGS-E 12 Li User manual

GGS-E 12 Li
Art.-Nr.: 34.103.98 I.-Nr.: 11015
7
DE Originalbetriebsanleitung
Akku-Gras- und Strauchschere
GB Original operating instructions
Cordless grass and shrub shears
FR Instructions d’origine
Taille-herbes et taille-haies sans fil
IT Istruzioni per l’uso originali
Forbici a batteria per erba ed
arbusti
ES Manual de instrucciones original
Tijera cortacésped y recortasetos de
batería
NL Originele handleiding
Accugras- en struikschaar
PL Instrukcjąoryginalną
Akumulatorowe nożyce do trawy i krze-
wów
CZ Originální návod k obsluze
Akumulátorové nůžky na trávu a keře
SK Originálny návod na obsluhu
Akumulátorové nožnice na trávu a kríky
HU Eredeti használati utasítás
Akku-fű- és bozótolló
SI Originalna navodila za uporabo
Akumulatorske škarje za travo in
grmičevje
HR Originalne upute za uporabu
Baterijske škare za travu i grmlje
BG Оригинално упътване за употреба
Акумулаторна ножица за трева и
храсти
BA Originalne upute za uporabu
Baterijske škare za travu i grmlje
RS Originalna uputstva za upotrebu
Baterijske makaze za travu i žbunje
TR Orijinal Kullanma Talimatı
Akülü çim ve çit makasi
RU Оригинальное руководство по
эксплуатации
Аккумуляторные ножницы для
газона икустарника
DK Original betjeningsvejledning
Akku-græs- og buskklipper
NO Original-driftsveiledning
Batteridrevet gress- og busksaks
IS Upprunalegar
notandaleiðbeiningar
Hleðslu-gras og runnaklippur
SE Original-bruksanvisning
Batteridriven gräs-/häcksax
FI Alkuperäiskäyttöohje
Akku-ruoho-ja pensassakset
EE Originaalkasutusjuhend
Akuga muru- ja pöösakäärid
LV Oriģinālālietošanas instrukcija
Akumulatora zāles un krūmu šķēres
LT Originali naudojimo instrukcija
Akumuliatorinės žirklės žolei ir
krūmams kirpti
Anl_GGS_E_12_Li_SPK7.indb 1Anl_GGS_E_12_Li_SPK7.indb 1 08.10.2015 16:06:5408.10.2015 16:06:54

- 2 -
1
29
11
11
3 41
12
10
Anl_GGS_E_12_Li_SPK7.indb 2Anl_GGS_E_12_Li_SPK7.indb 2 08.10.2015 16:06:5508.10.2015 16:06:55
- 3 -
3 4
1
5 6
7 8
8
A
B
12
2 2
1
1
Anl_GGS_E_12_Li_SPK7.indb 3Anl_GGS_E_12_Li_SPK7.indb 3 08.10.2015 16:06:5608.10.2015 16:06:56
- 4 -
9
1
10
11 5
22 4
34 6
7
Anl_GGS_E_12_Li_SPK7.indb 4Anl_GGS_E_12_Li_SPK7.indb 4 08.10.2015 16:07:0008.10.2015 16:07:00

DE
- 5 -
Gefahr!
Beim Benutzen von Geräten müssen einige Si-
cherheitsvorkehrungen eingehalten werden, um
Verletzungen und Schäden zu verhindern. Lesen
Sie diese Bedienungsanleitung / Sicherheitshin-
weise deshalb sorgfältig durch. Bewahren Sie die-
se gut auf, damit Ihnen die Informationen jederzeit
zur Verfügung stehen. Falls Sie das Gerät an an-
dere Personen übergeben sollten, händigen Sie
diese Bedienungsanleitung / Sicherheitshinweise
bitte mit aus.Wir übernehmen keine Haftung für
Unfälle oder Schäden, die durch Nichtbeachten
dieser Anleitung und den Sicherheitshinweisen
entstehen.
1. Sicherheitshinweise
Die entsprechenden Sicherheitshinweise finden
Sie im beiliegenden Heftchen!
Gefahr!
Lesen Sie alle Sicherheitshinweise und An-
weisungen. Versäumnisse bei der Einhaltung der
Sicherheitshinweise und Anweisungen können
elektrischen Schlag, Brand und/oder schwere
Verletzungen verursachen. Bewahren Sie alle
Sicherheitshinweise und Anweisungen für
die Zukunft auf.
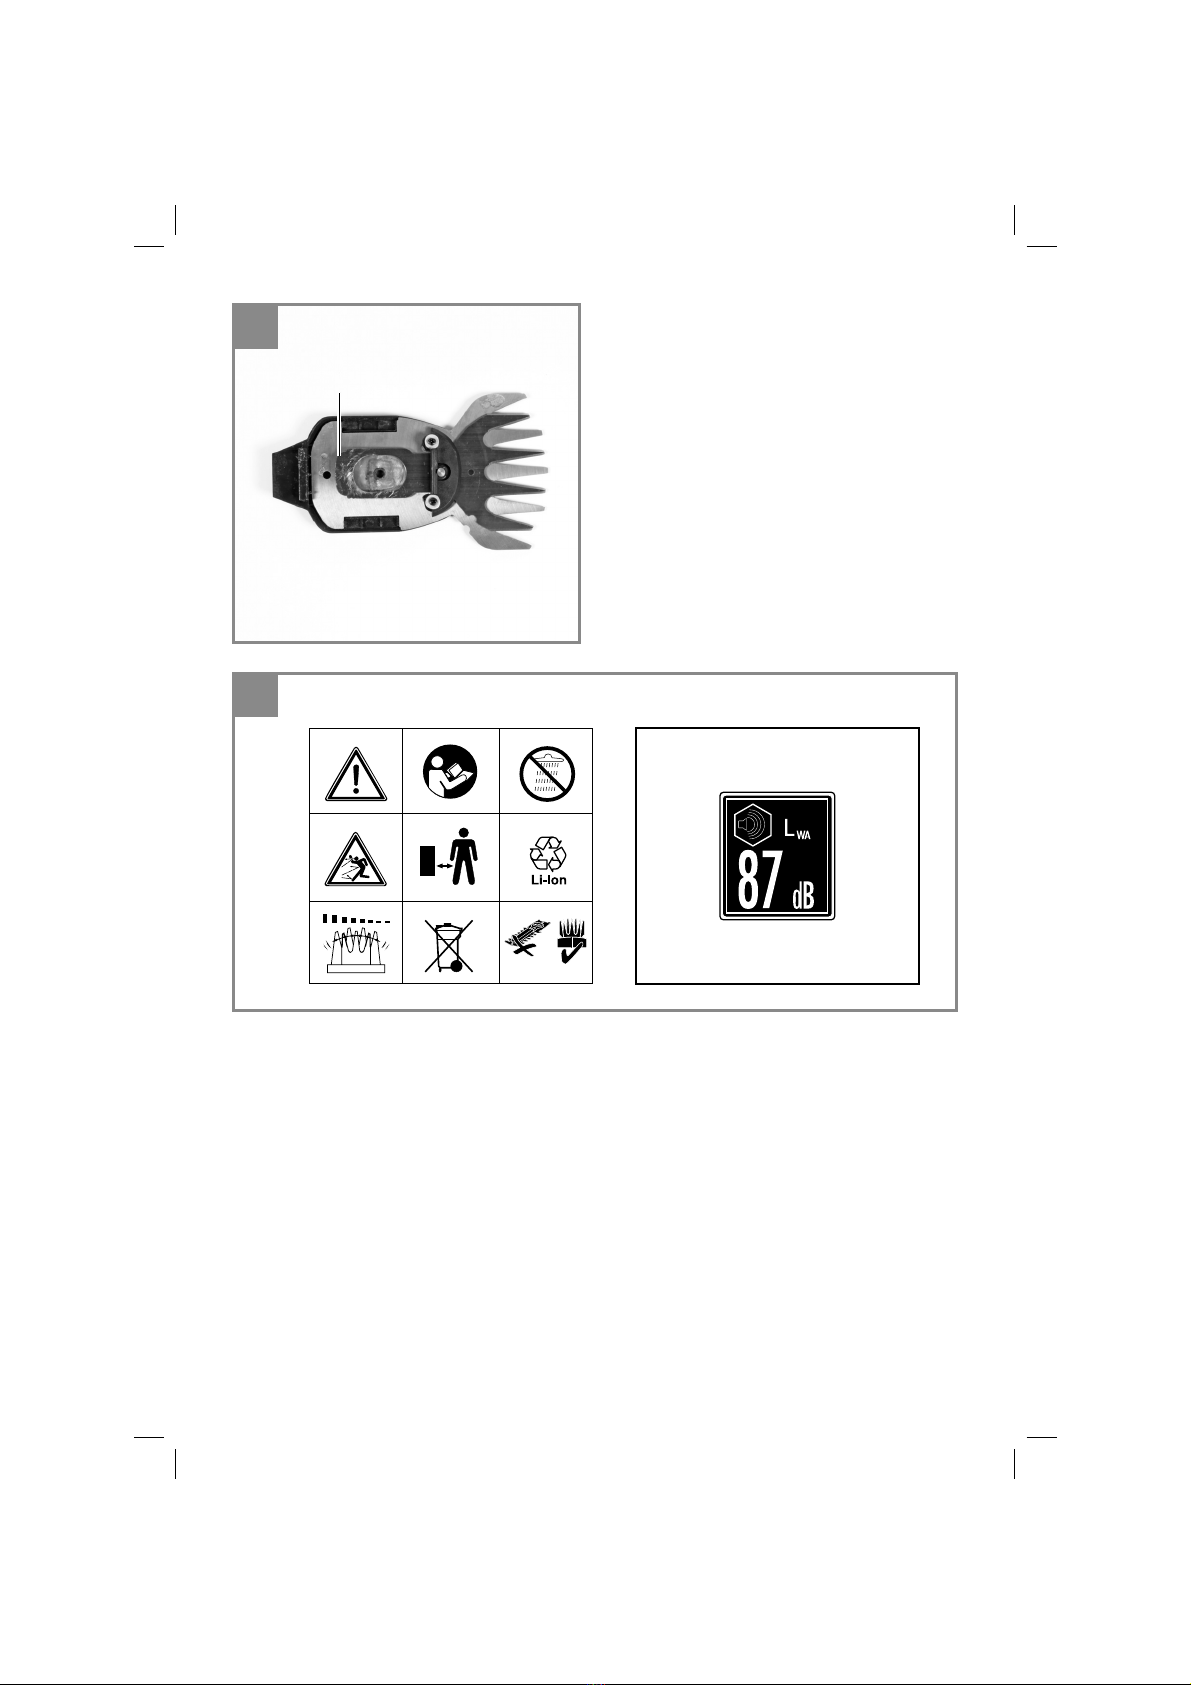
Erklärung des Hinweisschildes auf dem
Gerät (siehe Bild 10)
1. Achtung! Betriebsanweisung lesen und Warn-
und Sicherheitshinweise befolgen.
2. Dritte aus dem Gefahrenbereich fernhalten.
3. Achtung! Nach dem Ausschalten laufen die
Messer nach. Stillstand der Messer abwarten.
Verletzungsgefahr!
4. Akku fachgerecht entsorgen
5. Gerät vor Regen und Feuchtigkeit schützen!
6. Verlängerung nur mit Grasschneidemesser!
Eine Verwendung der Verlängerung mit dem
Strauchmesser ist nicht zulässig!
7. Garantierter Schallleistungspegel: 87 dB
2. Gerätebeschreibung und
Lieferumfang
2.1 Gerätebeschreibung (Bild 1/2)
1 Grasschneidmesser
3 Einschaltsperre
4 Ein-/Ausschalter
9 Messerschutz
10 Ladegerät
11 Strauchmesser
12 Messerentriegelung
2.2 Lieferumfang
Bitte überprüfen Sie die Vollständigkeit des Arti-
kels anhand des beschriebenen Lieferumfangs.
Bei Fehlteilen wenden Sie sich bitte spätestens
innerhalb von 5 Arbeitstagen nach Kauf des Arti-
kels unter Vorlage eines gültigen Kaufbeleges an
unser Service Center oder an die Verkaufstelle,
bei der Sie das Gerät erworben haben. Bitte
beachten Sie hierzu die Gewährleistungstabelle
in den Service-Informationen am Ende der An-
leitung.
• Öffnen Sie die Verpackung und nehmen Sie
das Gerät vorsichtig aus der Verpackung.
• Entfernen Sie das Verpackungsmaterial so-
wie Verpackungs-/ und Transportsicherungen
(falls vorhanden).
• Überprüfen Sie, ob der Lieferumfang vollstän-
dig ist.
• Kontrollieren Sie das Gerät und die Zubehör-
teile auf Transportschäden.
• Bewahren Sie die Verpackung nach Möglich-
keit bis zum Ablauf der Garantiezeit auf.
Gefahr!
Gerät und Verpackungsmaterial sind kein
Kinderspielzeug! Kinder dürfen nicht mit
Kunststoffbeuteln, Folien und Kleinteilen
spielen! Es besteht Verschluckungs- und Er-
stickungsgefahr!
• Originalbetriebsanleitung
• Sicherheitshinweise
Anl_GGS_E_12_Li_SPK7.indb 5Anl_GGS_E_12_Li_SPK7.indb 5 08.10.2015 16:07:0108.10.2015 16:07:01

DE
- 6 -
3. Bestimmungsgemäße
Verwendung
Das Gerät ist zum Schneiden von Rasenkanten
und kleineren Grasflächen im privaten Haus- und
Hobbygarten bestimmt. Als Geräte für den priva-
ten Haus- und Hobbygarten werden solche an-
gesehen, die nicht in öffentlichen Anlagen, Parks,
Sportstätten, an Straßen und in der Land- und
Forstwirtschaft eingesetzt werden. Die Einhaltung
der vom Hersteller beigefügten Gebrauchsanwei-
sung ist Voraussetzung für den ordnungsgemä-
ßen Gebrauch des Gerätes.
Warnung! Wegen Gefahr von Personen und
Sachschaden darf das Gerät nicht zum Zer-
kleinern im Sinn von Kompostieren verwen-
det werden.
Das Gerät darf nur nach seiner Bestimmung ver-
wendet werden. Jede weitere darüber hinausge-
hende Verwendung ist nicht bestimmungsgemäß.
Für daraus hervorgerufene Schäden oder Verlet-
zungen aller Art haftet der Benutzer/Bediener und
nicht der Hersteller.
Bitte beachten Sie, dass unsere Geräte bestim-
mungsgemäß nicht für den gewerblichen, hand-
werklichen oder industriellen Einsatz konstruiert
wurden.Wir übernehmen keine Gewährleistung,
wenn das Gerät in Gewerbe-, Handwerks- oder
Industriebetrieben sowie bei gleichzusetzenden
Tätigkeiten eingesetzt wird.
4. Technische Daten
Drehzahl n0.........................................1200 min-1
Schnittbreite Grasschere ........................ 100 mm
Schnittlänge Strauchschere.................... 190 mm
Schnittstärke Strauchschere....................... 8 mm
max. Laufzeit ...........................................100 min
Akku...............................Li-Ion / 12 V d.c. / 1,3 Ah
Ladezeit.......................................................... 2 h
Schalldruckpegel LpA ............................ 61 dB (A)
Schalleistungspegel LWA ....................... 81 dB (A)
Unsicherheit K ........................................ 6 dB (A)
Vibration ahv .............................................5,5 m/s2
Unsicherheit K .........................................1,5 m/s2
Gewicht.......................................................1,4 kg
Schalldruckpegel
am Ohr des Bedieners.......................... 77 dB (A)
Unsicherheit K ........................................ 3 dB (A)
Ladegerät
Netzspannung ..................100-240 V ~ 50-60 Hz
Ausgang
Nennspannung .....................................13 V d. c.
Nennstrom ..............................................900 mA
• Der angegebene Schwingungsemissionswert
ist nach einem genormten Prüfverfahren
gemessen worden und kann zum Vergleich
eines Elektrowerkzeugs mit einem anderen
verwendet werden;
• Der angegebene Schwingungsemissionswert
kann auch zu einer einleitenden Einschät-
zung der Aussetzung verwendet werden.
• Der Schwingungsemissionswert kann sich
während der tatsächlichen Benutzung des
Elektrowerkzeugs von dem Angabewert un-
terscheiden, abhängig von der Art und Weise,
in der das Elektrowerkzeug verwendet wird;
• Versuchen Sie, die Belastung durch Vib-
rationen so gering wie möglich zu halten.
Beispielhafte Maßnahmen zur Verringerung
der Vibrationsbelastung sind das Tragen von
Handschuhen beim Gebrauch des Werk-
zeugs und die Begrenzung der Arbeitszeit.
Dabei sind alle Anteile des Betriebszyklus
sind zu berücksichtigen (beispielsweise
Zeiten, in denen das Elektrowerkzeug abge-
schaltet ist, und solche, in denen es zwar ein-
geschaltet ist, aber ohne Belastung läuft).
5. Vor Inbetriebnahme
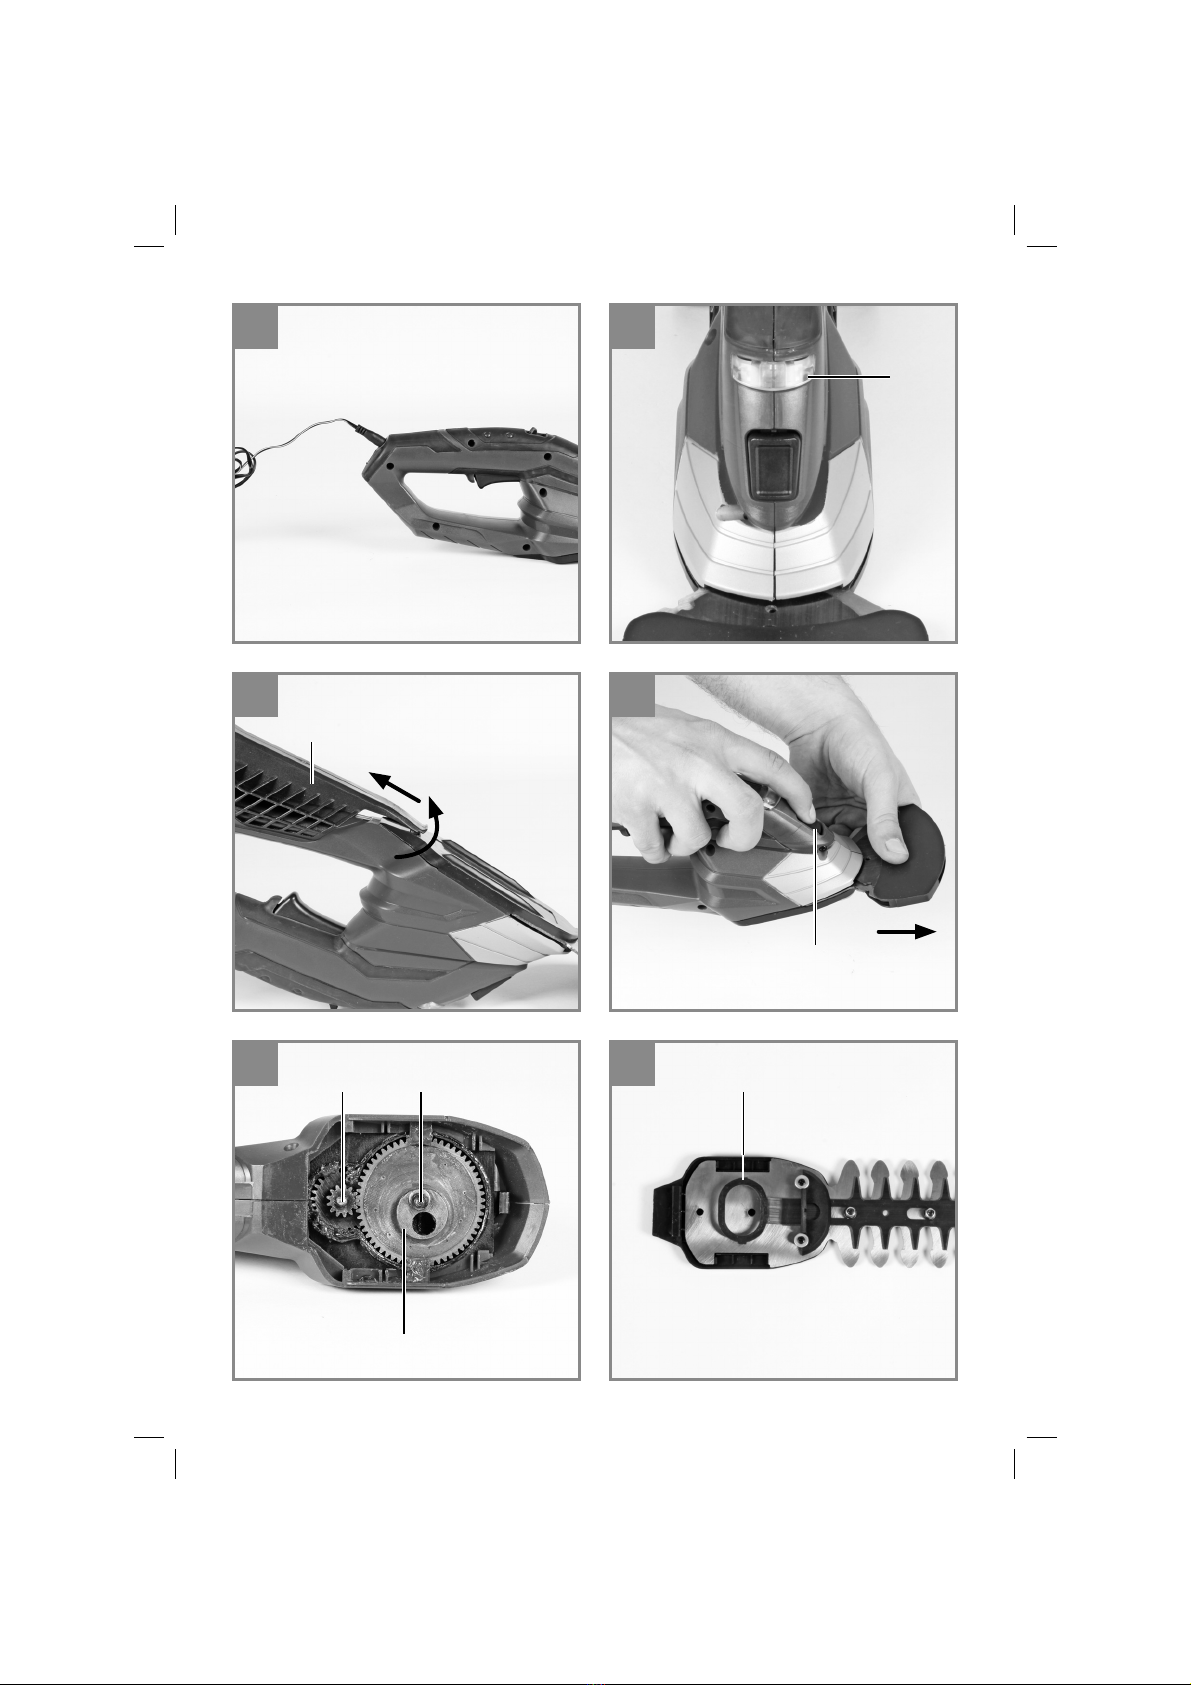
5.1. Akku laden (Bild 3/4)
• Ladegerät und Gerät verbinden (Bild 3).
• Vergleichen Sie, ob die auf dem Typenschild
angegebene Netzspannung mit der vorhan-
denen Netzspannung übereinstimmt. Lade-
gerät in Netzsteckdose einstecken, die rote
LED (Bild 4/ Pos. 1) leuchtet und zeigt die
vorhandene Ladespannung an.
• Der Akku wird geladen. Die Ladezeit beträgt
bei leerem Akku max. 2 Stunden.Während
des Ladevorgangs kann sich der Akku im Ge-
rät etwas erwärmen, dies ist jedoch normal.
• Ist der Akku voll geladen, erlischt die rote
LED (Bild 4/Pos. 1).
Anl_GGS_E_12_Li_SPK7.indb 6Anl_GGS_E_12_Li_SPK7.indb 6 08.10.2015 16:07:0108.10.2015 16:07:01

DE
- 7 -
Sollte das Laden des Akkus nicht möglich sein,
überprüfen Sie bitte
• ob an der Steckdose die Netzspannung vor-
handen ist.
Sollte das Laden des Akkus immer noch nicht
möglich sein, bitten wir Sie das komplette Gerät
mit Ladegerät an unseren Kundendienst zu sen-
den.
Im Interesse einer langen Lebensdauer des
Akkus sollten Sie für eine rechtzeitige Wiederauf-
ladung des Akkus sorgen, Dies ist auf jeden Fall
notwendig, wenn Sie feststellen, dass die Leis-
tung des Gerätes nachlässt.
Entladen Sie den Akku nie vollständig. Dies führt
zu einem Defekt des Akkus!
Warnung!
Die vom Hersteller am Gerät installierten
Schalteinrichtungen dürfen nicht entfernt
oder überbrückt werden, z. B. durch Anbin-
den einer Schalttaste am Griff, da andernfalls
Verletzungsgefahr besteht und das Gerät
nicht automatisch abschaltet.
6. Bedienung
Die zu schneidende Fläche vorher von Steinen
und anderen festen Gegenständen befreien. Die
Einschaltsperre (Bild 1 / Pos. 3) verhindert ein
unbeabsichtigtes Einschalten des Gerätes. Zum
Einschalten die Einschaltsperre (Bild 1/ Pos. 3)
durch drücken und gleichzeitig den Ein- /Aus-
schalter (Bild 1 / Pos. 4) drücken. Durch Loslas-
sen des Ein-/Ausschalters (Bild 1 / Pos. 4) kann
das Gerät wieder ausgeschaltet werden.
6.1 Gras schneiden
Die Grasschere über den Boden gleiten lassen.
Die beste Schneideleistung erzielt man bei tro-
ckenem Rasen.
Beim Nachlassen der Schneideleistung, Schere
sofort neu aufladen, damit die Akkus nicht völlig
entleert werden.
Wird die Grasschere nicht benutzt, muss die
schwarze Messerschutzhaube auf die Messer
aufgesetzt werden.
6.2 Hecken schneiden
Das Gerät kann zum Schneiden kleiner Hecken
und Sträucher verwendet werden.
Neigen Sie die Strauchschere leicht in Richtung
der zu schneidenden Hecke.
Schneiden Sie zunächst die Seiten, von unten
nach oben, dann erst die Oberseite.
Achten Sie auf Fremdkörper in oder an der He-
cke, die das Messer beschädigen könnten.
Wann schneidet man die Hecken:
• Allgemein gilt die Regel, Hecken, die Ihr Laub
im Herbst verlieren im Juni und Oktober zu
schneiden.
• Immergrüne Hecken können im April und Au-
gust geschnitten werden.
6.3 Wechseln der Messer
Warnung! Verletzungsgefahr!
Zum Entfernen der Messer drücken Sie die Mes-
serentriegelung (Bild 1/Pos. 12) und nehmen das
Messer wie in Bild 6 /Pos 12 zu sehen ist ab.
Nach dem Entfernen des Messers sind die Ge-
triebezahnräder zu sehen (Bild 7). Achten Sie
darauf, dass während des Messerwechsels kein
Schmutz in das Getriebe gelangt.
Die Montage erfolgt in umgekehrter Reihenfolge.
Vorsicht! Beim Drücken der Messerentriegelung
(Bild 1/Pos. 12) fällt das Messer herab!
Beim Einsetzen des Heckenscherenmessers
achten Sie darauf, in welcher Stellung sich der
Exzenterstift (Bild 7 / Pos.1) befindet. Nehmen Sie
das Heckenscherenmesser und schieben Sie die
Exzenteraufnahme (Bild 8/ Pos.1) an die Position,
so dass beim Zusammenbau der Exzenterstift
genau auf die Exzenteraufnahme passt. Das He-
ckenscherenmesser wird auf die Führungsstifte
(Bild 7 / Pos. 2) gesteckt.
Beim Einsetzen des Grasschneidemessers
achten Sie wieder auf die Stellung des Exzenter-
stiftes (Bild 7 / Pos.1).
Am Grasscherenmesser kann durch verschieben
der Exzenteraufnahme (Bild 9 / Pos. 1) nach links
oder rechts die Position gefunden werden, dass
der Exzenterstift (Bild 7 /Pos. 1) und die Exzenter-
aufnahme (Bild 9 / Pos. 1) zusammen passen.
Anl_GGS_E_12_Li_SPK7.indb 7Anl_GGS_E_12_Li_SPK7.indb 7 08.10.2015 16:07:0108.10.2015 16:07:01

DE
- 8 -
7. Reinigung, Wartung und
Ersatzteilbestellung
7.1 Reinigung
• Halten Sie Schutzvorrichtungen, Luftschlitze
und Motorengehäuse so staub- und schmutz-
frei wie möglich. Reiben Sie das Gerät mit
einem sauberen Tuch ab oder blasen Sie es
mit Druckluft bei niedrigem Druck aus.
• Wir empfehlen, dass Sie das Gerät direkt
nach jeder Benutzung reinigen.
• Reinigen Sie das Gerät regelmäßig mit einem
feuchten Tuch und etwas Schmierseife.Ver-
wenden Sie keine Reinigungs- oder Lösungs-
mittel; diese könnten die Kunststoffteile des
Gerätes angreifen. Achten Sie darauf, dass
kein Wasser in das Geräteinnere gelangen
kann.
• Vor und nach dem Gebrauch sollte die Sche-
re gründlich gereinigt werden. Ein paar Trop-
fen Öl (z. B. Nähmaschinenöl) auf die Messer
verbessern die Schneideleistung. Messer
jedoch niemals fetten.
• Für einen gleichbleibend exakten Schnitt ist
es notwendig, dass Grasreste und Schmutz
auch zwischen Ober- und Untermesser ent-
fernt werden.
Vorsicht!
Wegen der Gefahr von Personen- und Sach-
schäden, reinigen Sie das Produkt nie mit
fließendem Wasser, insbesondere nicht unter
Hochdruck. Bewahren Sie die Akkuschere an
einem trockenen und frostsicheren Ort auf.
Der Aufbewahrungsort muss für Kinder unzu-
gänglich sein.
7.2 Wartung
• Für ein gutes Schneideergebnis sollten die
Messer stets scharf sein. Sie können des-
halb mit einem Abziehstein wieder geschärft
werden. Besonders empfehlen wir, Scharten
und Grate, die durch Steine o. ä. entstehen
können, zu entfernen.
• Im Geräteinneren befinden sich keine weite-
ren zu wartenden Teile.
7.3 Ersatzteilbestellung
Bei der Ersatzteilbestellung sollten folgende
Angaben gemacht werden:
• Typ des Gerätes
• Artikelnummer des Gerätes
• Ident-Nummer des Gerätes
• Ersatzteil-Nummer des erforderlichen Ersatz-
teils
Aktuelle Preise und Infos finden Sie unter
www.isc-gmbh.info
8. Entsorgung und
Wiederverwertung
Das Gerät befindet sich in einer Verpackung um
Transportschäden zu verhindern. Diese Verpa-
ckung ist Rohstoffund ist somit wieder verwend-
bar oder kann dem Rohstoffkreislauf zurückge-
führt werden. Das Gerät und dessen Zubehör
bestehen aus verschiedenen Materialien, wie z.B.
Metall und Kunststoffe. Führen Sie defekte Bau-
teile der Sondermüllentsorgung zu. Fragen Sie im
Fachgeschäft oder in der Gemeindeverwaltung
nach!
Anl_GGS_E_12_Li_SPK7.indb 8Anl_GGS_E_12_Li_SPK7.indb 8 08.10.2015 16:07:0208.10.2015 16:07:02

DE
- 9 -
Nur für EU-Länder
Werfen Sie Elektrowerkzeuge nicht in den Hausmüll!
Gemäß europäischer Richtlinie 2012/19/EG über Elektro- und Elektronik-Altgeräte und Umsetzung in
nationales Recht müssen verbrauchte Elektrowerkzeuge getrennt gesammelt werden und einer umwelt-
gerechten Wiederverwertung zugeführt werden.
Recycling-Alternative zur Rücksendeaufforderung:
Der Eigentümer des Elektrogerätes ist alternativ anstelle Rücksendung zur Mitwirkung bei der sachge-
rechten Verwertung im Falle der Eigentumsaufgabe verpflichtet. Das Altgerät kann hierfür auch einer
Rücknahmestelle überlassen werden, die eine Beseitigung im Sinne der nationalen Kreislaufwirt-
schafts- und Abfallgesetze durchführt. Nicht betroffen sind den Altgeräten beigefügte Zubehörteile und
Hilfsmittel ohne Elektrobestandteile.
Diese Sendung enthält Lithium-Ionen-Batterien.
Gemäß Sondervorschrift 188 unterliegt diese Sendung nicht den Vorschriften des ADR. Sorgsam
behandeln. Entzündungsgefahr bei Beschädigung des Versandstücks. Bei Beschädigung des Versand-
stücks: Kontrolle und erforderlichenfalls erneutes Verpacken.
Für zusätzliche Informationen rufen Sie bitte: 0049 1807 10 20 20 66 (Festnetzpreis: 14 ct/min, Mobil-
funkpreise maximal: 42 ct/min) Außerhalb Deutschlands fallen stattdessen Gebühren für ein reguläres
Gespräch ins dt. Festnetz an.
Der Nachdruck oder sonstige Vervielfältigung von Dokumentation und Begleitpapieren der Produkte,
auch auszugsweise, ist nur mit ausdrücklicher Zustimmung der iSC GmbH zulässig.
Technische Änderungen vorbehalten
Anl_GGS_E_12_Li_SPK7.indb 9Anl_GGS_E_12_Li_SPK7.indb 9 08.10.2015 16:07:0208.10.2015 16:07:02

DE
- 10 -
Service-Informationen
Wir unterhalten in allen Ländern, welche in der Garantieurkunde benannt sind, kompetente Service-
Partner, deren Kontakte Sie der Garantieurkunde entnehmen. Diese stehen Ihnen für alle Service-
Belange wie Reparatur, Ersatzteil- und Verschleißteil-Versorgung oder den Bezug von Verbrauchsmate-
rialien zur Verfügung.
Es ist zu beachten, dass bei diesem Produkt folgende Teile einem gebrauchsgemäßen oder natürlichen
Verschleiß unterliegen bzw. folgende Teile als Verbrauchsmaterialien benötigt werden.
Kategorie Beispiel
Verschleißteile* Kohlebürsten, Akku
Verbrauchsmaterial/ Verbrauchsteile* Messer
Fehlteile
* nicht zwingend im Lieferumfang enthalten!
Bei Mängel oder Fehlern bitten wir Sie, den Fehlerfall im Internet unter www.isc-gmbh.info anzumelden.
Bitte achten Sie auf eine genaue Fehlerbeschreibung und beantworten Sie dazu in jedem Fall folgende
Fragen:
• Hat das Gerät bereits einmal funktioniert oder war es von Anfang an defekt?
• Ist Ihnen vor dem Auftreten des Defektes etwas aufgefallen (Symptom vor Defekt)?
• Welche Fehlfunktion weist das Gerät Ihrer Meinung nach auf (Hauptsymptom)?
Beschreiben Sie diese Fehlfunktion.
Anl_GGS_E_12_Li_SPK7.indb 10Anl_GGS_E_12_Li_SPK7.indb 10 08.10.2015 16:07:0208.10.2015 16:07:02

DE
- 11 -
Garantieurkunde
Sehr geehrte Kundin, sehr geehrter Kunde,
unsere Produkte unterliegen einer strengen Qualitätskontrolle. Sollte dieses Gerät dennoch einmal nicht
einwandfrei funktionieren, bedauern wir dies sehr und bitten Sie, sich an unseren Servicedienst unter
der auf dieser Garantiekarte angegebenen Adresse, oder an die Verkaufstelle, bei der Sie das Gerät
erworben haben, zu wenden. Für die Geltendmachung von Garantieansprüchen gilt folgendes:
1. Diese Garantiebedingungen regeln zusätzliche Garantieleistungen, die der u. g. Hersteller zusätz-
lich zur gesetzlichen Gewährleistung Käufern seiner Neugeräte verspricht. Ihre gesetzlichen Ge-
währleistungsansprüche werden von dieser Garantie nicht berührt. Unsere Garantieleistung ist für
Sie kostenlos.
2. Die Garantieleistung erstreckt sich ausschließlich auf Mängel an einem von Ihnen erworbenen neu-
en Gerät des u. g. Herstellers, die auf einem Material- oder Herstellungsfehler beruhen und ist nach
unserer Wahl auf die Behebung solcher Mängel am Gerät oder den Austausch des Gerätes be-
schränkt. Bitte beachten Sie, dass unsere Geräte bestimmungsgemäß nicht für den gewerblichen,
handwerklichen oder beruflichen Einsatz konstruiert wurden. Ein Garantievertrag kommt daher nicht
zustande, wenn das Gerät innerhalb der Garantiezeit in Gewerbe-, Handwerks- oder Industriebe-
trieben verwendet wurde oder einer gleichzusetzenden Beanspruchung ausgesetzt war.
3. Von unserer Garantie ausgenommen sind:
- Schäden am Gerät, die durch Nichtbeachtung der Montageanleitung oder aufgrund nicht fach-
gerechter Installation, Nichtbeachtung der Gebrauchsanleitung (wie durch z.B. Anschluss an eine
falsche Netzspannung oder Stromart) oder Nichtbeachtung der Wartungs- und Sicherheitsbestim-
mungen oder durch Aussetzen des Geräts an anomale Umweltbedingungen oder durch mangelnde
Pflege und Wartung entstanden sind.
- Schäden am Gerät, die durch missbräuchliche oder unsachgemäße Anwendungen (wie z.B. Über-
lastung des Gerätes oder Verwendung von nicht zugelassenen Einsatzwerkzeugen oder Zubehör),
Eindringen von Fremdkörpern in das Gerät (wie z.B. Sand, Steine oder Staub, Transportschäden),
Gewaltanwendung oder Fremdeinwirkungen (wie z. B. Schäden durch Herunterfallen) entstanden
sind.
- Schäden am Gerät oder an Teilen des Geräts, die auf einen gebrauchsgemäßen, üblichen oder
sonstigen natürlichen Verschleiß zurückzuführen sind.
4. Die Garantiezeit beträgt 5 Jahre und beginnt mit dem Kaufdatum des Gerätes. Garantieansprüche
sind vor Ablauf der Garantiezeit innerhalb von zwei Wochen, nachdem Sie den Defekt erkannt
haben, geltend zu machen. Die Geltendmachung von Garantieansprüchen nach Ablauf der Ga-
rantiezeit ist ausgeschlossen. Die Reparatur oder der Austausch des Gerätes führt weder zu einer
Verlängerung der Garantiezeit noch wird eine neue Garantiezeit durch diese Leistung für das Gerät
oder für etwaige eingebaute Ersatzteile in Gang gesetzt. Dies gilt auch bei Einsatz eines Vor-Ort-
Services.
5. Für die Geltendmachung Ihres Garantieanspruches melden Sie bitte das defekte Gerät an unter:
www.isc-gmbh.info. Ist der Defekt des Gerätes von unserer Garantieleistung erfasst, erhalten Sie
umgehend ein repariertes oder neues Gerät zurück.
Für Verschleiß-, Verbrauchs- und Fehlteile verweisen wir auf die Einschränkungen dieser Garantie ge-
mäß den Service-Informationen dieser Bedienungsanleitung.
iSC GmbH · Eschenstraße 6 · 94405 Landau/Isar (Deutschland)
Anl_GGS_E_12_Li_SPK7.indb 11Anl_GGS_E_12_Li_SPK7.indb 11 08.10.2015 16:07:0208.10.2015 16:07:02

GB
- 12 -
Danger!
When using the equipment, a few safety pre-
cautions must be observed to avoid injuries and
damage. Please read the complete operating
instructions and safety regulations with due care.
Keep this manual in a safe place, so that the in-
formation is available at all times. If you give the
equipment to any other person, hand over these
operating instructions and safety regulations as
well.We cannot accept any liability for damage
or accidents which arise due to a failure to follow
these instructions and the safety instructions.
1. Safety regulations
The corresponding safety information can be
found in the enclosed booklet.
Danger!
Read all safety regulations and instructions.
Any errors made in following the safety regula-
tions and instructions may result in an electric
shock, fire and/or serious injury.
Keep all safety regulations and instructions
in a safe place for future use.
Explanation of the warning signs on the ma-
chine (Figure 10)
1. Important! Read the operating instructions
and follow the warnings and safety instruc-
tions
2. Keep all other persons away from the danger
zone.
3. Caution! The cutter blades continue to run
after the motor is switched off.Wait for the
blades to come to a standstill.
Risk of injury!
4. Dispose of batteries correctly!
5. Protect the tool from the damp and never
expose it to rain.
6. Extension only with grass cutter blade! It
is prohibited to use the extension with the
hedge cutter blade!
7. Guaranteed sound power level: 87 dB
2. Layout and items supplied
2.1 Layout (Fig. 1/2)
1 Grass cutter blade
3 Safety lock-off
4 ON button
9 Blade guard
10 Battery charger
11 Shrub cutter blade
12 Blade release mechanism
2.2 Items supplied
Please check that the article is complete as
specified in the scope of delivery. If parts are
missing, please contact our service center or the
sales outlet where you made your purchase at
the latest within 5 working days after purchasing
the product and upon presentation of a valid bill
of purchase. Also, refer to the warranty table in
the service information at the end of the operating
instructions.
• Open the packaging and take out the equip-
ment with care.
• Remove the packaging material and any
packaging and/or transportation braces (if
available).
• Check to see if all items are supplied.
• Inspect the equipment and accessories for
transport damage.
• If possible, please keep the packaging until
the end of the guarantee period.
Danger!
The equipment and packaging material are
not toys. Do not let children play with plastic
bags, foils or small parts. There is a danger of
swallowing or suffocating!
• Original operating instructions
• Safety instructions
3. Proper use
The equipment is designed for cutting the edges
of lawns and small areas of grass in private and
hobby gardens.
Tools for private and hobby gardens are not sui-
table for use in public facilities, parks and sport
centers, along roadways, on farms or in the fore-
stry sector. For the tool to be used properly it is
imperative to follow the instructions set out in the
manufacturer’s directions for use.
Anl_GGS_E_12_Li_SPK7.indb 12Anl_GGS_E_12_Li_SPK7.indb 12 08.10.2015 16:07:0208.10.2015 16:07:02

GB
- 13 -
Warning! It is prohibited to use the tool to
chop material for composting because of the
potential danger to persons and property.
The machine is to be used only for its prescribed
purpose. Any other use is deemed to be a case
of misuse.The user / operator and not the manu-
facturer will be liable for any damage or injuries of
any kind caused as a result of this.
Please note that our equipment has not been de-
signed for use in commercial, trade or industrial
applications. Our warranty will be voided if the
machine is used in commercial, trade or industrial
businesses or for equivalent purposes.
4. Technical data
Speed n0: ............................................. 1200 rpm
Cutting width of the grass cutter: ............ 100 mm
Cutting width of the shrub shears ........... 190 mm
Cutting thickness of the shrub shears ........ 8 mm
Running time max.: .................................100 min
Battery pack: ................ Li-Ion / 12 V d. c. / 1.3 Ah
Charging time: ................................................ 2 h
LpA sound pressure level: ...................... 61 dB (A)
LWA sound power level: ......................... 81 dB (A)
K uncertainty........................................... 6 dB (A)
Vibration ahV: .......................................... 5.5 m/s2
K uncertainty............................................1,5 m/s2
Weight: .......................................................1.4 kg
Sound pressure level
at the operator‘s ear.............................. 77 dB (A)
K uncertainty........................................... 3 dB (A)
Battery charger
Mains voltage.....................100-240 V ~ 50-60 Hz
Output
Rated voltage.......................................... 13 V DC
Rated current:..........................................900 mA
• The vibration emission level has been measu-
red in accordance with a set of standardized
criteria and can be used to compare one po-
wer tool with another.
• The specified emission level can also be
used to make an initial assessment of the ex-
posure to vibrations.
• The vibration emission level may vary from
the level specified during actual use, depen-
ding on the way in which the power tool is
used.
• Try to keep the impact from vibrations as low
as possible. Exposure to vibrations can be re-
duced by wearing gloves when using the tool,
for example, and by limiting the amount of
operating time.This includes the full cycle of
operation (e.g. times when the power tool is
switched off and times when the tool is swit-
ched on but no working load is applied).
5. Before starting the equipment
5.1 Charging the battery pack (Figure 3, 4)
• Connect the charger to the charging station
(Figure 3).
• Check that your mains voltage is the same
as that marked on the rating plate of the bat-
tery charger. Plug the battery charger in a
socket-outlet.The red LED (Figure 4 / Item 1)
comes on to indicate that charging voltage is
available.
• The battery pack is being charged. An empty
battery pack requires a maximum charging
period of 2 hours.The temperature of the bat-
tery pack may rise slightly during the charging
operation.This is normal.
• As soon as battery pack is fully charged, the
red LED (Fig. 4/Item 1) extinguishes
If the rechargeable battery fails to charge, check
whether there is voltage at the socket outlet.
Timely recharging of the battery pack will help
it serve you well for a long time. Recharging is
always necessary when you notice a drop in the
tool’s performance.
Never allow the battery pack to become fully di-
scharged. This will cause it to develop a defect.
Anl_GGS_E_12_Li_SPK7.indb 13Anl_GGS_E_12_Li_SPK7.indb 13 08.10.2015 16:07:0208.10.2015 16:07:02

GB
- 14 -
Warning!
It is prohibited to remove or bridge any of the
switching elements installed on the tool by
the manufacturer (e.g. by securing a button
to the handle) as this would prevent the tool
from switching offautomatically and result in
high risk of injury. Under no circumstances
are you to use the shrub cutter with the tele-
scopic long handle fitted.
6. Operation
The area to be cut must first be cleared of stones
and other solid objects.The safety lock-off(Fig. 1/
Item 3) prevents the tool being started unintenti-
onally. Activate the safety lock-off(Figure 1 / Item
3) by pushing it forward and pressing the ON/
OFF switch (Figure 1 Item 4) at the same time.To
switch offthe tool, let go of the ON/OFF switch
(Figure 1 / Item 4).
6.1 Cutting grass
Allow the grass cutter to glide above the ground.
The best results are achieved when the lawn is
dry.
When you notice a drop in cutting performance,
re-charge the tool immediately so that the battery
does not become fully discharged.
6.2 Trimming hedges
The tool can be used to trim small hedges and
shrubs.
Hold the tool slightly tilted in relation to the hedge
you want to cut.
First cut the sides from the bottom up, then cut
the top.
Watch out for foreign objects in or on the hedge
which could damage the blades.
When is the best time to trim hedges?
• As a general rule, hedges which lose their
leaves in the autumn should be trimmed in
June and October.
• Hedges which do not lose their leaves should
be cut in April and August.
6.3 Changing the blades
Warning! Risk of injury!
To remove the blade, press the release mecha-
nism (Fig. 1/Item 12) and take out the blade as
shown in Fig. 6/Item 12.
Once you have removed the blade you will be
able to see the toothed wheels of the gear unit
(Fig. 7). Make sure that no dirt gets into the gear
unit when you change the blade.
To assemble, proceed in the reverse order.
Caution! The blade will fall out when the release
mechanism is pressed (Fig. 1/Item 12)!
When you fit the hedge cutter blade
check the position of the pin for the eccentric con-
nector (Fig. 7/Item 1).Take the hedge cutter blade
and slide the eccentric mount (Fig. 8/Item 1) into
position so that the pin for the eccentric connector
and the eccentric mount fit together precisely
when assembled. Slot the hedge cutter blade
onto the guide pins (Fig. 7/Item 2).
When you fit the grass cutter blade
check the position of the pin for the eccentric
connector (Fig. 7/Item 1) again. Shift the eccentric
mount (Fig. 9/Item 1) on the grass cutter blade to
the left or the right to find the position at which the
pin for the eccentric connector (Fig. 7/Item 1) and
the eccentric mount (Fig. 9/Item 1) match up.
7. Cleaning, maintenance and
ordering of spare parts
7.1 Cleaning
• Keep all safety devices, air vents and the
motor housing free of dirt and dust as far as
possible.Wipe the equipment with a clean
cloth or blow it with compressed air at low
pressure.
• We recommend that you clean the device
immediately each time you have finished
using it.
• Clean the equipment regularly with a moist
cloth and some soft soap. Do not use
cleaning agents or solvents; these could
attack the plastic parts of the equipment. En-
sure that no water can seep into the device.
• A few drops of oil (e.g. sewing machine oil)
will improve the cutting performance of the
blades, but never apply any grease to the
blades.
Anl_GGS_E_12_Li_SPK7.indb 14Anl_GGS_E_12_Li_SPK7.indb 14 08.10.2015 16:07:0308.10.2015 16:07:03

GB
- 15 -
• To ensure constant exact cutting it is also
important to remove grass remnants and dirt
from between the upper and lower blade.
Caution!
Never clean the tool under running water
- and particularly never with high pressure -
because of the potential danger to persons
and property. Keep your cordless grass
cutter and hedge trimmer in a dry and frost-
proof place. Choose a place that children are
unable to enter.
7.2 Maintenance
• To achieve good results you should keep the
blades sharp at all times. In particular we re-
commend that you immediately level off any
jags or ridges caused by stones or the like.
The tool should be thoroughly cleaned both
before and after use.
• There are no parts inside the equipment
which require additional maintenance.
7.3 Ordering replacement parts:
Please quote the following data when ordering
replacement parts:
• Type of machine
• Article number of the machine
• Identification number of the machine
• Replacement part number of the part required
For our latest prices and information please go to
www.isc-gmbh.info
8. Disposal and recycling
The unit is supplied in packaging to prevent its
being damaged in transit.This packaging is raw
material and can therefore be reused or can be
returned to the raw material system.
The unit and its accessories are made of various
types of material, such as metal and plastic. De-
fective components must be disposed of as spe-
cial waste. Ask your dealer or your local council.
Anl_GGS_E_12_Li_SPK7.indb 15Anl_GGS_E_12_Li_SPK7.indb 15 08.10.2015 16:07:0308.10.2015 16:07:03

GB
- 16 -
For EU countries only
Never place any electric power tools in your household refuse.
To comply with European Directive 2012/19/EC concerning old electric and electronic equipment and
its implementation in national laws, old electric power tools have to be separated from other waste and
disposed of in an environment-friendly fashion, e.g. by taking to a recycling depot.
Recycling alternative to the return request:
As an alternative to returning the equipment to the manufacturer, the owner of the electrical equipment
must make sure that the equipment is properly disposed of if he no longer wants to keep the equipment.
The old equipment can be returned to a suitable collection point that will dispose of the equipment in
accordance with the national recycling and waste disposal regulations.This does not apply to any ac-
cessories or aids without electrical components supplied with the old equipment.
This consignment contains lithium-ion batteries.
In accordance with special provision 188 this consignment is not subject to the ADR regulations. Handle
with care. Danger of ignition in case of damage to the consignment package. If the consignment packa-
ge is damaged: Check and if necessary repackage. For further information contact: 0049 1807 10 20 20
66 (fixed network 14 ct/min, mobile phone max. 42 ct/min) Outside Germany charges will apply instead
for a regular call to a landline number in Germany.
The reprinting or reproduction by any other means, in whole or in part, of documentation and papers
accompanying products is permitted only with the express consent of the iSC GmbH.
Subject to technical changes
Anl_GGS_E_12_Li_SPK7.indb 16Anl_GGS_E_12_Li_SPK7.indb 16 08.10.2015 16:07:0308.10.2015 16:07:03

GB
- 17 -
Service information
We have competent service partners in all countries named on the guarantee certificate whose contact
details can also be found on the guarantee certificate.These partners will help you with all service re-
quests such as repairs, spare and wearing part orders or the purchase of consumables.
Please note that the following parts of this product are subject to normal or natural wear and that the
following parts are therefore also required for use as consumables.
Category Example
Wear parts* Carbon brushes, Battery
Consumables* Blade
Missing parts
* Not necessarily included in the scope of delivery!
In the effect of defects or faults, please register the problem on the internet at www.isc-gmbh.info. Ple-
ase ensure that you provide a precise description of the problem and answer the following questions in
all cases:
• Did the equipment work at all or was it defective from the beginning?
• Did you notice anything (symptom or defect) prior to the failure?
• What malfunction does the equipment have in your opinion (main symptom)?
Describe this malfunction.
Anl_GGS_E_12_Li_SPK7.indb 17Anl_GGS_E_12_Li_SPK7.indb 17 08.10.2015 16:07:0308.10.2015 16:07:03

GB
- 18 -
Warranty certificate
Dear Customer,
All of our products undergo strict quality checks to ensure that they reach you in perfect condition. In the
unlikely event that your device develops a fault, please contact our service department at the address
shown on this guarantee card or the sales outlet from where you bought the device. Please note the fol-
lowing terms under which guarantee claims can be made:
1. These warranty terms regulate additional warranty services, which the manufacturer mentioned
below promises to buyers of its new products in addition to their statutory rights of guarantee.Your
statutory guarantee claims are not affected by this guarantee. Our guarantee is free of charge to
you.
2. The warranty services cover only defects due to material or manufacturing faults on a product which
you have bought from the manufacturer mentioned below and are limited to either the rectification of
said defects on the product or the replacement of the product, whichever we prefer.
Please note that our devices are not designed for use in commercial, trade or professional applica-
tions. A guarantee contract will not be created if the device has been used by commercial, trade or
industrial business or has been exposed to similar stresses during the guarantee period.
3. The following are not covered by our guarantee:
- Damage to the device caused by a failure to follow the assembly instructions or due to incorrect
installation, a failure to follow the operating instructions (for example connecting it to an incorrect
mains voltage or current type) or a failure to follow the maintenance and safety instructions or by ex-
posing the device to abnormal environmental conditions or by lack of care and maintenance.
- Damage to the device caused by abuse or incorrect use (for example overloading the device or the
use or unapproved tools or accessories), ingress of foreign bodies into the device (such as sand,
stones or dust, transport damage), the use of force or damage caused by external forces (for ex-
ample by dropping it).
- Damage to the device or parts of the device caused by normal or natural wear or tear or by normal
use of the device.
4. The guarantee is valid for a period of 60 months starting from the purchase date of the device. Gu-
arantee claims should be submitted before the end of the guarantee period within two weeks of the
defect being noticed. No guarantee claims will be accepted after the end of the guarantee period.
The original guarantee period remains applicable to the device even if repairs are carried out or
parts are replaced. In such cases, the work performed or parts fitted will not result in an extension
of the guarantee period, and no new guarantee will become active for the work performed or parts
fitted.This also applies if an on-site service is used.
5. Please report the defective device on the following internet address to register your guarantee claim:
www.isc-gmbh.info. If the defect is covered by our guarantee, then the item in question will either be
repaired immediately and returned to you or we will send you a new replacement device.
Also refer to the restrictions of this warranty concerning wear parts, consumables and missing parts as
set out in the service information in these operating instructions.
Anl_GGS_E_12_Li_SPK7.indb 18Anl_GGS_E_12_Li_SPK7.indb 18 08.10.2015 16:07:0308.10.2015 16:07:03

FR
- 19 -
Danger !
Lors de l’utilisation d’appareils, il faut respecter
certaines mesures de sécurité afin d’éviter des
blessures et dommages.Veuillez donc lire atten-
tivement ce mode d’emploi/ces consignes de
sécurité.Veillez à le conserver en bon état pour
pouvoir accéder aux informations à tout moment.
Si l’appareil doit être remis à d’autres personnes,
veillez à leur remettre aussi ce mode d’emploi/
ces consignes de sécurité. Nous déclinons toute
responsabilité pour les accidents et dommages
dus au non-respect de ce mode d’emploi et des
consignes de sécurité.
1. Consignes de sécurité
Vous trouverez les consignes de sécurité corres-
pondantes dans le cahier en annexe.
Danger !
Veuillez lire toutes les consignes de sécurité
et instructions. Tout non-respect des consignes
de sécurité et instructions peut provoquer une
décharge électrique, un incendie et/ou des bles-
sures graves.
Conservez toutes les consignes de sécurité
et instructions pour une consultation ultéri-
eure.
Explication de la plaque indicatrice sur
l’appareil (figure 10)
1. Attention ! Lisez les instructions de service et
respectez les avertissements et les consig-
nes de sécurité.
2. Gardez les autres personnes hors de la zone
de danger.
3. Attention ! Après la mise hors service, les
couteaux continuent à tourner. Attendez
l’arrêt des couteaux.
Risque de blessure !
4. Eliminez l’accumulateur selon les règles de
l’art
5. Protégez l’appareil contre la pluie et
l’humidité !
6. Rallonge uniquement avec la lame coupe
herbe ! Il est interdit d‘utiliser la rallonge avec
la lame à arbustes !
7. Niveau de puissance acoustique garanti:
87 dB
2. Description de l’appareil et
volume de livraison
2.1 Description de l’appareil (figure 1/2)
1 Cisaille à gazon
3 Verrouillage de démarrage
4 Bouton de mise sous tension
9 Protection de la lame
10 Chargeur
11 Lame taille-haies
12 Déverrouillage de la lame
2.2 Volume de livraison
Veuillez contrôler si l‘article est complet à l‘aide
de la description du volume de livraison. S‘il
manque des pièces, adressez-vous dans un délai
de 5 jours maximum après votre achat à notre
service après-vente ou au magasin où vous avez
acheté l‘appareil muni d‘une preuve d‘achat vala-
ble.Veuillez consulter pour cela le tableau des
garanties dans les informations service après-
vente à la fin du mode d‘emploi.
• Ouvrez l’emballage et prenez l’appareil en le
sortant avec précaution de l’emballage.
• Retirez le matériel d’emballage tout comme
les sécurités d’emballage et de transport (s’il
y en a).
• Vérifiez si la livraison est bien complète.
• Contrôlez si l’appareil et ses accessoires ne
sont pas endommagés par le transport.
• Conservez l’emballage autant que possible
jusqu’à la fin de la période de garantie.
Danger !
L’appareil et le matériel d’emballage ne sont
pas des jouets ! Il est interdit de laisser des
enfants jouer avec des sacs et des films en
plastique et avec des pièces de petite taille.
Ils risquent de les avaler et de s’étouffer !
• Mode d’emploi d’origine
• Consignes de sécurité
Anl_GGS_E_12_Li_SPK7.indb 19Anl_GGS_E_12_Li_SPK7.indb 19 08.10.2015 16:07:0308.10.2015 16:07:03

FR
- 20 -
3. Utilisation conforme à
l’affectation
Cet appareil est conçu pour découper des por-
dures de pelouses et de petites surfaces d’herbe
dans les jardins privés et les jardins de loisirs.
Sont considérés comme des appareils pour jar-
dins privés, ceux qui ne sont pas employés dans
des installations publiques, parcs, terrains de
sport, rues, ni dans les exploitations agricoles et
forestières. L’emploi de l’appareil sera considéré
comme conforme à la condition que le mode
d’emploi joint à la livraison par le constructeur
aura bien été respecté.
Avertissement ! Pour des raisons de danger
occasionné aux personnes et aux biens,
l’appareil ne doit pas être employé pour broy-
er - dans le sens de composter.
La machine doit exclusivement être employée
conformément à son affectation. Chaque uti-
lisation allant au-delà de cette affectation est
considérée comme non conforme. Pour les
dommages en résultant ou les blessures de tout
genre, le producteur décline toute responsabilité
et l’opérateur/l’exploitant est responsable.
Veillez au fait que nos appareils, conformément
à leur affectation, n’ont pas été construits, pour
être utilisés dans un environnement profession-
nel, industriel ou artisanal. Nous déclinons toute
responsabilité si l’appareil est utilisé profession-
nellement, artisanalement ou dans des sociétés
industrielles, tout comme pour toute activité
équivalente.
4. Données techniques
Vitesse de rotation n0: .......................1200 tr/min
Largeur de coupe de la cisaille à herbes :100 mm
largeur de coupe de la cisaille à buissons : .........
................................................................ 190 mm
Epaisseur de coupe de la cisaille à buissons : ....
.................................................................... 8 mm
Temps de fonctionnement maxi. : ............100 min
Accumulateur : .............Li-Ion / 12 V d.c. / 1,3 Ah
Durée de charge : .......................................... 2 h
Niveau de pression acoustique LpA : ..... 61 dB (A)
Niveau acoustique LWA : ........................ 81 dB (A)
Imprécision K :........................................ 6 dB (A)
Vibration ahv : ...........................................5,5 m/s2
Imprécision K :.........................................1,5 m/s2
Poids : ........................................................1,4 kg
Niveau de pression acoustique
à l‘oreille de l‘utilisateur :… .................... 77dB (A)
Imprécision K :........................................ 3 dB (A)
Chargeur
Tension du réseau .............100-240 V ~ 50-60 Hz
Sortie
Tension nominale ..................................13 V d. c.
Courant nominal ......................................900 MA
• La valeur d’émission de vibration donnée a
été mesurée selon une méthode d’essai nor-
mée et peut être utilisée pour comparaison
d’un outil électrique avec un autre.
• La valeur d’émission de vibration indiquée
peut également être utilisée pour faire une
estimation préliminaire de l’exposition.
• La valeur d’émission de vibration peut être
différente de la valeur indiquée pendant
l’utilisation effective de l’outil électrique, en
fonction du type d’emploi de l’outil électrique.
• Essayez de maintenir la charge due aux vi-
brations à un niveau aussi bas que possible.
Le port de gants lors de l’utilisation de l’outil
et la limitation du temps de travail peuvent
par exemple être des mesures pour diminuer
la charge des vibrations. Pour cela, tous les
composants du cycle de fonctionnement
doivent être pris en compte (par exemple, les
temps pendant lesquels l’outil électrique est
éteint et ceux pendant lesquels il est certes
allumé mais fonctionne sans sollicitation).
5. Avant la mise en service
5.1 Charger accumulateur (figure 3, 4)
• Connectez le chargeur et le support de char-
ge (figure 3).
• Comparez si la tension du secteur indiquée
sur la plaque signalétique correspond à la
tension du bloc du serveur disponible. Bran-
chez le chargeur dans la prise de courant, la
DEL rouge (figure 4 / rep. 1) s’allume et affi-
che la tension de charge présente.
• L’accumulateur est en charge. Le temps
de charge pour un accumulateur vide est
de maxi 2 heures. Pendant la recharge,
l’accumulateur peut un peu s’échauffer dans
l’appareil, ceci est cependant normal.
Anl_GGS_E_12_Li_SPK7.indb 20Anl_GGS_E_12_Li_SPK7.indb 20 08.10.2015 16:07:0308.10.2015 16:07:03
This manual suits for next models
2
Table of contents
Languages:
Other Gardol Power Tools manuals


