Gardyn HOME KIT 3.0 User manual

Grow Guide
HOME KIT 3.0

HOME KIT - GROW GUIDE HOME KIT - GROW GUIDE
Welcome to the Gardyn family!
Let’s take your growing experience to the next level.
Once you set up your new Gardyn, you’ll see your rst sprouts in a
matter of days. From there, get to know all of the Garydn essentials,
including the Nursery, Trellis, Microgreens, Vase, and more! Let’s get Gardyning!
Inside this guide you’ll nd tips on:
Gardyn Home Kit 3.0 setup 4
The Gardyn essentials to help you grow with peace of mind 26
Your Gardyn’s care cycle 28

4HOME KIT - GROW GUIDE HOME KIT - SETUP 5
LED light bars
Water pump
Columns
Metal rodCameras
Main switch
Water tank
Lid
Wood cap to watering compartment
Light switch
Meet Your Gardyn Home
Upper blades
Lower blades
Lid locks
Safety strap
Light protective caps
Reminder: Do not plug the device in until instructed to do so.
Watch Video

6HOME KIT - GROW GUIDE HOME KIT - SETUP 7
Carefully unpack the parts following the order in the video.
Unpack cautiously
STEP 1
Accessory bag
Lid with wood cap
2 LED light bars
Water tank
3 columns
30 yPodsPower supply
2 upper blades and rod
Watch Video

8HOME KIT - GROW GUIDE HOME KIT - SETUP 9
Assemble the columns
STEP 2
1
2
3
Gently pull on the end of the irrigation hoses to ensure they are
straight inside the columns and avoid any kinks.
Identify the center column with the safety strap.
Align the arrows, then twist.
When completed, the arrows will no longer align.
Watch Video

10 HOME KIT - GROW GUIDE HOME KIT - SETUP 11
Mount and lock the lid
STEP 3
Open the lid locks to mount and lock the lid onto the
water tank.
Remove the transportation plug and lower the water pump.
The plug’s appearance may vary slightly from the one shown.
Unlock / Lock
REAR
FRONT
LID FRONT
1
2
Pump in upper position
Pump in lower position
Watch Video

12 HOME KIT - GROW GUIDE HOME KIT - SETUP 13
Start with the middle column identied by the safety
strap in the back.
Connect the columns
STEP 4
1
2
3
4
Hold the column vertically and plug the hose connector
onto the tube inside the column’s base until snug.
Twist the column to secure. When completed, the arrows
will no longer align.
Ensure all open slots face the front of the lid, as shown.
Watch Video

14 HOME KIT - GROW GUIDE HOME KIT - SETUP 15
Carefully open and unpack the box containing the 2 LED
light bars.
Attach the LED light bars
STEP 5
1
2
3Starting with either side, hold the bar vertically to carefully
yet rmly slide the bottom of the light onto the lower blades
attached to the lid.
Press until you see the grey post in the notch of the light bar.
Right bar (camera on top)
Left bar (camera in the middle)
Identify your LED light bars:
Watch Video

16 HOME KIT - GROW GUIDE HOME KIT - SETUP 17
1
2
3
4
Mount upper blades
STEP 6
Insert the metal rod on the back of the columns.
Slide the metal plate into the center column and insert
the plug to secure.
Insert plugs to secure.
Your kit comes with an extra plug should
you ever need it.
Insert upper blades and slide light protective caps until ush
with light bars.
Watch Video

18 HOME KIT - GROW GUIDE 19
Check progress
WARNING:
Prevent the device from tipping over.
The device must be securely attached to
the wall. Use the safety straps provided
with the product and the appropriate
hardware to afx to your wall type.
Never let children hang onto the lights
or columns. Never let children climb on
the device.
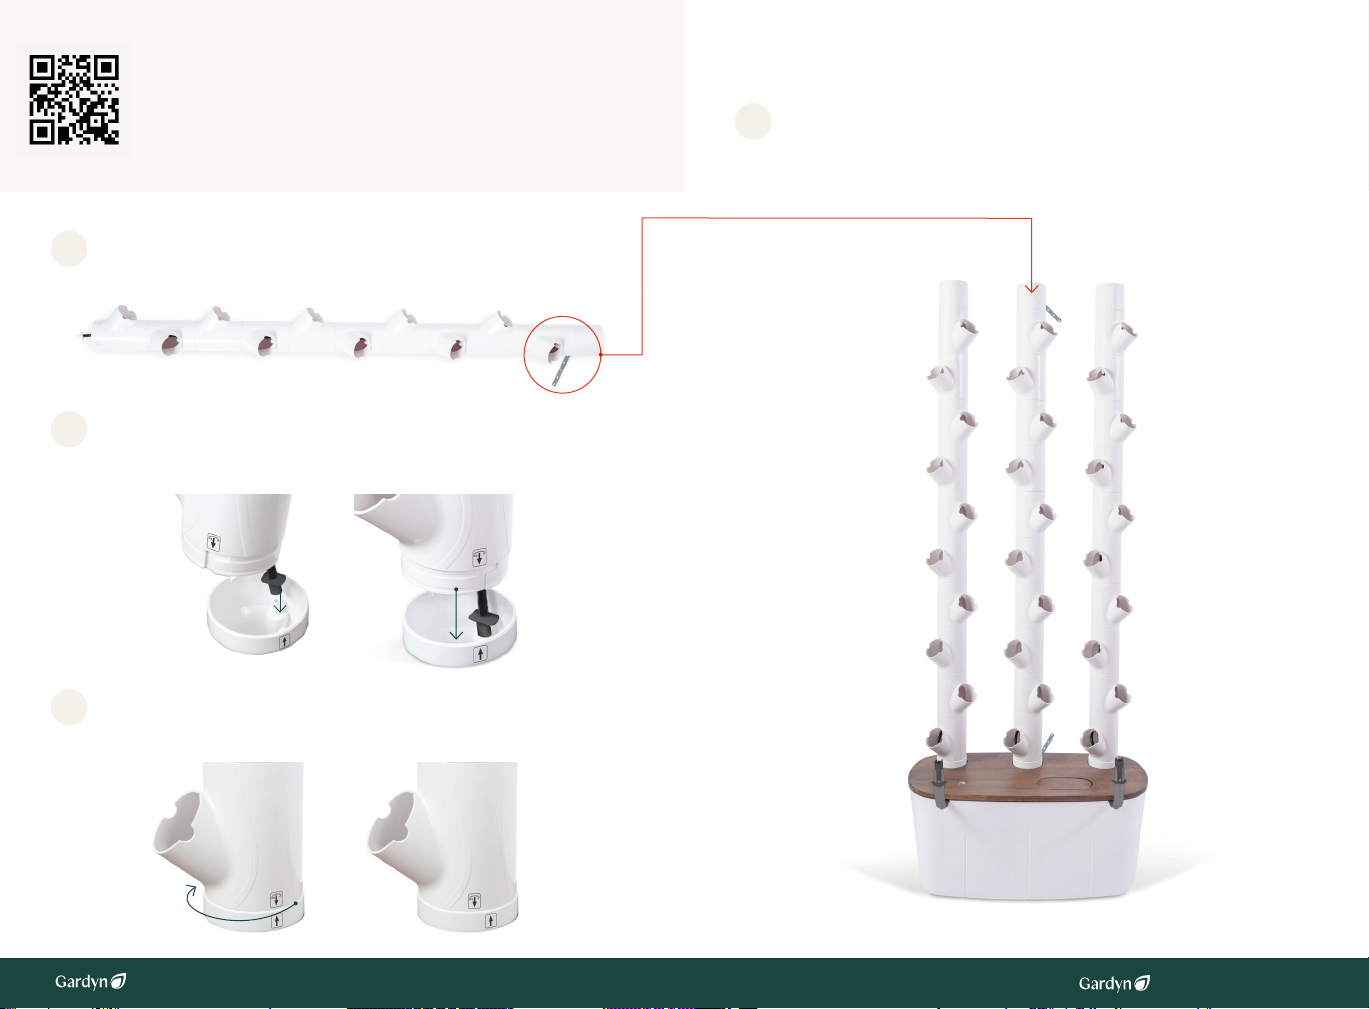
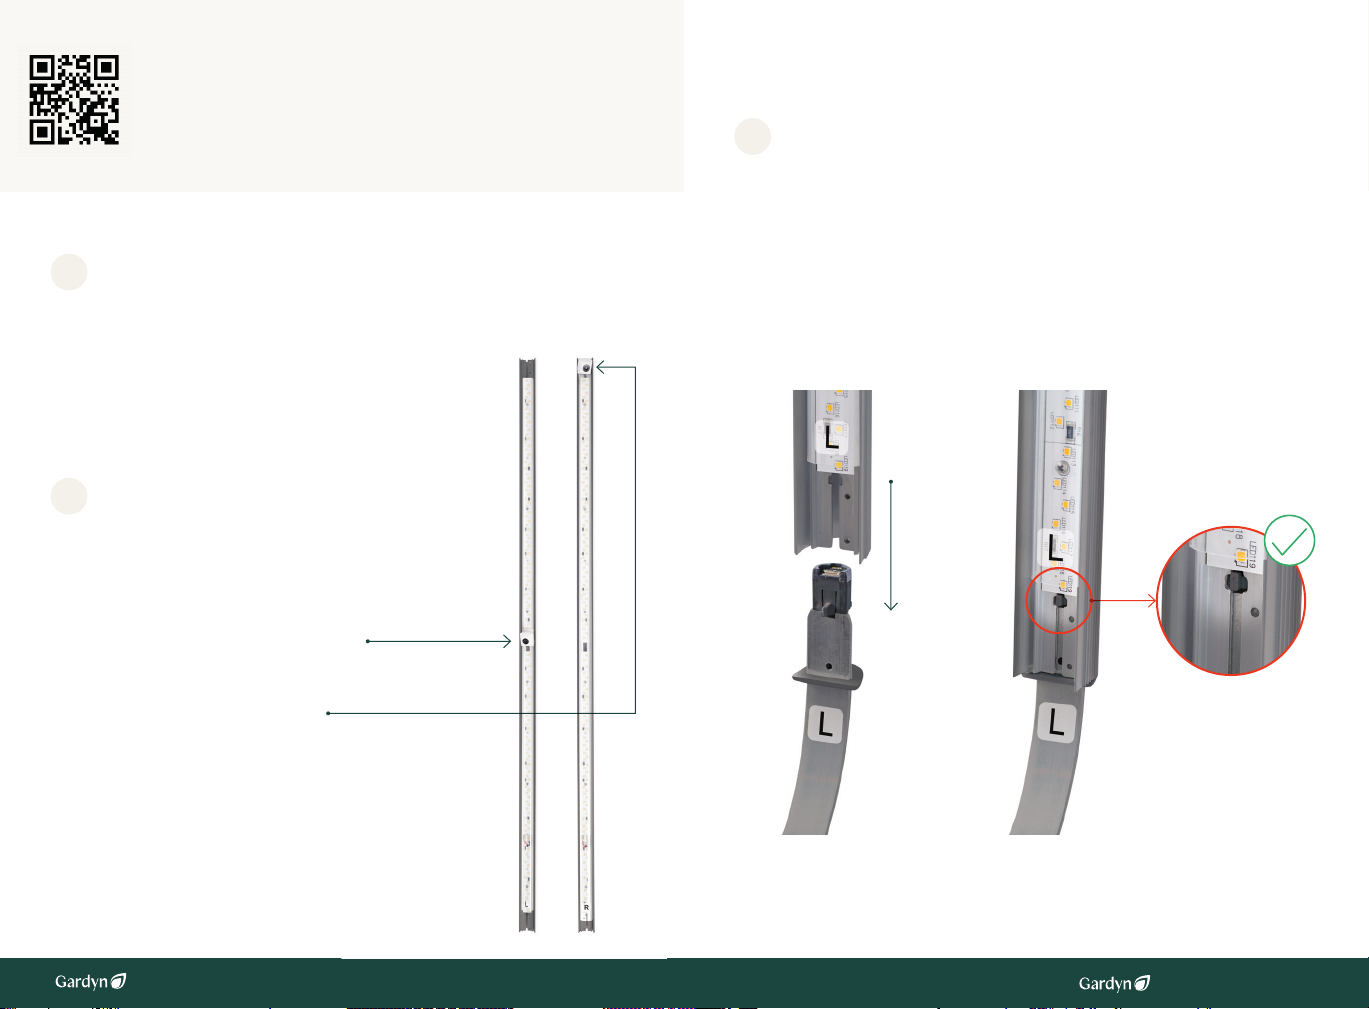
At this stage, you should see the following:
The 3 columns have all slots facing the lights and all vine
designs aligned.
The safety strap is attached to the middle column.
The two LED light bars are mounted vertically, and the
lower blade with the L sticker is on the left while the lower
blade with the R sticker is on the right.
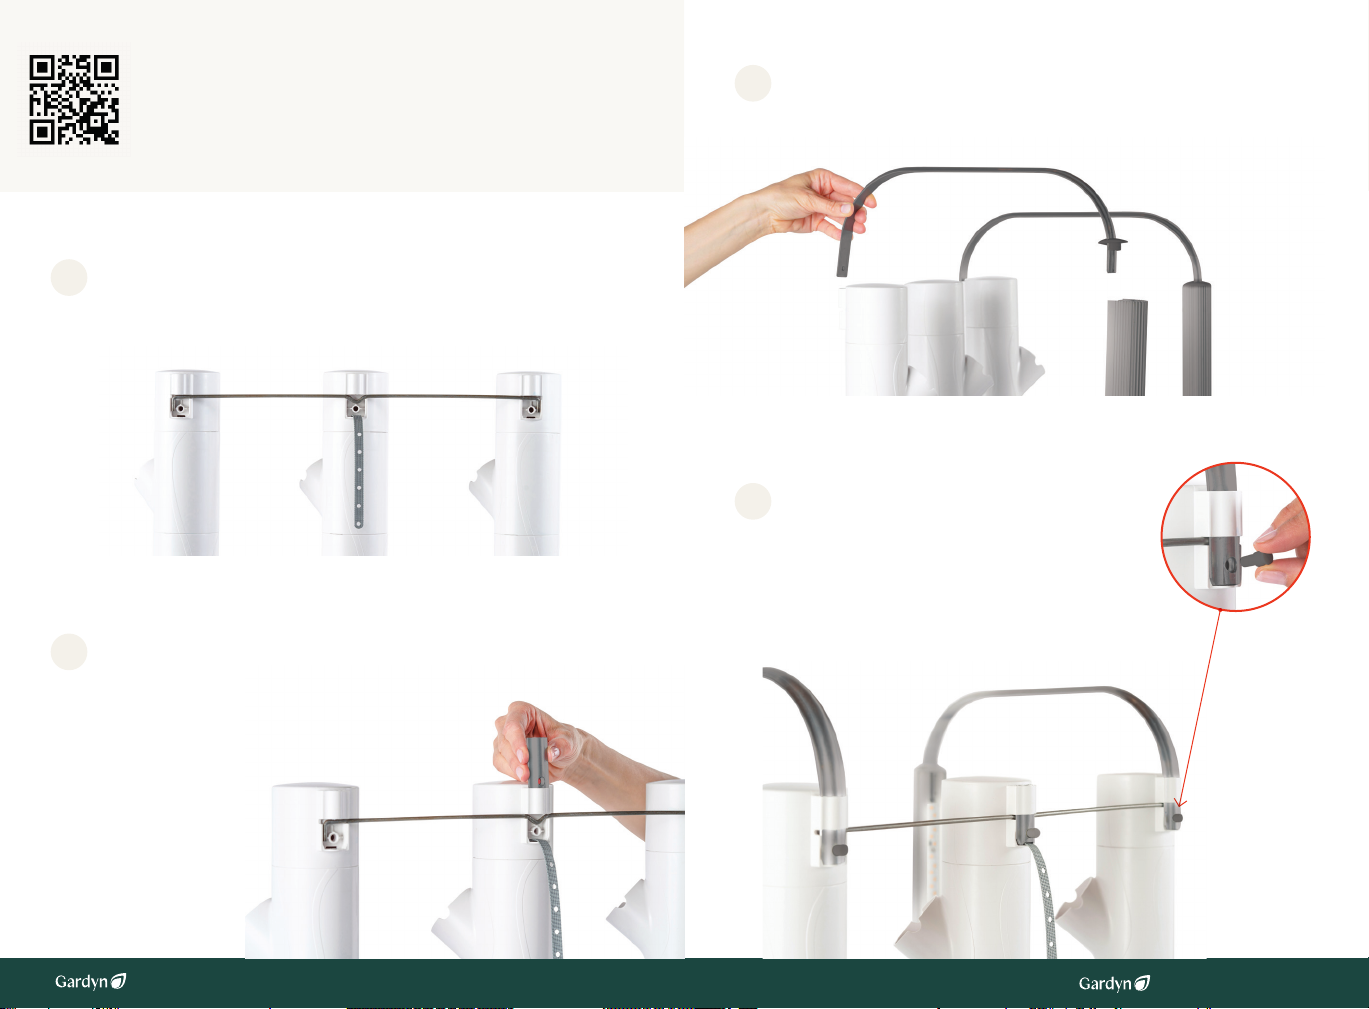
The metal bar and upper blades are secured by the metal
plate and 3 plugs in the back of the columns.
The protective caps on the upper blades are ush with the
top of each light bar.
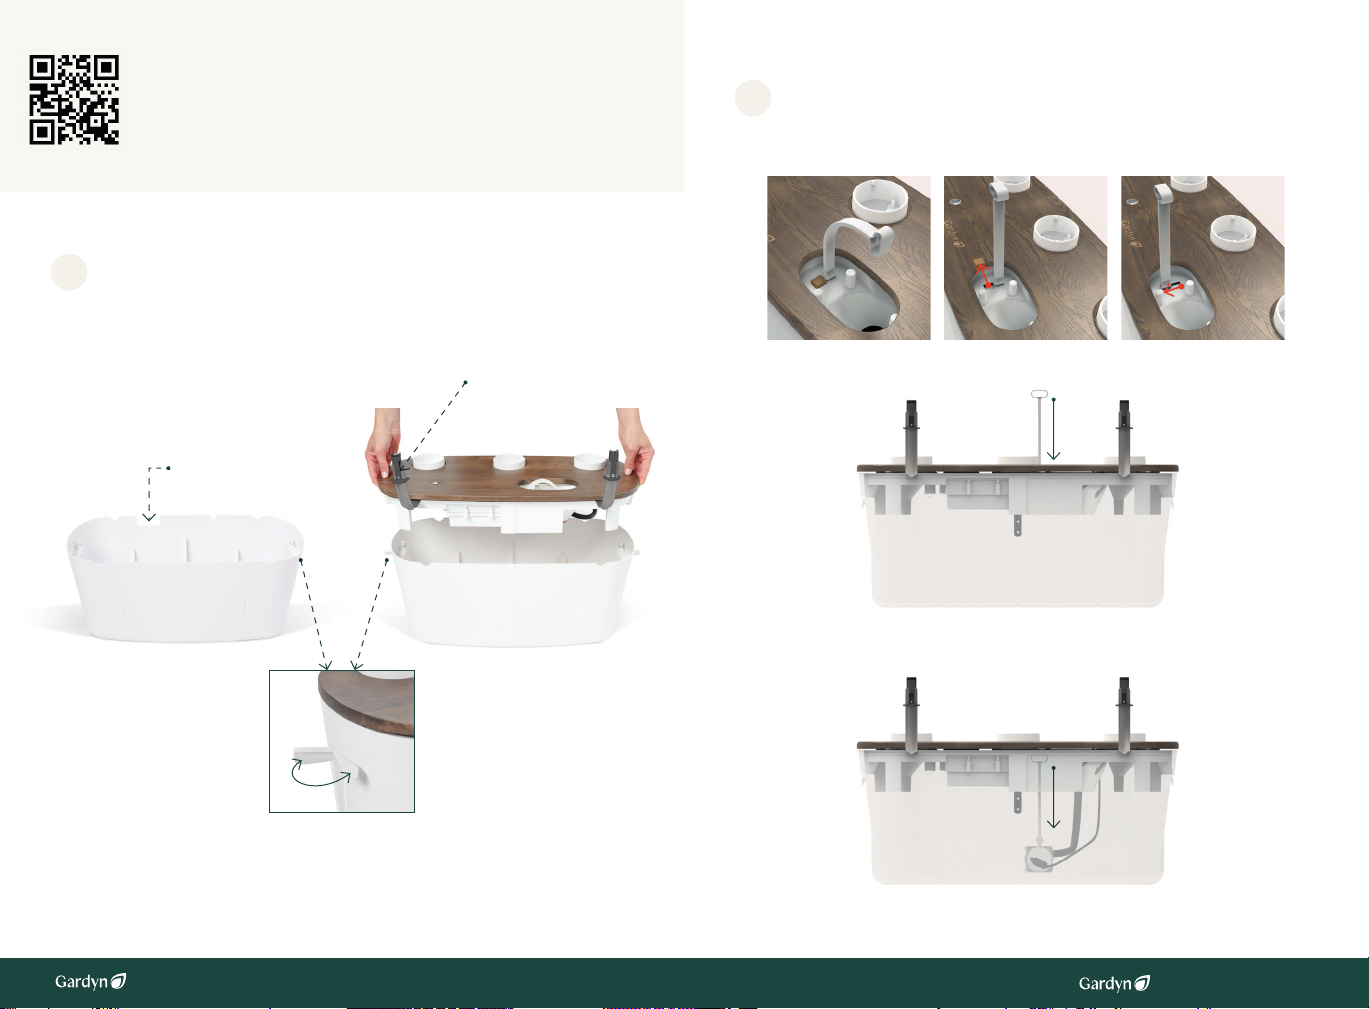
The water pump is lowered into the tank and the
transportation plug is removed.
The lid locks are pushed against the sides of the water tank
in the locked position.
If you’ve completed each of these steps, you’re ready to secure your device
to the wall using the safety straps on the center column and back of the lid.
Safety strap
Safety strap
HOME KIT - SETUP

20 HOME KIT - GROW GUIDE HOME KIT - SETUP 21
Fill tank and turn on
STEP 7
Fill the tank with 3 gallons of tap
water. Later, Kelby and the app will
let you know when and how much
water to add.
DO NOT ADD PLANT FOOD when you start your Gardyn.
Kelby will help you learn when it’s time to start feeding your
plants later on.
The device is turned ON/OFF by ipping the main switch located on the
back of the water tank.
Make sure the main switch is in the OFF [O] position before plugging
in or unplugging the device to the power supply. Once the device is
plugged in, turn it on by ipping the main switch to the ON [ I ] position.
The main switch will illuminate and your device will blink 3 times once it
is fully powered up.
[O] OFF [ I ] ON
Watch Video

22 HOME KIT - GROW GUIDE HOME KIT - SETUP 23
yPod
Install your plants
STEP 8
Time to plant! Place the yCubes into the
yPods. yCubes are correctly inserted when
they sit ush with the yPod.
Only see one layer of yCubes in the box?
Lift the packaging to nd all 30!
Insert 1 yPod into each of the open slots on
every column. To insert, twist each yPod until
it sits ush with the column.
If you haven’t already, open and unpack the box
containing the 30 yPods.
30 plants or fewer to start?
The choice is yours! If you plant fewer than 30,
be sure to cover open slots with Gardyn Caps,
available in the app.
Check out our placement guide for optimal
growth customized to your starter kit.
1
2
3
Tip
Tip
Tip
yCube
No slot should be left open.
Use Gardyn Caps to close
spots without plants.
Watch Video
Placement Guide
Shop Gardyn Caps

24 HOME KIT - GROW GUIDE HOME KIT - SETUP 25
Connect your Gardyn
to get growing
STEP 9
Gardyn
Download the Gardyn app
to connect your Gardyn to WiFi and pair it
with your phone.
Join us in The Gardyners,
our unique community in the app.
Connect with fellow plant enthusiasts and create a vibrant
space where knowledge, creativity, and fun intertwine!
Activate your membership
Meet your AI Gardyning Assistant Kelby
Discover and shop for your favorite varieties
Control your device at your ngertips
The full Gardyn experience awaits you in the app.
Download
the app

26 HOME KIT - GROW GUIDE HOME KIT - ESSENTIALS 27
The Gardyn Essentials
Grow with condence and ease using our unique accessories.
Scan to shop
Nursery
Enjoy continuous harvests by
germinating new yCubes after you’ve
started your Gardyn, plus grow
Microgreens with ease.
HydroBoost
Reduce the frequency and intensity of
cleaning while boosting plant health with
our plant-based water treatment solution.

28 HOME KIT - GROW GUIDE 29
Your Gardyn’s Care Cycle
Seed to Sprout
Water & Feed Keep it Clean
Arrange
Plants
Read
the Roots
Trim,
Prune,
& Pollinate
Enjoy, Harvest,
& Repeat
Thin
for Success
1
Order Replacement
Plants
2 3 4
5
89 67
Get to know the life cycle of your device from seed to harvest and beyond.
You’ll get the hang of this simple routine in no time.
Plus, Kelby and the app will guide members on all the details!
HOME KIT - CARE CYCLE
Learn More

30 HOME KIT - GROW GUIDE HOME KIT - SETUP 31
SAFETY INSTRUCTIONS
Read all instructions before installing and operating your device.
It is the owner's responsibility to ensure that all users are aware of all warnings and precautions.
When using an electrical unit, basic precautions should always be followed, including the following:
DANGER – To reduce the risk of electric shock:
●Always unplug the Gardyn Home from the electrical outlet before cleaning or performing maintenance operations.
WARNING – To reduce the risk of burns, fire, electric shock, or injury to persons:
●Unplug from outlet before assembling or disassembling parts.
●To disconnect, place the power switch located behind the unit in OFF position, then remove plug from outlet.
●Use this unit only for its intended use as described in these instructions. Use only original parts from the manufacturer.
Changes or modifications to this unit not expressly approved by the party responsible for compliance could void the user's
authority to operate the equipment.
●If a part is damaged or worn, contact the manufacturer immediately to order the appropriate spare part, then replace the
damaged or worn parts. Do not use the unit until the repair is performed.
●Never operate this unit if it is incomplete, has a damaged cord or plug, is not working properly, has been dropped or damaged,
or has been dropped into water.
●Do not try to unscrew any part of the unit or open it using force.
●Keep the cord away from any heat source.
●Never drop or insert any object into any unit opening.
●This unit is for indoor use only. Do not store it outdoors, near water, or in high humidity levels.
●Do not operate where aerosol (spray) products are being used or where oxygen is being administered.
●Do not immerse the unit, cord, or plug in water or any other liquid.
●Make sure there is no water close to the power supply or its cord.
●Never pour water on the lights, on the power supply, on the cord, or on the power outlet.
●This appliance is not intended for use by children or persons with reduced physical, sensory or mental capabilities or lack of
experience or knowledge, unless they have been given supervision or instruction concerning use of the appliance by a person
responsible for their safety and understand the hazards involved.
●Cleaning and user maintenance shall not be performed by children without supervision.
●Close supervision is necessary when this unit is used by, or near children, invalids, or disabled persons.
●Electrical wiring shall be in accordance with local regulation.
●Make sure that the product is connected to an outlet having the same configuration as the device’s plug. No adapter should be
used with this product.
Notice & Additional safeguards
●Do not look directly into the lights when ON.
●The device should be used indoors exclusively, in a dry and temperate environment (65
°F-80°F / 18°C – 27°C).
●Make sure all packaging material or promotional labels have been removed and safely discarded before using the unit for the
first time.
●To operate, the device needs to be connected to WiFi.
●No water connection is necessary.
●No sunlight is necessary.
●Use the lateral lid locks to secure the lid on the water tank before powering the device.
●Do not touch the lights' enclosure: it can get warm due to the heat dissipated by the lights.
●An opening on the surface of the wooden board makes it possible to fill the tank and add nutrients. When filling the water tank,
make sure that the water level stays below the bottom edge of the circular opening.
●Any water that may spill on the device should be promptly wiped off.
●The removable wooden cap, which covers the hole to pour water onto the tank, should remain in position when the device is
ON to avoid the development of biofilm in the device.
●Always make sure the water pump is in the lowered position inside the water tank when the device is ON.
● When pulling yPods out of the column, use the sleeve provided by the manufacturer to avoid any water spillage. Do not pull the
yPods from the column when the pump is working or within the 5 minutes following irrigation by the water pump.
● Do not touch or try to manually adjust the cameras. Cameras can be disabled by adjusting the settings in the App.
● Used electric or electrical products should not be disposed of with general household waste. Please recycle where facilities
exist. Check with your local authority for recycling advice. Disposing of this product correctly will help save valuable resources
and prevent any potential negative effects on human health and the environment, which could otherwise arise from
inappropriate waste handling.
● The plants growing on the device are of the user's sole responsibility. Do not add any spray or liquid or chemical on the plants.
Do not eat any plant if it presents any risk, including food sensitivities and/or allergies. Typically, only some parts of the plants
are edible. Non-edible parts should not be consumed.
NOTE: This equipment has been tested and found to comply with the limits for a Class B digital device, pursuant to Part 15 of the
FCC Rules. These limits are designed to provide reasonable protection against harmful interference in a residential installation. This
equipment generates, uses and can radiate radio frequency energy and, if not installed and used in accordance with the
instructions, may cause harmful interference to radio communications. However, there is no guarantee that interference will not
occur in a particular installation.
If this equipment does cause harmful interference to radio or television reception, which can be determined by turning the
equipment off and on, the user is encouraged to try to correct the interference by one or more of the following measures:
● Reorient or relocate the receiving antenna.
● Increase the separation between the equipment and receiver.
● Connect the equipment into an outlet on a circuit different from that to which the receiver is connected.
● Consult the dealer or an experienced radio/TV technician for help.
This device complies with Part 15 of the FCC Rules and Industry Canada licence-exempt RSS standard(s). Operation is subject to
the following two conditions:
● this device may not cause harmful interference, and
● this device must accept any interference received, including interference that may cause undesired operation.
FCC& IC Radiation Exposure Statement:
This equipment complies with FCC and Canada radiation exposure limits set forth for an uncontrolled environment. This equipment
should be installed and operated with a minimum distance of 20cm between the radiator and your body.
This transmitter must not be co-located or operating in conjunction with any other antenna or transmitter.
SAVE THESE INSTRUCTIONS FOR FUTURE REFERENCE
Safety instructions
Due to continuous product improvement, the products illustrated/photographed in this booklet
may vary slightly from the actual product.
Membership:
mygardyn.com/policy/subscription
Patents:
mygardyn.com/patents
Privacy:
mygardyn.com/policy/privacy
Referral Terms & Conditions:
mygardyn.com/policy-referrals
Returns:
mygardyn.com/policy/return
Terms of Service:
mygardyn.com/policy/terms-of-service
Warranty:
mygardyn.com/policy/warranty

Gardyn Home – Grow Guide – Ed. 7
© 2018-2023 – Gardyn, Inc. – All rights reserved
Questions?
Explore the Help Center
Table of contents
Other Gardyn Home Improvement manuals