Garmin GHS 20 User manual

GHS 20/20i handset
installation instructions
GHS 20/20i Installation Instructions EN-3
GHS™ 20/20i Installation
Instructions
These installation instructions are for the
GHS 20 and GHS 20i handsets. The GHS 20
is for use with the Garmin® VHF 200 or 300
radio and the GHS 20i is for use with the
Garmin VHF 200i or 300i radio.
For additional information, refer to the
installation instructions provided with your
radio. For operational instructions, refer
to the owner’s manual provided with your
radio.
Compatibility
Your existing VHF 200/200i or
VHF 300/300i radio may need a software
update to work with the GHS 20/GHS 20i.
Consult your Garmin dealer or contact
Garmin for information.
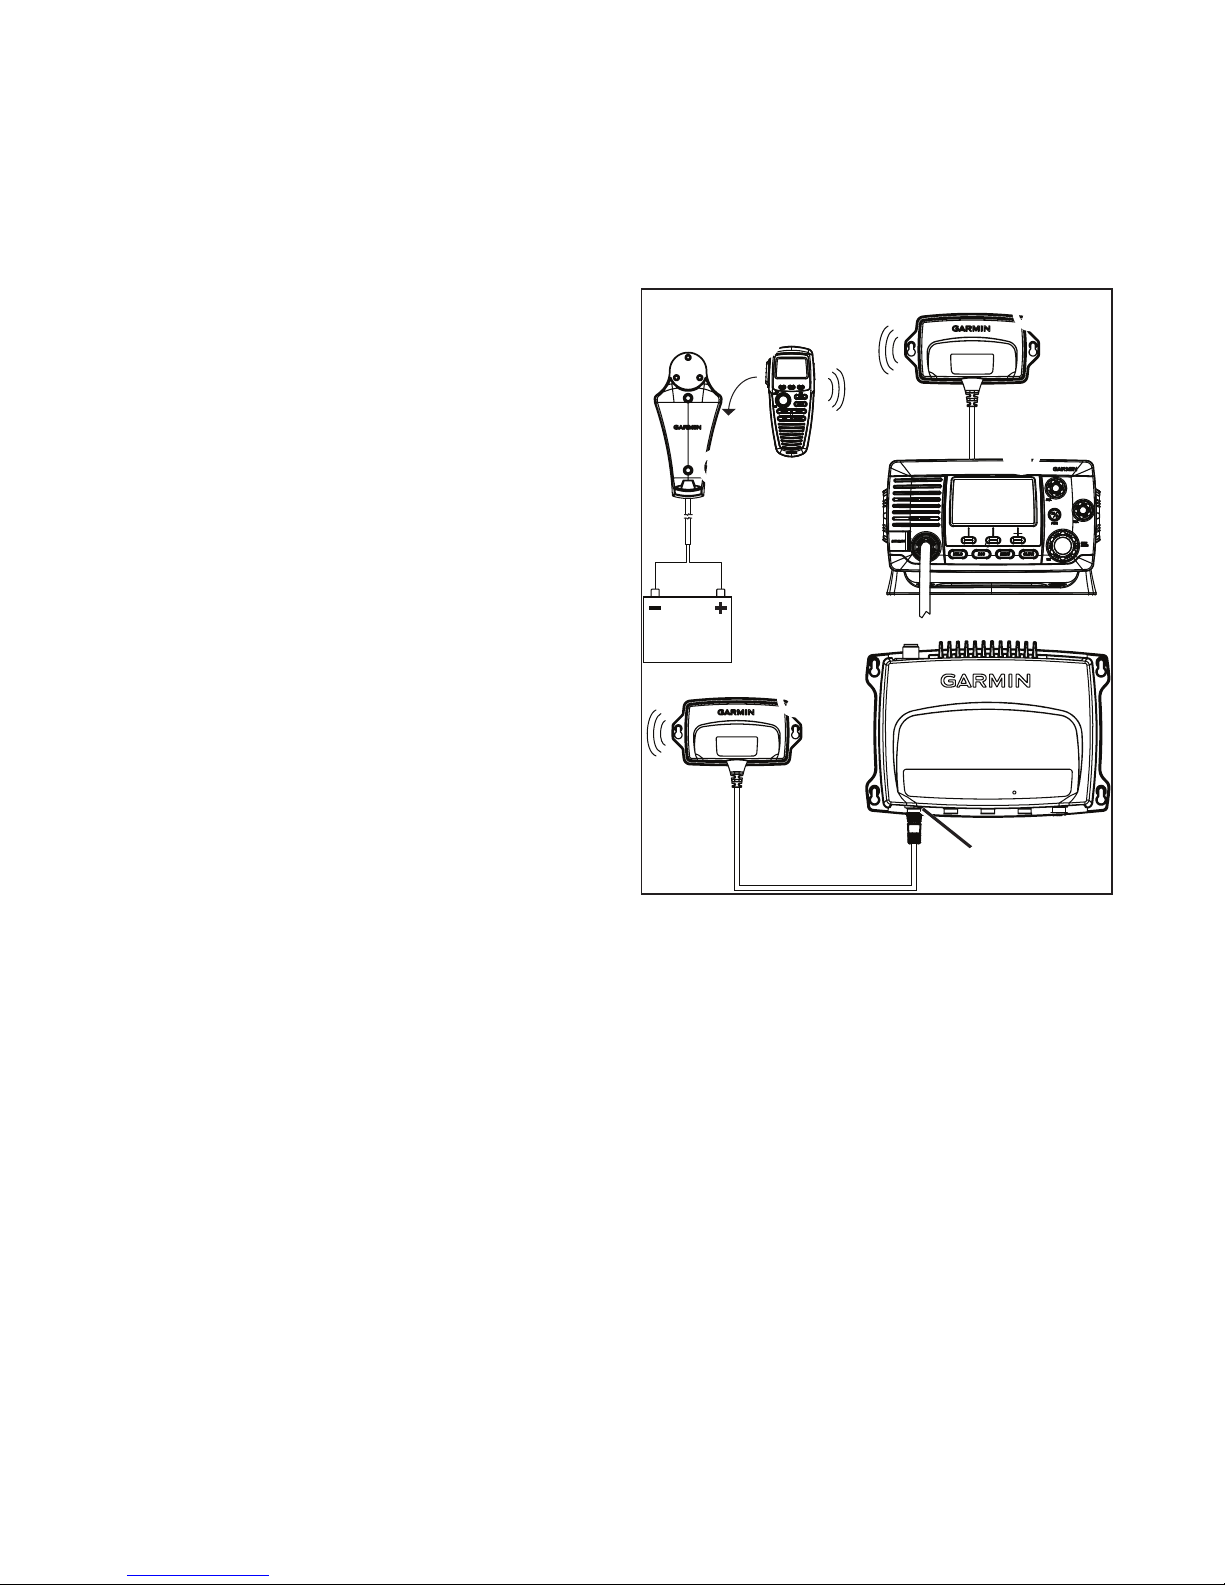
About the GHS 20/20i
The GHS 20/20i handset
➊
comes with a
GWH™ 20 receiver
➋
, a charging cradle
➌
,
a belt clip, and the necessary mounting
hardware.
➍
➎
➊
➌
➋
➋
➏
On a VHF 200/200i
➍
, the GWH 20 will
only function correctly when connected to
the microphone relocation port in the back.
On a VHF 300/300i
➎
, the GWH 20 will
only function correctly when connected to
the STATION3 connector
➏
.
Both the GHS 20/20i handset and the
GWH 20 receiver should be at least
23 5/8 in. (60 cm) from any compass to avoid
interference.

EN-4 GHS 20/20i Installation Instructions
About the GHS 20 Battery
The GHS 20 contains a Lithium-ion battery
that charges when the handset is placed in
the properly installed cradle.
An LED above the Channel knob on the
GHS 20/20i indicates the charging status:
• Off—Not charging
• Solid—Charging
• Slow blink (1 blink/second)—The battery
temperature is outside the safe charging
temperature (page 7).
• Fast blink (6 blinks/second)—The battery
cannot charge, and must be replaced.
Installing the GHS 20/20i
Charging Cradle
1. Determine a location to mount the
charging cradle where the cradle can be
connected to the boat battery.
2. Using the cradle as a template, mark the
two screw locations on the surface.
3. Use a ⅛ in. (3 mm) drill bit to drill the
two pilot holes.
4. Use the included 25 mm M4.2 × 1.4
panhead screws to attach the cradle to the
surface.
5. Route the power cable from the cradle to
the boat battery or fuse block.
If it is necessary to extend the wires, use
18 AWG wire.
6. Connect the red wire to the positive
terminal on the battery or fuse block, and
connect the black wire to the negative
terminal.
Installing the GWH 20
NOTE: Metal and other dense materials may
inhibit communication between the GWH 20
and the GHS 20. Test the location to make
sure the GWH 20 reliably communicates
with the GHS 20 everywhere you plan to use
it on the boat.
1. Determine a location to mount the
GWH 20.
If it is necessary to extend the GWH 20
cable, 5 m and 10 m extensions are
available from your Garmin dealer.
2. Using the GWH 20 as a template, mark
the two screw locations on the surface.

GHS 20/20i Installation Instructions EN-5
3. Use a ⅛ in. (3 mm) drill bit to drill the
two pilot holes.
4. Use the included 25 mm M4.2 × 1.4
panhead screws to attach the GWH 20 to
the surface.
5. Route the GWH 20 cable to the
VHF 200/200i or the VHF 300/300i.
6. Perform an action:
• On a VHF 200/200i, connect the
GWH 20 cable to the microphone
relocation port on the rear of the
radio.
• On a VHF 300/300i connect the
GWH 20 to the STATION3 port on
the radio.
The GWH 20 cannot be connected
to any other station on the
VHF 300/300i.
Pairing GHS 20/20i
Up to three GHS 20/20i handsets can be
paired with the GWH 20. You must pair
a GHS 20/20i handset with the GWH 20
only once. The device and the handset
automatically connect after they have been
paired.
1. Turn on all of the GHS 20/20i handsets
you want to pair.
2.
Make sure the GWH 20 is connected to
the VHF 200/200i or VHF 300/300i radio
(page 4), and turn it on.
3. On the VHF 200/200i or on a handset
connected to the VHF 300/300i, select
MENU > COMMUNICATIONS >
PAIRING.
4. Select OKto search for the GHS 20
handsets.
A list of IDs for found GHS 20/20i
handsets is shown.
5. Select a handset ID.
6. Select ACCEPT.
A message is shown while the handset
pairs with the GWH 20.

EN-6 GHS 20/20i Installation Instructions
7. When the handset makes a sound, select
OK on the handset to complete the
pairing.
8. Repeat steps 4–7 for each additional
handset.
After a handset has been paired with
the GWH 20, you do not need to pair it
again. It will connect automatically when
the handset and radio are both turned on.
Pairing Troubleshooting
If you are not able to pair a GHS 20/20i
handset with the GWH 20, complete these
steps.
• Make sure all the handsets you want to
pair are turned on.
• Make sure the GWH 20 is connected to
the microphone relocation port of the
VHF 200/200i radio or to STATION3 of
the VHF 300/300i radio.
• When pairing the handsets for the rst
time, make sure the handsets are close
to the GWH 20 (within 3 ft (1 m) if
possible).
• You can connect up to three GHS 20/20i
handsets to the GWH 20. If you have
three handsets paired with the GWH 20,
and you are attempting to replace one of
them, you must first disconnect the
handset you are replacing (page 6).
Renaming a Paired GHS 20/20i
1. On the VHF 200/200i or on a handset
connected to the VHF 300/300i, select
MENU > COMMUNICATIONS >
CONNECTIONS>[DeviceName]>
NAME.
2. Enter all the letters in the new name
using the Channel knob (up to 12
letters).
3. Select ACCEPT.
Disconnecting a GHS 20/20i From
the GWH 20
If you must replace a GHS 20/20i handset
because one is lost or damaged, for the best
results, disconnect, or unpair, the handset
you are replacing before pairing the
replacement handset to the GWH 20
(page 5).
GHS 20/20i Installation Instructions EN-7
1. On the VHF 200/200i or on the
primary VHF 300/300i (STATION1)
GHS 10/10i handset, select MENU >
COMMUNICATIONS >
CONNECTIONS>[DeviceName]>
DISCONNECT.
2. Select YES to conrm and disconnect the
GHS 20/20i.
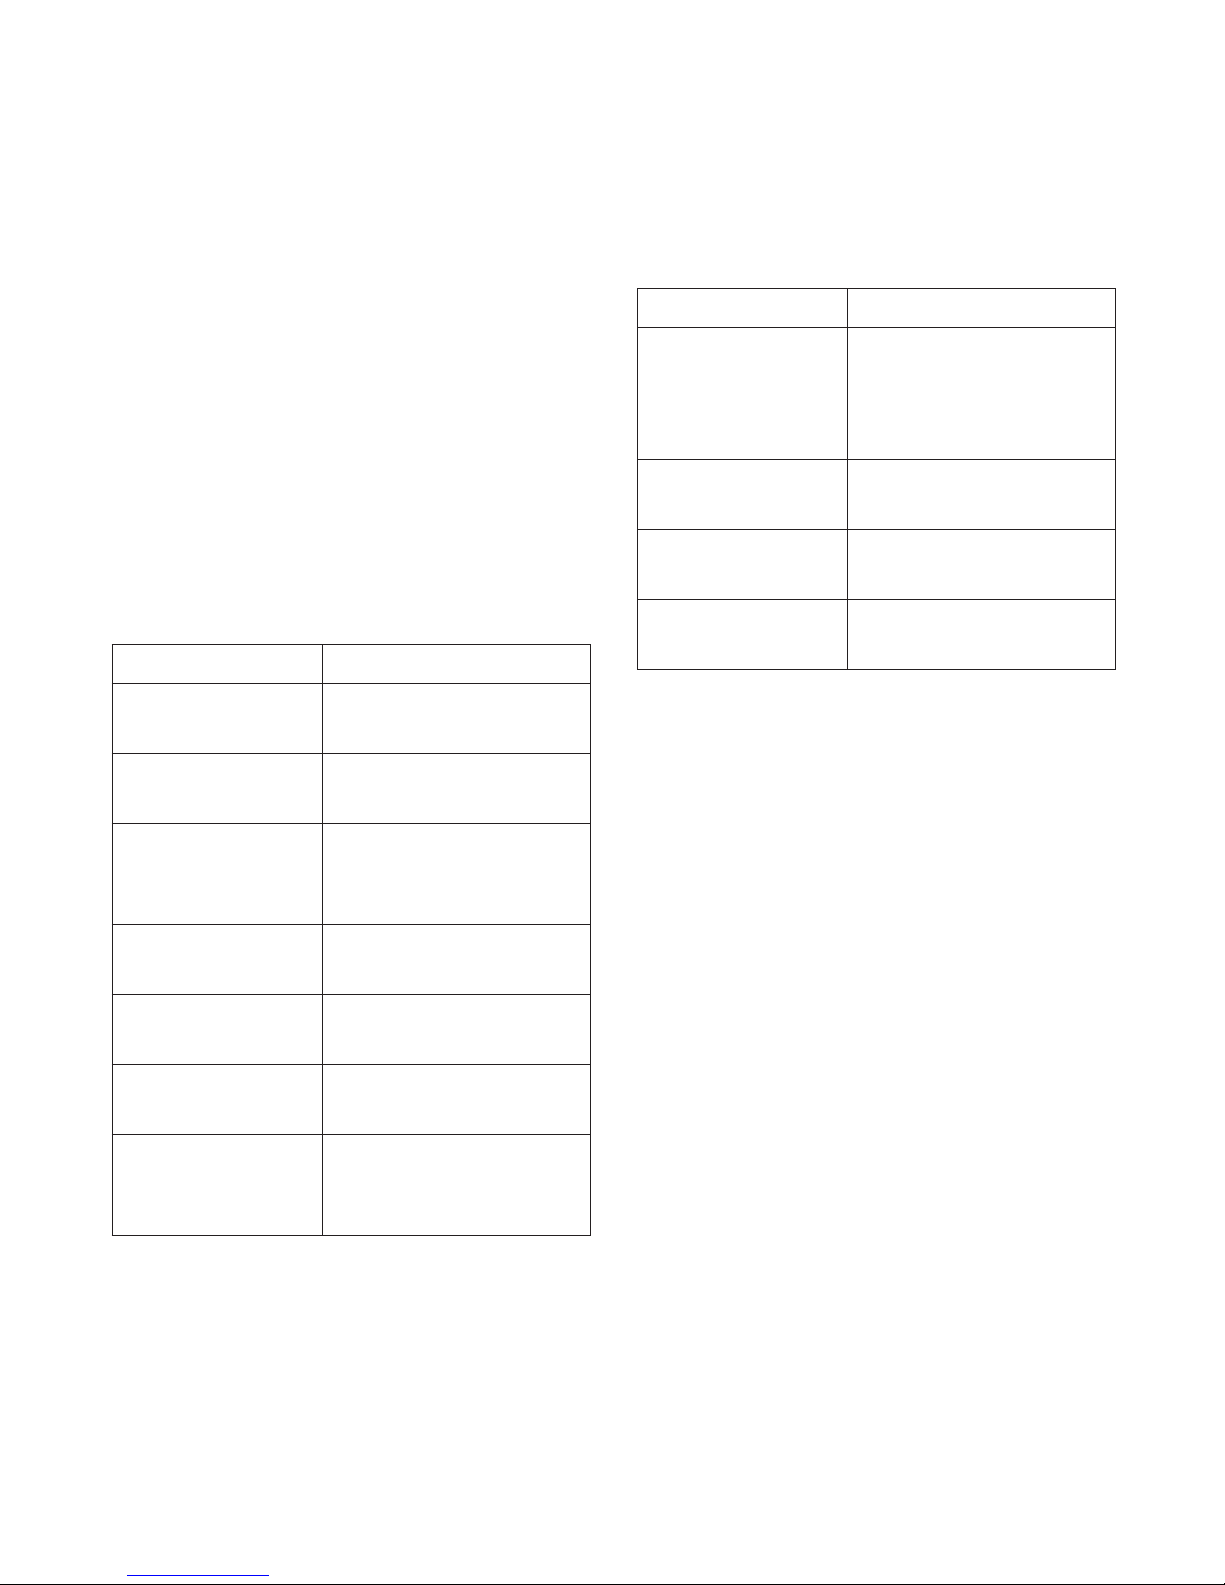
GHS 20/20i Specications
Specication Measurement
Dimensions
GHS 20/20i
6
11
/
32
× 2
53
/
64
× 1
11
/
16
in.
(16.1 × 7.2 × 4.28 cm)
Dimensions
GWH 20
2
51
/
64
× 5
5
/
16
× 1
1
/
32
in.
(7.1 × 13.5 × 2.6 cm)
Weight
GHS 20/20i
GWH 20
8.82 oz (250 g)
6.63 oz (188 g)
Operating
temperature range
from 5ºF to 158ºF
(from -15ºC to 70ºC)
Charging
temperature range
from 32ºF to 113ºF
(from -0ºC to 45ºC)
Compass-safe
distance
23
5
/
8
in. (60 cm)
Waterproof IEC 60529 IPX7
(Immersion in 1 meter
of water for 30 minutes)
Speci ication Measurement
GHS 20/20i GWH
20 maximum
transmission
distance
328 ft. (100 m),
depending on
installation
location (page 4)
GWH 20 cable
length
59 in. (1.5 m)
Battery type Rechargeable
lithium-ion
Battery life
Charge time
Up to 18 hours
Up to 4 hours
This manual suits for next models
1
Table of contents
Other Garmin Handset manuals


