Garmin RV FIXED Series User manual

RV FIXED DISPLAY
Owner’s Manual

© 2020 Garmin Ltd. or its subsidiaries
All rights reserved. Under the copyright laws, this manual may not be copied, in whole or in part, without the written consent of Garmin. Garmin reserves the right to change or improve its
products and to make changes in the content of this manual without obligation to notify any person or organization of such changes or improvements. Go to www.garmin.com for current updates
and supplemental information concerning the use of this product.
Garmin®, the Garmin logo, EmpirBus™, and FUSION® are trademarks of Garmin Ltd. or its subsidiaries, registered in the USA and other countries. These trademarks may not be used without the
express permission of Garmin.
NMEA®, NMEA 2000®, and the NMEA 2000 logo are registered trademarks of the National Marine Electronics Association. HDMI® is a registered trademark of HDMI Licensing, LLC.

Table of Contents
Introduction.....................................................................1
Device Overview......................................................................... 1
Using the Touchscreen............................................................... 1
Locking and Unlocking the Touchscreen.................................... 1
Tips and Shortcuts......................................................... 1
Garmin® Support Center............................................... 1
Customizing the RV Fixed Display Device................... 1
Home Screen.............................................................................. 1
Changing the Background Image............................................... 1
Customizing the Startup Screen................................................. 1
Recommended Startup Image Dimensions........................... 1
Adjusting the Backlight............................................................... 1
Adjusting the Color Mode........................................................... 1
Turning On the Device Automatically......................................... 1
Automatically Turning Off the System........................................ 1
Digital Switching.............................................................2
Opening the Digital Switching Controls...................................... 2
Adding and Editing a Digital Switching Page.............................. 2
Media Player................................................................... 2
Opening the Media Player.......................................................... 2
Icons...................................................................................... 2
Selecting the Media Device and Source..................................... 2
Playing Music..............................................................................2
Browsing for Music.................................................................2
Setting a Song to Repeat....................................................... 2
Setting Songs to Shuffle........................................................ 2
Adjusting the Volume.................................................................. 2
Muting the Media Volume...................................................... 2
Enabling and Disabling Zones............................................... 2
Radio.......................................................................................... 2
Setting the Tuner Region....................................................... 2
Changing the Radio Station................................................... 2
Changing the Tuning Mode................................................... 2
Presets................................................................................... 2
Setting the Device Name............................................................ 3
Updating the Media Player Software.......................................... 3
Device Configuration..................................................... 3
System Settings.......................................................................... 3
Sounds and Display Settings................................................. 3
Viewing System Software Information................................... 3
Preferences Settings.................................................................. 3
Restoring the Original Device Factory Settings.......................... 3
Appendix......................................................................... 3
Software Update......................................................................... 3
Loading the New Software on a Memory Card...................... 3
Updating the Device Software............................................... 3
Cleaning the Screen................................................................... 4
Viewing Images on a Memory card............................................ 4
Specifications..............................................................................4
Index................................................................................ 5
Table of Contents i

Introduction
WARNING
See the Important Safety and Product Information guide in the
product box for product warnings and other important
information.
Not all features are available on all models.
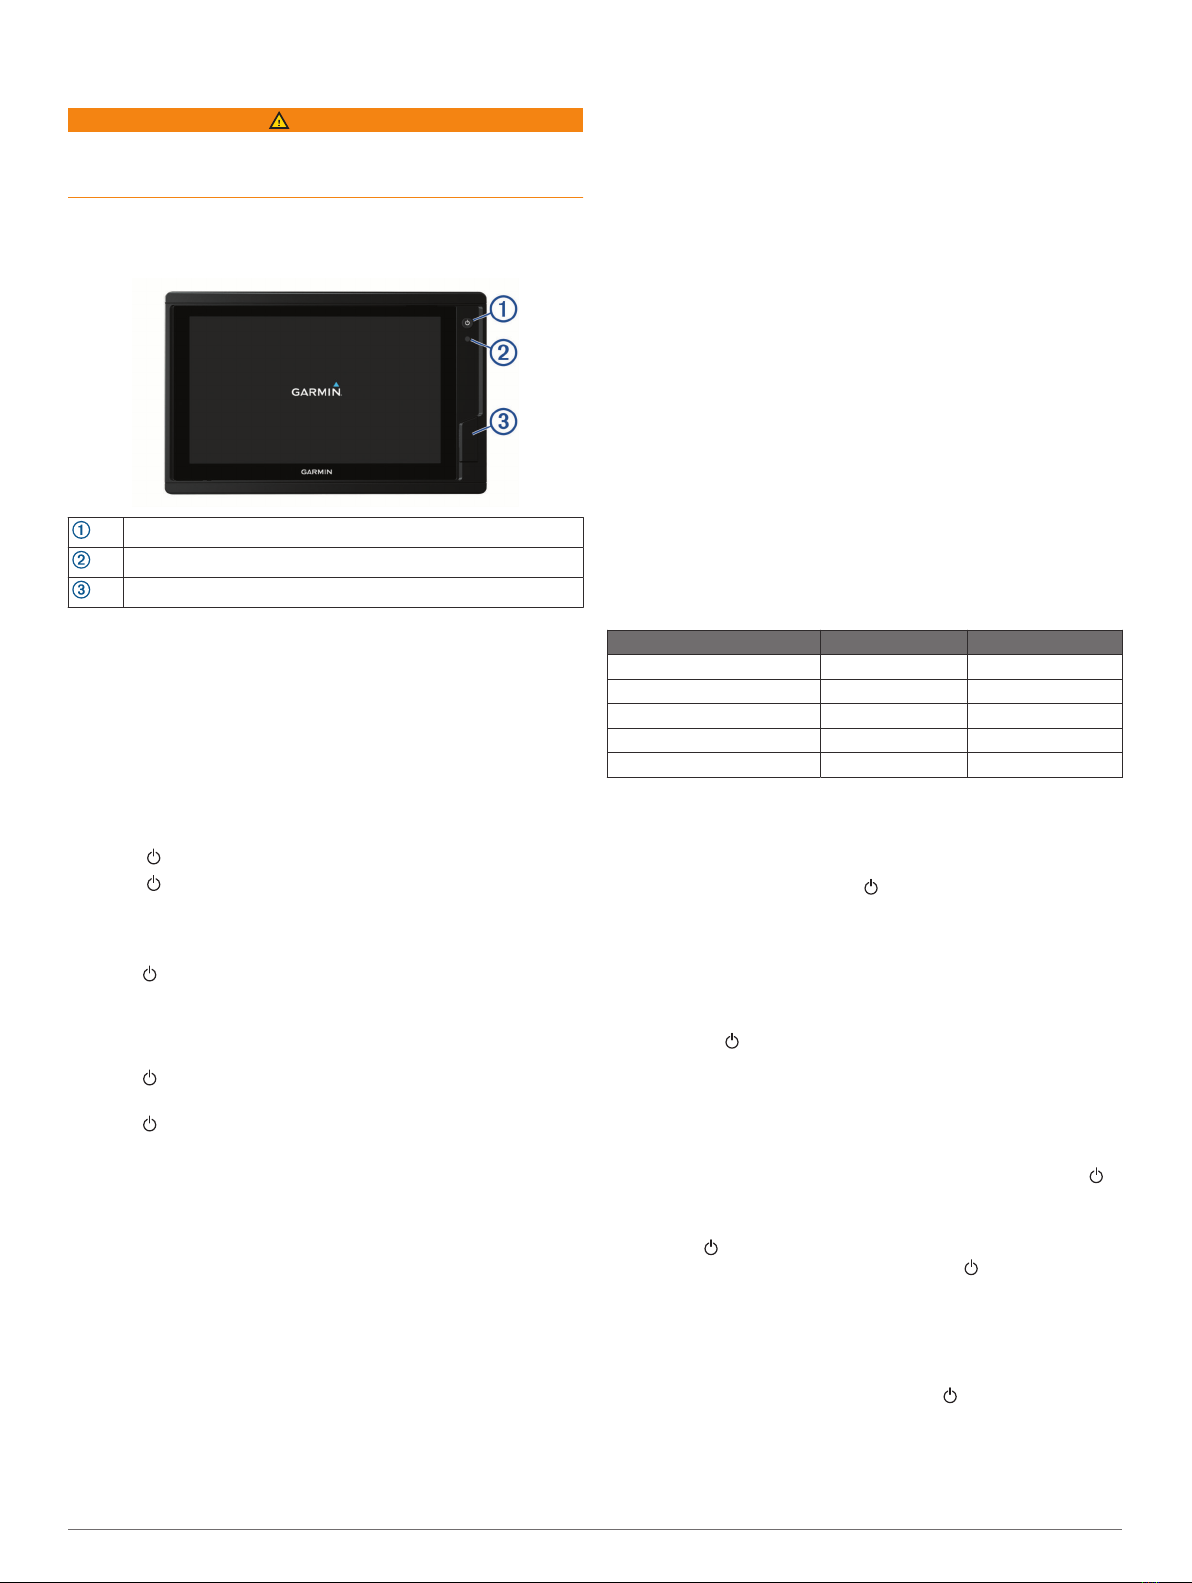
Device Overview
Power key
Automatic backlight sensor
2 microSD® memory card slots
Using the Touchscreen
• Tap the screen to select an item.
• Drag or swipe your finger across the screen to pan or scroll.
• Pinch two fingers together to zoom out.
• Spread two fingers apart to zoom in.
Locking and Unlocking the Touchscreen
You can lock the touchscreen to prevent inadvertent screen
touches.
1Select > Lock Touchscreen to lock the screen.
2Select to unlock the screen.
Tips and Shortcuts
• Press to turn the device on.
• Select Home from any screen to return to the Home screen.
• Select Menu to access additional settings about that screen.
• Select Menu to close the menu when finished.
• Press to open additional options, such as adjusting the
backlight and locking the touchscreen.
• Press and select Power to turn the device off.
Garmin® Support Center
Go to support.garmin.com for help and information, such as
product manuals, frequently asked questions, videos, software
updates, and customer support.
Customizing the RV Fixed Display
Device
Home Screen
From the home screen, you can access FUSION® media and
EmpirBus™ or other compatible digital switching controls.
• Select Media to access FUSION media controls
• Select EmpirBus to access EmpirBus digital switching
controls
• Select the digital switching icon to access another compatible
digital switching system
Changing the Background Image
1From the home screen, select Settings > System > Sounds
and Display > Background.
2Select an image.
Customizing the Startup Screen
You can personalize the image that is displayed while the device
is turning on. For the best fit, the image should be 50 MB or less
and conform to the recommended dimensions (Recommended
Startup Image Dimensions, page 1).
1Insert a memory card that contains the image you want to
use.
2Select Settings > System > Sounds and Display > Startup
Image > Select Image.
3Select the memory card slot.
4Select the image.
5Select Set as Startup Image.
The new image is shown when turning on the device.
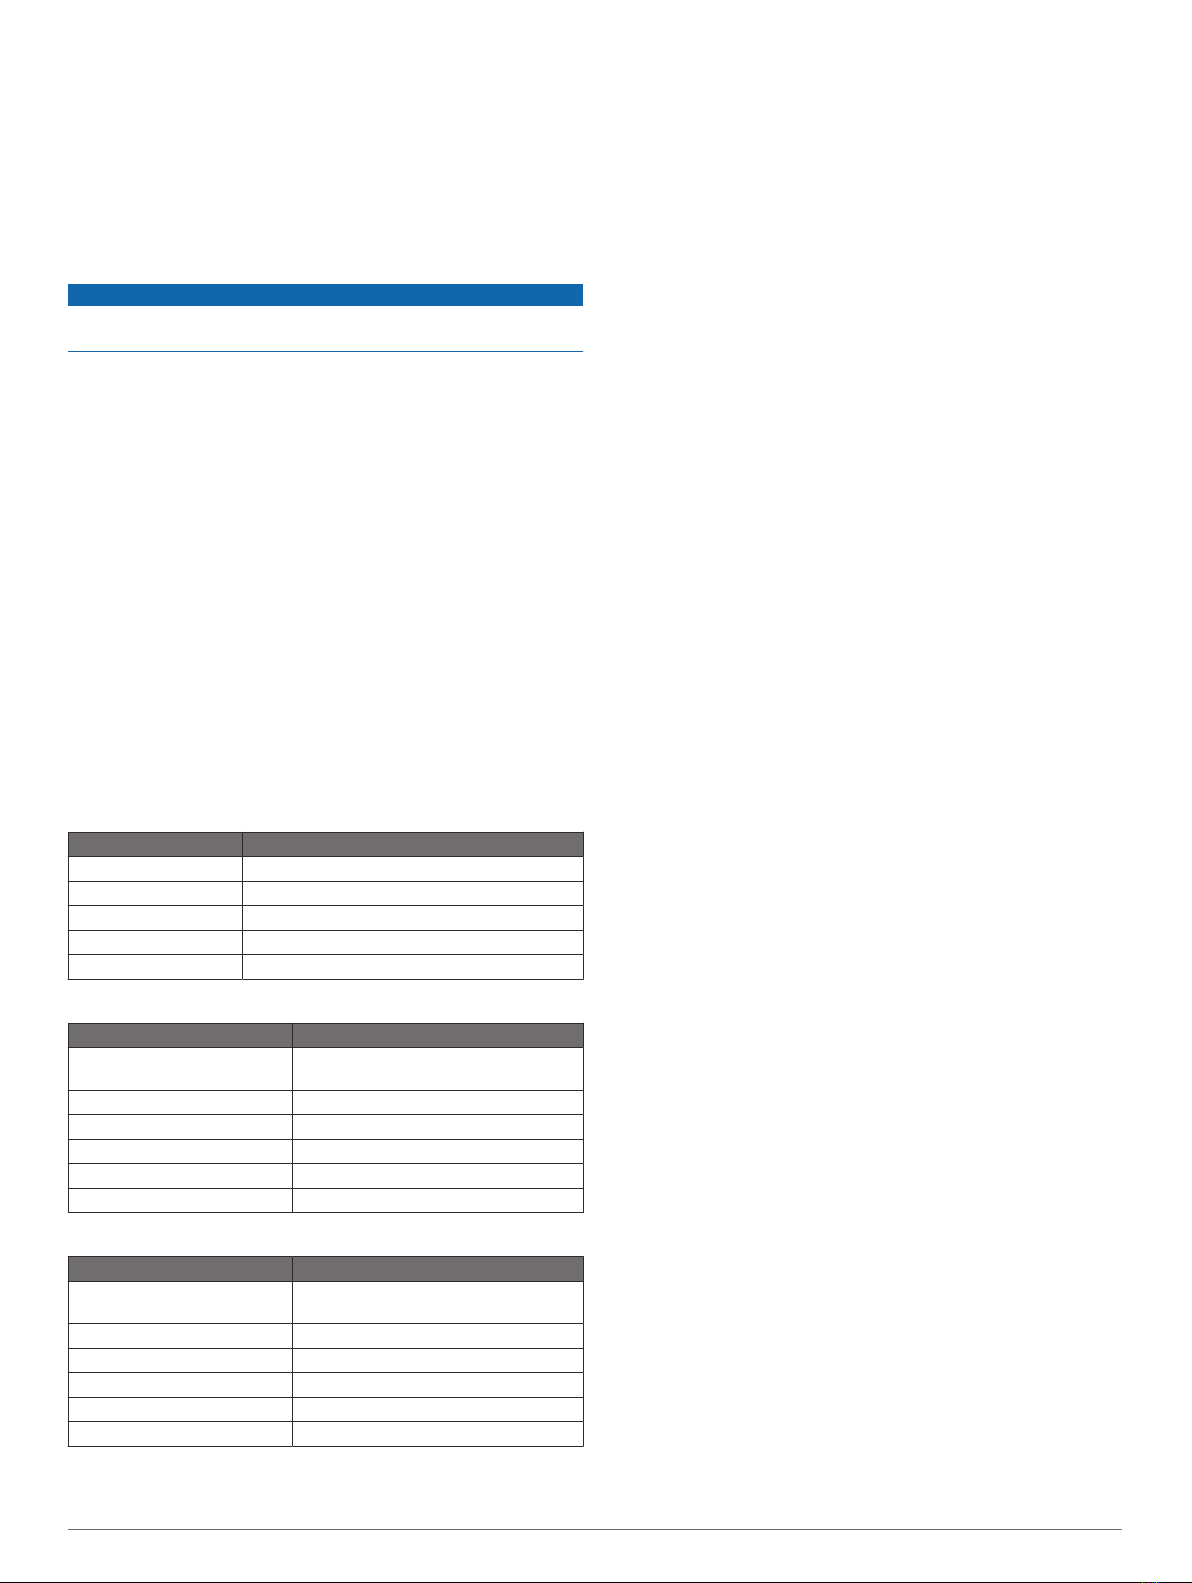
Recommended Startup Image Dimensions
For the best fit for the startup images, use an image that has the
following dimensions, in pixels.
Display resolution Image width Image height
WVGA 680 200
WSVGA 880 270
WXGA 1080 350
HD 1240 450
WUXGA 1700 650
Adjusting the Backlight
1Select Settings > System > Display > Backlight.
2Adjust the backlight.
TIP: From any screen, press repeatedly to scroll through
the brightness levels. This can be helpful when the
brightness is so low you cannot see the screen.
Adjusting the Color Mode
1Select Settings > System > Sounds and Display > Color
Mode.
TIP: Select > Color Mode from any screen to access the
color settings.
2Select an option.
Turning On the Device Automatically
You can set the device to turn on automatically when power is
applied. Otherwise, you must turn on the device by pressing .
Select Settings > System > Auto Power Up.
NOTE: When Auto Power Up is On, and the device is turned
off using , and power is removed and reapplied within less
than two minutes, you may need to press to restart the
device.
Automatically Turning Off the System
You can set the device and the whole system to turn off
automatically after it has been asleep for the selected length of
time. Otherwise, you must press and hold to turn off the
system manually.
1Select Settings > System > Auto Power Off.
2Select an option.
Introduction 1

Digital Switching
Your RV Fixed Display device can be used to monitor and
control circuits using anEmpirBus digital switching system or
another compatible digital switching system.
For example, you can control the interior lights in your RV.
Opening the Digital Switching Controls
You can access the digital switching controls from the home
screen.
• If you are using an EmpirBus digital switching system, select
EmpirBus.
• If you are using another compatible digital switching system,
select the icon for that system.
Adding and Editing a Digital Switching Page
You can add and customize digital switching pages for some
compatible digital switching systems.
1Select Switching > Menu.
2Select Add Page or select a page to edit. .
3Set up the page as needed:
• To enter a name for the page, select Name.
• To set up the switches, select Edit Switches.
Media Player
NOTE: Not all features are available on all connected media
players.
If you have a compatible stereo connected to the NMEA 2000®
network, you can control the stereo using the RV Fixed Display.
The device automatically detects the stereo when it is first
connected to the network.
You can play media from sources connected to the media player
and sources connected to the network.
Opening the Media Player
Before you can open the media player, you must connect a
compatible FUSION stereo to the device.
Select Media.
Icons
NOTE: Not all devices have these icons.
Icon Description
Saves or deletes a channel as a preset
Repeats all songs
Repeats one song
Scans for stations
Searches for stations or skips songs
Shuffles
Selecting the Media Device and Source
You can select the media source connected to the stereo. When
you have multiple stereo or media devices connected on a
network, you can select the device from which you want to play
music.
NOTE: You can play media only from sources that are
connected to the stereo.
NOTE: Not all features are available on all media devices and
sources.
1From the media screen, select Devices, and select the
stereo.
2From the media screen, select Source, and select the media
source.
NOTE: The Devices button only appears when more than
one media device is connected to the network.
NOTE: The Source button only appears for devices that
support multiple media sources.
Playing Music
Browsing for Music
From the media screen, select Browse or Menu > Browse.
Setting a Song to Repeat
1While playing a song, select Menu > Repeat.
2If necessary, select Single.
Setting Songs to Shuffle
1From the media screen, select Menu > Shuffle.
2If necessary, select an option.
Adjusting the Volume
Muting the Media Volume
From the media screen, select .
Enabling and Disabling Zones
If you have wired your RV's speakers into zones, you can
enable needed zones and disable unused zones.
1From the media screen, select Menu > Audio Levels >
Enable/Disable Zones.
2Select a zone.
Radio
To listen to AM or FM radio, you must have a suitable AM/FM
antenna properly connected to the stereo and be within range of
a broadcasting station. For instructions on connecting an AM/FM
antenna, see the stereo installation instructions.
Setting the Tuner Region
1From the media screen, select Menu > Installation > Tuner
Region.
2Select an option.
Changing the Radio Station
1From the media screen, select an applicable source, such as
FM.
2Select or to tune to a station.
Changing the Tuning Mode
You can change how you find a station for some media types,
such as FM or AM radio. For example, you can choose to tune
manually or automatically find the next available station.
NOTE: Not all tuning modes are available for all media sources.
1From the media screen, select Menu > Tuning Mode.
2Select an option.
Presets
You can save your favorite AM stations and FM stations as
presets for easy access.
Saving a Station as a Preset
1From an applicable media screen, tune to the station to save
as a preset.
2Select Presets > Add Current Channel.
Selecting a Preset
1From an applicable media screen, select Presets.
2Select a preset from the list.
3Select Tune to Channel.
2 Digital Switching

Removing a Preset
1From an applicable media screen, select Presets.
2Select a preset from the list.
3Select Remove Current Channel.
Setting the Device Name
1From the media screen, select Menu > Installation > Set
Device Name.
2Enter a device name.
3Select Done.
Updating the Media Player Software
You can update the software on compatible connected stereos
and accessories.
1Go to www.fusionentertainment.com/marine, and download
the software update onto a USB flash drive.
Software updates and instructions are available on your
device product page.
2Insert the USB flash drive into the USB port of the stereo.
3On the RV Fixed Display device media screen, select Menu
> Installation > Update Software.
4Select the item to update.
Device Configuration
System Settings
Select Settings > System.
Sounds and Display: Adjusts the display and audio settings.
System Information: Provides information about the devices on
the network and the software version.
Auto Power Up: Controls which networked devices turn on
automatically when you turn on the system.
Auto Power Off: Automatically turns off the system after it has
been asleep for the selected length of time.
Sounds and Display Settings
Select Settings > System > Sounds and Display.
Beeper: Turns on and off the tone that sounds for alarms and
selections.
Backlight: Sets the backlight brightness. You can select the
Auto option to adjust the backlight brightness automatically
based on the ambient light.
Backlight Sync: Synchronizes the backlight brightness of other
chartplotters in the station.
Color Mode: Sets the device to display day or night colors. You
can select the Auto option to allow the device to set day or
night colors automatically based on the time of day.
Background: Sets the background image.
Startup Image: Sets the image that appears when you turn on
the device.
Viewing System Software Information
Select Settings > System > System Information >
Software Information.
Preferences Settings
Select Settings > Preferences.
Units: Sets units of measure.
Language: Sets the on-screen text language.
Keyboard Layout: Sets the arrangement of the keys on the on-
screen keyboard.
Screenshot Capture: Allows the device to save images of the
screen.
Menu Bar Display: Sets the menu bar to always show or
automatically hide when it is not needed.
Restoring the Original Device Factory
Settings
NOTE: This affects all devices on the network.
1Select Settings > System > System Information > Reset.
2Select an option:
• To reset the device settings to the factory default values,
select Reset Default Settings. This restores the default
configuration settings, but does not remove saved user
data or software updates.
• To clear saved data, select Delete User Data. This does
not affect software updates.
• To clear saved data and reset device settings to the
factory default values, disconnect the device from the
Garmin Marine Network, and select Delete Data and
Reset Settings. This does not affect software updates.
Appendix
Software Update
You may need to update the device software when you install
the device or add an accessory to the device.
Loading the New Software on a Memory Card
1Insert a memory card into the card slot on the computer.
2Go to www.garmin.com, and locate the product page.
3Select Software from the product page.
4Select Download.
5Read and agree to the terms.
6Select Download.
7Select Run.
8Select the drive associated with the memory card, and select
Next > Finish.
Updating the Device Software
Before you can update the software, you must obtain a
software-update memory card or load the latest software onto a
memory card.
1Turn on the device, and wait for the home screen to appear.
NOTE: In order for the software update instructions to
appear, the device must be fully booted before the card is
inserted.
2Open the memory card door .
3Insert the memory card , and press it in until it clicks.
4Close the door.
5Follow the on-screen instructions.
Device Configuration 3
6Wait several minutes while the software update process
completes.
The device returns to normal operation after the software
update process is complete.
7Remove the memory card.
NOTE: If the memory card is removed before the device
restarts fully, the software update is not complete.
Cleaning the Screen
NOTICE
Cleaners containing ammonia will harm the anti-reflective
coating.
The device is coated with a special anti-reflective coating which
is very sensitive to waxes and abrasive cleaners.
1Apply an eyeglass lens cleaner specified as safe for anti-
reflective coatings to the cloth.
2Gently wipe the screen with a soft, clean, lint-free cloth.
Viewing Images on a Memory card
You can view images that are saved on a memory card. You
can view .jpg, .png, and .bmp files.
1Insert a memory card with image files into the card slot.
2Select Info > Image Viewer.
3Select the folder containing the images.
4Wait a few seconds for the thumbnail images to load.
5Select an image.
6Use the arrows to scroll through the images.
7If necessary, select Menu > Start Slideshow.
Specifications
All Models
Specification Measurement
Temperature range From -15° to 55°C (from 5° to 131°F)
Input voltage From 10 to 32 Vdc
Fuse 6 A, 125 V fast-acting
Memory card 2 SD® card slots; 32 GB max. card size
Wireless frequency 2.4 GHz @ 17.6 dBm
Seven-inch Models
Specification Measurement
Dimensions (W × H × D) 224 × 142.5 × 53.9 mm (8 13/16 × 5 5/8
× 2 1/8 in.)
Display size (W × H) 154 × 86 mm (6.1 × 3.4 in.)
Weight 0.86 kg (1.9 lb.)
Max. power usage at 10 Vdc 24 W
Typical current draw at 12 Vdc 1.5 A
Max. current draw at 12 Vdc 2.0 A
Nine-inch Models
Specification Measurement
Dimensions (W × H × D) 256.4 × 162.3 × 52.5 mm (10 1/8 × 6 3/8
× 2 1/16 in.)
Display size (W × H) 197 × 114 mm (7.74 × 4.49 in.)
Weight 1.14 kg (2.5 lb.)
Max. power usage at 10 Vdc 27 W
Typical current draw at 12 Vdc 1.3 A
Max. current draw at 12 Vdc 2.3 A
4 Appendix

Index
A
AM 2
B
background 1
backlight 1
C
circuits 2
color mode 1
D
device, cleaning 4
digital switching 2
F
factory settings 3
FM 2
G
Garmin product support. See product support
H
help. See product support
home screen 1
I
images 1, 4
K
keyboard 3
L
language 3
locking, screen 1
M
media player 2, 3
device name 3
FUSION-Link 2
muting 2
preset 2, 3
repeating 2
shuffling 2
source 2
stereo 2
tuner region 2
tuning mode 2
zones 2
memory card
installing 3
slot 1
music player. See media player
O
off 1
P
power key 1
presets 2
product support 1
R
radio 2
AM 2
FM 2
reset 3
restore 3
S
screen
brightness 1
locking 1
unlocking 1
settings 3
system information 3
software
updates 3
updating 3
support. See product support
system information 3
T
touchscreen 1
U
unit ID 3
unlocking, screen 1
updates, software 3
Index 5

support.garmin.com
GUID-7C3FD59D-DDF1-4FBA-8415-F523FF7A833D v1March 2020
Table of contents
Other Garmin Monitor manuals

Garmin
Garmin GNX 130 User manual

Garmin
Garmin GPSMAP 9000 Series User manual

Garmin
Garmin TD 50 User manual

Garmin
Garmin VIEO RV 852 Instruction manual

Garmin
Garmin GMX 200 User manual

Garmin
Garmin GPSMAP 7X3 User manual

Garmin
Garmin SERV User manual

Garmin
Garmin GPSMAP 8400 series User manual

Garmin
Garmin GMX 200 User manual

Garmin
Garmin A03985 Instruction manual


