GAs-Weld 5777 User manual
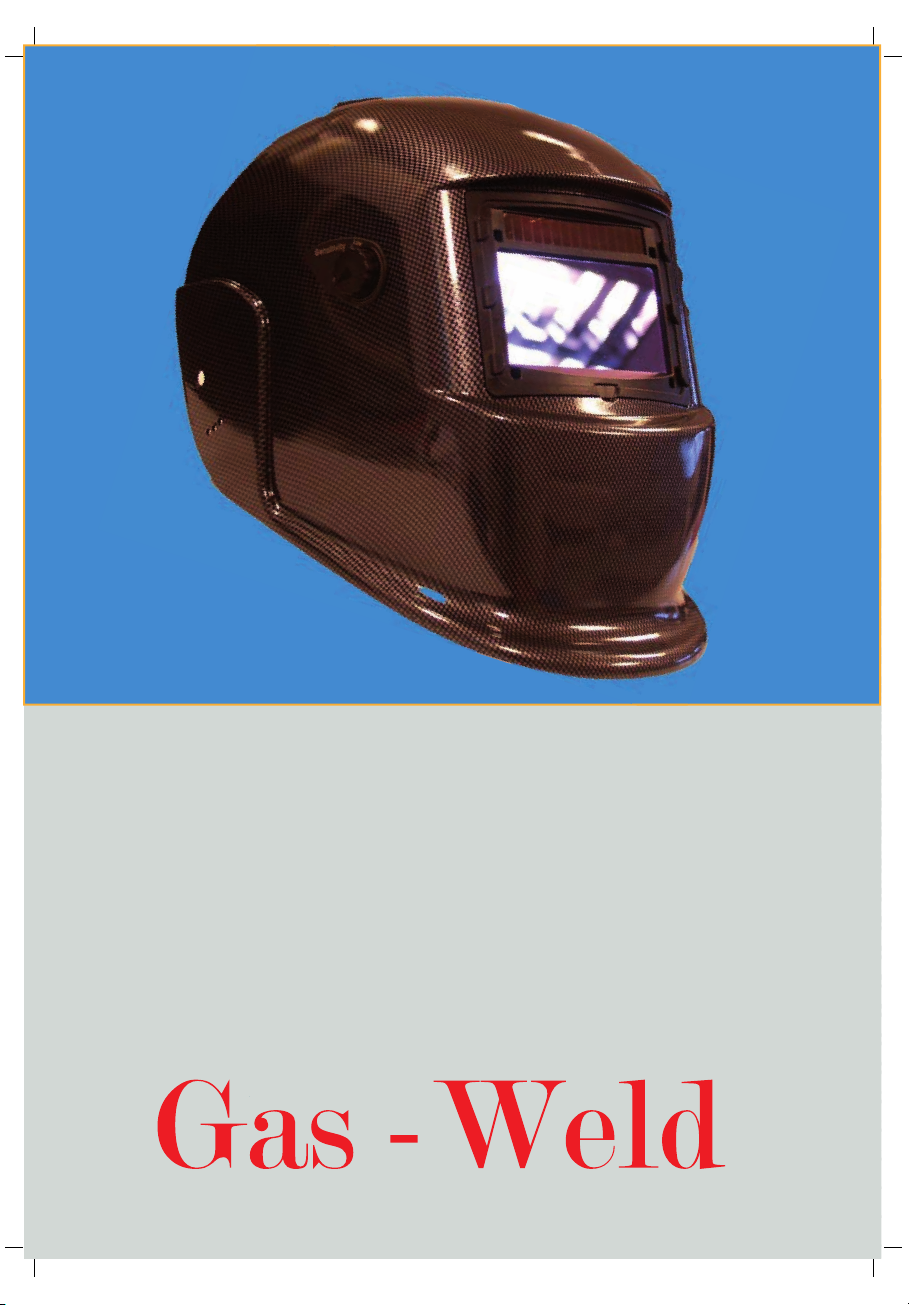
Auto-Darkening Filter
Welding Helmet

BEFORE WELDING
DARK SHADE NUMBER SELECTION
PRODUCT FEATURES
Auto-Darkening Filter
Welding Helmet
WARNING :Read and understand all instruction
before using !
This Auto-Darkening lter Welding Helmet is
designed to protect the eyes and face from sparks,
spatter, and harmful radiation under normal welding
conditions. Auto-darkening lter automatically
changes from a light state to a dark state when an
arc is struck, and it returns to the light state when
welding stops.
Auto-Darkening lter Welding Helmet comes ready
for use. The only thing you need to do before your
welding is to adjust the position of the headband
and select the correct shade number for your
application.
Check the front cover lens to make sure that they are
clean, and that no dirt is covering the four sensors on
the front of lter cartridge. Also check the front/inside
cover lens and the front lens retaining frame to make
sure that they are secure.
· Inspect all operating parts before use for signs of
wear or damage. Any scratched, cracked, or pitted
parts should be replaced immediately before using
again to avoid severe personal injury.
· Check for light tightness before each use.
· Select the shade number you require at the turn of
a shade knob ( Seeing the Shade Guide Table No.1 ).
Finally, be sure that the shade number is the correct
setting for your application.
· Adjust headband so that the helmet is seated as low
as possible on the head and close to your face.
Adjust helmet's angle when in the lowered position
by turning the adjustable limitation washer.
The shade number can be set manually between 9(8)
-13 (12). Check the Shade Guide Table to determine
the proper shade number for your application. Select
a shade number by turning the shade knob until the
arrow points to the required setting (See Shade Guide
Table No.1).
· This model is designed & equipped with a special
turnover (up & down) headband mechanism. When
welder turns over the helmet to welder’s head top,
the headband mechanism makes helmet’s gravity
center to be more lower, and be coincided with the
center of welder’s head. The design of welding helmet
greatly lowers the fatigue of welder’s head ( & neck )
and make welder feel more comfortable than before
while at working.
· At the moment of starting welding, it automatically
changes lter screen from clear to dark in only 1/30,000
sec.
· Dark to clear delay adjustment : Operator can vary the
time for the lter to return to clear state.
· Outside sensitivity adjustable can make the operators
more convenient while operating.
· At the moment of stopping welding, the lter screen
automatically changes from dark to light state according
to your per-set delay time.( Turning the time-setting
switch to the "short"position--then, it can vary at
0.25s ~ 0.35s; Turning the time-setting switch .to the
"long" position -- then, it can vary at 0.5s ~ 0.8s ).
· “WELDING”/ “GRINDING” can be selective.
· The helmet utilizes high performance solar cells as
power supply and has 2 built-in 3V lithium batteries
as power back-up. No change of battery is required.
And the battery life is raised to a new limit. Under
normal welding conditions, users can expect a battery
has a lifetime of more than 6 years.
· Variable shade (DIN) from DIN9 (8) to DIN13(12) is
adjusted at the turn of a shade knob (shade variable).
· The product is in full conformity with related DIN, ISO,
EN safety standards andANSI Z87.1-2003
standards.

WARNING:
COMMON PROBLEMS AND REMEDY
The ultra high performance of UV/IR Auto-Darkening
lters provide full protection for the user's eye &
face a against UV/IR radiation during the entire
welding process, even in the light state. The UV/IR
protection level is up to Shade16(DIN) at all times.
It makes welders feel comfortable in welding
working.
· This Auto-Darkening lter Welding Helmet is not
suitable for laser welding,& Oxyacetylene Welding.
· Never place this Helmet and Auto-darkening lter
on a hot surface.
· Never open or tamper with the Auto-Darkening
Filter.
· Before operating, please make sure if the
function-setting switch set the suitable location
“WELDING”/“GRINDING”, or not. This Auto-darkening
lter welding helmet will not protect against severe
impact hazards,
· This helmet will not protect against explosive
devices or corrosive liquids.
· Don't make any modications to either the lter or
helmet, unless specied in this manual. Don't use
replacement parts other than those specied in this
manual. Unauthorized modications and replacement
parts will void the warranty and expose the operator
to the risk of personal injury.
· Should this helmet not darken upon striking an arc,
stop welding immediately and contact your supervisor
or your dealer.
· Don't immerse the lter in water.
· Don't use any solvents on lters' screen or helmet
components.
· Use only at temperatures : - 5°C ~ + 55°C ( 23°F ~
131°F ).
· Storing temperature : - 20°C ~ + 70°C (-4 ° F ~ 158° F).
· Protect lter from contacting with liquid and dirt.
· Clean lters' surfaces regularly; do not use strong
cleaning solutions. Always keep sensors and solar cells
clean using a clean lint-free tissue/cloth.
· Regularly replace the cracked/scratched/pitted front
cover lens.
Severe personal injury could occur if the user fails to
follow the aforementioned warnings, and / or fails to
follow the operatinginstructions.
* Irregular Darkening Dimming
· Headband has been set unevenly and there is an
uneven distance from the eyes to the lter's lens
(Reset headband to reduce the dierence to lter).
** Auto-Darkening Filter Does Not Darken Or Flickers
· Front cover lens is soiled or damaged (change lens cover)
· Sensors are soiled (clean the sensors’surface)
· Welding current is too low (turns the switch to the
"Long" position).
*** Slow response
· Operating temperature is too low (do not use at
temperatures below - 5 ° C or 23 °F).
**** Poor Vision
· Front /inside cover lens and/or lter lens are soiled
(change lens)
· There is insucient ambient light
· Shade number is incorrectly set (reset the shade number)
***** Welding Helmet Slips
· Headband is not adjusted properly (readjust headband)
WARNING ! Operator must stop using the auto - darkening
lter welding helmet immediately if the abovementioned
problems cannot be corrected. Contact the dealer.
WARNING ! Materials wich may come into contact with the
wearers skin can cause allergic reactions in some
circumstances.
LENS & HELMET MAINTENANCE
PRODUCT WARRANTY!!!
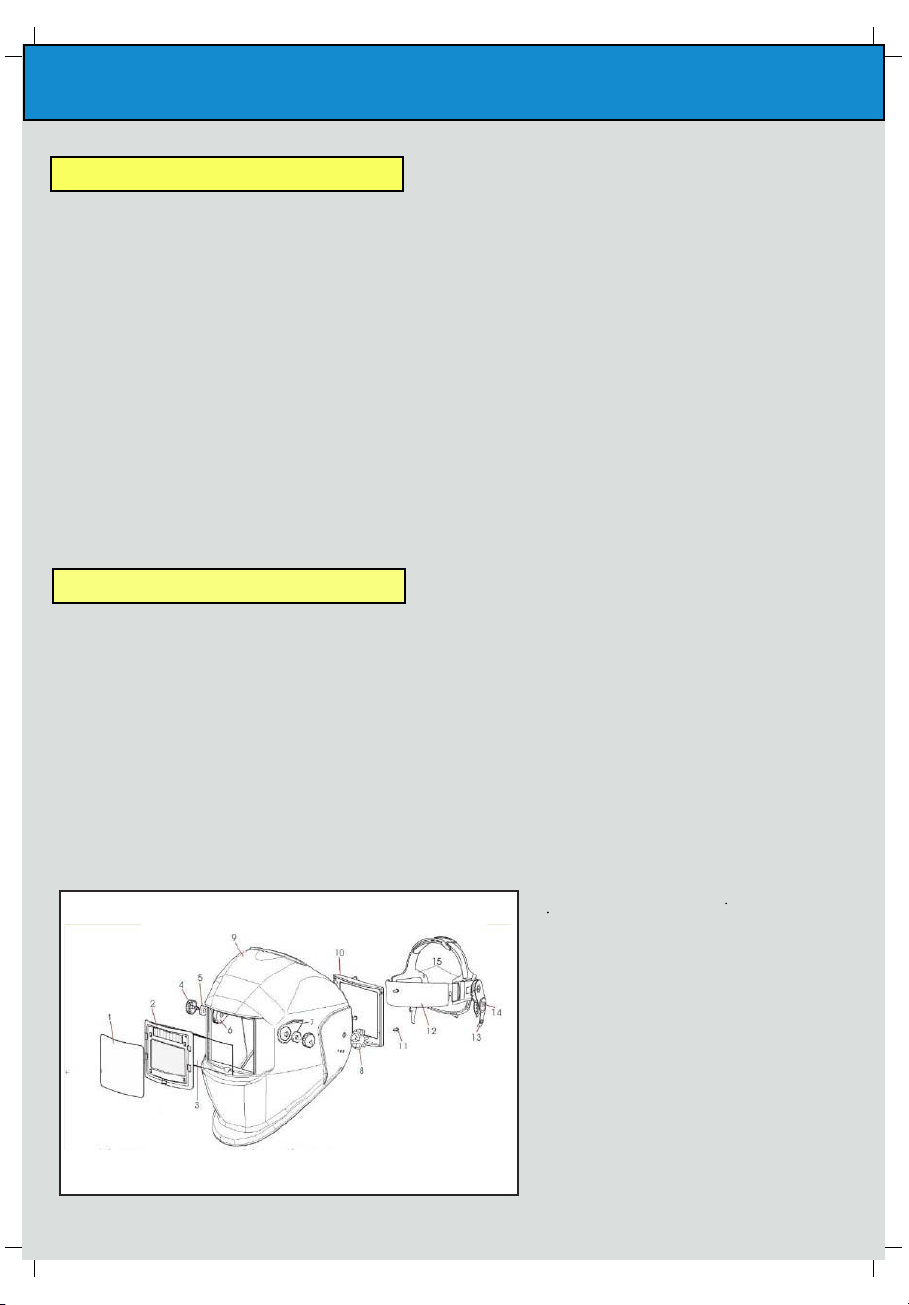
1. Front cover lens
3. Inside cover lens
4. Shade knob / sensitivity knob
5. 2x Shade nut
6. Shade-box / sensitivity box
(replaceable batteries inside)
7. Shade scale plate / sensitivity
scale plate
8. 2x block nut
9. Shell (welding mask)
12. Front headband
13. 2x adjustable limitation washer
14. 2x screw
15. Adjustable headband
· Replacing the front cover lens if it is damaged (cracked,
scratched, soiled or pitted)
Step 1: Remove the front cover lens by pulling up the
central part of the lens (gure). Place the new cover lens
into the correct position.
Step 2: Check and make sure that the frame is securely
installed.
· Replacing the inside cover lens if it is damaged (cracked,
scratched, soiled or pitted).
· Cleaning The Filter’s Lens with a clean lint-free tissue or
cotton cloth.
· Don’t immerse the lens in water or any other liquid. Never
use abrasives, solvents or oil based cleaners.
· Don’t remove the auto-darkening lter from the helmet.
Never try to open the lter.
The manufacturer's sole obligation under this warranty
is limited to making replacement or repairs, or refund of
the purchase price for the products with defects.
This warranty does not cover product malfunctions or
damages resulting from products tampering,misuse or
abuse. Please follow the operating instructions carefully
to maintain this warranty. Failure to do so will void the
warranty. The manufacturer shall also not be hold liable
for any indirect or consequential damages arising out of
the use of this product.
A copy of the original receipt and serial number
(located on lter cartridge's surface) are required
as proof of purchase. Please carefully maintain this
warranty well. This warranty is non-transferable and
extends only to the original buyer purchasing the
products directly from the manufacturer or through
its authorized distributors,dealers, or agents.
Additionally, All auto darkening lter welding helmet
are designed with three necessary special mechanism:
a). A ne-turning mechanism for adjusting the incline
angle between welder’s eyes and lter lenses.
b). A special mechanism for regulating the distance
between welder’s eyes and lter lenses.
c). A special headgear mechanism for adjusting the
up & down vertical distance between welder’s eyes
and lter
lenses.
d). The gravity center of helmet can be auotomaticlly
adjustable. As a result of above mechanism action, The
welder surely feels more comfortable than before, and
are in working with more high prociency at any time.
2. Auto-darkening lter cartridge
10. Filter setting frame
11. 4 x Filter setting screw

Welding helmet
Viewing Area
Size of Cartridge:
UV/IR Protection
Light State
Variable Shade:
Power Supply:
Power On/O:
Sensitivity:
· Switching Time:
a) Light to Dark:
a) Dark to Light:
Operating Temperature:
Storing Temperature:
· Helmet Material:
Total Weight:
TECHNICAL SPECIFICATIONS
98 × 55 mm ( 3.86" × 2.17"), larger view, four optical sensors
110 × 90 × 9 mm (4.33" × 3.54" × 0.35")
Up To Shade DIN16 at all time
Shade DIN 4
From DIN 9 to DIN 13
Solar cells,within built in replaceable battery
FullyAutomatic
Outside Can be continued adjustable
1/30000 s (0,000033 seg.), (- 5º C, 0,0008 seg.),
0,25 /0,80 s (short -- long)
– 5º C a + 55º C (23º F a 131º F)
– 20º C /+ 70º C (-4º F a 158º F)
High-impact resistant plastic / Polyamide (Nylon)
435 ó 450 gr
Shade guide table
Ref: 5777
Note: * SMAW-Shielded Metal Arc Welding. * TIG, GTAW-Gas Tungsten Arc Welding
* MIG(heavy)-MIG on heavy metals. * SAW Shielded Semi-Automatic Arc Welding.
* MIG(light)-MIG on light alloys. * PAC-Plasma Arc Cutting. * PAW-Plasma Arc Wedling.
Nota:
Intensidad de la corriente de arco (Amperios)
0.5 2,5 10 20 40 80 125 175 225 275 350 450
1 5 15 30 60 100 150 200 250 300 400 500
Proceso de soldadura
SMAW 9 10 11 12 13 14
MIG (heavy) 4131211101
MIG (light) 4131211101 15
TIG, GTAW 9 10 11 12 13 14
MAG/CO24131211101 15
SAW 4131211101 15
PAC 312111
PAW 8 9 10 11 12 13 14 15

.
Table of contents


